一.ConfigMap
二.创建ConfigMap
三.Pod引用configmap
四.Redis结合ConfigMap实践
=======================================================
一.ConfigMap
1.1 什么是ConfigMap
ConfigMap资源主要为容器注入相关的程序配置信息,用来制定程序的运行方式,比如Redis监听端口、最大客户端连接数。
当定义好一个ConfigMap资源后,如果Pod需要使用,可以通过环境变量或存储卷的形式将其挂载并加载相关的配置,降低了配置与镜像文件的耦合关系。
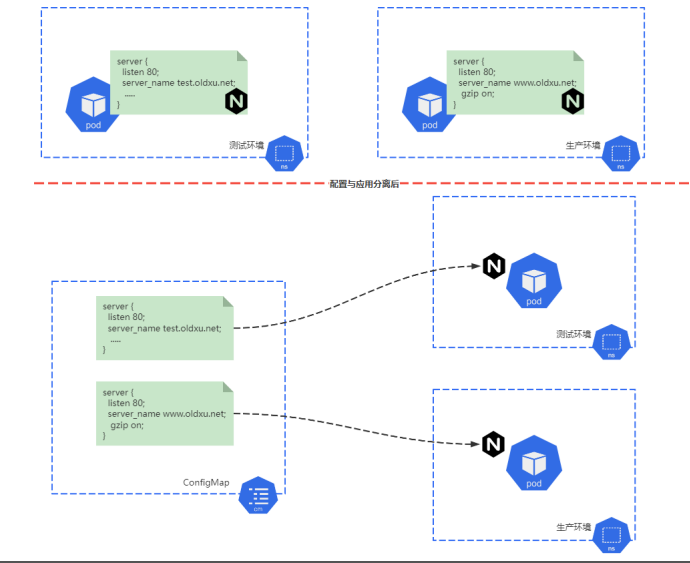
1.2 为什么需要ConfigMap
将应用配置信息与程序进行分离,这样可以使得应用程序被更好地复用,通过不同的配置能实现更灵活的功能,例如:在测试环境中Nginx提供test域名访问,且没配置压缩功能,而在生产环境中则需要提供wwww域名访问,且需要开启压缩功能,所以将应用容器与配置分离,根据不同的环境调用不同的ConfigMap配置,能有效的降低耦合度和复杂度。
二.创建ConfigMap
2.1 基于命令创建CM
1.使用 kubectl create configmap命令使用--from-literal选项给出键值对来创建 ConfigMap
[root@master ~]# kubectl create configmap nginx-command-cm --from-literal=ngx.host='0.0.0.0' --from-literal=nginx.port='8899'
configmap/nginx-command-cm created
2.通过 kubectl get configmap 查看 nginx-comand-cm对象YAML格式可以看出,ConfigMap资源没有 sepc和status,而是直接使用data字段嵌套键值数据。
[root@master ~]# kubectl get configmaps nginx-uliangcommand-cm -o yaml
apiVersion: V1
data:
  nginx.port: "8899"
  ngx.host: 0.0.0.0
kind: ConfigMap
metadata:
  creationTimestamp: "2022-04-17T07:11:41Z"
  name: nginx-command-cm
  namespace: default
  resourceVersion:"1270921"
  uid: 2691ce16-6e6d-4b2c-a489-a2b01a53bd93
从上配置得知,若要基于配置清单创建ConfigMap资源时,仅需要指定apiVersion、kind、metadata、data这四个字段;
2.2 基于文件创建CM
ConfigMap资源也可以为应用程序提供大段配置,这些大段配置通常保存在一个或多个文件中,可以使用 kubectl create configmap 命令,通过 --from-file 选项一次加载一个配置文件的内容为指定键的值。默认文件名为 key,文件内容为 values
1.准备两个nginx配置文件
#主位置文件
[root@master configmap]# cat myserver.conf
server {
     listen 8080;
     server_name my.oldxu.net ;
     location / {
           root /usr/share/nginx/html;
           index index.html;
     }
     include /etc/nginx/conf.d/*.cfg;
}

# 用于开启Nginx状态模块配置
[root@master configmap]# cat myserver-status.cfg
location /ngx_status {
     stub_status;
     access_log off;
}
2.通过下面的命令可以把准备好的Nginx配置文件保存到ConfigMap对象的 nginx-confs中,其中一个直接使用myserver.conf作为key名称,另一个myserver-status.cfg对应的键名称自定义为status.cfg
[root@master ~]# kubectl create configmap nginx-confs --from-file=./nginx-conf.d/myserver.conf --from-file=status.cfg=./nginx-conf.d/myserver-status.cfg
3.我们通过nginx-confs对象的详情了解到各个键对应的值
kubectl describe configmaps nginx-confs
Name:        nginX-confs
Namespace:   default
Labels:      <none>
Annotations: <none>

Data:
===
myserver.conf:          # 键的名称
------                  # 下面是键的值
server
   listen 8080;
   server_name my.oldxu.net;

   location / {
        root /usr/share/nginx/html;
        index index.html;
   }
   include /etc/nginx/conf.d/*.cfg;
}

status.cfg:
----
location /ngx_status {
    stub status;
    access_log off;
}
2.3 基于目录创建CM
对于配置文件较多且无需自定义键名称的场景,可以直接在 kubectl create configmap 命令的--from-file选项上附加一个目录路径就能将该目录下的所有文件创建于同一个ConfigMap资源中,各文件名即为键名称。
1.准备多个nginx配置文件,都统一存储至nginx-conf.d目录中;
# 主位管文件
[root@master configmap]# cat nginx-conf.d/myserver.conf
server {
     listen 8888;
     server_name my.odxu.net ;

     location / {
          root /usr/share/nginx/html;
          index index.html;
     }

     include /etc/nginx/conf.d/*.cfg;
}

# 用于开启Nginx状态模块配置
[root@master configmap]# cat nginx-conf.d/myserver-status .cfg
location /ngxstatus {
      stub_status;
      access_log off;
}

# 用于开启Nginx压缩功能
[root@master configmap]# cat nginx-conf.d/myserver-gzip.cfg
gzip on;
2.通过下面的命令将nginx-conf.d目录中的所用文件都保存到nginx-confs-files对象中。
[root@master configmap]# kubectl create configmap nginx-confs-files --from-file= ./nginx-conf.d/
3.此目录包含 myserver.conf,myserver-status.cfg,myserver-gzip.cfg 这3个配登文件,它们会被分别存储为3个键值数据。
kubectl describe configmaps nginx-confs-files
Name:        nginx-confs-files
Namespace:   default
Labels:      <none>
Annotations: <none>

Data:
=====
myserver-gzip.cfg:         # 键名称1
====
gzip on;

myserver-status.cfg:       # 键名称2
....
location /ngxstatus {
     stub_status;
     access_log off;
}

myserver.conf:            # 键名称3
----
server  {
    listen 8080;
    server_name my.oldxu.net;

    location / {
        root /usr/share/nginx/html;
        index index.html;
        }
    include /etc/nginx/conf.d/*.cfg;
}
2.4 配合清单创建CM
基于配置清单创建ConfigMap资源时,仅需要指定apiVersion、kind、metadata、data这四个字段;
cat demoapp-config.yaml
apiVersion: v1
kind: ConfigMap
metadata:
  name: demoapp-config
  namespace: default
data:
  host: 0.0.0.0                #key: value
  port: "8888"                 #key: value
  myserver.conf: |             #key: value
    server
    listen 80;
    server_name k8s.oldxu.net;
    location / {
      root /usr/share/nginx/html;
      include /etc/nginx/conf.d/*.cfg;
    }
  myserver-status.cfg: |       #key: value
    location /ngx_status {
      stub_status;
      access_log off;
    }
若键值来自于文件或一个目录,会发现不如通过命令行创建来的有效,因此我们可以先使用命令行加载文件或目录的方式进行创建,而后在通过kubectl get cm -o yaml 获取相关信息进行编辑和保存。
三.Pod引用configmap
3.1 通过环境变量引入CM键值
3.1.1 env引用变量示例
pod清单中除了使用vaule字段直接给定变量之外,还支持valueFrom字段嵌套 configMapKeyRef 来引用ConfigMap对象的键值,具体格式如下:
env:
- name: <string>           # 要赋值的环境变量名称
  valueFrom:               # 定义变量的引用
    configMapkeyRef:       # 变量来自于configmap对象
      name: <string>       # configmap对象的名称 (因为有很多configmap,需要指定具体的名称)
      key: <string>        # configmap的键名称
这种方式赋值环境变量与直接赋值环境变量方式并无区别,它们都可以用于容器的启动脚本或直接传递给容器应用等。
3.1.2 env引用变量实践
demoapp 容器支持通过环境变量 HOST、PORT 为其指定监听的地址和端口。
1.定义configmap资源
[root@master configmap]# cat demoapp-var-conf.yaml
apiVersion: v1
kind: ConfigMap
metadata :
  name: demoapp-var-conf
data:
  demoapp.host: 0.0.0.0
  demoapp.port: "8888"
2.创建一个Pod,然后通过env方式引用变量
cat demoapp-pod.yaml
apiVersion: v1
kind: Pod
metadata:
  name: demoapp-env-cm
spec:
  containers:
    - name: demoapp-env-cm
      image: oldxu3957/demoapp:v1.0
      env:
        - name: HOST                               # HOST变量名
          valueFrom:
            configMapKeyRef:
              name: demoapp-var-conf               # 引用demoapp-var-conf资源中的demoapp.host
              key: demoapp.host
        - name: PORT                               # PORT变量名
          valueFrom:
            configMapKeyRef:
              name: demoapp-var-conf               # 引用demoapp-var-conf资源中的的demoapp.port
              key: demoapp.port
3.验证与测试
[root@master configmap]# kubectl exec demoapp-env-cm -- netstat -lntp
Active Internet connections (only servers)
Proto Recv-Q Send-Q Local Address   Foreign  Address        State        PID/Program name
tcp     0  0.0.0.0:8888  0.0.0.0:* LISTEN1/python3
注意:
被引用的ConfigMap资源必须事先存在,否则无法在Pod对象中引用ConfigMap资源,另外ConfigMap属于名称空间级别的资源,它必须与引用它的Pod资源在同一名称空间
3.2 通过卷挂载方式引入CM键值
使用环境变量方式导入 ConfigMap 对象中来源较长的文件内容,会导致占据过多的内存空间,同时也不支持内容的动态更新。其次该类数据主要用于为容器提供配置文件,所以将其内容直接通过挂载的方式进行引用,会是一种更好的选择.
3.2.1 引用整个存储卷
将ConfigMap对象的每个键名转为容器挂载点路径下的一个文件名,所以每个键名应该设计为对容器应用加载的配置文件名称。
1.启动一个NginxPod,然后将此前创建的 nginx-confs-files 引用至容器的 /etc/nginx/conf.d目录中;
cat nginx-volume-all-conf.yaml
apiVersion: v1
kind: Pod
metadata:
  name: nginx-volume-all-cm
spec:
  containers:
    - name: nginx-volume-all-cm
      image: nginx
      volumeMounts:                             #1.将nginx-confs-files挂载到/etc/nginx/conf.d/目录下
        - name: nginx-confs
          mountPath: /etc/nginx/conf.d/
  volumes:                                      #2.nginx-confs-files的内容
    - name: nginx-confs
      configMap:
        name: nginx-confs-files
2.此Pod资源引用了nginx-confs-files中包含三个配置文件
[root@master ~]# kubectl exec -it nginx-volume-all-cm -- ls /etc/nginx/conf.d/
myserver-gzip.cfg   myserver-status.cfg   myserver.conf
# myserver.conf定义主站,然后include包含了所有.cfg文件
3.访问Pod对应8080端口对应的/ngx_status,看是否能打开对应的nginx状态页
[root@master ~]# kubectl get pod -o wide
NAME    READY      STATUS        RESTARTS      AGE      IP            NODE
nginx-volume-all-cm     1/1      Running      4m49s  192.168.166.184 node1
[root@master ~]# curl 192.168.166.184:8080/ngx_status
Active connections: 1
server accepts handled requests
1 1 1
Reading: 0 Writing: 1 Waiting: 0
3.2.2 引用存储卷部分键值
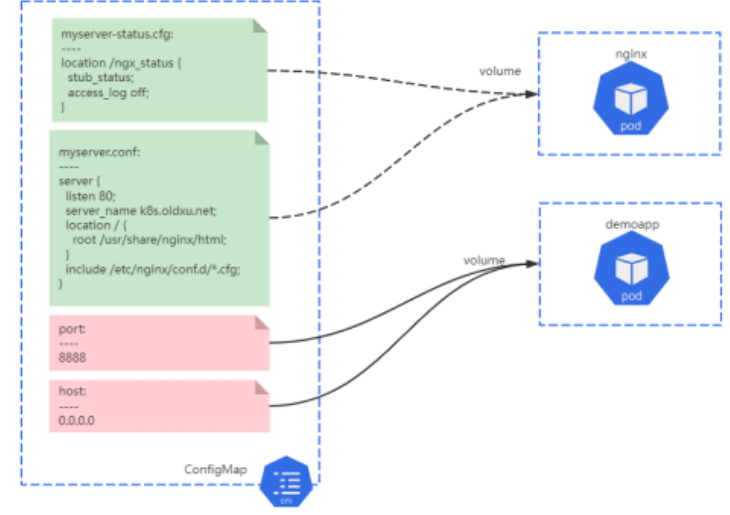
有些应用场景中,用户可能期望仅向容器中挂载指定的几个键,例如前面创建的一个名为 demoapp-config 里面有4个键,其中 host、port能为demoapp容器定义监听地址及端口,而 myserver.conf.myserver-status.cfg 能为nginx提供一个虚拟主机站点以及该虚拟站点的状态信息。
1.编写Pod,运行两个容器,分别调用不同的configmap配置
cat demoapp-nginx-cm.yaml
apiVersion: v1
kind: Pod
metadata:
  name: demoapp-nginx-cm
spec:
  containers:
    - name: nginx
      image: nginx
      volumeMounts:
        - name: ngxconfs                  # 将ngxconfs配置文件挂载至/etc/nginx/conf.d/目录下
          mountPath: /etc/nginx/conf.d/
    - name: demoapp                       # demoapp容器详情
      image: oldxu3957/demoapp:w1.8
      env:
        - name: PORT
          valueFrom:
            configMapKeyRef:
              name: demoapp-config
              key: port
        - name: HOST
          valueFrom:
            configMapKeyRef:
              name: demoapp-config
              key: host
  volumes:
    - name: ngxconfs                      # nginxconfs引用demoapp-config的configmap资源
      configMap:
        name: demoapp-config
        items:
          - key: myserver.conf            # 要引用的键名称(必写)
            path: k8s.oldxu.net.conf      # 对应的键在挂载点目录中映射的文件名称(必写)
            mode: 0644
          - key: myserver-status.cfg
            path: myserver-status.cfg
            mode: 0644
2.查看容器状态
[root@master ]# kubectl get pod demoapp-nginx-cm -o wide
NAME               READY    STATUS     RESTARTS       AGE      IP           NODE
demoapp-nginx-cm     2/2   Running8     0             17S   192.168.184.48  node2
3.验证nginx容器
[root@master ]# curl  http://192.168.184.48/ngx_status
Active connections: 1
server accepts handled requests
2 2 2
Reading: 8 Writing: 1 Waiting: 0
4.验证demoapp容器
[root@master configmap]# kubectl exec -it demoapp-nginx-cm -c demoapp -- netstat -lntp
Proto    Recv-0    Send-D     Local Address       Foreign        Address         State          PID/Program name
tcp        0      0 0.0.0.0:80           LISTEN      nginx
tcp        0      0 0.0.0.0:8888         LISTEN      demoapp

# demoapp和nginx容器都在一个Pod中,且他们是共享网络命名空间,所以在demoapp容器中能看到nginx的80端口
3.2.3 引用存储卷单个键值
前面两种方式中,无论是装在ConfigMap对象中的所有文件还是部分文件,挂载点目录下原有的文件都会被隐藏。 (打开刚才创建的nginx容器验证,看默认的default.conf配置文件是否还存在)
对于期望将ConfigMap 对象提供的配置文件补充在挂载点目录下的需求来说,这种方法难以实现,好在我们可以通过容器上的volumeMounts字段 subpath 来解决
1.运行一个NginxPod,将demoapp-config中myserver.confmyserver-status.cfg挂载进来测试
cat nginx-subpath-cm.yaml
apiVersion: v1
kind: Pod
metadata:
  name: nginx-subpath-cm
spec:
  volumes:
    - name: ngxconfs
      configMap:
        name: demoapp-config
  containers:
    - name: nginx
      image: nginx
      volumeMounts:
        - name: ngxconfs
          mountPath: /etc/nginx/conf.d/k8s.oldxu.net.conf   #挂载容器对应的路径
          subPath: myserver.conf

        - name: ngxconfs
          mountPath: /etc/nginx/conf.d/k8s-status.cfg
          subPath: myserver-status.cfg
2.验证容器/etc/nginx/conf.d/目录中原有的 default.conf 文件是否能够得以保留
[root@master ~]# kubectl exec -it nginx-subpath-cm --ls -l /etc/nginx/conf.d/
-rw-r--r-- 1 root root  1093 Apr 17 11:58 default.conf
-rw-r--r-- 1 root root    58 Apr 17 11:58 k8s-status.cfg
-rW-r--r-- 1 root root   152 Apr 17 11:58 k8s.oldxu.net.conf
3.访问测试
[root@master configmap]# curl 192.168.166.157
<html>
.....
<h1>Welcome to nginx!</h1>
.....
</html>

# 只能通过k8s.oldxu.net域名方式访问到对应的状态页面,其他方式访问会出现404
[root@master configmap]# curl -HHost:k8s.oldxu.net 192.168.166.157/ngx_status
Active connections: 1
server accepts handled requests
21 21 21
Reading: 0 Writing: 1 Waiting: 0
四.Redis结合ConfigMap实践
4.1 场景说明
- 使用Redis配置的值创建一个ConfigMap文档
- 创建一个Redis Pod,挂载并使用创建的ConfigMap
- 验证配置已经被正确应用
4.2 创建configmap
首先创建一个ConfigMap配置文件,写入一些配置信息
cat <<EOF >./redis-config.yaml
apiVersion: V1
kind: ConfigMap
metadata:
  name: example-redis-conf
data:
  redis-config: |
    bind 0.0.0.0
    port 6380
EOF
4.3 创建Redis-Pod
cat redis-server-cm.yaml
apiVersion: v1
kind: Pod
metadata:
  name: redis-server-cm
spec:
  containers:
    - name: redis-server-cm
      image: redis
      command:                          #调整启动命令
        - redis-server
        - "/redis-master/redis.conf"
      volumeMounts:
        - name: config                  #2.config内容挂载至/redis-master/redis.conf
          mountPath: /redis-master/redis.conf
          subPath: redis-config         #3.将config中redis-config这个key挂载至对应的路径
  volumes:
    - name: config                      #1.config数据来源与example-redis-conf这个CM
      configMap:
        name: example-redis-conf
4.4 检查Redis配置
使用 kubectl exec 进入 pod,运行 redis-cli 工具检查当前配置:
[root@master configmap]# kubectl exec -it redis-server-cm -- /bin/bash
root@redis-server-cm:/data# redis-cli
Could not connect to Redis at 127.0..1:6379:
Connection refused
not connected> exit
root@redis-server-cm:/data# redis-cli -p 6380
127.0.0.1:6380>
1.查看maxclients,最大运行客户端连接数
127.0.0.1:6380> config get maxclients
1) "maxclients"
2) "10000"
2.查看maxmemory,最大能使用的内存;
127.0.0.1:6380> config get maxmemory
1)"maxmemory"
2)"0"
4.5 更新ConfigMap
接下来,向example-redis-config configmap更新一些配置信息
cat redis-config.yaml
apiVersion: v1
kind: ConfigMap
metadata:
  name: example-redis-conf
data:
  redis-config: |
    bind 0.0.0.0
    port 6380
    maxclients 200000           # 调整最大允许的客户端连接数
    maxmemory 2mb               # 调整最大使用的内存
    requirepass oldxu           # 为redis设定一个密码
4.6 验证容器更新
修改后,容器中对应配置值并未更改,联的 ConfigMap 中获取更新的值。
1.删除并重新创建 Pod:
[root@master ~]# kubectl delete pod redis-server-cm
[root@master ~]# kubectl apply -f redis-server-cm.yaml
2.重新登录Redis应用:
[root@master ~]# kubectl exec -it redis-server-cm -- /bin/bash
root@redis-server-cm:/data# redis-cli -p 6380 -a oldxu
127.0.0.1:6380>
3.查看 maxclients
127.0.0.1:6380> config get maxclients
1)"maxclients"
2) "200000"
4.查看 maxmemory,它的值应该是 2097152 bytes,相当于2Mb
127.0.0.1:6380> config get maxmemory
1) "maxmemory"
2) "2097152"