在生产者消费者模型这篇文章中我们使用了ReentrantLock结合Condition实现生产者消费者模型,但我们对于ReentrantLock和Condition的工作原理并不了解,其内部的结构和源码级别实现就更加不了解了。比如在使用await方法的时候,为什么一定要用while判断条件,用if为什么不行呢?使用Condition时,线程之间是如何通信的呢?与synchronized有什么区别?如果后续要用到BlockingQueue,其内部的实现是离不开ReentrantLock和Condition的,所以对于ReentrantLock和Condition源码级别的分析是十分有必要的。
管程(Monitors)
在上篇文章中我们谈到synchronized与wait、notify结合来实现生产者消费者,其实它与操作系统级别的管程概念联系甚大。管程(monitor)在维基百科中有如下描述(我就直接Copy了_):
管程 (英语:Monitors,也称为监视器) 是一种程序结构,结构内的多个子程序(对象或模块)形成的多个工作线程互斥访问共享资源。这些共享资源一般是硬件设备或一群变量。管程实现了在一个时间点,最多只有一个线程在执行管程的某个子程序。与那些通过修改数据结构实现互斥访问的并发程序设计相比,管程实现很大程度上简化了程序设计。
管程提供了一种机制,线程可以临时放弃互斥访问,等待某些条件得到满足后,重新获得执行权恢复它的互斥访问。
管程实现对共享资源的互斥访问,一个管程包含:
- 多个彼此可以交互并共享资源的线程
- 多个与资源使用有关的变量
- 一个互斥锁
- 一个用来避免竞态条件的不变量
条件变量(Condition Variable)
对于许多应用场合,互斥操作是不够用的。线程可能需要等待某个条件 P为真,才能继续执行。在一个忙碌等待循环中
while not( P ) do skip
将会导致所有其它进程都无法进入临界区使得该条件P为真,该管程发生死锁.
解决办法是条件变量(condition variables). 概念上,一个条件变量就是一个线程队列(queue), 其中的线程正等待某个条件变为真。每个条件变量 c 关联着一个断言\(P_c\).当一个线程等待一个条件变量,该线程不算作占用了该管程,因而其它线程可以进入该管程执行,改变管程的状态,通知条件变量c其关联的断言\(P_c\)在当前状态下为真.
因此对条件变量存在两种主要操作:
- wait c 被一个线程调用,以等待断言 \(P_c\) 被满足后该线程可恢复执行. 线程挂在该条件变量上等待时,不被认为是占用了管程.
- signal c (有时写作notify c)被一个线程调用,以指出断言\(P_c\)现在为真.
在下述例子中, 用管程实现了一个信号量. 一个私有整型变量s需要被互斥访问。管程中定义了子程序“增加”(V)与子程序“减少”(P),整型变量s不能被减少到小于0; 因此子程序“减少”必须等到该整型变量是正数时才可执行. 使用条件变量sIsPositive与相关联的断言 \(P_sIsPositive = (s>0)\).
monitor class Semaphore
{
  private int s := 0
  invariant s >= 0
  private Condition sIsPositive /* associated with s > 0 */

  public method P()
  {
    if s = 0 then wait sIsPositive
    assert s > 0
    s := s - 1
  }

  public method V()
  {
    s := s + 1
    assert s > 0
    signal sIsPositive
  }
}
当一个通知(signal)发给了一个有线程处于等待中的条件变量,则有至少两个线程将要占用该管程: 发出通知的线程与等待该通知的某个线程. 只能有一个线程占用该管程,因此必须做出选择。两种理论体系导致了两种不同的条件变量的实现:
- 阻塞式条件变量(Blocking condition variables),把优先级给了被通知的线程.
- 非阻塞式条件变量(Nonblocking condition variables),把优先级给了发出通知的线程.
看过上面维基百科对管程的介绍,发现上面的概念仿佛Java已经实现了,不错,synchronized与wait、notify 以及Java1.5引入的Lock、Condition,就是对管程相关实现。找到了Condition的理论基础,相信我们对Condition的用途与实现方式有个初步的认识。下面我们就用Lock与Condition结合实现的生产者消费者例子来分析Condition的实现原理。
Condition源码分析
对于ReentrantLock的源码分析,请参考: ReentrantLock源码笔记 - 获取锁(JDK 1.8)和 AQS源码分析-独占模式,在此不再详细分析,所以我们详细研究下Condition的实现。
下面是Lock与Condition结合实现的生产者消费者例子,这个代码流程已经在上一篇文章分析过了,代码如下:
public class Buffer {
    private List<String> queue;
    private int size;

    private final Lock lock = new ReentrantLock();
    // 读线程条件(消费者线程 条件队列)
    private final Condition notEmpty = lock.newCondition();
    // 写线程条件(生产者线程 条件队列)
    private final Condition notNull = lock.newCondition();

    public Buffer() {
        this(10);
    }

    public Buffer(int size) {
        this.size = size;
        queue = new ArrayList<>();
    }

    public void put() throws InterruptedException {
        lock.lock();
        try {
            while (queue.size() == size) {
                System.out.println("[Put] Current thread " + Thread.currentThread().getName() + " is waiting");
                notNull.await();
            }

            queue.add("1");
            System.out.println("[Put] Current thread " + Thread.currentThread().getName()
                    + " add 1 item, current count: " + queue.size());
            notEmpty.signal();
        } finally {
            lock.unlock();
        }
    }

    public void take() throws InterruptedException {
        lock.lock();
        try {
            while (queue.size() == 0) {
                System.out.println("[Take] Current thread " + Thread.currentThread().getName() + " is waiting");
                notEmpty.await();
            }

            System.out.println("size = " + queue.size());

            queue.remove(queue.size() - 1);
            System.out.println("[Take] Current thread " + Thread.currentThread().getName()
                    + " remove 1 item, current count: " + queue.size());
            notNull.signal();
        } finally {
            lock.unlock();
        }

    }
}
在使用Condition之前,当前线程必须获得锁,然后调用lock.newCondition()获取一个Condition对象,这个操作是在AQS中的,ConditionObject是AQS的内部类,下面是该类的一部分代码:
/**
 * Condition implementation for a {@link AbstractQueuedSynchronizer}
 * serving as the basis of a {@link Lock} implementation.
 *
 * <p>Method documentation for this class describes mechanics,
 * not behavioral specifications from the point of view of Lock
 * and Condition users. Exported versions of this class will in
 * general need to be accompanied by documentation describing
 * condition semantics that rely on those of the associated
 * {@code AbstractQueuedSynchronizer}.
 *
 * <p>This class is Serializable, but all fields are transient,
 * so deserialized conditions have no waiters.
 */
public class ConditionObject implements Condition, java.io.Serializable {
    private static final long serialVersionUID = 1173984872572414699L;
    /** First node of condition queue. */
    private transient Node firstWaiter;
    /** Last node of condition queue. */
    private transient Node lastWaiter;

    /**
     * Creates a new {@code ConditionObject} instance.
     */
    public ConditionObject() { }

    // Internal methods

    ......
}
在维基百科中,我们了解到:一个条件变量就是一个线程队列(queue),所以Condition的实现也应该是基于队列的。从上面代码可以发现,ConditionObject有两个成员变量:
/** First node of condition queue. */
private transient Node firstWaiter;
/** Last node of condition queue. */
private transient Node lastWaiter;
firstWaiter与lastWaiter分别是condition queue的第一个和最后一个结点,所以Condition自己维护了一个队列,那这个队列和CLH有没有关系呢?我们下面接着来看。
await
在上面的生产者消费者代码的put方法中,当队列满了,会调用notNull.await()方法,那么这个方法做了什么操作呢?代码如下:
/**
 * Implements interruptible condition wait.
 * <ol>
 * <li>If current thread is interrupted, throw InterruptedException.
 * <li>Save lock state returned by {@link #getState}.
 * <li>Invoke {@link #release} with saved state as argument,
 *     throwing IllegalMonitorStateException if it fails.
 * <li>Block until signalled or interrupted.
 * <li>Reacquire by invoking specialized version of
 *     {@link #acquire} with saved state as argument.
 * <li>If interrupted while blocked in step 4, throw InterruptedException.
 * </ol>
 */
public final void await() throws InterruptedException {
    if (Thread.interrupted())
        throw new InterruptedException();
    Node node = addConditionWaiter();
    int savedState = fullyRelease(node);
    int interruptMode = 0;
    while (!isOnSyncQueue(node)) {
        LockSupport.park(this);
        if ((interruptMode = checkInterruptWhileWaiting(node)) != 0)
            break;
    }
    if (acquireQueued(node, savedState) && interruptMode != THROW_IE)
        interruptMode = REINTERRUPT;
    if (node.nextWaiter != null) // clean up if cancelled
        unlinkCancelledWaiters();
    if (interruptMode != 0)
        reportInterruptAfterWait(interruptMode);
}
从上面代码第一行可以看出,await方法是响应中断的,如果检测到线程中断,就会立即抛出InterruptedException。接着调用addConditionWaiter()方法,代码如下:
/**
 * Adds a new waiter to wait queue.
 * @return its new wait node
 */
private Node addConditionWaiter() {
    if (!isHeldExclusively())
        throw new IllegalMonitorStateException();
    Node t = lastWaiter;
    // If lastWaiter is cancelled, clean out.
    if (t != null && t.waitStatus != Node.CONDITION) {
        unlinkCancelledWaiters();
        t = lastWaiter;
    }

    Node node = new Node(Node.CONDITION);

    if (t == null)
        firstWaiter = node;
    else
        t.nextWaiter = node;
    lastWaiter = node;
    return node;
}
在addConditionWaiter()方法中,首先会调用isHeldExclusively()当前线程是否处于独占模式,注意该方法的实现在AQS的子类中,这里就相当于在ReentrantLock中,代码如下:
protected final boolean isHeldExclusively() {
    // While we must in general read state before owner,
    // we don't need to do so to check if current thread is owner
    return getExclusiveOwnerThread() == Thread.currentThread();
}
可见Condition是用在独占模式下的,共享模式下会直接报错。接着获取 队列中最后一个节点t = lastWaiter,并且判断t是否为空,并且t的waitStatus是否为Node.CONDITION,根据上面的注释,如果t的waitStatus不是Node.CONDITION,证明该节点已经被取消了,需要将其从队列中移除,会调用unlinkCancelledWaiters()方法,该方法源码如下:
/**
 * Unlinks cancelled waiter nodes from condition queue.
 * Called only while holding lock. This is called when
 * cancellation occurred during condition wait, and upon
 * insertion of a new waiter when lastWaiter is seen to have
 * been cancelled. This method is needed to avoid garbage
 * retention in the absence of signals. So even though it may
 * require a full traversal, it comes into play only when
 * timeouts or cancellations occur in the absence of
 * signals. It traverses all nodes rather than stopping at a
 * particular target to unlink all pointers to garbage nodes
 * without requiring many re-traversals during cancellation
 * storms.
 */
private void unlinkCancelledWaiters() {
    Node t = firstWaiter; // 获取头节点
    Node trail = null;  // 表示当前节点的上一个节点
    while (t != null) { // 遍历队列
        Node next = t.nextWaiter; // 获取后继节点
        // 判断waitStatus是否为 Node.CONDITION
        if (t.waitStatus != Node.CONDITION) {
            t.nextWaiter = null; // 置空当前节点的后继,等待垃圾回收
            if (trail == null)
                firstWaiter = next; // 让当前节点的后继节点作为头结点
            else
                trail.nextWaiter = next; // 由于当前节点不符合要求,需要被踢出队列,只好用上一个节点来链接next节点
            if (next == null) // 判断后继节点是否为空
                // 如果next为空,代表当前节点没有后继节点,注意此时当前节点的waitStatus不等于 Node.CONDITION,
                // 上面的操作已经被置空了,等待被垃圾回收,
                // 就将上一个waitStatus是否为 Node.CONDITION的结点作为尾节点
                lastWaiter = trail;
        }
        else
            // 如果当前节点的waitStatus为Node.CONDITION,
            // 那么将当前节点赋值给trail,相当于暂存一下
            trail = t;
        t = next; // 继续向后遍历
    }
}
在unlinkCancelledWaiters()方法中,首先获取队列的头结点t = firstWaiter,并且有一个变量为trail,初始化为null,表示当前节点的上一个节点,接下来的操作如果同学对单链表的移除节点操作熟悉的话,那么就没必要说了,只不过被移除的条件是t.waitStatus != Node.CONDITION,具体流程请参考上面的注释。总结来说,unlinkCancelledWaiters()方法是踢出队列中waitStatus不是Node.CONDITION的节点。
让我们回到addConditionWaiter()方法,由于在unlinkCancelledWaiters()方法,队列的尾节点会产生变化,所以在执行unlinkCancelledWaiters()方法后,需要再重新获取一下尾节点。接着构造一个新的节点node,注意此时的Condition队列的节点还是用的是CLH中的节点Node,这一点想必大家都熟悉了,此时传递一个Node.CONDITION参数,这一步操作是设置节点的waitStatus的值为Node.CONDITION。
Node(int waitStatus) {
    WAITSTATUS.set(this, waitStatus);
    THREAD.set(this, Thread.currentThread());
}
接着判断尾节点t是否为空,如果为null,直接让首节点执行当前新构建的节点;如果不为null,让当前新构建的节点放到队尾,并且返回新创建的节点,方法结束。
完全释放锁
让我们回到await()方法中,addConditionWaiter()方法执行完后,获得了一个新创建的节点node,接下来执行fullyRelease(node)方法,参数为刚才新创建的节点,源码如下:
/**
 * Invokes release with current state value; returns saved state.
 * Cancels node and throws exception on failure.
 * @param node the condition node for this wait
 * @return previous sync state
 */
final int fullyRelease(Node node) {
    try {
        int savedState = getState();
        if (release(savedState))
            return savedState;
        throw new IllegalMonitorStateException();
    } catch (Throwable t) {
        node.waitStatus = Node.CANCELLED;
        throw t;
    }
}
看过AQS的独占模式的同学对release这个方法是比较熟悉的,关于release方法具体实现解析请参考:AQS源码分析-独占模式#释放资源。
在fullyRelease方法内,首先会获取state的值,并将该值传给release方法,下面是release源码:
public final boolean release(int arg) {
    if (tryRelease(arg)) {
        Node h = head;
        if (h != null && h.waitStatus != 0)
            unparkSuccessor(h);
        return true;
    }
    return false;
}
注意tryRelease这个方法是在AQS的子类中实现的,由于我们用的ReentrantLock,所以我们来看一眼这个方法的实现:
@ReservedStackAccess
protected final boolean tryRelease(int releases) {
    int c = getState() - releases;
    if (Thread.currentThread() != getExclusiveOwnerThread())
        throw new IllegalMonitorStateException();
    boolean free = false;
    if (c == 0) {
        free = true;
        setExclusiveOwnerThread(null);
    }
    setState(c);
    return free;
}
从上面的方法可以看出,如果tryRelease 返回 true,代表 state此时已经为0,锁已经被释放了;返回false,说明c不为0。也就是说,在fullyRelease方法中,主要是为了释放持有锁的线程。在release方法中抛出的任何异常,都会将当前节点的waitStatus设置为Node.CANCELLED。
好了,我们回到fullyRelease方法中,可以看出,对于可重入锁,这个方法会直接导致state的值为0,也就是完全释放锁,返回值为释放锁之前的state的值。
挂起线程
接着进入一个while循环,循环条件是:!isOnSyncQueue(node),这个是什么意思?看其源码:
/**
 * Returns true if a node, always one that was initially placed on
 * a condition queue, is now waiting to reacquire on sync queue.
 * @param node the node
 * @return true if is reacquiring
 */
final boolean isOnSyncQueue(Node node) {
    // 如果节点的waitStatus是Node.CONDITION,那么说明当前节点在条件队列中
    // 由于条件队列是单链表,那么节点的prev必然是空
    if (node.waitStatus == Node.CONDITION || node.prev == null)
        return false;
    // 如果节点的next有值,我们知道next是CLH中的,条件队列中没有此值,
    // 说明当前节点必然在CLH队列中
    if (node.next != null) // If has successor, it must be on queue
        return true;
    /*
     * node.prev can be non-null, but not yet on queue because
     * the CAS to place it on queue can fail. So we have to
     * traverse from tail to make sure it actually made it.  It
     * will always be near the tail in calls to this method, and
     * unless the CAS failed (which is unlikely), it will be
     * there, so we hardly ever traverse much.
     */

    return findNodeFromTail(node);
}
从上面的方法的注释来看,该方法的作用就是来判断传入的节点在不在CLH队列中,如果在,就返回true;不在,返回false。
分析isOnSyncQueue方法,如果节点的waitStatus是Node.CONDITION,那么说明当前节点在条件队列中,由于条件队列是单链表,那么节点的prev必然是空;如果节点的next有值,我们知道next是CLH中的,条件队列中没有此值,说明当前节点必然在CLH队列中。那么还有什么情况没有考虑到呢?就是node.prev != null 并且 node.next == null 的情况,仿佛这种情况就在CLH队列里了,事实是这样吗?
从上面的代码来看,显然不是。为啥呢?我们直接来看AQS独占模式下入队的addWaiter方法,代码如下。从addWaiter方法可以看出,node.setPrevRelaxed(oldTail)这一步是可以成功的,但下面的compareAndSetTail(oldTail, node) 是个CAS操作,可能会失败,此时节点尚未在CLH队列中。
/**
 * Creates and enqueues node for current thread and given mode.
 *
 * @param mode Node.EXCLUSIVE for exclusive, Node.SHARED for shared
 * @return the new node
 */
private Node addWaiter(Node mode) {
    Node node = new Node(mode);

    for (;;) {
        Node oldTail = tail;
        if (oldTail != null) {
            node.setPrevRelaxed(oldTail);
            if (compareAndSetTail(oldTail, node)) {
                oldTail.next = node;
                return node;
            }
        } else {
            initializeSyncQueue();
        }
    }
}
所以需要从阻塞队列的队尾往前遍历,如果找到,返回 true,下面是findNodeFromTail代码。
/**
 * Returns true if node is on sync queue by searching backwards from tail.
 * Called only when needed by isOnSyncQueue.
 * @return true if present
 */
private boolean findNodeFromTail(Node node) {
    // We check for node first, since it's likely to be at or near tail.
    // tail is known to be non-null, so we could re-order to "save"
    // one null check, but we leave it this way to help the VM.
    for (Node p = tail;;) {
        if (p == node)
            return true;
        if (p == null)
            return false;
        p = p.prev;
    }
}
回到await方法中,我们看了isOnSyncQueue方法的实现,isOnSyncQueue(node) 返回 false 的话,就会进入到while循环内部,执行LockSupport.park(this);挂起当前线程。await的代码等我们看了signal()方法再来看。
signal
上面我们分析到在await方法中线程被挂起了,那么这个线程如何被唤醒呢?回到最上面的生产者消费者代码中put方法,当添加一个数据后,我们调用了notEmpty.signal();来通知消费者线程可以消费者数据了,我们可能想象到此时应该唤醒notEmpty条件队列中被阻塞的线程,下面我们来分析下源码。下面是signal()的源码:
/**
 * Moves the longest-waiting thread, if one exists, from the
 * wait queue for this condition to the wait queue for the
 * owning lock.
 *
 * @throws IllegalMonitorStateException if {@link #isHeldExclusively}
 *         returns {@code false}
 */
public final void signal() {
    if (!isHeldExclusively())
        throw new IllegalMonitorStateException();
    Node first = firstWaiter;
    if (first != null)
        doSignal(first);
}
在signal()方法中,首先判断调用 signal 方法的线程必须持有当前的独占锁,如果不是,直接抛出IllegalMonitorStateException异常。
接着获取条件队列的首节点,不为空的话,就调用doSignal(first)方法,下面是该方法的源码:
/**
 * Removes and transfers nodes until hit non-cancelled one or
 * null. Split out from signal in part to encourage compilers
 * to inline the case of no waiters.
 * @param first (non-null) the first node on condition queue
 */
private void doSignal(Node first) {
    do {
        if ( (firstWaiter = first.nextWaiter) == null)
            lastWaiter = null;
        first.nextWaiter = null;
    } while (!transferForSignal(first) &&
             (first = firstWaiter) != null);
}
从上面的代码我们可以发现,方法内部是一个do while循环。在循环体内,首先调用firstWaiter = first.nextWaiter将条件队列的首节点的下一个节点赋值给首节点(firstWaiter),相当于将原来的首节点移除条件队列,然后判断新的首节点是否为空,如果为null,说明此时队列就已经空了,直接把尾节点赋值为空。然后将原来的首节点的nextWaiter赋值为空,等待垃圾回收该节点。
转移到CLH
那么while的循环条件是什么呢?在while循环内,首先会调用transferForSignal(first)方法,注意此时的参数first还是原来的头节点,该方法代码如下:
/**
 * Transfers a node from a condition queue onto sync queue.
 * Returns true if successful.
 * @param node the node
 * @return true if successfully transferred (else the node was
 * cancelled before signal)
 *
 * 当返回true时代表成功转移到CLH队列中
 * 返回false代表在 signal 之前,当前节点已经取消了。
 */
final boolean transferForSignal(Node node) {
    /*
     * If cannot change waitStatus, the node has been cancelled.
     */
    if (!node.compareAndSetWaitStatus(Node.CONDITION, 0))
        return false;

    /*
     * Splice onto queue and try to set waitStatus of predecessor to
     * indicate that thread is (probably) waiting. If cancelled or
     * attempt to set waitStatus fails, wake up to resync (in which
     * case the waitStatus can be transiently and harmlessly wrong).
     */
    Node p = enq(node);
    int ws = p.waitStatus;
    if (ws > 0 || !p.compareAndSetWaitStatus(ws, Node.SIGNAL))
        LockSupport.unpark(node.thread);
    return true;
}
在transferForSignal方法内,首先利用 CAS 将传入节点的waitStatus由Node.CONDITION设置为0
- 如果失败,说明当前节点已经被取消了,不需要再转移到CLH队列,直接返回false;
- 如果成功,接着将调用enq(node)方法,该方法会将传入的节点自旋进入CLH队列的队尾注意,这里的返回值 p 是 node 在阻塞队列的前驱节点(该方法不再进行分析)。
接着获取p的waitStatus,下面会分两步判断:
- 当ws大于0时,代表当前节点在CLH队列中已经被取消了
- 如果
ws<=0,接着会调用p.compareAndSetWaitStatus(ws, Node.SIGNAL),利用CAS将p的waitStatus由原来的值设置为Node.SIGNAL,在CLH队列中,我们知道,如果当前节点想要被唤醒继续获取锁,那么该节点的前驱节点的waitStatus必须为Node.SIGNAL
综合上面两步,如果当前节点的前驱节点被取消或者前驱节点CAS设置waitStatus为Node.SIGNAL失败,就会调用LockSupport.unpark(node.thread);唤醒当前节点的线程,唤醒之后如何操作呢?这时我们需要到await方法来看,这个稍后再说。
综合以上,对于transferForSignal方法,我们可以知道:当返回true时代表成功转移到CLH队列中;返回false代表在 signal 之前,当前节点已经取消了。
我们回到 doSignal 方法,while循环的条件是:!transferForSignal(first) 并且 (first = firstWaiter) != null,即当前节点已经取消,并且将当前条件队列的头节点赋值给first,且不为空。
综合doSignal方法,我们可以知道:如果 first 转移至CLH不成功,那么选择 first 后面的第一个节点进行转移,依此类推。
唤醒后检查中断状态
这里我们先总结一下,什么情况下LockSupport.park(this);会继续向下执行?
- 当节点在signal后转移至CLH队列后,重新获取到独占锁
- 在CLH队列中,当前节点的前驱节点被取消或者前驱节点的waitStatus由原来的值设置为
Node.SIGNALCAS设置失败
我们回到await方法,在while循环中,当线程获取到锁后,就会接着执行挂起之后的方法:
while (!isOnSyncQueue(node)) {
    LockSupport.park(this);
    if ((interruptMode = checkInterruptWhileWaiting(node)) != 0)
        break;
}
如上面代码所示,interruptMode代表什么意思呢?我们发现接着执行了checkInterruptWhileWaiting(node)方法,代码如下:
/**
 * Checks for interrupt, returning THROW_IE if interrupted
 * before signalled, REINTERRUPT if after signalled, or
 * 0 if not interrupted.
 */
private int checkInterruptWhileWaiting(Node node) {
    return Thread.interrupted() ?
        (transferAfterCancelledWait(node) ? THROW_IE : REINTERRUPT) :
        0;
}
从注释来看,该方法用来检测当前节点的线程在wait过程中的中断状态,有三个值:
- THROW_IE(-1): 在被signalled之前,当前节点的线程被中断了
- REINTERRUPT(1): 在被signalled之后,当前节点的线程被中断了
- 0: 未发生中断
在checkInterruptWhileWaiting方法内,首先判断Thread.interrupted()线程中断标识,如果返回true,就需要判断线程是在 signal 之前还是之后中断的,否则返回0。
这里有个问题,怎样判断线程是在signal 之前还是之后中断的?接着就看transferAfterCancelledWait(node)方法,根据返回值可知,返回true, 代表在signal之前被中断了;返回false,代表在signal之后被中断了。源码如下:
/**
 * Transfers node, if necessary, to sync queue after a cancelled wait.
 * Returns true if thread was cancelled before being signalled.
 *
 * @param node the node
 * @return true if cancelled before the node was signalled
 */
final boolean transferAfterCancelledWait(Node node) {
    if (node.compareAndSetWaitStatus(Node.CONDITION, 0)) {
        enq(node);
        return true;
    }
    /*
     * If we lost out to a signal(), then we can't proceed
     * until it finishes its enq().  Cancelling during an
     * incomplete transfer is both rare and transient, so just
     * spin.
     */
    while (!isOnSyncQueue(node))
        Thread.yield();
    return false;
}
在transferAfterCancelledWait方法内,首先利用CAS将node的waitStatus由Node.CONDITION 设置为0,注意这一步,在上面我们分析signal操作的transferForSignal方法时我们知道:当前节点的线程如果被signal的话,那么它的waitStatus已经由Node.CONDITION设置为0了。所以此时再进行此操作成功,说明该节点的线程在signal之前被中断了,此时调用enq(node)进入CLH队列,返回true;
如果由Node.CONDITION设置为0失败,说明signal方法已经设置过了,注意在transferForSignal方法中,设置成功后,还要将当前节点转移到CLH队列中,这个阶段需要时间来完成,所以while (!isOnSyncQueue(node)) 这里判断是否已经进入CLH成功,如果不成功,就让出CPU时间片,等待其完成。最后transferAfterCancelledWait返回false。这里注意一点,上面在中断检查时,如果在signal过程中发生了中断,节点依然会进入CLH队列
此时我们再次回到await()的循环体内,从上面的分析可以看出,跳出循环的条件是:
- signal的转移操作成功,节点已在CLH队列中
- 节点的线程发生了中断
退出循环继续执行
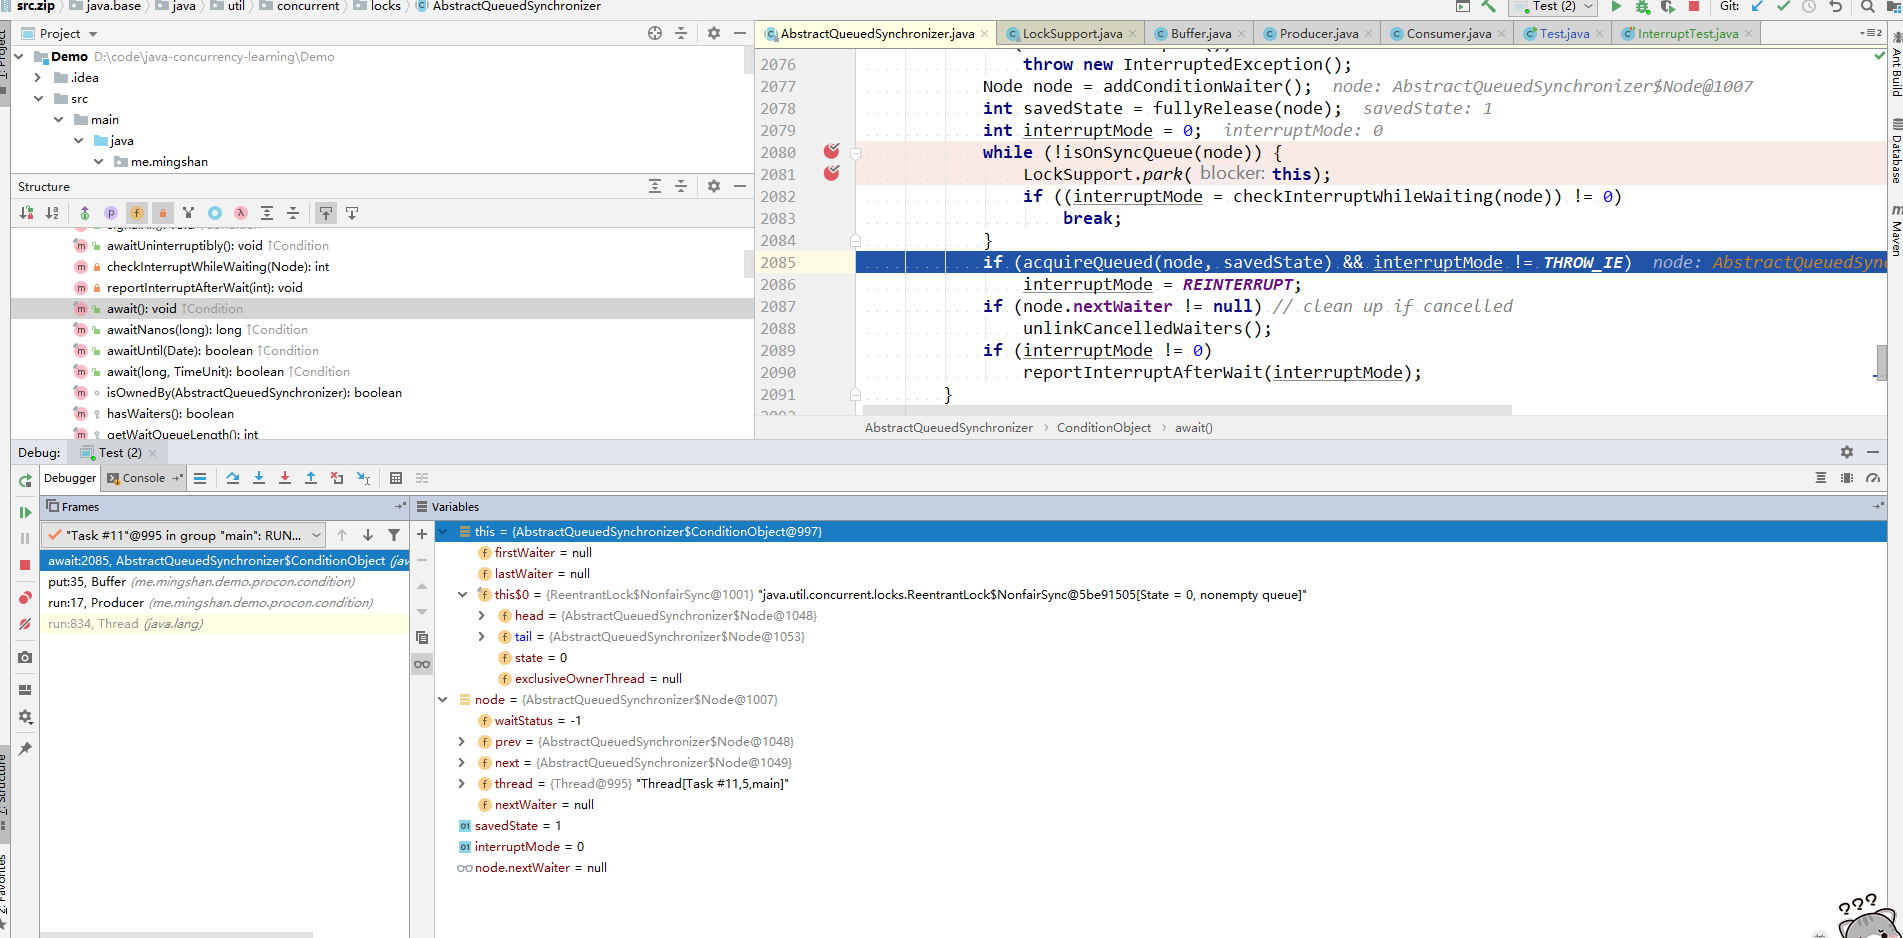
分析到这里,可以大家会有疑惑,下面我们来直接上代码DEBUG下,代码是上面的生产者消费者源码,在下面的第一个图,线程#11的状态已经被转移到CLH队列中了,看下面的参数列表可知,state为0,exclusiveOwnerThread为null,说明此时尚未获取到独占锁

由于已经在CLH队列中,会直接跳出while循环,接着执行下面这段代码:
if (acquireQueued(node, savedState) && interruptMode != THROW_IE)
    interruptMode = REINTERRUPT;
在执行上面这段代码之前,我们来看一下DEBUG变量情况:
通过上面图片可以发现state为0,exclusiveOwnerThread为null,说明在跳出while循环之前是没有获取到锁的。
接着会继续执行上面那段代码,acquireQueued(node, savedState)是获取独占锁,并返回线程中断状态,true为被中断,所以上面的代码的语义为:获取独占锁,如果线程发生中断且不是在singal之前发生的,将interruptMode设置为REINTERRUPT。执行完上面的代码,我们来看看DEBUG变量情况:
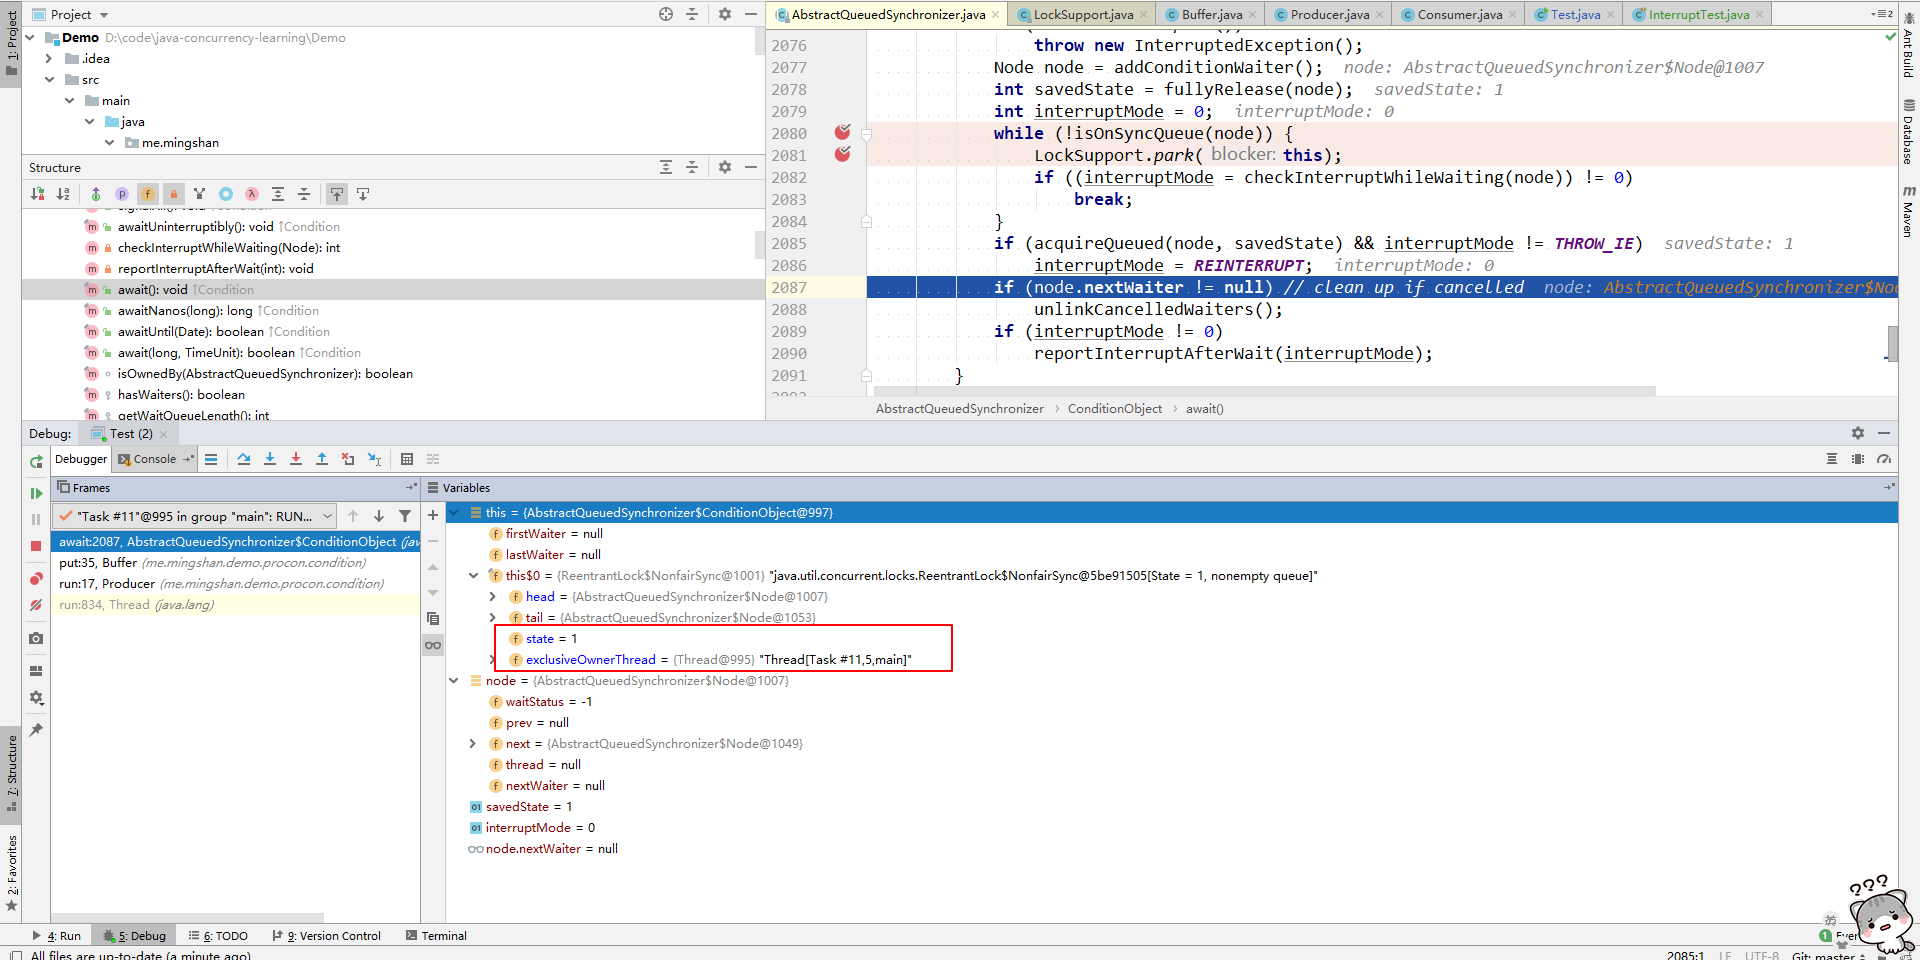
从面的图可以看出,state的值已经为1(与savedState相等),并且exclusiveOwnerThread为线程#11,说明线程#11获取到了独占锁。
接着继续下面的代码:
if (node.nextWaiter != null) // clean up if cancelled
    unlinkCancelledWaiters();
上面的代码是判断当前节点的nextWaiter是否为null,我们阅读过singal的代码可以知道,如果当前节点转移至CLH队列中,那么当前节点的nextWaiter会被赋null,那么这是正常情况。如果在singal之前线程发生了中断,当前线程会在await的while循环跳出,执行上面的这段代码,这时node.nextWaiter并没有赋值为null,但当前节点会在while循环的中断检查时进入CLH队列(transferAfterCancelledWait方法中将waitStatus置为0),这时相当于成功转移了,但Condition队列中还保留当前节点的引用,这时需要清理一下,接着就会调用unlinkCancelledWaiters()方法,清除无用的节点。
处理中断状态
上面的interruptMode似乎代码中还没有做处理,接下来就是处理与中断相关的,interruptMode != 0说明发生了中断:
if (interruptMode != 0)
    reportInterruptAfterWait(interruptMode);
这里重复一下,interruptMode会有下面三个值:
- THROW_IE(-1): 在被signalled之前,当前节点的线程被中断了,代表 await 返回的时候,需要抛出 InterruptedException 异常代表
- REINTERRUPT(1): 在被signalled之后,当前节点的线程被中断了,代表 await 返回的时候,需要重新设置中断状态
- 0: 未发生中断
接着执行reportInterruptAfterWait(interruptMode)方法,代码如下,逻辑就是上面的逻辑。
/**
 * Throws InterruptedException, reinterrupts current thread, or
 * does nothing, depending on mode.
 */
private void reportInterruptAfterWait(int interruptMode)
    throws InterruptedException {
    if (interruptMode == THROW_IE)
        throw new InterruptedException();
    else if (interruptMode == REINTERRUPT)
        selfInterrupt();
}
注意这里的selfInterrupt()是设置中断标志,代码如下:
static void selfInterrupt() {
    Thread.currentThread().interrupt();
}
总结
这里画图总结各个流程。。。
References:
- 入门AQS锁 - Condition与LockSupport
- 操作系统-进程(6)管程
- 管程 - 维基百科
- 一行一行源码分析清楚 AbstractQueuedSynchronizer (二)
- 浅谈Java并发编程系列(八)—— LockSupport原理剖析