LAMP
1. lamp简介
有了前面学习的知识的铺垫,今天可以来学习下第一个常用的web架构了。
所谓lamp,其实就是由Linux+Apache+Mysql/MariaDB+Php/Perl/Python的一组动态网站或者服务器的开源软件,除Linux外其它各部件本身都是各自独立的程序,但是因为经常被放在一起使用,拥有了越来越高的兼容度,共同组成了一个强大的Web应用程序平台。
LAMP指的是Linux(操作系统)、Apache(HTTP服务器)、MySQL(也指MariaDB,数据库软件)和PHP(有时也是指Perl或Python)的第一个字母,一般用来建立web应用平台。
2. web服务器工作流程
在说lamp架构平台的搭建前,我们先来了解下什么是CGI,什么是FastCGI,什么是......
web服务器的资源分为两种,静态资源和动态资源
- 静态资源就是指静态内容,客户端从服务器获得的资源的表现形式与原文件相同。可以简单的理解为就是直接存储于文件系统中的资源
- 动态资源则通常是程序文件,需要在服务器执行之后,将执行的结果返回给客户端
那么web服务器如何执行程序并将结果返回给客户端呢?下面通过一张图来说明一下web服务器如何处理客户端的请求
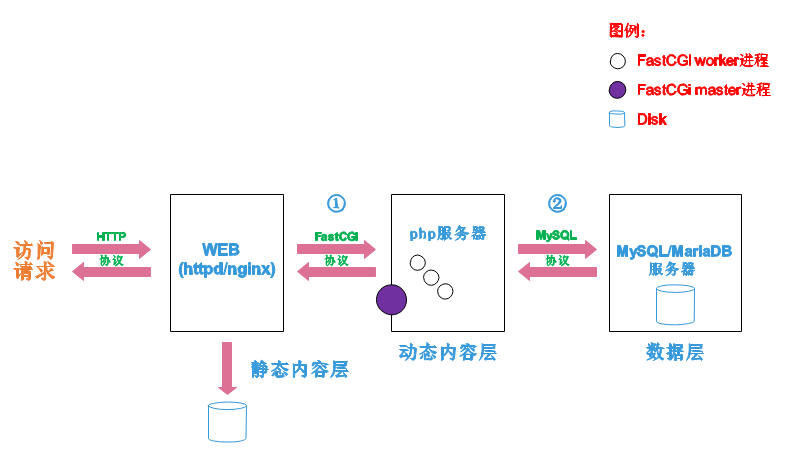
如上图所示
阶段①显示的是httpd服务器(即apache)和php服务器通过FastCGI协议进行通信,且php作为独立的服务进程运行
阶段②显示的是php程序和mysql数据库间通过mysql协议进行通信。php与mysql本没有什么联系,但是由Php语言写成的程序可以与mysql进行数据交互。同理perl和python写的程序也可以与mysql数据库进行交互
2.1 cgi与fastcgi
上图阶段①中提到了FastCGI,下面我们来了解下CGI与FastCGI。
CGI(Common Gateway Interface,通用网关接口),CGI是外部应用程序(CGI程序)与WEB服务器之间的接口标准,是在CGI程序和Web服务器之间传递信息的过程。CGI规范允许Web服务器执行外部程序,并将它们的输出发送给Web浏览器,CGI将web的一组简单的静态超媒体文档变成一个完整的新的交互式媒体。
FastCGI(Fast Common Gateway Interface)是CGI的改良版,CGI是通过启用一个解释器进程来处理每个请求,耗时且耗资源,而FastCGI则是通过master-worker形式来处理每个请求,即启动一个master主进程,然后根据配置启动几个worker进程,当请求进来时,master会从worker进程中选择一个去处理请求,这样就避免了重复的生成和杀死进程带来的频繁cpu上下文切换而导致耗时
2.2 httpd与php结合的方式
httpd与php结合的方式有以下三种:
- modules:php将以httpd的扩展模块形式存在,需要加载动态资源时,httpd可以直接通过php模块来加工资源并返回给客户端
- httpd prefork:libphp5.so(多进程模型的php)
- httpd event or worker:libphp5-zts.so(线程模型的php)
- CGI:httpd需要加载动态资源时,通过CGI与php解释器联系,获得php执行的结果,此时httpd负责与php连接的建立和断开等
- FastCGI:利用php-fpm机制,启动为服务进程,php自行运行为一个服务,https通过socket与php通信
较于CGI方式,FastCGI更为常用,很少有人使用CGI方式来加载动态资源
2.3 web工作流程
通过上面的图说明一下web的工作流程:
- 客户端通过http协议请求web服务器资源
- web服务器收到请求后判断客户端请求的资源是静态资源或是动态资源
- 若是静态资源则直接从本地文件系统取之返回给客户端。
- 否则若为动态资源则通过FastCGI协议与php服务器联系,通过CGI程序的master进程调度worker进程来执行程序以获得客户端请求的动态资源,并将执行的结果通过FastCGI协议返回给httpd服务器,httpd服务器收到php的执行结果后将其封装为http响应报文响应给客户端。在执行程序获取动态资源时若需要获得数据库中的资源时,由Php服务器通过mysql协议与MySQL/MariaDB服务器交互,取之而后返回给httpd,httpd将从php服务器收到的执行结果封装成http响应报文响应给客户端。
lamp平台构建
环境说明:
| 系统平台 | IP | 需要安装的服务 |
|---|---|---|
| centos7 redhat7 | 172.16.12.128 | httpd-2.4 mysql-5.7 php php-mysql |
lamp平台软件安装次序:
httpd --> mysql --> php
注意:php要求httpd使用prefork MPM
3.1 安装httpd
#安装服务
[root@wjl ~]# yum -y install epel-release vim

//安装开发工具包
[root@wjl ~]# yum groups mark install 'Development Tools'

//创建apache服务的用户和组
[root@wjl ~]# groupadd -r apache
[root@wjl ~]# useradd -r -M -s /sbin/nologin -g apache apache

//安装依赖包
[root@wjl ~]# yum -y install openssl-devel pcre-devel expat-devel libtool gcc gcc-c++

//下载和安装apr以及apr-util
[root@wjl ~]# cd /usr/src/
[root@wjl src]# wget https://archive.apache.org/dist/apr/apr-1.7.4.tar.gz
--2023-05-22 10:03:31--  https://archive.apache.org/dist/apr/apr-1.7.4.tar.gz
Resolving archive.apache.org (archive.apache.org)... 65.108.204.189, 2a01:4f9:1a:a084::2
Connecting to archive.apache.org (archive.apache.org)|65.108.204.189|:443... connected.
HTTP request sent, awaiting response... 200 OK
Length: 1122147 (1.1M) [application/x-gzip]
Saving to: ‘apr-1.7.4.tar.gz’

100%[===================>] 1,122,147    352KB/s   in 3.1s

2023-05-22 10:03:35 (352 KB/s) - ‘apr-1.7.4.tar.gz’ saved [1122147/1122147]

[root@wjl src]# wget https://archive.apache.org/dist/apr/apr-util-1.6.3.tar.gz
--2023-05-22 10:07:03--  https://archive.apache.org/dist/apr/apr-util-1.6.3.tar.gz
Resolving archive.apache.org (archive.apache.org)... 65.108.204.189, 2a01:4f9:1a:a084::2
Connecting to archive.apache.org (archive.apache.org)|65.108.204.189|:443... connected.
HTTP request sent, awaiting response... 200 OK
Length: 556623 (544K) [application/x-gzip]
Saving to: ‘apr-util-1.6.3.tar.gz’

100%[===================>] 556,623      250KB/s   in 2.2s

2023-05-22 10:07:07 (250 KB/s) - ‘apr-util-1.6.3.tar.gz’ saved [556623/556623]

[root@wjl src]# ls
apr-1.7.4.tar.gz  apr-util-1.6.3.tar.gz  debug  kernels
[root@wjl src]# tar xf apr-1.7.4.tar.gz
[root@wjl src]# tar xf apr-util-1.6.3.tar.gz
[root@wjl src]# ls
apr-1.7.4         apr-util-1.6.3         debug
apr-1.7.4.tar.gz  apr-util-1.6.3.tar.gz  kernels
[root@wjl src]# cd apr-1.7.4
[root@wjl apr-1.7.4]# vi configure
    cfgfile="${ofile}T"
    trap "$RM \"$cfgfile\"; exit 1" 1 2 15
    # $RM "$cfgfile"        //将此行加上注释,或者删除此行

[root@wjl apr-1.7.4]# ./configure --prefix=/usr/local/apr
配置过程略...
[root@wjl apr-1.7.4]# make && make install
编译安装过程略...

[root@wjl apr-1.7.4]# cd /usr/src/apr-util-1.6.3
[root@wjl apr-util-1.6.3]# ./configure --prefix=/usr/local/apr-util --with-apr=/usr/local/apr
配置过程略...
[root@wjl apr-util-1.6.3]# make && make install
编译安装过程略...

//编译安装httpd
[root@wjl apr-util-1.6.3]# cd /usr/src
[root@wjl src]# ls
apr-1.7.4         apr-util-1.6.3         debug
apr-1.7.4.tar.gz  apr-util-1.6.3.tar.gz  kernels
[root@wjl src]# wget https://archive.apache.org/dist/httpd/httpd-2.4.57.tar.gz
--2023-05-22 10:23:36--  https://archive.apache.org/dist/httpd/httpd-2.4.57.tar.gz
Resolving archive.apache.org (archive.apache.org)... 65.108.204.189, 2a01:4f9:1a:a084::2
Connecting to archive.apache.org (archive.apache.org)|65.108.204.189|:443... connected.
HTTP request sent, awaiting response... 200 OK
Length: 9773385 (9.3M) [application/x-gzip]
Saving to: ‘httpd-2.4.57.tar.gz’
100%[===================>] 9,773,385   41.5KB/s   in 5m 18s

2023-05-22 10:28:56 (30.0 KB/s) - ‘httpd-2.4.57.tar.gz’ saved [9773385/9773385]

[root@wjl src]# ls
apr-1.7.4         apr-util-1.6.3.tar.gz  kernels
apr-1.7.4.tar.gz  debug
apr-util-1.6.3    httpd-2.4.57.tar.gz

[root@wjl src]# tar xf httpd-2.4.57.tar.gz
[root@wjl src]# cd httpd-2.4.57
[root@wjl httpd-2.4.57]# ./configure --prefix=/usr/local/apache \> --enable-so \
> --enable-ssl \
> --enable-cgi \
> --enable-rewrite \
> --with-zlib \
> --with-pcre \
> --with-apr=/usr/local/apr \
> --with-apr-util=/usr/local/apr-util/ \
> --enable-modules=most \
> --enable-mpms-shared=all \
> --with-mpm=prefork

[root@wjl httpd-2.4.57]# make && make install
编译安装过程略...

//安装后配置
[root@wjl httpd-2.4.57]# echo 'export PATH=/usr/local/apache/bin:$PATH' > /etc/profile.d/httpd.sh
[root@wjl httpd-2.4.57]# source /etc/profile.d/httpd.sh
[root@wjl httpd-2.4.57]# ln -s /usr/local/apache/include/ /usr/include/httpd
#开启80端口
[root@wjl ~]#  cd /usr/local/apache/
[root@wjl apache]# ls
bin    cgi-bin  error   icons    logs  manual
build  conf     htdocs  include  man   modules
[root@wjl apache]# cd conf/
[root@wjl conf]# ls
extra  httpd.conf  magic  mime.types  original
[root@wjl conf]# vi httpd.conf

ServerName www.example.com:80     #去掉注释,这一行在203,命令模式set nu可显示行号

//启动apache
[root@wjl ~]# apachectl start
httpd (pid 57943) already running
[root@wjl ~]# ss -antl
State       Recv-Q Send-Q Local Address:Port               Peer Address:Port
LISTEN      0      128     *:22                  *:*
LISTEN      0      100    127.0.0.1:25                  *:*
LISTEN      0      128    :::80                 :::*
LISTEN      0      128    :::22                 :::*
LISTEN      0      100       ::1:25                 :::*
3.2 安装mysql
//安装依赖包
[root@wjl ~]# yum -y install ncurses-devel openssl-devel openssl cmake mariadb-devel
Loaded plugins: fastestmirror
Loading mirror speeds from cached hostfile
 * base: mirrors.tuna.tsinghua.edu.cn
 * epel: mirrors.tuna.tsinghua.edu.cn
 * extras: mirrors.ustc.edu.cn
 * updates: mirrors.ustc.edu.cn
Package 1:openssl-devel-1.0.2k-26.el7_9.x86_64 already installed and latest version
Package 1:openssl-1.0.2k-26.el7_9.x86_64 already installed and latest version
Resolving Dependencies
--> Running transaction check
---> Package cmake.x86_64 0:2.8.12.2-2.el7 will be installed
--> Processing Dependency: libarchive.so.13()(64bit) for package: cmake-2.8.12.2-2.el7.x86_64
---> Package mariadb-devel.x86_64 1:5.5.68-1.el7 will be installed
--> Processing Dependency: mariadb-libs(x86-64) = 1:5.5.68-1.el7 for package: 1:mariadb-devel-5.5.68-1.el7.x86_64
---> Package ncurses-devel.x86_64 0:5.9-14.20130511.el7_4 will be installed
--> Running transaction check
---> Package libarchive.x86_64 0:3.1.2-14.el7_7 will be installed
---> Package mariadb-libs.x86_64 1:5.5.56-2.el7 will be updated
---> Package mariadb-libs.x86_64 1:5.5.68-1.el7 will be an update
--> Finished Dependency Resolution

Dependencies Resolved

=================================================================
 Package         Arch     Version                   Repository
                                                            Size
=================================================================
Installing:
 cmake           x86_64   2.8.12.2-2.el7            base   7.1 M
 mariadb-devel   x86_64   1:5.5.68-1.el7            base   757 k
 ncurses-devel   x86_64   5.9-14.20130511.el7_4     base   712 k
Installing for dependencies:
 libarchive      x86_64   3.1.2-14.el7_7            base   319 k
Updating for dependencies:
 mariadb-libs    x86_64   1:5.5.68-1.el7            base   760 k

Transaction Summary
=================================================================
Install  3 Packages (+1 Dependent package)
Upgrade             ( 1 Dependent package)

Total download size: 9.5 M
Downloading packages:
Delta RPMs disabled because /usr/bin/applydeltarpm not installed.
(1/5): libarchive-3.1.2-14.el7_7.x86_64.rpm | 319 kB   00:00
(2/5): mariadb-devel-5.5.68-1.el7.x86_64.rp | 757 kB   00:00
(3/5): mariadb-libs-5.5.68-1.el7.x86_64.rpm | 760 kB   00:00
(4/5): ncurses-devel-5.9-14.20130511.el7_4. | 712 kB   00:00
(5/5): cmake-2.8.12.2-2.el7.x86_64.rpm      | 7.1 MB   00:00
-----------------------------------------------------------------
Total                                11 MB/s | 9.5 MB  00:00
Running transaction check
Running transaction test
Transaction test succeeded
Running transaction
  Installing : libarchive-3.1.2-14.el7_7.x86_64              1/6
  Updating   : 1:mariadb-libs-5.5.68-1.el7.x86_64            2/6
  Installing : 1:mariadb-devel-5.5.68-1.el7.x86_64           3/6
  Installing : cmake-2.8.12.2-2.el7.x86_64                   4/6
  Installing : ncurses-devel-5.9-14.20130511.el7_4.x86_64    5/6
  Cleanup    : 1:mariadb-libs-5.5.56-2.el7.x86_64            6/6
  Verifying  : 1:mariadb-devel-5.5.68-1.el7.x86_64           1/6
  Verifying  : 1:mariadb-libs-5.5.68-1.el7.x86_64            2/6
  Verifying  : libarchive-3.1.2-14.el7_7.x86_64              3/6
  Verifying  : ncurses-devel-5.9-14.20130511.el7_4.x86_64    4/6
  Verifying  : cmake-2.8.12.2-2.el7.x86_64                   5/6
  Verifying  : 1:mariadb-libs-5.5.56-2.el7.x86_64            6/6

Installed:
  cmake.x86_64 0:2.8.12.2-2.el7
  mariadb-devel.x86_64 1:5.5.68-1.el7
  ncurses-devel.x86_64 0:5.9-14.20130511.el7_4

Dependency Installed:
  libarchive.x86_64 0:3.1.2-14.el7_7

Dependency Updated:
  mariadb-libs.x86_64 1:5.5.68-1.el7

Complete!

//创建用户和组
[root@wjl ~]# groupadd -r -g 306 mysql
[root@wjl ~]# useradd -r -M -s /sbin/nologin -g 306 -u 306 mysql


//下载mysql软件包
[root@master ~]# rpm -ivh mysql-community-common-5.7.18-1.el7.x86_64.rpm
warning: mysql-community-common-5.7.18-1.el7.x86_64.rpm: Header V3 DSA/SHA1 Signature, key ID 5072e1f5: NOKEY
Preparing...                          ################################# [100%]
Updating / installing...
   1:mysql-community-common-5.7.18-1.e################################# [100%]
[root@master ~]# rpm -ivh mysql-community-libs-5.7.18-1.el7.x86_64.rpm
warning: mysql-community-libs-5.7.18-1.el7.x86_64.rpm: Header V3 DSA/SHA1 Signature, key ID 5072e1f5: NOKEY
Preparing...                          ################################# [100%]
Updating / installing...
   1:mysql-community-libs-5.7.18-1.el7################################# [100%]
[root@master ~]# rpm -ivh mysql-community-client-5.7.18-1.el7.x86_64.rpm
warning: mysql-community-client-5.7.18-1.el7.x86_64.rpm: Header V3 DSA/SHA1 Signature, key ID 5072e1f5: NOKEY
Preparing...                          ################################# [100%]
Updating / installing...
   1:mysql-community-client-5.7.18-1.e################################# [100%]
[root@master ~]# rpm -ivh mysql-community-devel-5.7.18-1.el7.x86_64.rpm
warning: mysql-community-devel-5.7.18-1.el7.x86_64.rpm: Header V3 DSA/SHA1 Signature, key ID 5072e1f5: NOKEY
Preparing...                          ################################# [100%]
Updating / installing...
   1:mysql-community-devel-5.7.18-1.el################################# [100%]
[root@master ~]# yum -y install mysql-community-server-5.7.18-1.el7.x86_64.rpm
Loaded plugins: fastestmirror
Examining mysql-community-server-5.7.18-1.el7.x86_64.rpm: mysql-community-server-5.7.18-1.el7.x86_64
Marking mysql-community-server-5.7.18-1.el7.x86_64.rpm to be installed
Resolving Dependencies
--> Running transaction check
---> Package mysql-community-server.x86_64 0:5.7.18-1.el7 will be installed
--> Processing Dependency: net-tools for package: mysql-community-server-5.7.18-1.el7.x86_64
Determining fastest mirrors
 * base: mirrors.huaweicloud.com
 * extras: mirrors.ustc.edu.cn
 * updates: mirrors.bfsu.edu.cn
......
Complete!

#将以下配置信息添加到/etc/my.cnf 文件 symbolic-links=0 配置信息的下方。

default-storage-engine=innodb
innodb_file_per_table
collation-server=utf8_general_ci
init-connect='SET NAMES utf8'
character-set-server=utf8


#启动 MySQL 数据库。
[root@wjl src]# systemctl start mysqld
[root@wjl src]# systemctl enable mysqld
[root@wjl src]# systemctl status mysqld
● mysqld.service - MySQL Server
   Loaded: loaded (/usr/lib/systemd/system/mysqld.service; enabled; vendor preset: disabled)
   Active: active (running) since Mon 2023-05-22 11:20:42 CST; 8s ago
     Docs: man:mysqld(8)
           http://dev.mysql.com/doc/refman/en/using-systemd.html
 Main PID: 58412 (mysqld)
   CGroup: /system.slice/mysqld.service
           └─58412 /usr/sbin/mysqld --daemonize --pid-file=/va...

May 22 11:20:39 wjl systemd[1]: Starting MySQL Server...
May 22 11:20:42 wjl systemd[1]: Started MySQL Server.
[root@wjl src]# ss -antl
State       Recv-Q Send-Q Local Address:Port               Peer Address:Port
LISTEN      0      128     *:22                  *:*
LISTEN      0      100    127.0.0.1:25                  *:*
LISTEN      0      80     :::3306               :::*
LISTEN      0      128    :::80                 :::*
LISTEN      0      128    :::22                 :::*
LISTEN      0      100       ::1:25                 :::*
查询 MySQL 数据库默认密码。
MySQL 数据库安装后的默认密码保存在/var/log/mysqld.log 文件中,在该文件中以 password 关键字搜索默认密码。
[root@master ~]# cat /var/log/mysqld.log | grep password
2023-03-22T14:38:11.993912Z 1 [Note] A temporary password is generated for root@localhost: prhqisH#u5?v      # 默 认 密 码 为 prhqisH#u5?v
MySQL 数据库是安装后随机生成的,所以每次安装后生成的默认密码不相同。
MySQL 数据库初始化。
执行 mysql_secure_installation 命令初始化 MySQL 数据库,初始化过程中需要设定 数据库 root 用户登录密码,密码需符合安全规则,包括大小写字符、数字和特殊符号, 可设定密码为 Password123¥。
在进行 MySQL 数据库初始化过程中会出现以下交互确认信息:
1)Change the password for root ? ((Press y|Y for Yes, any other key for No)表示是否更改 root 用户密码,在键盘输入 y 和回车。
2)Do you wish to continue with the password provided?(Press y|Y for Yes, any other key for No)表示是否使用设定的密码继续,在键盘输入 y 和回车。
3)Remove anonymous users? (Press y|Y for Yes, any other key for No)表示是 否删除匿名用户,在键盘输入 y 和回车。
4)Disallow root login remotely? (Press y|Y for Yes, any other key for No) 表示是否拒绝 root 用户远程登录,在键盘输入 n 和回车,表示允许 root 用户远程登录。
5)Remove test database and access to it? (Press y|Y for Yes, any other key for No)表示是否删除测试数据库,在键盘输入 y 和回车。
6)Reload privilege tables now? (Press y|Y for Yes, any other key for No) 表示是否重新加载授权表,在键盘输入 y 和回车。
mysql_secure_installation 命令执行过程如下:
[root@master ~]# mysql_secure_installation

Securing the MySQL server deployment.

Enter password for user root:     # 输入/var/log/mysqld.log 文件中查询到的默认 root 用户登录密码
The existing password for the user account root has expired. Please set a new password.

New password:                            # 输入新密码 Passwd123$

Re-enter new password:                   # 再次输入新密码 Passwd123$
The 'validate_password' plugin is installed on the server.
The subsequent steps will run with the existing configuration
of the plugin.
Using existing password for root.
Estimated strength of the password: 100
Do you wish to continue with the password provided?(Press y|Y for Yes, any other key for No) : y                           #输入y
By default, a MySQL installation has an anonymous user,
allowing anyone to log into MySQL without having to have
a user account created for them. This is intended only for
testing, and to make the installation go a bit smoother.
You should remove them before moving into a production
environment.

Remove anonymous users? (Press y|Y for Yes, any other key for No) : y
Success.


Normally, root should only be allowed to connect from
'localhost'. This ensures that someone cannot guess at
the root password from the network.

Disallow root login remotely? (Press y|Y for Yes, any other key for No) : n
             #输入n
 ... skipping.
By default, MySQL comes with a database named 'test' that
anyone can access. This is also intended only for testing,
and should be removed before moving into a production
environment.


Remove test database and access to it? (Press y|Y for Yes, any other key for No) : y                                         #输入y
 - Dropping test database...
Success.

 - Removing privileges on test database...
Success.

Reloading the privilege tables will ensure that all changes
made so far will take effect immediately.

Reload privilege tables now? (Press y|Y for Yes, any other key for No) :
                                            #输入回车
 ... skipping.
All done!
添加 root 用户从本地和远程访问 MySQL 数据库表单的授权。
[root@master ~]# mysql -uroot -p'Passwd123$'
mysql: [Warning] Using a password on the command line interface can be insecure.
Welcome to the MySQL monitor.  Commands end with ; or \g.
Your MySQL connection id is 8
Server version: 5.7.18 MySQL Community Server (GPL)

Copyright (c) 2000, 2017, Oracle and/or its affiliates. All rights reserved.

Oracle is a registered trademark of Oracle Corporation and/or its
affiliates. Other names may be trademarks of their respective
owners.

Type 'help;' or '\h' for help. Type '\c' to clear the current input statement.

mysql> grant all privileges on *.* to root@'localhost'identified by 'Passwd123$';     # 添加 root 用户本地访问授权

Query OK, 0 rows affected, 1 warning (0.00 sec)

mysql> grant all privileges on *.* to root@'%' identified by 'Passwd123$'; # 添加 root 用户远程访问授权
Query OK, 0 rows affected, 1 warning (0.00 sec)

mysql> flush privileges;    # 刷新授权
Query OK, 0 rows affected (0.00 sec)

mysql> select user,host from mysql.user where user='root';    # 查询 root 用户授权情况
| user | host      |
+------+-----------+
| root | %         |
| root | localhost |
+------+-----------+
2 rows in set (0.00 sec)

mysql> exit     # 退出 MySQL 数据库
Bye
添加环境变量
[root@wjl src]# echo 'export PATH=/usr/local/mysql/bin:$PATH' > /etc/profile.d/mysql.sh
[root@wjl src]# cd
[root@wjl ~]# . /etc/profile.d/mysql.sh
[root@wjl ~]# echo $PATH
/usr/local/mysql/bin:/usr/local/apache/bin:/usr/local/sbin:/usr/local/bin:/usr/sbin:/usr/bin:/root/bin
[root@wjl ~]# service mysqld start
Redirecting to /bin/systemctl start mysqld.service
[root@wjl ~]# ps -ef|grep mysql
mysql     58412      1  0 11:20 ?        00:00:00 /usr/sbin/mysqd --daemonize --pid-file=/var/run/mysqld/mysqld.pid
root      58512  57958  0 11:27 pts/0    00:00:00 grep --color=auto mysql
3.3 安装php
//配置yum源
[root@wjl ~]# wget http://rpms.remirepo.net/enterprise/remi-release-7.rpm
--2023-05-22 11:35:06--  http://rpms.remirepo.net/enterprise/remi-release-7.rpm
Resolving rpms.remirepo.net (rpms.remirepo.net)... 109.238.14.107, 2a00:c70:1:109:238:14:107:1
Connecting to rpms.remirepo.net (rpms.remirepo.net)|109.238.14.107|:80... connected.
HTTP request sent, awaiting response... 200 OK
Length: 28112 (27K) [application/x-rpm]
Saving to: ‘remi-release-7.rpm’

100%[=======================>] 28,112       118KB/s   in 0.2s

2023-05-22 11:35:06 (118 KB/s) - ‘remi-release-7.rpm’ saved [28112/28112]


//安装依赖包
[root@wjl ~]# yum -y install libxml2 libxml2-devel openssl openssl-devel bzip2 bzip2-devel libcurl libcurl-devel libicu-devel libjpeg libjpeg-devel libpng libpng-devel openldap-devel  pcre-devel freetype freetype-devel gmp gmp-devel libmcrypt libmcrypt-devel readline readline-devel libxslt libxslt-devel mhash mhash-devel php72-php-mysqlnd
安装过程略....


//下载php
[root@localhost ~]# cd /usr/src/
[root@localhost src]# wget http://cn.php.net/distributions/php-7.2.8.tar.xz
下载过程略....


//编译安装php
[root@localhost src]# tar xf php-7.2.8.tar.xz
[root@localhost src]# cd php-7.2.8
[root@localhost php-7.2.8]# ./configure --prefix=/usr/local/php7  \
--with-config-file-path=/etc \
--enable-fpm \
--enable-inline-optimization \
--disable-debug \
--disable-rpath \
--enable-shared \
--enable-soap \
--with-openssl \
--enable-bcmath \
--with-iconv \
--with-bz2 \
--enable-calendar \
--with-curl \
--enable-exif  \
--enable-ftp \
--with-gd \
--with-jpeg-dir \
--with-png-dir \
--with-zlib-dir \
--with-freetype-dir \
--with-gettext \
--enable-json \
--enable-mbstring \
--enable-pdo \
--with-mysqli=mysqlnd \
--with-pdo-mysql=mysqlnd \
--with-readline \
--enable-shmop \
--enable-simplexml \
--enable-sockets \
--enable-zip \
--enable-mysqlnd-compression-support \
--with-pear \
--enable-pcntl \
--enable-posix
[root@localhost php-7.2.8]# make -j $(cat /proc/cpuinfo |grep processor|wc -l)
编译过程略
[root@localhost php-7.2.8]# make install
安装过程略


//安装后配置
[root@localhost ~]# echo 'export PATH=/usr/local/php7/bin:$PATH' > /etc/profile.d/php7.sh
[root@localhost ~]# source /etc/profile.d/php7.sh
[root@localhost php-7.2.8]# which php
/usr/local/php7/bin/php
[root@localhost php-7.2.8]# php -v
PHP 7.2.8 (cli) (built: Aug 16 2018 13:27:30) ( NTS )
Copyright (c) 1997-2018 The PHP Group
Zend Engine v3.2.0, Copyright (c) 1998-2018 Zend Technologies


//配置php-fpm
[root@localhost php-7.2.8]# cp php.ini-production /etc/php.ini
[root@localhost php-7.2.8]# cp sapi/fpm/init.d.php-fpm /etc/init.d/php-fpm
[root@localhost php-7.2.8]# chmod +x /etc/rc.d/init.d/php-fpm
[root@localhost php-7.2.8]# cp /usr/local/php7/etc/php-fpm.conf.default /usr/local/php7/etc/php-fpm.conf
[root@localhost php-7.2.8]# cp /usr/local/php7/etc/php-fpm.d/www.conf.default /usr/local/php7/etc/php-fpm.d/www.conf

//编辑php-fpm的配置文件(/usr/local/php7/etc/php-fpm.conf):
//配置fpm的相关选项为你所需要的值:
[root@localhost ~]# vim /usr/local/php7/etc/php-fpm.conf
.....
.....
pm.max_children = 50    ;最多同时提供50个进程提供50个并发服务
pm.start_servers = 5    ;启动时启动5个进程
pm.min_spare_servers = 2    ;最小空闲进程数
pm.max_spare_servers = 8    ;最大空闲进程数

[root@localhost ~]# tail /usr/local/php7/etc/php-fpm.conf
; file.
; Relative path can also be used. They will be prefixed by:
;  - the global prefix if it's been set (-p argument)
;  - /usr/local/php7 otherwise
include=/usr/local/php7/etc/php-fpm.d/*.conf
pm.max_children = 50
pm.start_servers = 5
pm.min_spare_servers = 2
pm.max_spare_servers = 8


//启动php-fpm
[root@localhost ~]# service php-fpm start
Starting php-fpm  done

//默认情况下,fpm监听在127.0.0.1的9000端口,也可以使用如下命令验证其是否已经监听在相应的套接字
[root@localhost ~]# ss -antl
State      Recv-Q Send-Q           Local Address:Port                          Peer Address:Port
LISTEN     0      128                          *:22                                       *:*
LISTEN     0      100                  127.0.0.1:25                                       *:*
LISTEN     0      128                  127.0.0.1:9000                                     *:*
LISTEN     0      128                         :::80                                      :::*
LISTEN     0      128                         :::22                                      :::*
LISTEN     0      100                        ::1:25                                      :::*
LISTEN     0      80                          :::3306                                    :::*

[root@localhost ~]# ps -ef|grep php
root      81070      1  0 14:13 ?        00:00:00 php-fpm: master process (/usr/local/php7/etc/php-fpm.conf)
nobody    81071  81070  0 14:13 ?        00:00:00 php-fpm: pool www
nobody    81072  81070  0 14:13 ?        00:00:00 php-fpm: pool www
nobody    81073  81070  0 14:13 ?        00:00:00 php-fpm: pool www
nobody    81074  81070  0 14:13 ?        00:00:00 php-fpm: pool www
nobody    81075  81070  0 14:13 ?        00:00:00 php-fpm: pool www
root      81079  83354  0 14:15 pts/1    00:00:00 grep --color=auto php
3.4 配置apache
3.4.1 启用代理模块
在apache httpd 2.4以后已经专门有一个模块针对FastCGI的实现,此模块为mod_proxy_fcgi.so,它其实是作为mod_proxy.so模块的扩展,因此,这两个模块都要加载,编辑httpd.conf文件,取消以下两行内容的注释:
- LoadModule proxy_module modules/mod_proxy.so
- LoadModule proxy_fcgi_module modules/mod_proxy_fcgi.so
//启用httpd的相关模块
[root@localhost ~]# sed -i '/proxy_module/s/#//g' /etc/httpd24/httpd.conf
[root@localhost ~]# sed -i '/proxy_fcgi_module/s/#//g' /etc/httpd24/httpd.conf
3.4.2 配置虚拟主机
在需要使用fcgi的虚拟主机中添加类似如下两行:
ProxyRequests Off       //关闭正向代理
ProxyPassMatch ^/(.*\.php)$ fcgi://127.0.0.1:9000/PATH/TO/DOCUMENT_ROOT/$1
例如:
ProxyPassMatch ^/(.*\.php)$ fcgi://127.0.0.1:9000/var/www/html/idfsoft.com/$1
以上设置表示把以.php结尾的文件请求发送到php-fpm进程,php-fpm至少需要知道运行的目录和URI,所以这里直接在fcgi://127.0.0.1:9000后指明了这两个参数,其它参数的传递已经被mod_proxy_fcgi.so进行了封装,不需要手动指定。
注意:
这里写的/var/www/html/是yum源安装方式生成的网页存放目录,这里必须改成你编译安装指定的网页存放路径,禁止直接复制我这里的路径
这里的idfsoft.com是域名,你必须改成你所使用的域名,禁止直接复制此处的域名
这里的$1表示匹配所有以.php结尾的http请求
//创建虚拟主机目录并生成php测试页面
[root@localhost ~]# mkdir /usr/local/apache/htdocs/wangqing.com
[root@localhost ~]# cat > /usr/local/apache/htdocs/wangqing.com/index.php <<EOF
<?php
   phpinfo();
?>
EOF
[root@localhost ~]# chown -R apache.apache /usr/local/apache/htdocs/
[root@localhost ~]# ll /usr/local/apache/htdocs/ -d
drwxr-xr-x 3 apache apache 44 Aug 16 14:50 /usr/local/apache/htdocs/


[root@localhost ~]# vim /etc/httpd24/httpd.conf
//在配置文件的最后加入以下内容
<VirtualHost *:80>
    DocumentRoot "/usr/local/apache/htdocs/wangqing.com"
    ServerName www.wangqing.com
    ProxyRequests Off
    ProxyPassMatch ^/(.*\.php)$ fcgi://127.0.0.1:9000/usr/local/apache/htdocs/wangqing.com/$1
    <Directory "/usr/local/apache/htdocs/wangqing.com">
        Options none
        AllowOverride none
        Require all granted
    </Directory>
</VirtualHost>

[root@localhost ~]# vim /etc/httpd24/httpd.conf
//搜索AddType,添加以下内容
    # If the AddEncoding directives above are commented-out, then you
    # probably should define those extensions to indicate media types:
    #
    AddType application/x-compress .Z
    AddType application/x-gzip .gz .tgz
    AddType application/x-httpd-php .php        #添加此行
    AddType application/x-httpd-php-source .phps        #添加此行

[root@localhost ~]# sed -i '/    DirectoryIndex/s/index.html/index.php index.html/g' /etc/httpd24/httpd.conf


//重启apache服务
[root@localhost ~]# apachectl stop
[root@localhost ~]# apachectl start
[root@localhost ~]# ss -antl
State      Recv-Q Send-Q           Local Address:Port                          Peer Address:Port
LISTEN     0      128                          *:22                                       *:*
LISTEN     0      100                  127.0.0.1:25                                       *:*
LISTEN     0      128                  127.0.0.1:9000                                     *:*
LISTEN     0      128                         :::80                                      :::*
LISTEN     0      128                         :::22                                      :::*
LISTEN     0      100                        ::1:25                                      :::*
LISTEN     0      80                          :::3306                                    :::*
3.5 验证
1.修改/etc/hosts文件,添加域名与IP的映射
2.在浏览器上使用域名访问,若看到以下界面则表示lamp架构搭建成功,否则请检查你的操作