一、我们先看docker容器安装nacos后,登录容器看到:

配置文件放在 /home/nacos/conf中,该文件夹中有很多配置,因此我们不能按以前的方式直接挂载某个文件:
这里我们要挂载application.properties文件和cluster.conf文件


我这里搭单机版,如果是集群,需要在cluster.conf配置上三个节点的ip
application.properties的配置
# spring
server.servlet.contextPath=/nacos
server.contextPath=/nacos
server.port=8848
spring.datasource.platform=mysql
nacos.cmdb.dumpTaskInterval=3600
nacos.cmdb.eventTaskInterval=10
nacos.cmdb.labelTaskInterval=300
nacos.cmdb.loadDataAtStart=false
db.num=1
db.url.0=jdbc:mysql://mysql.terp:3306/nacos?characterEncoding=utf8&connectTimeout=1000&socketTimeout=3000&autoReconnect=true&useSSL=false
db.user.0=root
db.password.0=yangxiaohui227
### The auth system to use, currently only 'nacos' is supported:
nacos.core.auth.system.type=nacos


### The token expiration in seconds:
nacos.core.auth.default.token.expire.seconds=${NACOS_AUTH_TOKEN_EXPIRE_SECONDS:18000}

### The default token:
nacos.core.auth.default.token.secret.key=${NACOS_AUTH_TOKEN:SecretKey012345678901234567890123456789012345678901234567890123456789}

### Turn on/off caching of auth information. By turning on this switch, the update of auth information would have a 15 seconds delay.
nacos.core.auth.caching.enabled=${NACOS_AUTH_CACHE_ENABLE:false}
nacos.core.auth.enable.userAgentAuthWhite=${NACOS_AUTH_USER_AGENT_AUTH_WHITE_ENABLE:false}
nacos.core.auth.server.identity.key=${NACOS_AUTH_IDENTITY_KEY:serverIdentity}
nacos.core.auth.server.identity.value=${NACOS_AUTH_IDENTITY_VALUE:security}
server.tomcat.accesslog.enabled=${TOMCAT_ACCESSLOG_ENABLED:false}
server.tomcat.accesslog.pattern=%h %l %u %t "%r" %s %b %D
# default current work dir
server.tomcat.basedir=
## spring security config
### turn off security
nacos.security.ignore.urls=${NACOS_SECURITY_IGNORE_URLS:/,/error,/**/*.css,/**/*.js,/**/*.html,/**/*.map,/**/*.svg,/**/*.png,/**/*.ico,/console-fe/public/**,/v1/auth/**,/v1/console/health/**,/actuator/**,/v1/console/server/**}
# metrics for elastic search
management.metrics.export.elastic.enabled=false
management.metrics.export.influx.enabled=false

nacos.naming.distro.taskDispatchThreadCount=10
nacos.naming.distro.taskDispatchPeriod=200
nacos.naming.distro.batchSyncKeyCount=1000
nacos.naming.distro.initDataRatio=0.9
nacos.naming.distro.syncRetryDelay=5000
nacos.naming.data.warmup=true
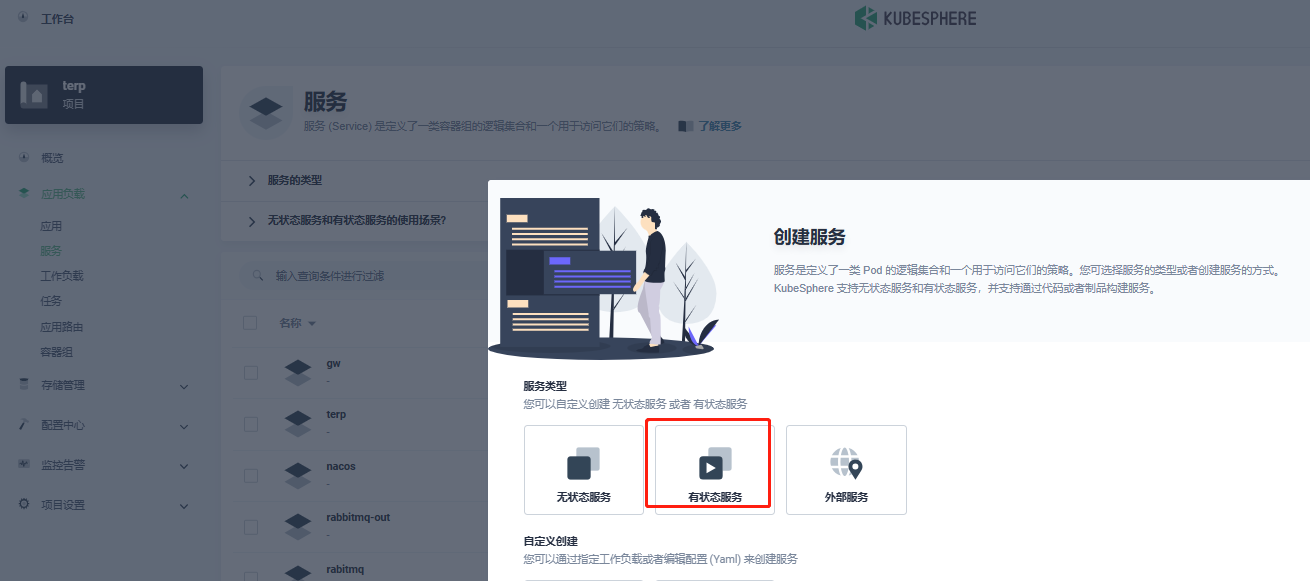
二、搭建nacos
1.创建有状态服务


数据挂载:


至此,就搭建成功了