环境介绍
版本介绍
操作系统
CentOS Linux release 7.9.2009 (Core)
Ceph版本
rpm-nautilus
主机信息
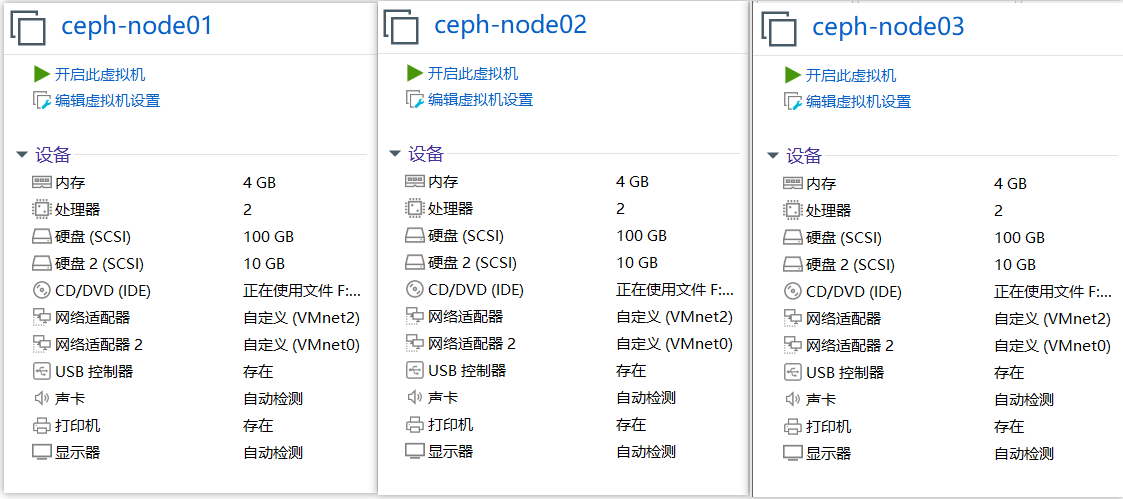
| 主机名 | IP | 角色 |
|---|---|---|
| ceph-node01 | 192.168.199.31 | monitor、mgr、mds、osd |
| ceph-node02 | 192.168.199.32 | monitor、mds、osd |
| ceph-node03 | 192.168.199.33 | monitor、mds、osd |
| ceph-client | 192.168.199.107 | ceph客户端 |
所有服务器都准备了一块裸盘(/dev/sdb),客户端可以是任意一台CentOS 7 主机。
准备工作
修改主机名
注意:集群所有主机都须操作
###每台主机修改主机名###
root@localhost(192.168.199.31)~>hostnamectl set-hostname --static ceph-node01
root@localhost(192.168.199.32)~>hostnamectl set-hostname --static ceph-node02
root@localhost(192.168.199.33)~>hostnamectl set-hostname --static ceph-node03

###申明IP对应的主机名###
root@localhost(192.168.199.31)~>cat << EOF >> /etc/hosts
192.168.199.31  ceph-node01
192.168.199.32  ceph-node02
192.168.199.33  ceph-node03
EOF

###拷贝hosts到集群所有主机###
root@ceph01(192.168.199.31)~>scp /etc/hosts ceph-node02:/etc/
root@ceph01(192.168.199.31)~>scp /etc/hosts ceph-node03:/etc/
设置ssh互信
###生成密钥###
root@ceph01(192.168.199.31)~>ssh-keygen -t rsa -P '' -f ~/.ssh/id_rsa

###拷贝到每台主机(包括自身主机)###
root@ceph01(192.168.199.31)~>ssh-copy-id ceph-node01
root@ceph01(192.168.199.31)~>ssh-copy-id ceph-node02
root@ceph01(192.168.199.31)~>ssh-copy-id ceph-node03
配置yum源
注意:集群所有主机都须操作
root@ceph01(192.168.199.31)~>curl http://mirrors.aliyun.com/repo/Centos-7.repo -o /etc/yum.repos.d/Centos-7.repo
root@ceph01(192.168.199.31)~>curl http://mirrors.aliyun.com/repo/epel-7.repo -o /etc/yum.repos.d/epel-7.repo
root@ceph01(192.168.199.31)~>sed -i '/aliyuncs/d' /etc/yum.repos.d/Centos-7.repo

###添加ceph源###
root@ceph01(192.168.199.31)~>cat << EOF >> /etc/yum.repos.d/ceph.repo
[ceph]
name=ceph
baseurl=http://mirrors.aliyun.com/ceph/rpm-nautilus/el7/x86_64/
enabled=1
gpgcheck=0
priority=1

[ceph-noarch]
name=cephnoarch
baseurl=http://mirrors.aliyun.com/ceph/rpm-nautilus/el7/noarch/
enabled=1
gpgcheck=0
priority=1

[ceph-source]
name=Ceph source packages
baseurl=http://mirrors.aliyun.com/ceph/rpm-nautilus/el7/SRPMS
enabled=1
gpgcheck=0
priority=1
EOF
配置时间同步
注意:集群所有主机都须操作
yum install chrony ntpdate -y
sed -i "s/^server/#server/g" /etc/chrony.conf
echo 'server tiger.sina.com.cn iburst' >> /etc/chrony.conf
echo 'server ntp1.aliyun.com iburst' >> /etc/chrony.conf
systemctl enable chronyd ; systemctl start chronyd
组建集群
注意:使用 ceph-deploy 对集群的操作都必须在 /etc/ceph 目录下进行。
安装ceph包
注意:集群所有主机都须操作
yum -y install ceph ceph-radosgw
安装ceph-deploy
注意:ceph-node01 操作
root@ceph01(192.168.199.31)~>yum install -y ceph-deploy
初始化集群
root@ceph01(192.168.199.31)~>cd /etc/ceph/
###开始初始化集群###
###主机: ceph-node01 ceph-node02 ceph-node03 简写: ceph-node0{1..3}
### --public-network 指定业务(内网)地址
### --cluster-network 指定集群通信地址
### 这两网络可指定同一个网络地址
###
root@ceph01(192.168.199.31)/etc/ceph>ceph-deploy new ceph-node0{1..3} --public-network=192.168.199.0/24 --cluster-network=192.168.1.0/24

###执行完成后,会生成如下文件:
root@ceph01(192.168.199.31)/etc/ceph>ls
ceph.conf  ceph-deploy-ceph.log  ceph.mon.keyring  rbdmap
###查看配置文件
root@ceph01(192.168.199.31)/etc/ceph>cat ceph.conf
[global]
fsid = 3f85979a-2232-41af-a3b0-998350c28ade
public_network = 192.168.199.0/24
cluster_network = 192.168.1.0/24
mon_initial_members = ceph-node01, ceph-node02, ceph-node03
mon_host = 192.168.199.31,192.168.199.32,192.168.199.33
auth_cluster_required = cephx
auth_service_required = cephx
auth_client_required = cephx
监控节点初始化
###注意:所有的初始化及集群操作都需要在 /etc/ceph 目录下执行###
root@ceph-node01(192.168.199.31)/etc/ceph>ceph-deploy mon create-initial
root@ceph-node01(192.168.199.31)/etc/ceph>ceph -s
  cluster:
    id:     9dbde528-0233-4be1-a9d6-9548e922dd92
    health: HEALTH_WARN
            mon is allowing insecure global_id reclaim

  services:
    mon: 3 daemons, quorum ceph-node01,ceph-node02,ceph-node03 (age 103s)
    mgr: no daemons active
    osd: 0 osds: 0 up, 0 in

  data:
    pools:   0 pools, 0 pgs
    objects: 0 objects, 0 B
    usage:   0 B used, 0 B / 0 B avail
    pgs:
禁止不安全模式
root@ceph-node01(192.168.199.31)/etc/ceph>ceph config set mon auth_allow_insecure_global_id_reclaim false
root@ceph-node01(192.168.199.31)/etc/ceph>ceph -s
  cluster:
    id:     9dbde528-0233-4be1-a9d6-9548e922dd92
    health: HEALTH_OK

  services:
    mon: 3 daemons, quorum ceph-node01,ceph-node02,ceph-node03 (age 4m)
    mgr: no daemons active
    osd: 0 osds: 0 up, 0 in

  data:
    pools:   0 pools, 0 pgs
    objects: 0 objects, 0 B
    usage:   0 B used, 0 B / 0 B avail
    pgs:
查看mon各种状态
#查看mon状态
ceph mon stat
#查看mon的选举信息
ceph quorum_status -f json-pretty
#查看mon映射信息
ceph mon dump
#查看mon详细信息
ceph daemon mon.ceph-node01 mon_status
创建mgr
###创建一个mgr###
root@ceph-node01(192.168.199.31)~>cd /etc/ceph/
root@ceph-node01(192.168.199.31)/etc/ceph>ceph-deploy mgr create ceph-node01
###创建多个mgr组成HA###
root@ceph-node01(192.168.199.31)/etc/ceph>ceph-deploy mgr create ceph-node0{2..3}

root@ceph-node01(192.168.199.31)/etc/ceph>ceph -s
  cluster:
    id:     9dbde528-0233-4be1-a9d6-9548e922dd92
    health: HEALTH_WARN
            OSD count 0 < osd_pool_default_size 3

  services:
    mon: 3 daemons, quorum ceph-node01,ceph-node02,ceph-node03 (age 13m)
    mgr: ceph-node01(active, since 48s), standbys: ceph-node02, ceph-node03
    osd: 0 osds: 0 up, 0 in

  data:
    pools:   0 pools, 0 pgs
    objects: 0 objects, 0 B
    usage:   0 B used, 0 B / 0 B avail
    pgs:
创建OSD
root@ceph-node01(192.168.199.31)~>cd /etc/ceph/

root@ceph-node01(192.168.199.31)/etc/ceph>ceph-deploy disk --help
root@ceph-node01(192.168.199.31)/etc/ceph>ceph-deploy osd --help

#查看磁盘
root@ceph-node01(192.168.199.31)/etc/ceph>ceph-deploy disk list ceph-node01
#初始化磁盘
root@ceph-node01(192.168.199.31)/etc/ceph>ceph-deploy disk zap ceph-node01 /dev/sdb
#创建osd
root@ceph-node01(192.168.199.31)/etc/ceph>ceph-deploy osd create ceph-node01 --data /dev/sdb
#查看osd
root@ceph-node01(192.168.199.31)/etc/ceph>ceph osd tree
ID CLASS WEIGHT  TYPE NAME            STATUS REWEIGHT PRI-AFF
-1       0.00980 root default
-3       0.00980     host ceph-node01
 0   hdd 0.00980         osd.0            up  1.00000 1.00000


#添加ceph-node02 osd
root@ceph-node01(192.168.199.31)/etc/ceph>ceph-deploy disk list ceph-node02
root@ceph-node01(192.168.199.31)/etc/ceph>ceph-deploy disk zap ceph-node02 /dev/sdb
root@ceph-node01(192.168.199.31)/etc/ceph>ceph-deploy osd create ceph-node02 --data /dev/sdb

#添加ceph-node03 osd
root@ceph-node01(192.168.199.31)/etc/ceph>ceph-deploy disk list ceph-node03
root@ceph-node01(192.168.199.31)/etc/ceph>ceph-deploy disk zap ceph-node03 /dev/sdb
root@ceph-node01(192.168.199.31)/etc/ceph>ceph-deploy osd create ceph-node03 --data /dev/sdb
查看集群
#查看集群
root@ceph-node01(192.168.199.31)/etc/ceph>ceph -s
  cluster:
    id:     9dbde528-0233-4be1-a9d6-9548e922dd92
    health: HEALTH_OK

  services:
    mon: 3 daemons, quorum ceph-node01,ceph-node02,ceph-node03 (age 29m)
    mgr: ceph-node01(active, since 17m), standbys: ceph-node02, ceph-node03
    osd: 3 osds: 3 up (since 19s), 3 in (since 19s)

  data:
    pools:   0 pools, 0 pgs
    objects: 0 objects, 0 B
    usage:   3.0 GiB used, 27 GiB / 30 GiB avail
    pgs:

#查看osd
root@ceph-node01(192.168.199.31)/etc/ceph>ceph osd tree
ID CLASS WEIGHT  TYPE NAME            STATUS REWEIGHT PRI-AFF
-1       0.02939 root default
-3       0.00980     host ceph-node01
 0   hdd 0.00980         osd.0            up  1.00000 1.00000
-5       0.00980     host ceph-node02
 1   hdd 0.00980         osd.1            up  1.00000 1.00000
-7       0.00980     host ceph-node03
 2   hdd 0.00980         osd.2            up  1.00000 1.00000
查看osd各种状态
#查看osd运行状态
ceph osd stat

#查看osd映射信息
ceph osd dump

#查看数据延迟
ceph osd perf

#详细列出集群每块盘的使用情况
ceph osd df

#查看osd目录树
ceph osd tree

#查看最大osd个数
ceph osd getmaxosd
调整时间偏差阈值
查看集群信息,可能会出现如下信息:
root@ceph-node01(192.168.199.31)/etc/ceph>ceph -s
  cluster:
    id:     9dbde528-0233-4be1-a9d6-9548e922dd92
    health: HEALTH_WARN
            clock skew detected on mon.ceph-node02	#时间存在偏差

  services:
    mon: 3 daemons, quorum ceph-node01,ceph-node02,ceph-node03 (age 48m)
    mgr: ceph-node01(active, since 35m), standbys: ceph-node02, ceph-node03
    osd: 3 osds: 3 up (since 19m), 3 in (since 19m)

  data:
    pools:   0 pools, 0 pgs
    objects: 0 objects, 0 B
    usage:   3.0 GiB used, 27 GiB / 30 GiB avail
    pgs:
出现该问题,首先检查出现问题的主机时间是否正确,时间正确则添加如下参数来调整阈值:
root@ceph-node01(192.168.199.31)/etc/ceph>cat << EOF >> /etc/ceph/ceph.conf
mon clock drift allowed = 2
mon clock drift warn backoff = 30
EOF

#再把修改的配置同步到所有节点(前面同步过配置文件,所以这次命令有点不同,这是同步覆盖过去)
root@ceph-node01(192.168.199.31)/etc/ceph>ceph-deploy --overwrite-conf admin ceph-node0{1..3}

#然后在重启时间偏差节点的mon服务
systemctl restart ceph-mon.target
添加删除pool的参数
root@ceph-node01(192.168.199.31)/etc/ceph>echo mon_allow_pool_delete = true >> /etc/ceph/ceph.conf
root@ceph-node01(192.168.199.31)/etc/ceph>echo mon_max_pg_per_osd = 2000 >> /etc/ceph/ceph.conf
root@ceph-node01(192.168.199.31)/etc/ceph>ceph-deploy --overwrite-conf admin ceph-node0{1..3}

#重启所有节点的mon服务
systemctl restart ceph-mon.target
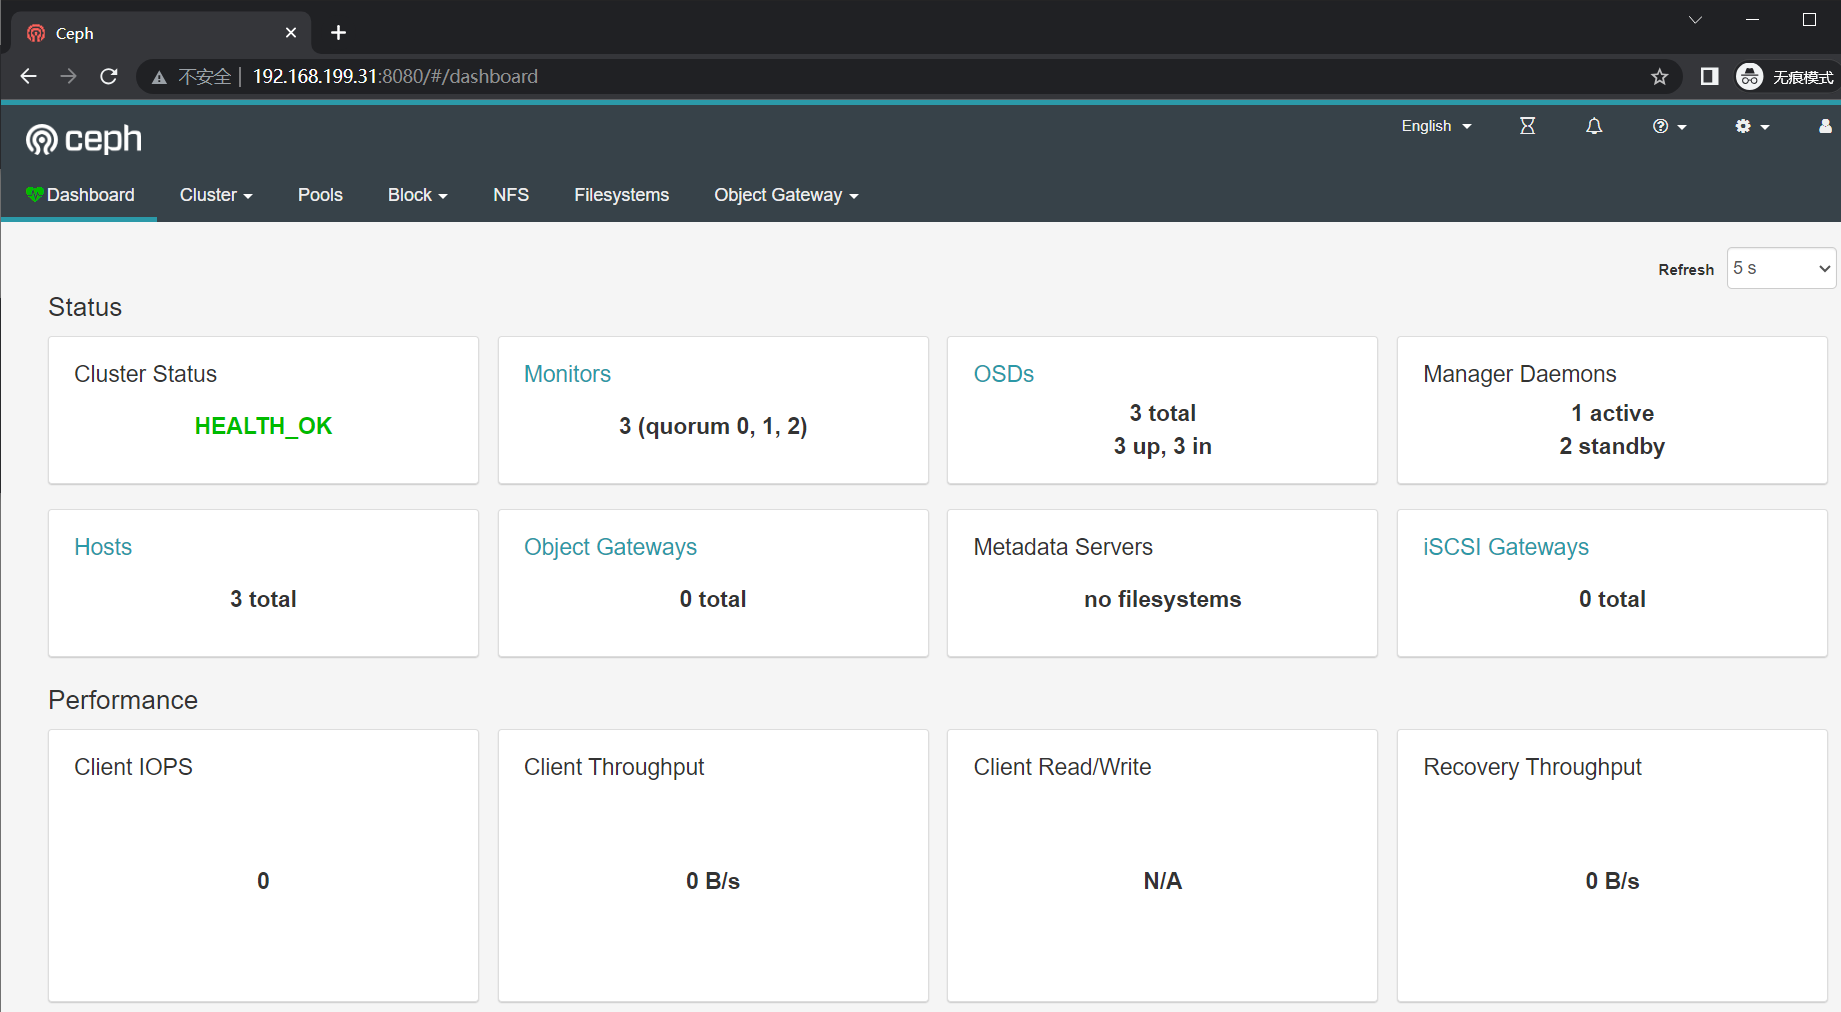
开启dashboard
ceph 提供了原生的 Dashboard 功能,通过 ceph dashboard 完成对 ceph 存储系统可视化监视
(nautilus版) 需要安装 ceph-mgr-dashboard ,只需在 mgr 节点上安装
root@ceph-node01(192.168.199.31)/etc/ceph>ceph -s | egrep mgr
    mgr: ceph-node01(active, since 19h), standbys: ceph-node02, ceph-node03
- 安装 ceph-mgr-dashboard
上面查看到 mgr 有三个节点,三个节点都需要安装,否则会报错如下:
root@ceph-node01(192.168.199.31)~>ceph mgr module enable dashboard
Error ENOENT: all mgr daemons do not support module 'dashboard', pass --force to force enablement

#安装ceph-mgr-dashboard
root@ceph-node01(192.168.199.31)~>yum install -y ceph-mgr-dashboard
root@ceph-node01(192.168.199.32)~>yum install -y ceph-mgr-dashboard
root@ceph-node01(192.168.199.33)~>yum install -y ceph-mgr-dashboard
- 开启 dashboard module
root@ceph-node01(192.168.199.31)~>ceph mgr module enable dashboard
- 禁止SSL
这里没必要使用不信任的https
root@ceph-node01(192.168.199.31)~>ceph config set mgr mgr/dashboard/ssl false
- 设置监听地址和端口
root@ceph-node01(192.168.199.31)~>ceph config set mgr mgr/dashboard/server_addr 0.0.0.0
root@ceph-node01(192.168.199.31)~>ceph config set mgr mgr/dashboard/server_port 8080
root@ceph-node01(192.168.199.31)~>ceph mgr services
{
    "dashboard": "http://ceph-node01:8080/"
}
- 设定用户名和密码
root@ceph-node01(192.168.199.31)~>echo 'admin123' > ceph-dashboard-passwd.txt
root@ceph-node01(192.168.199.31)~>ceph dashboard set-login-credentials admin -i ceph-dashboard-passwd.txt
******************************************************************
***          WARNING: this command is deprecated.              ***
*** Please use the ac-user-* related commands to manage users. ***
******************************************************************
Username and password updated
- 登录验证
Ceph文件存储
创建mds
#首先同步配置文件
root@ceph-node01(192.168.199.31)/etc/ceph>ceph-deploy --overwrite-conf admin ceph-node0{1..3}

#创建mds,三个节点都创建 mds
root@ceph-node01(192.168.199.31)/etc/ceph>ceph-deploy mds create ceph-node0{1..3}

#查看
root@ceph-node01(192.168.199.31)/etc/ceph>ceph -s
  cluster:
    id:     9dbde528-0233-4be1-a9d6-9548e922dd92
    health: HEALTH_OK

  services:
    mon: 3 daemons, quorum ceph-node01,ceph-node02,ceph-node03 (age 2m)
    mgr: ceph-node01(active, since 51m), standbys: ceph-node02, ceph-node03
    mds:  3 up:standby
    osd: 3 osds: 3 up (since 34m), 3 in (since 34m)

  data:
    pools:   0 pools, 0 pgs
    objects: 0 objects, 0 B
    usage:   3.0 GiB used, 27 GiB / 30 GiB avail
    pgs:
创建存储池
一个 ceph 文件系统需要至少两个 RADOS 存储池,一个用于存储数据,一个用于存储元数据
root@ceph-node01(192.168.199.31)/etc/ceph>ceph osd pool create cephfs_pool 128
pool 'cephfs_pool' created
root@ceph-node01(192.168.199.31)/etc/ceph>ceph osd pool create cephfs_metadata 64
pool 'cephfs_metadata' created
root@ceph-node01(192.168.199.31)/etc/ceph>ceph osd pool ls
cephfs_pool
cephfs_metadata
创建文件系统
root@ceph-node01(192.168.199.31)/etc/ceph>ceph fs new cephfs cephfs_metadata cephfs_pool
new fs with metadata pool 2 and data pool 1
root@ceph-node01(192.168.199.31)/etc/ceph>ceph fs ls
name: cephfs, metadata pool: cephfs_metadata, data pools: [cephfs_pool ]

#查看mds状态
root@ceph-node01(192.168.199.31)/etc/ceph>ceph mds stat
cephfs:1 {0=ceph-node01=up:active} 2 up:standby	#ceph-node01为up状态,另外两个随时待命
生成客户端密钥
在 ceph-node01(上面查看是 ceph-node01为up状态)上创建客户端挂载需要验证的key文件,并传给客户端 ceph 默认启用了 cephx 认证,要求客户端挂载必须输入用户名和密码验证
#使用ceph-authtool验证工具生成密码key文件
root@ceph-node01(192.168.199.31)/etc/ceph>ll
total 156K
124K -rw-r--r-- 1 root root 122K 2023-08-24 17:34:21 ceph-deploy-ceph.log
4.0K -rw-r--r-- 1 root root  443 2023-08-24 17:34:19 ceph.conf
4.0K -rw------- 1 root root  151 2023-08-24 17:33:23 ceph.client.admin.keyring
4.0K -rw------- 1 root root  113 2023-08-24 16:31:01 ceph.bootstrap-rgw.keyring
4.0K -rw------- 1 root root  113 2023-08-24 16:31:01 ceph.bootstrap-osd.keyring
4.0K -rw------- 1 root root  113 2023-08-24 16:31:00 ceph.bootstrap-mgr.keyring
4.0K -rw------- 1 root root  113 2023-08-24 16:31:00 ceph.bootstrap-mds.keyring
4.0K -rw------- 1 root root   73 2023-08-24 16:30:18 ceph.mon.keyring
4.0K -rw-r--r-- 1 root root   92 2021-06-30 06:36:49 rbdmap

root@ceph-node01(192.168.199.31)/etc/ceph>ceph-authtool -p /etc/ceph/ceph.client.admin.keyring > /etc/ceph/admin.key

root@ceph-node01(192.168.199.31)/etc/ceph>cat admin.key
AQBBFedkdrUFARAAztzd4+Qs5MTHhvY7ZzeS4g==

#将key文件拷贝到ceph需要挂载的客户端
root@ceph-node01(192.168.199.31)/etc/ceph>scp admin.key 192.168.199.107:/root/
客户端挂载
#安装挂载所需命令 mount.ceph
root@ceph-client(192.168.199.107)~>yum install -y ceph-common

#将验证文件归档到 /etc/ceph 目录下
root@ceph-client(192.168.199.107)/etc/ceph>mv /root/admin.key /etc/ceph/

#挂载(这里把所有 mds 都写在挂载里面,可实现故障切换)
root@ceph-client(192.168.199.107)/etc/ceph>mkdir /mnt/test
root@ceph-client(192.168.199.107)/etc/ceph>mount.ceph 192.168.199.31:6789,192.168.199.32:6789,192.168.199.33:6789:/ /mnt/test/ -o name=admin,secretfile=/etc/ceph/admin.key

#查看挂载
root@ceph-client(192.168.199.107)/etc/ceph>df | egrep /mnt/test
192.168.199.31:6789,192.168.199.32:6789,192.168.199.33:6789:/ ceph      8.5G     0  8.5G   0% /mnt/test

#尝试在挂载目录写入数据
root@ceph-client(192.168.199.107)/etc/ceph>cd /mnt/test/
root@ceph-client(192.168.199.107)/mnt/test>echo 'hello ceph.' > index.html
root@ceph-client(192.168.199.107)/mnt/test>cat index.html
hello ceph.
永久挂载
客户端卸载
1.在客户端上删除数据,并umount所有挂载
root@ceph-client(192.168.199.107)~>rm -rf /mnt/test/*

2.卸载 cephfs
root@ceph-client(192.168.199.107)~>fuser -k  /mnt/test/
/mnt/test:            1680
root@ceph-client(192.168.199.107)~>umount /mnt/test
删除 cephfs
- 停止所有节点的 mds
root@ceph-node01(192.168.199.31)~>systemctl stop ceph-mds.target
root@ceph-node01(192.168.199.32)~>systemctl stop ceph-mds.target
root@ceph-node01(192.168.199.33)~>systemctl stop ceph-mds.target
- 删除fs
root@ceph-node01(192.168.199.31)~>ceph fs ls
name: cephfs, metadata pool: cephfs_metadata, data pools: [cephfs_pool ]

root@ceph-node01(192.168.199.31)~>ceph fs rm cephfs --yes-i-really-mean-it
- 删除pool
root@ceph-node01(192.168.199.31)~>ceph osd  pool ls
cephfs_pool
cephfs_metadata

root@ceph-node01(192.168.199.31)~>ceph osd pool rm cephfs_pool cephfs_pool --yes-i-really-really-mean-it
pool 'cephfs_pool' removed

root@ceph-node01(192.168.199.31)~>ceph osd pool rm cephfs_metadata cephfs_metadata --yes-i-really-really-mean-it
pool 'cephfs_metadata' removed
- 启动mds(可选项,如果后期没有在使用 cephfs 则可以不用启动)
root@ceph-node01(192.168.199.31)~>systemctl start ceph-mds.target
root@ceph-node01(192.168.199.32)~>systemctl start ceph-mds.target
root@ceph-node01(192.168.199.33)~>systemctl start ceph-mds.target
Ceph块存储
创建块存储
- 在 ceph-node01 同步配置到所有节点
root@ceph-node01(192.168.199.31)~>cd /etc/ceph/
root@ceph-node01(192.168.199.31)/etc/ceph>ceph-deploy --overwrite-conf admin ceph-node0{1..3}
- 建立存储池
root@ceph-node01(192.168.199.31)/etc/ceph>ceph osd pool create rbd_pool 128
pool 'rbd_pool' created
创建客户端帐号
root@ceph-node01(192.168.199.31)/etc/ceph>ceph auth get-or-create client.rbd mon 'allow r' osd 'allow class-read object_prefix rbd_children, allow rwx pool=rbd_pool'
[client.rbd]
        key = AQDEG+hkpRPKMRAAsvzQdqA67wgW3e9V6e1rmg==

root@ceph-node01(192.168.199.31)/etc/ceph>ceph auth get client.rbd
[client.rbd]
        key = AQDEG+hkpRPKMRAAsvzQdqA67wgW3e9V6e1rmg==
        caps mon = "allow r"
        caps osd = "allow class-read object_prefix rbd_children, allow rwx pool=rbd_pool"
exported keyring for client.rbd
客户端keyring
- 生成客户端keyring
root@ceph-node01(192.168.199.31)/etc/ceph>ceph auth get client.rbd -o ./ceph.client.rbd.keyring
exported keyring for client.rbd

root@ceph-node01(192.168.199.31)/etc/ceph>ls ./ceph.client.rbd.keyring
./ceph.client.rbd.keyring
- 将客户端keyring拷贝到客户端
root@ceph-node01(192.168.199.31)/etc/ceph>scp ceph.conf ceph.client.rbd.keyring 192.168.199.107:/root/
启动rbd
root@ceph-node01(192.168.199.31)/etc/ceph>ceph osd pool application enable rbd_pool rbd_pool
enabled application 'rbd_pool' on pool 'rbd_pool'
客户端操作
- 安装 ceph-common
root@ceph-client(192.168.199.107)~>yum install -y ceph-common
- 将拷贝过来的keyring归档
root@ceph-client(192.168.199.107)~>mv ceph.conf ceph.client.rbd.keyring /etc/ceph/
- 使用创建的用户查看集群
root@ceph-client(192.168.199.107)~>ceph -s --user rbd
  cluster:
    id:     9dbde528-0233-4be1-a9d6-9548e922dd92
    health: HEALTH_OK

  services:
    mon: 3 daemons, quorum ceph-node01,ceph-node02,ceph-node03 (age 17h)
    mgr: ceph-node01(active, since 18h), standbys: ceph-node02, ceph-node03
    mds:  3 up:standby
    osd: 3 osds: 3 up (since 18h), 3 in (since 18h)

  data:
    pools:   1 pools, 128 pgs
    objects: 0 objects, 0 B
    usage:   3.0 GiB used, 27 GiB / 30 GiB avail
    pgs:     128 active+clean
- 创建image
root@ceph-client(192.168.199.107)~>rbd create rbd -p rbd_pool/rbd --size 1G --user rbd
root@ceph-client(192.168.199.107)~>rbd create rbd -p rbd_pool/rbd1 --size 1G --user rbd
root@ceph-client(192.168.199.107)~>rbd ls -l rbd_pool --user rbd
NAME SIZE  PARENT FMT PROT LOCK
rbd  1 GiB          2
rbd1 1 GiB          2

#查看详细信息
root@ceph-client(192.168.199.107)~>rbd info rbd_pool/rbd --user rbd
rbd image 'rbd':
        size 1 GiB in 256 objects
        order 22 (4 MiB objects)
        snapshot_count: 0
        id: 5f0ba25d8e8d
        block_name_prefix: rbd_data.5f0ba25d8e8d
        format: 2
        features: layering, exclusive-lock, object-map, fast-diff, deep-flatten
        op_features:
        flags:
        create_timestamp: Fri Aug 25 11:31:08 2023
        access_timestamp: Fri Aug 25 11:31:08 2023
        modify_timestamp: Fri Aug 25 11:31:08 2023
- 禁止image特性
默认 image 的特性包括:
features: layering, exclusive-lock, object-map, fast-diff, deep-flatten
作为 rbd 一般只需要 layering ,需要把其他的特性全部禁止掉。
#禁止 image 特性
root@ceph-client(192.168.199.107)~>rbd feature disable rbd_pool/rbd exclusive-lock, object-map, fast-diff, deep-flatten --user rbd
root@ceph-client(192.168.199.107)~>rbd info rbd_pool/rbd --user rbd
rbd image 'rbd':
        size 1 GiB in 256 objects
        order 22 (4 MiB objects)
        snapshot_count: 0
        id: 5f0ba25d8e8d
        block_name_prefix: rbd_data.5f0ba25d8e8d
        format: 2
        features: layering
        op_features:
        flags:
        create_timestamp: Fri Aug 25 11:31:08 2023
        access_timestamp: Fri Aug 25 11:31:08 2023
        modify_timestamp: Fri Aug 25 11:31:08 2023
- 挂载image
root@ceph-client(192.168.199.107)~>lsblk
NAME            MAJ:MIN RM  SIZE RO TYPE MOUNTPOINT
sr0              11:0    1 1024M  0 rom
vda             252:0    0  100G  0 disk
├─vda1          252:1    0    1G  0 part /boot
└─vda2          252:2    0   99G  0 part
  ├─centos-root 253:0    0 95.1G  0 lvm  /
  └─centos-swap 253:1    0  3.9G  0 lvm  [SWAP]
root@ceph-client(192.168.199.107)~>rbd ls -l rbd_pool --user rbd
NAME SIZE  PARENT FMT PROT LOCK
rbd  1 GiB          2
rbd1 1 GiB          2
root@ceph-client(192.168.199.107)~>rbd map rbd_pool/rbd --user rbd
/dev/rbd0
root@ceph-client(192.168.199.107)~>lsblk
NAME            MAJ:MIN RM  SIZE RO TYPE MOUNTPOINT
sr0              11:0    1 1024M  0 rom
vda             252:0    0  100G  0 disk
├─vda1          252:1    0    1G  0 part /boot
└─vda2          252:2    0   99G  0 part
  ├─centos-root 253:0    0 95.1G  0 lvm  /
  └─centos-swap 253:1    0  3.9G  0 lvm  [SWAP]
rbd0            251:0    0    1G  0 disk
- 初始化文件系统及挂载
#磁盘格式化
root@ceph-client(192.168.199.107)~>mkfs.xfs /dev/rbd0
Discarding blocks...Done.
meta-data=/dev/rbd0              isize=512    agcount=8, agsize=32768 blks
         =                       sectsz=512   attr=2, projid32bit=1
         =                       crc=1        finobt=0, sparse=0
data     =                       bsize=4096   blocks=262144, imaxpct=25
         =                       sunit=1024   swidth=1024 blks
naming   =version 2              bsize=4096   ascii-ci=0 ftype=1
log      =internal log           bsize=4096   blocks=2560, version=2
         =                       sectsz=512   sunit=8 blks, lazy-count=1
realtime =none                   extsz=4096   blocks=0, rtextents=0
root@ceph-client(192.168.199.107)~>mkdir /mnt/test/
root@ceph-client(192.168.199.107)~>mount /dev/rbd0 /mnt/test/
root@ceph-client(192.168.199.107)~>df | tail -1
/dev/rbd0               xfs      1014M   33M  982M   4% /mnt/test

#写入数据测试
root@ceph-client(192.168.199.107)~>echo 'hello ceph.' > /mnt/test/index.html
root@ceph-client(192.168.199.107)~>cat /mnt/test/index.html
hello ceph.
永久挂载
root@ceph-client(192.168.199.107)~>tail -1 /etc/fstab
/dev/rbd0               /mnt/test               xfs     defaults,_netdev    0 0
客户端卸载
- 删除永久挂载及umount
#删除fstab中 rbd0 的挂载信息
root@ceph-client(192.168.199.107)~>tail -1 /etc/fstab
/dev/rbd0               /mnt/test               xfs     defaults,_netdev    0 0

#执行卸载
root@ceph-client(192.168.199.107)~>umount /mnt/test
- 卸载image
root@ceph-client(192.168.199.107)~>rbd showmapped --user rbd
id pool     namespace image snap device
0  rbd_pool           rbd   -    /dev/rbd0

root@ceph-client(192.168.199.107)~>rbd unmap rbd_pool/rbd --user rbd
- 删除image
root@ceph-client(192.168.199.107)~>rbd ls -l rbd_pool --user rbd
NAME SIZE  PARENT FMT PROT LOCK
rbd  1 GiB          2
rbd1 1 GiB          2

root@ceph-client(192.168.199.107)~>rbd rm  rbd_pool/rbd --user rbd
Removing image: 100% complete...done.
root@ceph-client(192.168.199.107)~>rbd rm  rbd_pool/rbd1 --user rbd
Removing image: 100% complete...done.
- 在 ceph-node01 删除 pool
root@ceph-node01(192.168.199.31)/etc/ceph>ceph osd pool rm rbd_pool rbd_pool --yes-i-really-really-mean-it
pool 'rbd_pool' removed
- 删除创建的keyring
root@ceph-node01(192.168.199.31)/etc/ceph>ceph auth rm client.rbd
updated