概念
PV: kubernetes管理员维护
PVC:kubernetes用户维护
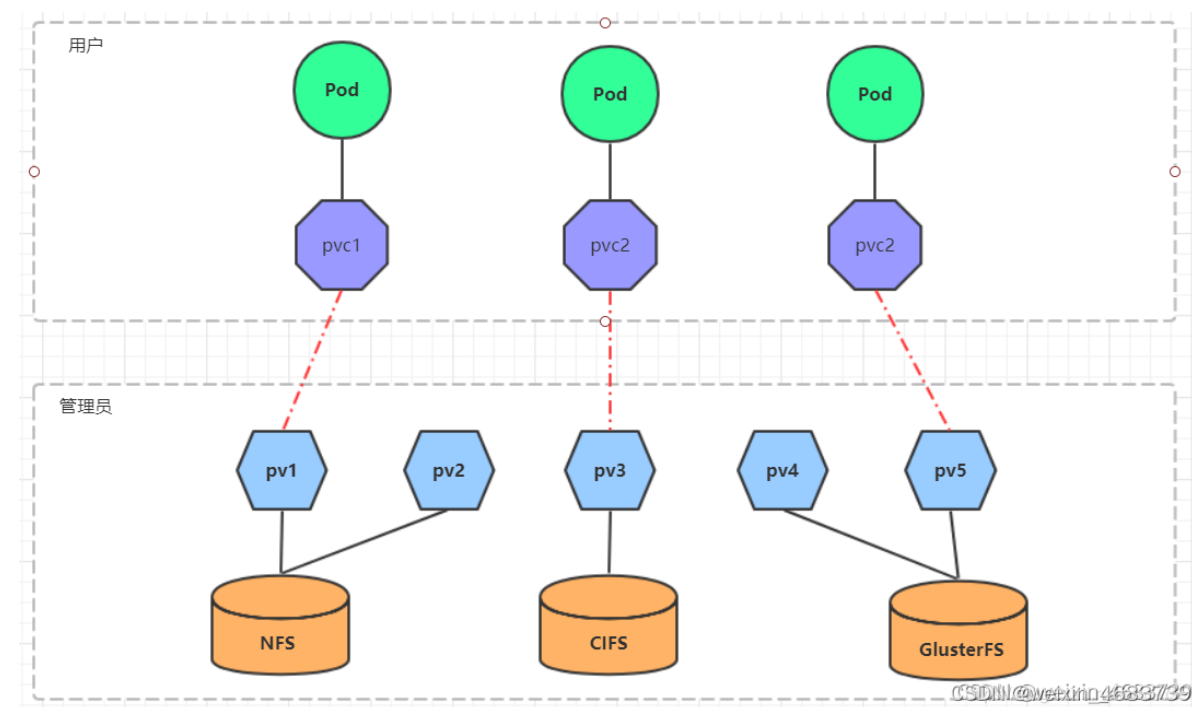
PV
持久卷(PersistentVolume)简称PV,是集群中的一块存储,可以由管理员事先供应。
可以配置NFS、Ceph等常用存储配置,相对于volumes,提供了更多的功能,如生命周期管理、大小的限制。
PV 卷的供应有两种方式:静态供应或动态供应。
静态:
集群管理员预先创建许多PV,在PV的定义中能够体现存储资源的特性。
动态:
集群管理员无须预先创建PV,而是通过StorageClass的设置对后端存储资源进行描述,标记存储的类型和特性。用户通过创建PVC对存储类型进行申请,系统将自动完成PV的创建及与PVC的绑定。如果PVC声明的Class为空"",则说明PVC不使用动态模式。
PVC
PersistentVolumeClaim (PVC) 是用户存储的请求。它与 Pod 相似。Pod 消耗节点资源,PVC 消耗 PV 资源。Pod 可以请求特定级别的资源(CPU 和内存)。声明可以请求特定的大小和访问模式(例如,可以以读/写一次或 只读多次模式挂载)。
pv的访问模式
PV 的访问模式(accessModes)
- ReadWriteOnce(RWO):读写权限,但是只能被单个节点挂载
- ReadOnlyMany(ROX):只读权限,可以被多个节点挂载
- ReadWriteMany(RWX):读写权限,可以被多个节点挂载
PV的状态
- Available(可用):表示可用状态,还未被任何 PVC 绑定
- Bound(已绑定):表示 PV 已经被 PVC 绑定
- Released(已释放):PVC 被删除,但是资源还未被集群重新声明
- Failed(失败): 表示该 PV 的自动回收失败
PV的回收策略(persistentVolumeReclaimPolicy)
- Retain(保留)- 保留数据,需要管理员手工清理数据
- Recycle(回收)- 清除 PV 中的数据,效果相当于执行 rm -rf /thevolume/*
- Delete(删除)- 与 PV 相连的后端存储完成 volume 的删除操作,当然这常见于云服务商的存储服务,比如 ASW EBS。
PV与PVC管理NFS存储卷实践
NFS环境准备
客户端:10.0.0.80
yum -y install nfs-utils rpcbind

# 共享目录
 mkdir -p /data/k8s/{pv01,pv02,pv03} && chmod 755 /data/k8s

echo '/data/k8s  *(insecure,rw,sync,no_root_squash)'>>/etc/exports

systemctl enable rpcbind && systemctl start rpcbind
systemctl enable nfs && systemctl start nfs
创建pv
pv.yaml
apiVersion: v1
kind: PersistentVolume
metadata:
  name:  pv01
spec:
  capacity:
    storage: 1Gi
  accessModes:
  - ReadWriteMany
  persistentVolumeReclaimPolicy: Retain  #回收策略
  nfs:                       #nfs存储
    path: /data/k8s/pv01      #nfs挂载路径
    server: 10.0.0.80    #对应的nfs服务器
---
apiVersion: v1
kind: PersistentVolume
metadata:
  name:  pv02
spec:
  capacity:
    storage: 2Gi
  accessModes:
  - ReadWriteMany
  persistentVolumeReclaimPolicy: Retain  #回收策略
  nfs:                       #nfs存储
    path: /data/k8s/pv02      #nfs挂载路径
    server: 10.0.0.80    #对应的nfs服务器
---
apiVersion: v1
kind: PersistentVolume
metadata:
  name:  pv03
spec:
  capacity:
    storage: 3Gi
  accessModes:
  - ReadWriteMany
  persistentVolumeReclaimPolicy: Retain  #回收策略
  nfs:                       #nfs存储
    path: /data/k8s/pv03      #nfs挂载路径
    server: 10.0.0.80    #对应的nfs服务器
查看pv
[root@master pv]# kubectl apply -f pv.yaml
persistentvolume/pv01 created
persistentvolume/pv02 created
persistentvolume/pv03 created
[root@master pv]# kubectl get pv
NAME   CAPACITY   ACCESS MODES   RECLAIM POLICY   STATUS      CLAIM   STORAGECLASS   REASON   AGE
pv01   1Gi        RWX            Retain           Available                                   5s
pv02   2Gi        RWX            Retain           Available                                   5s
pv03   3Gi        RWX            Retain           Available                                   5s
[root@master pv]#  kubectl describe pv pv01
Name:            pv01
Labels:          <none>
Annotations:     <none>
Finalizers:      [kubernetes.io/pv-protection]
StorageClass:
Status:          Available
Claim:
Reclaim Policy:  Retain
Access Modes:    RWX
VolumeMode:      Filesystem
Capacity:        1Gi
Node Affinity:   <none>
Message:
Source:
    Type:      NFS (an NFS mount that lasts the lifetime of a pod)
    Server:    10.0.0.80
    Path:      /data/k8s/pv01
    ReadOnly:  false
Events:        <none>
[root@master pv]#  kubectl describe pv pv02
Name:            pv02
Labels:          <none>
Annotations:     <none>
Finalizers:      [kubernetes.io/pv-protection]
StorageClass:
Status:          Available
Claim:
Reclaim Policy:  Retain
Access Modes:    RWX
VolumeMode:      Filesystem
Capacity:        2Gi
Node Affinity:   <none>
Message:
Source:
    Type:      NFS (an NFS mount that lasts the lifetime of a pod)
    Server:    10.0.0.80
    Path:      /data/k8s/pv02
    ReadOnly:  false
Events:        <none>
[root@master pv]#  kubectl describe pv pv03
Name:            pv03
Labels:          <none>
Annotations:     <none>
Finalizers:      [kubernetes.io/pv-protection]
StorageClass:
Status:          Available
Claim:
Reclaim Policy:  Retain
Access Modes:    RWX
VolumeMode:      Filesystem
Capacity:        3Gi
Node Affinity:   <none>
Message:
Source:
    Type:      NFS (an NFS mount that lasts the lifetime of a pod)
    Server:    10.0.0.80
    Path:      /data/k8s/pv03
    ReadOnly:  false
Events:        <none>
创建pod挂载pvc
apiVersion: apps/v1
kind: Deployment
metadata:
  name: nfs-pvc
spec:
  replicas: 2
  selector:             #指定Pod的选择器
    matchLabels:
      app: nginx
  template:
    metadata:
      labels:
        app: nginx
    spec:
      containers:
      - name: nginx
        image: nginx
        imagePullPolicy: IfNotPresent
        ports:
        - containerPort: 80
          name: web
        volumeMounts:                        #挂载容器中的目录到pvc nfs中的目录
        - name: www
          mountPath: /usr/share/nginx/html
      volumes:
      - name: www
        persistentVolumeClaim:              #指定pvc
          claimName: pvc-nfs-01             #按pvc的名称进行关联
---
apiVersion: v1
kind: PersistentVolumeClaim
metadata:
  name: pvc-nfs-01
  namespace: default
spec:
  accessModes:
  - ReadWriteMany       #跟创建pv的访问模式一致才能匹配上
  resources:
    requests:
      storage: 1Gi
查看pv和pvc
在提交PVC后,是如何找到对应的PV:先根据PVC的accessModes匹配出PV列表,再根据PVC的Capacity、StorageClassName、Label Selector进一步筛选PV。如果满足条件的PV有多个,选择PV的size最小的,accessmodes列表最短的PV,也即最小适合原则。
也就是说,PVC绑定PV的过程是有一定规则的,以下规则都满足的PV才能被PVC绑定:
- VolumeMode:被消费PV的VolumeMode需要和PVC一致。
- AccessMode:被消费PV的AccessMode需要和PVC一致。
- StorageClassName:如果PVC定义了此字段,则PV也必须有对应字段才能进行绑定。
- LabelSelector:通过标签(labels)匹配的方式从PV列表中选择合适的PV绑定。
- Size:被消费PV的capacity必须大于或等于PVC的存储容量需求才能被绑定。
[root@master pv]#  kubectl get pvc
NAME         STATUS   VOLUME   CAPACITY   ACCESS MODES   STORAGECLASS   AGE
pvc-nfs-01   Bound    pv01     1Gi        RWX                           31s
[root@master pv]#  kubectl get pv
NAME   CAPACITY   ACCESS MODES   RECLAIM POLICY   STATUS      CLAIM                STORAGECLASS   REASON   AGE
pv01   1Gi        RWX            Retain           Bound       default/pvc-nfs-01                           2m7s
pv02   2Gi        RWX            Retain           Available                                                2m7s
pv03   3Gi        RWX            Retain           Available                                                2m7s                    25s
storageClass
创建pv及pvc过程是手动,且pv与pvc一一对应,手动创建很繁琐。因此,通过storageClass + provisioner的方式来实现通过PVC自动创建并绑定PV。
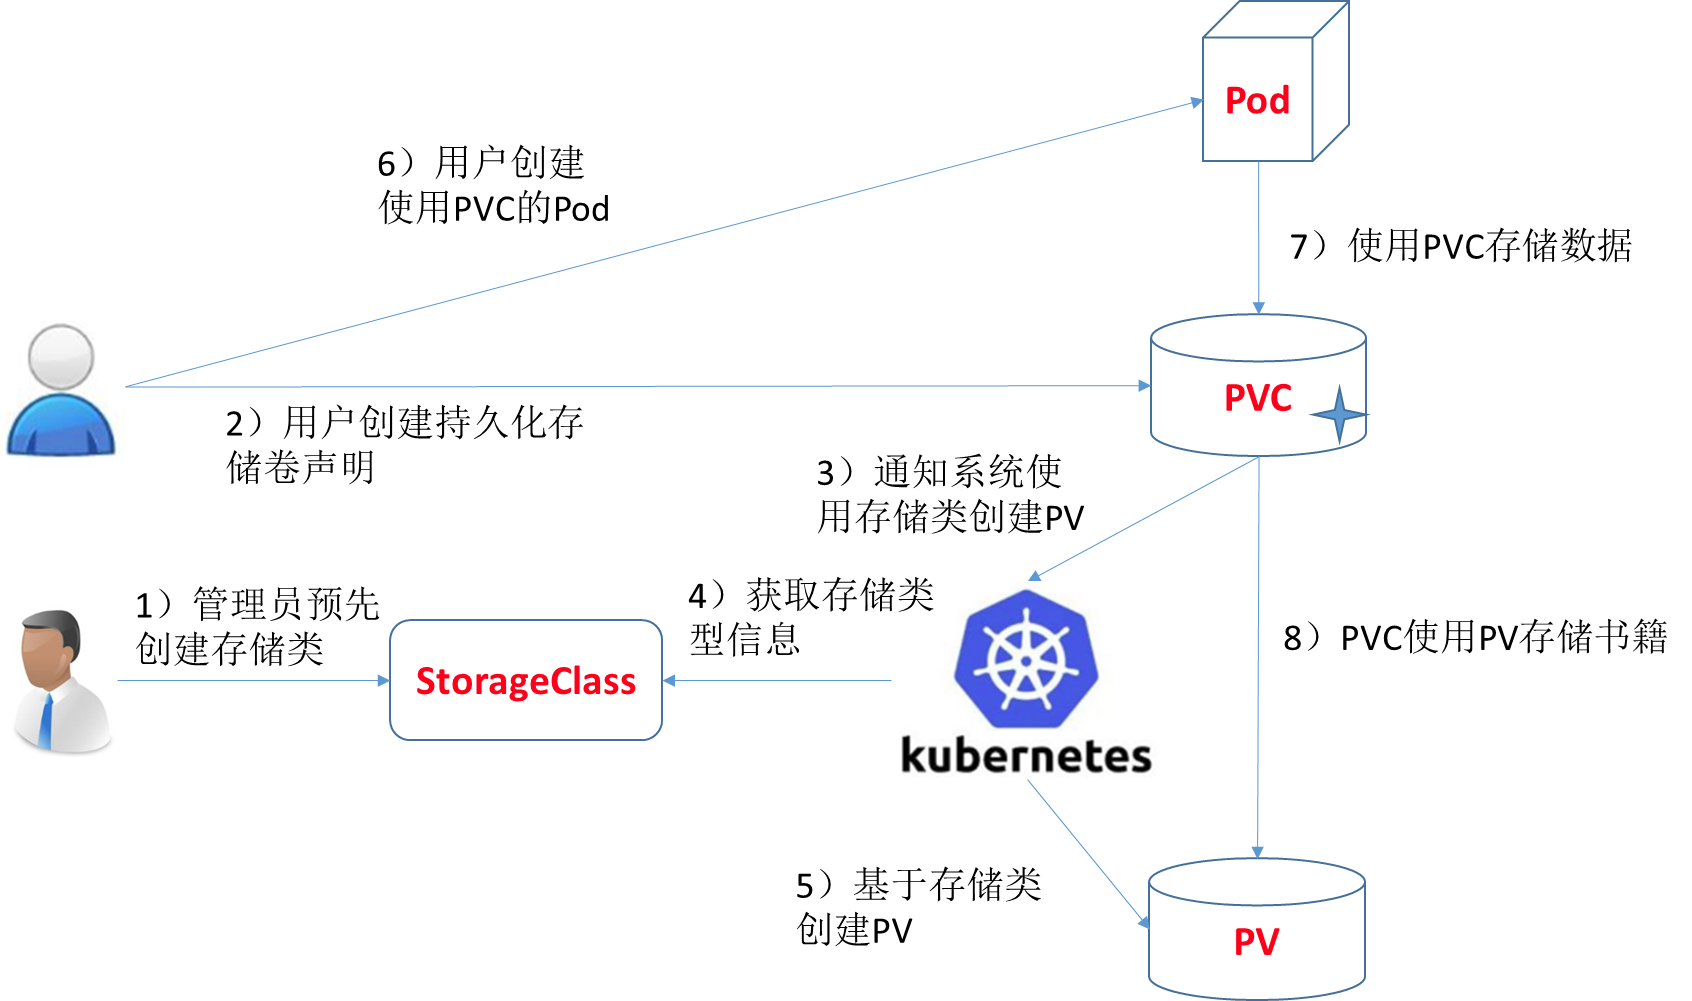
StorageClass概述
StorageClass 对象中包含 provisioner、parameters 和 reclaimPolicy 字段,当需要动态分配 PersistentVolume 时会使用到。当创建 StorageClass 对象时,设置名称和其他参数,一旦创建了对象就不能再对其更新。也可以为没有申请绑定到特定 class 的 PVC 指定一个默认的 StorageClass 。
StorageClass的属性
更多属性查看:https://kubernetes.io/zh/docs/concepts/storage/storage-classes/
Provisioner(存储分配器)
Storage class 有一个分配器(provisioner),用来决定使用哪个卷插件分配 PV,该字段必须指定。可以指定内部分配器,也可以指定外部分配器。外部分配器的代码地址为: kubernetes-incubator/external-storage,其中包括NFS和Ceph等。
Reclaim Policy(回收策略)
可以通过reclaimPolicy字段指定创建的Persistent Volume的回收策略,回收策略包括:Delete 或者 Retain,没有指定默认为Delete。
nfs的storageclass配置
nfs-namespace.yaml
apiVersion: v1
kind: Namespace
metadata:
   name: nfs-provisioner
nfs-rbac.yaml
https://raw.githubusercontent.com/kubernetes-incubator/external-storage/master/nfs-client/deploy/rbac.yaml
每次配置文件,只需要调整ClusterRoleBinding、RoleBinding的namespace值,如果服务是部署在默认的namespace中,配置文件不需要调整。
kind: ServiceAccount
apiVersion: v1
metadata:
  name: nfs-client-provisioner
  namespace: nfs-provisioner
---
kind: ClusterRole
apiVersion: rbac.authorization.k8s.io/v1
metadata:
  name: nfs-client-provisioner-runner
  namespace: nfs-provisioner
rules:
  - apiGroups: [""]
    resources: ["persistentvolumes"]
    verbs: ["get", "list", "watch", "create", "delete"]
  - apiGroups: [""]
    resources: ["persistentvolumeclaims"]
    verbs: ["get", "list", "watch", "update"]
  - apiGroups: ["storage.k8s.io"]
    resources: ["storageclasses"]
    verbs: ["get", "list", "watch"]
  - apiGroups: [""]
    resources: ["events"]
    verbs: ["create", "update", "patch"]
---
kind: ClusterRoleBinding
apiVersion: rbac.authorization.k8s.io/v1
metadata:
  name: run-nfs-client-provisioner
  namespace: nfs-provisioner
subjects:
  - kind: ServiceAccount
    name: nfs-client-provisioner
    namespace: nfs-provisioner
roleRef:
  kind: ClusterRole
  name: nfs-client-provisioner-runner
  apiGroup: rbac.authorization.k8s.io
---
kind: Role
apiVersion: rbac.authorization.k8s.io/v1
metadata:
  name: leader-locking-nfs-client-provisioner
  namespace: nfs-provisioner
rules:
  - apiGroups: [""]
    resources: ["endpoints"]
    verbs: ["get", "list", "watch", "create", "update", "patch"]
---
kind: RoleBinding
apiVersion: rbac.authorization.k8s.io/v1
metadata:
  name: leader-locking-nfs-client-provisioner
  namespace: nfs-provisioner
subjects:
  - kind: ServiceAccount
    name: nfs-client-provisioner
    # replace with namespace where provisioner is deployed
    namespace: nfs-provisioner
roleRef:
  kind: Role
  name: leader-locking-nfs-client-provisioner
  apiGroup: rbac.authorization.k8s.io
nfs-storage.yml
apiVersion: apps/v1
kind: Deployment
metadata:
  name: nfs-client-provisioner
  labels:
    app: nfs-client-provisioner
  # replace with namespace where provisioner is deployed
  namespace: nfs-provisioner
spec:
  replicas: 1
  selector:
    matchLabels:
      app: nfs-client-provisioner
  strategy:
    type: Recreate
  selector:
    matchLabels:
      app: nfs-client-provisioner
  template:
    metadata:
      labels:
        app: nfs-client-provisioner
    spec:
      serviceAccountName: nfs-client-provisioner
      containers:
        - name: nfs-client-provisioner
          image: quay.io/external_storage/nfs-client-provisioner:latest
          volumeMounts:
            - name: nfs-client-root
              mountPath: /persistentvolumes
          env:
            - name: PROVISIONER_NAME
              value: nfs-client  #--- nfs-provisioner的名称,以后设置的 storageclass要和这个保持一致
            - name: NFS_SERVER
              value: 10.0.0.80   #NFS服务器地址,与volumes.nfs.servers保 持一致
            - name: NFS_PATH
              value: /data/k8s   #NFS服务共享目录地址,与volumes.nfs.path 保持一致
      volumes:
        - name: nfs-client-root
          nfs:
            server: 10.0.0.80    #NFS服务器地址,与spec.containers.env.value保持一致
            path: /data/k8s      #NFS服务器目录,与spec.containers.env.value保持一致
storage-class.yaml
apiVersion: storage.k8s.io/v1
kind: StorageClass
metadata:
  name: nfs-storage
  annotations:
    storageclass.kubernetes.io/is-default-class: "true" #设置为默认的storageclass
provisioner: nfs-client #动态卷分配者名称,必须和创建的"provisioner"变量中设置的name一致
parameters:
  archiveOnDelete: "true" #设置为"false"时删除PVC不会保留数据,"true"则保留数据
创建资源
[root@master storage-class]# kubectl apply -f  nfs-namespace.yaml
namespace/nfs-provisioner created
[root@master storage-class]# kubectl get namespace
NAME              STATUS   AGE
default           Active   27d
kube-flannel      Active   27d
kube-node-lease   Active   27d
kube-public       Active   27d
kube-system       Active   27d
nfs-provisioner   Active   5s
test              Active   19d
[root@master storage-class]# kubectl apply -f nfs-rbac.yaml
serviceaccount/nfs-client-provisioner created
clusterrole.rbac.authorization.k8s.io/nfs-client-provisioner-runner created
clusterrolebinding.rbac.authorization.k8s.io/run-nfs-client-provisioner created
role.rbac.authorization.k8s.io/leader-locking-nfs-client-provisioner created
rolebinding.rbac.authorization.k8s.io/leader-locking-nfs-client-provisioner created
[root@master storage-class]# kubectl apply -f nfs-storage.yml
deployment.apps/nfs-client-provisioner created
[root@master storage-class]# kubectl apply -f storage-class.yaml
storageclass.storage.k8s.io/nfs-storage created
创建pvc测试
pvc.yaml
kind: PersistentVolumeClaim
apiVersion: v1
metadata:
  name: test-pvc
spec:
  storageClassName: nfs-storage #需要与上面创建的storageclass的名称一致
  accessModes:
    - ReadWriteOnce
  resources:
    requests:
      storage: 1Gi
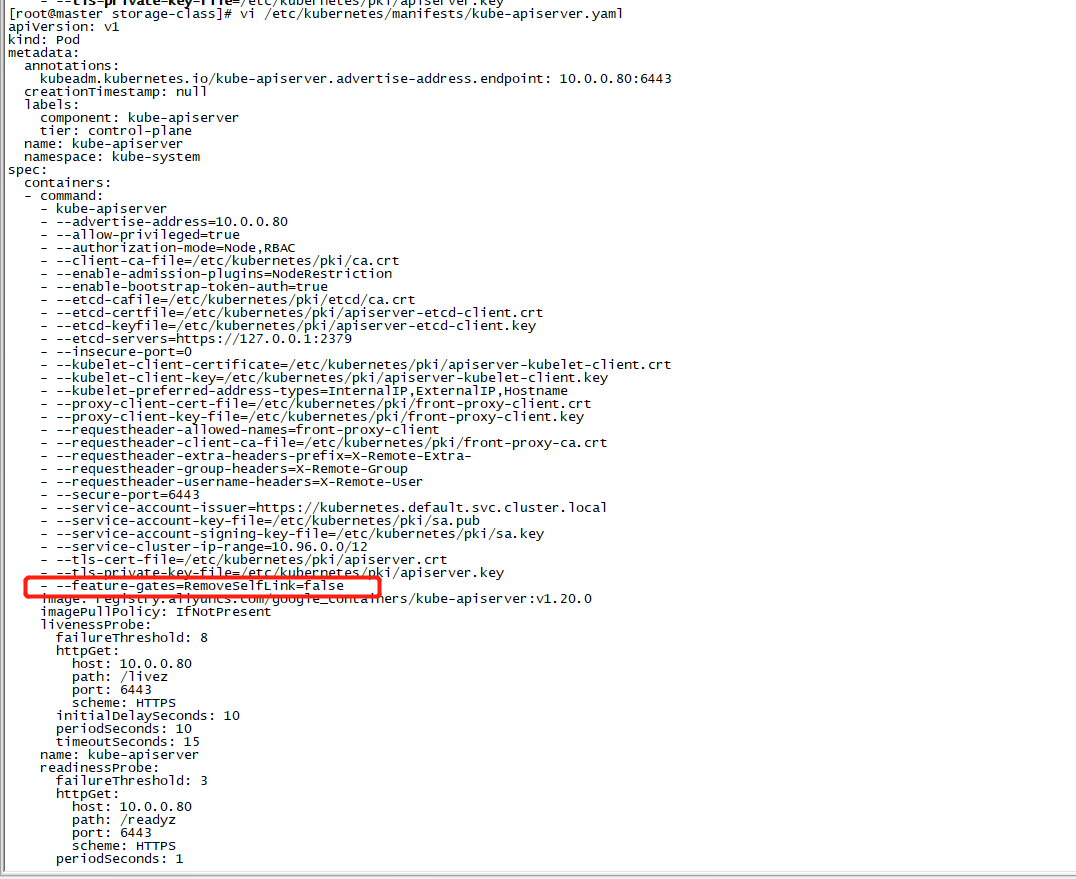
问题:创建pvc后状态一直是pending
原因:因为原来是1.20版本默认禁止使用selfLink。
解决:修改/etc/kubernetes/manifests/kube-apiserver.yaml
在 - --tls-private-key-file=/etc/kubernetes/pki/apiserver.key下面添加如下:
- --feature-gates=RemoveSelfLink=false
然后kubectl apply -f /etc/kubernetes/manifests/kube-apiserver.yaml
重新查看pv,pvc

查看挂载目录

创建deployment测试
deploy-sc.yaml
apiVersion: apps/v1
kind: Deployment
metadata:
  name: test-sc
  namespace: nfs-provisioner
spec:
  replicas: 2
  selector:             #指定Pod的选择器
    matchLabels:
      app: nginx
  template:
    metadata:
      labels:
        app: nginx
    spec:
      containers:
      - name: nginx
        image: nginx
        imagePullPolicy: IfNotPresent
        ports:
        - containerPort: 80
          name: web
        volumeMounts:                        #挂载容器中的目录到pvc nfs中的目录
        - name: www
          mountPath: /usr/share/nginx/html
      volumes:
      - name: www
        persistentVolumeClaim:              #指定pvc
          claimName: sc-pvc-test             #按pvc的名称进行关联
---
apiVersion: v1
kind: PersistentVolumeClaim
metadata:
  name: sc-pvc-test
  namespace: nfs-provisioner
spec:
  storageClassName: nfs-storage #需要与上面创建的storageclass的名称一致
  accessModes:
  - ReadWriteMany       #跟创建pv的访问模式一致才能匹配上
  resources:
    requests:
      storage: 1Gi

测试文件访问,在挂载目录下创建index.html,直接访问pod的地址
