Flask和pythonweb框架介绍
python web框架,本质都一样
同步框架
django:大而全,内置的app多,第三方app也多
flask:小而精,没有过多的内置组件,只是完成web框架最基本的功能,需要借助于第三方,完成更丰富的功能
web.py:是一个小巧灵活的python框架,它简单而且功能强大(国内几乎没有用的)
异步框架
fastapi:python的异步web框架,不少公司在用,https://fastapi.tiangolo.com/zh/
santic:python的异步框架,贡支持异步高并发请求的web服务
tornado:异步框架,用的比较少
同步框架和异步框架的区别
django是同步框架还是异步框架,django3.x以后支持异步
同步框架的意思:一个线程只处理一个请求
异步框架的意思:一个线程可以处理多个请求
异步框架可以很显著的提高并发
flask简介
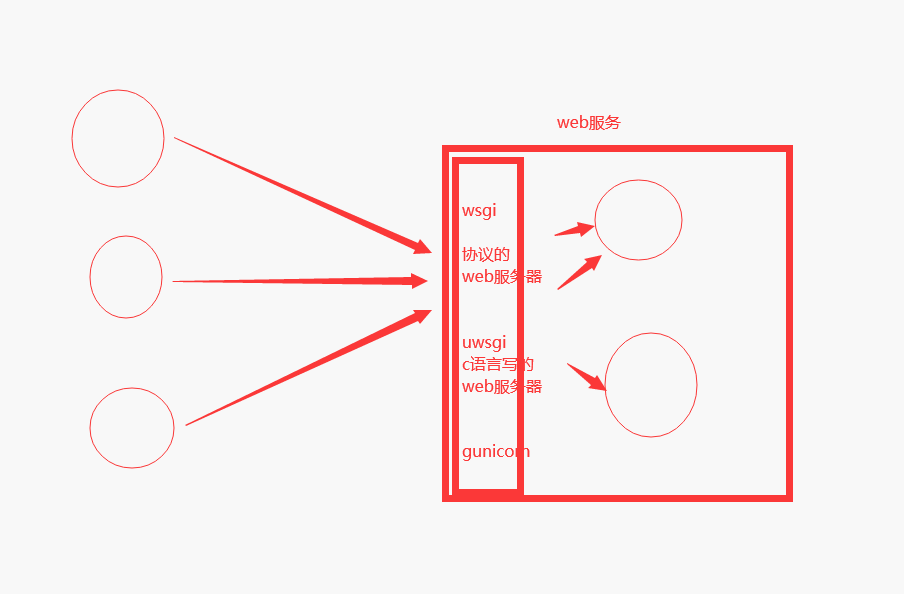
flask是一个基于python开发并且依赖于jinja2模板和Wekzeug WSGI服务的一个微型框架
jinja2 模板语法,django的dtl,非常像
Werkzeug WSGI符合wsgi协议的web服务器,django使用的wsgiref
wsgiref写web
from wsgiref.simple_server import make_server

# mya 就等同于django
def mya(environ, start_response):
    #把environ包装成了request
    print(environ)
    start_response('200 OK', [('Content-Type', 'text/html')])
    if environ.get('PATH_INFO') == '/index':
        with open('index.html','rb') as f:
            data=f.read()

    elif environ.get('PATH_INFO') == '/login':
        with open('login.html', 'rb') as f:
            data = f.read()
    else:
        data=b'<h1>Hello, web!</h1>'
    return [data]  # 做成了response

if __name__ == '__main__':
    myserver = make_server('', 8008, mya)
    print('监听8010')
    myserver.serve_forever()
使用werkzeug写web
from werkzeug.wrappers import Request, Response


@Request.application
def hello(request):
    return Response('Hello World!')


if __name__ == '__main__':
    from werkzeug.serving import run_simple

    run_simple('localhost', 4000, hello)
flask快速使用
安装
pip install flask
依赖于MarkupSafe, Werkzeug, Jinja2, flask
1.x 没有本质区别
2.x 没有本质区别,源码上动了,用起来一样
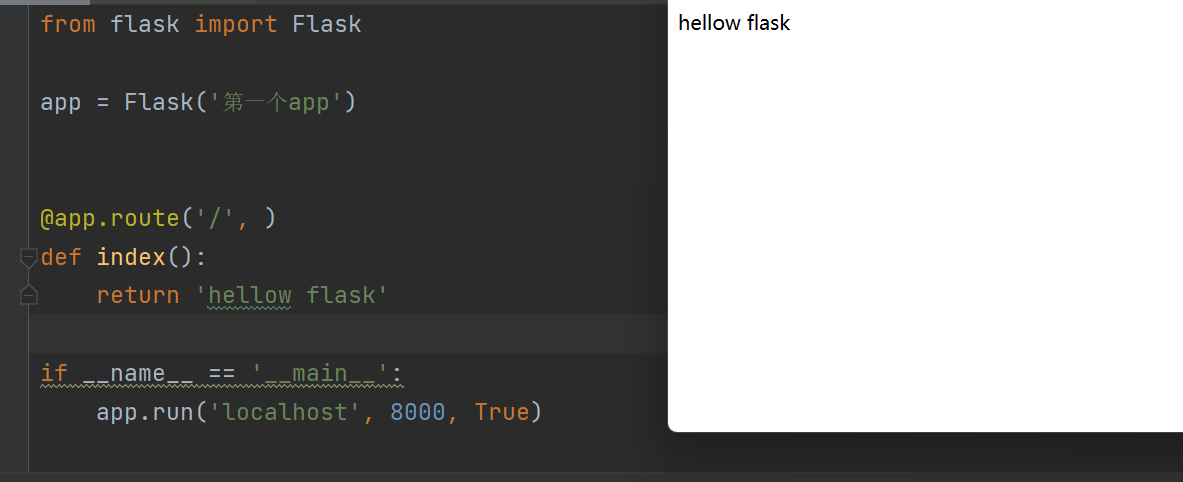
from flask import Flask

app = Flask('第一个app')

# 注册路由---》装饰器
@app.route('/', )
def index():
    return 'hellow flask'

if __name__ == '__main__':
    app.run('localhost', 8000, True)
登录,显示用户信息小案例
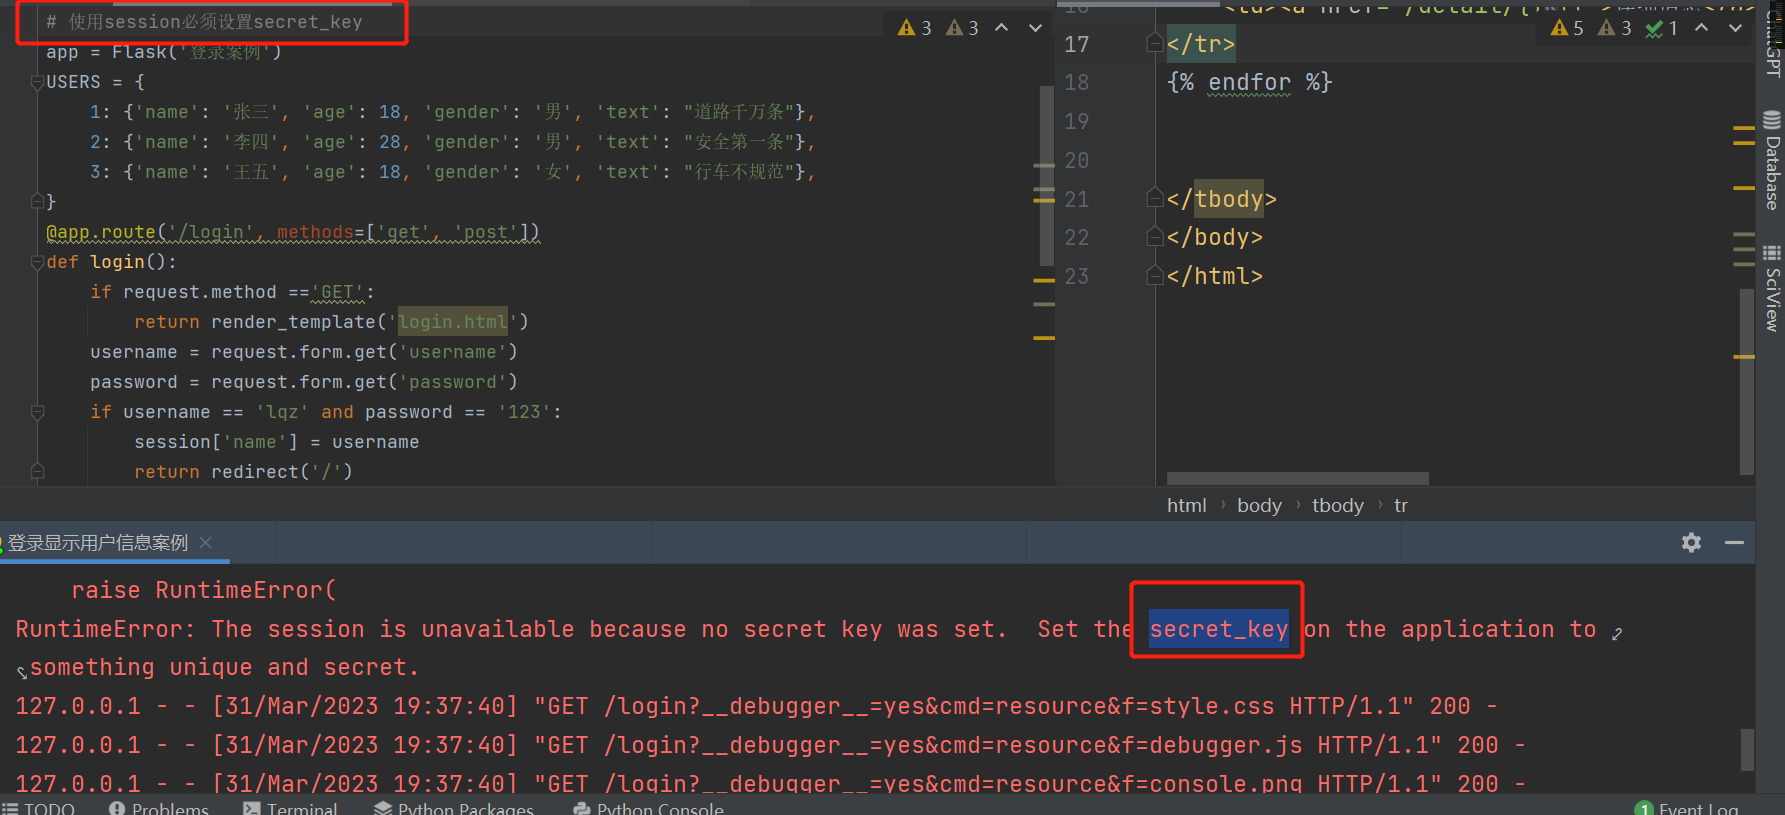
使用session必须设置SECRET_KEY
login.html
<!DOCTYPE html>
<html lang="en">
<head>
    <meta charset="UTF-8">
    <title>Title</title>
    <script src="https://cdn.bootcdn.net/ajax/libs/jquery/3.6.1/jquery.js"></script>
    <script src="./js/vue.js"></script>
</head>
<body>
<form action="" method="post">
    <p>用户名:<input type="text" name="username"></p>
    <p>密码:<input type="text" name="password"></p>
    <p><input type="submit" value="登录">{{error}}</p>

</form>

</body>
</html>
index.html
<!DOCTYPE html>
<html lang="en">
<head>
    <meta charset="UTF-8">
    <title>Title</title>
    <script src="https://cdn.bootcdn.net/ajax/libs/jquery/3.6.1/jquery.js"></script>
    <script src="./js/vue.js"></script>
</head>
<body>
<table>
    {% for k,v in user_list.items() %}
    <tr>
        <td>{{v.name}}</td>
        <td>{{v['age']}}</td>
        <td>{{v.get('gender')}}</td>
        <td><a href="/detail/{{k}}">详细信息</a></td>
    </tr>
    {% endfor %}


</table>
</body>
</html>
detail.html
<!DOCTYPE html>
<html lang="en">
<head>
    <meta charset="UTF-8">
    <title>Title</title>
    <script src="https://cdn.bootcdn.net/ajax/libs/jquery/3.6.1/jquery.js"></script>
    <script src="./js/vue.js"></script>
</head>
<body>
{% for k,v in user_list.items() %}
<div>{{k}}:{{v}}</div>
{% endfor %}

</body>
</html>
flask.py
from flask import Flask, request, session, redirect, render_template
app = Flask('登录案例')
# 使用session必须设置SECRET_KEY
app.config['SECRET_KEY'] = 'hajsdhladjhadhajkdhajd'
print(app.config)
USERS = {
1: {'name': '张三', 'age': 18, 'gender': '男', 'text': "道路千万条"},
2: {'name': '李四', 'age': 28, 'gender': '男', 'text': "安全第一条"},
3: {'name': '王五', 'age': 18, 'gender': '女', 'text': "行车不规范"},
}
@app.route('/login', methods=['get', 'post'])
def login():
if request.method == 'GET':
return render_template('login.html')
username = request.form.get('username')
password = request.form.get('password')
if username == 'lqz' and password == '123':
session['name'] = username
return redirect('/')
else:
return render_template('login.html', error='用户名或密码错误')
@app.route('/')
def index():
if session.get('name'):
return render_template('index.html', user_list=USERS)
else:
return redirect('/login')
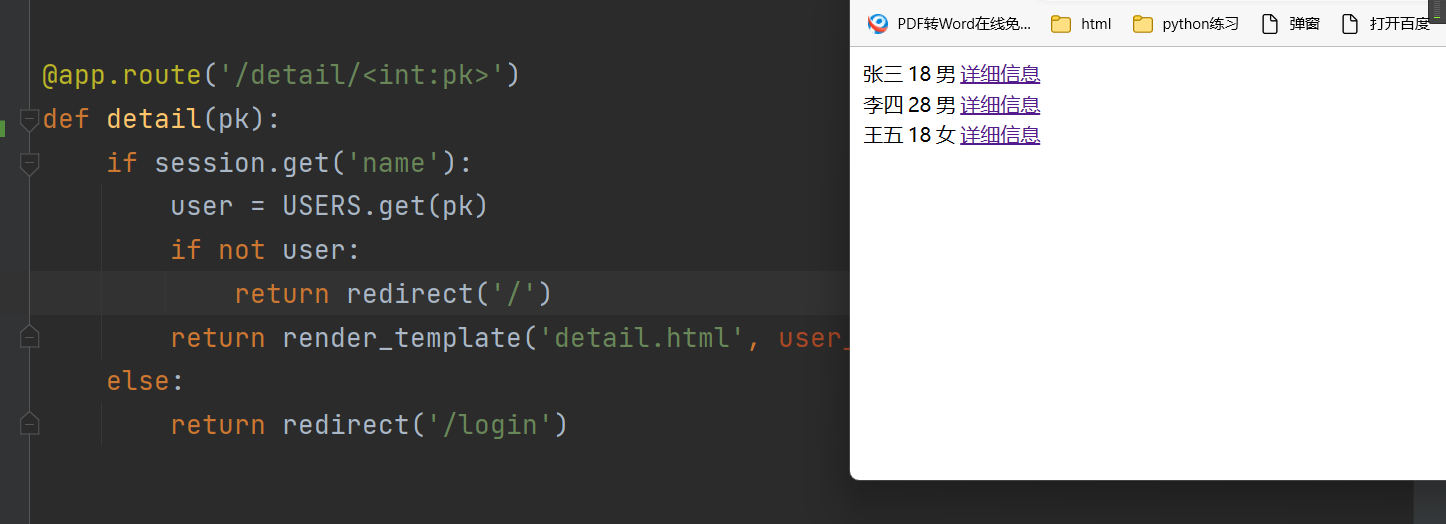
@app.route('/detail/<int:pk>')
def detail(pk):
if session.get('name'):
user = USERS.get(pk)
if not user:
return redirect('/')
return render_template('detail.html', user_list=user)
else:
return redirect('/login')
if __name__ == '__main__':
app.run(debug=True)
from flask import Flask, request, render_template, redirect, session,jsonify

app = Flask(__name__)

# 要使用session,必须设置秘钥,秘钥是配置信息
app.secret_key = 'asdfasdfa33aef3aefads'

USERS = {
    1:{'name':'张三','age':18,'gender':'男','text':"道路千万条"},
    2:{'name':'李四','age':28,'gender':'男','text':"安全第一条"},
    3:{'name':'王五','age':18,'gender':'女','text':"行车不规范"},
}
# 1 创建templates文件夹,写login.html
@app.route('/login', methods=['GET', 'POST'])
def index():
    # 没有request对象,使用全局的request
    # get请求,返回模板
    if request.method == 'GET':
        return render_template('login.html')  # 新手四件套之一:返回模板
    else:
        # post请求,校验数据
        # 取出前端传入的用户名密码,校验
        username = request.form.get('username')  # 等同于django的的request.POST
        password = request.form.get('password')
        if username == 'lqz' and password == '123':
            # 登录成功,保存登录状态 重定向到跟路径   新手四件套之一:重定向
            # 保存到session中,session是全局的
            session['name'] = username
            return redirect('/')
        else:
            return render_template('login.html', error='用户名或密码错误')  # 注意跟django的render区分,要模板渲染的数据,直接key=value传即可


@app.route('/')
def home():
    # 校验,登录成功,才能过来,不登录,重定向到登录页面
    if session.get('name'):  # 有值说明登录了,没有值说明没有登录
        return render_template('home.html',user_dict=USERS)
    else:
        return redirect('/login')


@app.route('/detail/<int:pk>')
def detail(pk):
    if session.get('name'):  # 有值说明登录了,没有值说明没有登录
        user_detail = USERS.get(pk)
        return render_template('detail.html', user=user_detail)
    else:
        return redirect('/login')


@app.route('/test')
def test():
    return jsonify([{'name':'lqz','age':19}])
if __name__ == '__main__':
    app.run()
了解到的
注册路由 app.route(路径,methods=[请求方式get,post])
新手四件套
render_template 渲染模板 跟django有区别
redirect 重定向
return 字符串 返回字符串
jsonify 返回json格式
请求的request对象,是全局的,直接导入使用即可,在不同视图函数中不会混乱
request.method 请求方式
request.form post请求方式的body体的内容转成了字典
session全局的,直接导入使用即可,一定要指定密钥app.secret_key=‘ahdkajsdk123jkl’
放值:session[‘name’]=’lqz‘
取值:session.get(‘name’)
模板的渲染
兼容django的dtl
更强大,可以加括号,字典可以.get() .values() .items()
{% for %}
转换器@app.route('/detail/int:pk')
配置文件方式
django有个settings
flask也有配置问题,但是它的使用方式有多种
方式一(测试用直接设置)
app.debug=True  # 调试模式,提示信息更详细,修改代码不需要重启,自动重启
app.secret_key='dasdfasdfasd'  # 秘钥,只能 放debug和secret_key
方式二:直接使用app.config设置
app.config['DEBUG']=True
app.config['SECRET_KEY']='sdfasdfasd'
print(app.config)
方式三:使用py文件(不常用)
app.config.from_pyfile("settings.py")
print(app.config)
方式四:常用的,使用类方式
app.config.from_object("python类或类的路径")

app.config.from_object('pro_flask.settings.TestingConfig')

settings.py


class Config(object):
    DEBUG = False
    TESTING = False
    DATABASE_URI = 'sqlite://:memory:'


class ProductionConfig(Config):
    DATABASE_URI = 'mysql://user@localhost/foo'


class DevelopmentConfig(Config):
    DEBUG = True


class TestingConfig(Config):
    TESTING = True
通过环境变量配置
app.config.from_envvar("环境变量名称")
通过json文件
app.config.from_json("json文件名称")
# JSON文件名称,必须是json格式,因为内部会执行json.loads
字典格式》配置中心
app.config.from_mapping({'DEBUG': True})
内置的配置字段,其他可以自己写的,比如redisd的连接地址mysql的连接地址
DEBUG
SECRET_KEY
SESSION_COOKIE_NAME
PERMANENT_SESSION_LIFETIME
路由系统
django中配置路由在urls.py 写path,写在列表中国
flask是基于装饰器的,大部分都用装饰器做,少量可以抽取到一个urls.py中
路由的装饰器源码分析
@app.route('/login')
def index():
    pass
本质是》
index=app.route('/login')(index)
# app.route('/login')的执行结果 decorator 函数
    	-rule是路径
        -其他参数都给了options
然后 decorator(index)--->在执行
# f是index
endpoint = options.pop("endpoint", None) # 目前没有endpoint,是None
# 核心,本质--》self就是实例化得到的app对象,flask对象
# app对象中有个方法add_url_rule,这是在添加路由
# 不使用装饰器,自己注册路由
self.add_url_rule(rule, endpoint, f, **options)
return f
@setupmethod
def route(self, rule: str, **options: t.Any) -> t.Callable[[T_route], T_route]:
    def decorator(f: T_route) -> T_route:
        endpoint = options.pop("endpoint", None)
        self.add_url_rule(rule, endpoint, f, **options)
        return f

    return decorator
可以不使用装饰器的方式,注册路由
app.add_url_rule('/', endpoint=None, view_func=home, methods=['GET'])
flask路由的本质是app对象的add_url_rule完成路由的注册
路由参数
# rule             URL规则
# view_func        视图函数名称
# defaults = None  默认值, 当URL中无参数,函数需要参数时,使用defaults = {'k': 'v'}为函数提供参数
# endpoint = None, 路径的别名,名称,用于反向解析URL,即: url_for('名称')
# methods = None, 允许的请求方式,如:["GET", "POST"]


#对URL最后的 / 符号是否严格要求
strict_slashes = None
    '''
        @app.route('/index', strict_slashes=False)
        #访问http://www.xx.com/index/ 或http://www.xx.com/index均可
        @app.route('/index', strict_slashes=True)
        #仅访问http://www.xx.com/index
    '''

#重定向到指定地址
redirect_to = None,
    '''
        @app.route('/index/<int:nid>', redirect_to='/home/<nid>')
    '''


 # 需要记住的
    # rule
    # view_func
    # defaults
    # endpoint
    # methods
转换器
 'default':          UnicodeConverter,
 'string':           UnicodeConverter,
 'any':              AnyConverter,
 'path':             PathConverter,
 'int':              IntegerConverter,
 'float':            FloatConverter,
 'uuid':             UUIDConverter,

 # 了解:让路由支持正则(忽略掉)