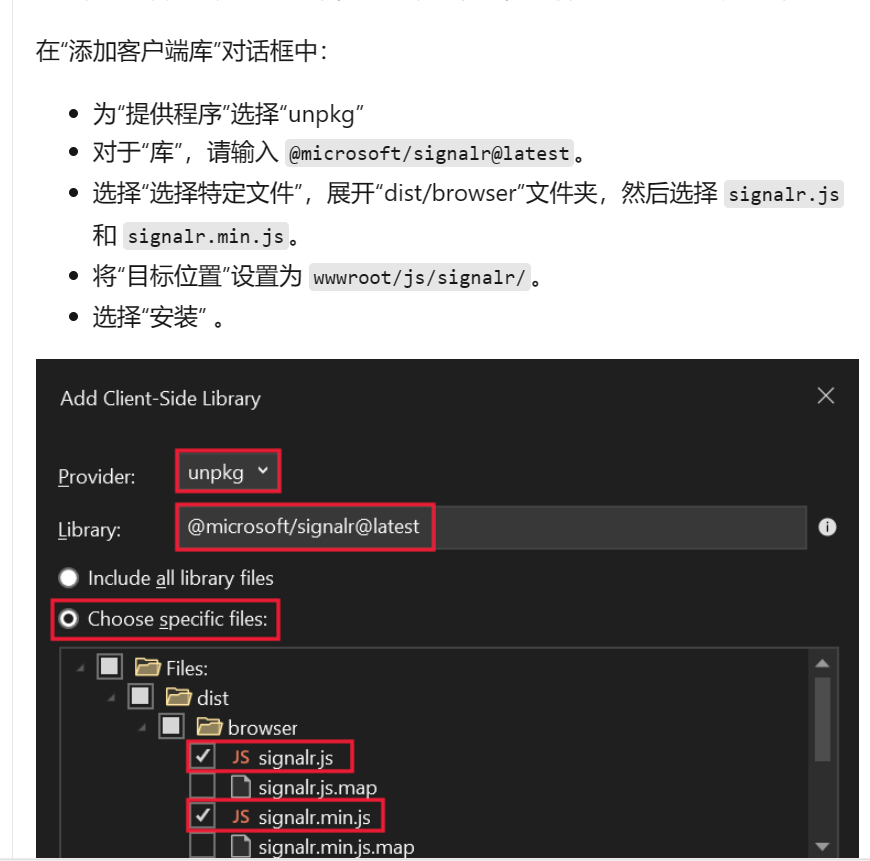
最近项目上需要做个服务给前端推消息,首先就想到了signalr,关于signalr 详情可以参考微软官方文档(ASP.NET Core SignalR 概述 | Microsoft Learn),微软现在也有使用教程(ASP.NET Core SignalR 入门 | Microsoft Learn) 微软教程是通过使用库管理器 (LibMan) 从 unpkg 获取客户端库,如图:
但是我的vs里面没找到对应的客户端库。如果你页没有,那么你恭喜你,你有解决方案了!
第一步 安装对应包 Microsoft.AspNetCore.SignalR.Client
第二步 配置代码
 1 builder.Services.AddSignalR();
 2 //配置跨域
 3 builder.Services.AddCors(option =>
 4 {
 5     option.AddPolicy("any", policy =>
 6     {
 7         policy.SetIsOriginAllowed(origin => true)
 8        .AllowAnyHeader()
 9        .AllowAnyMethod()
10        .AllowCredentials();
11     });
12 });
13
14
15
16 app.MapHub<LedHub>("/LedHub"); //配置hub
17 app.UseCors("any");  //使用跨域策略
第三步创建hub
  public class LedHub: Hub
  {
      private readonly ILogger<LedHub> _logger;
      private readonly IServiceProvider _service;
      private readonly IHttpContextAccessor _accessor;
      private readonly ConcurrentBag<LedResponse> onlineChat=new ConcurrentBag<LedResponse>();
 /// 这里不能注入 IHttpcontextaccessor 我用的是net8.0
      public LedHub(ILogger<LedHub> logger,IServiceProvider service)
      {
          _logger = logger;
          _service = service;
      }

      /// <summary>
      /// 连接成功
      /// </summary>
      /// <returns></returns>
      public override Task OnConnectedAsync()
      {
          string connId = Context.ConnectionId;


          _logger.LogWarning("SignalR已连接");
          //验证Token

          //var httpContextAccessor= _service.GetRequiredService<IHttpContextAccessor>();
          //var token = httpContextAccessor.HttpContext?.Request.Query["access_token"];
          // var user = JwtHelper.SerializeJwt(token); 验证token
          _logger.LogWarning($"SignalR已连接,用户名:{connId}");
          LedResponse ledResponse = new();
          //连接用户 这里可以存在Redis

          //给当前连接返回消息 .Clients可以发多个连接ID
          ledResponse.connectId = connId;
          onlineChat.Add(ledResponse);
          Clients.Client(connId).SendAsync("ConnectResponse",
            "LED", "连接成功");

          return base.OnConnectedAsync();
      }

      public override Task OnDisconnectedAsync(Exception? exception)
      {
          string connId = Context.ConnectionId;
          var model = onlineChat.FirstOrDefault(u => u.connectId == connId);
          //int count = OnlineUser.RemoveAll(u => u.ConnectionId == connId);
          if (model != null)
          {
              //给当前分组发送消息 在一个分组就能接收到消息
              //Clients.Group(model.GroupName).SendAsync("GetUsersResponse", result);

              //给当前连接返回消息 .Clients可以发多个连接ID
              Clients.Client(connId).SendAsync("DisconnectResponse",
            "用户", "断开连接");

          }
          return base.OnDisconnectedAsync(exception);
      }

      /// <summary>
      /// 发送消息
      /// </summary>
      /// <param name="user"></param>
      /// <param name="message"></param>
      /// <returns></returns>
      public async Task SendMessage(string user, string message)
      {
          await Clients.All.SendAsync("ReceiveMessage", user, message);
      }
  }
这样服务已经搞定了!
接下来我们来写前端这块
npm install @microsoft/signalr
安装包
 1 <template>
 2   <div>
 3     <div class="first_row">{{ msg }}</div>
 4     <span class="last_row">{{ msg1 }}</span>
 5   </div>
 6 </template>
 7
 8
 9 <script setup lang="ts">
10 import * as signalR from "@microsoft/signalr";//一次性导入全部模块
11 import { onMounted, ref } from "vue";
12 const hubUrl = "http://localhost:7199/LedHub"; //api服务地址
13
14 //.net core 版本中默认不会自动重连,需手动调用 withAutomaticReconnect
15 const connection = new signalR.HubConnectionBuilder()
16     .withAutomaticReconnect()//断线自动重连
17     .withUrl(hubUrl)//传递参数Query["access_token"]
18     .build();
19
20 //启动
21 connection.start().catch(err => {
22     console.log("启动" + err);
23 });
24
25 //自动重连成功后的处理
26 connection.onreconnected(connectionId => {
27     console.log(connectionId);
28 });
29 const msg=ref();
30 const msg1=ref();
31 const showvlue=ref();
32 onMounted(() => {
33     connection.on("SendMessageResponse", function (data) {
34         console.log(data);
35     });
36
37     //调用后端方法 SendMessage 接受自己人发送消息
38     connection.on("ReceiveMessage", function ( msginfo,msginfo2) {
39
40
41       msg.value=msginfo;
42       msg1.value=msginfo2;
43
44
45     });
46
47     //调用后端方法 ConnectResponse 接收连接成功
48     connection.on("ConnectResponse", function (data, msg) {
49         console.log(data + "==" + msg);
50     });
51
52 });
53
54 </script>
编写前端连接客户端!
接下来发送消息 在webApi controller 注入 IHubContext<LedHub> hub,即可使用!
  private readonly ILogger<WeatherForecastController> _logger;
  private readonly IHubContext<ChatHub> _hubContext;

  public WeatherForecastController(ILogger<WeatherForecastController> logger,IHubContext<ChatHub> hubContext)
  {
      _logger = logger;
      this._hubContext = hubContext;
  }

  [HttpGet(Name = "GetWeatherForecast")]
  public IEnumerable<WeatherForecast> Get()
  {
      _hubContext.Clients.All.SendAsync("ReceiveMessage", "xxx", "xxx");
      return Enumerable.Range(1, 5).Select(index => new WeatherForecast
      {
          Date = DateTime.Now.AddDays(index),
          TemperatureC = Random.Shared.Next(-20, 55),
          Summary = Summaries[Random.Shared.Next(Summaries.Length)]
      })
      .ToArray();
  }
到此已完成!