
1.Gitlab介绍
我们了解了git是以个人为中心,但是人人都得数据交互呀。。python程序员每天都忙着进行py交易
交互数据的方式
- 使用github或者码云等公有代码仓库,托管代码的地方,谁都可以看
- 公司内部使用gitlab私有仓库
github和gitlab的区别
- github国外公共仓库不安全,国内的码云代码仓库,可能会暴露自己公司代码机密,等着被开除吧。。
- 自建gitlab私有代码仓库,更加安全
- 从代码私有性方面来看,公司不希望员工随意获取全部代码,使用Gitlab无疑是最好的选择
- 若是开源项目,Github还是代码托管的首选平台。
https://about.gitlab.com/
Gitlab是一个开源分布式的版本控制系统,由Ruby语言开发,Gitlab主要实现的功能、管理项目源代码、对源代码进行版本控制,以及源代码的复用和查找。
Gitlab优势和应用场景:
- 开源免费,搭建简单,维护成本低,适合中小型公司。
- 权限管理,实现代码对部分人可见,确保醒目安全性。
- 离线同步,保证我们不需要依赖于网络环境进行代码提交(代码本地仓库管理然后推到远程仓库)
2.gitlab安装
操作系统centos7
内存:建议用4G+
磁盘:50G
安全:关闭防火墙,selinux
1.安装GItlab所需的依赖包
yum install curl policycoreutils-python openssh-server postfix wget -y
2.安装gitlab主程序,可以在线装,也可以安装本地准备好的rpm包,如果没有找超哥要
https://mirrors.tuna.tsinghua.edu.cn/gitlab-ce/yum/el7/gitlab-ce-12.0.3-ce.0.el7.x86_64.rpm


[root@cicd-99 ~]#ls
anaconda-ks.cfg  gitlab-ce-12.0.3-ce.0.el7.x86_64.rpm  init2.sh  init.sh  zbx-agent.sh

安装,检查下内存

[root@cicd-99 ~]#free -m
              total        used        free      shared  buff/cache   available
Mem:           7805         138        6697          11         969        7382
Swap:          3967           0        3967


[root@cicd-99 ~]#yum localinstall gitlab-ce-12.0.3-ce.0.el7.x86_64.rpm

安装完毕后,系统也给了你提示,改URL参数
Thank you for installing GitLab!
GitLab was unable to detect a valid hostname for your instance.
Please configure a URL for your GitLab instance by setting `external_url`
configuration in /etc/gitlab/gitlab.rb file.
Then, you can start your GitLab instance by running the following command:
  sudo gitlab-ctl reconfigure

For a comprehensive list of configuration options please see the Omnibus GitLab readme
https://gitlab.com/gitlab-org/omnibus-gitlab/blob/master/README.md

  Verifying  : gitlab-ce-12.0.3-ce.0.el7.x86_64                                                                                                                                         1/1

Installed:
  gitlab-ce.x86_64 0:12.0.3-ce.0.el7

Complete!
3.配置gitlab服务,修改域名和邮箱
[root@cicd-99 ~]#grep '^external_url' /etc/gitlab/gitlab.rb
external_url 'http://10.0.0.99'


设置邮箱配置
[root@cicd-99 ~]#grep '^gitlab_rails' /etc/gitlab/gitlab.rb
gitlab_rails['gitlab_email_enabled'] = true
gitlab_rails['gitlab_email_from'] = '877348180@qq.com'
gitlab_rails['gitlab_email_display_name'] = 'yuchaoit'
gitlab_rails['smtp_enable'] = true
gitlab_rails['smtp_address'] = "smtp.qq.com"
gitlab_rails['smtp_port'] = 465
gitlab_rails['smtp_user_name'] = "877348180@qq.com"
gitlab_rails['smtp_password'] = "dxeeorjtfhqcbbhh"
gitlab_rails['smtp_domain'] = "smtp.qq.com"
gitlab_rails['smtp_authentication'] = "login"
gitlab_rails['smtp_enable_starttls_auto'] = true
gitlab_rails['smtp_tls'] = true
让gitlab加载新配置文件,只要修改gitlab配置,就得执行
gitlab-ctl reconfigure


看到这个结果才是对的
Running handlers:
Running handlers complete
Chef Client finished, 512/1343 resources updated in 01 minutes 53 seconds
gitlab Reconfigured!
进入gitlab命令行,测试邮件是否能发出去,这里用的是于超老师的qq邮箱,发给163试试
[root@cicd-99 ~]#gitlab-rails console
-------------------------------------------------------------------------------------
 GitLab:       12.0.3 (08a51a9db93)
 GitLab Shell: 9.3.0
 PostgreSQL:   10.7
-------------------------------------------------------------------------------------
Loading production environment (Rails 5.1.7)
irb(main):001:0> Notify.test_email('yc_uuu@163.com','www.yuchaoit.cn','hello linux0224').deliver_now
Notify#test_email: processed outbound mail in 164.1ms
Sent mail to yc_uuu@163.com (1134.6ms)
Date: Sun, 10 Jul 2022 04:21:49 +0800
From: yuchaoit <877348180@qq.com>
Reply-To: yuchaoit <noreply@10.0.0.99>
To: yc_uuu@163.com
Message-ID: <62c9e35d40356_11543f9e6d5cf97c90099@cicd-99.mail>
Subject: www.yuchaoit.cn
Mime-Version: 1.0
Content-Type: text/html;
 charset=UTF-8
Content-Transfer-Encoding: 7bit
Auto-Submitted: auto-generated
X-Auto-Response-Suppress: All

<!DOCTYPE html PUBLIC "-//W3C//DTD HTML 4.0 Transitional//EN" "http://www.w3.org/TR/REC-html40/loose.dtd">
<html><body><p>hello linux0224</p></body></html>

=> #<Mail::Message:69949436475560, Multipart: false, Headers: <Date: Sun, 10 Jul 2022 04:21:49 +0800>, <From: yuchaoit <877348180@qq.com>>, <Reply-To: yuchaoit <noreply@10.0.0.99>>, <To: yc_uuu@163.com>, <Message-ID: <62c9e35d40356_11543f9e6d5cf97c90099@cicd-99.mail>>, <Subject: www.yuchaoit.cn>, <Mime-Version: 1.0>, <Content-Type: text/html; charset=UTF-8>, <Content-Transfer-Encoding: 7bit>, <Auto-Submitted: auto-generated>, <X-Auto-Response-Suppress: All>>
irb(main):002:0>


确认下收到邮件吗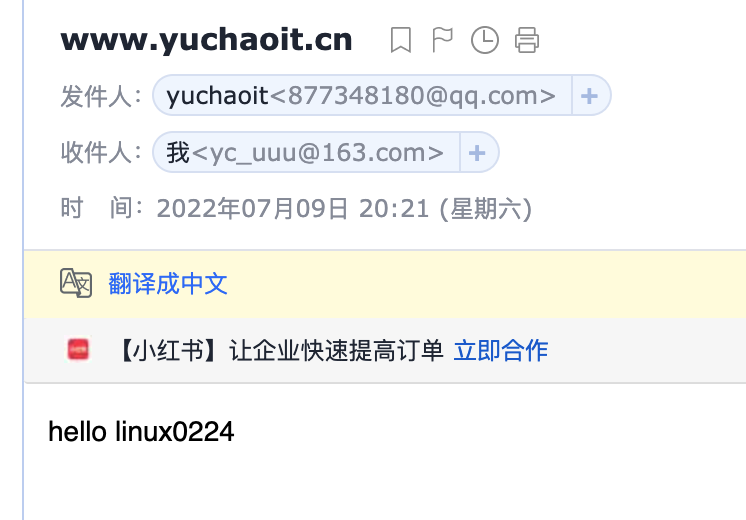
3.gitlab管理命令
重新加载配置
[root@cicd-99 ~]#gitlab-ctl reconfigure


服务管理状态命令
Service Management Commands:
  graceful-kill
    Attempt a graceful stop, then SIGKILL the entire process group.
  hup
    Send the services a HUP.
  int
    Send the services an INT.
  kill
    Send the services a KILL.
  once
    Start the services if they are down. Do not restart them if they stop.
  restart
    Stop the services if they are running, then start them again.
  service-list
    List all the services (enabled services appear with a *.)
  start
    Start services if they are down, and restart them if they stop.
  status
    Show the status of all the services.
  stop
    Stop the services, and do not restart them.
  tail
    Watch the service logs of all enabled services.
  term
    Send the services a TERM.
  usr1
    Send the services a USR1.
  usr2
    Send the services a USR2.


确认所有组件都启动了

[root@cicd-99 ~]#gitlab-ctl status
run: alertmanager: (pid 3878) 456s; run: log: (pid 3547) 483s
run: gitaly: (pid 3751) 458s; run: log: (pid 3047) 550s
run: gitlab-monitor: (pid 3764) 458s; run: log: (pid 3457) 497s
run: gitlab-workhorse: (pid 3728) 459s; run: log: (pid 3266) 515s
run: grafana: (pid 3904) 455s; run: log: (pid 3662) 465s
run: logrotate: (pid 3371) 508s; run: log: (pid 3409) 505s
run: nginx: (pid 3352) 510s; run: log: (pid 3367) 509s
run: node-exporter: (pid 3746) 459s; run: log: (pid 3432) 501s
run: postgres-exporter: (pid 3895) 456s; run: log: (pid 3590) 479s
run: postgresql: (pid 3052) 545s; run: log: (pid 3136) 544s
run: prometheus: (pid 3855) 457s; run: log: (pid 3517) 487s
run: redis: (pid 2893) 558s; run: log: (pid 2905) 555s
run: redis-exporter: (pid 3847) 458s; run: log: (pid 3486) 491s
run: sidekiq: (pid 3227) 522s; run: log: (pid 3245) 519s
run: unicorn: (pid 3199) 524s; run: log: (pid 3224) 523s


gitlab-ctl start
gitlab-ctl stop
gitlab-ctl stop postgresql
gitlab-ctl restart
gitlab-ctl status
gitlab-ctl reconfigure
gitlab-ctl tail
gitlab-ctl tail redis
gitlab服务组成解释
GitLab 由主要由以下服务构成,他们共同承担了 Gitlab 的运作需要
Nginx:静态 web 服务器。
gitlab-shell:用于处理 Git 命令和修改 authorized keys 列表。
gitlab-workhorse: 轻量级的反向代理服务器。 logrotate:日志文件管理工具。
postgresql:数据库。
redis:缓存数据库。
sidekiq:用于在后台执行队列任务(异步执行)。
unicorn:An HTTP server for Rack applications,GitLab Rails 应用是托管在这个
还有更多...
gitlab主要配置目录
/var/opt/gitlab/git-data/repositories/ :库默认存储目录
/opt/gitlab  :应用代码和相应的依赖程序
/var/opt/gitlab/ : gitlab-ctl reconfigure生成的数据和配置
/etc/gitlab :配置文件目录
/var/log/gitlab:此目录下存放了gitlab各个组件产生的日志
/var/opt/gitlab/backups :备份文件生成的目录
4.访问gitlab

登录账密
root
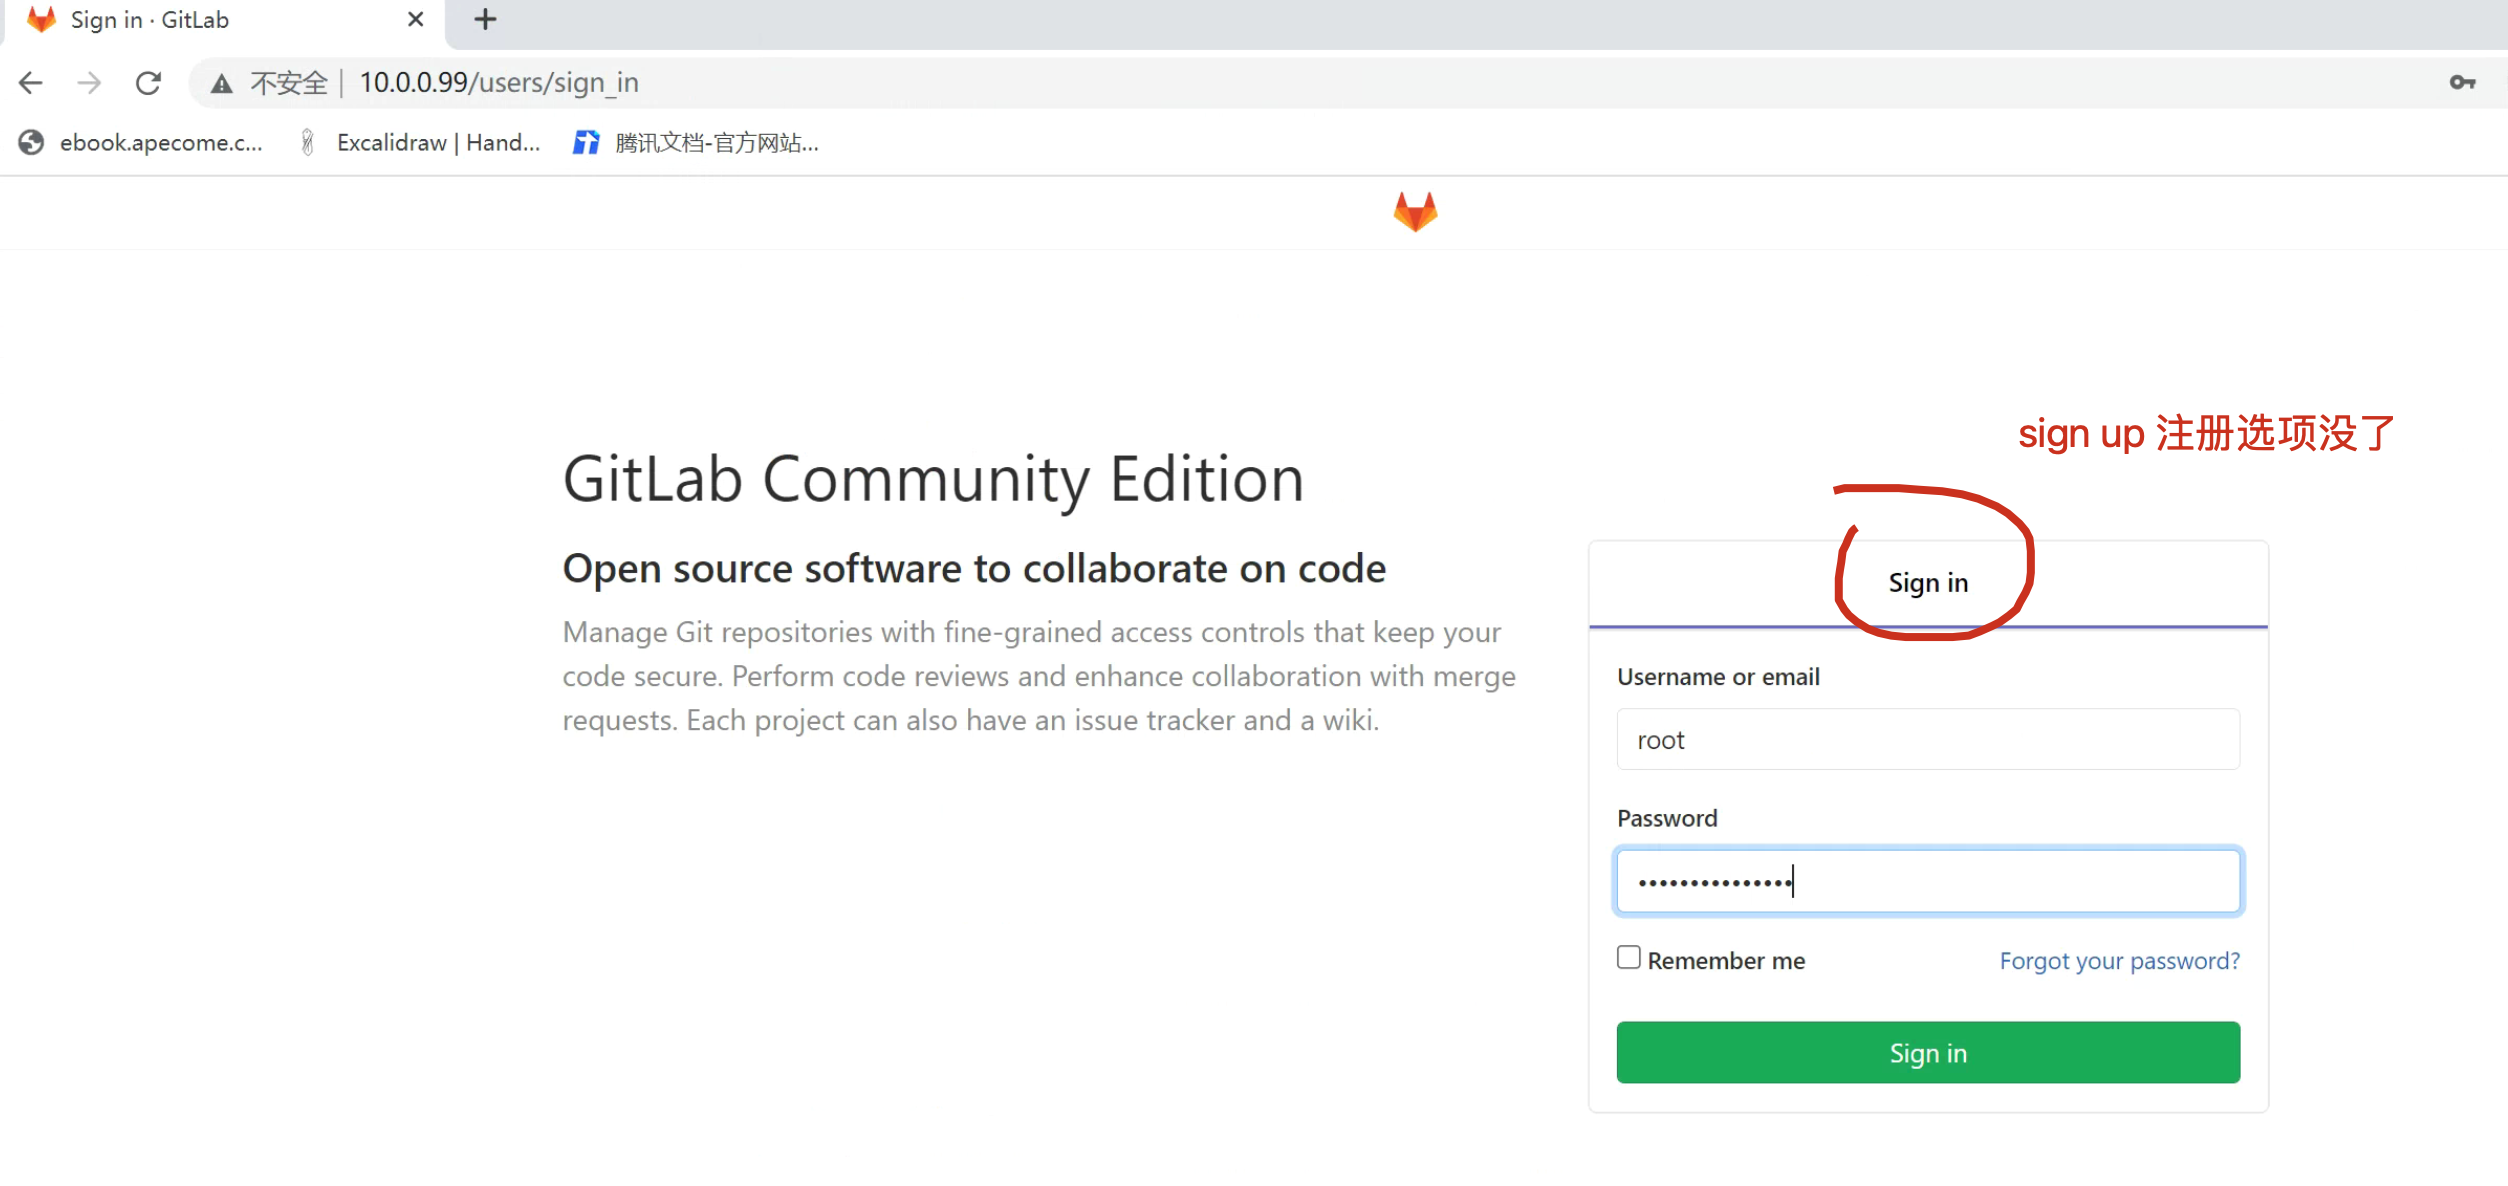
www.yuchaoit.cn5.关闭用户注册
我们GItlab是企业级内部私有代码仓库,所有用户都由管理员创建,而非外部注册,我们可以关闭其功能,保障平台安全。
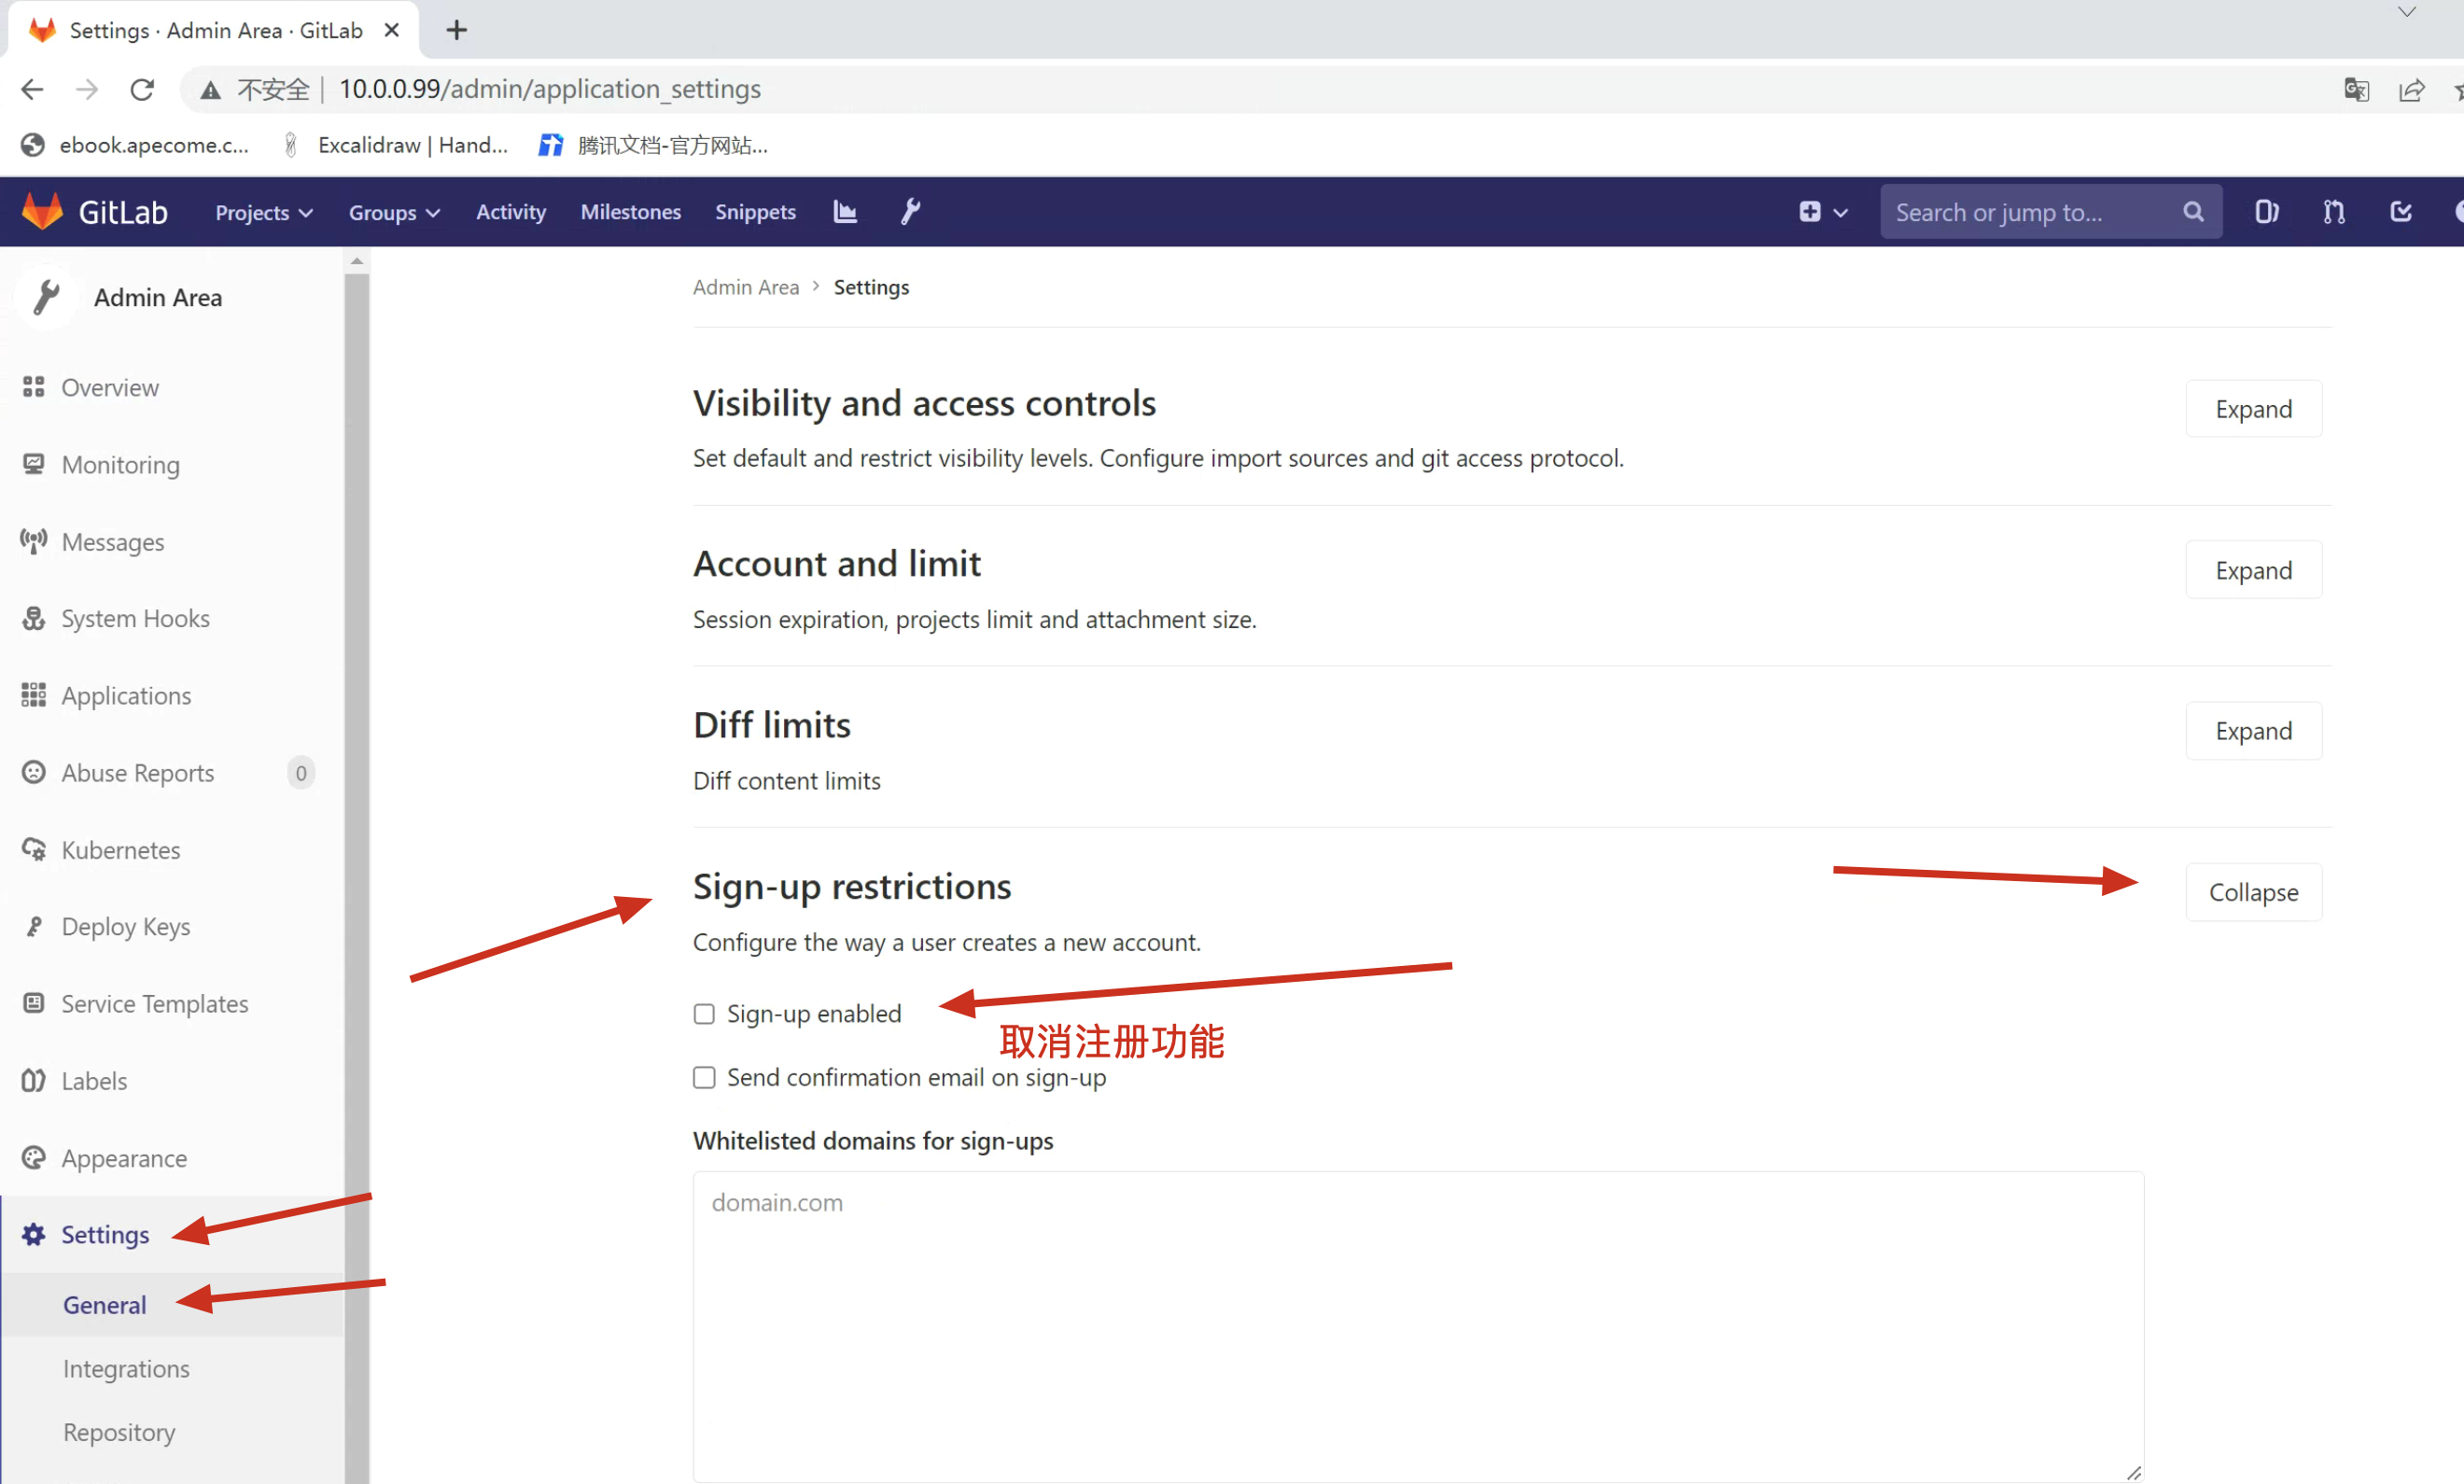
重新登录之后,注册功能就没了。
6.配置邮件功能
配置邮件服务
- 账号注册时,进行邮件验证
- 有分支合并请求时,邮件通知
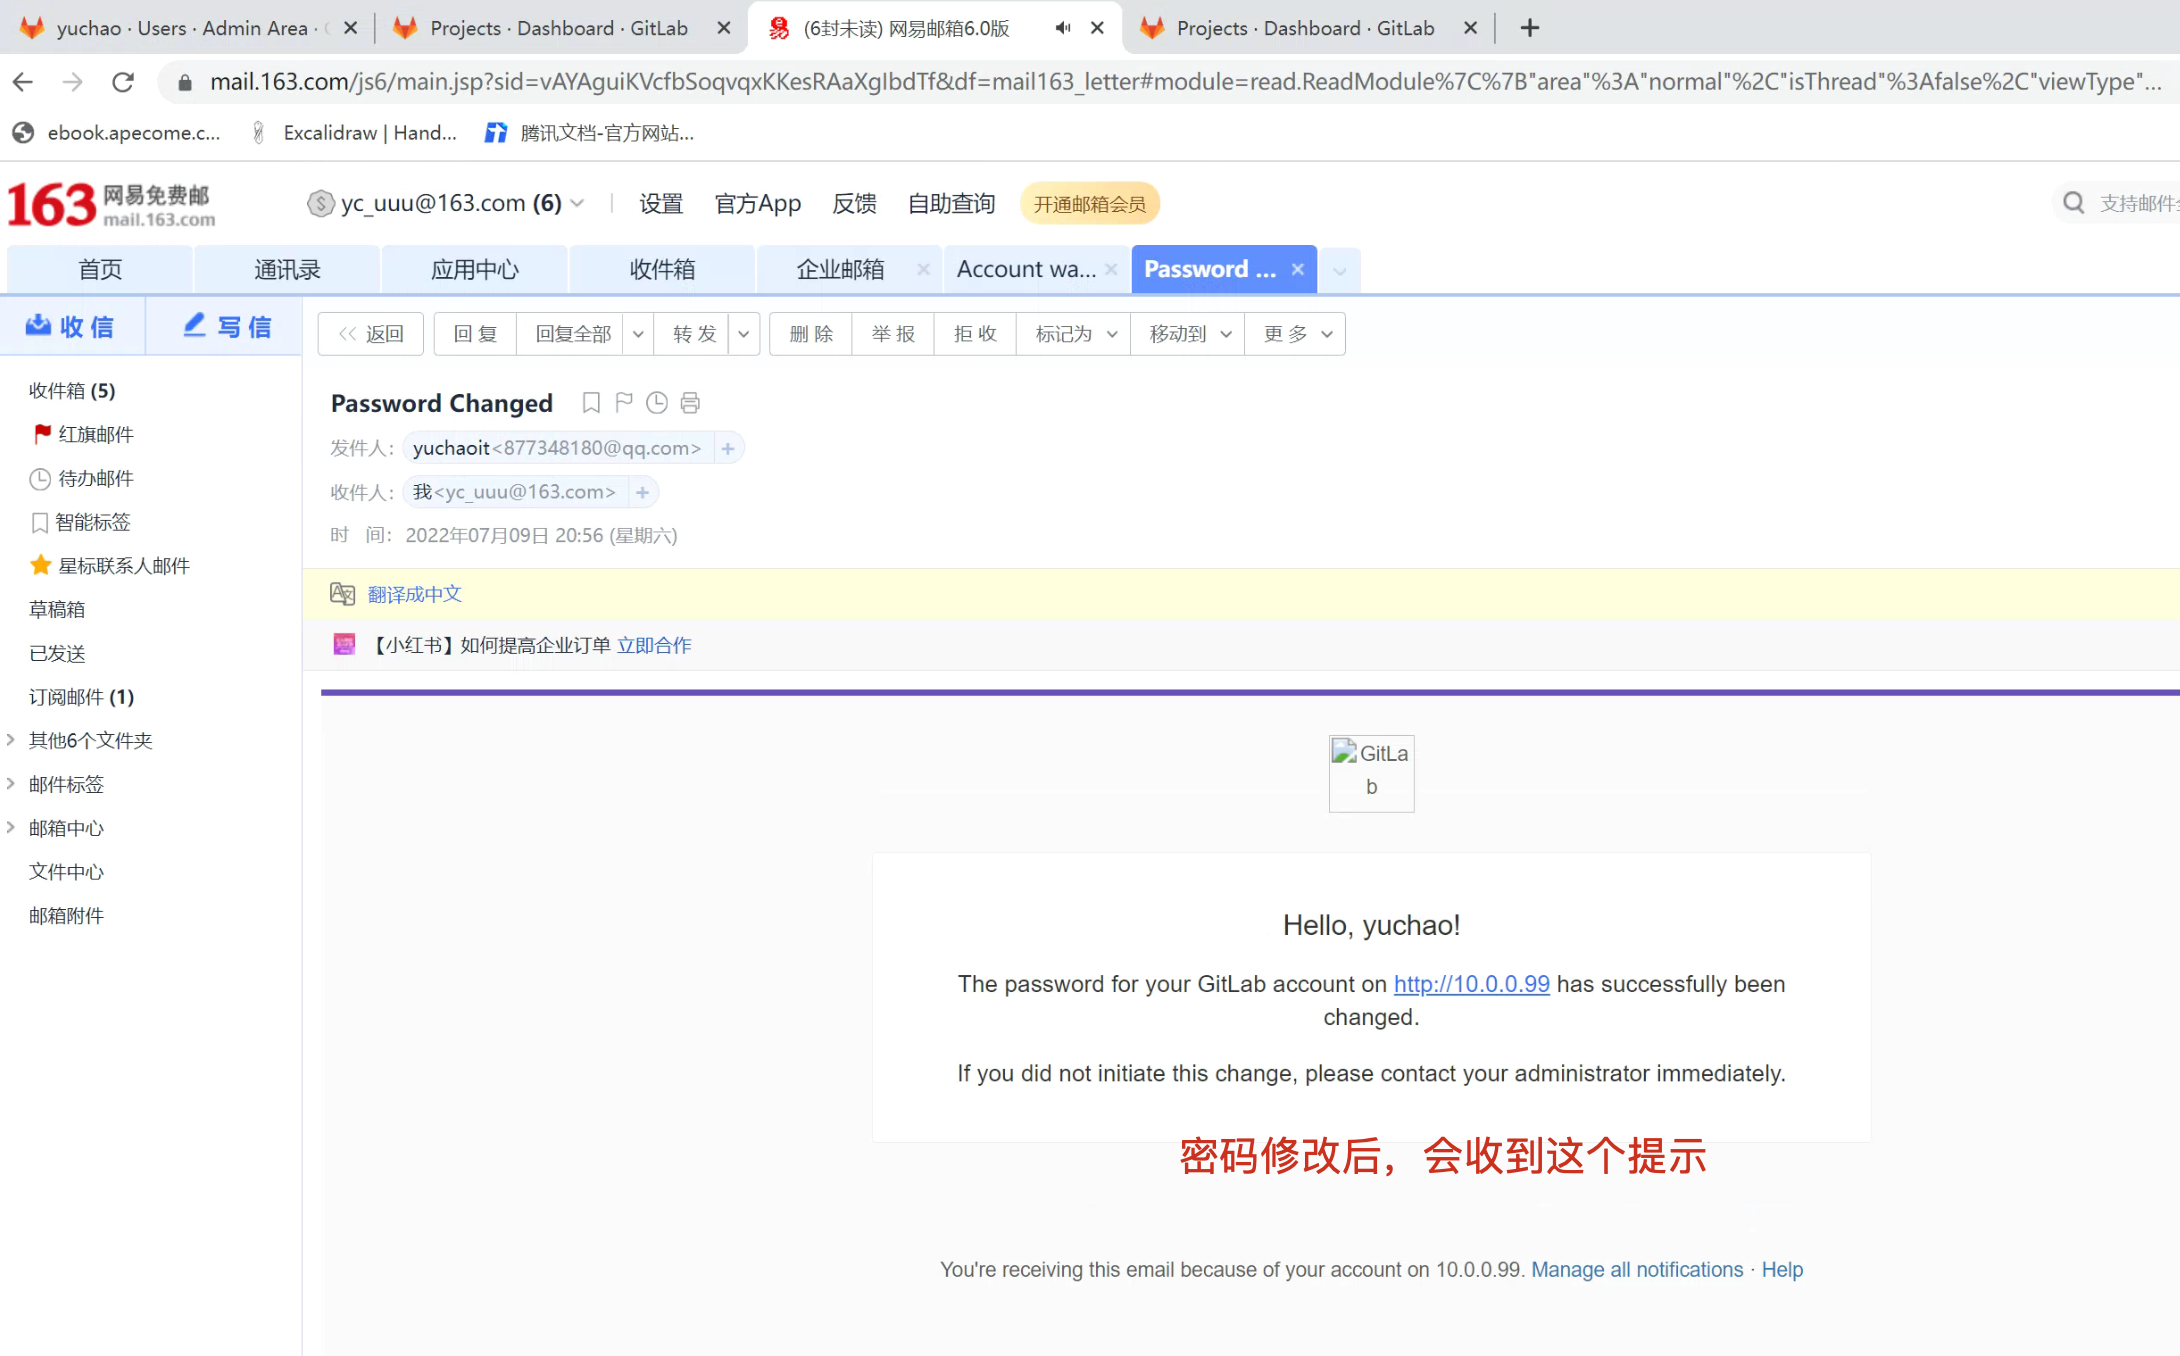
- 修改密码等操作,邮件通知

页面添加邮箱
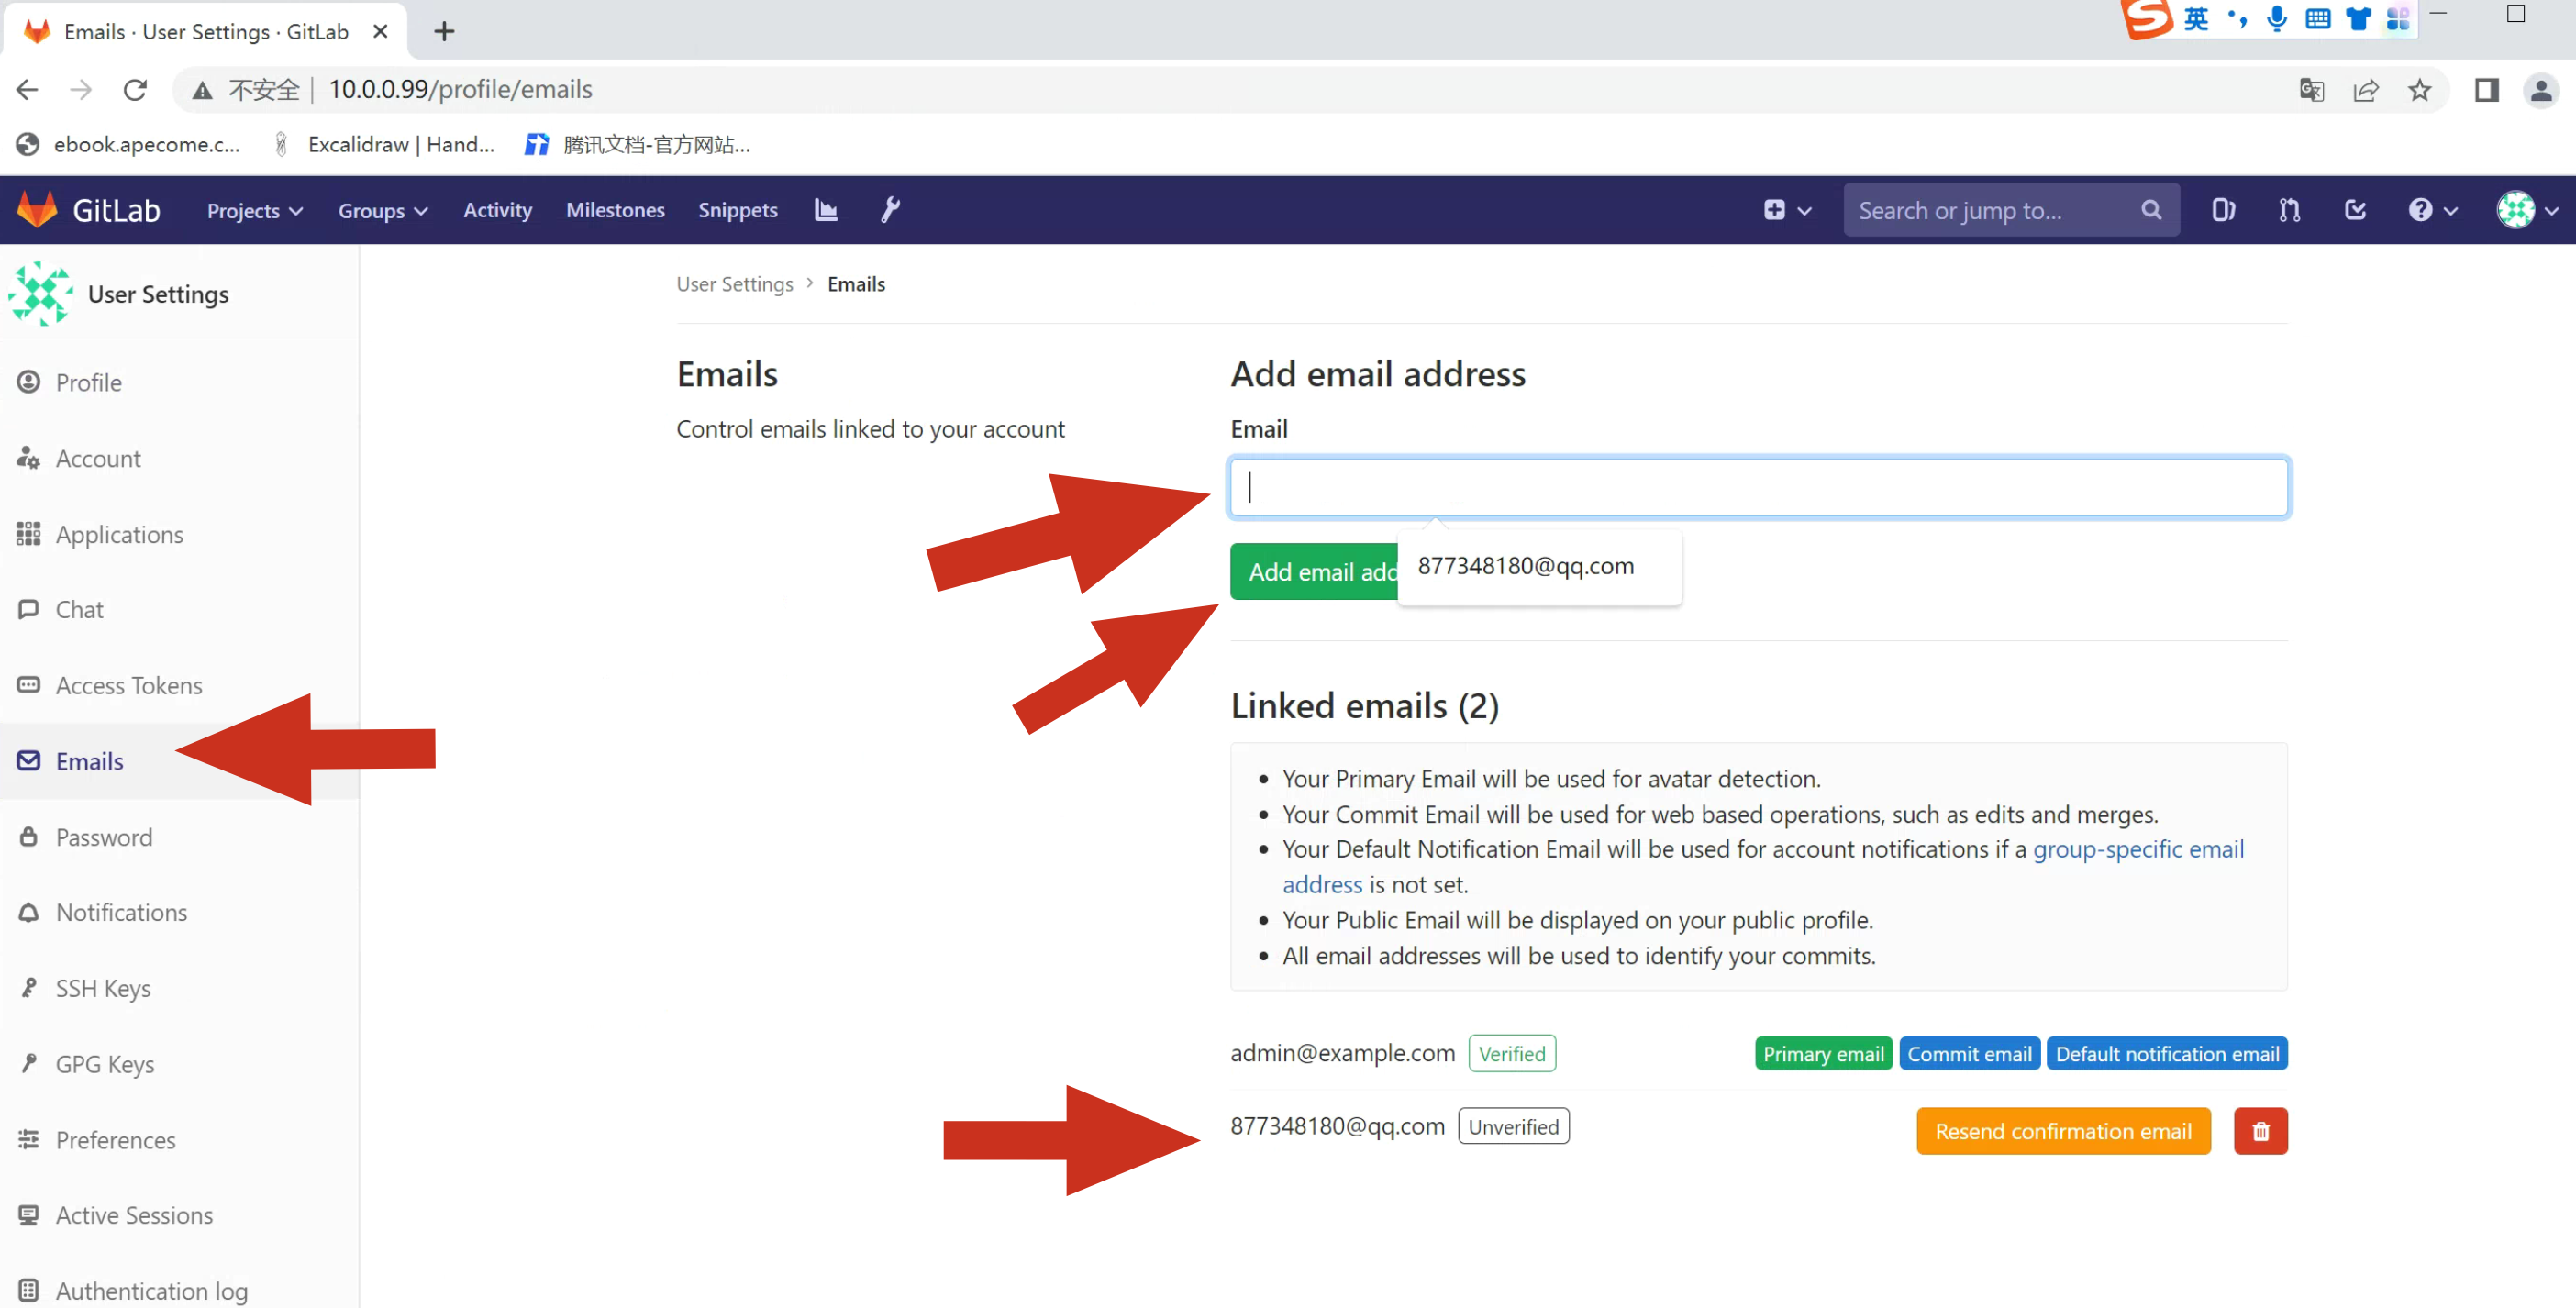
去邮箱中验证
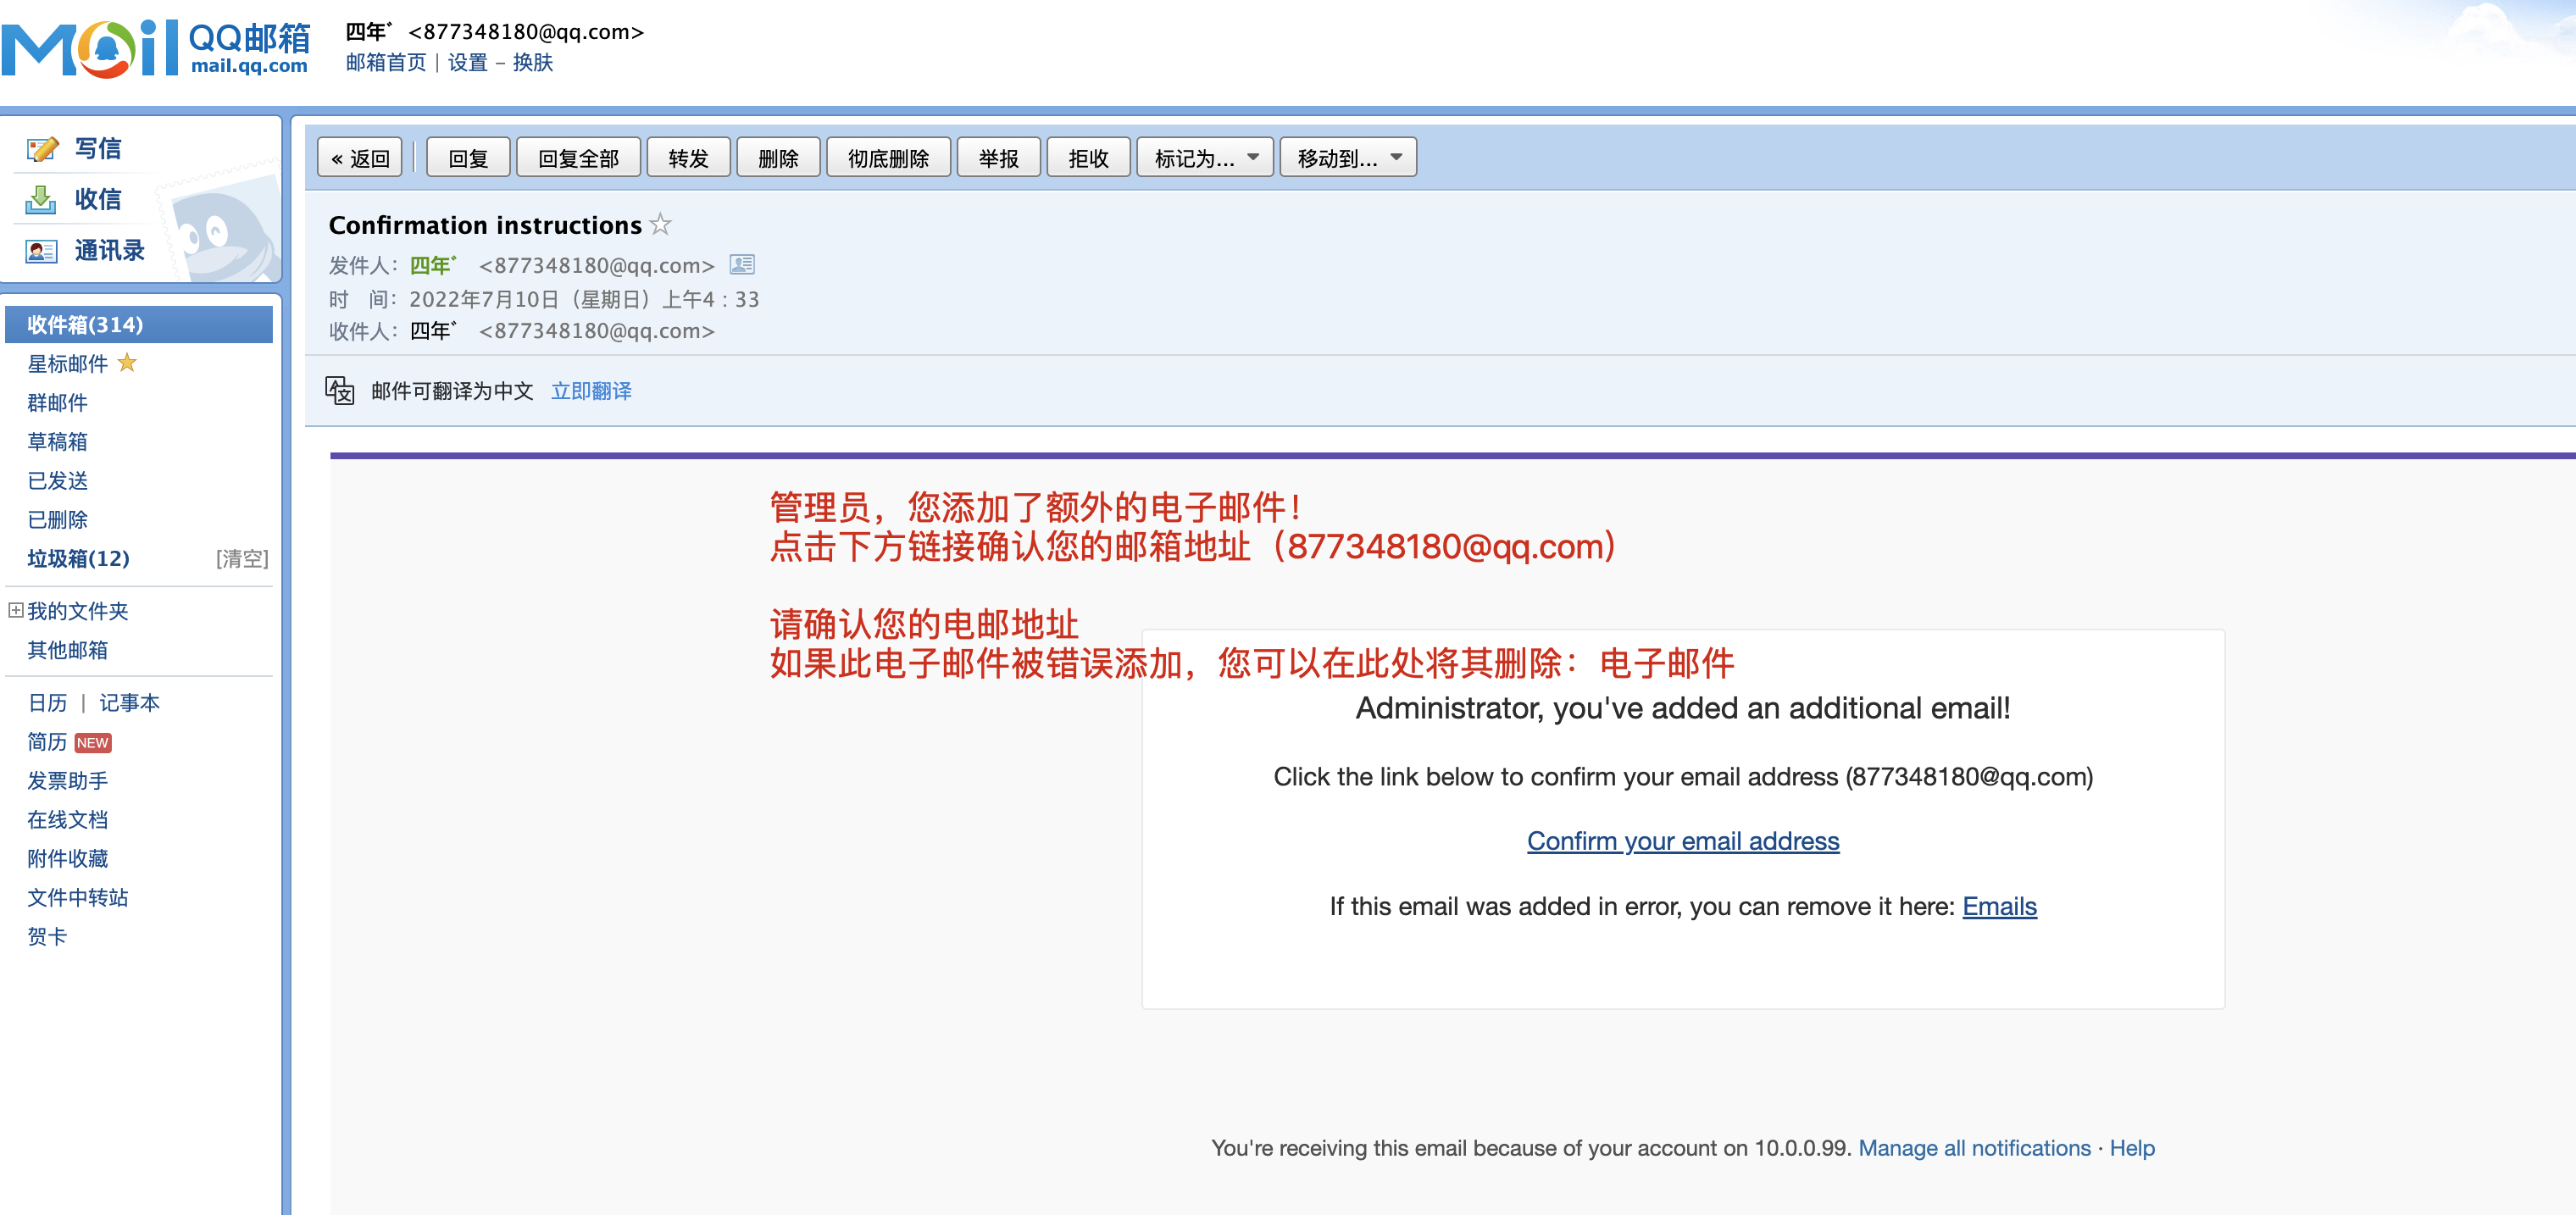
点击链接,确认邮件添加
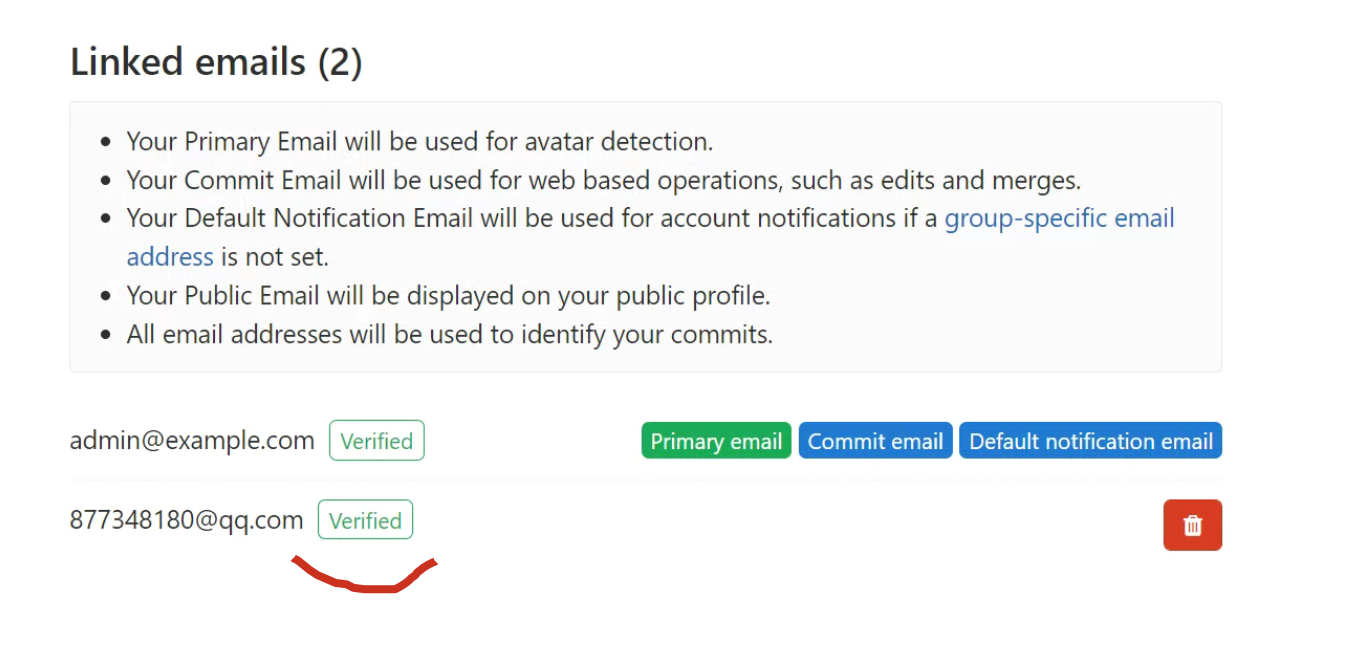
该邮箱以被验证。
7.gitlab用户与组管理

7.1 创建组
Gitlab是通过组(group)的概念来统一管理仓库(project)和用户(user),通过创建组,在组下创建仓库,再将用户加入组,从而实现用户和仓库的权限管理。
点击新建群组,在创建组页面中,组路径和名称为必填项,且该两处内容最好一致。
可见性级别,选择私有的即可
- Private:只有授权的用户才能看到
- Internal:只要登录了gitlab即可看见
- Public:公开仓库
ops运维部门

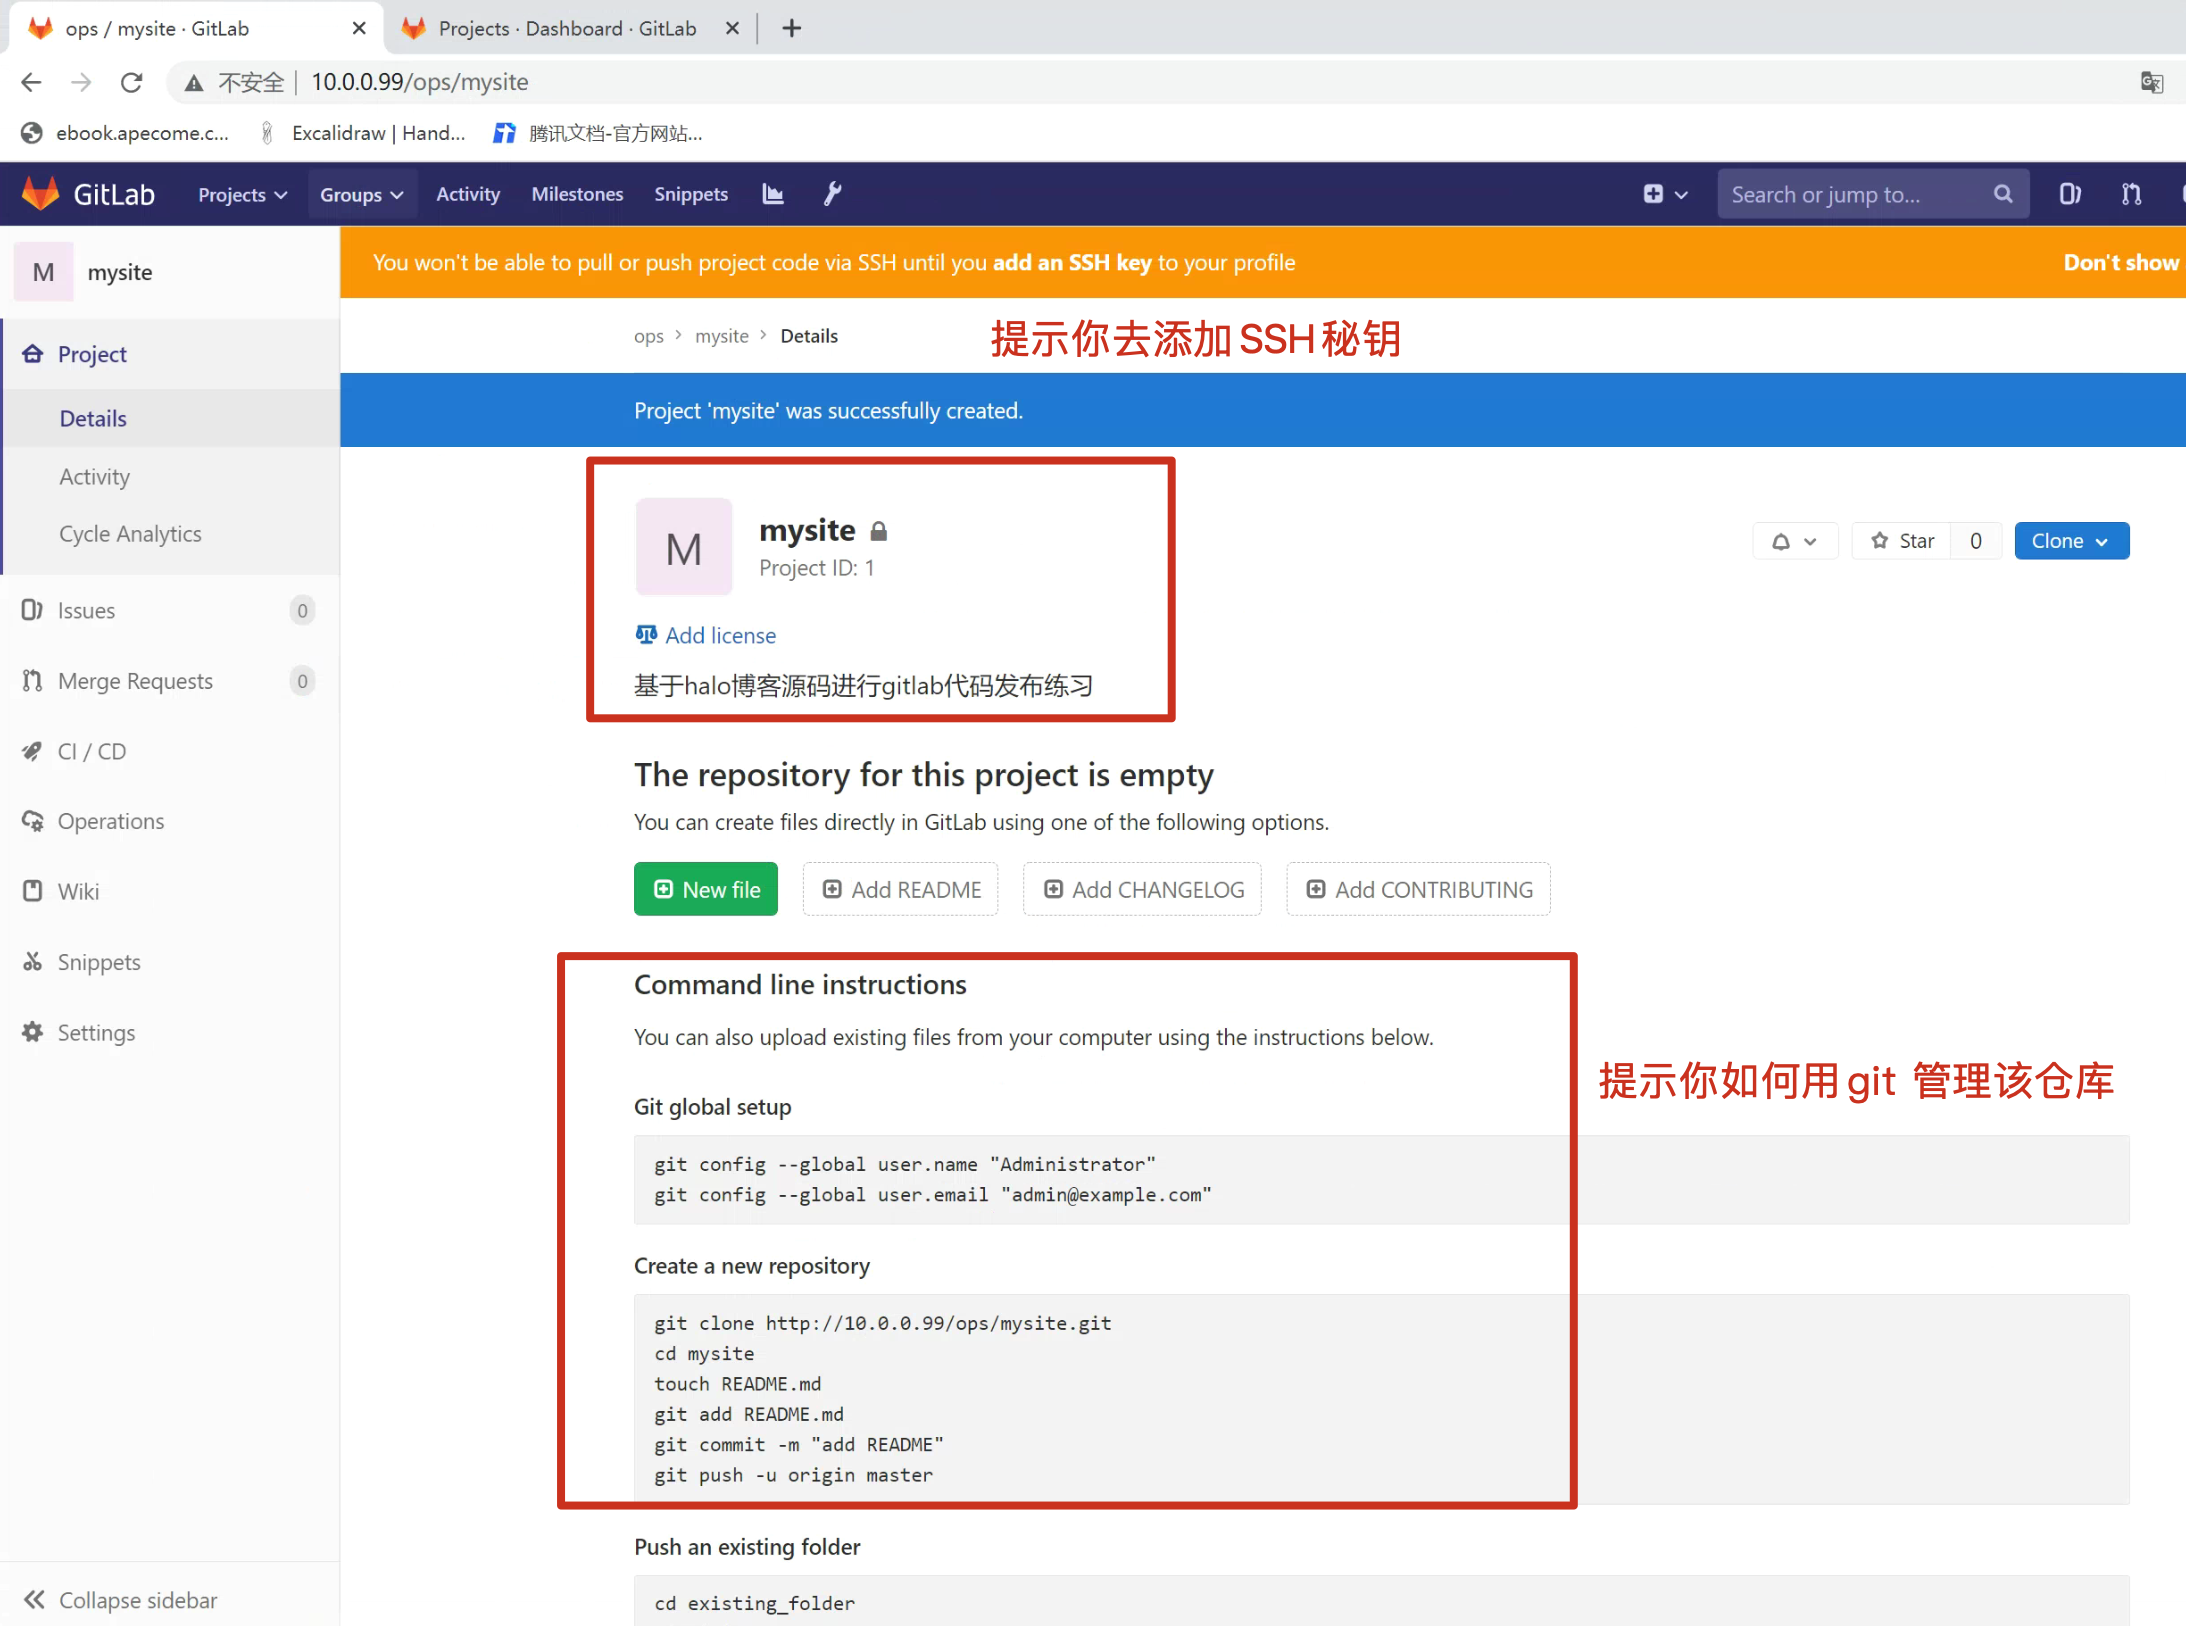
7.2 创建project项目
创建项目用于存储你的源代码,以及对该代码仓库做devops系列持续构建。

选择项目所属的组,输入项目名称,项目描述,选择可见级别,完成项目创建。
创建完毕
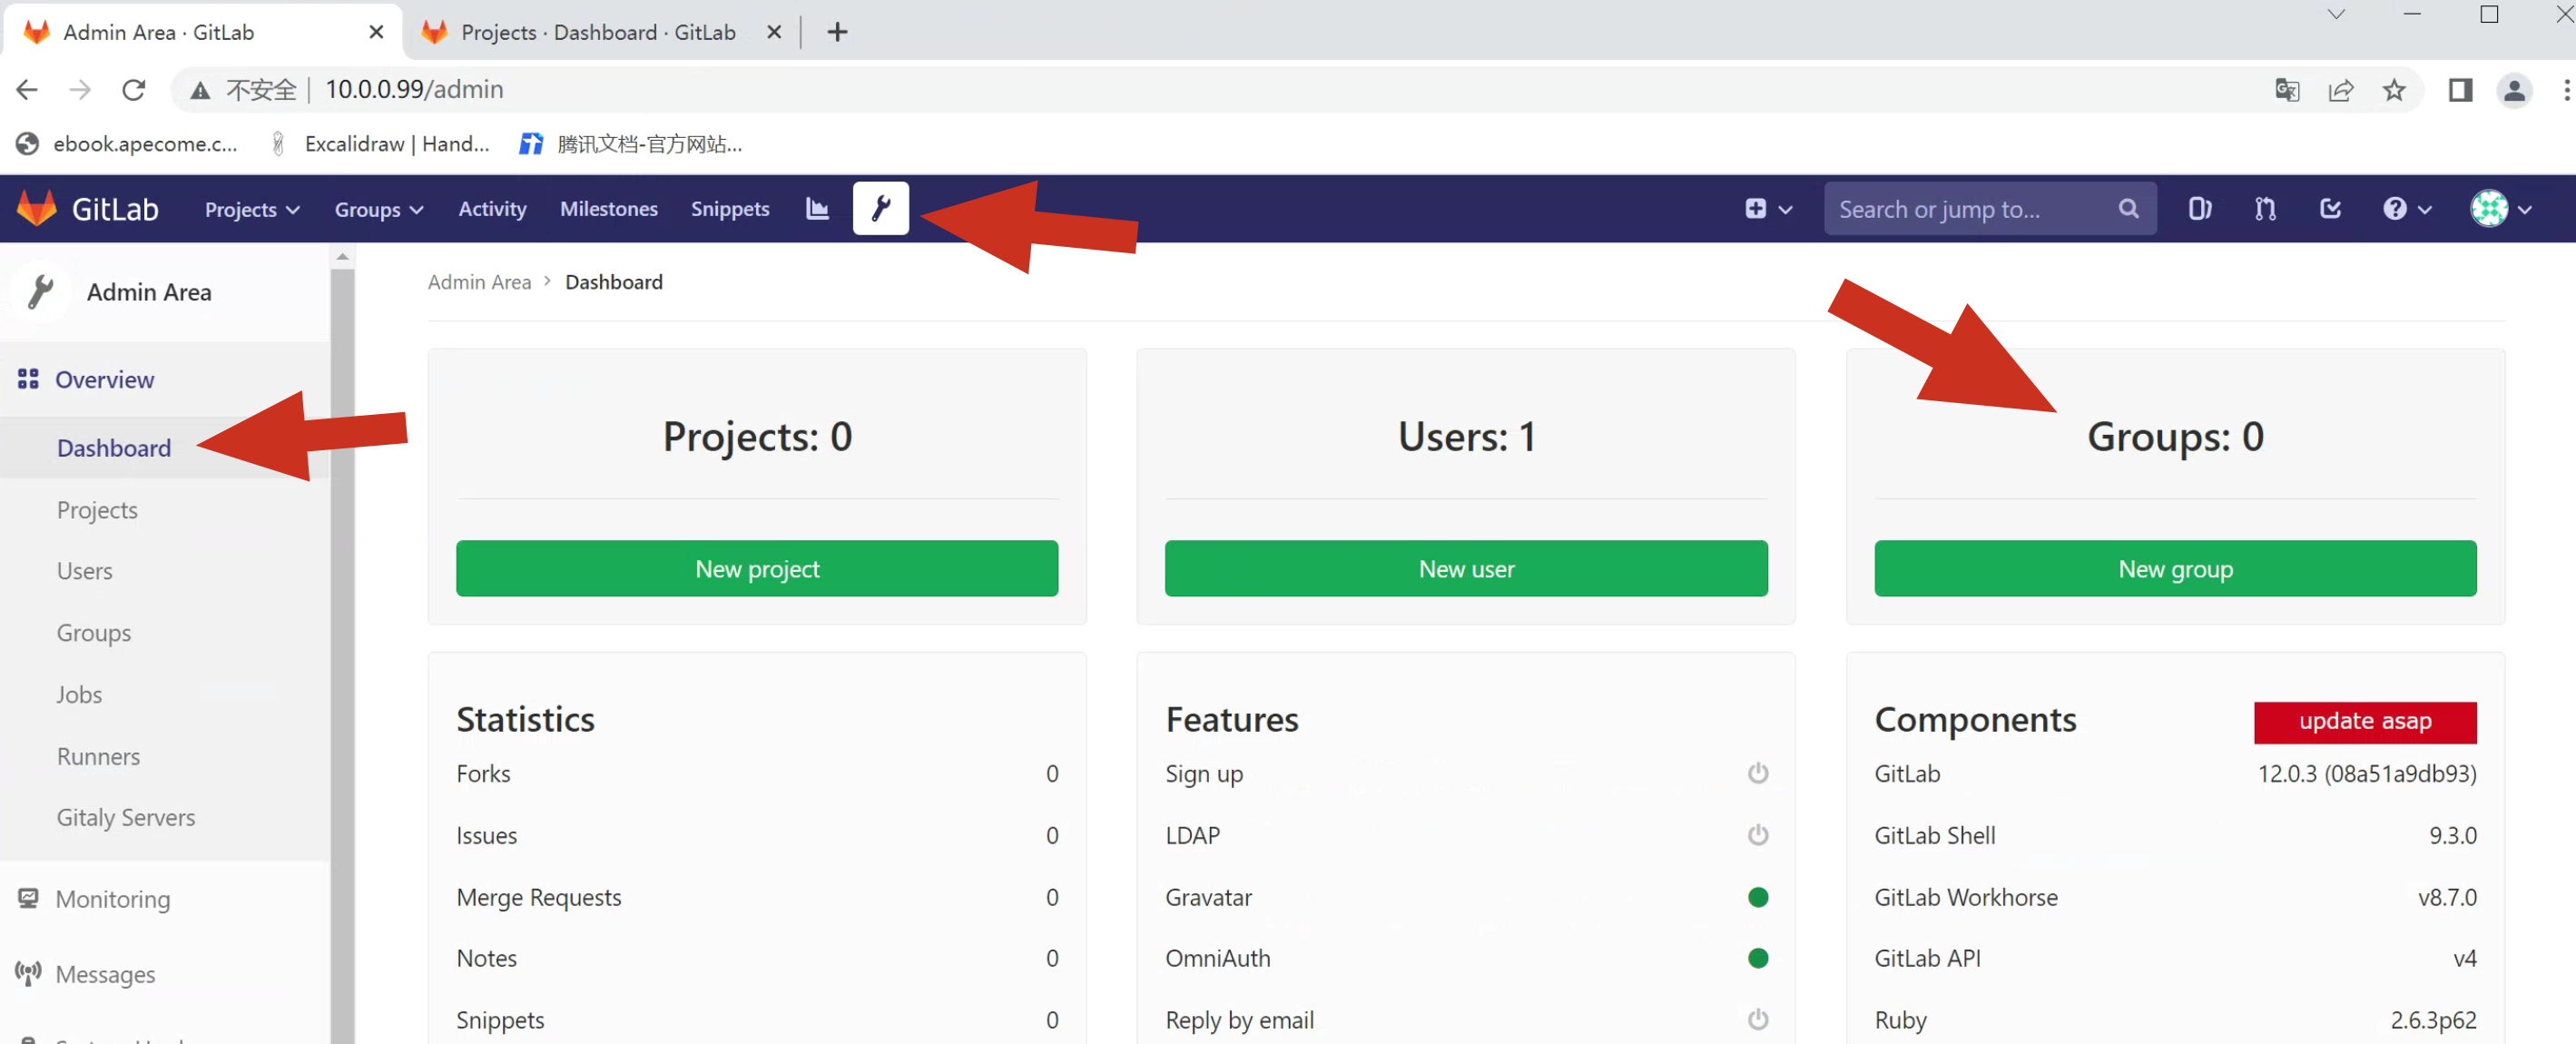
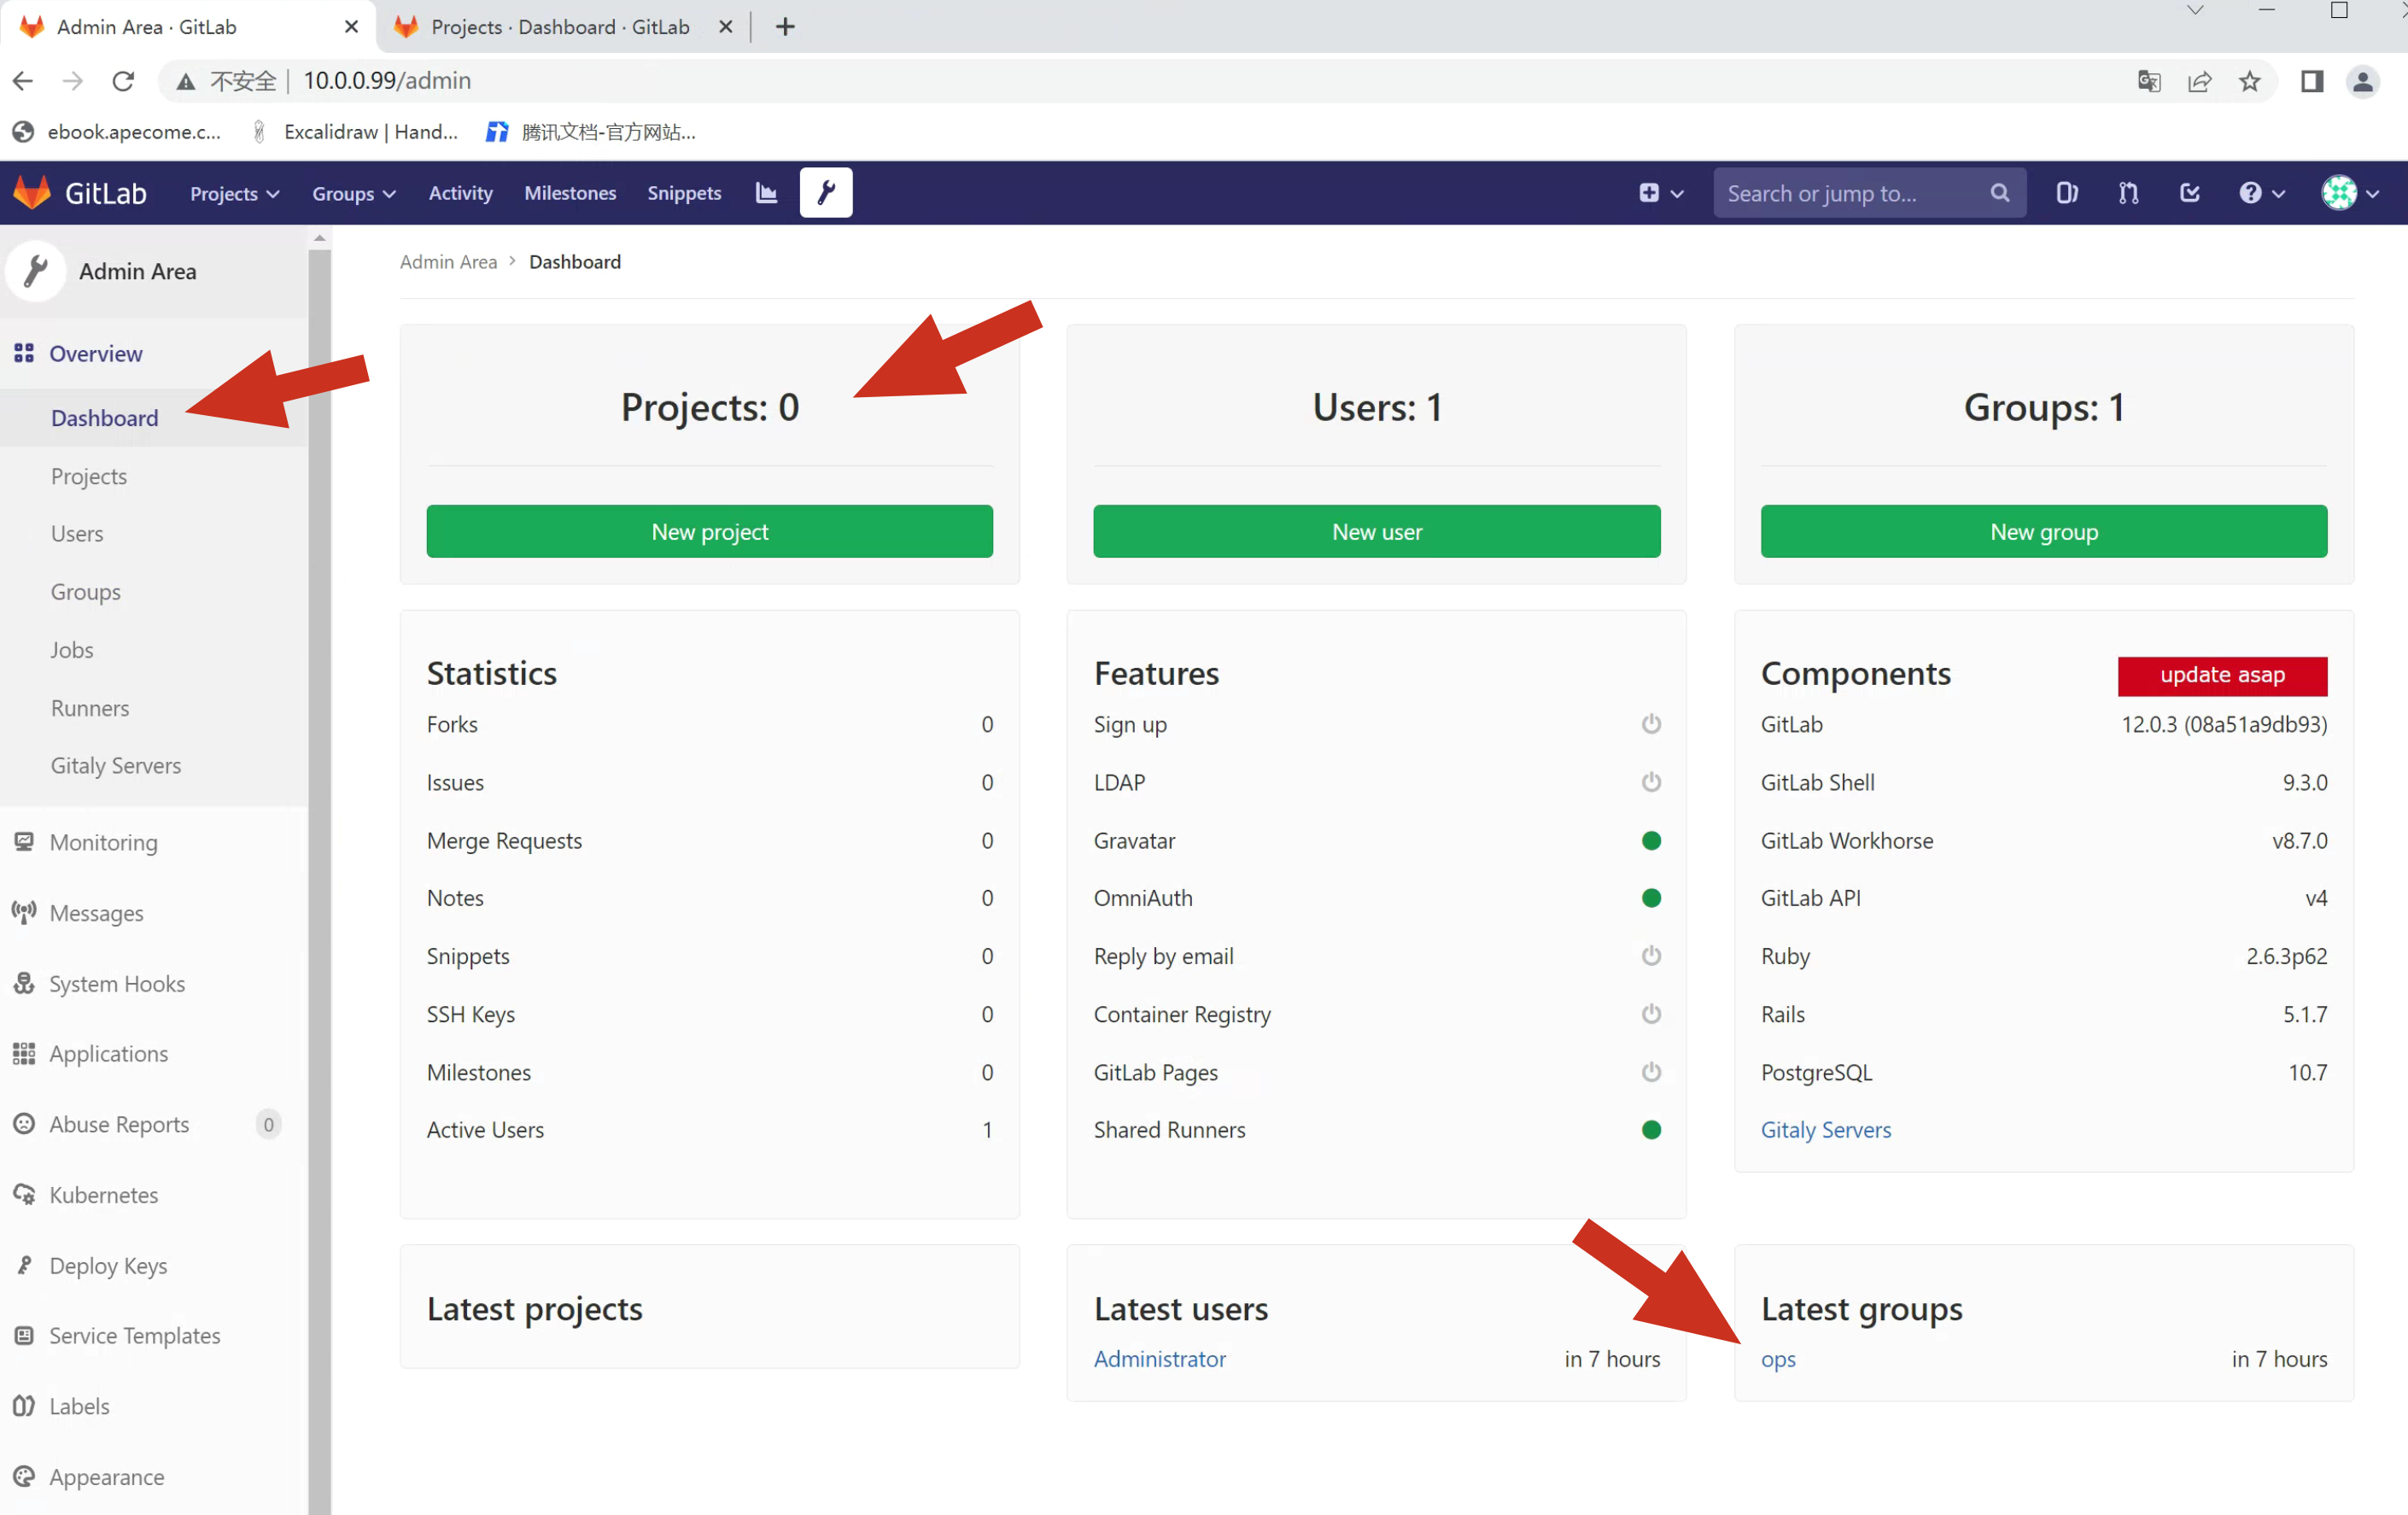
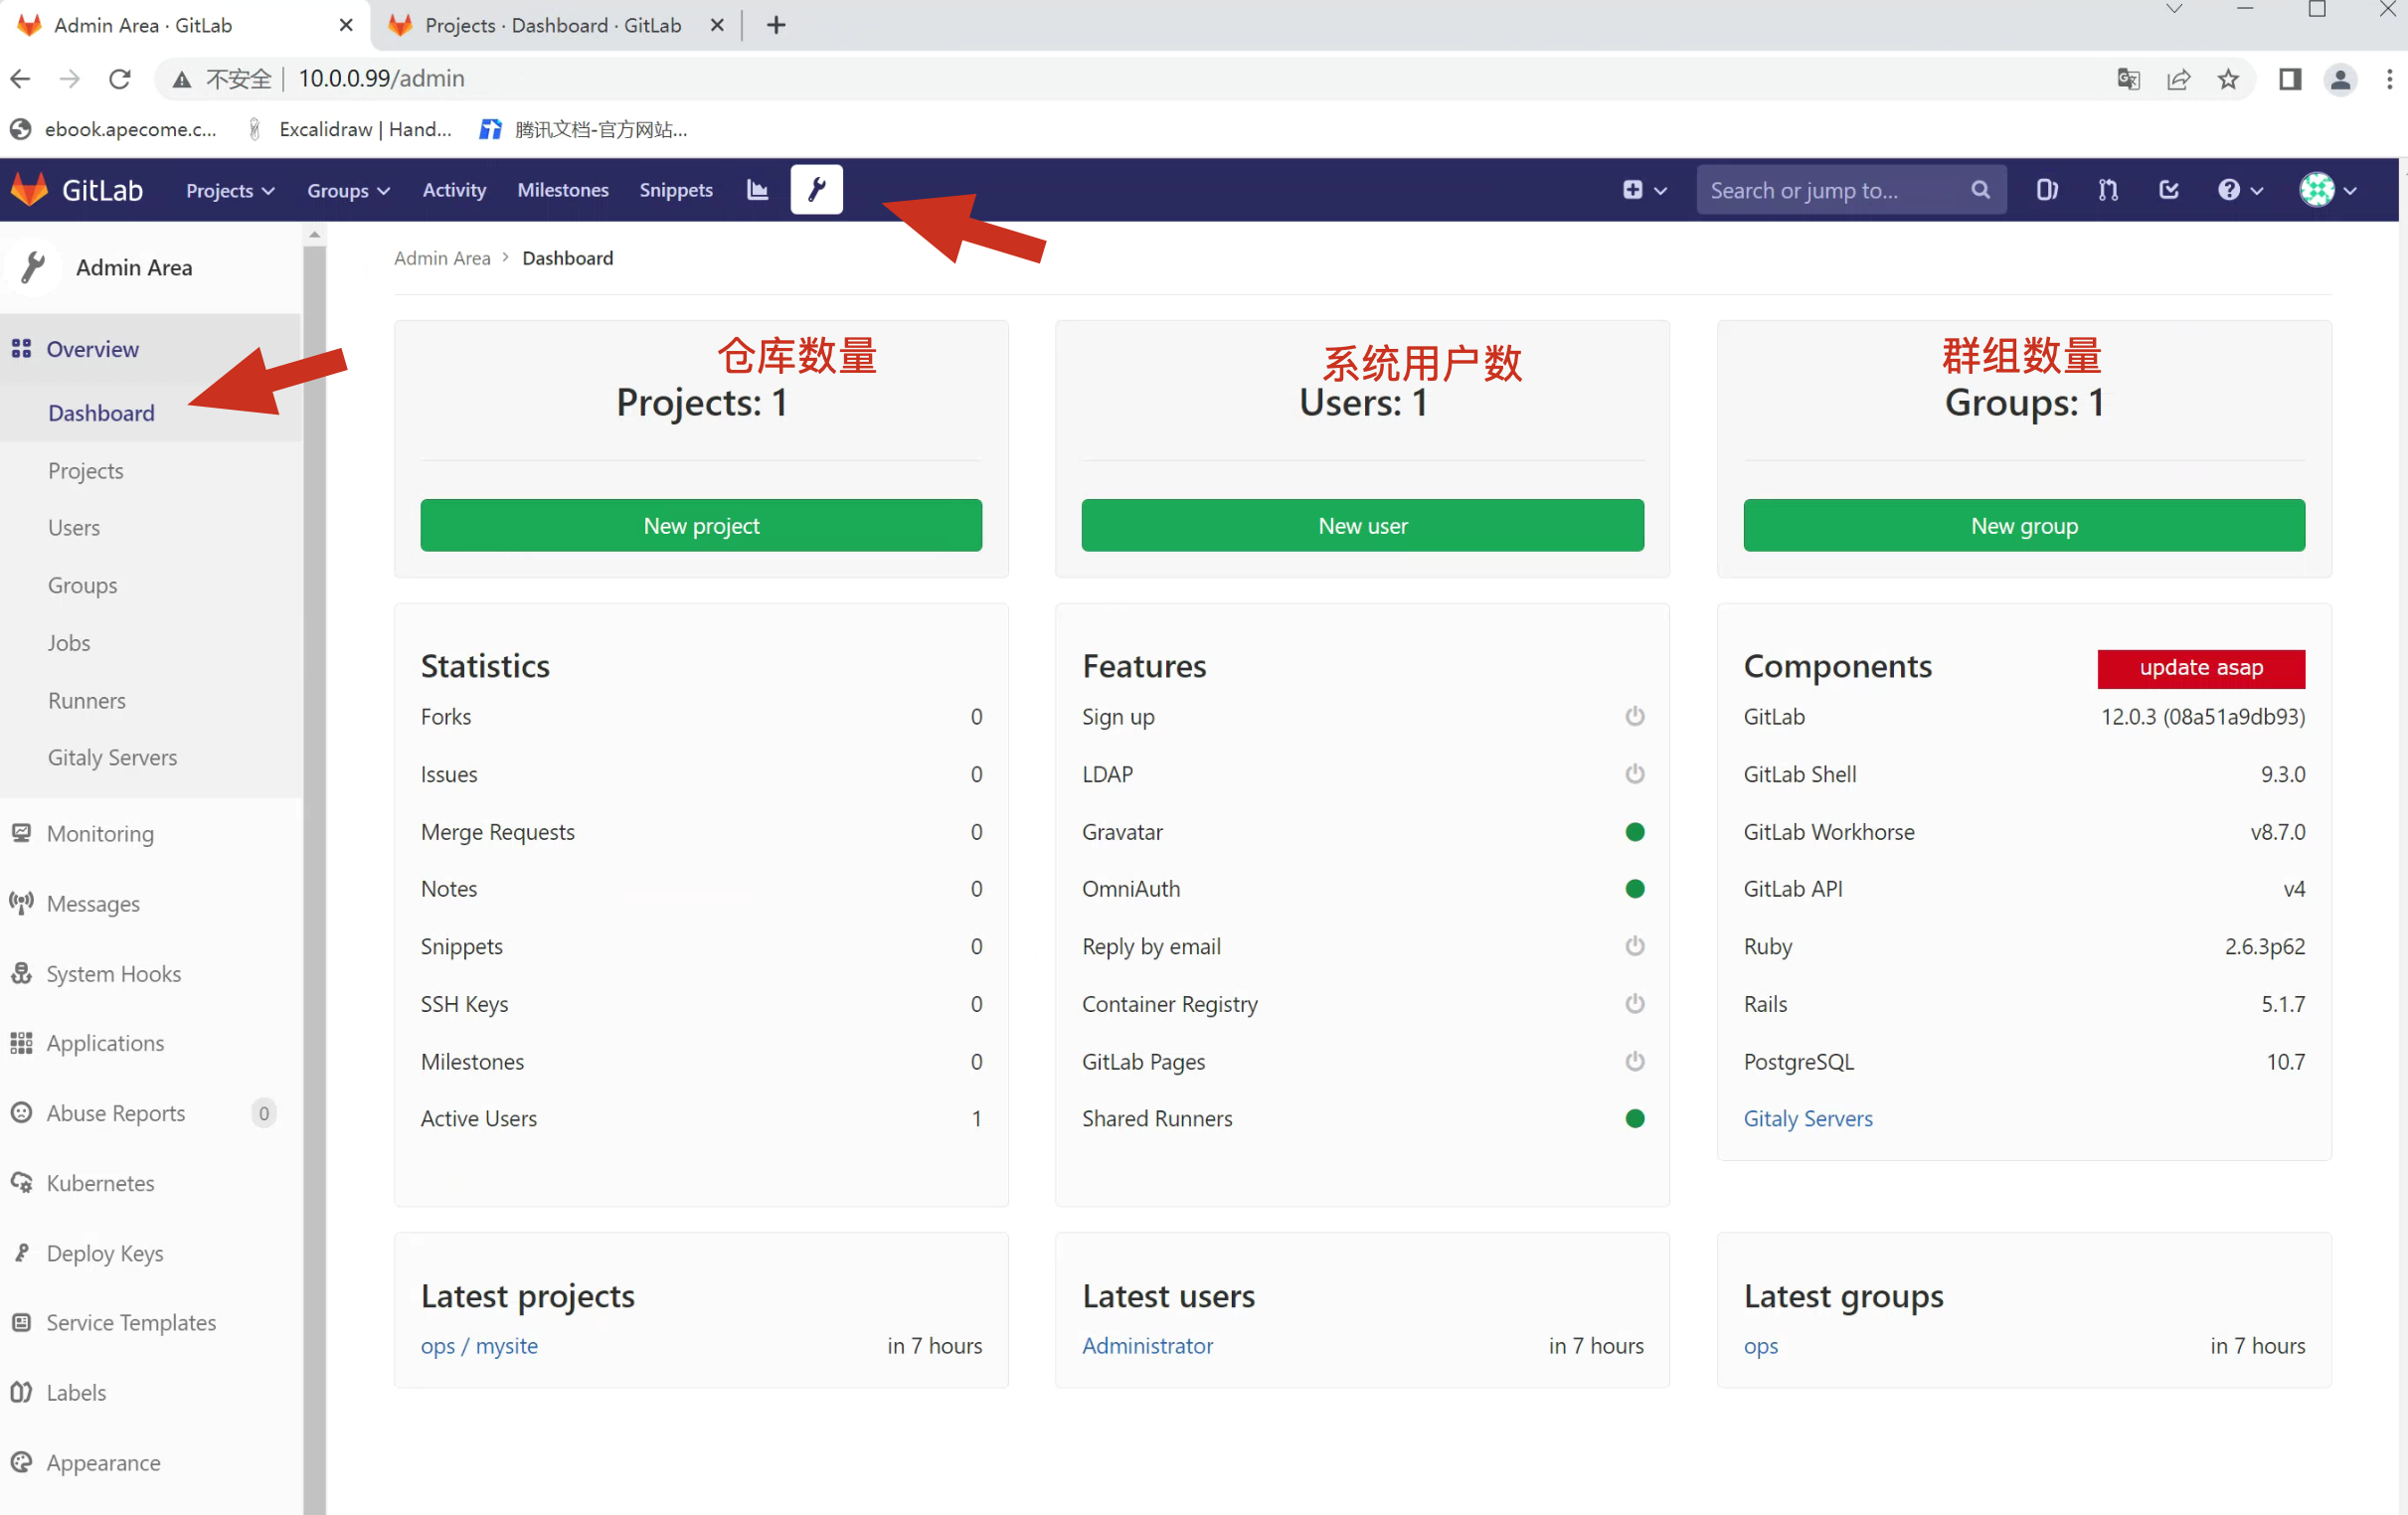
7.3查看仪表盘
7.4创建用户

用户创建后,会收到修改密码的邮件。
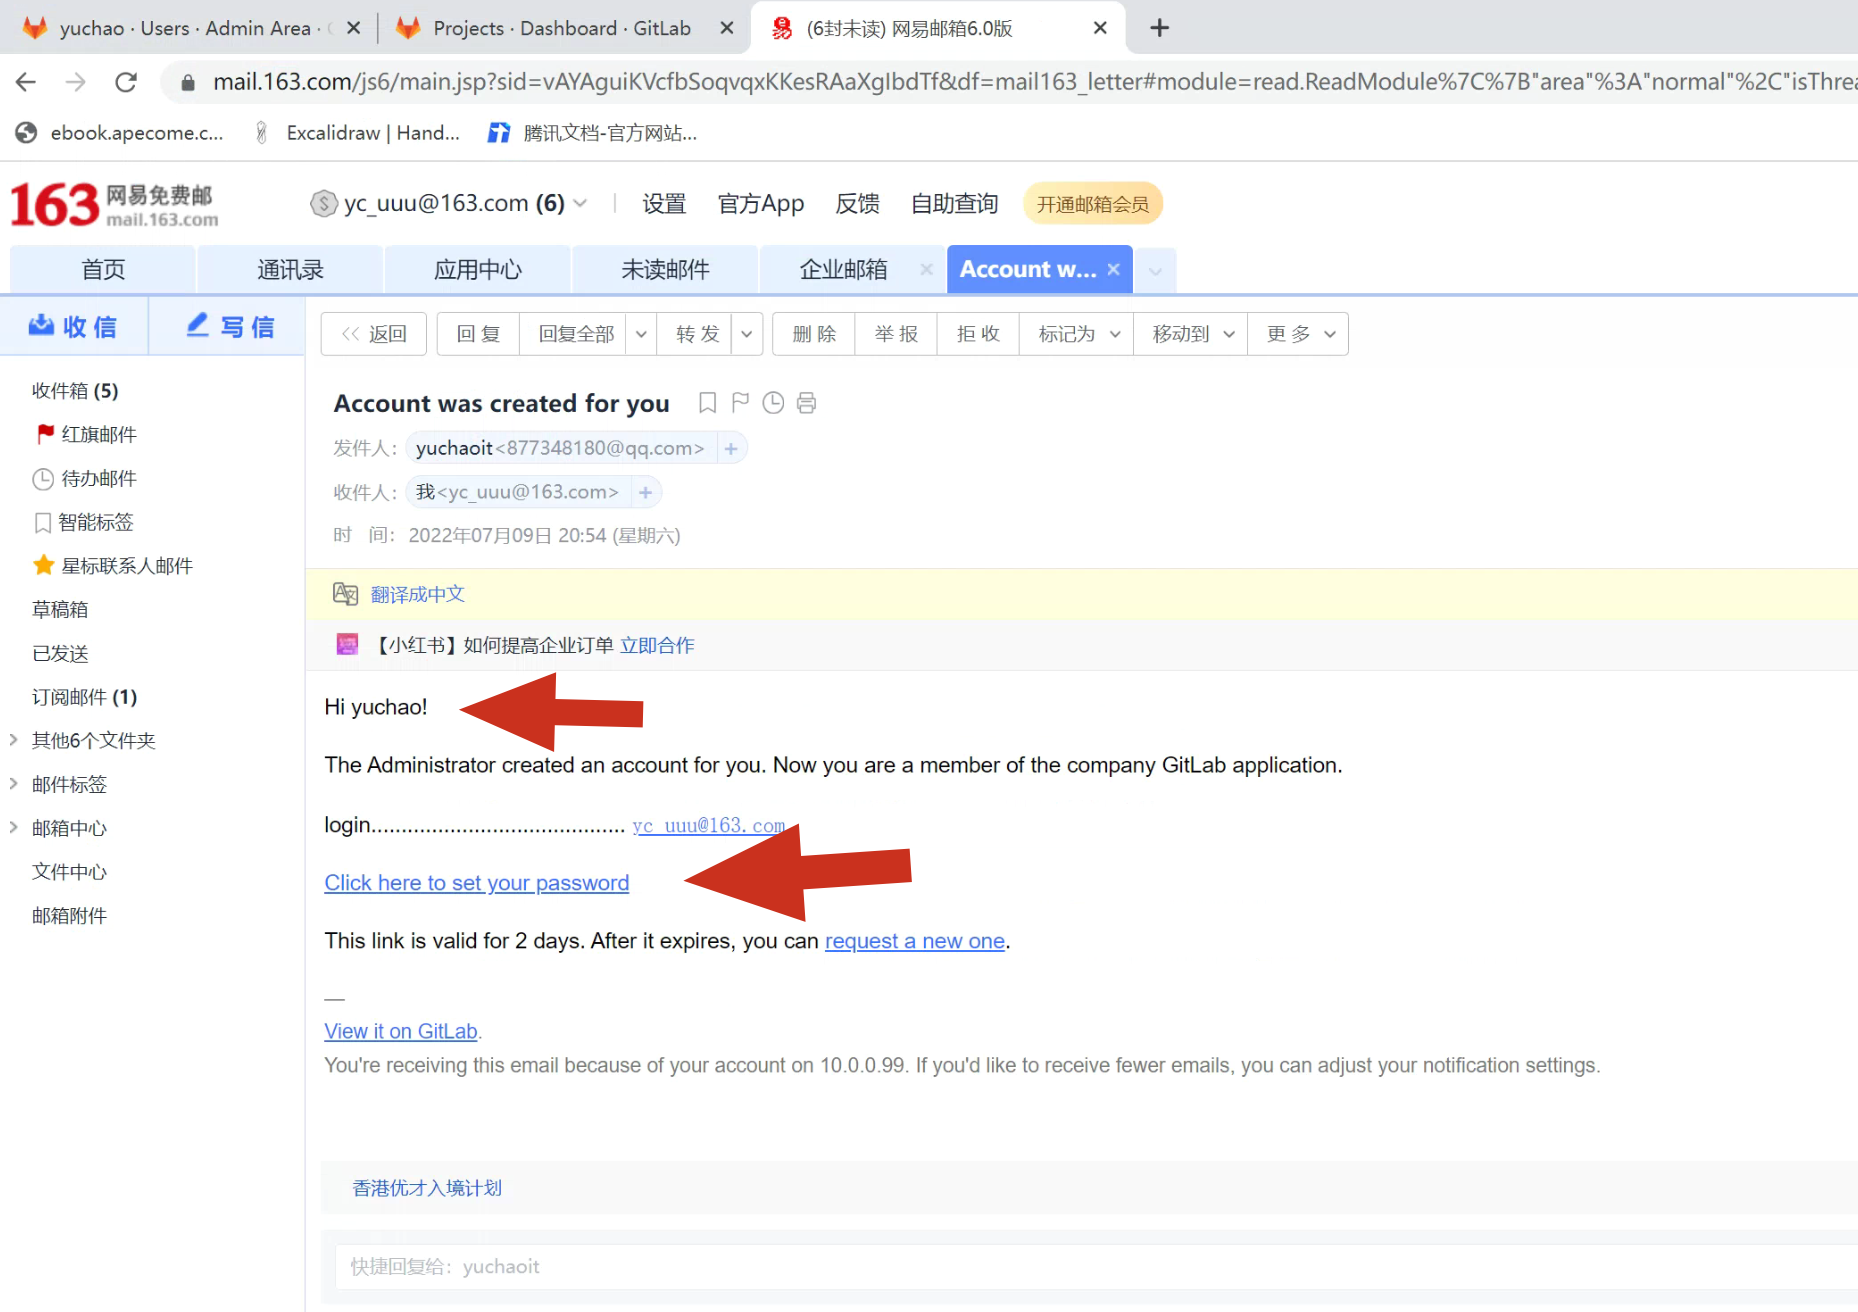
注意,会跳转到你gitlab设置的服务器url里。
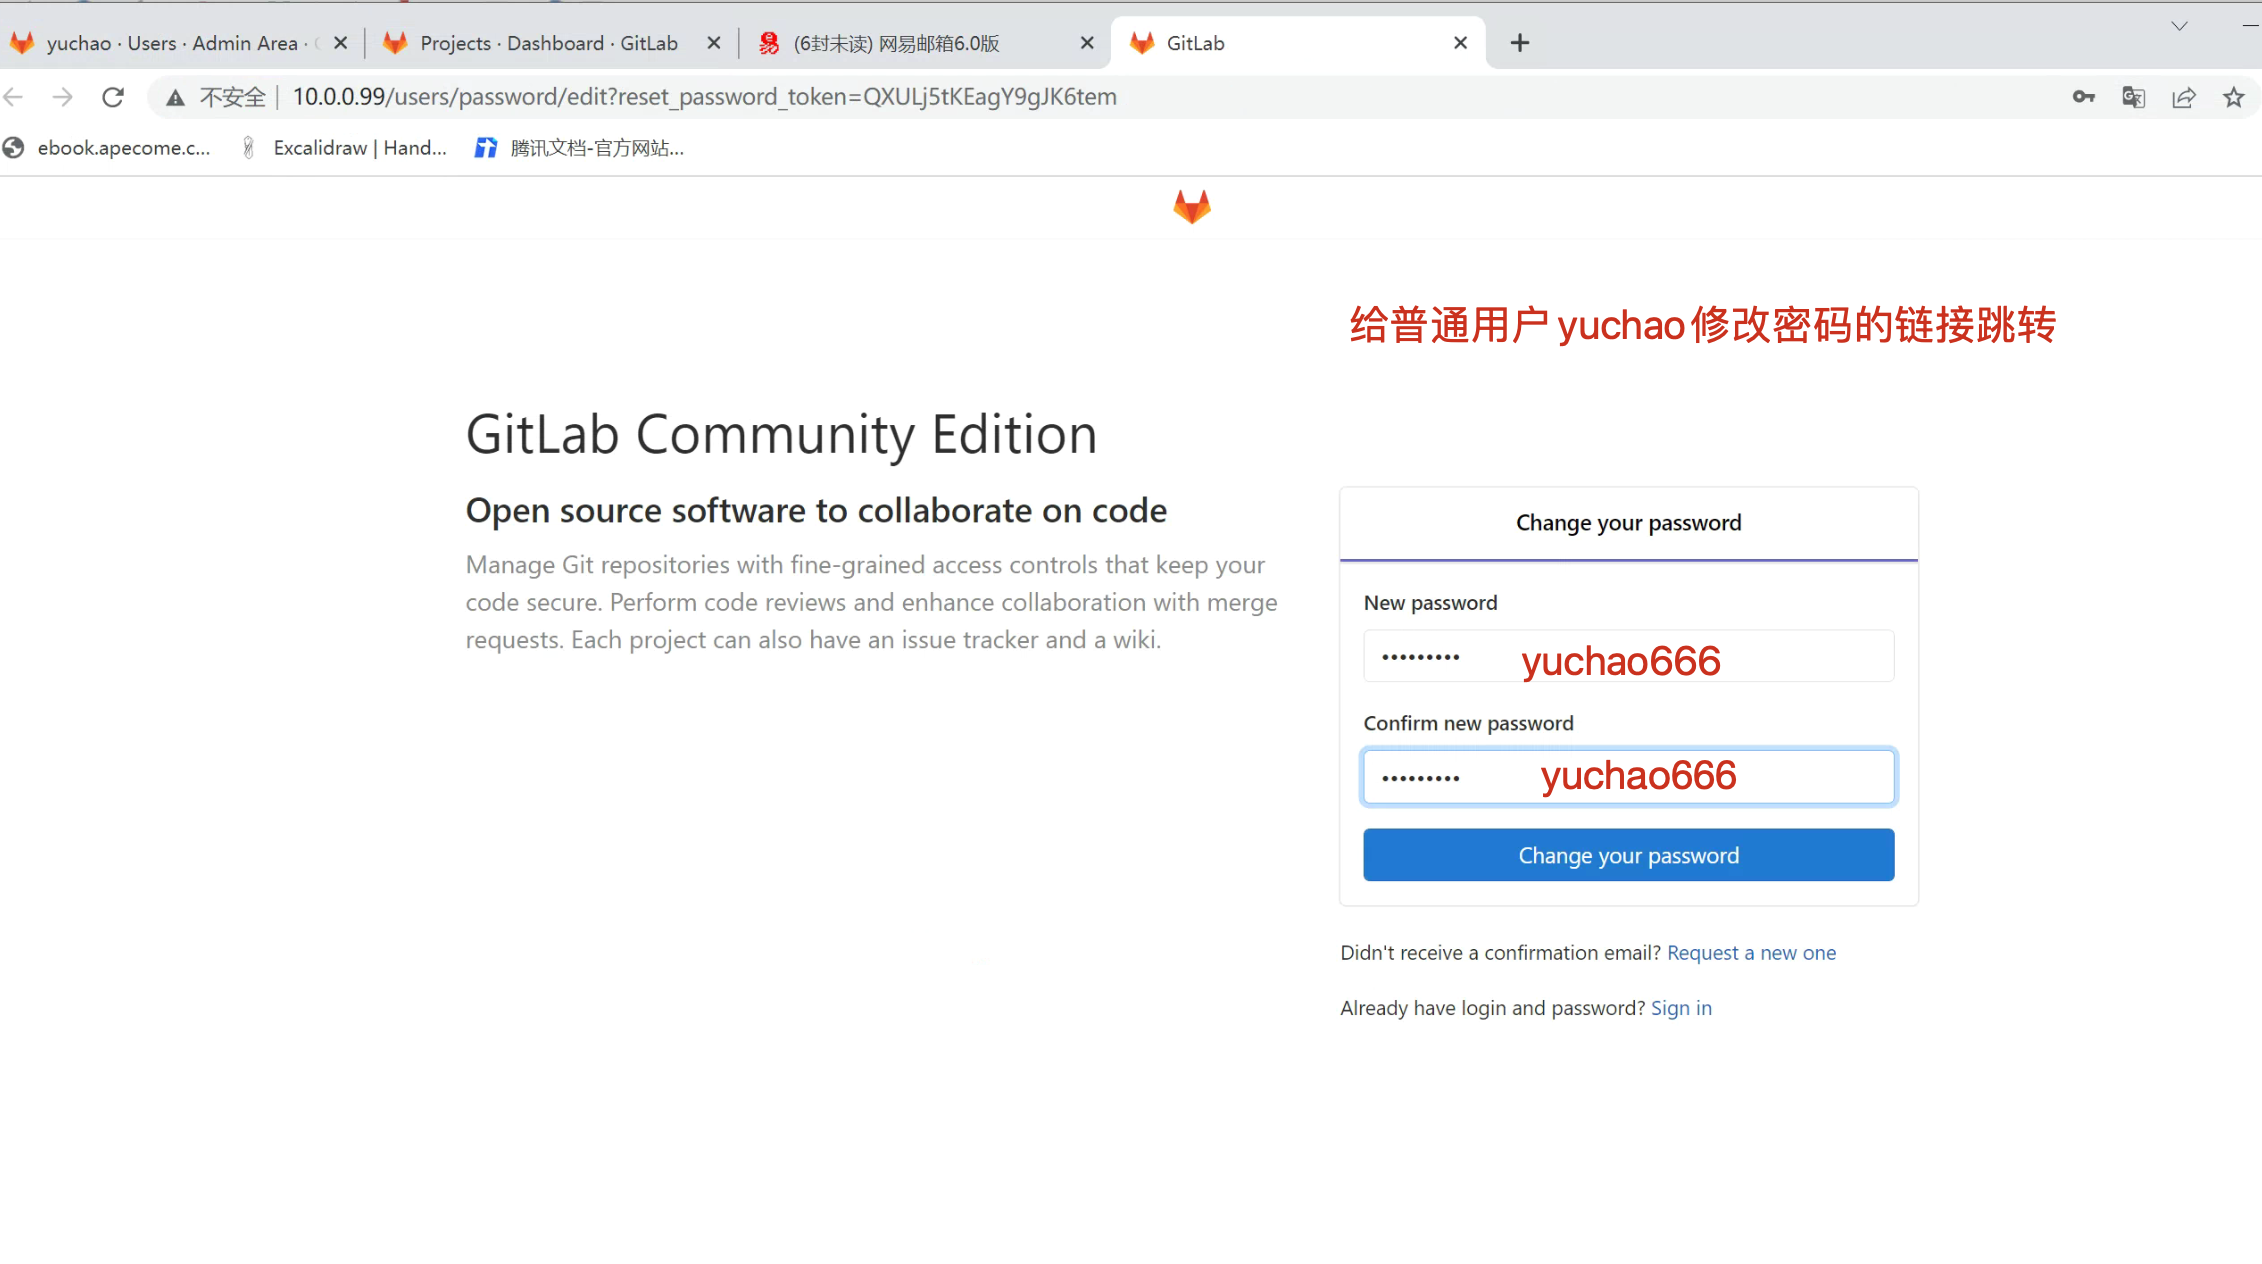
7.5用普通用户yuchao登录gitlab
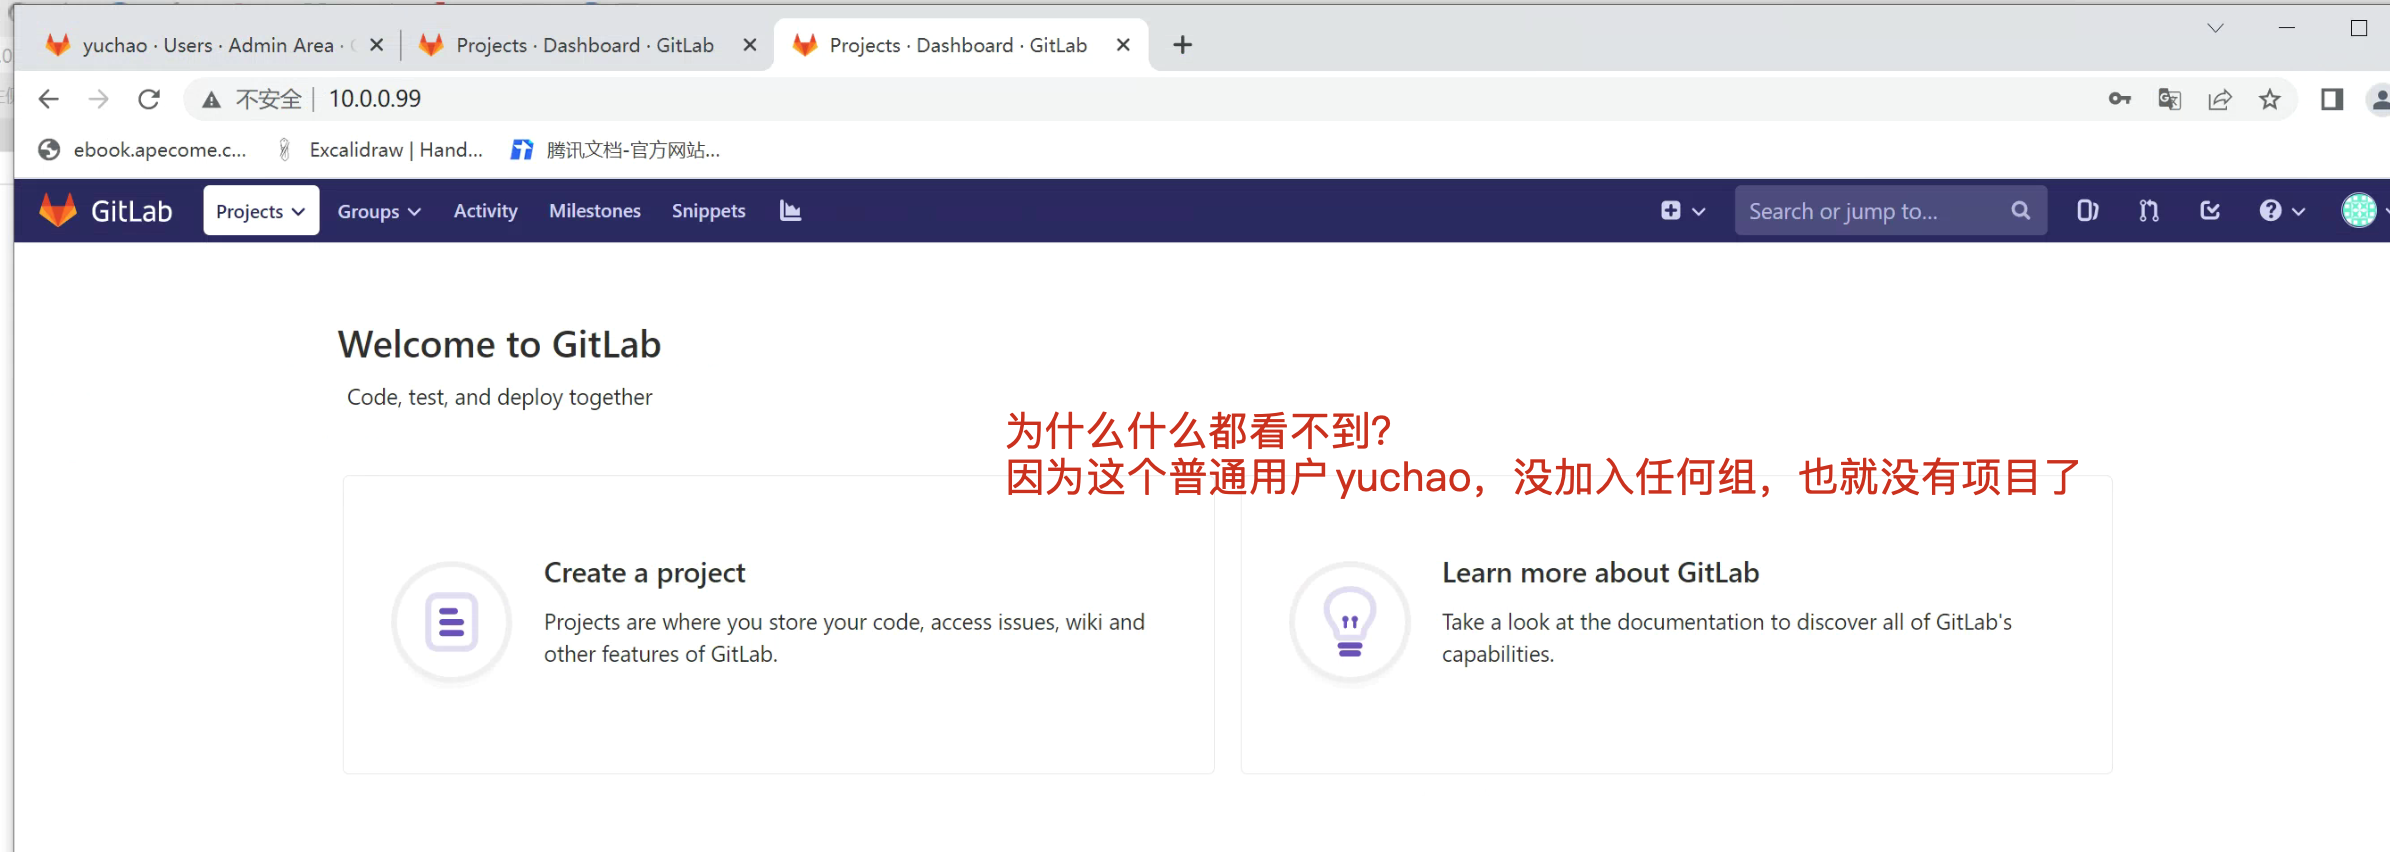
7.6 回到root给yuchao添加到ops组
Gitlab权限管理
Gitlab用户在组中有五种权限:Guest、Reporter、Developer、Master、Owner

Guest:可以创建issue、发表评论,不能读写版本库
Reporter:可以克隆代码,不能提交,QA、PM可以赋予这个权限
Developer:可以克隆代码、开发、提交、push,RD可以赋予这个权限
Master:可以创建项目、添加tag、保护分支、添加项目成员、编辑项目,核心RD负责人可以赋予这个权限
Owner:可以设置项目访问权限 - Visibility Level、删除项目、迁移项目、管理组成员,开发组leader可以赋予这个权限


Gitlab中的组和项目有三种访问权限:Private、Internal、Public

Private:只有组成员才能看到
Internal:只要登录的用户就能看到
Public:所有人都能看到
开源项目和组设置的是Internal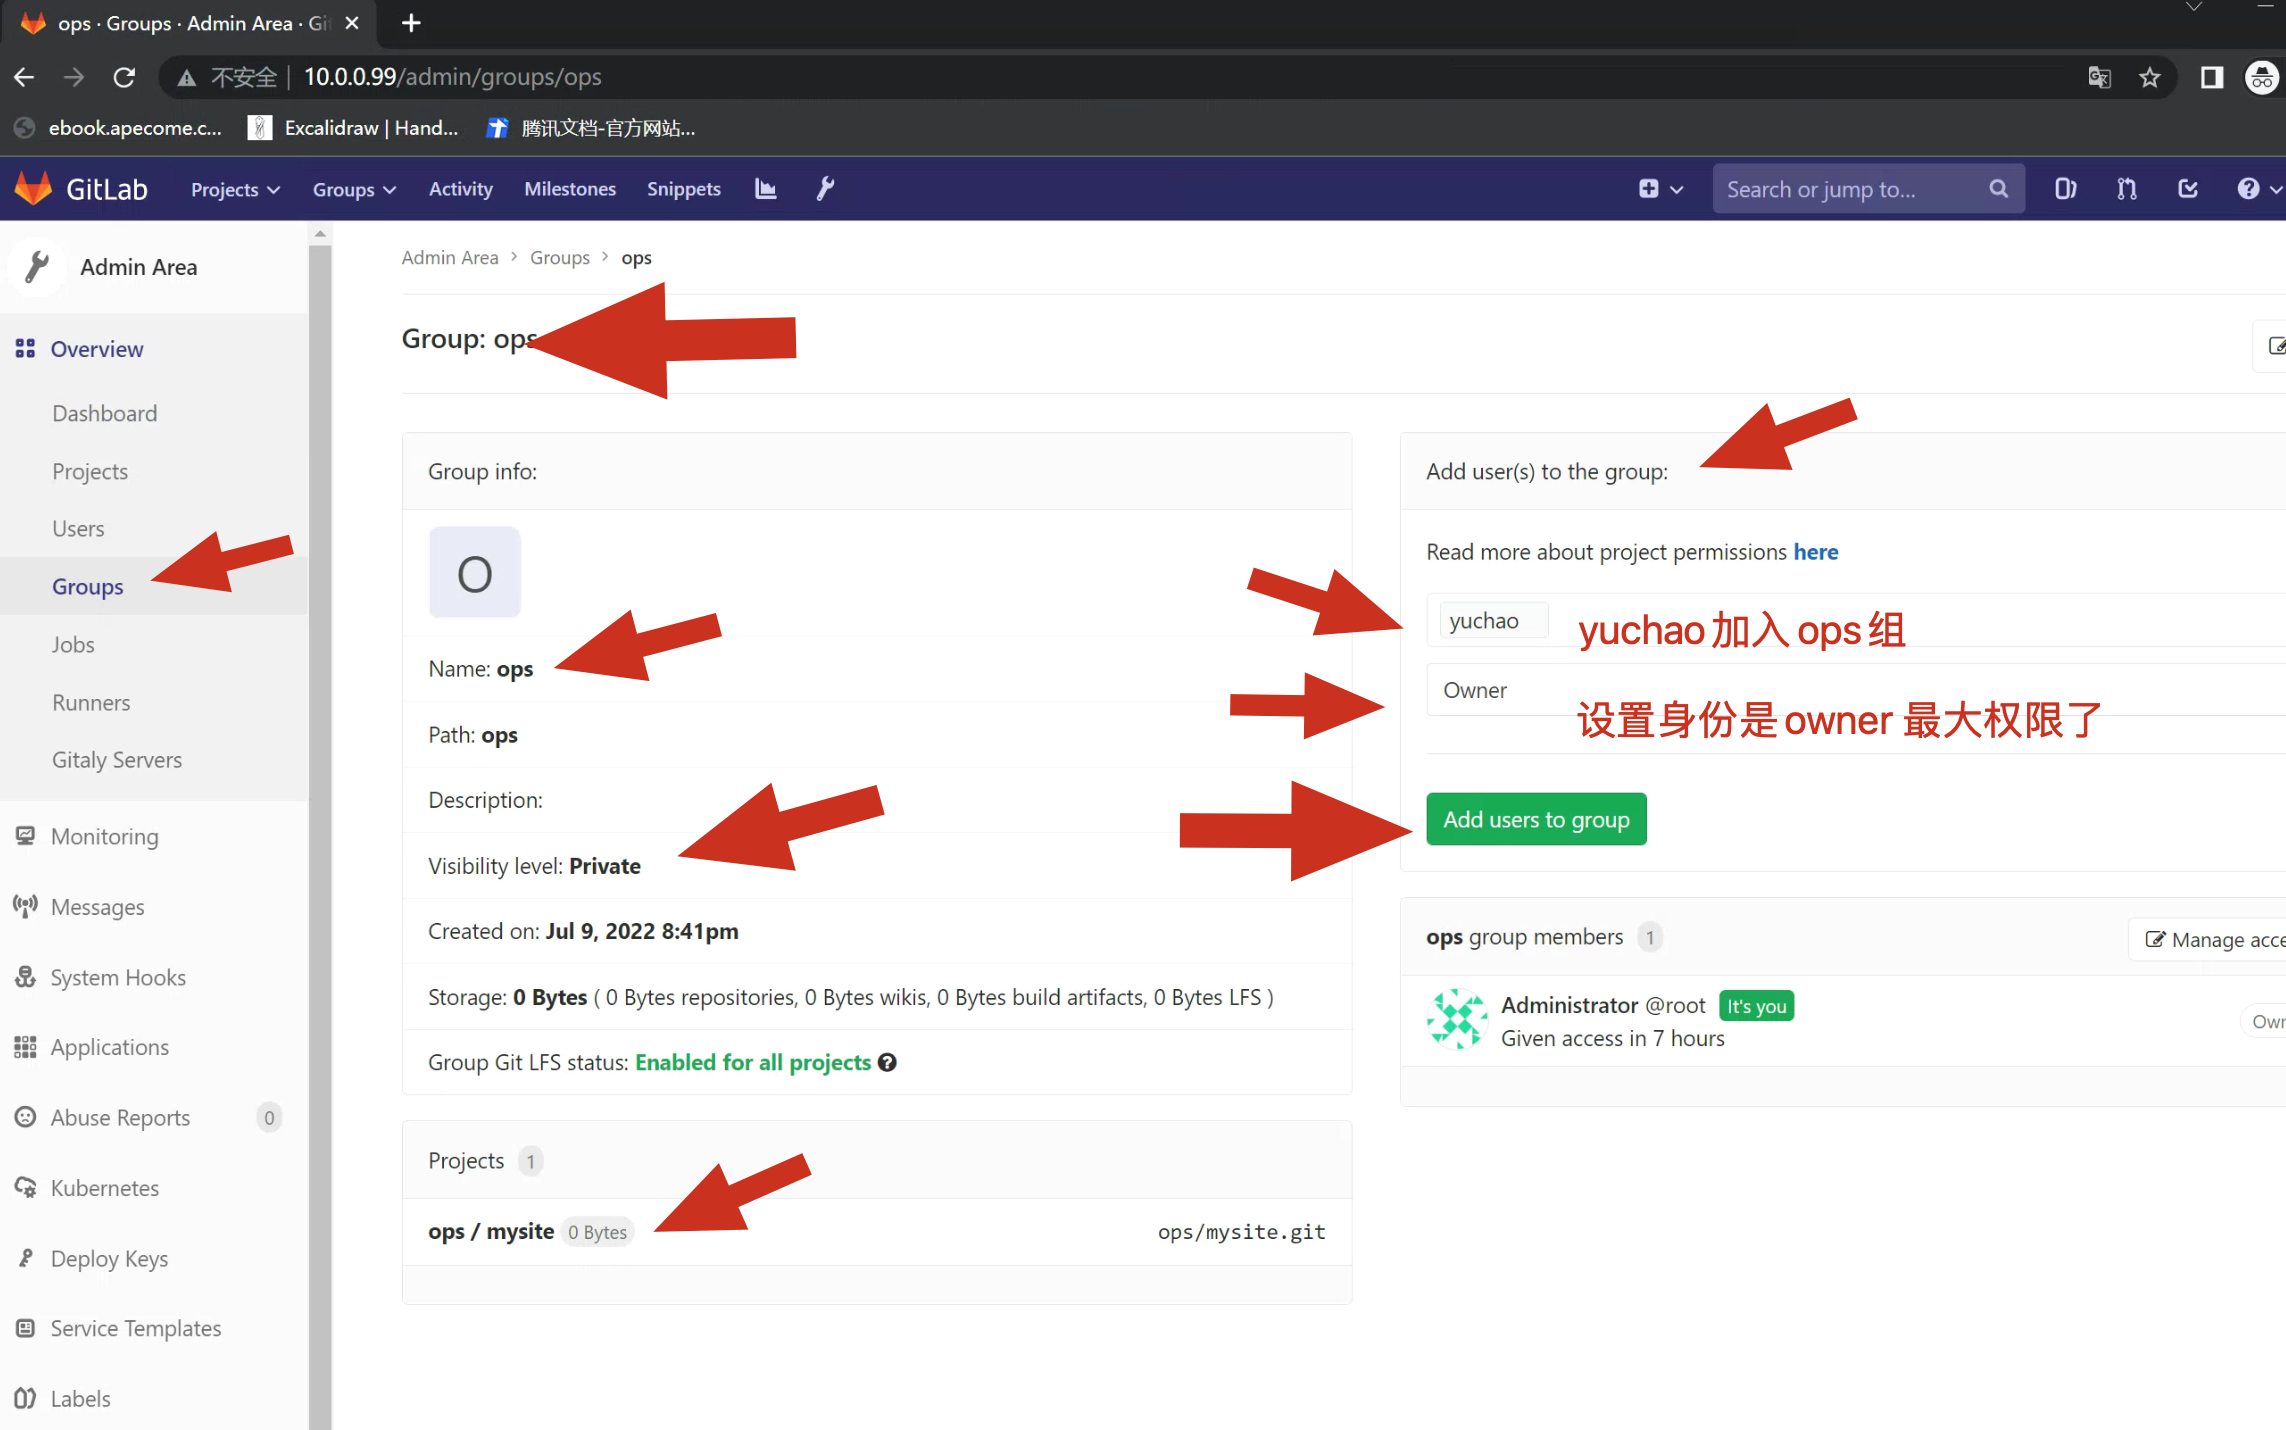
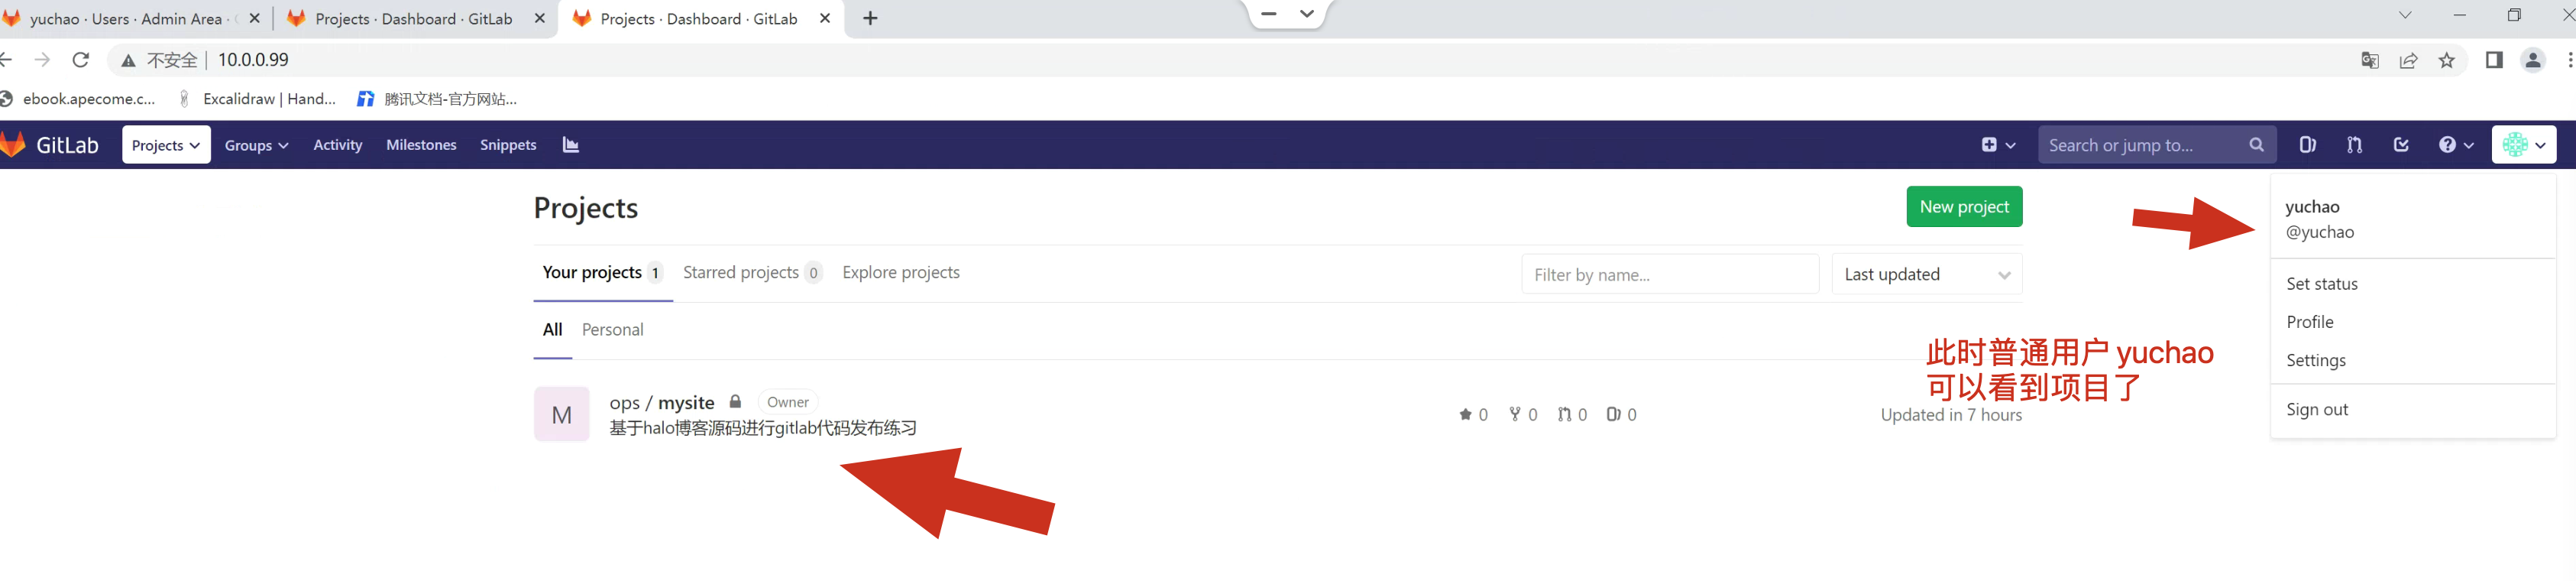
点击添加之后,回到yuchao用户,刷新查看权限,以可以看到代码仓库了。
如果是给的如developer权限,那么作为开发人员角色,权限较低,无法对代码仓库做编辑动作了。
8.gitlab仓库代码管理实践
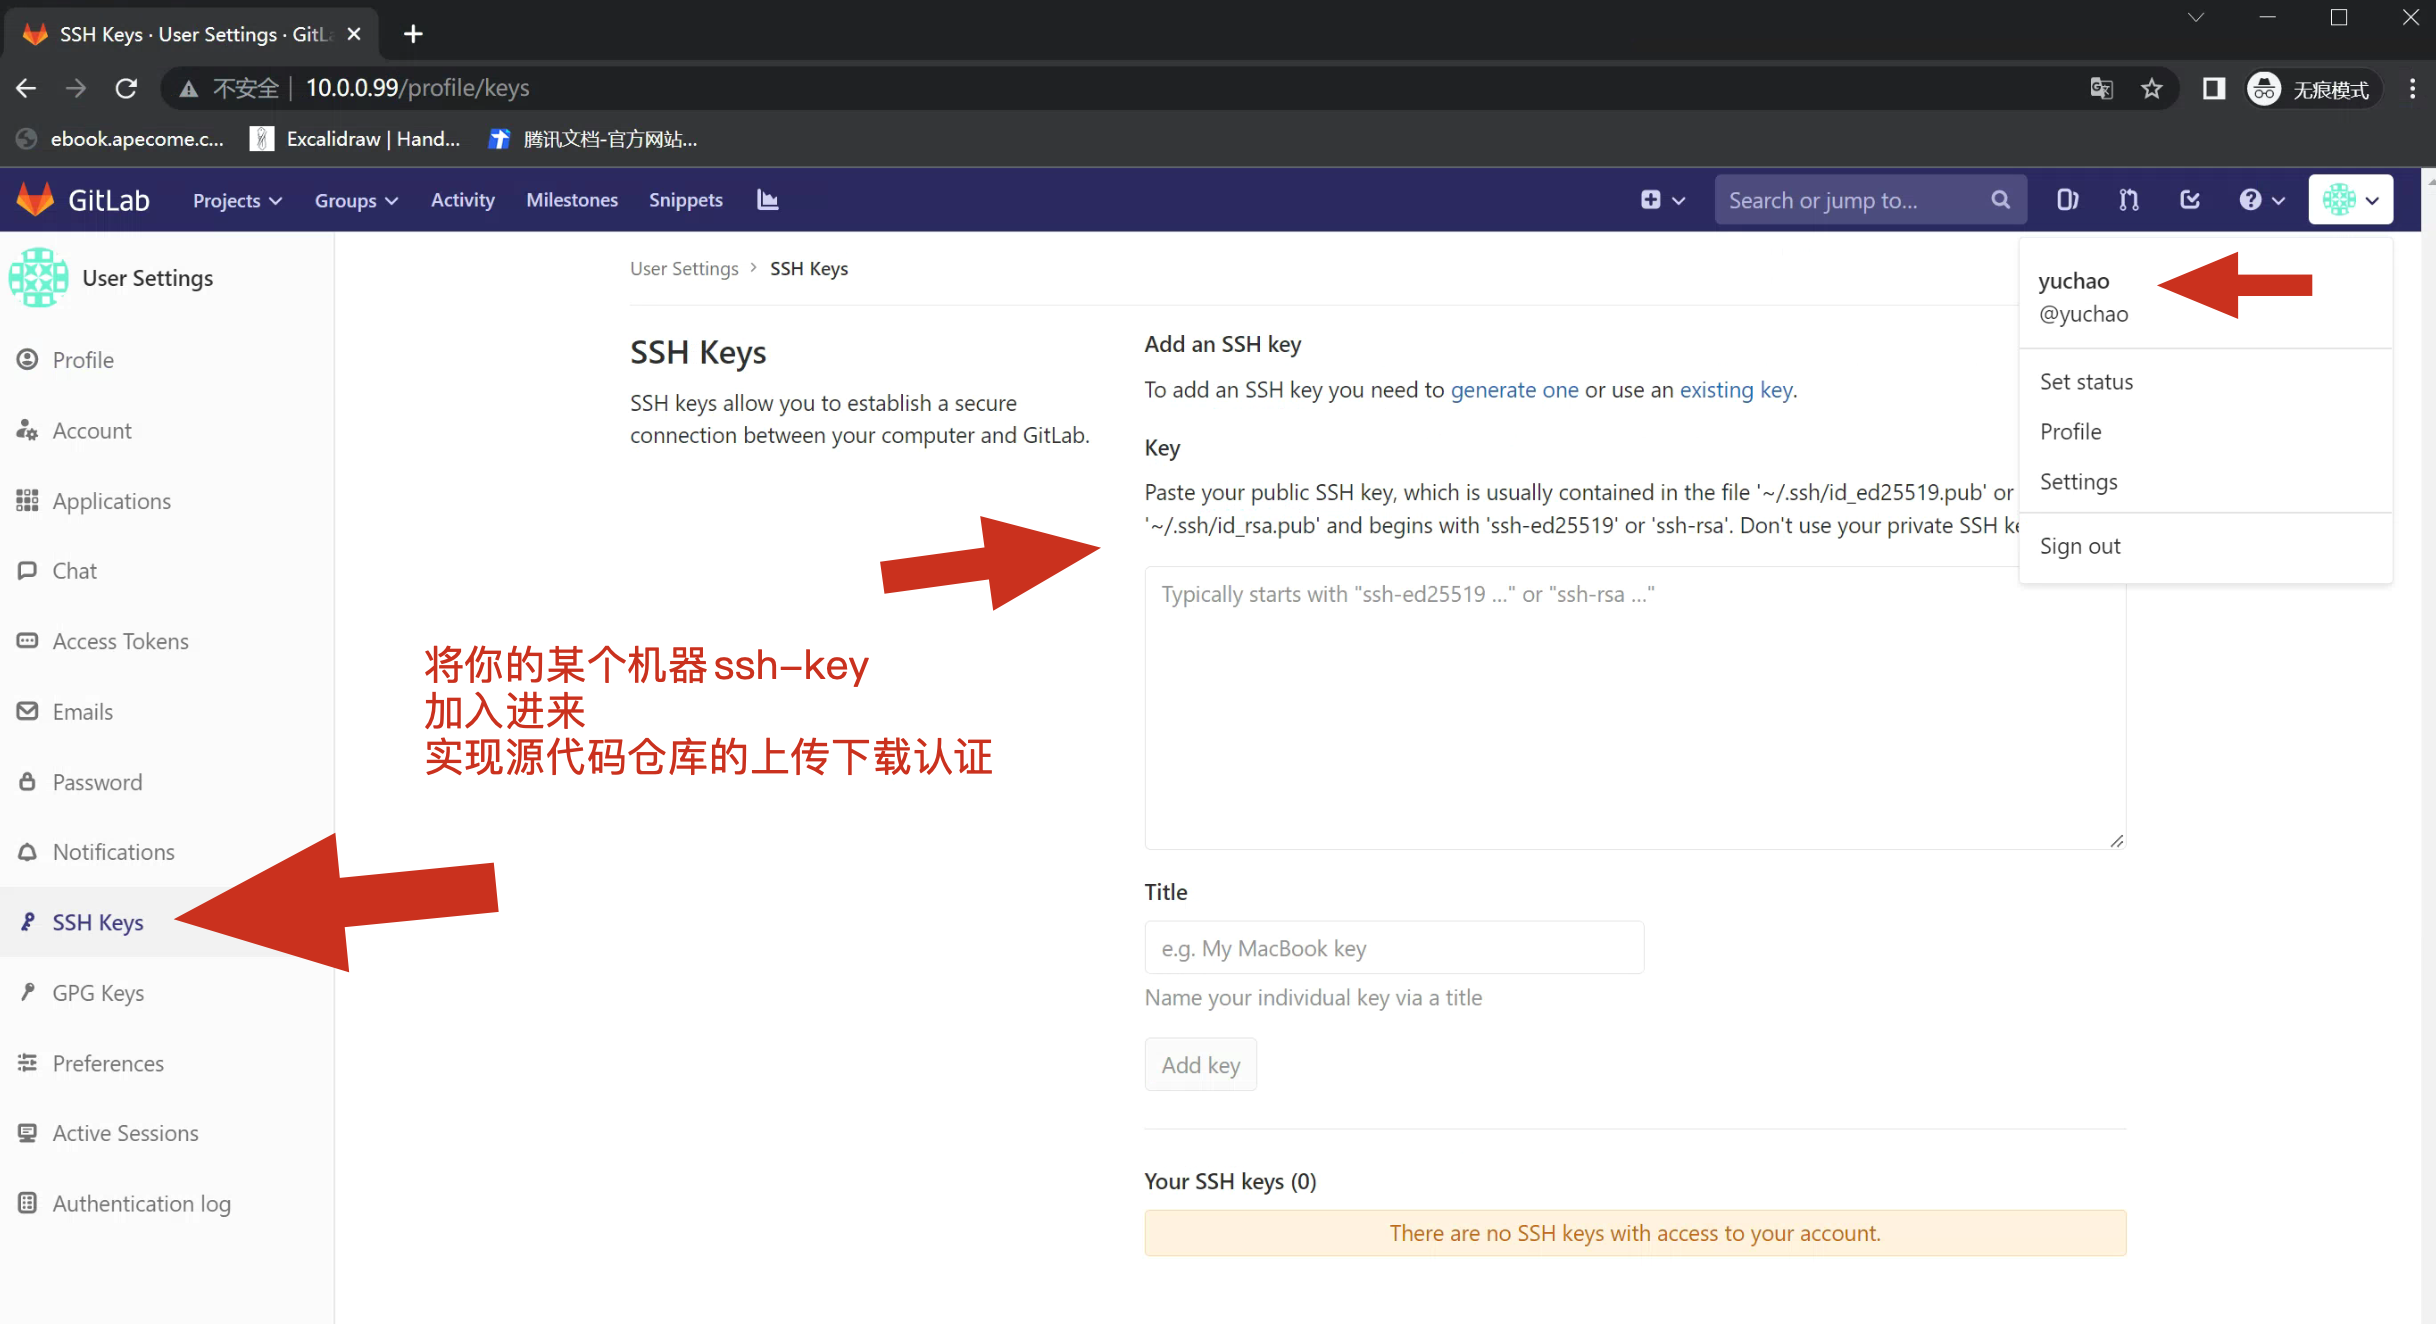
8.1配置ssh-key
前面我们已经在GitLab建立了仓库,并且授权用户可以使用仓库,我们所有的操作都是在Web界面进行的,接着我们就要配置客户端来连接代码仓库了。
我们的仓库是私有的,只有授权的用户才可以访问到该仓库,那么只要将客户端的用户 与我们GitLab的用户绑定,客户端即可访问到GitLab上的仓库,我们建议使用SSH方式实 现客户端与 Gitlab 用户的绑定,具体配置如下。
[root@zabbix-server-71 /home]#
[root@zabbix-server-71 /home]#
[root@zabbix-server-71 /home]#ssh-keygen
Generating public/private rsa key pair.
Enter file in which to save the key (/root/.ssh/id_rsa):
Enter passphrase (empty for no passphrase):
Enter same passphrase again:
Your identification has been saved in /root/.ssh/id_rsa.
Your public key has been saved in /root/.ssh/id_rsa.pub.
The key fingerprint is:
SHA256:trBXdW083SEfE3aw8BuLUROkXKfJgIjgOKMeGvQVvyU root@zabbix-server-71
The key's randomart image is:
+---[RSA 2048]----+
|    .o . . .ooBO+|
|   o  + . .. O+OB|
| .+ .. E .  = Oo*|
|...o.   +  . + =.|
|o. .  ..S . . o  |
|o..    + o       |
|..    . o        |
|       .         |
|                 |
+----[SHA256]-----+
[root@zabbix-server-71 /home]#cat ~/.ssh/id_rsa.pub
ssh-rsa AAAAB3NzaC1yc2EAAAADAQABAAABAQD6oxC6YMGx/pshLlqk2jhbB05XT858dRrMBEw/o4lpby2nY8l3uYaCz8CzxnHuUpm46E9rG3782rwbagzDcL1+iA7iYLvQ3EHFrjujPE/aFqf49HmS9B4+iQA1CeWDHKRcx2yx8kg13IoOa4/U3v6z64OAs9hkUlVEorBCT4IiH0UX11sHZyPyBfZWAd/Dm5V/5V3fzau3FV0bE5PGKQS+JTCQYrUA2dwjvp4sId+1XNSARpLoW9vZ9lo2OJPdvMCUVV/THcVFfQAKheIDHEbLdslptjP7U85JGtQ53bkMABPc1mgUKhW4PNgJ7twOZ0Kr3sqmWzKbF3VWwjrRBGAd root@zabbix-server-71
[root@zabbix-server-71 /home]#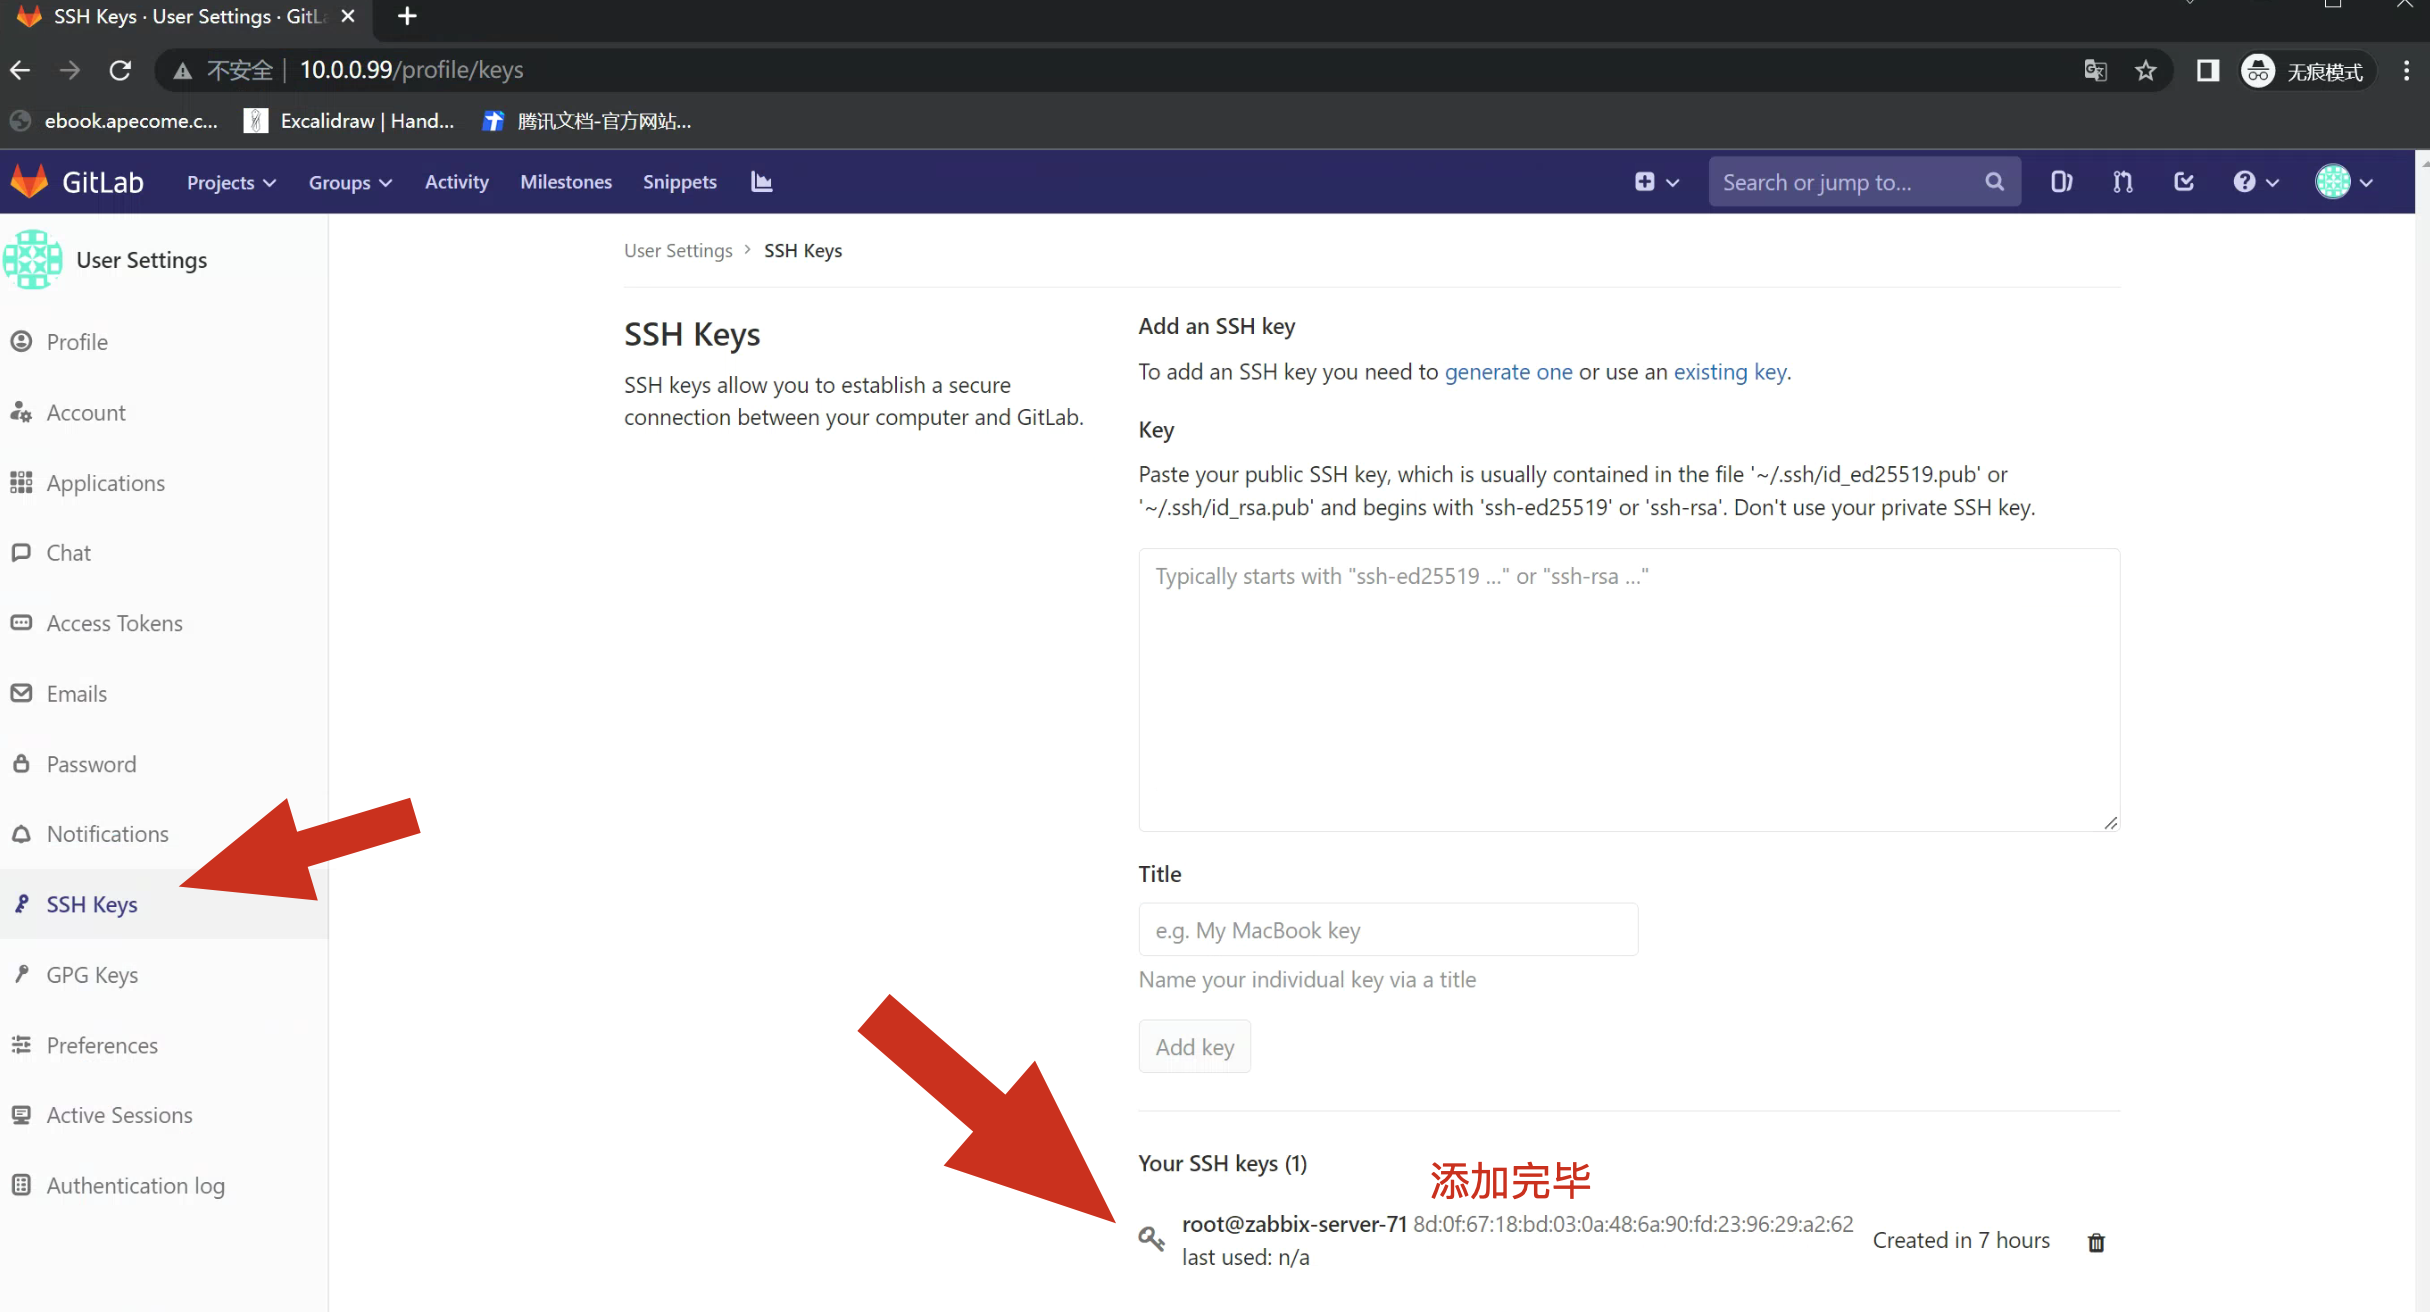
8.2发布halo博客源码实战
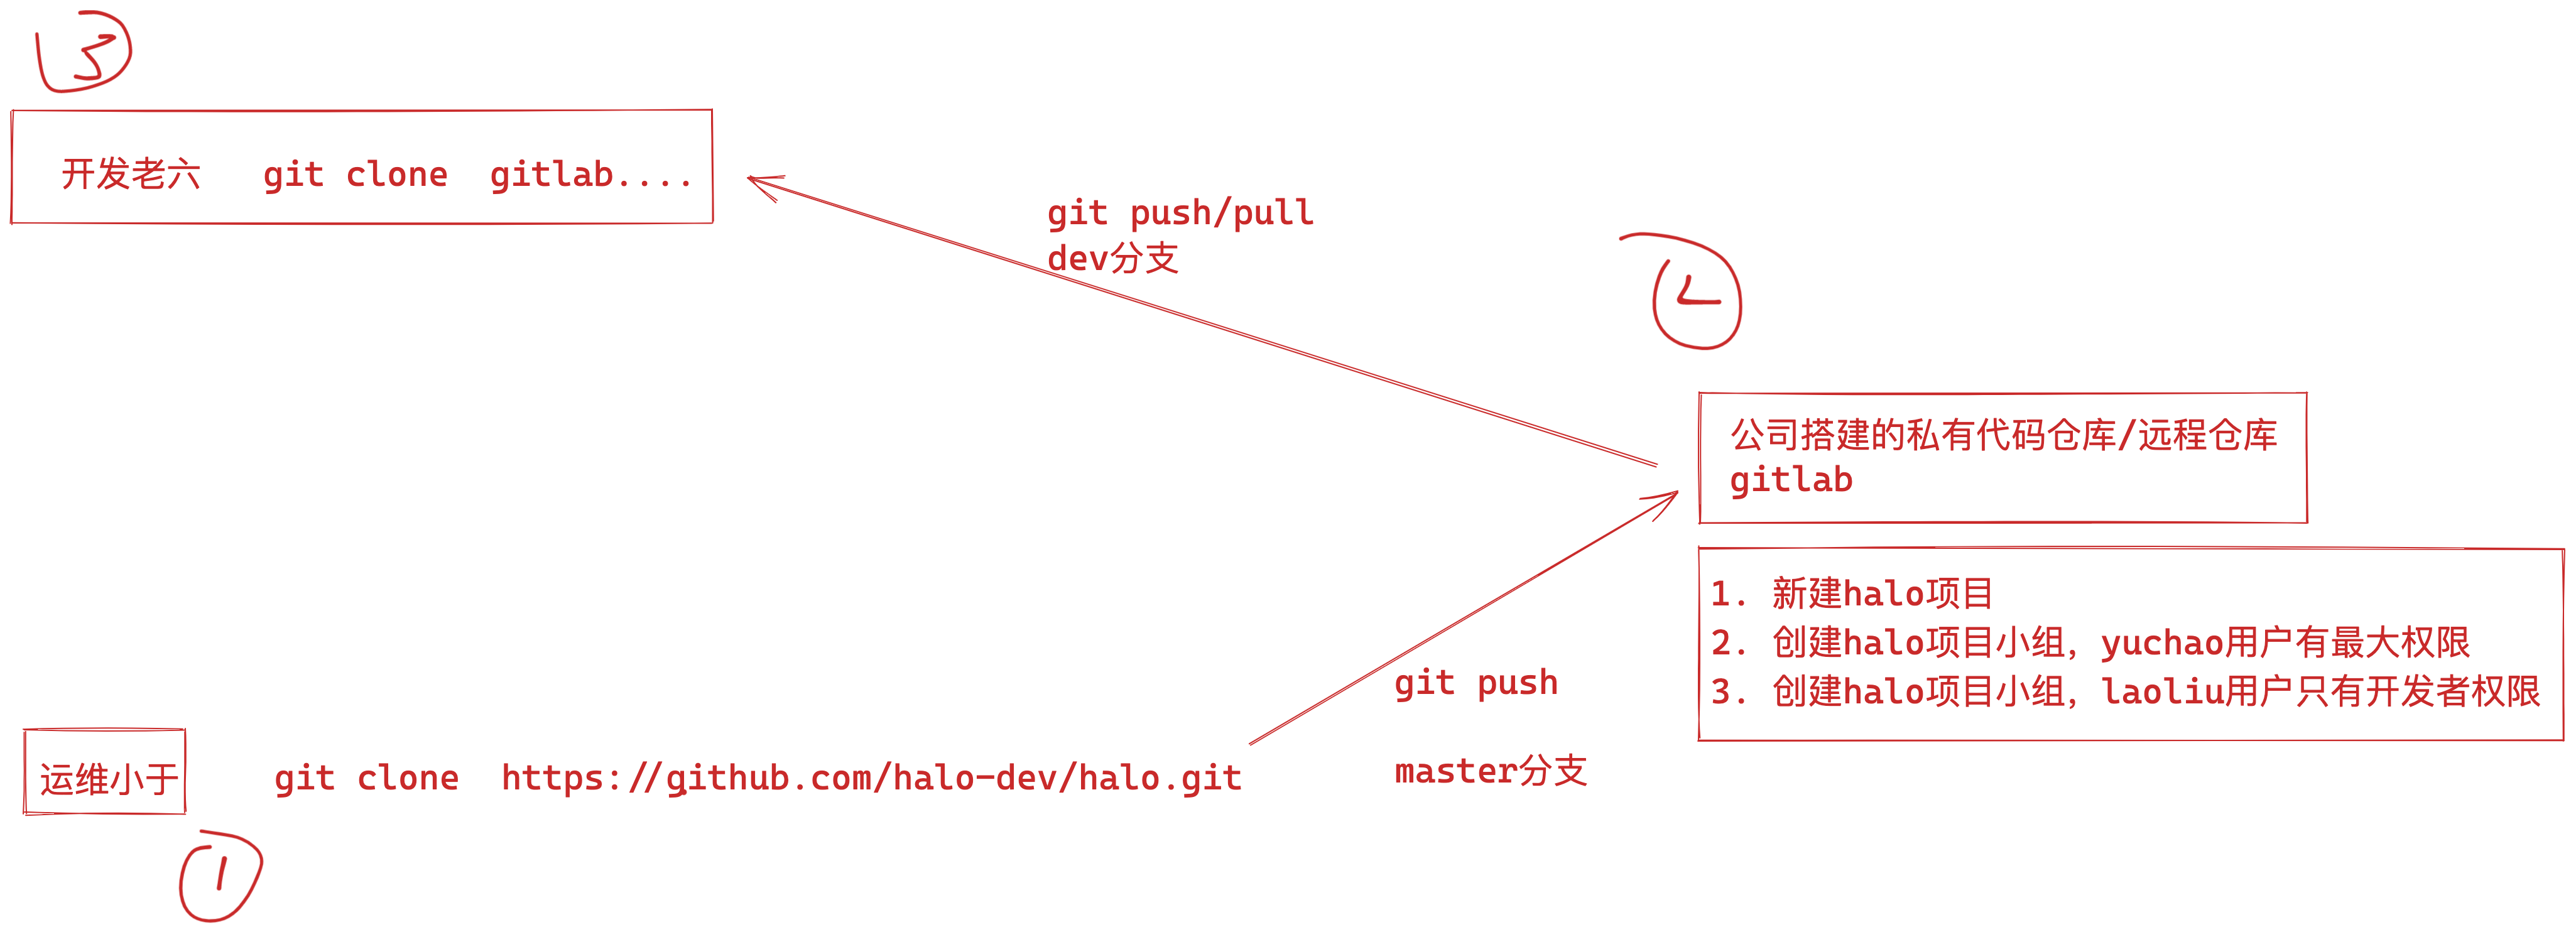
需求
1. 本地获取halo源码,进行git版本管理,修改代码文件
2. 上传到gitlab进行远程仓库管理
3. 实现分支合并,代码上传下载
实践
halo源码下载
1.设置git身份

[root@zabbix-server-71 /home]#yum install git -y

[root@zabbix-server-71 /home]#git config --global user.name 'yuchao'

[root@zabbix-server-71 /home]#
[root@zabbix-server-71 /home]#git config --global user.email 'yc_uuu@163.com'
[root@zabbix-server-71 /home]#git config --global color.ui true


[root@zabbix-server-71 /home]#git config --list
user.name=yuchao
user.email=yc_uuu@163.com
color.ui=true


2.运维小于下载源码
这里是在模拟,在公司里,这套源码,肯定是开发发给你的,然后你推送到gitlab里进行管理


[root@zabbix-server-71 /home]#git clone https://github.com/halo-dev/halo.git
Cloning into 'halo'...
remote: Enumerating objects: 42941, done.
remote: Counting objects: 100% (806/806), done.
remote: Compressing objects: 100% (489/489), done.
remote: Total 42941 (delta 228), reused 598 (delta 132), pack-reused 42135
Receiving objects: 100% (42941/42941), 46.46 MiB | 9.85 MiB/s, done.
Resolving deltas: 100% (22139/22139), done.


3.查看halo本地仓库
[root@zabbix-server-71 /home]#cd halo/
[root@zabbix-server-71 /home/halo]#ls -a
[root@zabbix-server-71 /home/halo]#git status

查看最近5条版本提交记录
[root@zabbix-server-71 /home/halo]#git log -5

查看tag记录
git tag -l

git show v1.5.4
gitlab创建小组\用户
创建yuchao用户是管理员

laoliu用户是开发者  账号laoliu 密码laoliu666
gitlab项目创建

设置ssh-key
运维推送代码到gitlab(yuchao账号)
[root@zabbix-server-71 /home/halo]#git remote rename origin old-origin
[root@zabbix-server-71 /home/halo]#git remote add origin git@10.0.0.99:halo/my_halo.git
[root@zabbix-server-71 /home/halo]#git push -u origin --all
[root@zabbix-server-71 /home/halo]#git push -u origin --tags
保护master分支(不允许开发者提交)

开发laoliu开始写代码
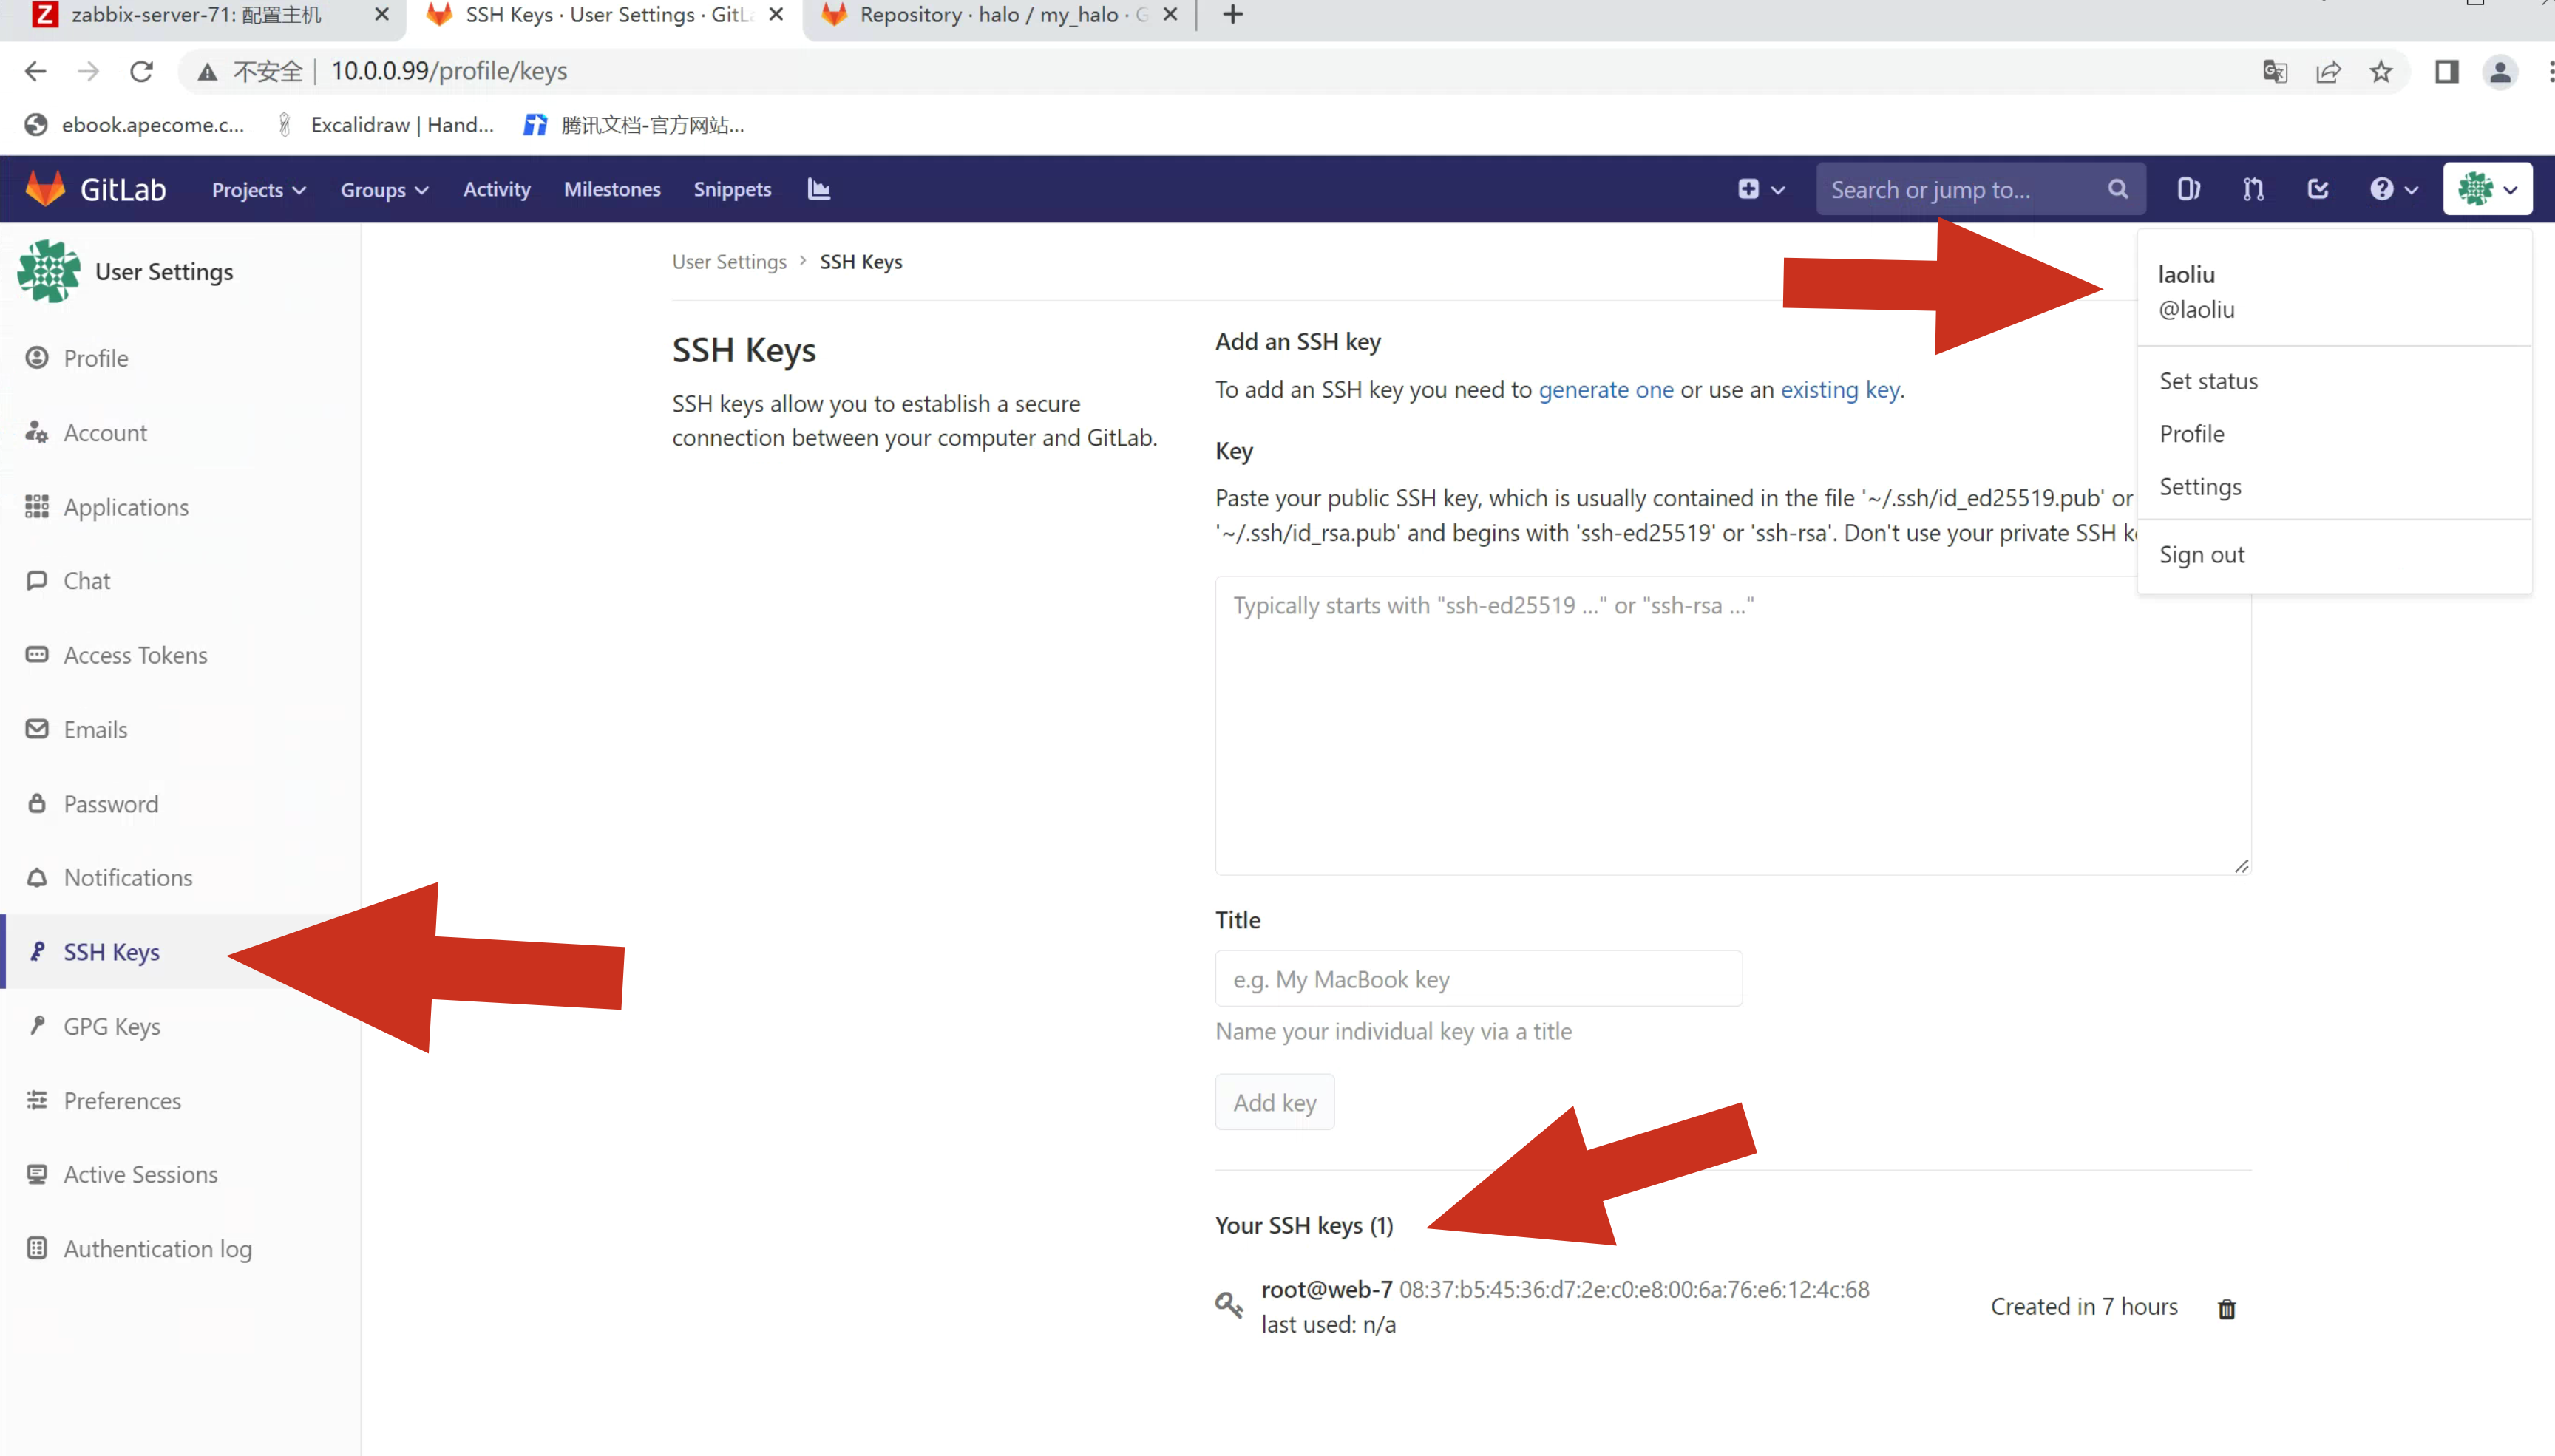
添加ssh-key
给web7机器的ssh-key,加入到laoliu的账号里
1. 克隆代码
2. 本地创建分支
3. 提交本地版本
4. 推送到gitlab
5. 运维去合并laoliu分支
实践
0.注意先设置当前git身份
yum install git -y
git config --global user.name 'laoliu'
git config --global user.email '2829397658@qq.com'
git config --global color.ui true


1.克隆代码,到任意一个新机器,属于laoliu用的机器
[root@web-7 /home/laoliu]#git clone git@10.0.0.99:halo/my_halo.git
Cloning into 'my_halo'...
remote: Enumerating objects: 41228, done.
remote: Counting objects: 100% (41228/41228), done.
remote: Compressing objects: 100% (13498/13498), done.
remote: Total 41228 (delta 21643), reused 41158 (delta 21573)
Receiving objects: 100% (41228/41228), 43.84 MiB | 52.48 MiB/s, done.
Resolving deltas: 100% (21643/21643), done.


2.老六绑定远程分支(laoliu属于halo组的开发者身份)

[root@web-7 /home/laoliu/my_halo]#git remote -v
origin    git@10.0.0.99:halo/my_halo.git (fetch)
origin    git@10.0.0.99:halo/my_halo.git (push)
3.试试能推送代码到master上吗?(肯定不能,因为laoliu普通用户,无法推到master分支,设置了分支保护)
[root@web-7 /home/laoliu/my_halo]#echo '我是老六shell' > laoliu.sh
[root@web-7 /home/laoliu/my_halo]#
[root@web-7 /home/laoliu/my_halo]#git add laoliu.sh
[root@web-7 /home/laoliu/my_halo]#git status
# On branch master
# Changes to be committed:
#   (use "git reset HEAD <file>..." to unstage)
#
#    new file:   laoliu.sh
#
[root@web-7 /home/laoliu/my_halo]#
[root@web-7 /home/laoliu/my_halo]#git commit -m 'laoliu.sh'
[master 305334c] laoliu.sh
 1 file changed, 1 insertion(+)
 create mode 100644 laoliu.sh
[root@web-7 /home/laoliu/my_halo]#
[root@web-7 /home/laoliu/my_halo]#git push -u origin master
Counting objects: 4, done.
Delta compression using up to 4 threads.
Compressing objects: 100% (2/2), done.
Writing objects: 100% (3/3), 279 bytes | 0 bytes/s, done.
Total 3 (delta 1), reused 0 (delta 0)
remote: GitLab: You are not allowed to push code to protected branches on this project.
To git@10.0.0.99:halo/my_halo.git
 ! [remote rejected] master -> master (pre-receive hook declined)
error: failed to push some refs to 'git@10.0.0.99:halo/my_halo.git'
4.你只能新建分支,然后写代码推送
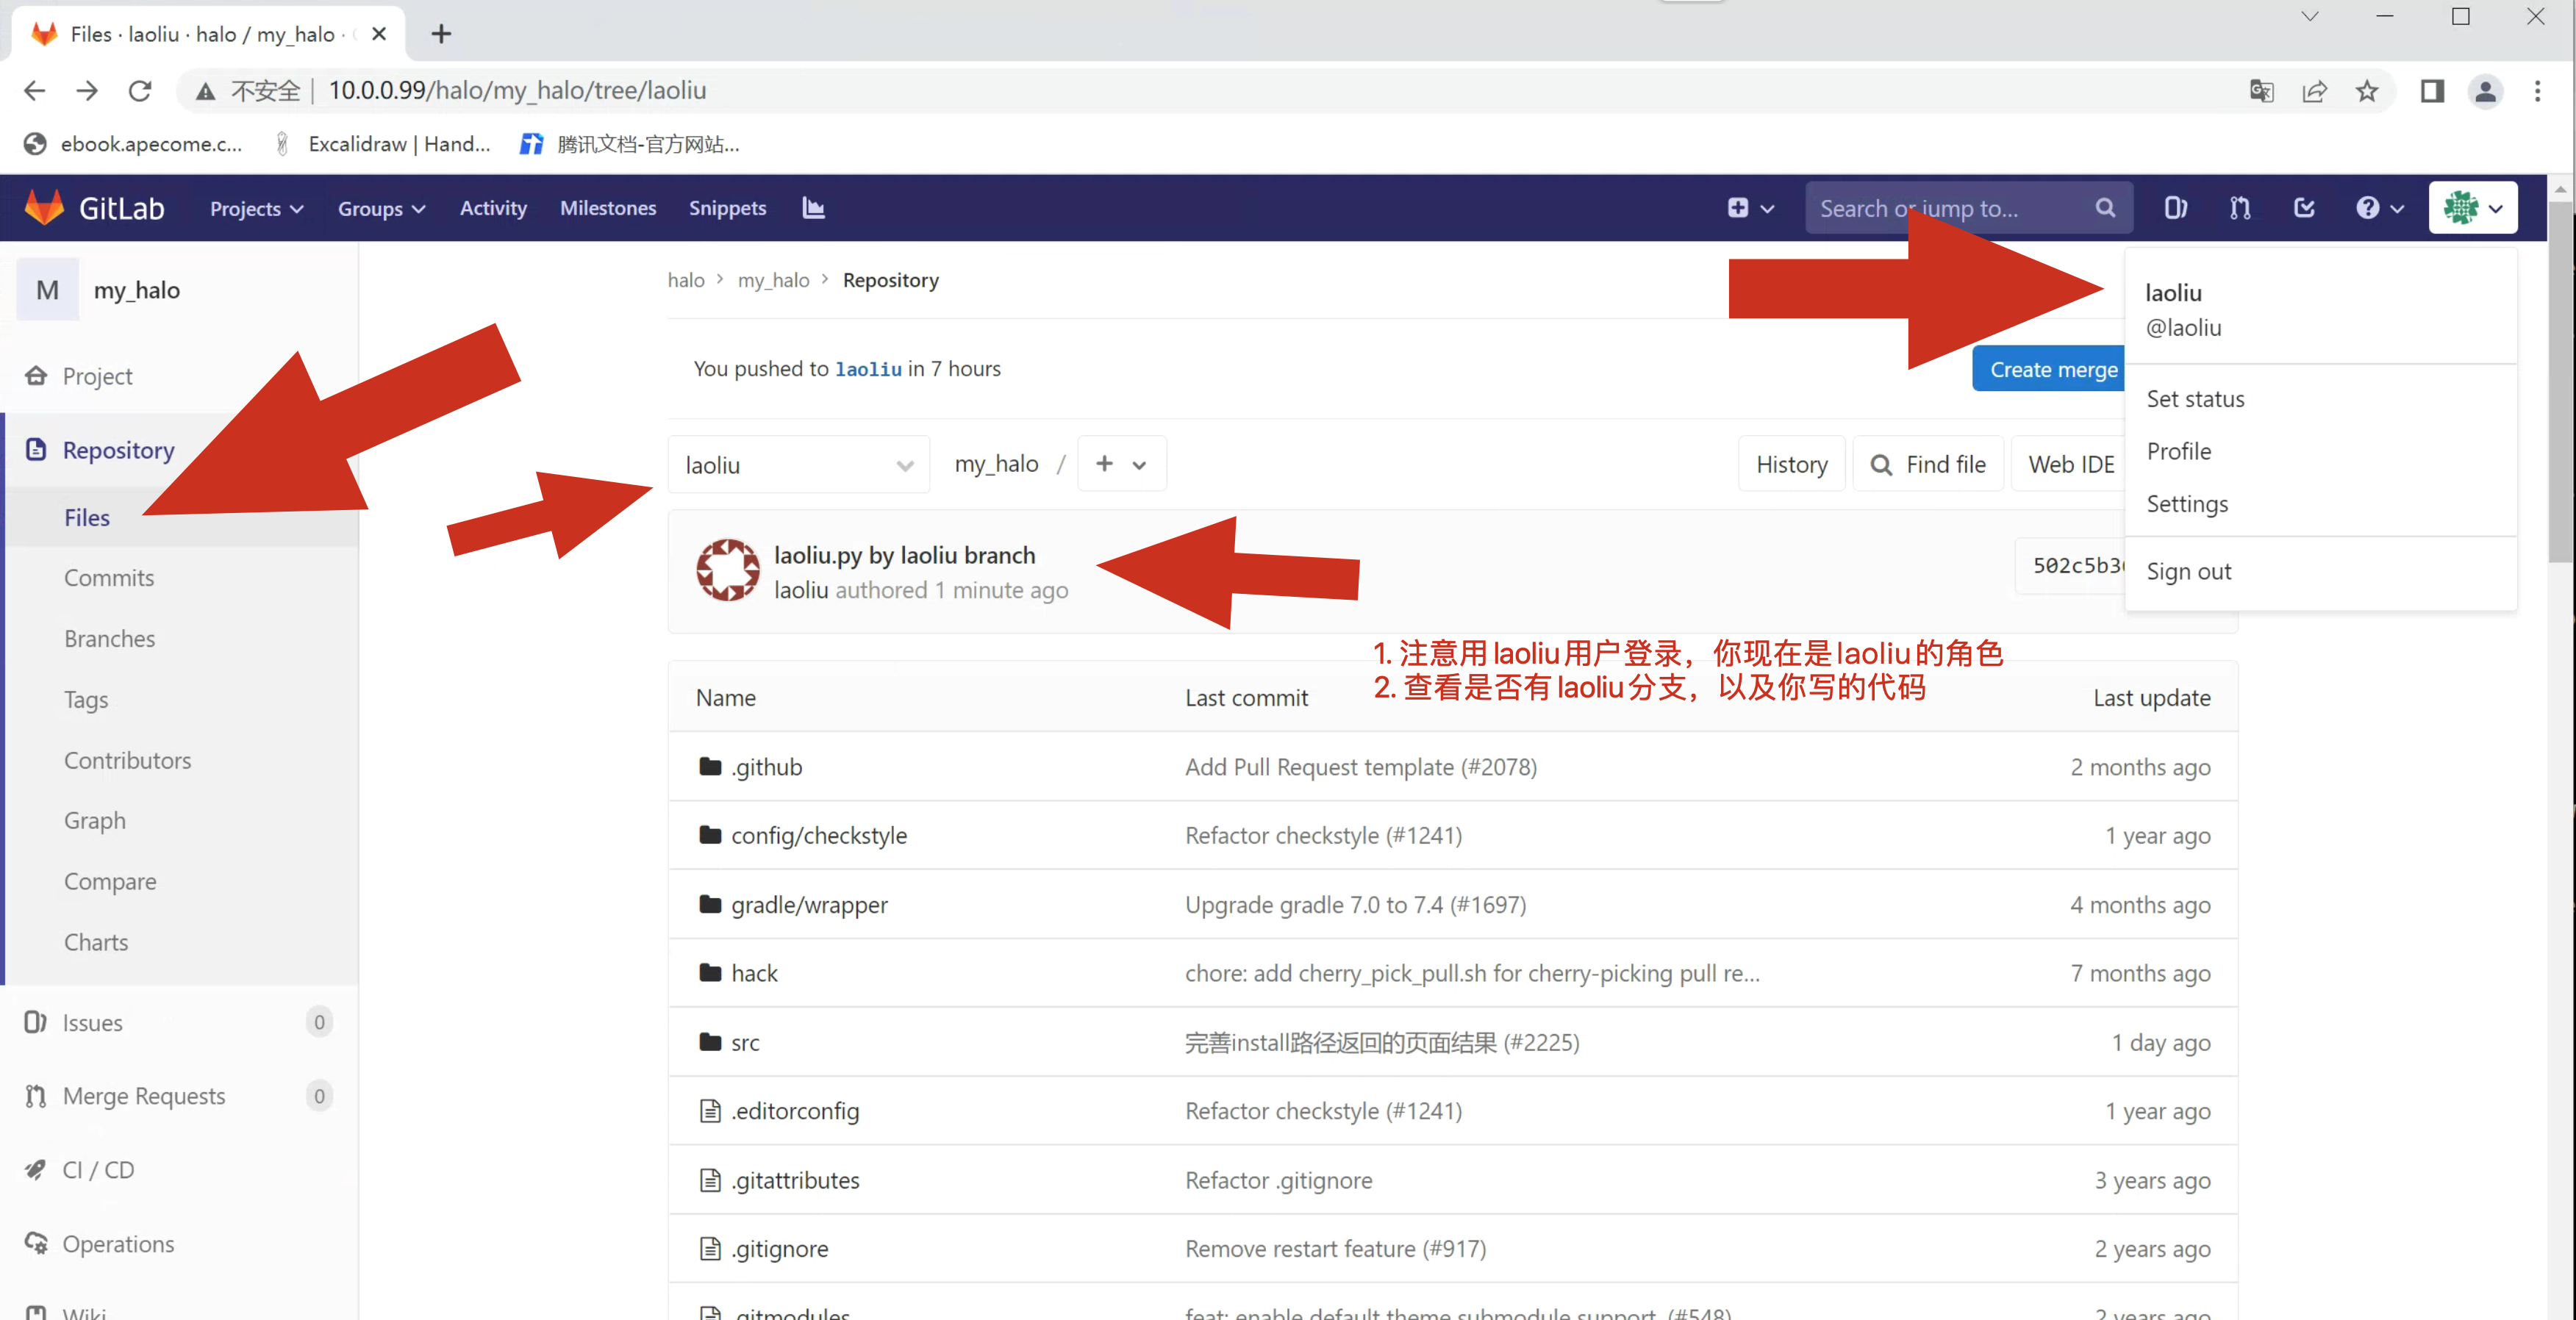
[root@web-7 /home/laoliu/my_halo]#git checkout -b laoliu
Switched to a new branch 'laoliu'


[root@web-7 /home/laoliu/my_halo]#echo '我是老六python' > laoliu.py
[root@web-7 /home/laoliu/my_halo]#
[root@web-7 /home/laoliu/my_halo]#
[root@web-7 /home/laoliu/my_halo]#git status
# On branch laoliu
# Untracked files:
#   (use "git add <file>..." to include in what will be committed)
#
#    laoliu.py
nothing added to commit but untracked files present (use "git add" to track)
[root@web-7 /home/laoliu/my_halo]#
[root@web-7 /home/laoliu/my_halo]#git add laoliu.py
[root@web-7 /home/laoliu/my_halo]#

[root@web-7 /home/laoliu/my_halo]#git commit -m 'laoliu.py by laoliu branch'
[laoliu 502c5b3] laoliu.py by laoliu branch
 1 file changed, 1 insertion(+)
 create mode 100644 laoliu.py


推送试试
[root@web-7 /home/laoliu/my_halo]#git push -u origin laoliu
Counting objects: 7, done.
Delta compression using up to 4 threads.
Compressing objects: 100% (4/4), done.
Writing objects: 100% (6/6), 517 bytes | 0 bytes/s, done.
Total 6 (delta 2), reused 0 (delta 0)
remote:
remote: To create a merge request for laoliu, visit:
remote:   http://10.0.0.99/halo/my_halo/merge_requests/new?merge_request%5Bsource_branch%5D=laoliu
remote:
To git@10.0.0.99:halo/my_halo.git
 * [new branch]      laoliu -> laoliu
Branch laoliu set up to track remote branch laoliu from origin.
查看远程halo仓库的分支代码
创建合并请求,提交PR

管理员yuchao去合并代码
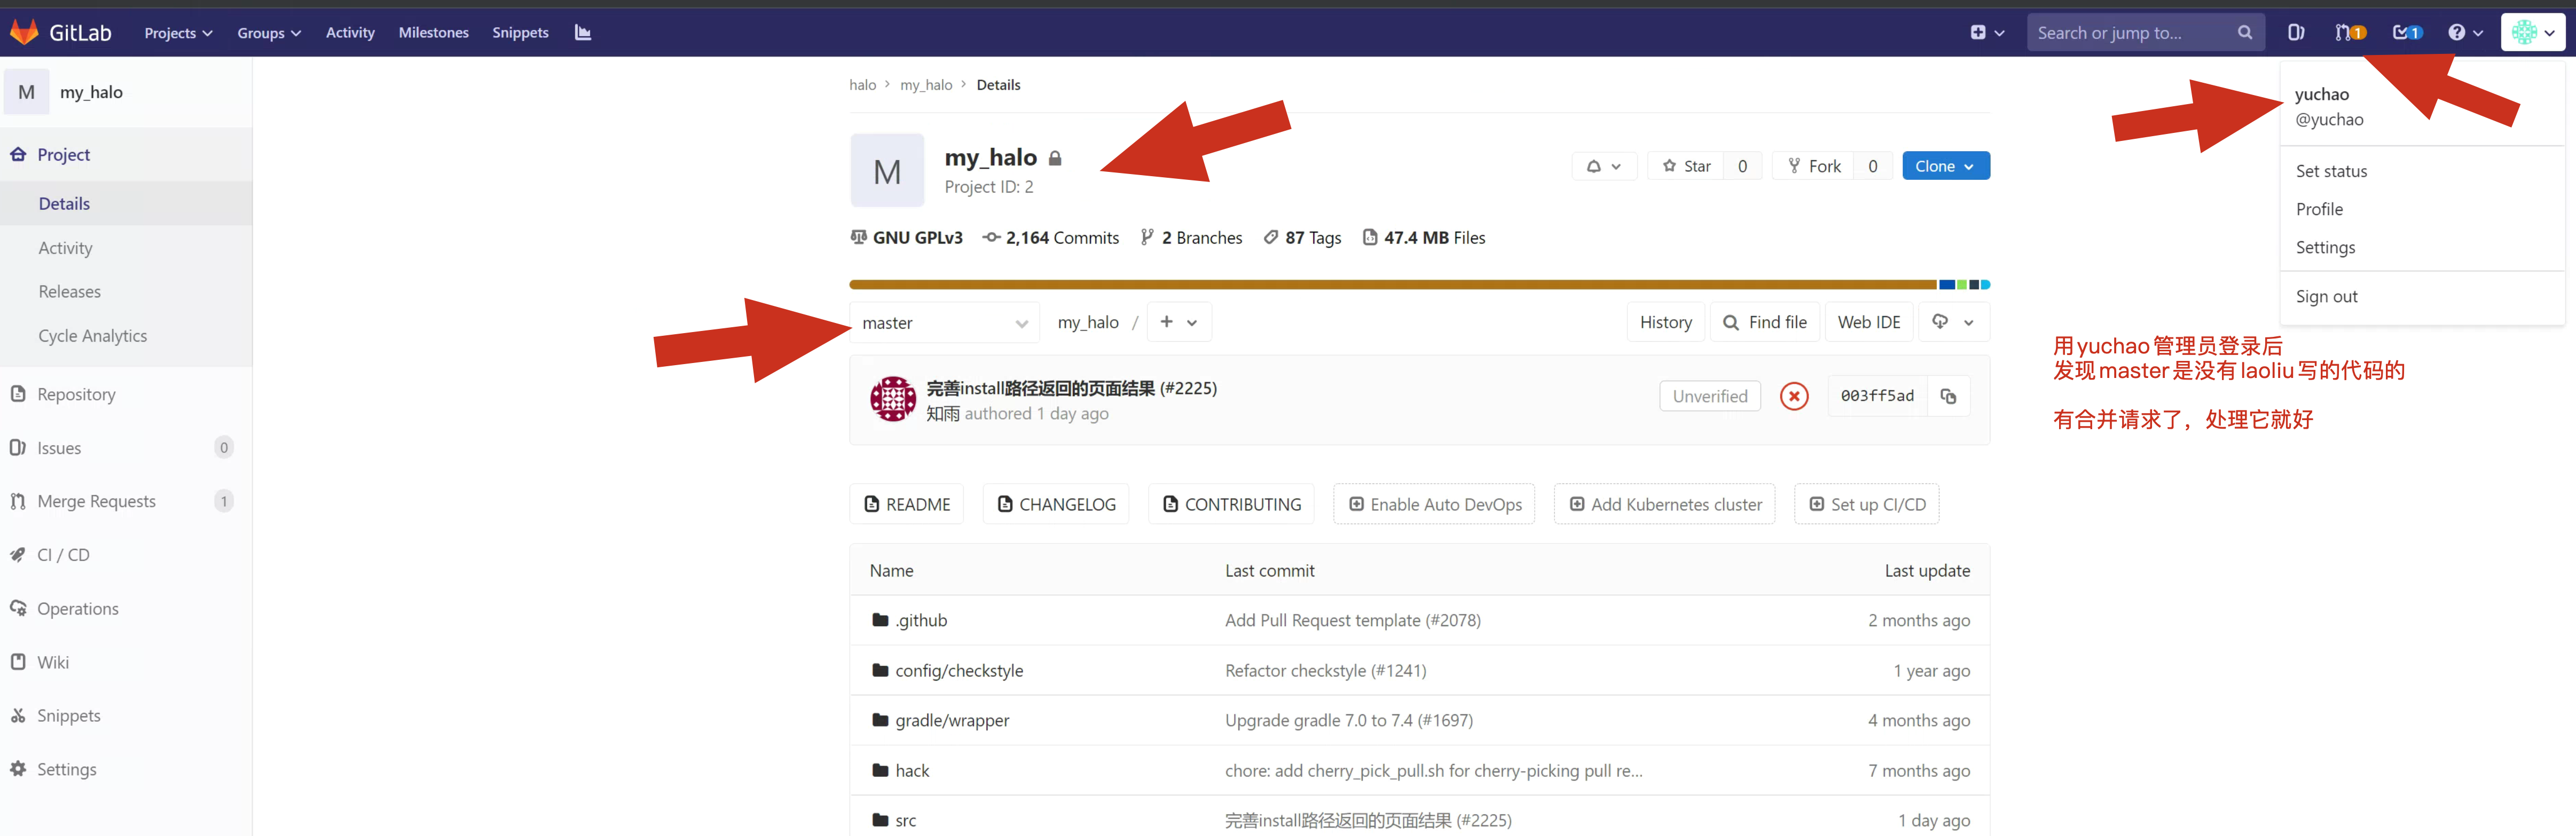
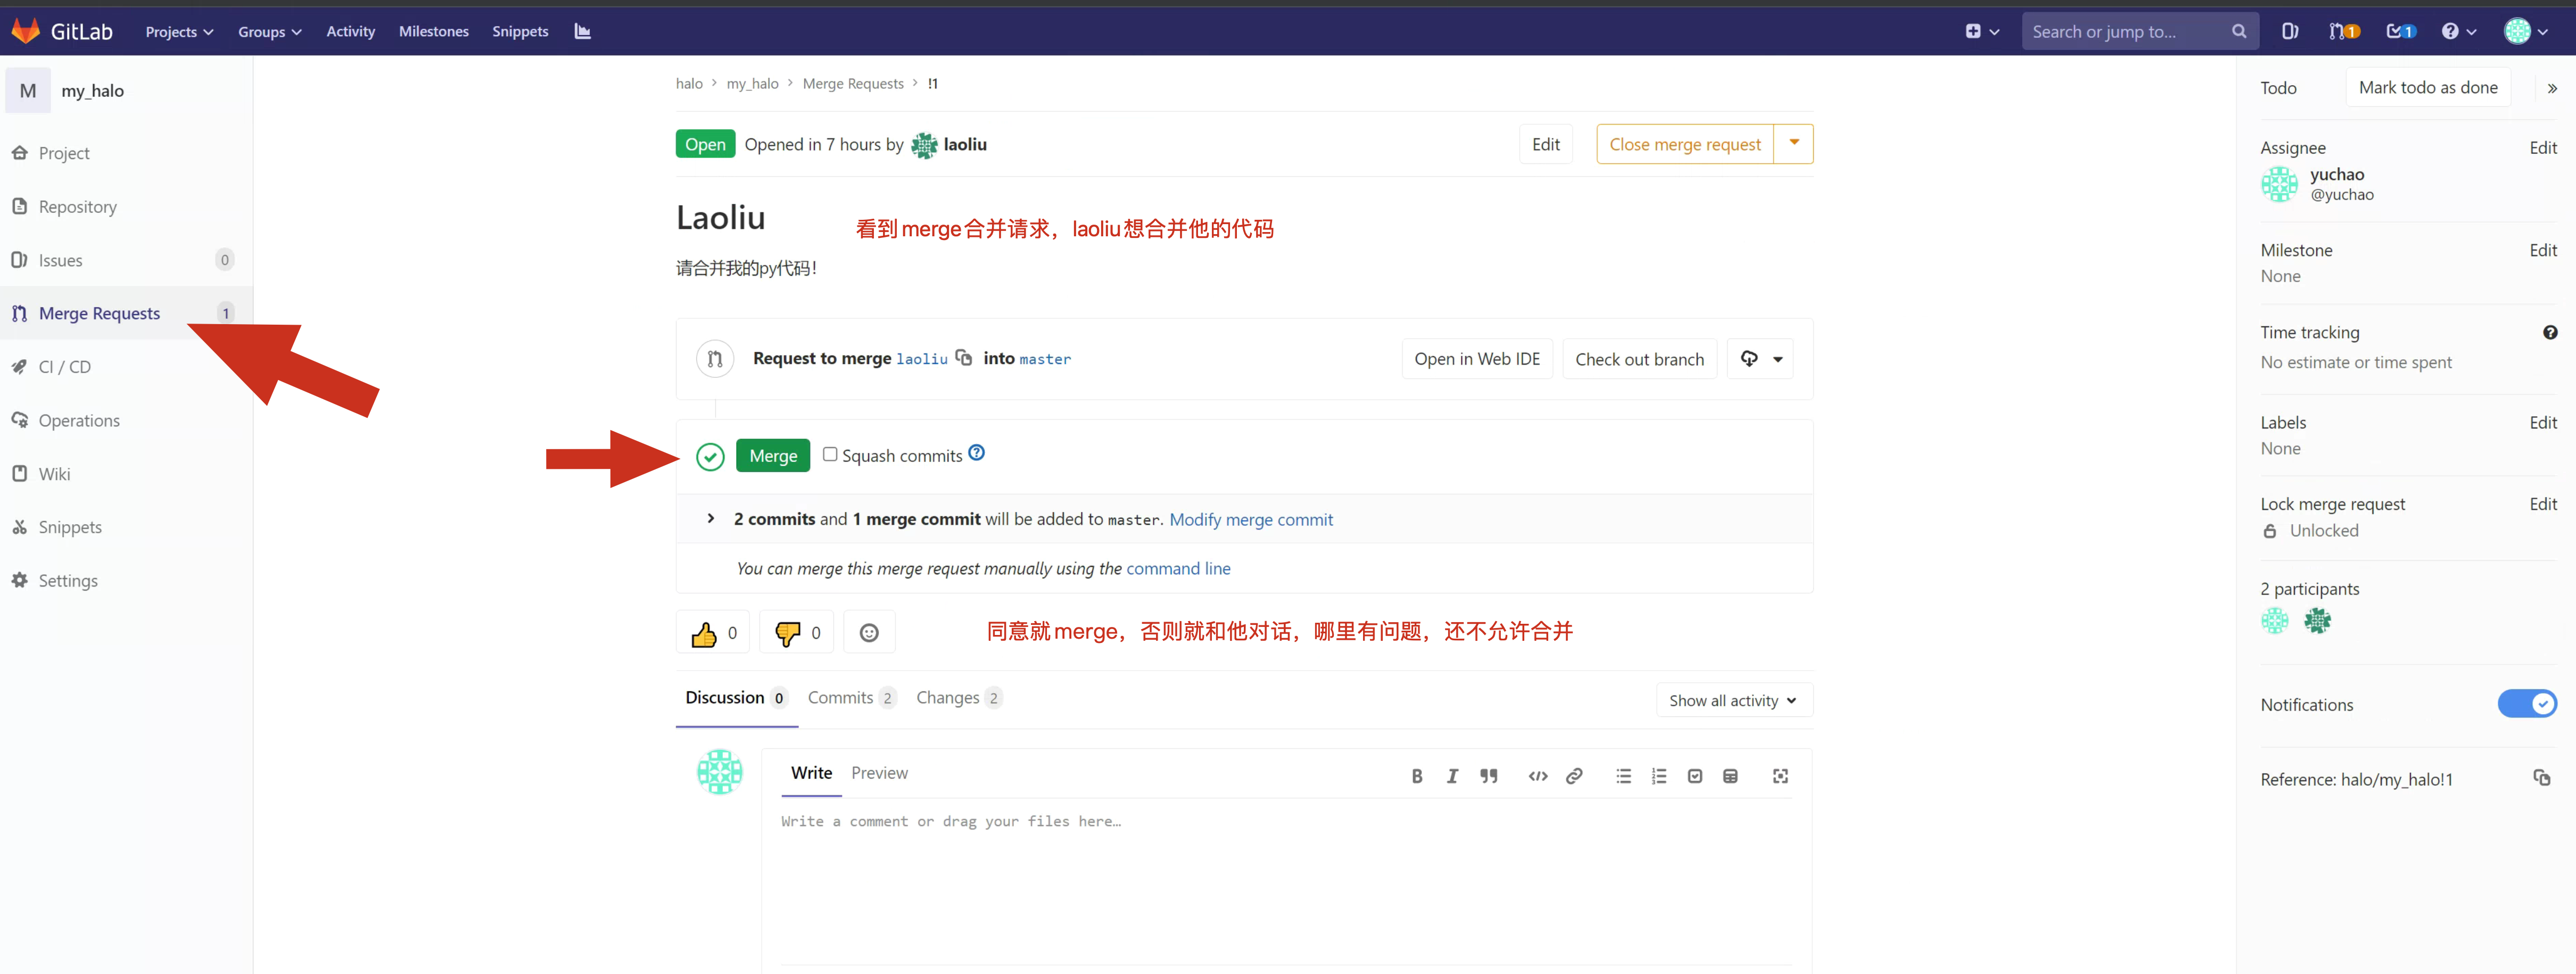
点击merge小绿灯之后,查看master分支代码
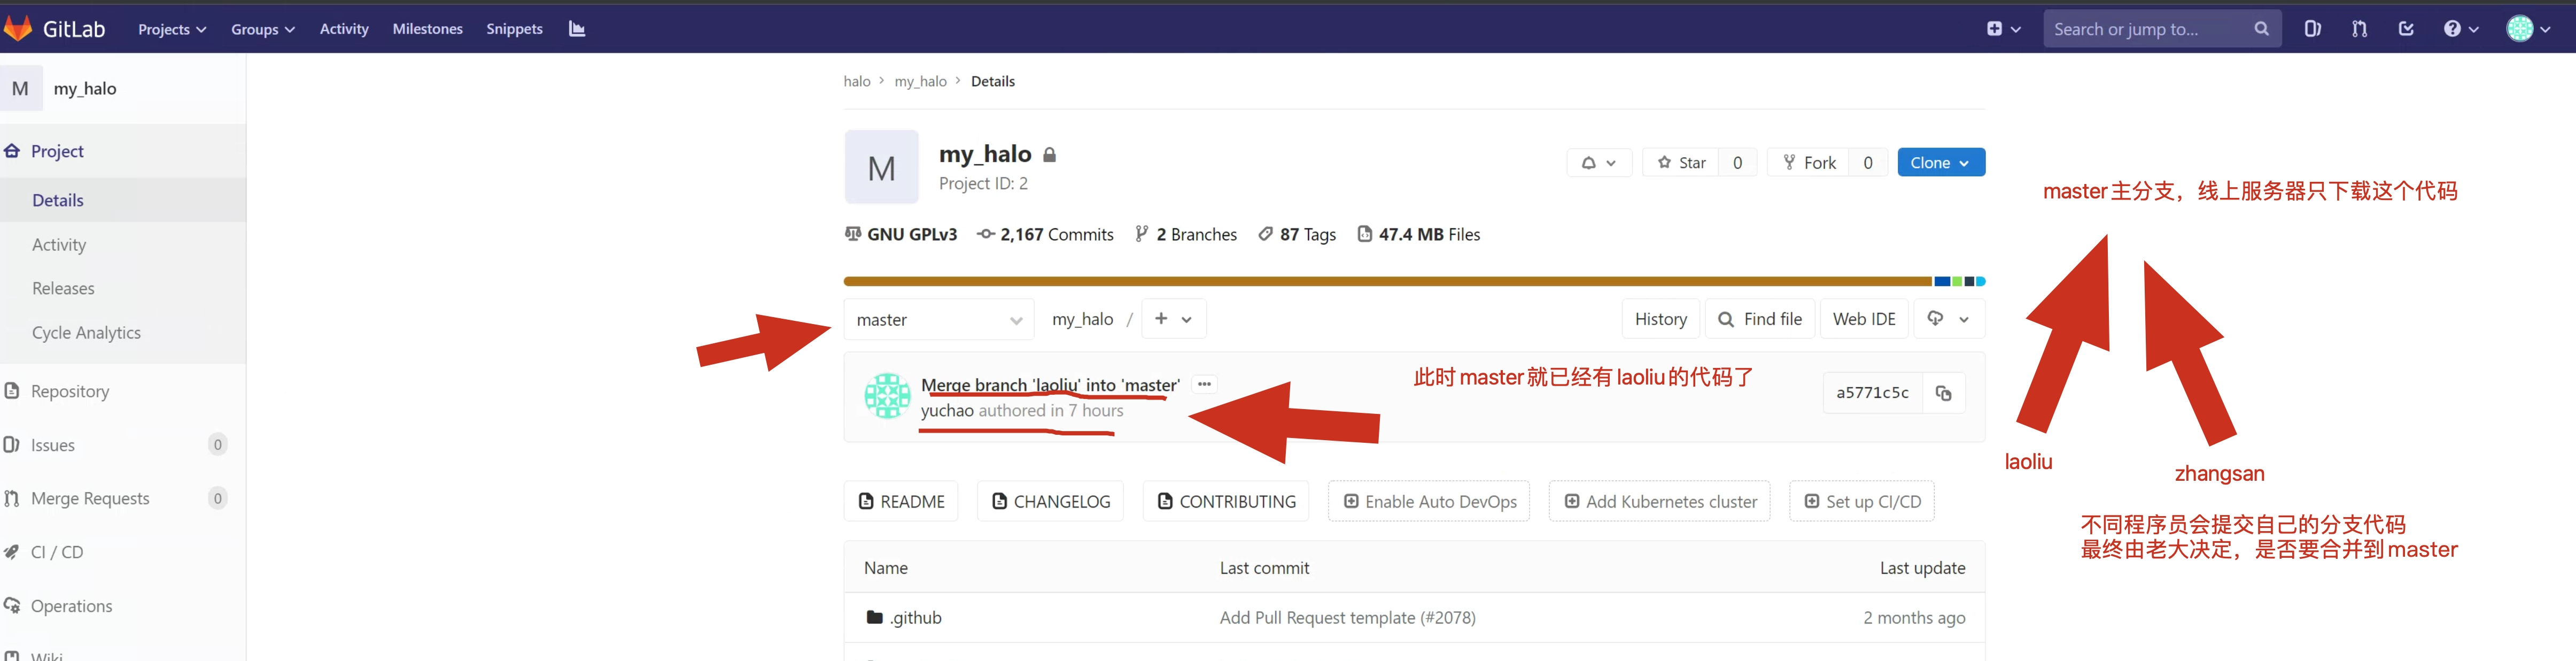
此时下载最新代码试试,master分支的
[root@web-7 /opt]#git clone git@10.0.0.99:halo/my_halo.git

[root@web-7 /opt/my_halo]#git log --oneline -5
a5771c5 Merge branch 'laoliu' into 'master'
502c5b3 laoliu.py by laoliu branch
305334c laoliu.sh
003ff5a 完善install路径返回的页面结果 (#2225)
5798a28 Revert huaweicloud-sdk-java-obs from 3.21.8.1 to 3.21.4 (#2209)
9.gitlab备份、恢复
对 gitlab 进行备份将会创建一个包含所有库和附件的归档文件。
对备份的恢复只能恢 复到与备份时的 gitlab 相同的版本。
将 gitlab 迁移到另一台服务器上的最佳方法就是通过 备份和还原。
gitlab提供了一个简单的命令行来备份整个gitlab,并且能灵活的满足需求。
9.1 修改备份配置
备份文件将保存在配置文件中定义的 backup_path 中
文件名为 TIMESTAMP_gitlab_backup.tar
TIMESTAMP 为备份时的时间戳
TIMESTAMP 的格式为: EPOCH_YYYY_MM_DD_Gitlab-version。
默认的备份文件目录为:/var/opt/gitlab/backups,如果自定义备份目录需要赋予目 录 git 权限,具体操作如下:
[root@cicd-99 ~]#grep -E '^[a-Z]' /etc/gitlab/gitlab.rb
external_url 'http://10.0.0.99'
gitlab_rails['gitlab_email_enabled'] = true
gitlab_rails['gitlab_email_from'] = '877348180@qq.com'
gitlab_rails['gitlab_email_display_name'] = 'yuchaoit'
gitlab_rails['backup_path'] = "/gitlab_backup/"
gitlab_rails['backup_keep_time'] = 604800
gitlab_rails['smtp_enable'] = true
gitlab_rails['smtp_address'] = "smtp.qq.com"
gitlab_rails['smtp_port'] = 465
gitlab_rails['smtp_user_name'] = "877348180@qq.com"
gitlab_rails['smtp_password'] = "dxeeorjtfhqcbbhh"
gitlab_rails['smtp_domain'] = "smtp.qq.com"
gitlab_rails['smtp_authentication'] = "login"
gitlab_rails['smtp_enable_starttls_auto'] = true
gitlab_rails['smtp_tls'] = true
重新加载gitlab脚本配置
1. 创建备份目录,授权
mkdir -p /gitlab_backup/

chown -R git.git /gitlab_backup/

2.重读配置
gitlab-ctl reconfigure

3.手动备份gitlab数据,命令如下
gitlab-rake gitlab:backup:create

若是有警告,红字部分表示 gitlab.rb 和 gitlab-secrets.json 两个文件包含敏感信息。未被备份到备份文件中。需要手动备份。

4.查看备份数据
[root@cicd-99 ~]#ls /gitlab_backup/ -hl
total 45M
-rw------- 1 git git 45M Jul 11 01:34 1657474494_2022_07_11_12.0.3_gitlab_backup.tar

5.实现定时备份
crontab -l
0 2 * * * /usr/bin/gitlab-rake gitlab:backup:create &>/dev/null
9.2 数据恢复
Gitlab的恢复只能恢复到与原本备份文件相同的gitlab版本中,恢复时,需要停止数据库的写入操作,但是保持gitlab是运行的。
暂停数据库写入,停止会连接数据库的几个服务
gitlab-ctl stop unicorn
gitlab-ctl stop sidekiq
gitlab-ctl stop nginx


[root@cicd-99 ~]#gitlab-ctl status |grep down
down: nginx: 19s, normally up; run: log: (pid 3367) 77030s
down: sidekiq: 21s, normally up; run: log: (pid 3245) 77040s
down: unicorn: 24s, normally up; run: log: (pid 3224) 77044s
进行数据恢复,整个恢复过程基本是在删除表,创建表。
查看备份的数据文件
ll /gitlab_backup/1657474494_2022_07_11_12.0.3_gitlab_backup.tar

# 只需要填写备份文件的时间戳信息即可
[root@cicd-99 ~]#gitlab-rake gitlab:backup:restore BACKUP=1657474494_2022_07_11_12.0.3
Unpacking backup ... done
Before restoring the database, we will remove all existing
tables to avoid future upgrade problems. Be aware that if you have
custom tables in the GitLab database these tables and all data will be
removed.

Do you want to continue (yes/no)?
注意点
- 备份tar包得在gitlab备份目录下,恢复操作是先删除原有数据,然后倒入tar包中的数据
- 如果是远程服务器恢复,需要拷贝如下2个文件
[root@cicd-99 ~]#ll /etc/gitlab/*
-rw------- 1 root root 91556 Jul 11 01:26 /etc/gitlab/gitlab.rb
-rw------- 1 root root 15561 Jul 11 01:32 /etc/gitlab/gitlab-secrets.json
重新恢复gitlab
gitlab-ctl reconfigure

gitlab-ctl restart

gitlab-ctl status |grep run
恢复完毕,试试是否可访问