TensorFlow Object Detection API 提供了在 COCO 2017 数据集上预训练的检测模型集合。如果你要识别的对象存在于 COCO2017 数据集,那么你就可以直接使用 TensorFlow Object Detection API 来检测图片或视频。
TensorFlow Object Detection API 包含各式的算法,主要有 CenterNet, EfficientDet, SSD, Faster R-CNN, 具体看这里。
TensorFlow Object Detection API 的安装 参照这里。
一、安装
这里我们说下在 Window10 环境下,TensorFlow Object Detectio API 的安装,具体步骤如下图(流程图显示的是完整有 GPU 的安装流程,但本人在实际中是用 CPU 运行,并没有安装 CUDA):
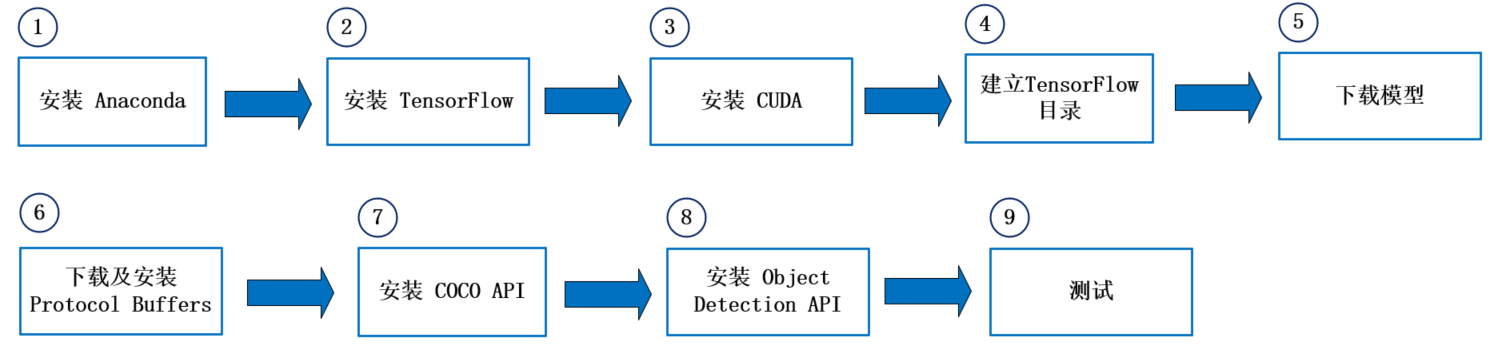
详细步骤:
(1)安装 Anaconda. 再创建使用 TensorFlow Object Detection API 的虚拟环境,如 conda create -n tensorflow_object_detection_api python=3.9 ,最后进入虚拟环境 conda activate tensorflow_object_detection_api
(2)在当前虚拟环境下安装 TensorFlow :需安装 v2.2 以上版本。命令: pip install tensorflow
(3)安装 CUDA:GPU 不一定需要,如果要使用 GPU,则需安装 CUDA 10.1/CuDNN v7.6.5,详细说明请看 这里。
(4)建立 TensorFlow 目录:在任意目录下建立 TensorFlow 目录。如我在 D 盘下创建了一个叫 TensorFlow 空的文件夹。
(5)下载模型:从 TensorFlow Models 下载整个项目(Repository)。并解压缩至 TensorFlow 次目录下,将 models-master 目录改名为 models。
(6)下载 Protocol Buffers:从 这里 下载最新版 protoc-3.xx.0-win64.zip,解压缩至特定目录(这里我就放在了 TensorFlow 目录下),例如并将其下 bin 路径加到环境变量 Path 中。
这里,我下载的是 protoc-25.0-win64.zip,找到你想要下载的版本后,可以在 “Assets” 列表下找到需要下载的内容。我的文件列表如下图所示:

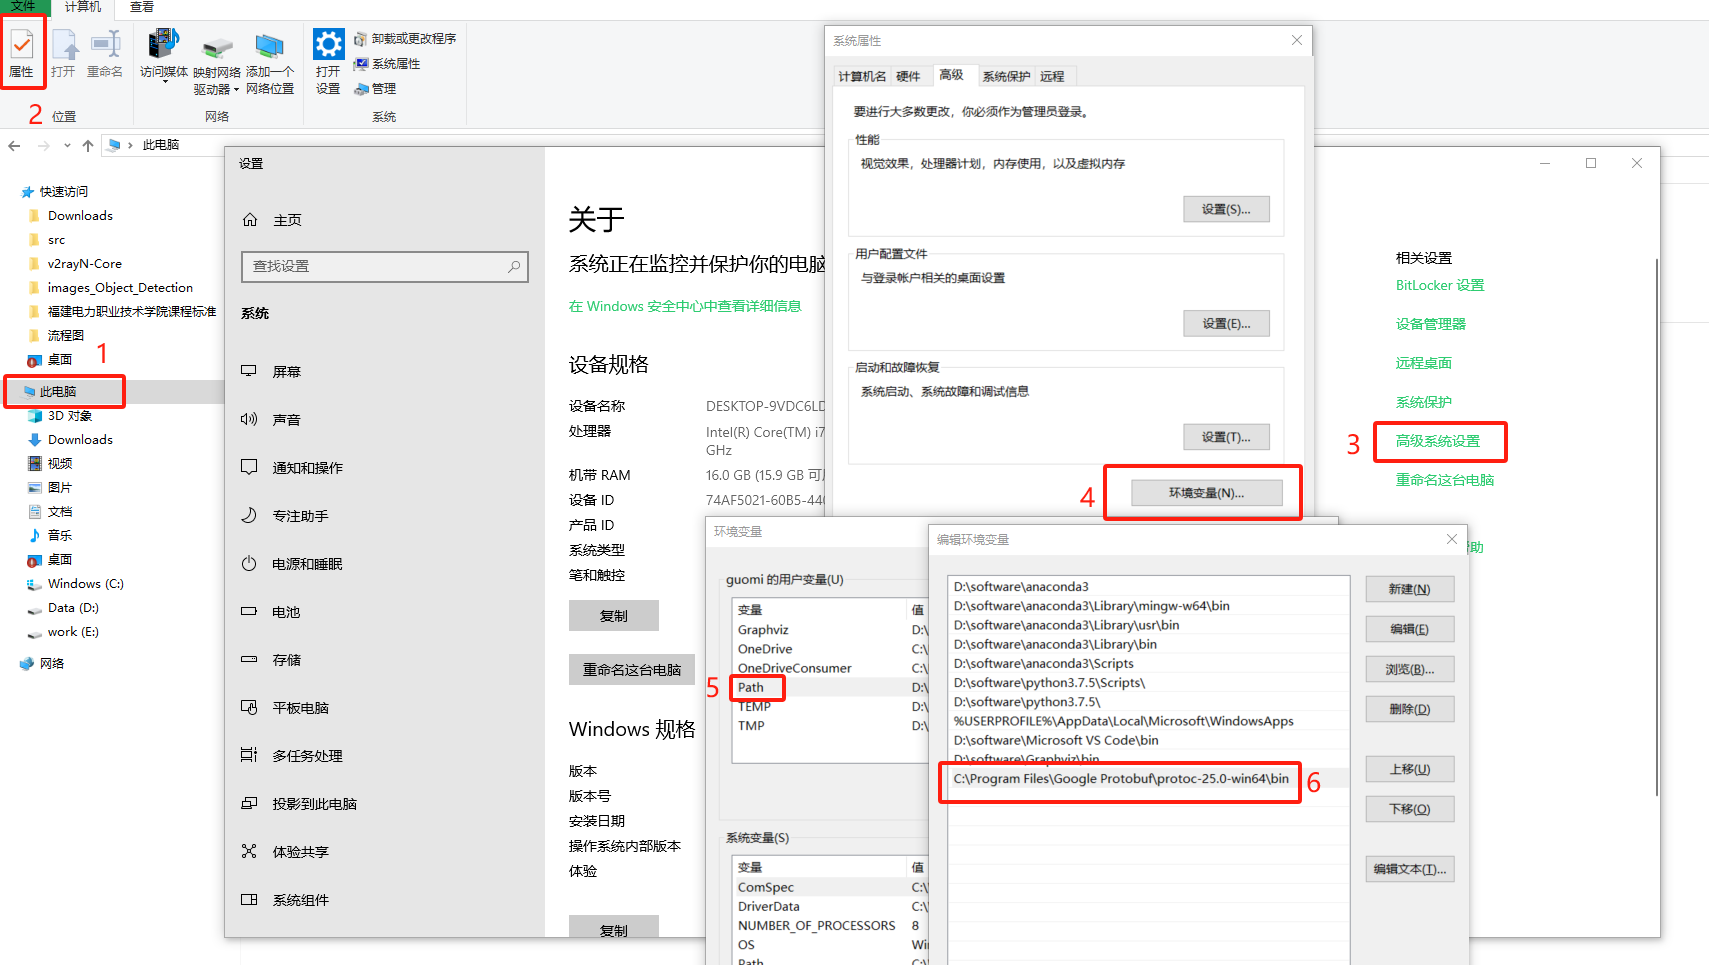
把 Protocol Buffers 下的 bin 添加到环境变量 Path 的具体步骤如下:
(7)安装 Protobuf:在 TensorFlow\models\research 目录开启 cmd,执行:protoc object_detection/protos/*.proto --python_out=.
(8)在 tensorflow_object_detection_api 虚拟环境下安装 COCO API,执行:pip install cython 和 pip install git+https://github.com/philferriere/cocoapi.git#subdirectory=PythonAPI
(9)在 tensorflow_object_detection_api 虚拟环境下安装 Object Detection API:到目录 TensorFlow\models\research,复制 object_detection/packages/tf2/setup.py 至目前目录,然后执行:
python -m pip install . (这个执行时间会比花费比较久的时间,同时也别忘了输入最后的“.”)
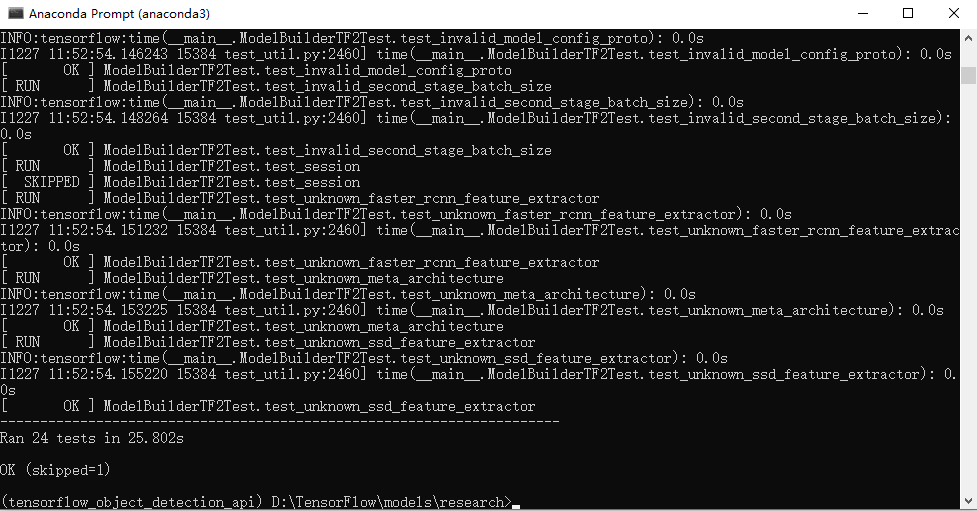
(10)以上安装完了就大功告成了,可通过执行测试指令: python object_detection/builders/model_builder_tf2_test.py 测试。显示如下结果,说明安装成功。
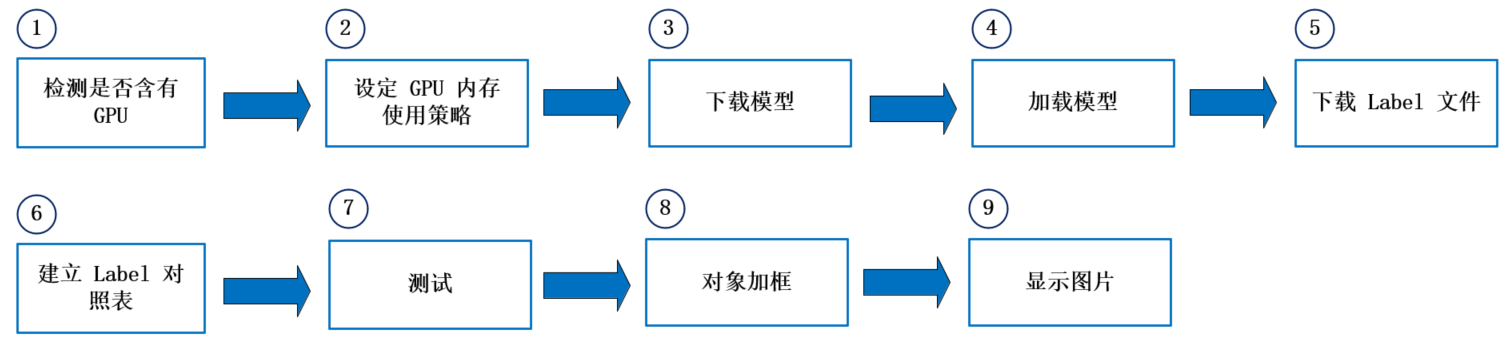
二、使用 TensorFlow Object Detection API 进行图像目标检测。
代码思路:
代码:
1 # 载入套件
2 import os
3 import pathlib
4 import tensorflow as tf
5 import cv2
6 from os import listdir, path
7 from os.path import isfile, join
8 import warnings
9 import time
10 from object_detection.utils import label_map_util, config_util
11 from object_detection.utils import visualization_utils as viz_utils
12 import numpy as np
13 from PIL import Image
14 import matplotlib.pyplot as plt
15 from object_detection.builders import model_builder
16
17 # GPU 记忆体配置设定
18 # GPU 设定为 记忆体动态调整 (dynamic memory allocation)
19 # 通过 tf.config.experimental.list_physical_devices,我们可以获得当前主机上某种特定运算设备类型(如 GPU 或 CPU )的列表
20 gpus = tf.config.experimental.list_physical_devices('GPU')
21 for gpu in gpus:
22 # 可以通过 tf.config.experimental.set_memory_growth 将 GPU 的显存使用策略设置为 “仅在需要时申请显存空间”
23 tf.config.experimental.set_memory_growth(gpu, True)
24
25 # GPU 设定为固定为 2GB
26 gpus = tf.config.experimental.list_physical_devices('GPU')
27 if gpus: # 1024*2:2048MB = 2GB
28 # 以下代码通过 tf.config.experimental.set_virtual_device_configuration 选项并传入
29 # tf.config.experimental.VirtualDeviceConfiguration 实例,设置 TensorFlow 固定消耗 GPU:0 的 1GB 显存(其实可以理解
30 # 为建立了一个显存大小为 1GB 的 “虚拟 GPU”)
31 tf.config.experimental.set_virtual_device_configuration(gpus[0],
32 [tf.config.experimental.VirtualDeviceConfiguration(memory_limit=1024*2)])
33
34
35 # --------------------------- 方法1:Object Detection From TF2 Saved Model
36 # 下载模型,并解压缩
37 def download_model(model_name, model_date):
38 base_url = 'http://download.tensorflow.org/models/object_detection/tf2/'
39 model_file = model_name + '.tar.gz'
40 # 解压缩 从一个 URL 下载文件,如果它不存在缓存中。返回的是下载文件的路径
41 model_dir = tf.keras.utils.get_file(fname=model_name, # 文件的名称
42 origin=base_url + model_date + '/' + model_file, # 文件的url
43 untar=True) # 是否需要解压
44 return str(model_dir)
45
46
47 MODEL_DATE = '20200711'
48 MODEL_NAME = 'centernet_hg104_1024x1024_coco17_tpu-32'
49 # 下载目标检测所使用的模型,并返回存储路径,一般用keras下载下来的文件存储在 C:\Users\用户名\.keras 下
50 PATH_TO_MODEL_DIR = download_model(MODEL_NAME, MODEL_DATE)
51 print(PATH_TO_MODEL_DIR)
52
53 # 检查模型目录
54 # 读取 PATH_TO_MODEL_DIR 目录下所有目录及档案
55 for f in listdir(PATH_TO_MODEL_DIR):
56 print(f)
57
58 # 从下载的目录载入模型
59 # 不显示警告讯息
60 # 通过警告过滤器进行控制是否发出警告消息
61 warnings.filterwarnings('ignore') # Suppress warnings
62
63 # 从下载的目录载入模型,耗时甚久
64 PATH_TO_SAVED_MODEL = PATH_TO_MODEL_DIR + "/saved_model"
65 print('载入模型...', end='')
66 start_time = time.time()
67 # 载入模型
68 detect_fn = tf.saved_model.load(PATH_TO_SAVED_MODEL)
69 end_time = time.time()
70 elapsed_time = end_time - start_time
71 print(f'共花费 {elapsed_time} 秒.')
72
73
74 # 建立 Label 的对照表
75 # 下载 labels file
76 def download_labels(filename):
77 base_url = 'https://raw.githubusercontent.com/tensorflow/models'
78 base_url += '/master/research/object_detection/data/'
79 label_dir = tf.keras.utils.get_file(fname=filename, # 文件的名称
80 origin=base_url + filename, # 文件的原始url
81 untar=False) # 文件是否需要解压
82 label_dir = pathlib.Path(label_dir)
83 return str(label_dir)
84
85
86 LABEL_FILENAME = 'mscoco_label_map.pbtxt'
87 PATH_TO_LABELS = download_labels(LABEL_FILENAME) # 下载 Label 对照表文件
88 print(PATH_TO_LABELS)
89 # 建立 Label 的对照表 (代码与名称) 标签映射将索引号对应于类别名称,因此假设当我们的卷积网络预测5时,我们知道这对应于飞机。
90 category_index = label_map_util.create_category_index_from_labelmap(PATH_TO_LABELS, use_display_name=True)
91
92 # 选一张图片进行物件侦测
93 image_np = np.array(Image.open('./data/images_Object_Detection/zebra.jpg'))
94 # 转为 TensorFlow tensor 资料型态
95 input_tensor = tf.convert_to_tensor(image_np)
96 # 加一维,变为 (笔数, 宽, 高, 颜色)
97 input_tensor = input_tensor[tf.newaxis, ...]
98
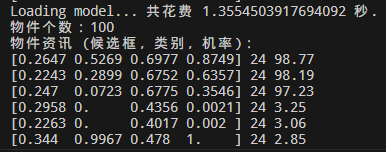
99 # detections:物件资讯 内含 (候选框, 类别, 机率)
100 detections = detect_fn(input_tensor)
101 # 得到检测到的目标数
102 num_detections = int(detections.pop('num_detections'))
103 print(f'检测到的物件个数:{num_detections}')
104 # 转换数据类型
105 detections = {key: value[0, :num_detections].numpy() for key, value in detections.items()}
106 detections['num_detections'] = num_detections
107 # 转为整数
108 detections['detection_classes'] = detections['detection_classes'].astype(np.int64)
109
110 # 打印检测到的结果
111 print(f'物件资讯 (候选框, 类别, 机率):')
112 for detection_boxes, detection_classes, detection_scores in \
113 zip(detections['detection_boxes'], detections['detection_classes'], detections['detection_scores']):
114 print(np.around(detection_boxes, 4), detection_classes, round(detection_scores*100, 2))
115
116 # 筛选Bounding Box,并将图片的物件加框
117 image_np_with_detections = image_np.copy()
118 # 加框 Overlay labeled boxes on an image with formatted scores and label name
119 viz_utils.visualize_boxes_and_labels_on_image_array(
120 image_np_with_detections,
121 detections['detection_boxes'],
122 detections['detection_classes'],
123 detections['detection_scores'],
124 category_index, # a dict containing category dictionaries keyed by category indices
125 use_normalized_coordinates=True, # whether boxes is to be interpreted as normalized coordinates or not.
126 max_boxes_to_draw=200, # maximum number of boxes to visualize. If None, draw all boxes.
127 min_score_thresh=.30, # minimum score threshold for a box to be visualized
128 agnostic_mode=False) # boolean (default: False) controlling whether to evaluate in class-agnostic mode or not. This mode will display scores but ignore classes.
129
130 # 发现用matplotlib显示,无效
131 plt.figure(figsize=(12, 8))
132 plt.imshow(image_np_with_detections, cmap='viridis')
133 # 显示处理后的图片
134 # 存档
135 saved_file = './data/images_Object_Detection/zebra._detection1.png'
136 if os.path.isfile(saved_file):
137 os.remove(saved_file)
138 plt.savefig(saved_file)
139
140 # -------------------------- 方法2:Object Detection From TF2 Checkpoint
141 # 从下载的目录载入模型另一种方法,非常快速,快速从下载的目录载入模型
142 # 设置组态档及模型档路径
143 PATH_TO_CFG = PATH_TO_MODEL_DIR + "/pipeline.config"
144 PATH_TO_CKPT = PATH_TO_MODEL_DIR + "/checkpoint"
145
146 # 计时开始
147 print('Loading model... ', end='')
148 start_time = time.time()
149 # 载入组态档,再建置模型
150 # Load pipeline config and build a detection model
151 configs = config_util.get_configs_from_pipeline_file(PATH_TO_CFG)
152 model_config = configs['model']
153 detection_model = model_builder.build(model_config=model_config, is_training=False)
154 # 还原模型
155 ckpt = tf.compat.v2.train.Checkpoint(model=detection_model)
156 # 恢复变量当在其他地方需要为模型重新载入之前保存的参数时,需要再次实例化一个 checkpoint,同时保持键名的一致。再调用 checkpoint 的 restore 方法。
157 ckpt.restore(os.path.join(PATH_TO_CKPT, 'ckpt-0')).expect_partial()
158 # 计时完成
159 end_time = time.time()
160 elapsed_time = end_time - start_time
161 print(f'共花费 {elapsed_time} 秒.')
162
163
164 # 任选一张图片进行物件侦测
165 # 虽然默认的即时执行模式(Eager Execution)为我们带来了灵活及易调试的特性,但在特定的场合,例如追求高性能或部署模型时,我们依然希望
166 # 使用 TensorFlow 1.X 中默认的图执行模式(Graph Execution),将模型转换为高效的 TensorFlow 图模型。此时,TensorFlow 2 为我们提供
167 # 了 tf.function 模块,结合 AutoGraph 机制,使得我们仅需加入一个简单的 @tf.function 修饰符,就能轻松将模型以图执行模式运行。
168 @tf.function
169 def detect_fn(image):
170 image, shapes = detection_model.preprocess(image)
171 prediction_dict = detection_model.predict(image, shapes)
172 detections = detection_model.postprocess(prediction_dict, shapes)
173
174 return detections
175
176
177 # 读取图档
178 image_np = np.array(Image.open('./data/images_Object_Detection/zebra.jpg'))
179 # 转换数据类型
180 input_tensor = tf.convert_to_tensor(image_np, dtype=tf.float32)
181 # 增加一维表示样本个数
182 input_tensor = input_tensor[tf.newaxis, ...]
183 # 进行检测
184 detections = detect_fn(input_tensor)
185 # 获取检测到的目标数
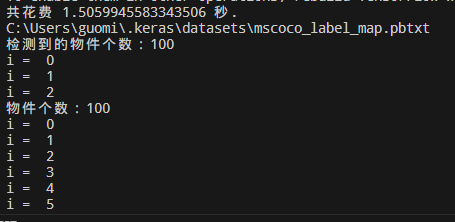
186 num_detections = int(detections.pop('num_detections'))
187 print(f'物件个数:{num_detections}')
188 # 转换数据类型
189 detections = {key: value[0, :num_detections].numpy() for key, value in detections.items()}
190 # 显示检测结果
191 print(f'物件资讯 (候选框, 类别, 机率):')
192 for detection_boxes, detection_classes, detection_scores in \
193 zip(detections['detection_boxes'], detections['detection_classes'], detections['detection_scores']):
194 print(np.around(detection_boxes, 4), int(detection_classes)+1, round(detection_scores*100, 2))
195
196 # 结果存入 detections 变数
197 detections['num_detections'] = num_detections
198 detections['detection_classes'] = detections['detection_classes'].astype(np.int64)
199
200 # 候选框筛选,并将图片的物件加框
201 # 将物件框起来
202 # min_score_thresh=.30 表机率(Confidence)至少要大于 30%
203 image_np_with_detections = image_np.copy()
204 viz_utils.visualize_boxes_and_labels_on_image_array(
205 image_np_with_detections,
206 detections['detection_boxes'],
207 detections['detection_classes']+1,
208 detections['detection_scores'],
209 category_index,
210 use_normalized_coordinates=True,
211 max_boxes_to_draw=200,
212 min_score_thresh=.30,
213 agnostic_mode=False)
214
215 plt.figure(figsize=(12, 8))
216 plt.imshow(image_np_with_detections, cmap='viridis')
217
218 # 显示处理后的图片
219 # 存档
220 saved_file = './data/images_Object_Detection/zebra._detection2.png'
221 if os.path.isfile(saved_file):
222 os.remove(saved_file)
223 plt.savefig(saved_file)
代码运行结果:


(1)以上代码显示了2种不同的导入模型的方法,一种是 SaveModel 格式,一种是 Checkpoint 格式。运行可发现,使用 Checkpoint 的方式载入模型,速度明显提升了许多。
(2)推断得分高于 30 的结果才会被显示出来,因此,因前三个检测框的得分为 98.77,98.19,97.23,所以最终显示的就是这三个框。
三、使用 TensorFlow Object Detection API 进行视频检测。
代码:
  1 # Tensorflow Object Detection API 视讯测试
  2 # 载入套件
  3 import os
  4 import pathlib
  5 import tensorflow as tf
  6 import pathlib
  7 import time
  8 from object_detection.utils import label_map_util, config_util
  9 from object_detection.utils import visualization_utils as viz_utils
 10 from object_detection.builders import model_builder
 11 import numpy as np
 12 import cv2
 13
 14 # GPU 记忆体配置设定
 15 # GPU 设定为 记忆体动态调整 (dynamic memory allocation)
 16 gpus = tf.config.experimental.list_physical_devices('GPU')
 17 for gpu in gpus:
 18     tf.config.experimental.set_memory_growth(gpu, True)
 19
 20
 21 # 载入模型
 22 # 下载模型,并解压缩
 23 def download_model(model_name, model_date):
 24     base_url = 'http://download.tensorflow.org/models/object_detection/tf2/'
 25     model_file = model_name + '.tar.gz'
 26     # 解压缩
 27     model_dir = tf.keras.utils.get_file(fname=model_name,
 28                                         origin=base_url + model_date + '/' + model_file,
 29                                         untar=True)
 30     return str(model_dir)
 31
 32
 33 MODEL_DATE = '20200711'
 34 MODEL_NAME = 'centernet_hg104_1024x1024_coco17_tpu-32'
 35 PATH_TO_MODEL_DIR = download_model(MODEL_NAME, MODEL_DATE)
 36 print(PATH_TO_MODEL_DIR)
 37
 38 # 快速从下载的目录载入模型
 39 # 组态档及模型档路径
 40 PATH_TO_CFG = PATH_TO_MODEL_DIR + "/pipeline.config"
 41 PATH_TO_CKPT = PATH_TO_MODEL_DIR + "/checkpoint"
 42
 43 # 计时开始
 44 print('Loading model... ', end='')
 45 start_time = time.time()
 46 # 载入组态档,再建置模型
 47 configs = config_util.get_configs_from_pipeline_file(PATH_TO_CFG)
 48 model_config = configs['model']
 49 detection_model = model_builder.build(model_config=model_config, is_training=False)
 50 # 还原模型
 51 ckpt = tf.compat.v2.train.Checkpoint(model=detection_model)
 52 ckpt.restore(os.path.join(PATH_TO_CKPT, 'ckpt-0')).expect_partial()
 53
 54 # 计时完成
 55 end_time = time.time()
 56 elapsed_time = end_time - start_time
 57 print(f'共花费 {elapsed_time} 秒.')
 58
 59
 60 # 建立 Label 的对照表
 61 # 下载 labels file
 62 def download_labels(filename):
 63     base_url = 'https://raw.githubusercontent.com/tensorflow/models'
 64     base_url += '/master/research/object_detection/data/'
 65     label_dir = tf.keras.utils.get_file(fname=filename,
 66                                         origin=base_url + filename,
 67                                         untar=False)
 68     label_dir = pathlib.Path(label_dir)
 69     return str(label_dir)
 70
 71
 72 LABEL_FILENAME = 'mscoco_label_map.pbtxt'
 73 PATH_TO_LABELS = download_labels(LABEL_FILENAME)
 74 print(PATH_TO_LABELS)
 75
 76 # 建立 Label 的对照表 (代码与名称)
 77 category_index = label_map_util.create_category_index_from_labelmap(PATH_TO_LABELS, use_display_name=True)
 78
 79
 80 # 视讯物件侦测
 81 @tf.function
 82 def detect_fn(image):
 83     image, shapes = detection_model.preprocess(image)
 84     prediction_dict = detection_model.predict(image, shapes)
 85     detections = detection_model.postprocess(prediction_dict, shapes)
 86
 87     return detections
 88
 89
 90 # 使用 webcam
 91 # cap = cv2.VideoCapture(0)
 92 # 读取视讯档案
 93 cap = cv2.VideoCapture('./data/images_Object_Detection/pedestrians.mp4')
 94 i = 0
 95 while True:
 96     # 读取一帧(frame) from camera or mp4 | Capture the video frame  by frame
 97     ret, image_np = cap.read()
 98
 99     # 加一维,变为 (笔数, 宽, 高, 颜色)
100     image_np_expanded = np.expand_dims(image_np, axis=0)
101
102     # 可测试水平翻转
103     # image_np = np.fliplr(image_np).copy()
104
105     # 可测试灰阶
106     # image_np = np.tile(
107     #     np.mean(image_np, 2, keepdims=True), (1, 1, 3)).astype(np.uint8)
108
109     # 转为 TensorFlow tensor 资料型态
110     input_tensor = tf.convert_to_tensor(np.expand_dims(image_np, 0), dtype=tf.float32)
111
112     # detections:物件资讯 内含 (候选框, 类别, 机率)
113     detections = detect_fn(input_tensor)
114     num_detections = int(detections.pop('num_detections'))
115
116     # 第一帧(Frame)才显示物件个数
117     if i == 0:
118         print(f'检测到的物件个数:{num_detections}')
119
120     # 结果存入 detections 变数
121     detections = {key: value[0, :num_detections].numpy() for key, value in detections.items()}
122     detections['detection_classes'] = detections['detection_classes'].astype(int)
123
124     # 将物件框起来
125     label_id_offset = 1
126     image_np_with_detections = image_np.copy()
127     viz_utils.visualize_boxes_and_labels_on_image_array(
128           image_np_with_detections,
129           detections['detection_boxes'],
130           detections['detection_classes'] + label_id_offset,
131           detections['detection_scores'],
132           category_index,                   # a dict containing category dictionaries keyed by category indices
133           use_normalized_coordinates=True,  # whether boxes is to be interpreted as normalized coordinates or not.
134           max_boxes_to_draw=200,            # maximum number of boxes to visualize.  If None, draw all boxes.
135           min_score_thresh=.30,             # minimum score threshold for a box to be visualized
136           agnostic_mode=False)              # boolean (default: False) controlling whether to evaluate in class-agnostic mode or not.  This mode will display scores but ignore classes.
137
138     print("i = ", i)
139     # 显示侦测结果
140     img = cv2.resize(image_np_with_detections, (800, 600))
141     cv2.imshow('object detection', img)
142
143     # 存档
144     i += 1
145     if i == 30:
146         cv2.imwrite('./data/images_Object_Detection/pedestrians.png', img)
147
148     # 按 q 可以结束 cv2 waikey()在进入下一组操作之前,会等待按下的按键事件
149     if cv2.waitKey(25) & 0xFF == ord('q'):
150         break
151
152 cap.release()
153 cv2.destroyAllWindows()
154
155 # 夜晚物件侦测
156 # 使用 webcam
157 # cap = cv2.VideoCapture(0)
158
159 # 读取视讯档案
160 cap = cv2.VideoCapture('./data/images_Object_Detection/night.mp4')
161 i = 0
162 while True:
163     # 读取一帧(frame) from camera or mp4
164     ret, image_np = cap.read()
165
166     # 加一维,变为 (笔数, 宽, 高, 颜色)
167     image_np_expanded = np.expand_dims(image_np, axis=0)
168
169     # 可测试水平翻转
170     # image_np = np.fliplr(image_np).copy()
171
172     # 可测试灰阶
173     # image_np = np.tile(
174     #     np.mean(image_np, 2, keepdims=True), (1, 1, 3)).astype(np.uint8)
175
176     # 转为 TensorFlow tensor 资料型态
177     input_tensor = tf.convert_to_tensor(np.expand_dims(image_np, 0), dtype=tf.float32)
178
179     # detections:物件资讯 内含 (候选框, 类别, 机率)
180     detections = detect_fn(input_tensor)
181     num_detections = int(detections.pop('num_detections'))
182
183     # 第一帧(Frame)才显示物件个数
184     if i == 0:
185         print(f'物件个数:{num_detections}')
186
187     # 结果存入 detections 变数
188     detections = {key: value[0, :num_detections].numpy() for key, value in detections.items()}
189     detections['detection_classes'] = detections['detection_classes'].astype(int)
190
191     # 将物件框起来
192     label_id_offset = 1
193     image_np_with_detections = image_np.copy()
194     viz_utils.visualize_boxes_and_labels_on_image_array(
195           image_np_with_detections,
196           detections['detection_boxes'],
197           detections['detection_classes'] + label_id_offset,
198           detections['detection_scores'],
199           category_index,
200           use_normalized_coordinates=True,  # whether boxes is to be interpreted as normalized coordinates or not.
201           max_boxes_to_draw=200,            # maximum number of boxes to visualize.  If None, draw all boxes.
202           min_score_thresh=.30,             # minimum score threshold for a box to be visualized
203           agnostic_mode=False)              # boolean (default: False) controlling whether to evaluate in class-agnostic mode or not.  This mode will display scores but ignore classes.
204
205     print("i = ", i)
206     # 显示侦测结果
207     img = cv2.resize(image_np_with_detections, (800, 600))
208     cv2.imshow('object detection', img)
209
210     # 存档
211     i += 1
212     if i == 30:
213         cv2.imwrite('./data/images_Object_Detection/night.png', img)
214
215     # 按 q 可以结束 cv2 waikey()在进入下一组操作之前,会等待按下的按键事件
216     if cv2.waitKey(25) & 0xFF == ord('q'):
217         break
218
219 cap.release()
220 cv2.destroyAllWindows()
代码运行结果:
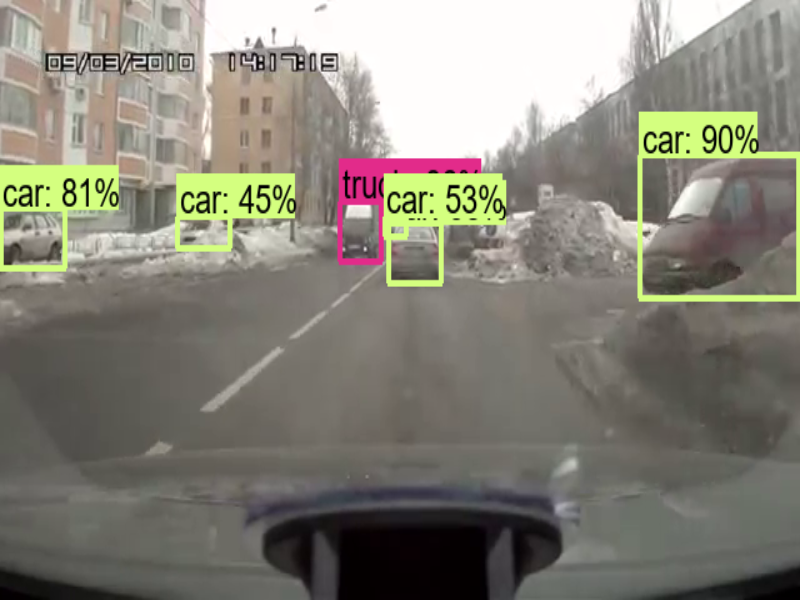
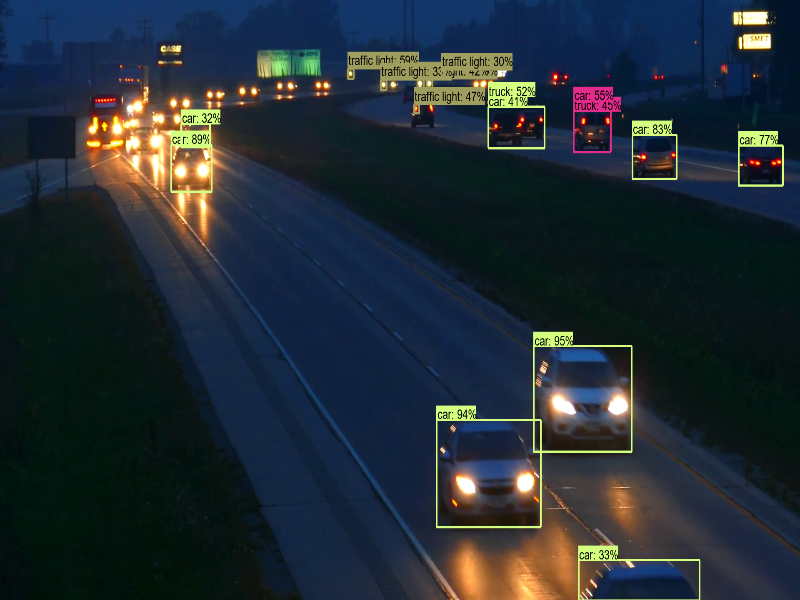
(1)以上代码测试了2个视频,从执行结果可以看出,辨识度极高,输入也能够使用 WebCam,然后改成 cv2.VideoCapture(0),其中的 0 代表第一台摄像机。
(2)如果要像 YOLO 自定义数据集,检测其他对象的话,TensorFlow Object Detection API 的 官网文件 有非常详细的解说,大家可以依照指示自行测试。
本文所涉及到的图片和模型可在如下地址中的 “TensorFlow Object Detection API” 文件夹中进行下载:
链接:https://pan.baidu.com/s/11vHUJSUgujFglNXPVf0PAQ?pwd=78cj
提取码:78cj