使用 JVM 进程缓存的优点就是没有网络开销,性能速度最快;缺点就是容量有限,无法共享;比较适合性能要求高,缓存数据量小的场景。如果我们自己实现 JVM 进程缓存的话,会使用到 Map 数据类型,相关的过期移除策略以及容量控制都得自己实现,比较麻烦。Caffeine 是一个基于 Java8 开发的提供了近乎最佳命中率的高性能的 JVM 进程缓存库,使用起来非常方便省心。
由于 Caffeine 的使用非常简单,这里就直接列出 Demo 代码进行演示,在博客最后会提供源代码下载。
Caffeine 的官网地址为:https://github.com/ben-manes/caffeine
一、搭建工程
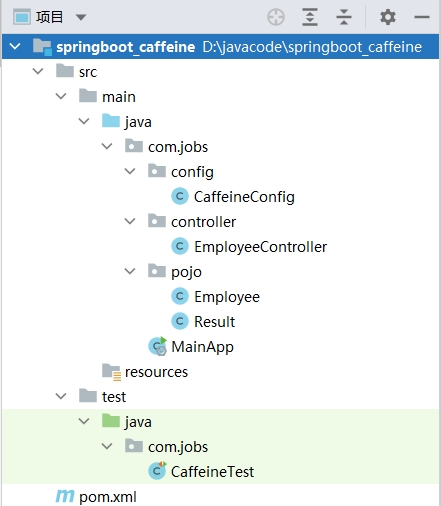
新建一个 SpringBoot 工程 springboot_caffeine,结构如下:
首先看一下 pom 文件,主要是引入 caffeine 的依赖包:
<?xml version="1.0" encoding="UTF-8"?>
<project xmlns="http://maven.apache.org/POM/4.0.0"
         xmlns:xsi="http://www.w3.org/2001/XMLSchema-instance"
         xsi:schemaLocation="http://maven.apache.org/POM/4.0.0 http://maven.apache.org/xsd/maven-4.0.0.xsd">
    <modelVersion>4.0.0</modelVersion>

    <groupId>com.jobs</groupId>
    <artifactId>springboot_caffeine</artifactId>
    <version>1.0</version>

    <properties>
        <maven.compiler.source>8</maven.compiler.source>
        <maven.compiler.target>8</maven.compiler.target>
    </properties>

    <parent>
        <groupId>org.springframework.boot</groupId>
        <artifactId>spring-boot-starter-parent</artifactId>
        <version>2.4.5</version>
    </parent>

    <dependencies>
        <dependency>
            <groupId>org.springframework.boot</groupId>
            <artifactId>spring-boot-starter-web</artifactId>
        </dependency>
        <dependency>
            <groupId>org.springframework.boot</groupId>
            <artifactId>spring-boot-starter-test</artifactId>
        </dependency>
        <dependency>
            <groupId>org.projectlombok</groupId>
            <artifactId>lombok</artifactId>
        </dependency>
        <!--引入 Caffeine 缓存依赖-->
        <dependency>
            <groupId>com.github.ben-manes.caffeine</groupId>
            <artifactId>caffeine</artifactId>
        </dependency>
    </dependencies>
    <build>
        <plugins>
            <plugin>
                <groupId>org.springframework.boot</groupId>
                <artifactId>spring-boot-maven-plugin</artifactId>
                <version>2.4.5</version>
            </plugin>
        </plugins>
    </build>
</project>
二、测试代码展示
在 CaffeineTest 类中,编写了使用 Caffeine 的用法,非常简单,具体内容如下:
package com.jobs;

import com.github.benmanes.caffeine.cache.Cache;
import com.github.benmanes.caffeine.cache.Caffeine;
import org.junit.jupiter.api.Test;
import org.springframework.boot.test.context.SpringBootTest;

import java.time.Duration;

@SpringBootTest
public class CaffeineTest {

    @Test
    void test1() {
        // 构建 cache 对象,由于是泛型,因此可以声明出你想要的类型
        Cache<String, String> cache = Caffeine.newBuilder().build();

        // 存数据 或 更新数据
        cache.put("user", "侯胖胖");

        // 取数据
        String user = cache.getIfPresent("user");
        System.out.println("user = " + user);

        // 取数据,如果未取到,可以执行方法,比如查询数据库,然后把结果自动存储到缓存中
        String fatUser = cache.get("fatUser", key -> {
            return "任肥肥";
        });
        System.out.println("fatUser = " + fatUser);
    }

    //设置最大容量,超过容量的话,清除之前添加的缓存
    @Test
    void test2() throws InterruptedException {
        // 创建缓存对象
        Cache<String, String> cache = Caffeine.newBuilder()
                // 设置缓存最大容量上限为 1
                .maximumSize(1).build();

        cache.put("user1", "侯胖胖");
        cache.put("user2", "任肥肥");
        cache.put("user3", "乔豆豆");

        // 延迟10ms,给清理线程一点时间
        Thread.sleep(10L);

        // 获取数据
        System.out.println("user1: " + cache.getIfPresent("user1"));
        System.out.println("user2: " + cache.getIfPresent("user2"));
        System.out.println("user3: " + cache.getIfPresent("user3"));
    }

    //设置缓存的有效期,超时后,将获取不到
    @Test
    void test3() throws InterruptedException {
        // 创建缓存对象
        Cache<String, String> cache = Caffeine.newBuilder()
                // 设置缓存有效期为 1 秒
                .expireAfterWrite(Duration.ofSeconds(1))
                .build();
        // 存数据
        cache.put("user", "乔豆豆");
        // 获取数据
        System.out.println("user: " + cache.getIfPresent("user"));
        // 休眠一会儿
        Thread.sleep(1300L);
        // 再获取数据
        System.out.println("user: " + cache.getIfPresent("user"));
    }
}
可以看出:我们在构建 Caffeine 缓存实例时,可以设置最大容量,以及缓存的有效期。
三、依赖注入示例
在 CaffeineConfig 类中,我们只需要构建实例并加上 @Bean 注解,即可全局使用:
package com.jobs.config;

import com.github.benmanes.caffeine.cache.Cache;
import com.github.benmanes.caffeine.cache.Caffeine;
import com.jobs.pojo.Employee;
import org.springframework.context.annotation.Bean;
import org.springframework.context.annotation.Configuration;

import java.util.concurrent.TimeUnit;

@Configuration
public class CaffeineConfig {

    @Bean
    public Cache<String, Employee> itemCache() {
        return Caffeine.newBuilder()
                //初始容量为100
                .initialCapacity(100)
                //最大容量为10000
                .maximumSize(10000)
                //写入后60秒过期
                .expireAfterWrite(60, TimeUnit.SECONDS)
                .build();
    }
}
当然你也可以把初始容量、最大容量、缓存有效期等参数,配置到 application.yml 文件中。
下面我们在 EmpolyeeController 类中,注入 Caffeine 缓存实例并使用:
package com.jobs.controller;

import com.github.benmanes.caffeine.cache.Cache;
import com.jobs.pojo.Employee;
import com.jobs.pojo.Result;
import org.springframework.beans.factory.annotation.Autowired;
import org.springframework.web.bind.annotation.*;

import java.util.Random;

@RequestMapping("/emp")
@RestController
public class EmployeeController {

    @Autowired
    private Cache<String, Employee> employeeCache;

    @PostMapping("/add")
    public Result<Boolean> addEmployee(Employee emp) {
        employeeCache.put(emp.getName(), emp);
        return Result.success(true);
    }

    @PostMapping("/update")
    public Result<Boolean> updateEmployee(Employee emp) {
        employeeCache.put(emp.getName(), emp);
        return Result.success(true);
    }

    @GetMapping("/get/{name}")
    public Result<Employee> getEmployee(@PathVariable("name") String name) {
        //如果能够取到,则返回获取的内容
        //如果取不到,则执行方法(比如去数据库中获取),然后存储到缓存中
        Employee employee = employeeCache.get(name,
                key -> new Employee(key, new Random().nextInt(50)));
        return Result.success(employee);
    }

    @DeleteMapping("/delete")
    public Result<Boolean> deleteEmployee(String name) {
        employeeCache.invalidate(name);
        return Result.success(true);
    }
}
下面列出 Employee 类的内容:
package com.jobs.pojo;

import lombok.AllArgsConstructor;
import lombok.Data;
import lombok.NoArgsConstructor;

@Data
@NoArgsConstructor
@AllArgsConstructor
public class Employee {
    //姓名
    private String name;
    //年龄
    private Integer age;
}
为了能够统一返回值,一般我们都会定义一个返回类,这里定义了 Result 类:
package com.jobs.pojo;

import lombok.Data;

@Data
public class Result<T> {

    //状态
    private Integer status;

    //消息
    private String msg;

    //数据
    private T data;

    public static <T> Result<T> success(T object) {
        Result<T> r = new Result<T>();
        r.status = 0;
        r.msg = "success";
        r.data = object;
        return r;
    }

    public static <T> Result<T> fail(Integer status, String msg) {
        Result r = new Result();
        r.status = status;
        r.msg = msg;
        return r;
    }

    public static <T> Result<T> error(String msg) {
        Result r = new Result();
        r.status = 500;
        r.msg = msg;
        return r;
    }
}
以上就是使用 Caffeine 的代码示例,非常简单。Caffeine 也提供了异步调用的方法,这里就不演示了,可以参考官网。
官网也列出了 Caffeine 与其它相关的 JVM 进程缓存的性能对比,如下图所示:
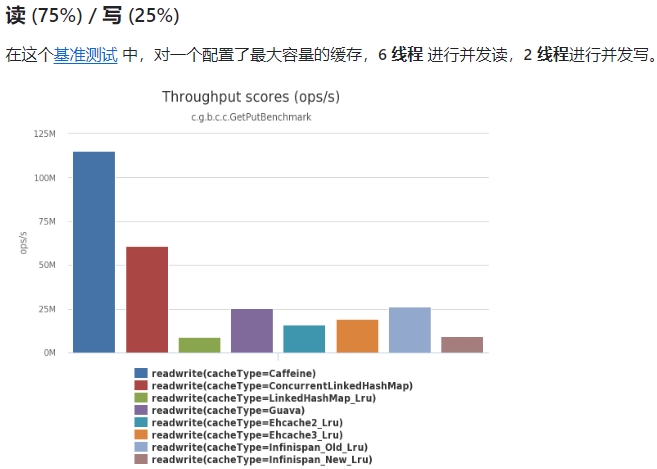
官网性能基准测试的结果访问地址为:https://github.com/ben-manes/caffeine/wiki/Benchmarks-zh-CN
本篇博客的Demo源代码下载地址为:https://files.cnblogs.com/files/blogs/699532/springboot_caffeine.zip