介绍SSM框架<原理>
一、什么是SSM框架?
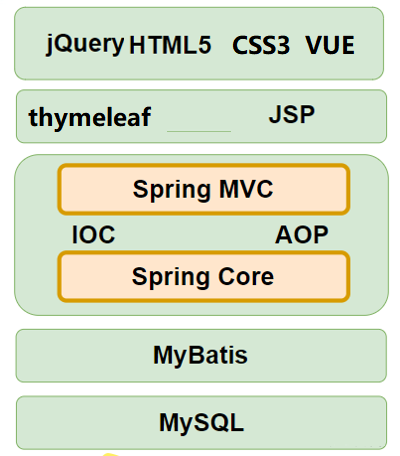
SSM框架是spring、spring MVC 、和mybatis框架的整合,是标准的MVC模式。SSM框架即是将SpringMVC框架、Spring框架、MyBatis框架整合使用。以简化在web开发中繁琐、重复的操作,让开发人员的精力专注于业务处理的开发上。标准的SSM框架有四层,分别是dao层(mapper),service层,controller层和View层。使用spring实现业务对象管理,使用spring MVC负责请求的转发和视图管理,mybatis作为数据对象的持久化引擎。
二、系统架构图
三、搭建步骤
SSM框架搭建实现步骤
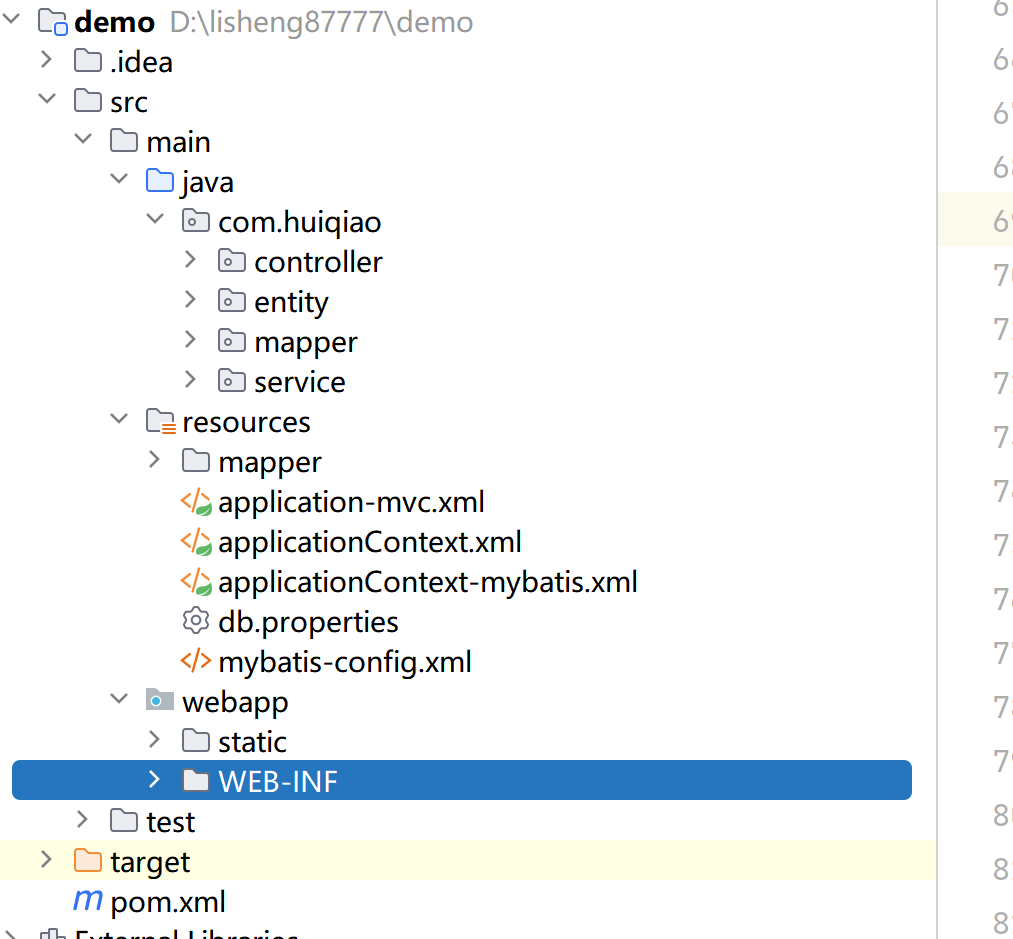
(1)创建Web项目
创建项目包结构
pom文件依赖
 <dependencies>
        <!-- Mybatis核心 -->
        <dependency>
            <groupId>org.mybatis</groupId>
            <artifactId>mybatis</artifactId>
            <version>3.5.7</version>
        </dependency>
        <dependency>
            <groupId>org.mybatis</groupId>
            <artifactId>mybatis-spring</artifactId>
            <version>2.0.6</version>
        </dependency>
        <!-- junit测试 -->
        <dependency>
            <groupId>junit</groupId>
            <artifactId>junit</artifactId>
            <version>4.12</version>
            <scope>test</scope>
        </dependency>
        <!-- MySQL驱动 -->
        <dependency>
            <groupId>mysql</groupId>
            <artifactId>mysql-connector-java</artifactId>
            <version>5.1.49</version>
        </dependency>
        <dependency>
            <groupId>javax.servlet</groupId>
            <artifactId>javax.servlet-api</artifactId>
            <version>4.0.1</version>
            <scope>provided</scope>
        </dependency>
        <!--spring-webmvc-->
        <dependency>
            <groupId>org.springframework</groupId>
            <artifactId>spring-webmvc</artifactId>
            <version>5.3.1</version>
        </dependency>
        <!-- 导入thymeleaf与spring5的整合包 -->
        <dependency>
            <groupId>org.thymeleaf</groupId>
            <artifactId>thymeleaf-spring5</artifactId>
            <version>3.0.12.RELEASE</version>
        </dependency>

        <!-- 导入jackson的依赖 -->
        <dependency>
            <groupId>com.fasterxml.jackson.core</groupId>
            <artifactId>jackson-databind</artifactId>
            <version>2.12.1</version>
        </dependency>
        <dependency>
            <groupId>com.alibaba</groupId>
            <artifactId>druid</artifactId>
            <version>1.2.18</version>
        </dependency>
        <!-- spring与jdbc连接spring-jdbc -->
        <dependency>
            <groupId>org.springframework</groupId>
            <artifactId>spring-jdbc</artifactId>
            <version>5.3.1</version>
        </dependency>
    </dependencies>
db.properties
#key=value
db.driver=com.mysql.jdbc.Driver
db.url=jdbc:mysql://localhost:3306/yubencheng
db.username=root
db.password=root
applicationContext.xml
<?xml version="1.0" encoding="UTF-8"?>
<beans xmlns="http://www.springframework.org/schema/beans"
       xmlns:xsi="http://www.w3.org/2001/XMLSchema-instance"
       xmlns:context="http://www.springframework.org/schema/context"
       xmlns:aop="http://www.springframework.org/schema/aop"
       xsi:schemaLocation="http://www.springframework.org/schema/beans http://www.springframework.org/schema/beans/spring-beans.xsd http://www.springframework.org/schema/context https://www.springframework.org/schema/context/spring-context.xsd http://www.springframework.org/schema/aop https://www.springframework.org/schema/aop/spring-aop.xsd">


    <context:component-scan base-package="com.huiqiao.service"></context:component-scan>

</beans>
mybatis-config.xml
<?xml version="1.0" encoding="UTF-8" ?>
<!DOCTYPE configuration
        PUBLIC "-//mybatis.org//DTD Config 3.0//EN"
        "http://mybatis.org/dtd/mybatis-3-config.dtd">
<configuration>

    <!-- <properties>
         <property name="driver" value="com.mysql.jdbc.Driver"/>
         <property name="url" value="jdbc:mysql://localhost:3306/yubencheng"/>
     </properties>-->


    <settings>
        <!-- 是否开启驼峰命名自动映射 -->
        <setting name="mapUnderscoreToCamelCase" value="true"/>
        <!-- 开启懒加载,全局开启 -->
        <setting name="lazyLoadingEnabled" value="true"/>
        <!-- (在 3.4.1 及之前的版本中aggressiveLazyLoading默认为 true) -->
        <setting name="aggressiveLazyLoading" value="false"/>
        <!-- 二级缓存 默认是开启的,不需要手动配置 -->
        <setting name="cacheEnabled" value="true"/>
    </settings>


</configuration>
applicationContext-mybatis.xml
<?xml version="1.0" encoding="UTF-8"?>
<beans xmlns="http://www.springframework.org/schema/beans"
       xmlns:xsi="http://www.w3.org/2001/XMLSchema-instance"
       xmlns:context="http://www.springframework.org/schema/context" xmlns:tx="http://www.springframework.org/schema/tx"
       xsi:schemaLocation="http://www.springframework.org/schema/beans http://www.springframework.org/schema/beans/spring-beans.xsd http://www.springframework.org/schema/context https://www.springframework.org/schema/context/spring-context.xsd http://www.springframework.org/schema/tx http://www.springframework.org/schema/tx/spring-tx.xsd">

    <!-- 加载属性文件 -->
    <context:property-placeholder location="classpath:db.properties"></context:property-placeholder>

    <!-- 配置数据源 -->
    <bean id="dataSource" class="com.alibaba.druid.pool.DruidDataSource" destroy-method="close">
        <property name="driverClassName" value="${db.driver}"></property>
        <property name="url" value="${db.url}"></property>
        <property name="username" value="${db.username}"></property>
        <property name="password" value="${db.password}"></property>
    </bean>
    <!-- 整合sqlSessionFactory -->
    <bean id="sqlSessionFactory" class="org.mybatis.spring.SqlSessionFactoryBean">
        <property name="dataSource" ref="dataSource"></property>
        <property name="configLocation" value="classpath:mybatis-config.xml"></property>
        <property name="mapperLocations" value="classpath:mapper/*.xml"></property>
    </bean>

    <!-- 专门扫描mapper接口 -->
    <bean class="org.mybatis.spring.mapper.MapperScannerConfigurer">
        <property name="basePackage" value="com.huiqiao.mapper"></property>
    </bean>


    <!-- 数据源事务管理器 ioc,指定管理的数据源 -->
    <bean id="transactionManager" class="org.springframework.jdbc.datasource.DataSourceTransactionManager">
        <property name="dataSource" ref="dataSource"></property>
    </bean>
    <!-- 开启事务注解驱动 -->
    <tx:annotation-driven transaction-manager="transactionManager"></tx:annotation-driven>


    <!-- 事务管理器增强,配置方法的事务传播机制 -->
   <!-- <tx:advice id="transactionManager" transaction-manager="txManager">
        <tx:attributes>
            <tx:method name="add*" propagation="REQUIRED"/>
            <tx:method name="update*" propagation="REQUIRED"/>
            <tx:method name="del*" propagation="REQUIRED"/>
            <tx:method name="get*" propagation="REQUIRED" read-only="true"/>
        </tx:attributes>
    </tx:advice>-->
</beans>
application-mvc.xml
<?xml version="1.0" encoding="UTF-8"?>
<beans xmlns="http://www.springframework.org/schema/beans"
xmlns:xsi="http://www.w3.org/2001/XMLSchema-instance"
xmlns:context="http://www.springframework.org/schema/context"
xmlns:mvc="http://www.springframework.org/schema/mvc"
xsi:schemaLocation="http://www.springframework.org/schema/beans http://www.springframework.org/schema/beans/spring-beans.xsd http://www.springframework.org/schema/context https://www.springframework.org/schema/context/spring-context.xsd http://www.springframework.org/schema/mvc https://www.springframework.org/schema/mvc/spring-mvc.xsd">
<!-- 开启注解扫描 -->
<context:component-scan base-package="com.huiqiao.controller"></context:component-scan>
<!--
path:设置处理的请求地址
view-name:设置请求地址所对应的视图名称
-->
<!-- <mvc:view-controller path="/" view-name="index"></mvc:view-controller>-->
<!--必须通过文件解析器的解析才能将文件转换为MultipartFile对象-->
<!-- <bean id="multipartResolver" class="org.springframework.web.multipart.commons.CommonsMultipartResolver"></bean>-->
<!-- 配置视图解析器【解析视图(设置视图前缀&后缀)】 -->
<!-- 配置Thymeleaf视图解析器 -->
<bean id="viewResolver" class="org.thymeleaf.spring5.view.ThymeleafViewResolver">
<property name="order" value="1"/>
<property name="characterEncoding" value="UTF-8"/>
<property name="templateEngine">
<bean class="org.thymeleaf.spring5.SpringTemplateEngine">
<property name="templateResolver">
<bean class="org.thymeleaf.spring5.templateresolver.SpringResourceTemplateResolver">
<!-- 视图前缀 -->
<property name="prefix" value="/WEB-INF/"/>
<!-- 视图后缀 -->
<property name="suffix" value=".html"/>
<property name="templateMode" value="HTML5"/>
<property name="characterEncoding" value="UTF-8" />
</bean>
</property>
</bean>
</property>
</bean>
<!--
处理静态资源,例如html、js、css、jpg
若只设置该标签,则只能访问静态资源,其他请求则无法访问
此时必须设置<mvc:annotation-driven/>解决问题
-->
<!-- 解决静态资源加载问题-->
<mvc:default-servlet-handler></mvc:default-servlet-handler>
<!-- 当SpringMVC中设置任何一个view-controller时,
其他控制器中的请求映射将全部失效,此时需要在SpringMVC的核心配置文件中设置开启mvc注解驱动的标签: -->
<mvc:annotation-driven />
<!-- <bean id="firstInterceptor" class="com.huiqiao.interceptor.FirstInterceptor"></bean>-->
<!-- 以上两种配置方式都是对DispatcherServlet所处理的所有的请求进行拦截 -->
<!-- <mvc:interceptors>
<!– 全局拦截 –>
<!– <ref bean="firstInterceptor"></ref>–>
<mvc:interceptor>
<mvc:mapping path="/**"/>
<ref bean="firstInterceptor"></ref>
</mvc:interceptor>
</mvc:interceptors>-->
<!--
以上配置方式可以通过ref或bean标签设置拦截器,通过mvc:mapping设置需要拦截的请求,通过mvc:exclude-mapping设置需要排除的请求,即不需要拦截的请求
-->
<bean class="org.springframework.web.servlet.handler.SimpleMappingExceptionResolver">
<property name="exceptionMappings">
<props>
<!--
properties的键表示处理器方法执行过程中出现的异常
properties的值表示若出现指定异常时,设置一个新的视图名称,跳转到指定页面
-->
<prop key="java.lang.NullPointerException">error</prop>
</props>
</property>
<!--
exceptionAttribute属性设置一个属性名,将出现的异常信息在请求域中进行共享
-->
<!--<property name="exceptionAttribute" value="ex"></property>-->
</bean>
</beans>
web.xm
<?xml version="1.0" encoding="UTF-8"?>
<web-app xmlns="http://xmlns.jcp.org/xml/ns/javaee"
         xmlns:xsi="http://www.w3.org/2001/XMLSchema-instance"
         xsi:schemaLocation="http://xmlns.jcp.org/xml/ns/javaee http://xmlns.jcp.org/xml/ns/javaee/web-app_4_0.xsd"
         version="4.0">

    <!--配置springMVC的编码过滤器-->
    <filter>
        <filter-name>CharacterEncodingFilter</filter-name>
        <filter-class>org.springframework.web.filter.CharacterEncodingFilter</filter-class>
        <init-param>
            <param-name>encoding</param-name>
            <param-value>UTF-8</param-value>
        </init-param>
        <init-param>
            <param-name>forceResponseEncoding</param-name>
            <param-value>true</param-value>
        </init-param>
    </filter>
    <filter-mapping>
        <filter-name>CharacterEncodingFilter</filter-name>
        <url-pattern>/*</url-pattern>
    </filter-mapping>

    <!-- HiddenHttpMethodFilter,RESTful实现 -->
    <filter>
        <filter-name>HiddenHttpMethodFilter</filter-name>
        <filter-class>org.springframework.web.filter.HiddenHttpMethodFilter</filter-class>
    </filter>
    <filter-mapping>
        <filter-name>HiddenHttpMethodFilter</filter-name>
        <url-pattern>/*</url-pattern>
    </filter-mapping>

    <servlet>
        <servlet-name>springMVC</servlet-name>
        <servlet-class>org.springframework.web.servlet.DispatcherServlet</servlet-class>
        <!-- 设置springmvc.xml配置文件路径【管理容器对象】 -->
        <init-param>
            <param-name>contextConfigLocation</param-name>
           <!-- <param-value>classpath:application-mvc.xml</param-value>-->
            <param-value>classpath:application-mvc.xml</param-value>
        </init-param>
        <!-- 设置DispatcherServlet优先级【启动服务器时,创建当前Servlet对象】 -->
        <!--
       作为框架的核心组件,在启动过程中有大量的初始化操作要做
      而这些操作放在第一次请求时才执行会严重影响访问速度
      因此需要通过此标签将启动控制DispatcherServlet的初始化时间提前到服务器启动时
         -->
        <load-on-startup>1</load-on-startup>
    </servlet>
    <servlet-mapping>
        <servlet-name>springMVC</servlet-name>
        <url-pattern>/</url-pattern>
    </servlet-mapping>


    <!-- 配置Spring的配置文件 去加载spring的配置文件 -->
    <listener>
        <!-- 默认是去WEB-INF下找 applicationContext.xml配置文件 -->
        <listener-class>org.springframework.web.context.ContextLoaderListener</listener-class>
    </listener>
    <context-param>
        <param-name>contextConfigLocation</param-name>
        <param-value>classpath:applicationContext*.xml</param-value>
    </context-param>
</web-app>