Springcloud介绍
微服务架构:
在大数据以及高并发的环境下,微服务架构就诞生了。微服务架构是一种将单应用程序作为一套小型服务开发的方法,每种应用程序都在其自己的进程中运行,并与轻量级机制 (通常是HTTP资源的API) 进行通信。服务拆分最小化,服务的集中化管理是最少的它们可以使用不同的存储计算存储数据数据。
微服务架构的特点:
微服务架构中每个服务都有自己的独立的数据库,数据库之间没有任何联系,这样的好处是,”随着业务的不断扩张,服务与服务不需要提供数据库集成,而是提供API接口相互调用。数据库的独立使系统维护简单,性能提高,迁移方便。一个典型的微服务系统,各个服务的数据库可能都不同,每个服务所使用的数据存储技术可以根据业务需求来选择。微服务是直接通过HTTP协议进行通信的,并且可以配合采用消息队列(如RabbitMQ,Kafka等)。
微服务架构中系统会被拆分为若干个微服务,每个微服务又是一个独立的运行程序,测试容易,维护简单。单体架构的应用程序系统部署一次而微服务架构对每一个微服务进行独立部署。这时出现的如Docker等自动化部署工具减少人为控制,降低出错概率。当然微服务架构也不是万能的,因为数据接口间需要通过网络进行通讯,必然会牺牲掉一部分效率,所以一些用户量不大、访问量低、m:很少高并发的服务器仍然建议使用单体架构的后端服务器。
微服务架构设计原则 :
- 前后端分离:
- 前后端分离下,前后端交互界面清晰,只考虑接口问题,容易维护
- AKF扩展拆分:
- X轴:水平复制;Y轴: 按服务功能拆分;Z轴: 基于类似数据分区
- 无状态服务:
- 也就是说url请求没有上下文关系。
- Restful通讯风格:
微服务拆分注意事项
-
不同的微服务,不要重复开发相同的业务
-
微服务数据独立,不要访问其它微服务数据库
-
微服务可以将自己的业务暴露为接口,供其它微服务调用
Spring Cloud:
-
Spring Cloud是一个微服务治理平台,提供了一套服务框架,包含了服务注册与发现、配置中心、消息中心、负载均衡、数据监控等等。
-
Spring Cloud是一个基于Spring Boot实现的微服务开发杂构,它利用SpringBoot的开发便利性巧妙地筒化了分布式系统的开发。
-
Spring Cloud为开发者提供了快速构建分布式系统的工具,开发者可以快速的启动服务或构建应用、同时能够快速和云平台资源对接。微服务是可以独立部署、水平扩展、独立访问的服务单元。Spring Cloud就是这些微服务的大管家。

Spring Cloud 两代对比:Spring Cloud一套框架标准,其实现是由许多公司的开源产品的整合而来的,这其中第一代标准主要以Netflix公司开源产品的实现为主,第二代标准主要以Alibaba公司开源产品的实现为主,它们之间可以结合使用。
| Spring Cloud 第一代 | Spring Cloud 第二代 | |
|---|---|---|
| 注册中心 | Eureka,Consul,ZooKeeper | Nacos,Radar |
| 负载均衡 | Ribbon | Spring Cloud LoadBanlancer(理论) |
| 远程调用 | Feign | Open Feign |
| 配置中心 | Spring Cloud Config | Nacos,Apollo,Config Keeper |
| 服务网关 | Spring Cloud Zuul | Spring Cloud Gateway |
| 容错保护 | Hystrix | Sentinel,Resilience4j |
注册中心(Eureka)
背景
在大数据以及高并发的环境下,一般不再使用单一服务器而是使用服务器集群完成工作。在微服务架构的服务器集群当中,一个业务可能需要有多个微服务配合来共同完成当业务越来越多越复杂的情况下,微服务的数量会越来越庞大,微服务之间的调用关系也越来越复杂。这么复杂的关系,单纯想靠人去记录和维护是不现实的。
如何快速找到相应的微服务地址,如何在多个相同微服务提供者中快速找到最适合的,这是急需解决的问题。
在此情况下微服务的注册中心就应运而生了,它可以记录微服务架构中每一个服务的IP地址、端口以及所对应的服务。这样当需要某一服务时,只需到注册中心去查找最佳的微服务提供者地址和端口即可。
注册中心
注册中心记录服务和服务地址的映射关系,所有服务注册到这里,当一个服务需要调用其他服务时,会到注册中心查找到相应的服务地址进行调用。类似"通讯录"。
- 注册中心主要作用有:服务注册/续期/反注册,服务订阅/取消订阅,服务健康检查等。
- Springcloud中典型的微服务注册中心有Euraka、Nacos、Consul、Zookeeper、Radar等
案例
Eureka实现步骤:
- 搭建注册中心
- 引入eureka-server依赖
- 在application.yml中配置eureka地址。
- 启动类上添加@EnableEurekaServer
- 服务注册
- 引eureka-client依赖
- 在application.yml中配置eureka地址
- 服务调用
- 引入eureka-client依赖
- 在application.yml中配置eureka地址
- RestTemplate上添加@LoadBalanced。
- 使用服务名称进行远程调用

新建一个eureka-server模块

application.yaml
server:
  port: 8090
spring:
  application:
    name: eurekaserver
eureka:
  client:
    fetch-registry: false
    register-with-eureka: false
    service-url:
      defaultZone: http://localhost:8090/eureka
添加注解

给customer-server和ticket-server添加Pom依赖和yaml配置

server:
  port: 8081
spring:
  datasource:
    password: root
    username: root
    driver-class-name: com.mysql.cj.jdbc.Driver
    url: jdbc:mysql://localhost:3306/service_customer?useSSL=false&allowPublicKeyRetrieval=true&serverTimezone=UTC
  application:
    name: servicecustomer
eureka:
  client:
    service-url:
      defaultZone: http://localhost:8090/eureka
启动全部服务
访问 http://localhost:8090/eureka。能看到有可以使用的服务

修改ticket-server模块的启动类,增加负载均衡。然后修改服务层源码,让其在eureka服务器中拉去customer-server服务。
@SpringBootApplication
public class TicketApplication {

    public static void main(String[] args) {
        SpringApplication.run(TicketApplication.class, args);
    }

    @Bean
    @LoadBalanced
    public RestTemplate getRestTemplate(){
        return new RestTemplate();
    }
}

| Restful | RestTemplate |
|---|---|
| Get | getForObject(URL+id,class |
| Post | postForObject(URL,Object,class |
| Put | put(URL,Object) |
| Delete | delete(URL+id) |
重新启动五个服务。打开浏览器访问serviceticket服务,它会在eureka服务器中找到适合的servicecustomer服务,并去拉取servicecustomer服务。
总结
Eureka注册中心主要解决的问题:
-
服务消费者如何获取服务提供者地址服务提供者启动时向Eureka注册自己的服务信息,Eureka服务器保存这些信息,服务消费者根据服务名称向Eureka服务器拉取服务提供者地址信息。
-
服务消费者如何感知服务提供者是否健康服务提供者默认会每隔30秒向Eureka服务器发送心跳信息报告健康状态,Eureka服务器会更新记录服务列表信息,心跳不正常会被剔除,服务消费者可以拉取到最新的信息
Eureka主要包含Eureka Server和Eureka Client:
-
注册中心(Eureka Server)
-
记录服务信息
-
心跳监控
-
-
服务提供者(Eureka Client)
-
注册自己的服务信息到注册中心
-
默认每隔30向注册中心发送一次心跳
-
-
服务消费者(Eureka Client)
-
根据服务名称从注册中心拉取服务列表
-
基于服务列表做负载均衡,选中一个微服务后发起远程调用
-
负载均衡(Ribbon)
有多个服务提供者时,服务消费者是如何选择?服务消费者利用负载均衡算法,从服务列表中根据指定的规则挑选一个服务提供者,这就需要用到Ribbon。
测试


连续8次调用http://localhost:8082/ticket/queryById/1

调用的次数是均衡的
使用负载均衡Ribbon
引入依赖
<dependency>
    <groupId>org.springframework.cloud</groupId>
    <artifactId>spring-cloud-starter-netflix-ribbon</artifactId>
    <version>1.4.3.RELEASE</version>
</dependency>
将均衡策略改为随机

Ribbon负载均衡流程

Ribbon的IRule常见负载均衡策略
| 策略名 | 策略描述 |
|---|---|
| RoundRobinRule | 简单轮询方法选择一个server |
| RandomRule | 随机选择一个server |
| WeightedResponseTimeRule | 根据响应时间分配权重,响应时间占比越长权重越小,被选中的机会越小 |
| BastAvailableRule | 选择最小并发连接数的server |
| ZoneAvailableRule | 轮询前剔除不可用的zone后选择server |
Ribbon的使用方法
-
在配置类中注入一个新的IRule即可

-
在配置文件中修改,可控制到具体服务提供者
servicecustomer:
  ribbon:
    NFLoadBalancerRuleClassName: com.netflix.loadbalancer.RandomRule
Ribbon默认是第一次使用服务时加载及延迟加载,所以第一次速度较慢。可以开启立即加载,启动是自动完成加载。
ribbon:
	eager-load:
		enabled: true
		clients:
			_servicecustomer
serviceticket服务配置文件中定义了servicecustomer对它进行立即加载
远程调用(Open Feign)
使用RestTemplate存在一定缺点,URL嵌入之后降低代码可读性,且遇到复杂冗长的URL更加难以维护。

Feign是一个声明式客户端,作用是解决上面的问题。github.com/OpenFeign/feign
- 在ticket模块中添加openfeign依赖
<dependency>
    <groupId>org.springframework.cloud</groupId>
    <artifactId>spring-cloud-starter-openfeign</artifactId>
</dependency>
-
修改Ticket的启动类,增加feign注解

-
建立一个CustomerClient接口,类似Controller
package com.ticket.client;

import com.custmer.domain.Customer;
import org.springframework.cloud.openfeign.FeignClient;
import org.springframework.web.bind.annotation.GetMapping;
import org.springframework.web.bind.annotation.PathVariable;

@FeignClient(value = "servicecustomer")
public interface CustomerClient {
// 和customerController的接口一致
@GetMapping("/customer/queryById/{id}")
Customer queryById(@PathVariable("id")int id);
}
- 修改TicketServiceImpl实现
@Service("TicketService")
public class TicketServiceImpl implements TicketService {
    @Autowired
    TicketDao ticketDao;
    @Autowired
    RestTemplate restTemplate;
    @Autowired
    CustomerClient customerClient;

    @Override
    public Ticket queryById(int id) {
        Optional<Ticket> ticket = ticketDao.findById(id);
        Ticket ticketRes = ticket.get();
        Customer customer = customerClient.queryById(ticketRes.getUid());
        ticketRes.setCustomer(customer);
        return ticketRes;
    }
}
PS: 这里坑比较多,建议SpringBoot版本使用3.0以下的。
Feign使用连接池
- URL Connection:默认方式,不支持连接池
- Apache HttpClient: 支持连接池
- OKHttp: 支持连接池
添加Pom依赖
<dependency>
    <groupId>io.github.openfeign</groupId>
    <artifactId>feign-httpclient</artifactId>
</dependency>
配置连接池
feign:
  httpclient:
    enabled: true
    max-connections: 200
    max-connections-per-route: 50
注册中心(Nacos)
- 是阿里巴巴的开源项目,作为Spring Cloud中的一个组件,相比于Eureka其功能更加丰富,在国内受欢迎程度更高。
- 提供基于DNS和基于RPC的服务发现,即能被采用http/https的服务注册和发现,也能被采用PRC的服务注册与发现。
- 动态修改配置并实时生效,非常有利于“配置优先”的服务开发。与Eureka可以无侵入的切换。
- 可用于单机模式(测试),集群模式和多集群模式(cluster-name区分不同集群)
- 可以直接手动修改权重配置。
- 可以通过命名空间来区分不同环境配置。
- 相比Eureka只能通过任务定时剔除无效服务,Nacos可以主动询问代替心跳检测和手动下线服务,在自动或手动下线服务后使用消息机制快速通知客户端。
nacos下载地址https://github.com/alibaba/nacos/releases
在bin目录下执行startup -m standalone

访问http://192.168.184.1:8848/nacos/index.html
默认 用户名nacos 密码nacos
SpringCloud兼容版本
| Spring Cloud Alibaba Version | Spring Cloud Version | Spring Boot Version |
|---|---|---|
| 2.2.10-RC1* | Spring Cloud Hoxton.SR12 | 2.3.12.RELEASE |
| 2.2.9.RELEASE | Spring Cloud Hoxton.SR12 | 2.3.12.RELEASE |
| 2.2.8.RELEASE | Spring Cloud Hoxton.SR12 | 2.3.12.RELEASE |
| 2.2.7.RELEASE | Spring Cloud Hoxton.SR12 | 2.312.RELEASE |
| 2.2.6.RELEASE | Spring Cloud Hoxton.SRg | 2.3.2.RELEASE |
| 2.2.1RELEASE | Spring Cloud Hoxton.SR3 | 2.2.5.RELEASE |
| 2.2.0.RELEASE | Spring Cloud Hoxton.RELEASE | 2.2.X.RELEASE |
| 2.1.4.RELEASE | Spring Cloud Greenwich.SR6 | 2.1.13.RELEASE |
| 2.1.2.RELEASE | Spring Cloud Greenwich | 2.1.X.RELEASE |
要尽量版本合适
| Spring Cloud Alibaba Version | Sentinel Version | Nacos Version | RocketMQ Version | Dubbo Version | Seata Version |
|---|---|---|---|---|---|
| 2022.0.0.0-RC2 | 18.6 | 2.2.1 | 4.9.4 | ~ | 1.7.0-native-rc2 |
| 2021.0.5.0 | 18.6 | 22.0 | 49.4 | ~ | 1.61 |
| 2.2.10-RC1 | 1.8.6 | 2.2.0 | 4.9.4 | ~ | 1.61 |
| 2022.0.0.0-RC1 | 18.6 | 2.2.1-RC | 4.9.4 | ~ | 1.61 |
| 2.2.9.RELEASE | 1.8.5 | 2.1.0 | 4.9.4 | ~ | 1.5.2 |
| 2021.0.4.0 | 18.5 | 2.0.4 | 4.9.4 | ~ | 15.2 |
| 2.2.8RELEASE | 1.8.4 | 2.1.0 | 4.9.3 | ~ | 1.5.1 |
| 2021.0.1.0 | 18.3 | 1.4.2 | 4.9.2 | ~ | 14.2 |
| 2.2.7.RELEASE | 181 | 2.0.3 | 4.6.1 | 2.7.13 | 13.0 |
| 2.2.6.RELEASE | 181 | 14.2 | 4.4.0 | 2.7.8 | 130 |
测试
- 修改customer服务的Pom依赖。
<?xml version="1.0" encoding="UTF-8"?>
<project xmlns="http://maven.apache.org/POM/4.0.0" xmlns:xsi="http://www.w3.org/2001/XMLSchema-instance"
         xsi:schemaLocation="http://maven.apache.org/POM/4.0.0 https://maven.apache.org/xsd/maven-4.0.0.xsd">
    <modelVersion>4.0.0</modelVersion>
    <parent>
        <groupId>org.springframework.boot</groupId>
        <artifactId>spring-boot-starter-parent</artifactId>
        <version>2.3.12.RELEASE</version>	<!--修改SpringBoot版本-->
        <relativePath/>
    </parent>

    <groupId>com.custmer</groupId>
    <artifactId>custmer</artifactId>
    <version>0.0.1-SNAPSHOT</version>

    <properties>
        <java.version>17</java.version>
        <spring-cloud.version>Hoxton.SR12</spring-cloud.version>
        <spring-cloud-alibaba.version>2.2.6.RELEASE</spring-cloud-alibaba.version>
    </properties><!--修改Springcloud和Springcloud alibaba的兼容版本-->

    <dependencies>

        <dependency>
            <groupId>com.alibaba.cloud</groupId>
            <artifactId>spring-cloud-starter-alibaba-nacos-discovery</artifactId>
            <version>2.1.0.RELEASE</version>
        </dependency><!--nacos代替eureka-->

        <dependency>
            <groupId>org.springframework.boot</groupId>
            <artifactId>spring-boot-starter-data-jpa</artifactId>
        </dependency>

        <dependency>
            <groupId>org.springframework.boot</groupId>
            <artifactId>spring-boot-starter-web</artifactId>
        </dependency>

        <dependency>
            <groupId>com.mysql</groupId>
            <artifactId>mysql-connector-j</artifactId>
            <version>8.0.33</version>
            <scope>runtime</scope>
        </dependency>

        <dependency>
            <groupId>org.projectlombok</groupId>
            <artifactId>lombok</artifactId>
            <optional>true</optional>
        </dependency>

        <dependency>
            <groupId>org.springframework.boot</groupId>
            <artifactId>spring-boot-starter-test</artifactId>
            <scope>test</scope>
        </dependency>
    </dependencies>

    <dependencyManagement>
        <dependencies>
            <dependency>
                <groupId>org.springframework.cloud</groupId>
                <artifactId>spring-cloud-dependencies</artifactId>
                <version>${spring-cloud.version}</version>
                <type>pom</type>
                <scope>import</scope>
            </dependency>
        </dependencies>
    </dependencyManagement>

    <build>
        <plugins>
            <plugin>
                <groupId>org.springframework.boot</groupId>
                <artifactId>spring-boot-maven-plugin</artifactId>
                <configuration>
                    <excludes>
                        <exclude>
                            <groupId>org.projectlombok</groupId>
                            <artifactId>lombok</artifactId>
                        </exclude>
                    </excludes>
                </configuration>
            </plugin>
        </plugins>
    </build>

</project>
- customer服务yaml配置文件
server:
  port: 8081
spring:
  datasource:
    password: root
    username: root
    driver-class-name: com.mysql.cj.jdbc.Driver
    url: jdbc:mysql://localhost:3306/service_customer?useSSL=false&allowPublicKeyRetrieval=true&serverTimezone=UTC
  application:
    name: servicecustomer
  cloud:
    nacos:
      discovery:
        server-addr: localhost:8848
-
对Ticket服务做同样的配置修改
-
访问
http://192.168.184.1:8848/nacos/index.html
-
复制customerserver

配置集群
添加配置
spring
  cloud:
    nacos:
      discovery:
        server-addr: localhost:8848
        cluster-name: SH

查看服务详情

客户端集群设置
- ticket配置文件上设置优先访问本集群(集群内为随机)
# 被访问服务名称
servicecustomer:
  ribbon:
    NFLoadBalancerRuleClassName: com.alibaba.cloud.nacos.ribbon.NacosRule
- 只有同集群服务都关闭之后,才去访问不同集群的服务
- 可以在nacos服务器中直接修改服务节点的权重
命名空间
创建命名空间ID

给customer服务和Ticket分配一个命名空间的ID

不同的命名空间不可以互相访问
Nacos非临时实例
-
不再是心跳检测,而是主动询问
-
在serviceTicket中修改配置文件

配置中心(Nacos)
- 在微服务架构中,每一个微服务都有自己的配置文件,随着微服务越来越多,将来要更改其中的配置难道要逐一去修改吗?
- 在微服务架构中一般会存在一个配置中心,它可以统一的管理集群中的所有配置。如果有配置需要变更,只需要去配置中心更改,由它通知相应的微服务进行相关配置的热更新。
配置的Data ID不是随意的,格式:服务名+环境.yaml


客户端拉取配置
- customer模块中Pom引入相关依赖
<dependency>
    <groupId>com.alibaba.cloud</groupId>
    <artifactId>spring-cloud-alibaba-nacos-config</artifactId>
    <version>2.1.0.RELEASE</version>
</dependency>
customer服务中添加bootstrap.yaml配置,删除application.yaml相同配置。

启动访问localhost:8084/customer/hello

配置文件热部署
修改Nacos中的配置文件。

在服务端的Controller类中添加注解@RefreshScope重启服务

此时。修改Nacos配置文件时,客户端的配置能够实时生效。
Nacos支持多环境配置,如配置共用配置+开发时配置+运营时配置。
总结
Nacos中配置管理的步骤:
- 在Nacos上添加配置文件在微服务中引入nacos的配置依赖在微服务中添加bootstrap.yml,配置nacos地址、环境、服务名称,文件后级名
- 多环境下配置文件优先级:服务名-环境.yml>服务名.yml>本地配置
服务网关(SpringCloud Gateway)
网关功能:
- 身份认证和权限控制
- 服务路由和负载均衡
- 请求限流
常见的网关
- Spring Cloud Zuul(阻塞式)
- Spring Cloud Gateway(响应式)
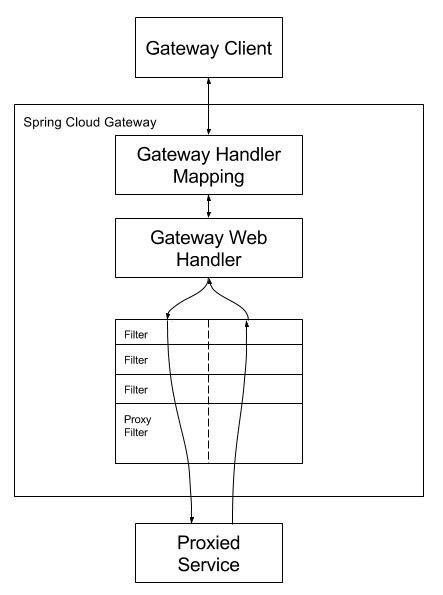
使用步骤:
- 新建一个SpringBoot服务Spring-Gateway
- 添加Pom依赖
<?xml version="1.0" encoding="UTF-8"?>
<project xmlns="http://maven.apache.org/POM/4.0.0" xmlns:xsi="http://www.w3.org/2001/XMLSchema-instance"
	xsi:schemaLocation="http://maven.apache.org/POM/4.0.0 https://maven.apache.org/xsd/maven-4.0.0.xsd">
	<modelVersion>4.0.0</modelVersion>
	<parent>
		<groupId>org.springframework.boot</groupId>
		<artifactId>spring-boot-starter-parent</artifactId>
		<version>2.3.12.RELEASE</version>
		<relativePath/>
	</parent>

	<groupId>com</groupId>
	<artifactId>spring-gateway</artifactId>
	<version>0.0.1-SNAPSHOT</version>

	<properties>
		<java.version>8</java.version>
		<spring-cloud.version>Hoxton.SR12</spring-cloud.version>
		<spring-cloud-alibaba.version>2.2.6.RELEASE</spring-cloud-alibaba.version>
	</properties>

	<dependencies>

		<dependency>
			<groupId>com.alibaba.cloud</groupId>
			<artifactId>spring-cloud-starter-alibaba-nacos-discovery</artifactId>
			<version>2.1.0.RELEASE</version>
		</dependency>

		<dependency>
			<groupId>org.springframework.cloud</groupId>
			<artifactId>spring-cloud-starter-gateway</artifactId>
		</dependency>

		<dependency>
			<groupId>org.springframework.boot</groupId>
			<artifactId>spring-boot-starter-test</artifactId>
			<scope>test</scope>
		</dependency>
	</dependencies>
	<dependencyManagement>
		<dependencies>
			<dependency>
				<groupId>org.springframework.cloud</groupId>
				<artifactId>spring-cloud-dependencies</artifactId>
				<version>${spring-cloud.version}</version>
				<type>pom</type>
				<scope>import</scope>
			</dependency>
		</dependencies>
	</dependencyManagement>

	<build>
		<plugins>
			<plugin>
				<groupId>org.springframework.boot</groupId>
				<artifactId>spring-boot-maven-plugin</artifactId>
			</plugin>
		</plugins>
	</build>

</project>
- 添加服务配置
server:
  port: 8888
spring:
  application:
    name: gateway
  cloud:
    nacos:
      discovery:
        server-addr: localhost:8848
    gateway:
      routes:
        - id: servicecustomer
          uri: lb://servicecustomer
          predicates:
            - Path=/customer/**
        - id: serviceticket
          uri: lb://serviceticket
          predicates:
            - Path=/ticket/**
PS:网关路由配置
- id:唯一id号
- uri: 路由目标地址,lb(loadbalance)后跟服务名称
- predicates: 路由断言,根据路径匹配是否符合要求

通过网关的8888端口也能访问服务
测试断言
修改配置中的predicates,增加After(服务在特定时间后才能访问)
spring:
    cloud:
        gateway:
            route:
                - id: servicecustomer
                  url: lb://servicecustomer
			predicates:
                - Path=/customer/**
                - After=2023-09-28T16:17:00.123+08:00[Asua/Shanghai]
过滤器
customer配置文件

自定义过滤器。实现GlobalFilter接口并实现里面的filter方法
package com.springgateway.utils;

import org.springframework.cloud.gateway.filter.GatewayFilterChain;
import org.springframework.cloud.gateway.filter.GlobalFilter;
import org.springframework.core.annotation.Order;
import org.springframework.http.HttpStatus;
import org.springframework.http.server.reactive.ServerHttpRequest;
import org.springframework.stereotype.Component;
import org.springframework.util.MultiValueMap;
import org.springframework.web.server.ServerWebExchange;
import reactor.core.publisher.Mono;

@Component
@Order(-1)// 过滤顺序,越小优先
public class AuthorizerFilter implements GlobalFilter {
    /**
     * @param exchange  // 请求上下文,可以获取Request、Response等
     * @param chain     // 下一个过滤器
     * @return {@link Mono}<{@link Void}>
     */
    @Override
    public Mono<Void> filter(ServerWebExchange exchange, GatewayFilterChain chain) {
        ServerHttpRequest request = exchange.getRequest();
        MultiValueMap<String,String> queryParams = request.getQueryParams();
        String authorization = queryParams.getFirst("authorization");
        if ("admin".equals(authorization)){
            return chain.filter(exchange);
        }
        exchange.getResponse().setStatusCode(HttpStatus.UNAUTHORIZED);
        return exchange.getResponse().setComplete();
    }
}
重启网关服务。携带指定的权限

不写或权限不正确。


网关路由断言工厂
| 名称 | 说明 | 例子 |
|---|---|---|
| After | 是某个时间点后的请求 | After=2037-01-20T17:42:47.789-07:00[America/Denver] |
| Before | 是某个时间点前的请求是 | Before=2031-04-13T15:14:47.433+08:00[Asia/Shanghai] |
| Between | 某两个时间点之前的请求 | Between=2037-01-20T17:42:47.789-07:00[America/Denver], 2037-0121T17:42:47.789-07:00[America/Denver] |
| Cookie | 请求必须包含某些cookie | Cookie=chocolate,ch.p //匹配具有一个名为chocolate的cookie的请求,该cookie的值匹配ch.p正则表达式 |
| Header | 请求必须包含某些header | Header=X-Request-Id,d+ //匹配有一个名为X-Request-Id的请求头其值匹配d+正则表达式(也就是说,它有一个或多个数字的值) |
| Host | 请求必须是访问某个域名 | Host=*.somehost.org,*,anotherhost.org |
| MethodPath | 请求方式必须是指定方式 | Method=GET,POST |
| Path | 请求路径必须符合指定规则 | Path=/red/{segment}/blue/** |
| Query | 请求参数必须包含指定参数 | Query=red,green. //请求中包含一个red的查询参数,且该参数的值匹配gree,正则表达式(即green,gree2都是可以的) |
| RemoteAddr | 请求者的ip必须是指定范围 | RemoteAddr=192.168.0.1/16 //其中192.168.0.1是一个IP地址,16是一个子网掩码 |
| Weight | 权重处理 |  |
总结
网关搭建步骤:
-
引入服务发现和网关的依赖
-
配置文件application.yml中配置网关信息,包括注册信息和路由信息等。
网关路由配置routers.filters:
- 路由id: 路由的唯一标识,一般使用服务名称即可
- 路由目标uri: 路由目标地址,使用Ib时代表根据服务名负载均衡使用地址,使用http时代表使用固定地址
- 路由断言predicates: 判断路由规则
- 路由过滤器filters: 对请求或响应做相应处理
默认路由配置default-filters;对所有的路由都生效
- 自定义(全局)过滤器: 对一切进入网关和微服务响应生效。"写一个自定义(全局)过滤器,实现接口GlobalFilter并实现里面的filter方法
过滤器的执行顺序:
-
每一个过滤器都必须指定一个int类型的order值order值越小优先级越高,执行顺序越靠前。
-
自定义(全局)过滤器可以通过@Order注解指定,@默认过滤器和路由过滤器由Spring指定,默认顺序从1开始递增。
-
当过滤器的order值相同时,会按照默认过滤器>"路由过滤器>自定义(全局)过滤器 的优先级执行。
-
默认情况下浏览器是不允许跨域的,但是Spring Gateway可以采用CORS方案处理跨域,仅需简单配置即可。
容错保护(Sentinel)
雪崩问题
微服务中的某个服务出现故障,引起整个链路中所有的微服务不可用

依赖服务都无法完成,导致服务D崩溃
雪崩问题的解决方案:
- 超时处理: 设定超时时间,“请求超过一定的时间没有相应就返回错误,不会无休止等待。
- 舱壁模式:"限定每个业务能使用的线程数,避免耗尽整个资源,因此也称为线程隔离。
- 熔断降级: 由断路器统计业务执行的异常比例,如果超出闽值则会熔断该业务,拦截访问该业务的一切请求。
- 流量控制: 限制业务访问的QPS,避免服务因流量的突增而故障。(预防措施)
- 常用的容错保护有Sentiel、Hystrix等
Sentinel监控
下载:https://github.com/alibaba/Sentinel/tags。配置:JDK17、sentinel-dashboard-1.8.3.jar
# Sentinel对JDK版本有要求
# sentinel-dashboard-1.8.3.jar<===>JDK1.8
# sentinel-dashboard-1.8.6.jar<===>JDK17
java -jar sentinel-dashboard-1.8.3.jar --server.port=8899

# 1.8.3使用高版本JDK,需要添加配置。==> 否则会报错"root of context hierarchy"
java --add-opens java.base/java.lang=ALL-UNNAMED -jar sentinel-dashboard-1.8.3.jar --server.port=8899
# 虽然能够启动,但是貌似不能正常使用
打开Sentinel控制台:http://localhost:8899/#/login。默认用户和密码都是sentinel

给Ticket添加Sentinel依赖
<dependency>
    <groupId>com.alibaba.cloud</groupId>
    <artifactId>spring-cloud-starter-alibaba-sentinel</artifactId>
    <version>2.1.4.RELEASE</version>
</dependency>
添加yaml配置
spring:
  cloud:
    sentinel:
      transport:
        dashboard: localhost:8899   #配置Sentinel实例
启动Ticket、customer、gateway服务。
先访问后才能监控到对应服务 http://localhost:8888/ticket/queryById/1?authorization=admin

Sentinel限流

每秒限访问1次

Sentinel隔离
- 添加配置,开启feign对Sentinel的支撑

- 在CustomerClient所在包中新建一个工厂类并将其注册为Bean
package com.ticket.client.fallback;

import com.custmer.domain.Customer;
import com.ticket.client.CustomerClient;
import feign.hystrix.FallbackFactory;

public class CustomerClientFallbackFactory
        implements FallbackFactory<CustomerClient> {
    @Override
    public CustomerClient create(Throwable throwable) {
        return new CustomerClient() {
            @Override
            public Customer queryById(int id) {
                System.out.println("!!!!!!!!!!!!!!!!!!!处理隔离请求!!!!!!!!!!!!!!!!!!!!");
                return new Customer();
            }
        };
    }
}
- 启动类中将其注册成Bean
    @Bean
    public CustomerClientFallbackFactory userClientFallbackFactory(){
        return new CustomerClientFallbackFactory();
    }
- 在customerClient的Feign注解中加入fallbackFactory
@FeignClient(value = "servicecustomer",fallbackFactory = CustomerClientFallbackFactory.class)
public interface CustomerClient {
    @GetMapping("/customer/queryById/{id}")
    Customer queryById(@PathVariable("id") int id);
}
重启服务。报错如下!
Caused by: java.lang.AbstractMethodError: com.alibaba.cloud.sentinel.feign.SentinelContractHolder.parseAndValidateMetadata(Ljava/lang/Class;)Ljava/util/List;
	at feign.ReflectiveFeign$ParseHandlersByName.apply(ReflectiveFeign.java:151) ~[feign-core-10.12.jar:na]
	at feign.ReflectiveFeign.newInstance(ReflectiveFeign.java:49) ~[feign-core-10.12.jar:na]
	at feign.Feign$Builder.target(Feign.java:269) ~[feign-core-10.12.jar:na]
	at org.springframework.cloud.openfeign.HystrixTargeter.target(HystrixTargeter.java:38) ~[spring-cloud-openfeign-core-2.2.9.RELEASE.jar:2.2.9.RELEASE]
	at org.springframework.cloud.openfeign.FeignClientFactoryBean.loadBalance(FeignClientFactoryBean.java:352) ~[spring-cloud-openfeign-core-2.2.9.RELEASE.jar:2.2.9.RELEASE]
	at org.springframework.cloud.openfeign.FeignClientFactoryBean.getTarget(FeignClientFactoryBean.java:388) ~[spring-cloud-openfeign-core-2.2.9.RELEASE.jar:2.2.9.RELEASE]
	at org.springframework.cloud.openfeign.FeignClientFactoryBean.getObject(FeignClientFactoryBean.java:361) ~[spring-cloud-openfeign-core-2.2.9.RELEASE.jar:2.2.9.RELEASE]
	at org.springframework.cloud.openfeign.FeignClientsRegistrar.lambda$registerFeignClient$0(FeignClientsRegistrar.java:246) ~[spring-cloud-openfeign-core-2.2.9.RELEASE.jar:2.2.9.RELEASE]
	at org.springframework.beans.factory.support.AbstractAutowireCapableBeanFactory.obtainFromSupplier(AbstractAutowireCapableBeanFactory.java:1235) ~[spring-beans-5.2.15.RELEASE.jar:5.2.15.RELEASE]
	at org.springframework.beans.factory.support.AbstractAutowireCapableBeanFactory.createBeanInstance(AbstractAutowireCapableBeanFactory.java:1177) ~[spring-beans-5.2.15.RELEASE.jar:5.2.15.RELEASE]
	at org.springframework.beans.factory.support.AbstractAutowireCapableBeanFactory.doCreateBean(AbstractAutowireCapableBeanFactory.java:556) ~[spring-beans-5.2.15.RELEASE.jar:5.2.15.RELEASE]
	at org.springframework.beans.factory.support.AbstractAutowireCapableBeanFactory.createBean(AbstractAutowireCapableBeanFactory.java:516) ~[spring-beans-5.2.15.RELEASE.jar:5.2.15.RELEASE]
	... 43 common frames omitted
原因依赖之间的版本问题。解决方案:使用alibaba默认配置的版本。
出现循环依赖问题!
Error creating bean with name 'com.ticket.client.CustomerClient': Requested bean is currently in creation: Is there an unresolvable circular reference?
原因估计是SpringBoot的扫包问题。使用注解主动扫描client的包。scanBasePackages。
在Sentinel服务器端成功捕获Feign端口数据

在Sentinel控制台上设置隔离。设置同时处理多个不同用户的请求。

使用apifox测试100个线程同时请求

查看拒绝通过和拒绝。

成功的状态码是200,429是被拒绝了

Sentine熔断
修改customer端,模拟慢调用

设置熔断规则

熔断效果

快速刷新。虽然请求成功,但是数据为null。等待之后能够重新获得数据

控制台的数据
