下载安装配置:https://pytorch.org/cppdocs/installing.html
小例程:https://pytorch.org/cppdocs/frontend.html
官方:https://pytorch.org/tutorials/beginner/Intro_to_TorchScript_tutorial.html
libtorch的API官网文档:https://pytorch.org/cppdocs/api/library_root.html
配置环境
下载libtorch
官网文档:https://pytorch.org/cppdocs/installing.html
pytorch官网:https://pytorch.org/
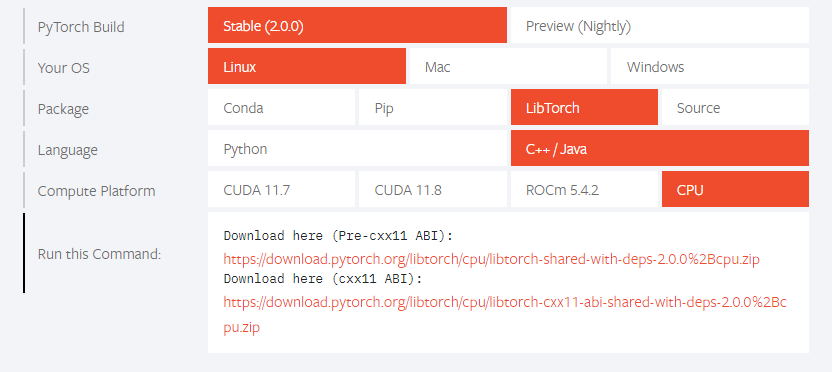
建议下载(cxx11 ABI)这个版本的,因为(Pre-cxx11 ABI)这个和opencv一起使用的时候opencv会用不了。
使用(cxx11 ABI)可以和opencv一起使用不会报错。
之前别人的提问:
https://blog.csdn.net/XDH19910113/article/details/110470565
下载下来之后解压到自己随意的一个文件夹
测试小demo
新建main.cpp
#include <torch/torch.h>
#include <iostream>

int main() {
  torch::Tensor tensor = torch::rand({2, 3});
  std::cout << tensor << std::endl;
}
新建CMakeLists.txt
cmake_minimum_required(VERSION 3.0)

project(test_torch)

# 调用torch的方法,有两种方法都可以成功编译,第一种是官方文档给出的方法
set(CMAKE_PREFIX_PATH "/home/bck18vm/software/libtorch-cxx11-2.0.0+cpu/libtorch")  # 这边是我解压的路径
# set(Torch_DIR "/home/bck18vm/software/libtorch-cxx11-2.0.0+cpu/libtorch/share/cmake/Torch")

set( CMAKE_CXX_FLAGS "-std=c++14" )
set(CMAKE_CXX_FLAGS "${CMAKE_CXX_FLAGS} ${TORCH_CXX_FLAGS}")

find_package(Torch REQUIRED)

add_executable(main main.cpp)
target_link_libraries(main ${TORCH_LIBRARIES})
之后就是使用以下命令进行编译
mkdir build && cd build
cmake ..
make
运行输出结果如下:
 0.0532  0.4963  0.2295
 0.0342  0.6857  0.0934
[ CPUFloatType{2,3} ]
也可以参考如下视频
https://www.youtube.com/watch?v=RFq8HweBjHA
将pytorch网络用C++部署小测试
参考博客:https://zhuanlan.zhihu.com/p/191569603
本人是在windows环境下使用pytorch训练网络,并且是使用cuda,
然后用虚拟机下的ubuntu使用libtorch进行测试的,虚拟机无gpu
windows下的python程序为:
# https://zhuanlan.zhihu.com/p/191569603
# 官方文档:https://pytorch.org/tutorials/beginner/blitz/cifar10_tutorial.html#sphx-glr-beginner-blitz-cifar10-tutorial-py

import torch.optim as optim
import torch.nn.functional as F
import torch.nn as nn
import numpy as np
import matplotlib.pyplot as plt
import torch
import torch.onnx
import torchvision
import torchvision.transforms as transforms
device = torch.device("cuda:0" if torch.cuda.is_available() else "cpu")
# device = torch.device("cpu")
transform = transforms.Compose(
    [transforms.ToTensor(),
     transforms.Normalize((0.5, 0.5, 0.5), (0.5, 0.5, 0.5))])

trainset = torchvision.datasets.CIFAR10(root='../data', train=True, download=True, transform=transform)
trainloader = torch.utils.data.DataLoader(trainset, batch_size=4, shuffle=True, num_workers=0)
testset = torchvision.datasets.CIFAR10(root='../data', train=False, download=True, transform=transform)
testloader = torch.utils.data.DataLoader(testset, batch_size=4, shuffle=False, num_workers=0)

classes = ('plane', 'car', 'bird', 'cat', 'deer', 'dog', 'frog', 'horse', 'ship', 'truck')


# functions to show an image


def imshow(img):
    img = img / 2 + 0.5     # unnormalize
    npimg = img.numpy()
    plt.imshow(np.transpose(npimg, (1, 2, 0)))
    plt.show()


# get some random training images
dataiter = iter(trainloader)
images, labels = next(dataiter)

print(images.shape)

# show images
imshow(torchvision.utils.make_grid(images))
# print labels
print(' '.join('%5s' % classes[labels[j]] for j in range(4)))


class Net(nn.Module):
    def __init__(self):
        super(Net, self).__init__()
        self.conv1 = nn.Conv2d(3, 6, 3)
        self.pool = nn.MaxPool2d(2, 2)
        self.conv2 = nn.Conv2d(6, 12, 3)
        self.conv3 = nn.Conv2d(12, 32, 3)
        self.fc1 = nn.Linear(32 * 4 * 4, 120)
        self.fc2 = nn.Linear(120, 84)
        self.fc3 = nn.Linear(84, 10)

    def forward(self, x):
        x = self.pool(F.relu(self.conv1(x)))
        x = self.pool(F.relu(self.conv2(x)))
        x = F.relu(self.conv3(x))
        x = x.view(-1, 32 * 4 * 4)
        x = F.relu(self.fc1(x))
        x = F.relu(self.fc2(x))
        x = self.fc3(x)
        return x


net = Net()
net.to(device)

criterion = nn.CrossEntropyLoss()
optimizer = optim.SGD(net.parameters(), lr=0.001, momentum=0.9)

for epoch in range(1):  # loop over the dataset multiple times

    running_loss = 0.0
    for i, data in enumerate(trainloader, 0):
        # get the inputs; data is a list of [inputs, labels]
        inputs, labels = data
        inputs = inputs.to(device)
        labels = labels.to(device)

        # zero the parameter gradients
        optimizer.zero_grad()

        # forward + backward + optimize
        outputs = net(inputs)

        loss = criterion(outputs, labels)
        loss.backward()
        optimizer.step()

        # print statistics
        running_loss += loss.item()
        if i % 2000 == 1999:    # print every 2000 mini-batches
            print(outputs)
            print('[%d, %5d] loss: %.3f' %
                  (epoch + 1, i + 1, running_loss / 2000))
            running_loss = 0.0

print('Finished Training')

# 定义一个输入数据dummy_input,它是一个大小为[1,3,32,32]的张量,
# 其中1表示batch_size,3表示通道数,32表示图像的高度和宽度
# 该张量使用 torch.randn()函数生成,其元素服从均值为0,标准差为1的正态分布,并将其移动到指定的设备上
# dummy_input是用于TorchScript模型转换的输入数据,它的定义需要满足两个条件:
# 1. 与实际使用时的输入数据大小和类型一致
# 2. 能够覆盖模型中的所有分支和情况
dummy_input = torch.randn(1, 3, 32, 32).to(device)
# 使用torch.jit.trace()函数将PyTorch模型net转换为 Torch Script 格式,
# 该函数需要传入两个参数:待转换的模型和用于推理的输入数据
# 再这里,我们使用上一步定义的输入数据 dummy_input 作为输入数据
traced_cell = torch.jit.trace(net, dummy_input)
# 将转换后的torch Script模型保存为 .pth文件
traced_cell.save("tests.pth")
ubuntu下的c++程序为:
#include <torch/script.h>
#include <iostream>
#include <opencv2/opencv.hpp>
#include <torch/torch.h>

int main(int argc, char *argv[])
{
    std::cout << "torch version = " << TORCH_VERSION << std::endl;

    torch::DeviceType device_type;
    if (torch::cuda::is_available())
    {
        std::cout << "CUDA available! Predicting on GPU." << std::endl;
        device_type = torch::kCUDA;
    }
    else
    {
        std::cout << "Predicting on CPU" << std::endl;
        device_type = torch::kCPU;
    }
    torch::Device device(device_type);

    // init model
    std::string model_pb = "../tests.pth";
    // 使用前面设置的设备进行调用,因为是虚拟机环境下,无GPU,而加载的.pth是使用gpu训练的,所以需要指定一个加载的设备
    torch::jit::script::Module module = torch::jit::load(model_pb, device);
    module.to(device);

    cv::Mat image = cv::imread("../dog.jpg");
    cv::Mat image_transformed;
    cv::resize(image, image_transformed, cv::Size(32, 32));

    // convert to tensort
    // 将opencv格式的图像数据转换为Pytorch的Tensor格式,
    // 该代码使用torch::from_blob() 函数将opencv图像数据的指针 image_transformed.data转换为
    // 一个大小为 [image_transformed.rows, image_transformed.cols, 3]的Tensor张量,其中 3 表示通道数
    torch::Tensor tensor_image = torch::from_blob(image_transformed.data,
                                                  {image_transformed.rows, image_transformed.cols, 3}, torch::kByte);

    // 调整张量的维度顺序,由于PyTorch中张量的维度顺序是[batch_size, channel, height, width]
    // 而opencv中的图像数据维度顺序是 [height, width, channel]
    // 因此需要使用tensor_image.permute() 函数将张量的维度顺序调整为PyTorch格式
    tensor_image = tensor_image.permute({2, 0, 1});
    // 将张量的数据类型转换为float类型,由于PyTorch模型需要输入float类型的数据,因此需要将uint8类型的图像数据转换为float类型
    tensor_image = tensor_image.toType(torch::kFloat);
    // 将张量中的所有元素除以255,由于图像数据的取值范围通常是0到255之间,因此需要将其归一化到0到1之间
    tensor_image = tensor_image.div(255);
    // 在张量的第一维上增加一个维度,以适应PyTorch模型输入的要求,由于PyTorch模型接受的输入数据是一个batch,因此需要在第一维上增加一个维度
    tensor_image = tensor_image.unsqueeze(0);
    // 将张量移动到指定的设备上(如gpu),在这里将其移动到之前定义的设备上
    tensor_image = tensor_image.to(device);
    // 使用PyTorch模型进行前向推理,并获取模型输出,该代码使用module.forward()函数对输入数据进行前向推理,
    // 并将其输出结果转换为Tensor格式
    torch::Tensor output = module.forward({tensor_image}).toTensor();
    // 获取模型中最大值所在的索引,由于模型输出是一个大小为[batch_size, num_classes]的张量,
    // 其中每个元素表示对应类别的概率值,因此需要找出最大值所在的索引,即预测结果
    auto max_result = output.max(1, true);
    auto max_index = std::get<1>(max_result).item<float>();
    std::cout << output << std::endl;
    std::cout << "预测的类别: " << max_index << std::endl;

    return 0;
}
CMakeLists.txt文件在前面的基础上添加opencv库即可正常运行。