当您开发 Web API 时,其他开发人员能够了解他们在与您的 API 交谈时必须发布、放置、删除或获取的内容非常重要。当开发人员完成编码后,为他们构建良好的文档可能具有挑战性。由于有了Swagger(称为OpenAPI),您现在可以在编码时使用 Swagger 轻松制作 API 文档。
通过将 Swagger 与 .NET Core 结合使用并结合 ReDoc,我们可以在编写代码时为我们的 API 制作出色的文档。它为我们和其他开发人员提供了一个交互式前端,其中包含文档和测试 API 的方法。
如果您准备好为您的 .NET Core API 制作一些文档,那么让我们开始吧。
Swagger 与 ReDoc [免费版] 的快速比较
在免费版本中运行 Swagger 和 ReDoc 的唯一区别是,您不能在 ReDoc 中尝试请求,只能在 Swagger 中尝试。另一方面,Swagger 中不会像 ReDoc 中那样拥有三个面板。我真的很喜欢这三个面板,当滚动浏览文档时,我可以在右侧看到代码示例。
从模板创建新的 ASP.NET Core Web API
首先,您必须创建一个新的 ASP.NET Core Web API(我将使用Visual Studio进行此演示)。在模板中搜索 ASP.NET Core Web API 并创建一个新项目。
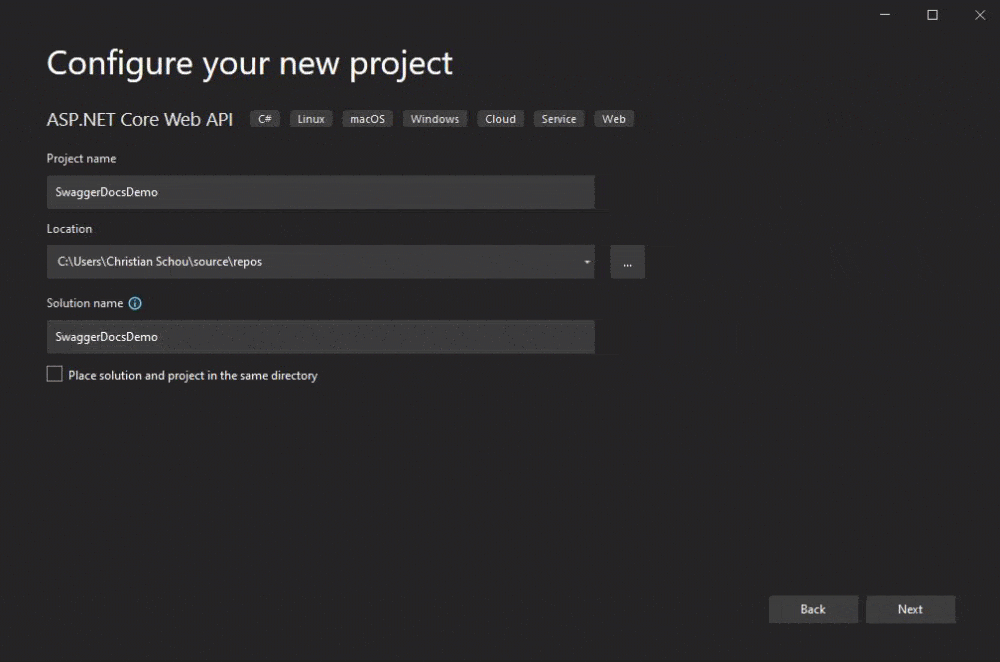
建一个新的 ASP.NET Core Web API 项目
安装 Swashbuckle、ReDoc 和注释所需的包
下面列出了该文档项目运行所需的包。下面的所有代码片段用于使用 NuGet 包控制台安装包。
#1 – Swashbuckle.AspNetCore
该包是 Swagger 工具,用于记录基于 ASP.NET Core 构建的 API。您可以从 NuGet.org 获取最新的软件包版本:Swashbuckle.AspNetCore。
Install-Package Swashbuckle.AspNetCore
#2 – Swashbuckle.AspNetCore.ReDoc
该包是中间件,用于从 ASP.NET Core 应用程序公开 ReDoc 的嵌入式版本。您可以从 NuGet.org 获取最新的软件包版本:Swashbuckle.AspNetCore.ReDoc。
Install-Package Swashbuckle.AspNetCore.ReDoc
#3 – Swashbuckle.AspNetCore.Newtonsoft
此包是一个 Swagger Generator 选择加入组件,用于支持 Newtonsoft.Json 序列化器行为。您可以从 NuGet.org 获取最新版本:Swashbuckle.AspNetCore.Newtonsoft。
Install-Package Swashbuckle.AspNetCore.Newtonsoft
#4 – Swashbuckle.AspNetCore.Annotations
该包提供了可应用于控制器、操作和模型的自定义属性,以丰富生成的 Swagger。您可以从 NuGet.org 获取最新版本:Swashbuckle.AspNetCore.Annotations。
Install-Package Swashbuckle.AspNetCore.Annotations
配置 Swagger
打开program.cs并添加以下代码行。如果您是从模板创建项目的,Swagger 已经为您添加了。您的文件应如下所示:
var builder = WebApplication.CreateBuilder(args);

// Add services to the container.

builder.Services.AddControllers();
// Learn more about configuring Swagger/OpenAPI at https://aka.ms/aspnetcore/swashbuckle
builder.Services.AddEndpointsApiExplorer();
builder.Services.AddSwaggerGen();

var app = builder.Build();

// Configure the HTTP request pipeline.
if (app.Environment.IsDevelopment())
{
    app.UseSwagger();
    app.UseSwaggerUI();
}

app.UseHttpsRedirection();

app.UseAuthorization();

app.MapControllers();

app.Run();
现在,让我们稍微修改一下 Swagger 配置,以包含客户端的更多详细信息。我们还将更改 swagger.json 定义的位置。下面是代码和解释:
using Microsoft.OpenApi.Models;

var builder = WebApplication.CreateBuilder(args);

// Add services to the container.

builder.Services.AddControllers();
// Learn more about configuring Swagger/OpenAPI at https://aka.ms/aspnetcore/swashbuckle
builder.Services.AddEndpointsApiExplorer();
builder.Services.AddSwaggerGen(options =>
{
    options.SwaggerDoc("v1",
        new OpenApiInfo
        {
            Title = "Swagger Demo Documentation",
            Version = "v1",
            Description = "This is a demo to see how documentation can easily be generated for ASP.NET Core Web APIs using Swagger and ReDoc.",
            Contact = new OpenApiContact
            {
                Name = "Christian Schou",
                Email = "someemail@somedomain.com"
            }
        });
});

var app = builder.Build();

// Configure the HTTP request pipeline.
if (app.Environment.IsDevelopment())
{
    app.UseSwagger();
    app.UseSwaggerUI(options =>
    options.SwaggerEndpoint("/swagger/v1/swagger.json",
    "Swagger Demo Documentation v1"));
}

app.UseHttpsRedirection();

app.UseAuthorization();

app.MapControllers();

app.Run();
- 第 10 – 24 行– 这里我们扩展 Swagger 生成器以包含 Swagger 文档。我使用了 SwaggerDoc 扩展并创建了一个新的 OpenApiInfo 对象,其中包含有关 API 的详细信息,并包含一个 OpenApiContact 对象。这将指导开发人员阅读有关 API 的信息,了解在出现问题或疑问时应联系谁。
- 第 32-34 行– 这是我定义我想要出现的位置的地方
swagger.json。如果我有多个版本,我会用另一种方式编写代码。
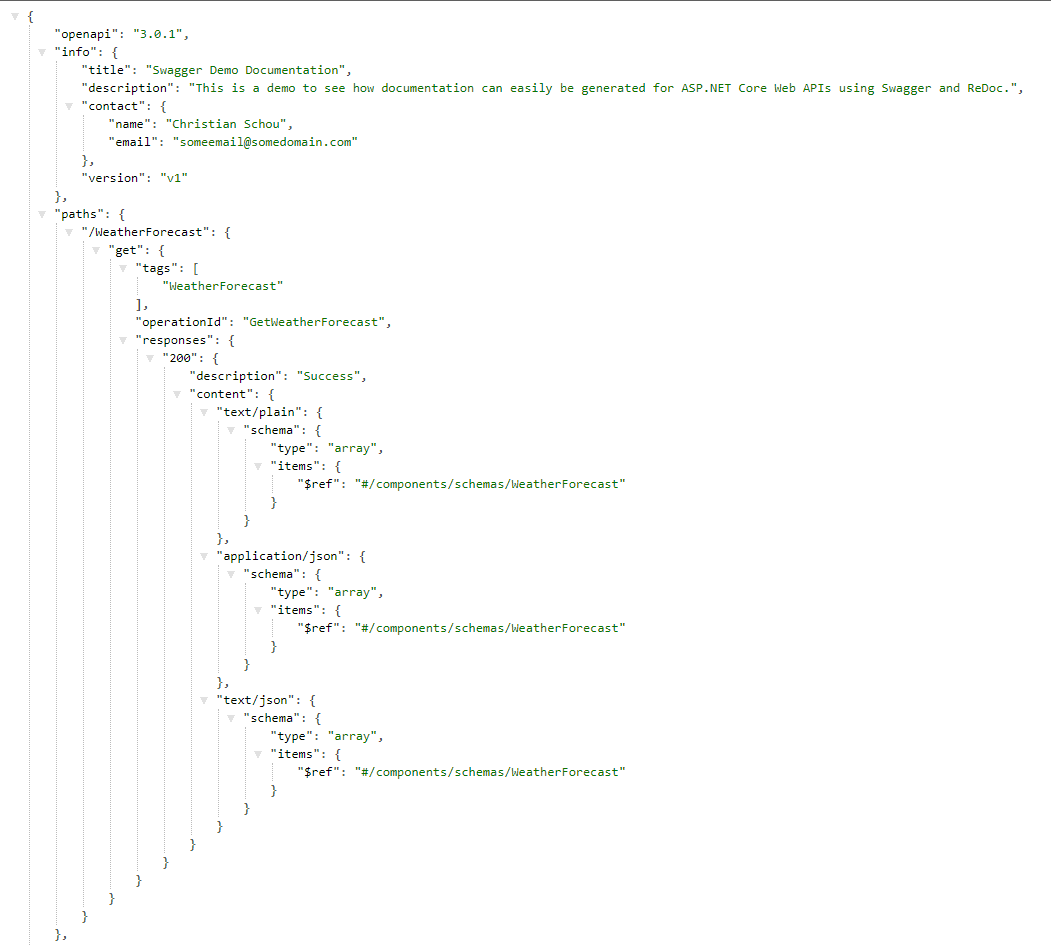
让我们启动应用程序并首先检查 Swagger 前端和 swagger.json 端点。两者均应在以下位置提供:
- https://your-host-and-port/swagger/index.html
- https://your-host-and-port/swagger/v1/swagger.json
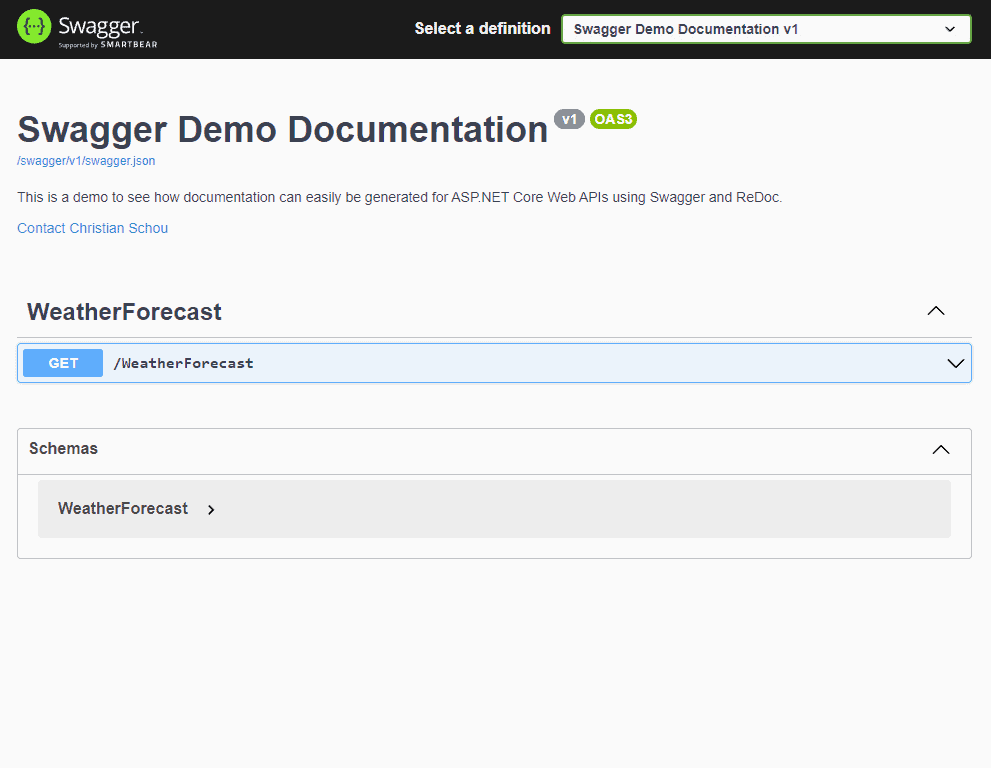
惊人的!看起来可行,让我们使用新配置的swagger.json端点为我们的 API 生成 ReDoc 文档页面。
配置ReDoc
启动并运行 ReDoc 非常容易。我们已经安装了必要的包,因此让我们将其包含在我们的program.cs文件中以使用它。
using Microsoft.OpenApi.Models;

var builder = WebApplication.CreateBuilder(args);

// Add services to the container.

builder.Services.AddControllers();
// Learn more about configuring Swagger/OpenAPI at https://aka.ms/aspnetcore/swashbuckle
builder.Services.AddEndpointsApiExplorer();
builder.Services.AddSwaggerGen(options =>
{
    options.SwaggerDoc("v1",
        new OpenApiInfo
        {
            Title = "Swagger Demo Documentation",
            Version = "v1",
            Description = "This is a demo to see how documentation can easily be generated for ASP.NET Core Web APIs using Swagger and ReDoc.",
            Contact = new OpenApiContact
            {
                Name = "Christian Schou",
                Email = "someemail@somedomain.com"
            }
        });
});

var app = builder.Build();

// Configure the HTTP request pipeline.
if (app.Environment.IsDevelopment())
{
    app.UseSwagger();
    app.UseSwaggerUI(options =>
    options.SwaggerEndpoint("/swagger/v1/swagger.json",
    "Swagger Demo Documentation v1"));

    app.UseReDoc(options =>
    {
        options.DocumentTitle = "Swagger Demo Documentation";
        options.SpecUrl = "/swagger/v1/swagger.json";
    });
}

app.UseHttpsRedirection();

app.UseAuthorization();

app.MapControllers();

app.Run();
现在再次运行应用程序并导航到 https://your-host-and-port/api-docs/ – 在这里您现在应该看到 ReDoc 文档页面。截图如下:
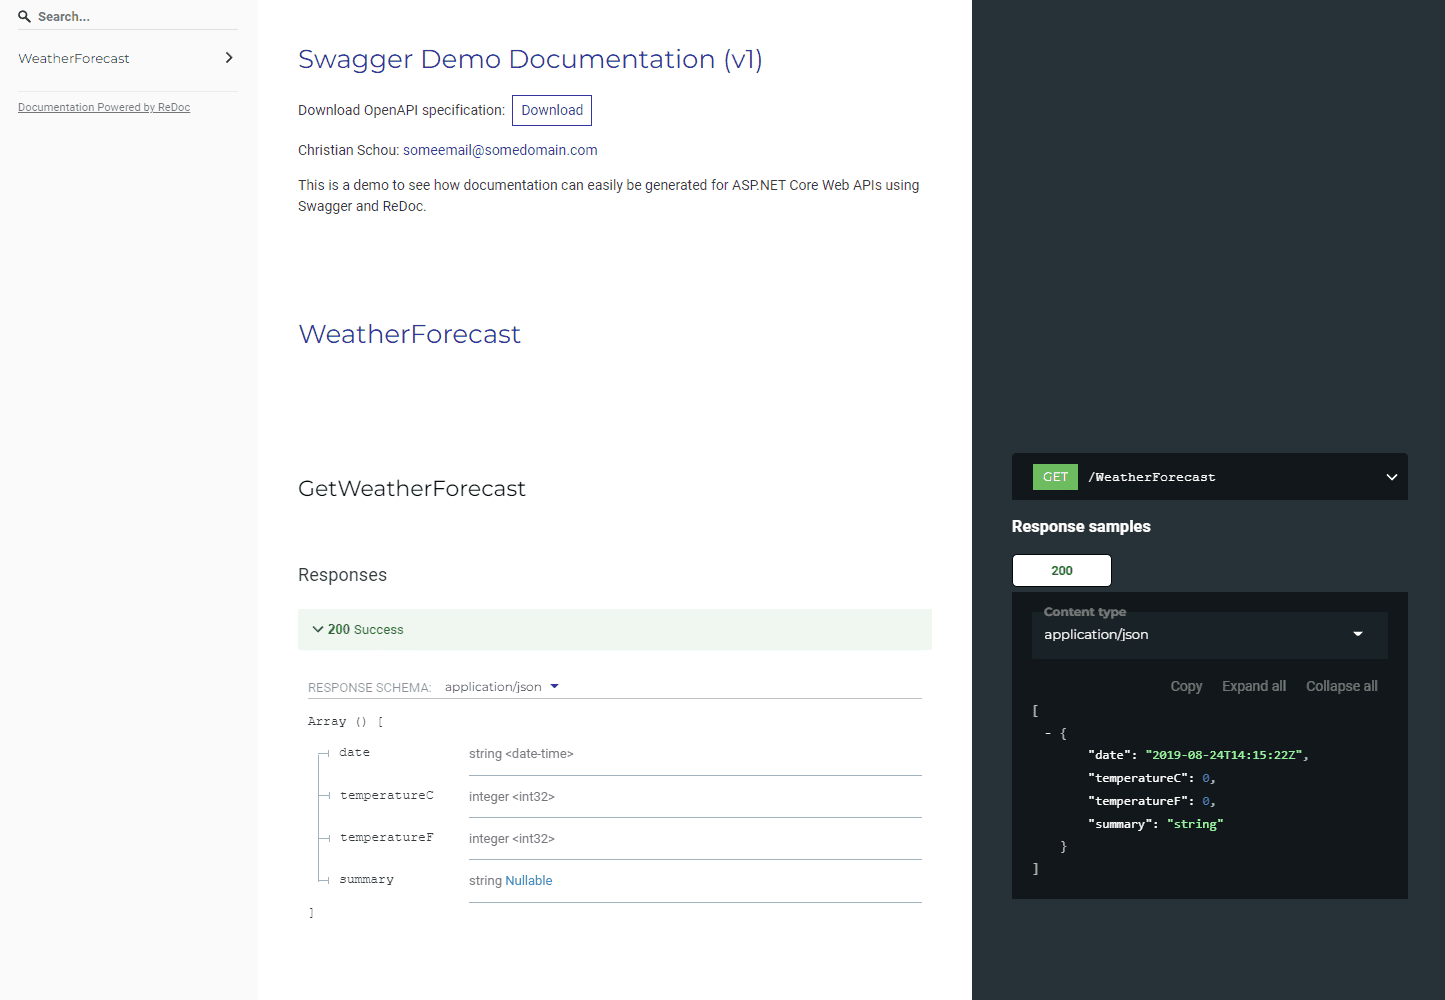
使用ReDoc作为默认启动页
您可以通过两种方式更改您的 URL。"launchUrl"第一个是打开位于 Properties 文件夹中的 launchSettings.json 并将名为from 的"swagger "属性更改为"api-docs"。另一种是启动调试配置文件 UI。请观看下面的视频,了解如何做到这一点:
您的启动文件将如下所示。在第 15 行中,我将 更新launchURL为 beapi-docs而不是 Swagger。
{
  "$schema": "https://json.schemastore.org/launchsettings.json",
  "iisSettings": {
    "windowsAuthentication": false,
    "anonymousAuthentication": true,
    "iisExpress": {
      "applicationUrl": "http://localhost:38382",
      "sslPort": 44357
    }
  },
  "profiles": {
    "SwaggerDocsDemo": {
      "commandName": "Project",
      "launchBrowser": true,
      "launchUrl": "api-docs",
      "environmentVariables": {
        "ASPNETCORE_ENVIRONMENT": "Development"
      },
      "applicationUrl": "https://localhost:7173;http://localhost:5173",
      "dotnetRunMessages": true
    },
    "IIS Express": {
      "commandName": "IISExpress",
      "launchBrowser": true,
      "launchUrl": "swagger",
      "environmentVariables": {
        "ASPNETCORE_ENVIRONMENT": "Development"
      }
    }
  }
}
在生产模式下运行时发布 Swagger 和 ReDoc
如果您想在生产环境中运行应用程序时使用 ReDoc 和 Swagger,只需从 if 语句中复制检查应用程序是否在调试模式下运行的代码,并将其粘贴到 if 语句下方,如下所示:
var app = builder.Build();

// Configure the HTTP request pipeline.
if (app.Environment.IsDevelopment())
{

}

app.UseSwagger();
app.UseSwaggerUI(options =>
options.SwaggerEndpoint("/swagger/v1/swagger.json",
"Swagger Demo Documentation v1"));

app.UseReDoc(options =>
{
    options.DocumentTitle = "Swagger Demo Documentation";
    options.SpecUrl = "/swagger/v1/swagger.json";
});

app.UseHttpsRedirection();

app.UseAuthorization();

app.MapControllers();

app.Run();
向控制器操作添加注释
我们已经安装了该软件包Swachbuckle.AspNetCore.Annotation- 让我们使用它为我们的api-docs. 转到您的方法并启用注释,就像我在下面第 19 行所做的那样:SwaggerGen()
builder.Services.AddSwaggerGen(options =>
{
    options.SwaggerDoc("v1",
        new OpenApiInfo
        {
            Title = "Swagger Demo Documentation",
            Version = "v1",
            Description = "This is a demo to see how documentation can easily be generated for ASP.NET Core Web APIs using Swagger and ReDoc.",
            Contact = new OpenApiContact
            {
                Name = "Christian Schou",
                Email = "someemail@somedomain.com"
            }
        });

    var xmlFile = $"{Assembly.GetExecutingAssembly().GetName().Name}.xml";
    var xmlPath = Path.Combine(AppContext.BaseDirectory, xmlFile);
    options.IncludeXmlComments(xmlPath);
    options.EnableAnnotations();
});
丰富控制器操作的操作元数据
Swagger 包中有一个内置注释选项,我们可以使用它来丰富操作的操作数据。让我们这样做:
[HttpGet(Name = "GetWeatherForecast")]
[SwaggerOperation(
    Summary = "Get Weather Forecast",
    Description = "This endpoint will return 5 days of weather forecasts with random temperatures in celcius.",
    OperationId = "Get",
    Tags = new[] {"WeatherForecast"})]
public IEnumerable<WeatherForecast> Get()
{
    return Enumerable.Range(1, 5).Select(index => new WeatherForecast
    {
        Date = DateTime.Now.AddDays(index),
        TemperatureC = Random.Shared.Next(-20, 55),
        Summary = Summaries[Random.Shared.Next(Summaries.Length)]
    })
    .ToArray();
}
正如您所看到的,我已经删除了响应类型,让我们使用 Swagger 响应类型再次添加它们:
丰富控制器操作的响应元数据
Swagger 有一个名为 SwaggerResponse 的属性,允许我们定义带有描述和类型的响应类型。下面是一个简单的例子:
[HttpGet(Name = "GetWeatherForecast")]
[SwaggerOperation(
    Summary = "Get Weather Forecast",
    Description = "This endpoint will return 5 days of weather forecasts with random temperatures in celcius.",
    OperationId = "Get",
    Tags = new[] {"WeatherForecast"})]
[SwaggerResponse(200, "The random weather forecasts", typeof(WeatherForecast))]
public IEnumerable<WeatherForecast> Get()
{
    return Enumerable.Range(1, 5).Select(index => new WeatherForecast
    {
        Date = DateTime.Now.AddDays(index),
        TemperatureC = Random.Shared.Next(-20, 55),
        Summary = Summaries[Random.Shared.Next(Summaries.Length)]
    })
    .ToArray();
}
丰富 POST、PUT 和 DELETE 类型的控制器操作的请求正文元数据
您可以使用 a 对正文参数进行注释SwaggerRequestBodyAttribute,以丰富由 Swashbuckle 生成的请求正文中的元数据。
在项目的根目录中添加一个名为的新类Order.cs并粘贴以下代码 -仅用于演示目的,请记住更新您的命名空间。
namespace SwaggerDocsDemo
{
    public class Order
    {
        public int Id { get; set; }
        public int OrderId { get; set; }
        public string? CustomerName { get; set; }
        public string? Address { get; set; }
        public string? OrderValue { get; set; }
    }
}
我们将重用天气预报控制器并实现一个新操作,该操作将接受订单的 POST 请求并将其返回给客户端。
创建一个名为 AddOrder 的新操作,它接受一个新的 Order 对象,如下所示:
[HttpPost]
public ActionResult<Order> AddOrder(Order order)
{
    return StatusCode(StatusCodes.Status200OK, order);
}
现在是时候对身体数据进行一些注释了。我们可以使用 attribute 来做到这一点,就像我在下面所做的那样:[FromBody]
[HttpPost("AddOrder")]
[SwaggerOperation(
Summary = "Add a new order to the API",
Description = "This endpoint will take in a new order and return it to the client.",
OperationId = "AddOrder",
Tags = new[] { "Order" })]
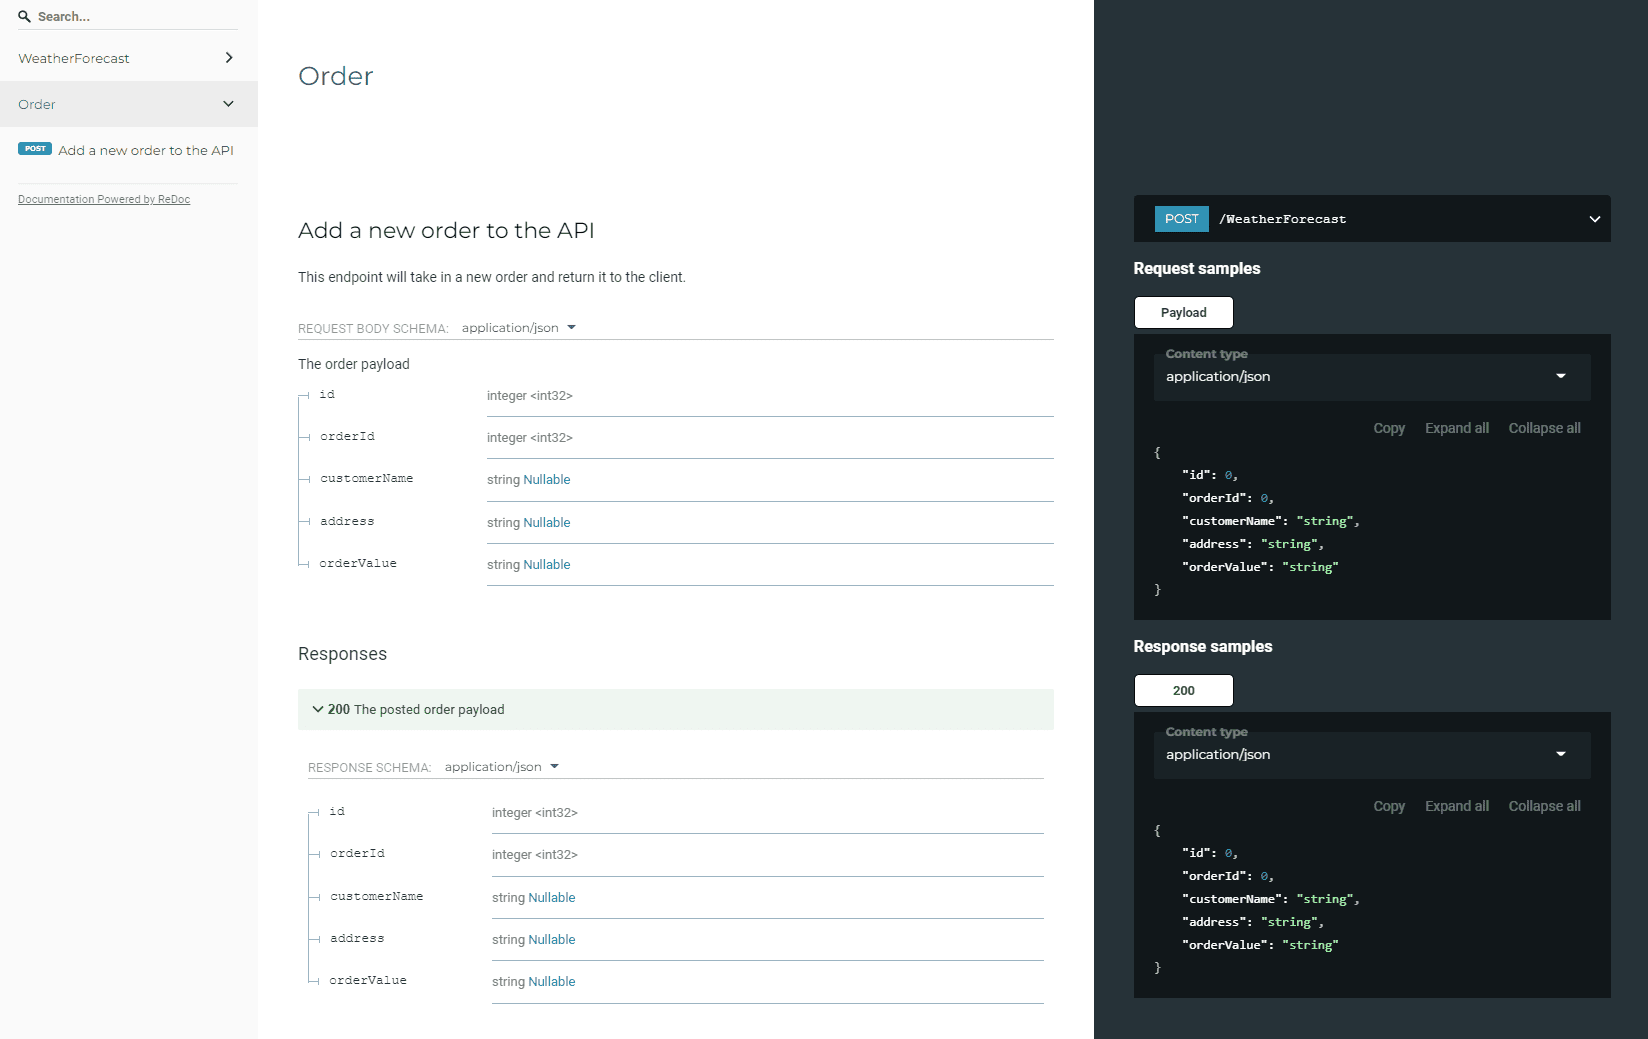
[SwaggerResponse(200, "The posted order payload", type: typeof(Order))]
public ActionResult<Order> AddOrder([FromBody, SwaggerRequestBody("The order payload", Required = true)]Order order)
{
return StatusCode(StatusCodes.Status200OK, order);
}
在tags操作属性中,我写了“Order”,这将更改 API 文档以显示一个名为 order 的新部分,其中将显示此请求。运行时会如下所示:
有参数时丰富参数元数据
让我们添加一个接受 GET 请求的新控制器,并用参数注释来装饰它。默认情况下,您可以注释路径、查询和标头。这些都用[FromRoute], [FromQuery],[FromHeader]使用 来装饰SwaggerParameterAttribute。
您可以为请求命名。我们将使用之前创建的订单模型来创建包含两个订单的列表,并在端点请求时返回 ID 指定的订单。GetOrder(int orderId)
[HttpGet("GetOrder")]
public ActionResult<Order> GetOrder(int orderId)
{
    List<Order> orders = new List<Order>();

    orders.Add(new Order
    {
        Id = 1,
        OrderId = 8427,
        CustomerName = "Christian Schou",
        Address = "Some Address here",
        OrderValue = "87429,8236 DKK"
    });
    orders.Add(new Order
    {
        Id = 1,
        OrderId = 3265,
        CustomerName = "John Doe",
        Address = "Johns address here",
        OrderValue = "236,255 DKK"
    });

    return StatusCode(StatusCodes.Status200OK, orders.FirstOrDefault(x => x.OrderId == orderId));

}
现在我们将使用属性来丰富操作。我知道没有检查订单 ID 是否确实存在等...但这也只是为了演示如何装饰请求参数:[FromQuery]
/// <summary>
/// Get an order by Order ID
/// </summary>
/// <param name="orderId"></param>
/// <returns>The order object</returns>
[HttpGet("GetOrder")]
[SwaggerOperation(
Summary = "Get an order by Order ID",
Description = "Use the endpoint to request an order by it's Order ID.",
OperationId = "GetOrder",
Tags = new[] {"Order"})]
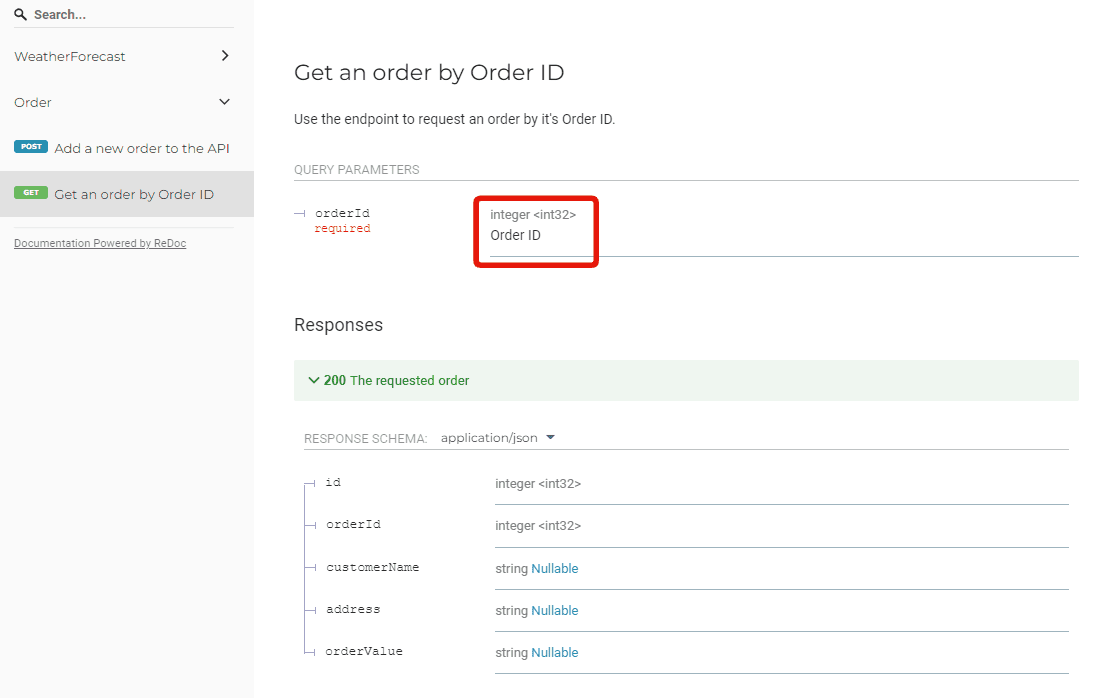
[SwaggerResponse(200, "The requested order", type: typeof(Order))]
public ActionResult<Order> GetOrder([FromQuery, SwaggerParameter("Order ID", Required = true)]int orderId)
{
List<Order> orders = new List<Order>();
orders.Add(new Order
{
Id = 1,
OrderId = 8427,
CustomerName = "Christian Schou",
Address = "Some Address here",
OrderValue = "87429,8236 DKK"
});
orders.Add(new Order
{
Id = 1,
OrderId = 3265,
CustomerName = "John Doe",
Address = "Johns address here",
OrderValue = "236,255 DKK"
});
return StatusCode(StatusCodes.Status200OK, orders.FirstOrDefault(x => x.OrderId == orderId));
}
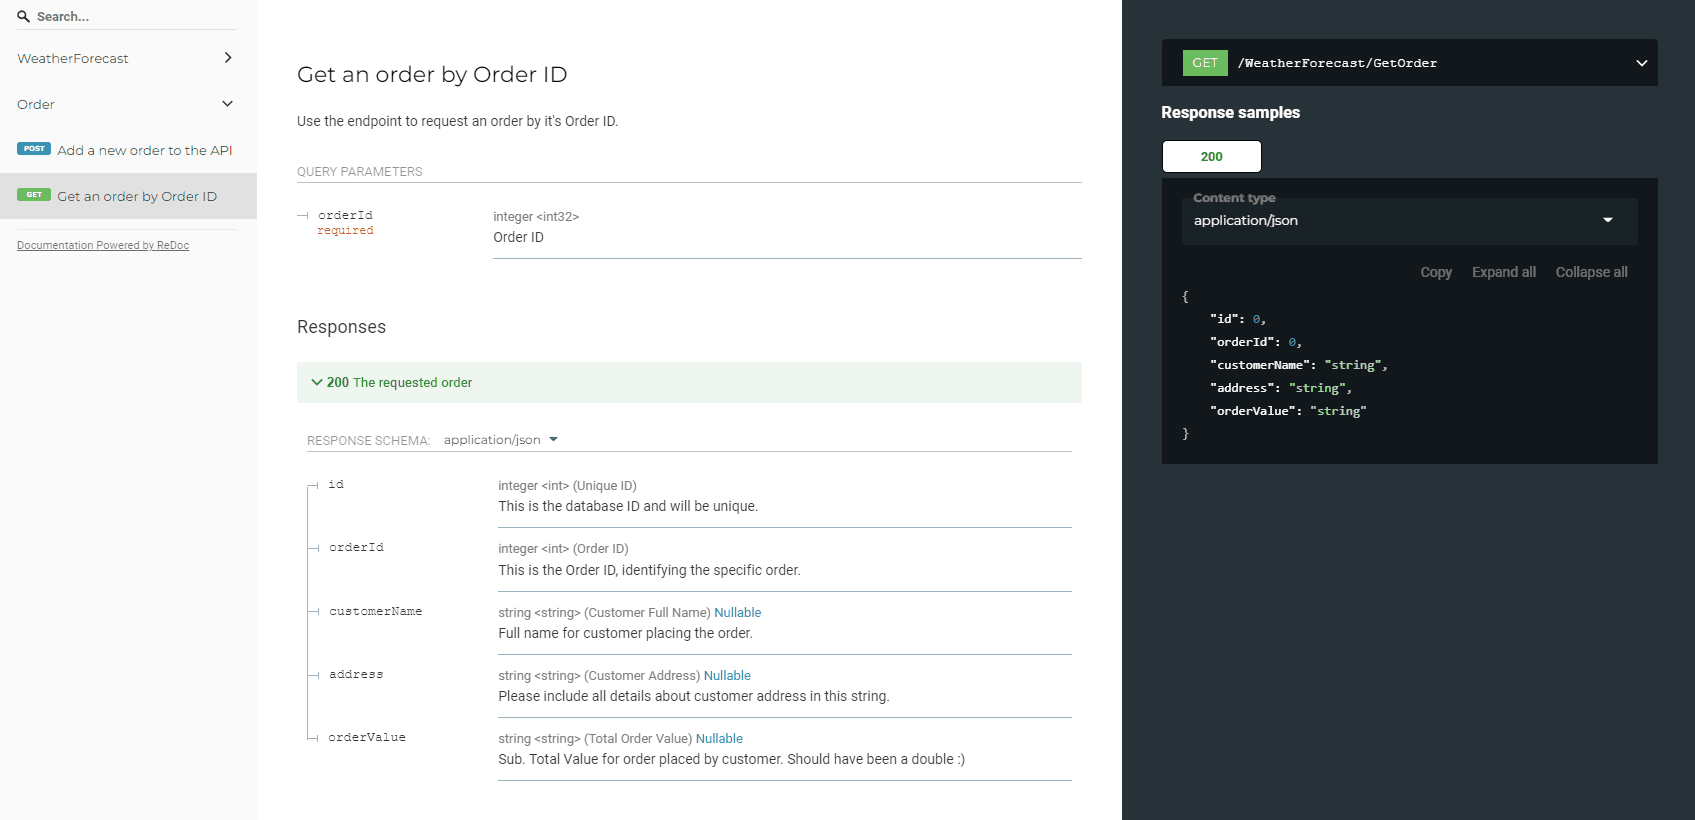
阅读文档时,结果应该给出参数的描述:

阅读文档时,结果应该给出参数的描述:
将 SwaggerTag 添加到控制器
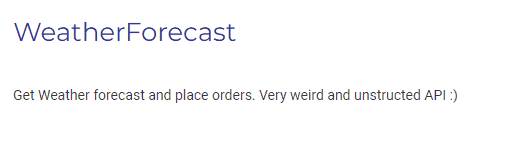
为了装饰控制器,我们可以使用[SwaggerTag]属性。这将在端点的文档页面上提供描述。
/// <summary>
/// Weather Forecasts
/// </summary>
[ApiController]
[Route("[controller]")]
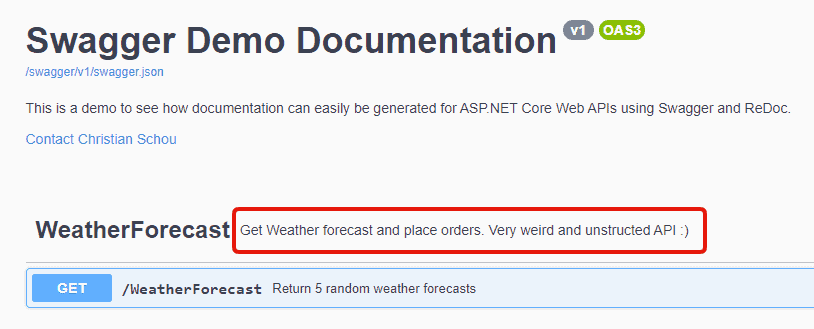
[SwaggerTag("Get Weather forecast and place orders. Very weird and unstructed API :)")]
public class WeatherForecastController : ControllerBase
{
private static readonly string[] Summaries = new[]
{
"Freezing", "Bracing", "Chilly", "Cool", "Mild", "Warm", "Balmy", "Hot", "Sweltering", "Scorching"
};
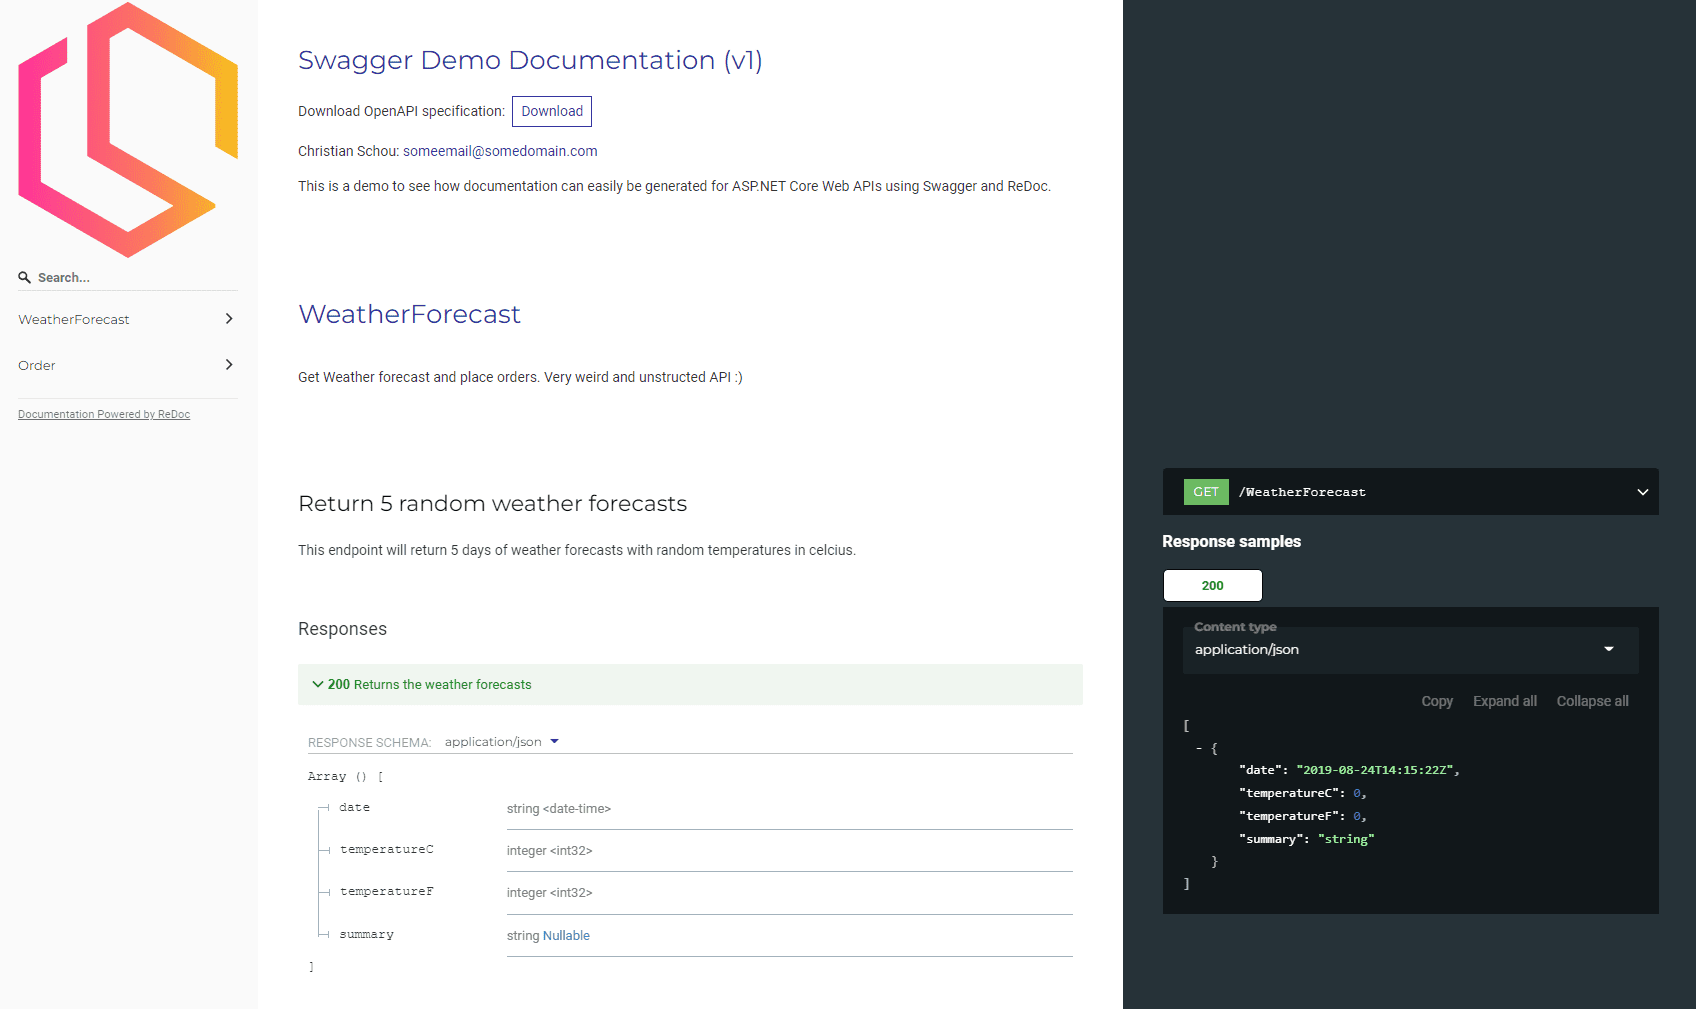
运行应用程序时我们得到:
太好了,让我们尝试丰富订单和天气预报的架构。
使用 SwaggerSchema 丰富 Schema 元数据
在我们的模型上使用将自动填充文档中参数的元数据。这是向 API 文档的架构数据中显示的模型添加摘要和描述的好方法。[SwaggerSchema]
转到Order.cs并添加以下属性:
using Swashbuckle.AspNetCore.Annotations;

namespace SwaggerDocsDemo
{
    /// <summary>
    /// Order Model
    /// </summary>
    [SwaggerSchema(Required = new[] {"Id", "OrderId", "CustomerName", "Address", "OrderValue"})]
    public class Order
    {
        [SwaggerSchema(
            Title = "Unique ID",
            Description = "This is the database ID and will be unique.",
            Format = "int")]
        public int Id { get; set; }

        [SwaggerSchema(
            Title = "Order ID",
            Description = "This is the Order ID, identifying the specific order.",
            Format = "int")]
        public int OrderId { get; set; }

        [SwaggerSchema(
            Title = "Customer Full Name",
            Description = "Full name for customer placing the order.",
            Format = "string")]
        public string? CustomerName { get; set; }

        [SwaggerSchema(
            Title = "Customer Address",
            Description = "Please include all details about customer address in this string.",
            Format = "string")]
        public string? Address { get; set; }

        [SwaggerSchema(
            Title = "Total Order Value",
            Description = "Sub. Total Value for order placed by customer. Should have been a double :)",
            Format = "string")]
        public string? OrderValue { get; set; }
    }
}
让我们启动我们的应用程序并检查文档以验证元数据是否已添加到订单的架构中。
将徽标添加到您的 ReDoc 文档页面
为了实现这一点,我们必须使用扩展功能来告诉 ReDoc 它应该为 ReDoc 页面使用自定义徽标。请注意,我对图像使用相对路径。如果您希望在发布解决方案时实现此功能,则必须更改图像的属性并告诉 Visual Studio 在发布时复制它。SwaggerGen()
下面是对我们的代码块的更新以包含图像。复制第 14 - 22 行:SwaggerGen()
builder.Services.AddSwaggerGen(options =>
{
    options.SwaggerDoc("v1",
        new OpenApiInfo
        {
            Title = "Swagger Demo Documentation",
            Version = "v1",
            Description = "This is a demo to see how documentation can easily be generated for ASP.NET Core Web APIs using Swagger and ReDoc.",
            Contact = new OpenApiContact
            {
                Name = "Christian Schou",
                Email = "someemail@somedomain.com"
            },
            Extensions = new Dictionary<string, IOpenApiExtension>
            {
              {"x-logo", new OpenApiObject
                {
                   {"url", new OpenApiString("https://christian-schou.dk/wp-content/uploads/2021/09/cropped-cs-logo-color-retina.png")},
                   { "altText", new OpenApiString("Your logo alt text here")}
                }
              }
            }
        });

    var xmlFile = $"{Assembly.GetExecutingAssembly().GetName().Name}.xml";
    var xmlPath = Path.Combine(AppContext.BaseDirectory, xmlFile);
    options.IncludeXmlComments(xmlPath);
    options.EnableAnnotations();
});
您可以包含来自 Web 服务器的徽标,就像我在上面的示例中所做的那样,或者您可以将其放置在您的解决方案中并在构建应用程序时发布它。结果将如下所示:
惊人的!现在,我们还可以在 API 的文档页面上展示我们很酷的徽标。
如何使用Swagger制作API文档总结
Swagger 与 ReDoc 的结合是使用 Swagger 快速生成 API 文档的一种非常强大的方法。如果在编写代码时添加属性,最终将使您更容易维护解决方案/项目文档。
Swagger 和 ReDoc 均提供免费(开源)和付费版本。我可以在许多项目中使用免费版本,因为它们都提供了很多功能。在本教程中,您学习了如何在基于 .NET 6 构建的 ASP.NET Core Web API 中实现 Swagger 和 ReDoc。您还学习了如何使用控制器操作上的注释来丰富操作操作元数据和模型以丰富架构元数据。
https://blog.christian-schou.dk/how-to-make-api-documentation-using-swagger/