公众号「架构成长指南」,专注于生产实践、云原生、分布式系统、大数据技术分享。
概述
在之前的教程中,我们看到了使用 RestTemplate 的 Spring Boot 微服务通信示例。
从 5.0 开始,RestTemplate处于维护模式,很快就会被弃用。因此 Spring 团队建议使用org.springframework.web.reactive.client.WebClient ,它支持同步、异步和流场景。
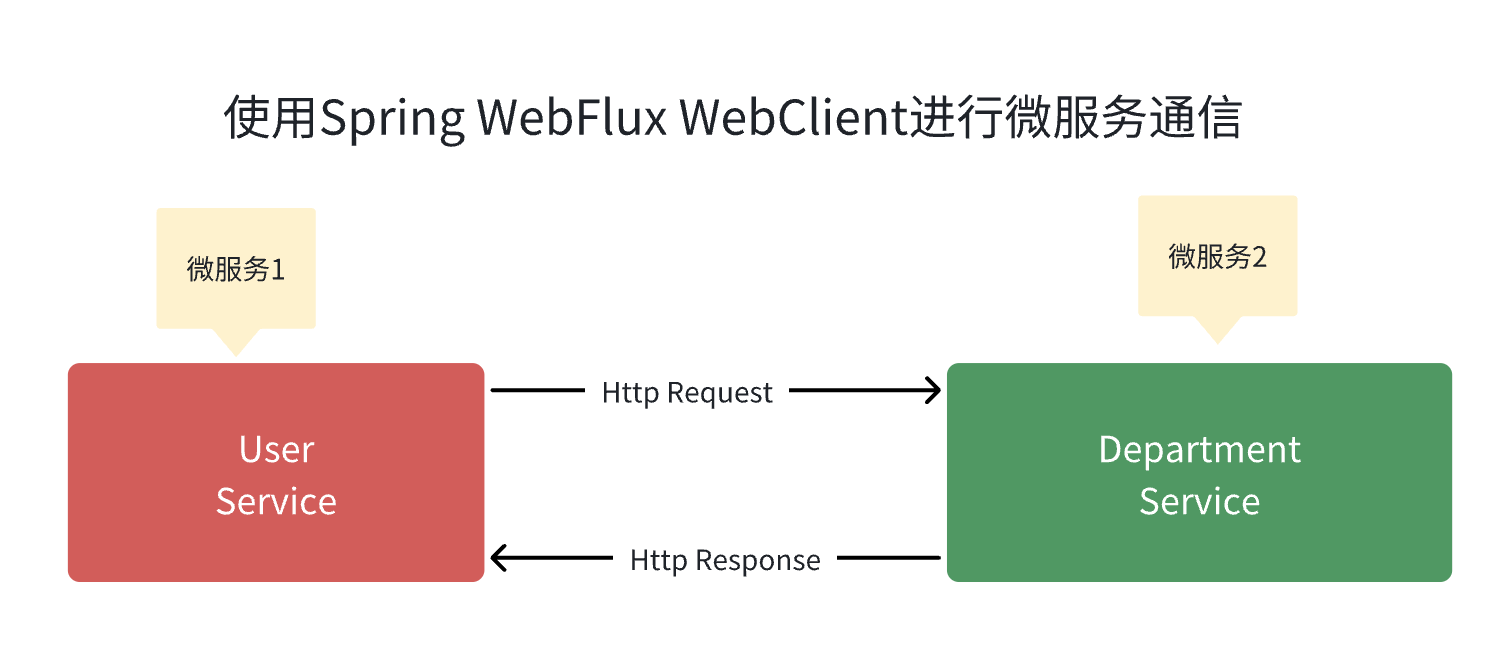
在本教程中,我们将学习如何使用WebClient在多个微服务之间进行 REST API 调用(同步通信)。
WebClient是一个非阻塞的响应式客户端,用于执行 HTTP 请求,通过底层 HTTP 客户端库(例如 Reactor Netty)来实现。
要在 Spring boot 项目中使用WebClient,我们必须将Spring WebFlux依赖项添加到类路径中。
我们需要做什么
下面将创建两个微服务,例如 部门服务 和 用户服务,并且我们将使用WebClient从 用户服务 到 部门服务 进行 REST API 调用 ,以获取特定的用户部门数据。
基础配置
我们在上一篇文章中创建了两个微服务: 使用 RestTemplate 的 Spring Boot 微服务通信示例。
第1步:添加Spring WebFlux依赖
打开user-service项目的pom.xml文件并添加以下依赖项:
		<dependency>
			<groupId>org.springframework.boot</groupId>
			<artifactId>spring-boot-starter-webflux</artifactId>
		</dependency>
		<dependency>
			<groupId>io.netty</groupId>
			<artifactId>netty-resolver-dns-native-macos</artifactId>
			<classifier>osx-aarch_64</classifier>
		</dependency>
可以看到上面还添加了netty-resolver-dns-native-macos的pom,原因是如果不添加此报会抛出相关异常,问题详情
第2步:将WebClient配置为Spring Bean
package io.wz.userservice;

import org.springframework.boot.SpringApplication;
import org.springframework.boot.autoconfigure.SpringBootApplication;
import org.springframework.context.annotation.Bean;
import org.springframework.web.reactive.function.client.WebClient;

@SpringBootApplication
public class UserServiceApplication {

    public static void main(String[] args) {
        SpringApplication.run(UserServiceApplication.class, args);
    }

    @Bean
    public WebClient webClient(){
        return WebClient.builder().build();
    }
}
第三步:注入并使用WebClient调用REST API
让我们注入WebClient并使用它来进行 REST API 调用:
 DepartmentDto departmentDto = webClient.get()
                 .uri("http://localhost:8080/api/departments/" + user.getDepartmentId())
                         .retrieve()
                                 .bodyToMono(DepartmentDto.class)
                                         .block();
下面是UserServiceImpl类的完整代码, 供大家参考:
package io.wz.userservice.service.impl;

import io.wz.userservice.dto.DepartmentDto;
import io.wz.userservice.dto.ResponseDto;
import io.wz.userservice.dto.UserDto;
import io.wz.userservice.entity.User;
import io.wz.userservice.repository.UserRepository;
import io.wz.userservice.service.UserService;
import lombok.AllArgsConstructor;
import org.springframework.stereotype.Service;
import org.springframework.web.reactive.function.client.WebClient;

@Service
@AllArgsConstructor
public class UserServiceImpl implements UserService {

    private UserRepository userRepository;
    private WebClient webClient;

    @Override
    public User saveUser(User user) {
        return userRepository.save(user);
    }

    @Override
    public ResponseDto getUser(Long userId) {

        ResponseDto responseDto = new ResponseDto();
        User user = userRepository.findById(userId).get();
        UserDto userDto = mapToUser(user);

        DepartmentDto departmentDto = webClient.get()
                .uri("http://localhost:8080/api/departments/" + user.getDepartmentId())
                .retrieve()
                .bodyToMono(DepartmentDto.class)
                .block();
        responseDto.setUser(userDto);
        responseDto.setDepartment(departmentDto);

        return responseDto;
    }

    private UserDto mapToUser(User user){
        UserDto userDto = new UserDto();
        userDto.setId(user.getId());
        userDto.setFirstName(user.getFirstName());
        userDto.setLastName(user.getLastName());
        userDto.setEmail(user.getEmail());
        return userDto;
    }
}
下面运行两个微服务并进行测试。
测试:启动两个微服务
首先启动部门服务项目,然后启动用户服务项目,一旦两个项目都启动并在不同的端口上运行。接下来,我们调用Get User REST API来测试user-service REST API 对Department-service 的调用。
获取用户 REST API:
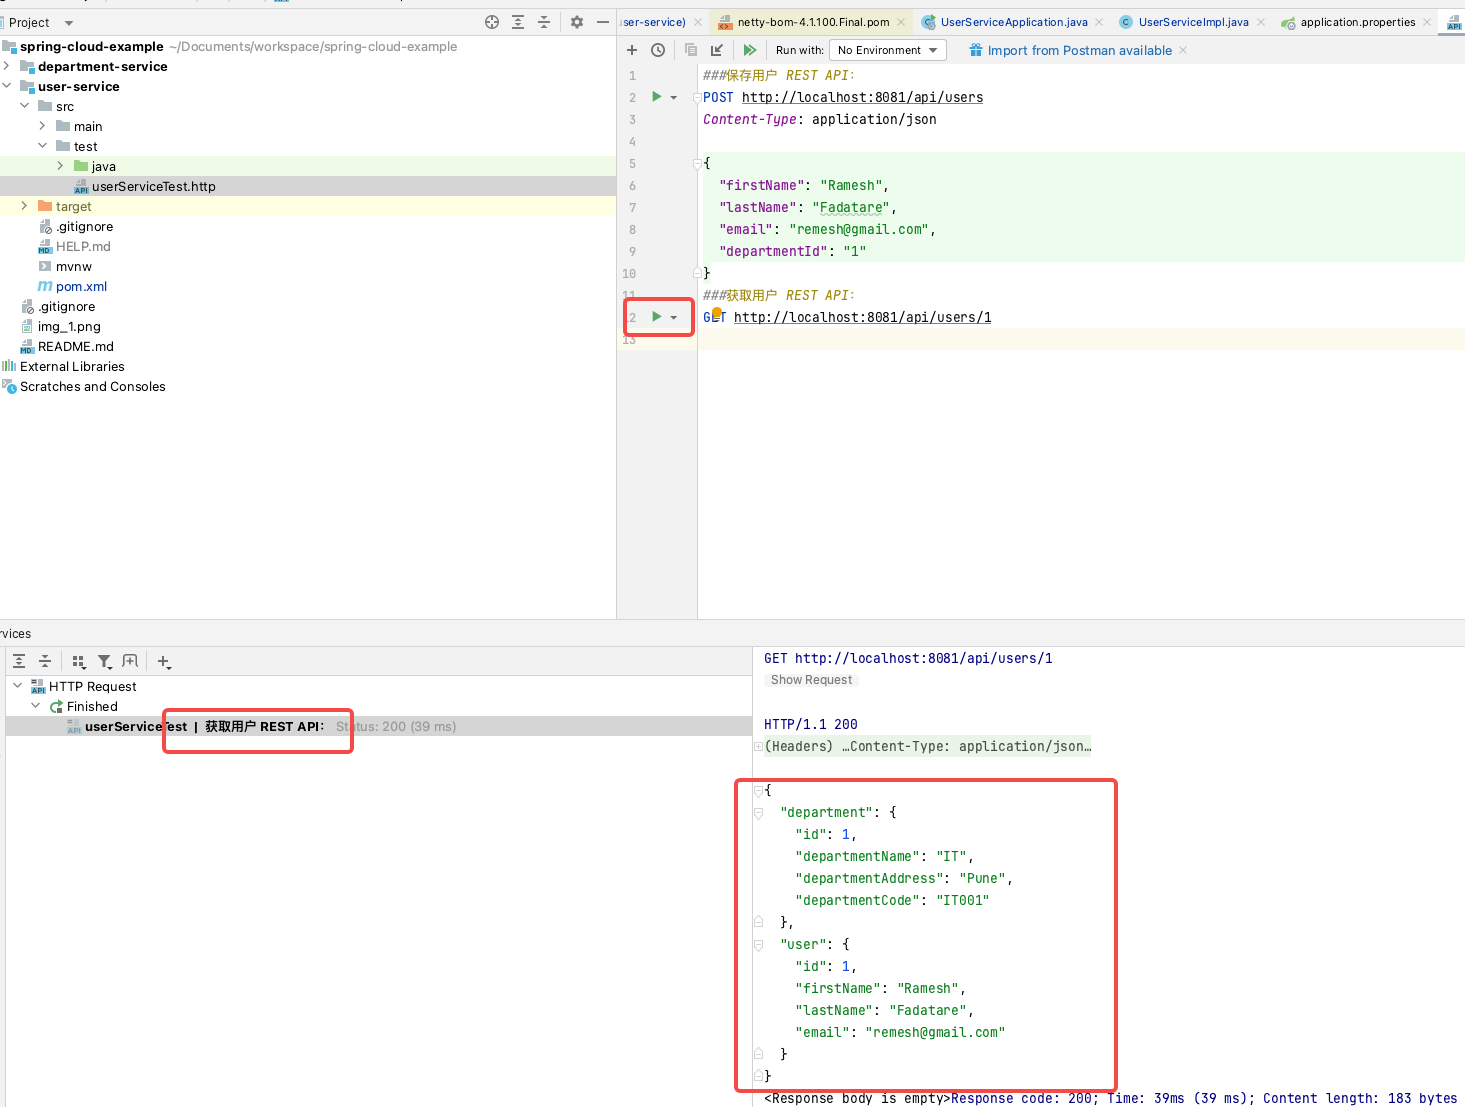
请注意,响应结果包含了用户的部门。这说明我们已成功使用WebClient从用户服务到部门服务进行 REST API 调用。
结论
在本教程中,我们学习了 如何使用WebClient 在多个微服务之间进行 REST API 调用(同步通信)。
- 示例 WebClient WebFlux Spring Boot示例webclient webflux spring spring-boot-webflux-servlet-webso示例servlet spring-boot-webflux-servlet-webso redisson-spring-boot-starter azure redis示例 示例spring feign boot 示例resttemplate spring boot webflux简介spring spring-webflux 线程 性能webflux spring spring-webflux webflux简介spring