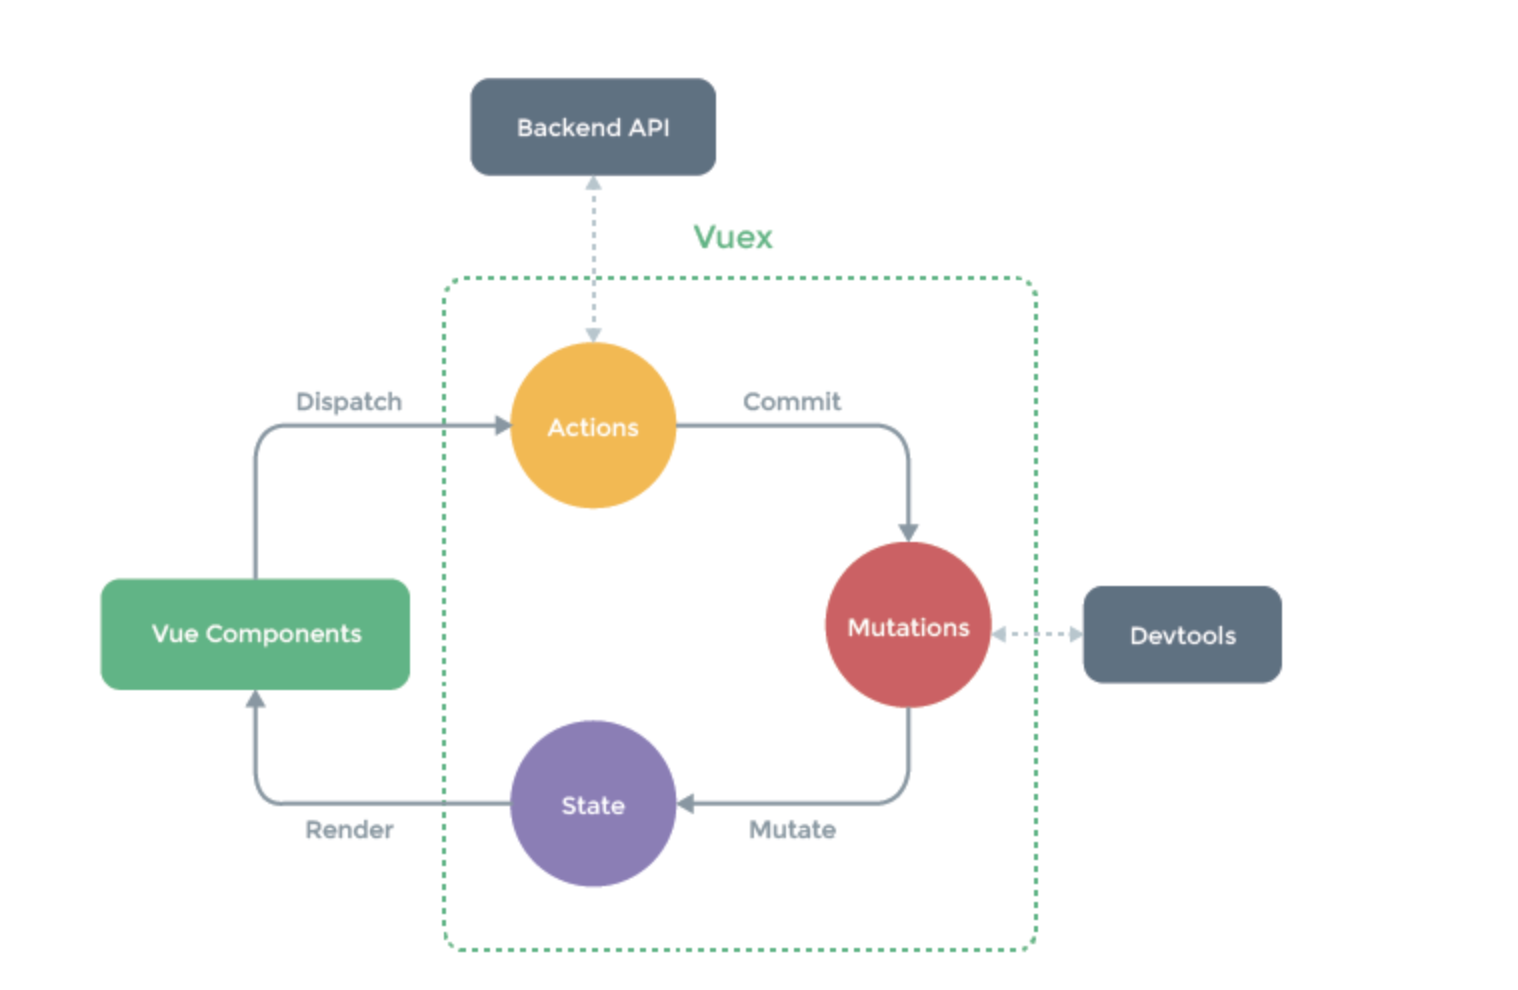
vuex使用
# vuex :状态管理器---》存数据(变量)的地方,所有组件都可以操作
在Vue中实现集中式状态(数据)管理的一个Vue插件,对vue应用中多个组件的共享状态进行集中式的管理(读/写),也是一种组件间通信的方式,且适用于任意组件间通信
<h1>1 vuex的使用 基本使用(操作state的数据)</h1>
    购物车商品数量:{{ $store.state.num }}

methods:{
    handleAdd(){
      // 1 直接操作
      // this.$store.state.num += 1
      // 2 正统方式,通过dispatch触发actions
      this.$store.dispatch('add',2)  //add 必须是action中得函数
    },
    add(name) {
      //1 直接操作
      // this.$store.state.goods.push(name)

      //2 正常套路
      this.$store.dispatch('addShopping', name)
    }
  },

export default new Vuex.Store({
    state: {
        num: 10,
        goods: [],
    },
    mutations: {
        mAdd(state,count){
            state.num += count
        },
        addShopping(state, name) {
            state.goods.push(name)
        }
    },
    actions: {
        // 至少要有一个参数,context上下文对象,触发mutations中函数执行,或者直接该state中数据都可以
        add(context,count){
            // 使用commit,触发mutations中得函数
            context.commit('mAdd',count)  // 会触发mutations中得mAdd的执行
        },
        addShopping(context, name) {
            // 这里起ajax请求,检查name库存够不够
            //假设库存不够,弹个不够的消息
            // alert('库存不够了')
            // return
            context.commit('addShopping', name)
        }
    },
})

Router使用
# 提倡单页面应用,需要做页面的跳转---->借助于Router实现页面组件的跳转

# 1 简单使用
	页面跳转
    写个页面组件
    在router--->index.js--->routes数组中加入一个路由即可

# 2 组件中实现页面跳转
	两种方式
    	方式一:使用 router-link 标签,to=地址
        	<router-link to="/about"></router-link>
        方式二:js控制
        	this.$router.push('/about')

# 3 路由跳转时,可以使用对象
	1 通过对象跳转路由name形式:<router-link :to="{name:'about'}"></router-link>
    2 通过对象跳转路由path形式:<router-link :to="{path:'/about'}"></router-link>
    3 对象中可以有query属性,是个对象类型,会把里面的key-value拼到路径后面
    4 在另一个页面中取出地址栏中数据:console.log(this.$route.query)
    5 这种传递方式和 3  一样 <router-link to="/about?name=lqz&age=19">
    6 注意区分:
    	this.$route:// 对象 表示当前路由对象,里面有当前路径的地方,携带的参数
        this.$router:// 对象,new VueRouter的镀锡,它主要用来做路由跳转
        #### 例如
        console.log(this.$route.query)  // 地址栏中的数据
    	console.log(this.$route.query.name)
   	7 路径中分割出参数
    	配置:
        	{
                path:'/detail/:pk',
                name: 'detail',
            	component: DetailView
            },
        在路由中取:
        	this.$route.params.pk
    8 路由跳转时,使用 7 的样子
    	<router-link :to="{name:'detail',params:{pk:1}}">
    	this.$router.push({name:'detail',params:{pk:1}})

# 4 this.router 的一些方法
	this.$router.push(path) 相当于点击路由链接(可以返回到当前路由界面)
    this.$router.replace(path): 用新路由替换当前路由(不可以返回到当前路由界面)
    this.$router.back(): 请求(返回)上一个记录路由
    this.$router.go(-1): 请求(返回)上一个记录路由
    this.$router.go(1): 请求下一个记录路由
多级路由
# 使用步骤
	1 新建一个页面组件(XxxView),配置路由
    	{
            path: '/xxx',
            name: 'xxx',
            component: XxxView,
        },
    2 在页面中,想再显示页面组件,实现点击切换的效果
    		<h1>lqz页面</h1>
            <router-link to="/xxx/xxx01">
              <button>xxx-01</button>
            </router-link>
            <router-link to="/xxx/xxx02">
              <button>xxx-02</button>
            </router-link>

            <router-view>
            # 以后这里变换页面组件,多级路由
            </router-view>
    3 新建两个页面组件 Xxx01.vue Xxx02.vue 配置路由children
    	{
            path: '/xxx',
            name: 'xxx',
            component: XxxView,
            children: [ //通过children配置子级路由
                {
                    path: 'xxx01', //此处一定不要写:/xxx
                    component: Xxx01
                },
                {
                    path: 'xxx02',//此处一定不要写:/xxx
                    component: Xxx02
                }
            ]
        },
路由守卫
# 前置路由收文,再进入路由之前做判断
# 写在router-index.js中,以后访问任意一个路由,都会执行这个代码
router.beforEach((to,from,next)=>{
    console.log('前置路由守卫',to,from)
    // 要是访问xxx01,不能跳转
    // 如果没有登录,不能访问
    if (to.path=='/xxx/xxx01'){
        alert('你咩有权限')
    }else{
        next() # 继续访问
    }
})
路由的两种工作模式
路由器的两种工作模式
1 对于一个url来说,什么是hash值?--#及其后面的内容就是hash值
2 hash值不会包含在HTTP请求中,即:hash值不会带给服务器
3 hash模式:
	地址中永远带着#号 不美观
	若以后将地址通过第三方手机app分享,若app校验严格,则地址会被标记为不合法
    兼容性较好
4 history模式:
	地址干净 美观
    兼容性和hash模式相关略差
    应用部署上线时需要后端人员支持,解决刷新页面服务端404的问题
localstorage、sessionstorage和cookie
# 前端存储数据
	登录成功,有token,存本地
    不登录加购物车

# 前端可以存数据的位置:
	localstorage:永久存储,除非你删除,关闭浏览器,再打开还会在
    sessionstorage:只在当前会话生效,关闭浏览器,就没了
    cookie:有过期时间,到了过期时间,自动删除
    	#  需要借助于第三方 vue-cookies
      	#  cnpm install -S vue-cookies
        import cookies from 'vue-cookies'
		Vue.use(cookies)
<template>
  <div class="home">
    <h1>操作localstorage,永久存储</h1>
    <button @click="addLocalstorage">增加</button>
    <button @click="getLocalstorage">查</button>
    <button @click="deleteLocalstorage">删除</button>
    <h1>操作sessiostorage,当前会话,关闭浏览器</h1>
    <button @click="addSessiostorage">增加</button>
    <button @click="getSessiostorage">查</button>
    <button @click="deleteSessiostorage">删除</button>
    <h1>操作cookie,有过期时间</h1>
    <button @click="addCookie">增加</button>
    <button @click="getCookie">查</button>
    <button @click="deleteCookie">删除</button>
  </div>
</template>

<script>
export default {
  name: 'HomeView',
  methods: {
    addLocalstorage(){
      let userinfo = {name:'lqz',age:19}
      localStorage.setItem('userinfo',JSON.stringify(userinfo))
    },
    getLocalstorage(){
      let userinfo = localStorage.getItem('userinfo')
      console.log(JSON.parse(userinfo).name)
    },
    deleteLocalstorage(){
      localStorage.clear()
      localStorage.removeItem('userinfo')
    },
    addSessiostorage(){
      let userinfo = {'name':'xxx','age':18}
      sessionStorage.setItem('userinfo',JSON.stringify(userinfo))
    },
    getSessiostorage(){
      let userinfo = sessionStorage.getItem('userinfo')
      console.log(JSON.parse(userinfo).name)
    },
    deleteSessiostorage(){
      sessionStorage.clear()
      sessionStorage.removeItem('userinfo')
    },
    addCookie(){
      // 需要借助于第三方 vue-cookies
      // cnpm install -S vue-cookies
      this.$cookies.set('name','xxx','300s')
    },
    getCookie(){
      console.log(this.$cookies.get('name'))
    },
    deleteCookie(){
      this.$cookies.remove('name')
    },
  },
}
</script>