ShoopingWeb没有控制器,普通api有控制器,ShoopingWeb是直达型,精简了很多中间代码,广泛适用于微服务架构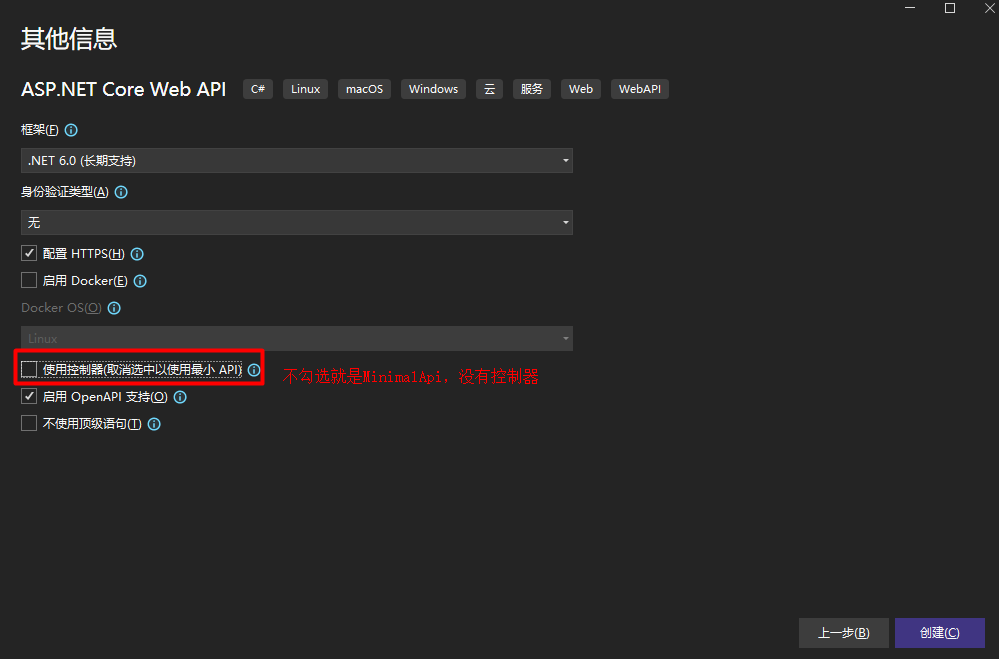
ShoopingWeb一切都在组控制台应用程序类【Program】上执行,也可以自由分类封装
namespace ShoopingWeb
{
    public static class Order
    {
        public static void OrderExtension(this WebApplication app)//如果没有参数,需要类名.方法名(app) 这样传进来
        {
            app.MapGet("/Query", () => { return new { Id = 123, name = "张三" }; }).WithTags("Query");
            app.MapPost("/Add", () => { return new {Success=true,Message="添加成功" }; }).WithTags("Add");
            app.MapPut("/Update", () => { return new { Success = true, Message = "修改成功" }; }).WithTags("Update");
            app.MapDelete("/Delete", (int id,HttpContext context) => {
                var query = context.Request.Query;//内注入参数,也能注入上下文,直接传过来就可以
                return new { Success = true, Message = "删除成功" };
            }).WithTags("Delete");
        }
    }
}
在去顶级程序添加即可。
app.OrderExtension();//相当于定义的一个扩展方法,封装某个商品的增删改查
普通webapi
前端用:vue3,后端:net6,的结合代码
vue3手动创建:勾选1、路由配置:router。2、vuex状态管理:store类似全局变量。3、在加上UI库:element-plus模板
大致UI库模板如下:安装ui库命令:npm install element-plus --save,UI库图标命令:npm install @element-plus/icons-vue
App.vue
<template>
  <router-view></router-view>
</template>
LayoutView.vue布局页
<template>
    <el-container class="layout-container-demo">
        <el-aside width="200px">
            <el-scrollbar>
                <div class="mb-2 logo">Vue+WebApi</div>
                <el-menu :default-openeds="['1', '2']" background-color="#303133" active-text-color="#ffd04b"
                    text-color="#ffff" :router="true">
                    <el-sub-menu index="1">
                        <template #title>
                            <el-icon>
                                <message />
                            </el-icon>店铺管理
                        </template>
                        <el-menu-item-group>
                            <el-menu-item index="1-1"><el-icon>
                                    <HomeFilled />
                                </el-icon>首页</el-menu-item>
                            <el-menu-item index="/category"><el-icon>
                                    <Operation />
                                </el-icon>分类管理</el-menu-item>
                            <el-menu-item index="1-3"><el-icon>
                                    <ShoppingCart />
                                </el-icon>商品管理</el-menu-item>
                        </el-menu-item-group>

                    </el-sub-menu>
                    <el-sub-menu index="2">
                        <template #title>
                            <el-icon><icon-menu /></el-icon>系统设置
                        </template>
                        <el-menu-item-group>
                            <el-menu-item index="2-1"><el-icon>
                                    <Edit />
                                </el-icon>密码修改</el-menu-item>
                        </el-menu-item-group>
                    </el-sub-menu>
                </el-menu>
            </el-scrollbar>
        </el-aside>

        <el-container>
            <el-header style="text-align: right; font-size: 12px">
                <div class="toolbar">
                    <el-dropdown>
                        <el-icon style="margin-right: 8px; margin-top: 1px">
                            <setting />
                        </el-icon>
                        <template #dropdown>
                            <el-dropdown-menu>
                                <el-dropdown-item>View</el-dropdown-item>
                                <el-dropdown-item>Add</el-dropdown-item>
                                <el-dropdown-item>Delete</el-dropdown-item>
                            </el-dropdown-menu>
                        </template>
                    </el-dropdown>
                    <span>Tom</span>
                </div>
            </el-header>

            <el-main>
                <router-view></router-view>
            </el-main>
            <el-footer>Footer</el-footer>
        </el-container>
    </el-container>
</template>

<script setup>


</script>

<style scoped>
.logo {
    height: 50px;
    color: white;
    text-align: center;
    line-height: 50px;
    font-weight: bold;
}

layout-container-demo {
    height: 100%;
}

.el-header {
    position: relative;
    background-color: white;
    color: var(--el-text-color-primary);
    box-shadow: var(--el-box-shadow-dark);
}

.layout-container-demo .el-aside {
    color: var(--el-text-color-primary);
    background-color: #303133;
}

.layout-container-demo .el-menu {
    border-right: none;
}

.layout-container-demo .el-main {
    padding: 0;
    box-shadow: var(--el-box-shadow-dark);
    margin: 10px 0px;
    /*上下间距10,左右0*/
}

.layout-container-demo .toolbar {
    display: inline-flex;
    align-items: center;
    justify-content: center;
    height: 100%;
    right: 20px;
}

.el-footer {
    box-shadow: var(--el-box-shadow-dark);
}
</style>


<style>
/*全局样式 */
.card-header {
    display: flex;
    justify-content: flex-start;
    align-items: center;
    gap: 10px
}

.text {
    font-size: 14px;
}

.item {
    margin-bottom: 18px;
}

.box-card {
    width: 100%;
    height: 100%;
}
</style>
main.js入口的挂载
import { createApp } from 'vue' //框架实例
import App from './App.vue'
import router from './router' //路由
import store from './store' //状态管理vuex--类似全局变量

import ElementPlus from 'element-plus'//ui库
import 'element-plus/dist/index.css' //ui库的样式
import * as ElementPlusIconsVue from '@element-plus/icons-vue'//ui库图标

const app = createApp(App)
for (const [key, component] of Object.entries(ElementPlusIconsVue)) {
    app.component(key, component)//注册icon图标,ui库图标
  }
app.use(store).use(router).use(ElementPlus).mount('#app')
router/index.js路由配置
import { createRouter, createWebHistory } from 'vue-router'
import HomeView from '../views/HomeView.vue'

const routes = [
  {
    path: '/login',
    name: 'login',
    component: () => import('@/auth/views/UserLogin.vue')
  },
  {
    path: '/',
    name: '/',
    component: () => import('@/views/LayoutView.vue'),
    redirect: '/home', //默认页面
    children: [//布局页的子组件路由
      {
        path: '/home',
        name: 'home',
        component: HomeView
      },
      {
        path: '/about',
        name: 'about',
        component: () => import('@/views/AboutView.vue')
      },
      {
        path: '/category',
        name: 'category',
        component: () => import('@/views/CategoryView.vue')
      },
      {
        path: '/addCategory',
        name: 'addCategory',
        component: () => import('@/components/AddCategory.vue')
      }
    ]
  }
]

const router = createRouter({
  history: createWebHistory(process.env.BASE_URL),
  routes
})

export default router
一、后台webAPI的搭建
创建asp.net core web api项目:搭建数据库连接
1.创建【Models】文件夹保存实体类:Category.cs
public class Category
{
    public int Id { get; set; }
    public string Name { get; set; }
}
2.创建【Data】文件夹保存数据库上下文类:ShopDbContext.cs
using Microsoft.EntityFrameworkCore;
using ShoopingWeb.Models;

namespace ShoopingWeb.Data
{
    public class ShopDbContext:DbContext
    {
        public ShopDbContext(DbContextOptions<ShopDbContext> options) : base(options)
        {
            //参数DbContext选项值创建的这个新的类型,包装后用base关键字传给父类
        }
        public DbSet<Category> Categories { get; set; }//添加表
    }
}
3.在【appsettings.json】文件中配置数据库连接字符串,这里用的vs自带数据库
"ConnectionStrings": {
    "ShopConn": "Data Source=(localdb)\\MSSQLLocalDB;Initial Catalog=OA;Integrated Security=True;Connect Timeout=30;Encrypt=False;TrustServerCertificate=False;ApplicationIntent=ReadWrite;MultiSubnetFailover=False"
  }
4.把数据库添加到服务全局【Program.cs】
builder.Services.AddDbContext<ShopDbContext>(option => { //添加数据库上下文类
    option.UseSqlServer(builder.Configuration.GetConnectionString("ShopConn"));//拿到数据库连接字符串,在appsettings.json配置文件里
});
5.工具-》nuget包管理-》控制台:1.执行数据库迁移:add-migration initDb 2.保存到数据库:update-database 手动输入
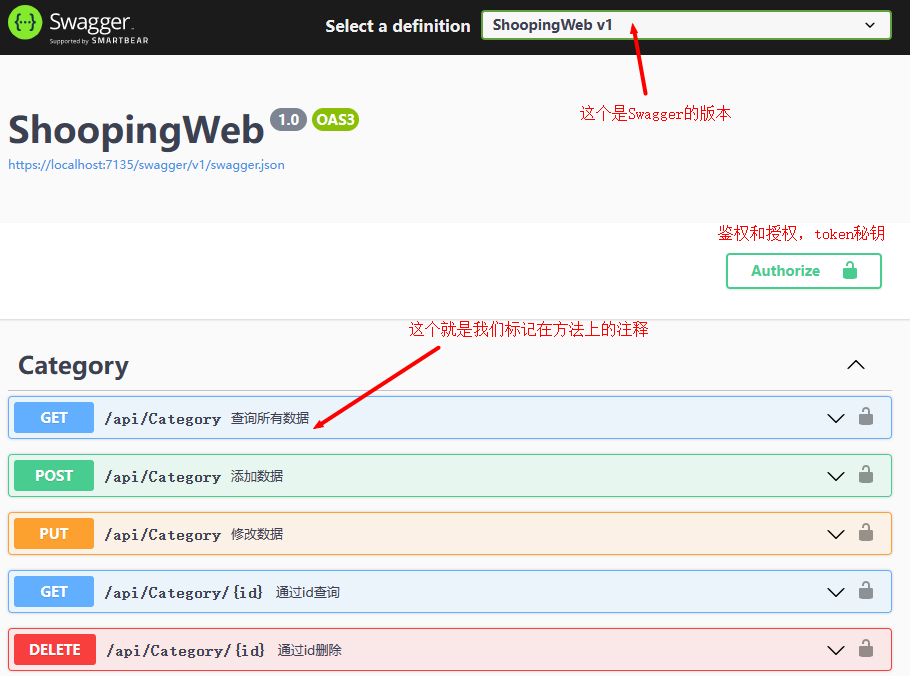
6.在【Controllers】文件夹下创建控制器:CategoryController.cs ,用的是RESTfull开发风格:路由+http请求=方法体定义的api
using ShoopingWeb.Models;
using Microsoft.AspNetCore.Http;
using Microsoft.AspNetCore.Mvc;
using Microsoft.EntityFrameworkCore;
using ShoopingWeb.Data;
using ShoopingWeb.Helpers;

namespace ShoopingWeb.Controllers
{
    [Route("api/[controller]")]//路由:api/控制器名,这里是Category别写错哟,如果需要方法名:[Route("api/[controller]/[action]")]
    [ApiController]//控制器是webapi
    [Authorize]//授权特性
    public class CategoryController : ControllerBase
    {
        private readonly ShopDbContext db;

        public CategoryController(ShopDbContext db)//鼠标右键快速生成字段并赋值
        {
            this.db = db;//绑定数据库ShopDbContext上下文类
        }
        /// <summary>
        /// 查询所有数据
        /// </summary>
        /// <returns></returns>
        [HttpGet]//在webapi中,是通过路由+http请求【特性】来找到方法的,和方法名无关,无调用只有注释的作用。
        public async Task<IEnumerable<Category>> GetList()//有async定义的异步编程,不过有没有返回值都必须Task
        {
            return await db.Categories.ToListAsync();//有async异步定义的方法,就必须有await来执行任务。
        }
        /// <summary>
        /// 通过id查询
        /// </summary>
        /// <param name="id"></param>
        /// <returns></returns>
        [HttpGet("{id}")]//路由模式:api/controller/{id}
        public async Task<ActionResult<Category>> Getid(int id)
        {
            var category = await db.Categories.FindAsync(id);//通过id查询
            if (category == null)
            {
                return NotFound();//返回404的状态码,多种返回类型用:ActionResult
            }
            return Ok(category);//返回数据
        }
        /// <summary>
        /// 添加数据
        /// </summary>
        /// <param name="model"></param>
        /// <returns></returns>
        [HttpPost]//增
        public async Task<ActionResult<int>> Add(Category model)
        {
            await db.Categories.AddAsync(model);//添加数据
            await db.SaveChangesAsync();
            return Ok(model.Id);
        }
        /// <summary>
        /// 通过id删除
        /// </summary>
        /// <param name="id"></param>
        /// <returns></returns>
        [HttpDelete("{id}")]//删
        //[Route("Delete")]//也可以这样指定特性路由,但是这样会打破【RestFull路由】风格:统一地址通过增删改查的功能,有需要可以标记在控制器上
        public async Task<IActionResult> Delete(int id)
        {
            var category = await db.Categories.FindAsync(id);
            if (category == null) { return NotFound(); }//返回404,都是返回状态码,用接口即可:IActionResult
            db.Categories.Remove(category);//删除数据不需要异步
            await db.SaveChangesAsync();//保存需要异步
            return NoContent();//返回204,成功删除
        }
        /// <summary>
        /// 修改数据
        /// </summary>
        /// <param name="model"></param>
        /// <returns></returns>
        [HttpPut]//改
        public async Task<IActionResult> Update(Category model)
        {
            var category = await db.Categories.FindAsync(model.Id);
            if (category == null) { return NotFound(); }//返回404
            category.Name = model.Name;
            await db.SaveChangesAsync();//保存修改的数据
            return NoContent();//返回204,成功修改
        }
    }
}
另外还可以在Swagger中显示注释需要设置【项目右键属性】
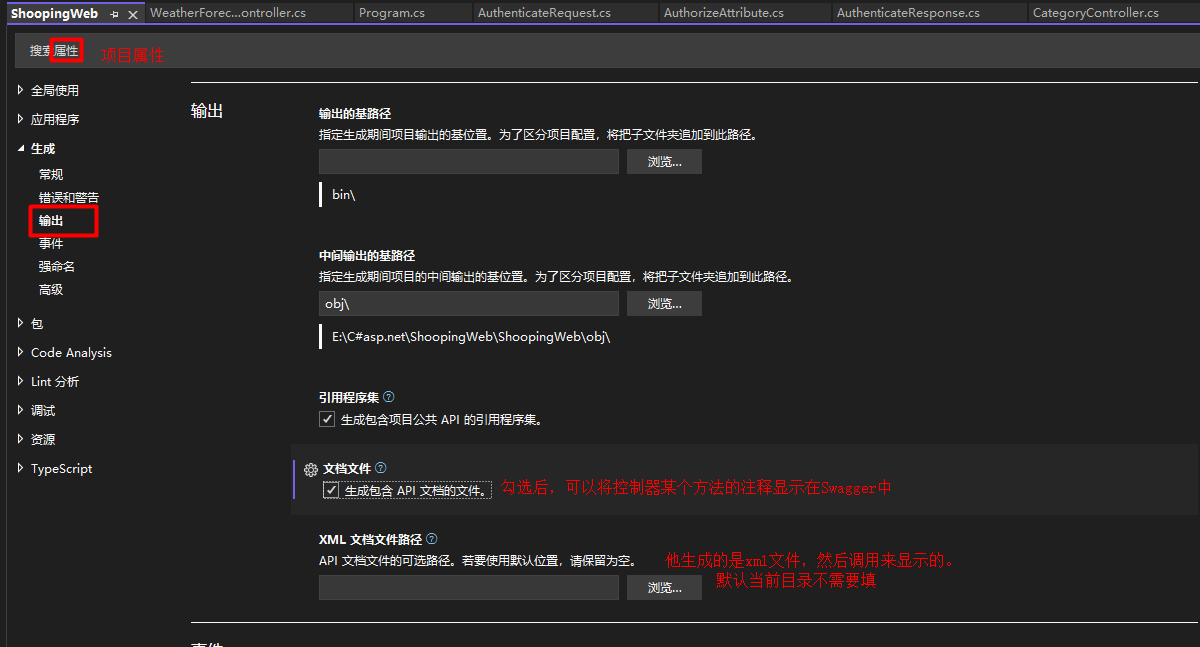
还需要在顶级程序【Program.cs】中,启用xml文件
builder.Services.AddSwaggerGen(a => { //为api文档添加说明信息
    string basePath = Path.GetDirectoryName(typeof(Program).Assembly.Location);//获取应用程序所在的目录(绝对路径,不受工作目录影响,建议使用)
    string xmlPath = Path.Combine(basePath, "ShoopingWeb.xml");//拼接目录找到xml的注释文件:项目名.xml
    a.IncludeXmlComments(xmlPath);//中间件启用
});
测试:直接运行后台代码,可以看出后台其实返回的就是josn字符串和状态码而已
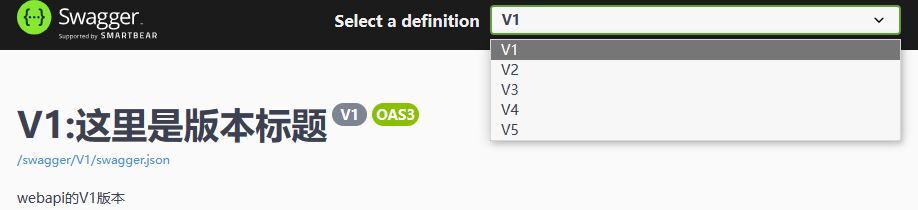
Swagger的版本添加和修改,可以创建一个静态类来表示版本号
namespace WebApi.Utility
{
    public static class ApiVersionInfo
    {
        public static string V1;//创建静态字段,代表5个版本
        public static string V2;
        public static string V3;
        public static string V4;
        public static string V5;
    }
}
第二步在在顶级程序中【Program.cs】配置版本
builder.Services.AddSwaggerGen(a => {//1、Swagger的文档设置
    foreach (FieldInfo field in typeof(ApiVersionInfo).GetFields())
    {
        a.SwaggerDoc(field.Name, new OpenApiInfo()//文档描述版本信息
        {
            Title= $"{field.Name}:这里是版本标题",
            Version=field.Name,//版本,就是下拉框的值
            Description= $"webapi的{field.Name}版本"
        });
    }
});

var app = builder.Build();

// Configure the HTTP request pipeline.
if (app.Environment.IsDevelopment())
{
    app.UseSwagger();
    app.UseSwaggerUI(c => {
        foreach (FieldInfo field in typeof(ApiVersionInfo).GetFields())
        {
            c.SwaggerEndpoint($"/swagger/{field.Name}/swagger.json", $"{field.Name}");//2、启动版本控制
        }
    });
}
最后在控制器中用特性标注版本号即可
[ApiExplorerSettings(GroupName = nameof(ApiVersionInfo.V1))]//标记在控制器中,表示支持第二个版本
二、前后端CORS跨域配置
在Ajax请求时遵循的是同源策略:协议相同,域名相同,端口相同。而在webapi中前后端分离的,端口肯定不一样。所以不能在使用Ajax来发送请求。
CORS(Cross-orgin-resource-sharing)跨域资源共享:打破同源策略的限制。Ajax为了安全考虑做的限制,打破限制的方案有很多,cors最常见。
后台跨域:有两种方式,中间件跨域和特性跨域
HttpContext.Response.Headers.Add("Access-Control-Allow-Origin", "*"); //*表示支持所有跨域,添加到控制器的每个方法中表示这个方法支持跨域
每个方法都行需要添加,也可以使用特性封装来跨域
public class CustomCorsActionFilterAttribute : Attribute, IActionFilter
{
    public void OnActionExecuting(ActionExecutingContext context)
    {
        context.HttpContext.Response.Headers.Add("Access-Control-Allow-Origin", "*");
    }
    public void OnActionExecuted(ActionExecutedContext context)
    {

    }
}
[CustomCorsActionFilterAttribute]//哪个方法需要可以就标记在哪个方法上
中间件跨域:服务端的配置【Program.cs】,开放运行策略(建议使用)
builder.Services.AddCors(options => //添加中间件跨域服务
{
    options.AddPolicy("cors", p =>//添加策略,可以添加多种
    { //如果是允许指定的域、方法、消息头需要使用WithOrigins、WithMethods、WithHeaders方法。
        p.AllowAnyOrigin()//允许可以,参数可以给ip,不给表示允许所有
        .AllowAnyMethod() //允许所有方法
        .AllowAnyHeader();//请求头
    });
});
app.UseCors("cors");//启用策略中间件管道,必须放跳转:app.UseHttpsRedirection();的后面
前台:客户端vue3的框架配置文件【vue.config.js】,每次修改此文件需要重启项目,Ctrl+c项目关闭,重启命令:npm run serve
const { defineConfig } = require('@vue/cli-service')
module.exports = defineConfig({//会覆盖webpack默认配置
  transpileDependencies: true,
  devServer:{//开发环境的服务器配置
    open:true,//是否自动打开浏览器
    host:"localhost",
    port:8080,//修改默认端口
    proxy:{//通过代理的方式访问,会重写路由
      "/api":{
        target:"https://localhost:7135/api/",//服务器请求地址,在后台Properties--》launchSettings.json中
        secure:false,//HTTPS需要配置这个参数
        changeOrigin:true,//请求头host属性,默认false发本机ip。true会把host设置为target的值。
        pathRewrite:{'^/api':''}//路径重写,(正则表达式)识别api路径替换为空字符串。
      }
    }
  }
})
三、获取后台数据【axios请求库】
安装命令:npm install axios ,请求库还有很多,axios只是vue3的一种
vue3前端src目录下创建【api】文件夹放配置文件:api_config.js
import axios from "axios" //请求库

axios.defaults.baseURL="http://localhost:8080/api" //基础路径,做请求前缀。
axios.defaults.headers['X-Requested-With']="XMLHttpRequest" //请求类型:异步请求
axios.defaults.headers.post['Content-Type']='application/json' //post以json格式提交到后台

export default axios;
获取后台所有数据:在【views】试图中【CategoryView.vue】组件下请求数据即可
<template>
    <el-card class="box-card">
      <template #header>
        <div class="card-header">
          <span>商品分类</span>
          <el-button type="primary" icon="CirclePlus" round>添加分类</el-button>
        </div>
      </template>
      <el-table :data="tableData.list" stripe style="width: 100%">
    <el-table-column prop="id" label="Id" width="180" />
    <el-table-column prop="name" label="名称" width="180" />
    <el-table-column fixed="right" label="操作" width="180">
      <template #default>
        <el-button type="success" size="small">修改</el-button>
        <el-button type="danger" size="small">删除</el-button>
      </template>
    </el-table-column>
  </el-table>
    </el-card>
  </template>

<script setup>
  import {reactive,onMounted} from 'vue' //vue里面要定义变量,需要导入reactive这个方法
  import axios from '@/api/api_config';//请求库,@符号表示src文件夹

  const tableData = reactive({list:[]})//reactive也可以定义一个对象list

  onMounted(()=>{ //类似于后台构造方法,初始化时调用
    getList()
  })
  const getList=()=>{//获取数据信息
    return axios.get('/Category').then((res)=>{//get得的后台控制器的数据,返回结果用then方法获取。
      tableData.list=res.data
      console.log(res.data)//打印到控制台
    })
  }
</script>
增删改:在【components】创建弹窗组件:AddCategory.vue 做添加和修改
<template>
    <el-dialog
      v-model="state.dialogVisible"
      :title="dialogTitle"
      width="35%"
      :before-close="handleClose"
    >
    <el-form :model="ruleForm" label-width="120px">
        <el-form-item label="姓名">
            <el-input v-model="ruleForm.name" />
        </el-form-item>
    </el-form>
      <template #footer>
        <span class="dialog-footer">
          <el-button @click="dialogVisible = false">取消</el-button>
          <el-button type="primary" @click="add">
            保存
          </el-button>
        </span>
      </template>
    </el-dialog>
</template>

<script  setup>
  import {inject, reactive,toRefs,watch} from "vue" //reactive可以定义变量也可以定义对象。
    import {ElMessage} from "element-plus" //弹窗
    import axios from '@/api/api_config';//请求库

  const state =reactive({
    dialogVisible:false,//表示不显示对话框,ui库包对话框当做属性来判断了
    ruleForm:{id:"",name:""}//对话框的数据,也是修改和添加用
  });//如果没有toRef转换,那么必须通过state.dialogVisible这样一层一层的取值
  const {dialogVisible,ruleForm} =toRefs(state)//将reactive转为ref对象,也不需要点value取值
  const dialogCategory=()=>{//定义一个打开对话框的方法
    state.dialogVisible = true;//调用方法就显示对话框
  };
  //主动暴露子组件方法,这是编译器的宏命令,不需要引入,其他组件就可以使用
  defineExpose({dialogCategory})//需要配置文件.eslintrc.js将宏命令打开:"vue/setup-compiler-macros":true在env选项中添加。
  const title = defineProps({//自动暴露这个变量
    dialogTitle:{type:String},//标题
    tableRow:{type:Object}//id
    })
  watch(//监听器,是vue的一个选项,监听数据的变化而变化
    ()=>title.tableRow,//需要监听的数据,
    ()=>{state.ruleForm=title.tableRow},//如果有变化就改变数据。
    {//配置
        deep:true,//是否深度检测,数据又多层,可以深度查找
        immediate:true //立即执行
    }
  )
  const getList=inject("getList")//依赖注入刷新页面,传过来的用provide,接收的用inject
  const add =()=>{
    if(title.dialogTitle==="添加数据"){
        let param={name:ruleForm.value.name} //let定义的变量在作用于大括号中,出了大括号无用
        axios.post('/Category',param).then(()=>{
            ElMessage.success("添加成功")
            getList()//刷新页面数据
            state.dialogVisible = false//关闭窗口
        })
    }else{
        let param={
            id:title.tableRow.id, //id
            name:ruleForm.value.name //姓名
        }
        axios.put('/Category',param).then(()=>{
            ElMessage.success("修改成功")
            getList()//刷新页面数据
            state.dialogVisible = false//关闭窗口
        })
    }
  }

</script>
<style scoped>
  .dialog-footer button:first-child {
    margin-right: 10px;
  }
</style>
数据页代码如下
<template>
    <el-card class="box-card">
      <template #header>
        <div class="card-header">
          <span>商品分类</span>
          <el-button type="primary" icon="CirclePlus" round @click="handleDialog()">添加分类</el-button>
        </div>
      </template>
      <el-table :data="tableData.list" stripe style="width: 100%">
    <el-table-column prop="id" label="Id" width="180" />
    <el-table-column prop="name" label="名称" width="180" />
    <el-table-column fixed="right" label="操作" width="180">
      <template #default="scop">
        <el-button type="success" size="small" @click="handleDialog(scop.row)">修改</el-button>
        <el-button type="danger" size="small" @click="open(scop.row.id)">删除</el-button>
      </template>
    </el-table-column>
  </el-table>
    </el-card>
    <AddCategoryVue ref="AddCategory" :dialogTitle="dialogTitle" :tableRow="tableRow"></AddCategoryVue>
  </template>

<script setup>
  import {reactive,onMounted,ref, provide} from 'vue' //vue里面要定义变量,需要导入reactive这个方法
  import axios from '@/api/api_config';//请求库,@符号表示src文件夹
  import AddCategoryVue from '@/components/AddCategory.vue'; //子组件,对话框的标签
  import { isNull } from '@/utils/filter';//自定义的做数据筛选处理
  import { ElMessage, ElMessageBox } from 'element-plus'//删除的消息弹窗

  const tableData = reactive({list:[]})//reactive也可以定义一个对象list

  onMounted(()=>{ //类似于后台构造方法,初始化时调用,自动运行
    getList()
  })
  const getList=()=>{//获取数据信息的方法
    return axios.get('/Category').then((res)=>{//返回结果用then方法获取。
      tableData.list=res.data
      console.log(res.data)//打印到控制台,测试数据用
    })
  }
  provide("getList",getList);//依赖注入:跨组件,把这个方法提供给子组件执行,传过去的用provide,接收的用inject他们两个是一对依赖注入

  const AddCategory = ref(null)//定义在标签里的ref属性,当做一个实例,名字就代表了这个对话框组件,就可以用变量去调用他里面的方法了
  const dialogTitle =ref("")//弹窗标题
  const tableRow =ref({})//修改和删除的id,绑定到标签,传给子组件
  const handleDialog=(row)=>{ //打开弹窗的事件
    if(isNull(row)){
      dialogTitle.value="添加数据"
    }else{
      dialogTitle.value="修改数据"
      tableRow.value = row //把id传入子组件的弹窗
    }
    AddCategory.value.dialogCategory()//调用子组件的弹窗方法
  }
  const open =(id)=>{
      ElMessageBox.confirm('你确定要删除吗?','温馨提示',{
        confirmButtonText:'确定',
        cancelButtonText:'取消',
        type:'warning',
      }).then(()=>{
        axios.delete(`/Category/${id}`).then(()=>{//这里的符号是反引号波浪线下面
          ElMessage({
            type:'success',
            message:'删除成功!',
          });
          getList() //加载数据的方法,刷新数据
        })
    }).catch(()=>{//捕捉到错误
        ElMessage({
          type:'info',
          message:'取消删除!',
        })
      })
  }


</script>
这里自定义了一个数据过滤器:src项目创建【utils】文件夹:filter.js怎么配置一些数据过滤
export const isNull=(data)=>{ //定义个数据过滤器
    if(!data)return true //普通值
    if(JSON.stringify(data)==='{}')return true //对象
    if(JSON.stringify(data)==='{}')return true //数组
}
四、JWT授权:后台数据安全配置
JWT:json web token令牌,在WebApi中不支持Session和Cookies,只支持token验证
因为http无状态,所有人都可以访问,使用就有了身份认证token,以json的方式前后端传递验证:服务器生成token秘钥,浏览器带上秘钥就可以去访问数据。
token是否安全:两把钥匙:私钥——在服务器上定义的一把钥匙;公钥——用户身份验证后带着服务器生成的token秘钥去访问。
后台配置
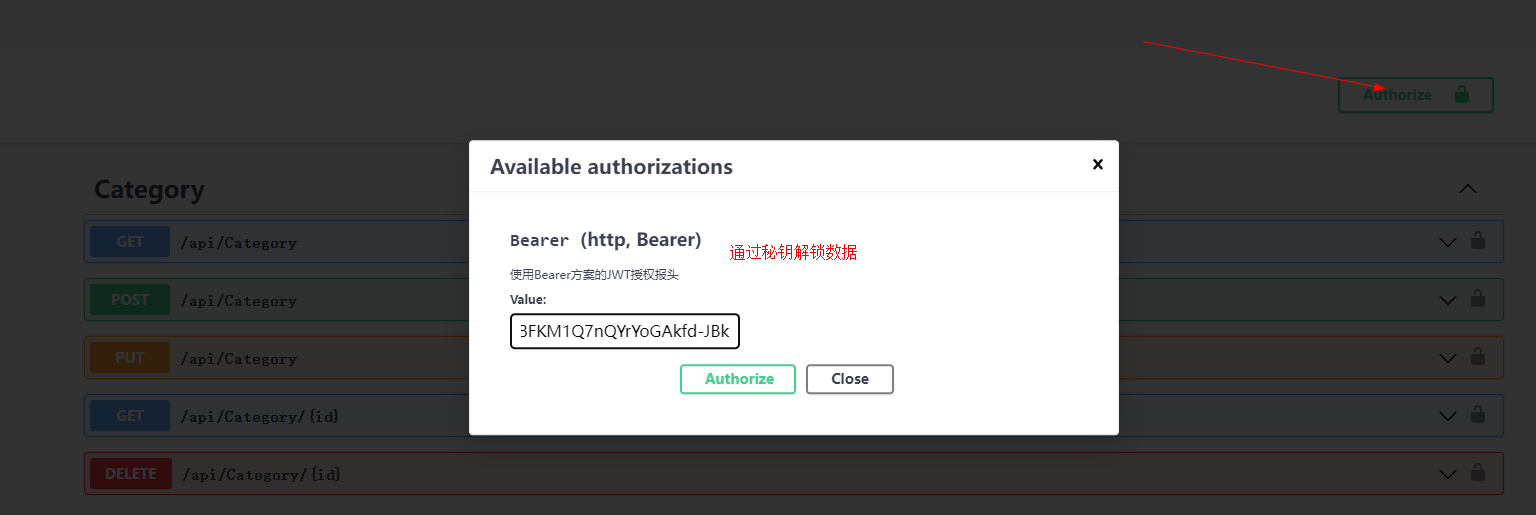
1、在【Program.cs】中添加AddSwaggerGen来描述api的安全配置信息
builder.Services.AddSwaggerGen(a => { //为api文档添加说明信息,安全配置
    //1.添加一种授权的方式,描述api的保护方式
    a.AddSecurityDefinition("Bearer", new OpenApiSecurityScheme //通过这种架构来保护,需要引入命名空间using Microsoft.OpenApi.Models;
    {//JWT(json web token)token是令牌:身份认证
        Description= "使用Bearer方案的JWT授权报头",//说明信息,是什么授权,会显示出来
        Name="Authorization",//取个名字,相当于键值对的键,以后用来放授权值
        In=ParameterLocation.Header,//放在头部信息里面
        Type=SecuritySchemeType.Http,//类型是http协议
        Scheme= "bearer"  //使用的方案结构=bearer方案,
    });
    //2.在api中添加全局安全要求
    a.AddSecurityRequirement(new OpenApiSecurityRequirement
    {//他继承的是字典的形式,以键值对的方式初始化配置
        {
            new OpenApiSecurityScheme{//键:是一个架构对象
                Reference=new OpenApiReference{ //参考,遵循这种规范
                    Type=ReferenceType.SecurityScheme,//参考类型:安全方案
                    Id="Bearer" //参考名称:上面定义的描述api的保护方式
                }
            },
            new List<string>()//参数2,可以是空的数组
        }
    });
});
2、在配置文件【appsettings.json】中添加自定义,token私钥字符串,字符串可以设置复杂一点,就是服务器的钥匙,加密解密会用到。
"AuthSettings": {
    "Secret": "Adfsfwfdsf15452@!$!$##%$#%^$"
  }
3、在Models添加User.cs实体类,相当于用户表的数据传递
public class User
{
    public int Id { get; set; }
    public string Email { get; set; }//邮箱账号
    public string Password { get; set; }//密码
}
4、创建一个【ViewModels】文件夹,创建模型做数据传输对象:AuthenticateResponse.cs,用于授权和响应的数据传输模型
using ShoopingWeb.Models;

namespace ShoopingWeb.ViewModels
{
    public class AuthenticateResponse//授权响应对象,用户进来拿到秘钥的数据传递
    {
        public AuthenticateResponse(User user, string _token)//用户信息和授权秘钥
        {
            id= user.Id;
            token= _token;
            Email= user.Email;
        }
        public int id { get; set; }//如果有个用户进来,就初始化这些数据,返回给用户
        public string token { get; set; }//返回的秘钥
        public string Email { get; set; }//返回的账号
    }
}
5、在ViewModels中在创建一个授权请求对象:AuthenticateRequest.cs,有用户进来表示这里面的数据必须存在的验证
using System.ComponentModel.DataAnnotations;

namespace ShoopingWeb.ViewModels
{
    public class AuthenticateRequest
    {
        [Required]//表示这两个特性必须存在
        public string Email { get; set; }
        [Required]
        public string Password { get; set; }
    }
}
6、添加服务接口:创建文件夹【Services】下面在创建【Interfaces】跟授权有关的接口:IUserService.cs
using ShoopingWeb.Models;
using ShoopingWeb.ViewModels;

namespace ShoopingWeb.Services.Interfaces
{
    public interface IUserService //授权接口
    {//定义一个方法输入账号密码,获取授权token秘钥
        AuthenticateResponse Authenticate(AuthenticateRequest model);//把请求对象发送过去,得到响应对象的token
        User GetById(int id);//通过id获取用户信息
    }
}
7.创建一个类型保存私钥字符串token:创建一个帮助文件夹【Helpers】AuthSettings.cs 做私钥字符串传递
namespace ShoopingWeb.Helpers
{
    public class AuthSettings
    {
        public string Secret { get; set; }//私有秘钥token字符串的数据传递
    }
}
8.实现接口(创建token秘钥)在Services创建【Implmentation】UserService.cs 实现token接口
using Microsoft.Extensions.Options;
using Microsoft.IdentityModel.Tokens;
using ShoopingWeb.Helpers;
using ShoopingWeb.Models;
using ShoopingWeb.Services.Interfaces;
using ShoopingWeb.ViewModels;
using System.IdentityModel.Tokens.Jwt;
using System.Security.Claims;
using System.Text;
namespace ShoopingWeb.Services.Implmentation
{
public class UserService : IUserService //实现接口:创建token秘钥
{
private readonly List<User> _users = new List<User>()
{
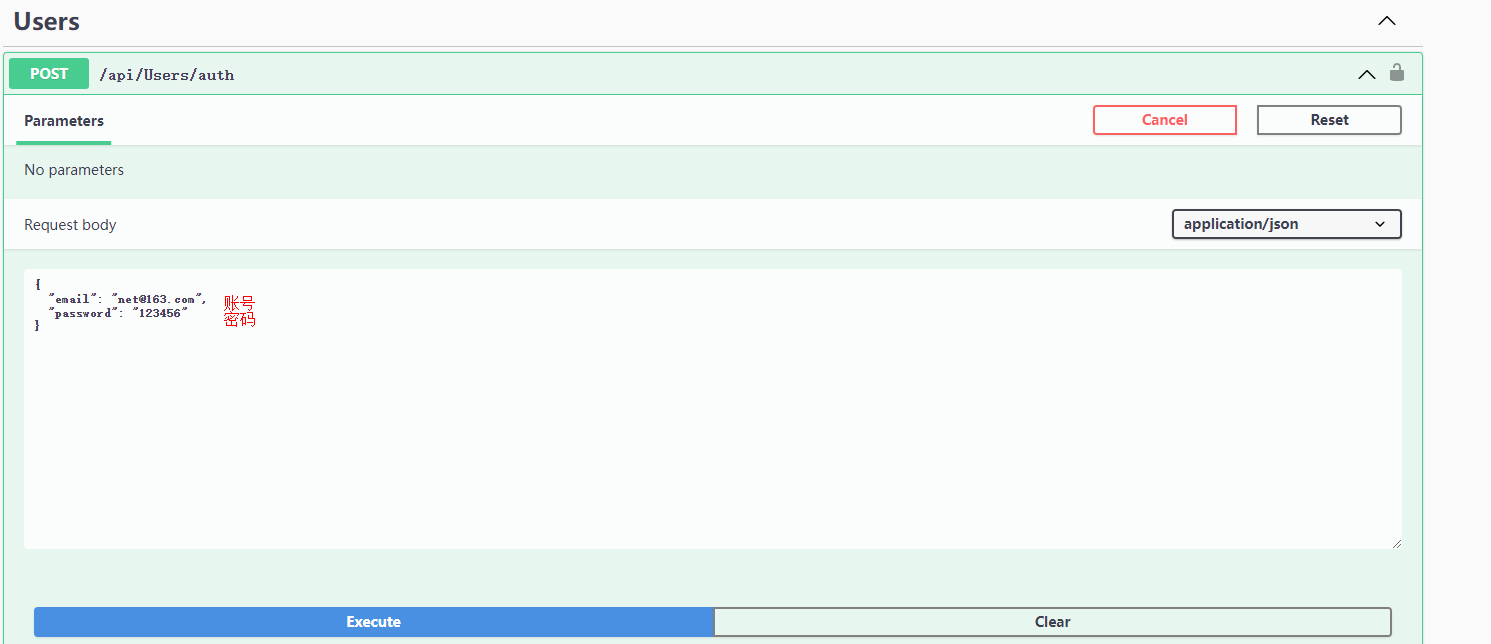
new User{ Id=1,Email="net@163.com",Password="123456"}//充当一个数据库用户表
};
private readonly AuthSettings authSettings;//1.拿到私有秘钥token
public UserService(IOptions<AuthSettings> _AuthSettings) //接口强类型化可以直接拿到appsettings.json里的数据
{
authSettings = _AuthSettings.Value;//IOptions是选项接口,选项类型需要点Value才能拿到值,这里拿到私有秘钥字符串
}
public AuthenticateResponse Authenticate(AuthenticateRequest model)//2、生成token的方法
{
//通过账号密码到数据库验证用户是否存在
var user = _users.SingleOrDefault(u => u.Email == model.Email && u.Password == model.Password);
if (user == null) return null;
var token = GenerateJwtToken(user);//用户存在,就通过方法来【创建令牌】
return new AuthenticateResponse(user, token);//返回用户信息和秘钥token
}
private string GenerateJwtToken(User user)//创建令牌的方法(把用户给他)返回token秘钥
{
byte[] key = Encoding.ASCII.GetBytes(authSettings.Secret);//把秘钥转为ASCII码
var tokenDescriptor = new SecurityTokenDescriptor //token的描述
{ //获取,设置身份信息
Subject = new System.Security.Claims.ClaimsIdentity(new[] {//Identity就是身份,这里就是获取身份信息
new Claim("sub",user.Id.ToString()),//Claim是声明()
new Claim("email",user.Email)//键值对类型,前面是键后面是值。
}),
Expires = DateTime.UtcNow.AddDays(1),//过期时间:国际公共标准数据1天后过期
//明细【证书凭证】参数1:把秘钥给他,参数2:通过算法创建一个证书凭证出来
SigningCredentials = new SigningCredentials(new SymmetricSecurityKey(key),SecurityAlgorithms.HmacSha256Signature)
};
var tokenHandler = new JwtSecurityTokenHandler();//实例化jwt对象,是token处理对象
var token = tokenHandler.CreateToken(tokenDescriptor);//创建token
return tokenHandler.WriteToken(token);//通过写的方法返回,写方法是序列号为json字符串的。
}
public User GetById(int id)
{
return _users.First(u => u.Id == id);//通过id查询到用户信息
}
}
}
9、自定义中间件验证token秘钥:在Helpers中添加验证token的中间件:JwtMiddleware.cs
using Microsoft.Extensions.Options;
using Microsoft.IdentityModel.Tokens;
using Microsoft.VisualBasic.FileIO;
using ShoopingWeb.Services.Interfaces;
using System.IdentityModel.Tokens.Jwt;
using System.Text;

namespace ShoopingWeb.Helpers
{
    public class JwtMiddleware//验证token秘钥的中间件
    {
        private readonly RequestDelegate _next;//请求的委托,这个类型是服务器和客户端之间联系的一个类型
        private readonly AuthSettings _authSettings;//私有秘钥token字符串

        public JwtMiddleware(RequestDelegate next, IOptions<AuthSettings> authSettings)
        {
            _next = next;
            _authSettings = authSettings.Value;//通过IOptions选项类型,强类型,直接拿到配置文件appsettings.json里的字符串token
        }
        //验证从发送方标头提取令牌,要想在中间件里执行方法名必须是:Invoke
        public async Task Invoke(HttpContext context, IUserService service)//参数1:http上下文类型,参数2:接口有获取id的方法
        {//HttpContext是服务器和客户端的联系上下文,从上下文拿到token,下标Authorization是安全配置里取的名字。通过请求头去查有没有这个属性
            var token = context.Request.Headers["Authorization"].FirstOrDefault()?.Split(" ").Last();//不为空就,拆分,last拿最后一个
            if (token != null)
            {
                AttachUserToContext(context, service, token);//验证token
            }
            await _next(context);//调用下一个中间件:一般中间件都需要往下调用,把上下文传给他,他就会往下走了
        }
        //如果验证通过,就获取用户数据
        private void AttachUserToContext(HttpContext context, IUserService service, string token)
        {
            var tokenHandler = new JwtSecurityTokenHandler();//实例化token处理对象
            byte[] key = Encoding.ASCII.GetBytes(_authSettings.Secret);//把秘钥字符串转ASCII码
            tokenHandler.ValidateToken(token, new TokenValidationParameters //验证token方法(参数1:token,参数2:设置验证参数返回token)
            {
                ValidateIssuerSigningKey= true,//验证颁发者的签名key。默认不验证
                IssuerSigningKey=new SymmetricSecurityKey(key),//获取和设置验证后的安全key,通过对称加密对象返回。
                ValidateIssuer=false,//不验证颁发者,默认是打开的
                ValidateAudience=false,//是否用于api,不做验证
                ClockSkew=TimeSpan.Zero//时钟偏移设置为0
            },out var validatedToken);//输出参数,拿到验证后的token
            var jwtToken = (JwtSecurityToken)validatedToken;//类型转换
            var userId = int.Parse(jwtToken.Claims.First(c=>c.Type =="sub").Value);//通过token字符串来查,获取用户id
            context.Items["User"] = service.GetById(userId);//通过id查询到用户信息,保存到上下文里面去
        }
    }
}
10、把【IUserService】和【AuthSettings】两个类型添加到ioc容器,才能直接使用,通过配置系统来配置:Program.cs
//配置节点,可以获取到appsettings.json字符串里的信息,验证token时就可以使用节点里的信息了
builder.Services.Configure<AuthSettings>(builder.Configuration.GetSection(nameof(AuthSettings)));//nameof是动态变化(参数名)
builder.Services.AddScoped<IUserService, UserService>();//用添加范围:注册服务,就可以创建自定义的JwtMiddleware中间件了
app.UseMiddleware<JwtMiddleware>();//使用中间件:自定义验证token秘钥的中间件,必须在授权中间件:app.UseAuthorization();之前调。
11、访问数据需要通过账号和密码,添加api控制器做授权【Controllers】UsersController.cs
using Microsoft.AspNetCore.Http;
using Microsoft.AspNetCore.Mvc;
using ShoopingWeb.Services.Interfaces;
using ShoopingWeb.ViewModels;

namespace ShoopingWeb.Controllers
{
    [Route("api/[controller]")]//路由
    [ApiController]//声明api的控制器
    public class UsersController : ControllerBase//给登录用户进行授权的。
    {
        private readonly IUserService userServivce;//调用授权服务,创建token的方法在里面

        public UsersController(IUserService _userServivce)
        {
            userServivce = _userServivce;//通过构造函数拿到授权服务,拿到token秘钥这些信息
        }
        [HttpPost("auth")]//提交过来的用户数据
        public ActionResult<AuthenticateResponse> actionResult(AuthenticateRequest modle)//方法名在api没用,只是注释
        {
            var response = userServivce.Authenticate(modle);//通过授权方法返回用户信息,参数modle请求的模型是数据验证。
            if (response == null) return BadRequest(new { message = "用户名或密码不正确!" });//请求错误(参数是一个对象)
            return response;//用:IActionResult接口就需要返回Ok(response)方法,泛型就不需要
        }
    }
}
12、最后自定义【Authorize】特性让授权生效,然后把特性放到【CategoryController】控制器里即可,需要授权的页面就放哪个控制器或方法都可以
using Microsoft.AspNetCore.Mvc;
using Microsoft.AspNetCore.Mvc.Filters;
using ShoopingWeb.Models;

namespace ShoopingWeb.Helpers
{
    public class AuthorizeAttribute : Attribute, IAuthorizationFilter//系统特性,添加一个授权接口
    {
        public void OnAuthorization(AuthorizationFilterContext context)
        {
            var user = (User)context.HttpContext.Items["User"];
            if (user == null) //没有查到用户
            {
                context.Result = new JsonResult(new { message = "未授权" })
                {
                    StatusCode= StatusCodes.Status401Unauthorized //401的状态码
                };
            }
        }
    }
}
验证:通过账号和密码返回token

前端
1.登录页:【src】-【auth】-【views】-创建【UserLogin.vue】
<template>
    <div class="login">
        <div class="body">
            <div class="container">
                <h1>用户登录</h1>
                <el-form :model="ruleForm" ref="loginForm" class="login-form" :rules="rules">
                    <el-form-item label="账号" prop="Email">
                        <el-input v-model="ruleForm.Email" />
                    </el-form-item>
                    <el-form-item label="密码" prop="Password">
                        <el-input v-model="ruleForm.Password" type="password" />
                    </el-form-item>
                    <el-button style="width: 100%;" type="primary" @click="submitForm(loginForm)">登录</el-button>
                </el-form>
            </div>
        </div>
    </div>
</template>
<script setup>
import {reactive,toRefs,ref} from 'vue'
import {useStore} from 'vuex'//全局变量
const store =useStore()//实例化对象,全局变量
const loginForm = ref() //模板的引用对象
const state = reactive({//reactive可以定义对象
    ruleForm:{Email:"net@163.com",Password:"123456"}
})

const rules = reactive({//验证表单输入内容
    Email: [{ required: true,message:"请输入账号!", trigger: 'blur' }],
    Password: [{ required: true,message:"请输入密码!", trigger: 'blur' }],
})

const submitForm = async(formEl) => { //async是异步编程,多线程任务
  if (!formEl) return
  await formEl.validate((valid) => {//async必须有await来执行任务
    if (valid) {
      console.log('验证通过进行登录!')
      //dispatch异步操作方法(模块名/下面的异步方法,参数登录的数据账号密码)
      store.dispatch('authModule/userLoginAction',state.ruleForm)
    } else {
      console.log('error submit!')
      return false
    }
  })
}

const {ruleForm} = toRefs(state)//将reactive转为ref不需要点value取值

</script>
<style scoped>
.login {
    background: url("../../assets/login.jpg");
    width: 100%;
    height: 100%;
    position: fixed;/*固定 */
    background-size: cover;/*覆盖 */
}
.body{
    display: flex;/*显示方式 */
    justify-content: center;/*居中 */
    align-items: center;/*居中 */
    margin-top: 15%;
}
.container{
    display: flex;
    justify-content: center;
    align-items: center;
    flex-direction: column;/*垂直居中对齐 */
    width: 420px;
    height: 250px;
    background-color: #fff;
    border-radius: 10px;
    box-shadow: 0px 21px 41px 0px rgba(red, green, blue, alpha);
}
</style>
登录执行方法:【src】-【auth】-创建【auth.service.js】因为登录后返回token,其他地方也会用到所以单独写
import axios from "@/api/api_config"//获取和请求后台数据,@表示src目录,
import router from "@/router"//页面跳转的路由对象
import * as jwt from "jsonwebtoken"//token的解析库,需要添加 npm add jsonwebtoken 库
//登录方法(登录的信息)
export const loginUser=async(login)=>{//async是异步编程,多线程任务
    return await axios.post('Users/auth',login)
}
const key='tokenKey'//用来保存token,以键值对的形式保存,定义键值对的键名
export const getToken=()=>{//从浏览器本地存储获取token值
    return localStorage.getItem(key)//localStorage是浏览器存储属性f12的存储可以看,跟cookie类似
}
export const logOut=()=>{//清楚token
    //localStorage.clear()//清除所有
    localStorage.removeItem(key)//移除某一个选项,这里只清除token
    router.replace('/login')//返回登录页面
}
//不需要设置token,因为只有登录时用到一次
//检查token过期时间 需要添加 npm add jsonwebtoken 库
export const isTokenFromLocalStorageVaild =()=>{
    const token = localStorage.getItem(key)//拿到浏览器本地token在localStorage存储里
    if(!token)return false
    const decoded = jwt.decode(token)//解析token,网站jwt.io
    const dateNow = Date.now() //当前前时间
    const expiresAt=decoded.exp*1000 //过期时间,乘1000变毫秒,时间戳(10位秒,13位毫秒)
    return dateNow <= expiresAt
} //5.0以下需要安装模块:npm add node-polyfill-webpack-plugin,这个是插件
模块还需要配置【vue.config.js】配置好需要重启项目。
const NodePolyfillPlugin = require('node-polyfill-webpack-plugin')
const { defineConfig } = require('@vue/cli-service')
module.exports = defineConfig({//会覆盖webpack默认配置
  transpileDependencies: true,
  devServer:{//开发环境的服务器配置
    open:true,//是否自动打开浏览器
    host:"localhost",
    port:8080,//修改默认端口
    proxy:{//通过代理的方式
      "/api":{
        target:"https://localhost:7135/api/",//服务器请求地址,在后台Properties--》launchSettings.json中
        secure:false,//HTTPS需要配置这个参数
        changeOrigin:true,//请求头host属性,默认false发本机ip。true会把host设置为target的值。
        pathRewrite:{'^/api':''}//路径重写,(正则表达式)识别api路径替换为空字符串。
      }
    }
  },
  configureWebpack:{//验证token那里需要用到的配置模块
    plugins:[new NodePolyfillPlugin()]
  }
})
全局变量:【src】-【store】-【index.js】
import { createStore } from 'vuex' //Store状态管理,类似全局变量
import authModule from './auth/index'//定义的模块换代码导入进来

export default createStore({
  state: {//全局变量
  },
  getters: {//全局变量的计算属性,类似方法,无缓存
  },
  mutations: {//方法,有缓存,方法用来修改全局变量的值
  },
  actions: {//异步修改,也是写方法的,用来修改全局变量的值
  },
  modules: {//模块化,代码多就需要归一,相当于总路由
    authModule
  }
})
登录状态管理:模块化的方式,如果所有代码都写在全局变量里会很多,所以创建文件提前出来【store】-【auth】-【index.js】
import { loginUser,logOut } from "@/auth/auth.service"//登录方法和退出
import router from "@/router"
const authModule={
    namespaced:true,//namespaced告诉使用者或者调用时需要加命名空间才能用
    state: {//全局变量
        signInState:{ //定义登录信息状态的一个对象
            emial:'',//登录账号
            exp:Date.now(),//过期时间
            sub:"",//后台设置的用户id
            token:null,//秘钥值
        }
    },
    getters: {//全局变量的计算属性,类似方法,无缓存
    },
    mutations: {//方法,有缓存,方法用来修改全局变量的值
        userLogin(state,token){//修改token(修改的对象,传参要修改的值)
            state.signInState.token = token
            localStorage.setItem("tokenKey",token)//保存到浏览器本地存储f12的属性可以看
        }
    },
    actions: {//异步修改,也是写方法的,用来修改全局变量的值
        async userLoginAction({commit},login){//登录(提交用commit是vuex的执行方法,参数2登录信息)
            const {data} = await loginUser(login)//登录
            commit('userLogin',data.token)//commit是同步操作方法,另外dispatch异步操作方法,
            router.replace('/')//登录成功跳转首页
        },
        logout(){//退出登录的方法
            logOut();//移除token
        }
    }
}

export default authModule //当做模块化的形式导出去
Axios拦截器:前后端访问之间做拦截。【src】-【api】-【api_config.js】
import axios from "axios" //请求库
axios.defaults.baseURL="http://localhost:8080/api/" //基础路径,做请求前缀。
axios.defaults.headers['X-Requested-With']="XMLHttpRequest" //请求类型:异步请求
axios.defaults.headers.post['Content-Type']='application/json' //post以json格式提交到后台

import {getToken} from '@/auth/auth.service'
import {ElMessage} from 'element-plus'//导入ui库框架的提示框
axios.interceptors.request.use(options=>{//token拦截器
    const jwtToken=getToken()//通过方法获取token
    if(jwtToken){
        options.headers.Authorization=`Bearer ${jwtToken}` //为请求添加token
    }
    return options //返回后台的信息给下面的res参数
})
axios.interceptors.response.use(res=>{ //响应拦截,res就是返回的状态码
    return res
}),error=>{
    ElMessage({//ui库框架的提示框
        message:error.response.data.message,//显示后台未授权信息
        type:"error"
    })
    return error
};

export default axios;
首页的退出登录按钮
<el-dropdown-item @click="Logout">退出</el-dropdown-item>

<script setup>
import { useStore } from 'vuex';
const store=useStore();
const Logout=()=>{//退出按钮
    store.dispatch("authModule/logout");//退出登录,清除token
}
</script>
token过期不能访问其他页面。【router】-【index.js】
路由守卫:3种全局,独享(某个路由),组件(某一个组件内),学三种就够了
守卫:就是跳转【前后】做什么事情,比如:A->B
to:获取到路由的目的地,获取到B
from:获取到从哪里来的路由,获取到A
next():表示继续/下一步(1.next()下一步什么都不做,2.next("/login")跳转登录页,3.next(false)取消当前导航)
router.beforeEach((to,from,next)=>{//全局守卫是参数是一个方法
  //const thisPath = from.fullPath
  if(to.path =="/login"){//访问的是登录页
    if(getToken() && isTokenFromLocalStorageVaild()){//有token并且没过期
      next("/")//跳转到首页
    }else{
      next();//放行登录页
    }
  }else{//其他页面
    if(getToken() && isTokenFromLocalStorageVaild()){//判断token是否存在
      next();//继续下一页
    }else{//如果token失效
      next("/login");
    }
  }
})