https://learn.microsoft.com/en-us/dotnet/core/install/windows?tabs=net60#dependencies
https://blog.csdn.net/weixin_43596442/article/details/119801821
In this article, you'll learn how to install .NET on Windows. .NET is made up of the runtime and the SDK. The runtime is used to run a .NET app and may or may not be included with the app. The SDK is used to create .NET apps and libraries. The .NET runtime is always installed with the SDK.
The latest version of .NET is 7.
There are two types of supported releases, Long Term Support (LTS) releases or Standard Term Support (STS). The quality of all releases is the same. The only difference is the length of support. LTS releases get free support and patches for 3 years. STS releases get free support and patches for 18 months. For more information, see .NET Support Policy.
The following table lists the support status of each version of .NET (and .NET Core):
| ✔️ Supported | ❌ Unsupported |
|---|---|
| 7 (STS) | 5 |
| 6 (LTS) | 3.1 |
| 3.0 | |
| 2.1 | |
| 2.0 | |
| 1.1 | |
| 1.0 |
Install with Windows Package Manager (winget)
You can install and manage .NET through the Windows Package Manager service, using the winget tool. For more information about how to install and use winget, see Use the winget tool.
If you're installing .NET system-wide, install with administrative privileges.
Install the SDK
The .NET SDK allows you to develop apps with .NET. If you install the .NET SDK, you don't need to install the corresponding runtimes. To install the .NET SDK, run the following command:
winget install Microsoft.DotNet.SDK.7
Install the runtime
For Windows, there are three .NET runtimes you can install. You should install both the .NET Desktop Runtime and the ASP.NET Core Runtime to ensure that you're compatible with all types of .NET apps.
-
.NET Desktop Runtime
This runtime includes the base .NET runtime, and supports Windows Presentation Foundation (WPF) and Windows Forms apps that are built with .NET. This isn't the same as .NET Framework, which comes with Windows.
Windows Command Promptwinget install Microsoft.DotNet.DesktopRuntime.7 -
ASP.NET Core Runtime
This runtime includes the base .NET runtime, and runs web server apps. The ASP.NET Core Runtime allows you to run apps that were made with .NET that didn't provide the runtime. The following commands install the ASP.NET Core Runtime, which is the most compatible runtime for .NET. In your terminal, run the following commands:
Windows Command Promptwinget install Microsoft.DotNet.AspNetCore.7 -
.NET Runtime
This is the base runtime, and contains just the components needed to run a console app. Typically, you'd install the other runtimes.
Windows Command Promptwinget install Microsoft.DotNet.Runtime.7
You can install preview versions of the runtimes by substituting the version number, such as 6, with the word Preview. The following example installs the preview release of the .NET Desktop Runtime:
winget install Microsoft.DotNet.DesktopRuntime.Preview
Install alongside Visual Studio Code
Visual Studio Code is a powerful and lightweight source code editor that runs on your desktop. Visual Studio Code is available for Windows, macOS, and Linux.
While Visual Studio Code doesn't come with an automated .NET Core installer like Visual Studio does, adding .NET Core support is simple.
- Download and install Visual Studio Code.
- Download and install the .NET SDK.
- Install the C# extension from the Visual Studio Code marketplace.
Install with Windows Installer
The download page for .NET provides Windows Installer executables.
When you use the Windows installers to install .NET, you can customize the installation path by setting the DOTNETHOME_X64 and DOTNETHOME_X86 parameters:
dotnet-sdk-7.0.100-win-x64.exe DOTNETHOME_X64="F:\dotnet\x64" DOTNETHOME_X86="F:\dotnet\x86"
If you want to install .NET silently, such as in a production environment or to support continuous integration, use the following switches:
-
/install
Installs .NET. -
/quiet
Prevents any UI and prompts from displaying. -
/norestart
Suppresses any attempts to restart.
dotnet-sdk-7.0.100-win-x64.exe /install /quiet /norestart
For more information, see Standard Installer Command-Line Options.
Tip
The installer returns an exit code of 0 for success and an exit code of 3010 to indicate that a restart is required. Any other value is generally an error code.
Install with PowerShell automation
The dotnet-install scripts are used for CI automation and non-admin installs of the runtime. You can download the script from the dotnet-install script reference page.
The script defaults to installing the latest long term support (LTS) version, which is .NET 6. You can choose a specific release by specifying the Channel switch. Include the Runtime switch to install a runtime. Otherwise, the script installs the SDK.
The following command installs the ASP.NET Core runtime for maximum compatibility. The ASP.NET Core runtime also includes the standard .NET runtime.
dotnet-install.ps1 -Channel 7.0 -Runtime aspnetcore
Install the SDK by omitting the -Runtime switch. The -Channel switch is set in this example to STS, which installs the latest Standard Term Support version (.NET 7).
dotnet-install.ps1 -Channel STS
Install with Visual Studio
If you're using Visual Studio to develop .NET apps, the following table describes the minimum required version of Visual Studio based on the target .NET SDK version.
| .NET SDK version | Visual Studio version |
|---|---|
| 7 | Visual Studio 2022 version 17.4 or higher. |
| 6 | Visual Studio 2022 version 17.0 or higher. |
| 5 | Visual Studio 2019 version 16.8 or higher. |
| 3.1 | Visual Studio 2019 version 16.4 or higher. |
| 3.0 | Visual Studio 2019 version 16.3 or higher. |
| 2.2 | Visual Studio 2017 version 15.9 or higher. |
| 2.1 | Visual Studio 2017 version 15.7 or higher. |
If you already have Visual Studio installed, you can check your version with the following steps.
- Open Visual Studio.
- Select Help > About Microsoft Visual Studio.
- Read the version number from the About dialog.
Visual Studio can install the latest .NET SDK and runtime.
Select a workload
When installing or modifying Visual Studio, select one or more of the following workloads, depending on the kind of application you're building:
- The .NET Core cross-platform development workload in the Other Toolsets section.
- The ASP.NET and web development workload in the Web & Cloud section.
- The Azure development workload in the Web & Cloud section.
- The .NET desktop development workload in the Desktop & Mobile section.

Supported releases
The following table is a list of currently supported .NET releases and the versions of Windows they're supported on. These versions remain supported until either the version of .NET reaches end-of-support or the version of Windows reaches end-of-life.
Windows 10 versions end-of-service dates are segmented by edition. Only Home, Pro, Pro Education, and Pro for Workstations editions are considered in the following table. Check the Windows lifecycle fact sheet for specific details.
Tip
A + symbol represents the minimum version.
| Operating System | .NET 7 | .NET 6 |
|---|---|---|
| Windows 11 | ✔️ | ✔️ |
| Windows Server 2022 | ✔️ | ✔️ |
| Windows Server, Version 1903 or later | ✔️ | ✔️ |
| Windows 10, Version 1607 or later | ✔️ | ✔️ |
| Windows 8.1 | ❌ | ✔️ |
| Windows 7 SP1 ESU | ❌ | ✔️ |
| Windows Server 2019 Windows Server 2016 Windows Server 2012 R2 Windows Server 2012 |
✔️ | |
| Windows Server Core 2012 R2 | ✔️ | ✔️ |
| Windows Server Core 2012 | ✔️ | ✔️ |
| Nano Server, Version 1809+ | ✔️ | ✔️ |
| Nano Server, Version 1803 | ❌ | ❌ |
For more information about .NET 7 supported operating systems, distributions, and lifecycle policy, see .NET 7 Supported OS Versions.
Unsupported releases
The following versions of .NET are ❌ no longer supported:
- .NET 5
- .NET Core 3.1
- .NET Core 3.0
- .NET Core 2.2
- .NET Core 2.1
- .NET Core 2.0
Runtime information
The runtime is used to run apps created with .NET. When an app author publishes an app, they can include the runtime with their app. If they don't include the runtime, it's up to the user to install the runtime.
There are three different runtimes you can install on Windows:
-
ASP.NET Core runtime
Runs ASP.NET Core apps. Includes the .NET runtime. -
Desktop runtime
Runs .NET WPF and Windows Forms desktop apps for Windows. Includes the .NET runtime. -
.NET runtime
This runtime is the simplest runtime and doesn't include any other runtime. It's highly recommended that you install both ASP.NET Core runtime and Desktop runtime for the best compatibility with .NET apps.
SDK information
The SDK is used to build and publish .NET apps and libraries. Installing the SDK includes all three runtimes: ASP.NET Core, Desktop, and .NET.
Arm-based Windows PCs
The following sections describe things you should consider when installing .NET on an Arm-based Windows PC.
What's supported
The following table describes which versions of .NET are supported on an Arm-based Windows PC:
| .NET Version | Architecture | SDK | Runtime | Path conflict |
|---|---|---|---|---|
| 7 | Arm64 | Yes | Yes | No |
| 7 | x64 | Yes | Yes | No |
| 6 | Arm64 | Yes | Yes | No |
| 6 | x64 | Yes | Yes | No |
| 5 | Arm64 | Yes | Yes | Yes |
| 5 | x64 | No | Yes | Yes |
Starting with .NET 6, the x64 and Arm64 versions of the .NET SDK exist independently from each other. If a new version is released, each architecture install needs to be upgraded.
Path differences
On an Arm-based Windows PC, all Arm64 versions of .NET are installed to the normal C:\Program Files\dotnet\ folder. However, when you install the x64 version of .NET 6 SDK or .NET 7 SDK, it's installed to the C:\Program Files\dotnet\x64\ folder.
Path conflicts
Starting with .NET 6, the x64 .NET SDK installs to its own directory, as described in the previous section. This allows the Arm64 and x64 versions of the .NET SDK to exist on the same machine. However, any x64 SDK prior to 6 isn't supported and installs to the same location as the Arm64 version, the C:\Program Files\dotnet\ folder. If you want to install an unsupported x64 SDK, you'll need to first uninstall the Arm64 version. The opposite is also true, you'll need to uninstall the unsupported x64 SDK to install the Arm64 version.
Path variables
Environment variables that add .NET to system path, such as the PATH variable, may need to be changed if you have both the x64 and Arm64 versions of the .NET SDK installed. Additionally, some tools rely on the DOTNET_ROOT environment variable, which would also need to be updated to point to the appropriate .NET SDK installation folder.
Dependencies
The following Windows versions are supported with .NET 6:
Note
A + symbol represents the minimum version.
| OS | Version | Architectures |
|---|---|---|
| Windows 11 | 21H2+ | x64, Arm64 |
| Windows 10 Client | 1607+ | x64, x86, Arm64 |
| Windows Client | 7 SP1+, 8.1 | x64, x86 |
| Windows Server | 2012+ | x64, x86 |
| Windows Server Core | 2012+ | x64, x86 |
| Nano Server | 1809+ | x64 |
For more information about .NET 6 supported operating systems, distributions, and lifecycle policy, see .NET 6 Supported OS Versions.
Offline install for Windows 7
Important
This section only applies to .NET Core 2.1.
When doing an offline install for .NET Core 2.1 on Windows 7, you'll first need to make sure that the latest Microsoft Root Certificate Authority 2011 has been installed on the target machine.
The certmgr.exe tool can automate installing a certificate and is obtained from Visual Studio or the Windows SDK. The following command is used to install the certificate before running the .NET Core 2.1 installer:
certmgr.exe /add MicRooCerAut2011_2011_03_22.crt /s /r localMachine root
Be sure to review the dependencies required for Windows 7 below.
Windows 7 / 8.1 / Server 2012
More dependencies are required if you're installing the .NET SDK or runtime on the following Windows versions:
| Operating System | Prerequisites |
|---|---|
| Windows 7 SP1 ESU | - Microsoft Visual C++ 2015-2019 Redistributable 64-bit / 32-bit - KB3063858 64-bit / 32-bit - Microsoft Root Certificate Authority 2011 (.NET Core 2.1 offline installer only) |
| Windows 8.1 | Microsoft Visual C++ 2015-2019 Redistributable 64-bit / 32-bit |
| Windows Server 2012 | Microsoft Visual C++ 2015-2019 Redistributable 64-bit / 32-bit |
| Windows Server 2012 R2 | Microsoft Visual C++ 2015-2019 Redistributable 64-bit / 32-bit |
The previous requirements are also required if you receive an error related to either of the following dlls:
- api-ms-win-crt-runtime-l1-1-0.dll
- api-ms-win-cor-timezone-l1-1-0.dll
- hostfxr.dll
Docker
Containers provide a lightweight way to isolate your application from the rest of the host system. Containers on the same machine share just the kernel and use resources given to your application.
.NET can run in a Docker container. Official .NET Docker images are published to the Microsoft Container Registry (MCR) and are discoverable at the Microsoft .NET Docker Hub repository. Each repository contains images for different combinations of the .NET (SDK or Runtime) and OS that you can use.
Microsoft provides images that are tailored for specific scenarios. For example, the ASP.NET Core repository provides images that are built for running ASP.NET Core apps in production.
For more information about using .NET in a Docker container, see Introduction to .NET and Docker and Samples.
Troubleshooting
After installing the .NET SDK, you may run into problems trying to run .NET CLI commands. This section collects those common problems and provides solutions.
It was not possible to find any installed .NET Core SDKs
Most likely you've installed both the x86 (32-bit) and x64 (64-bit) versions of the .NET SDK. This is causing a conflict because when you run the dotnet command it's resolving to the x86 version when it should resolve to the x64 version. This is usually fixed by adjusting the %PATH% variable to resolve the x64 version first.
-
Verify that you have both versions installed by running the
where.exe dotnetcommand. If you do, you should see an entry for both the Program Files\ and Program Files (x86)\ folders. If the Program Files (x86)\ folder is first as indicated by the following example, it's incorrect and you should continue on to the next step.Windows Command Prompt> where.exe dotnet C:\Program Files (x86)\dotnet\dotnet.exe C:\Program Files\dotnet\dotnet.exeIf it's correct and the Program Files\ is first, you don't have the problem this section is discussing and you should create a .NET help request issue on GitHub
-
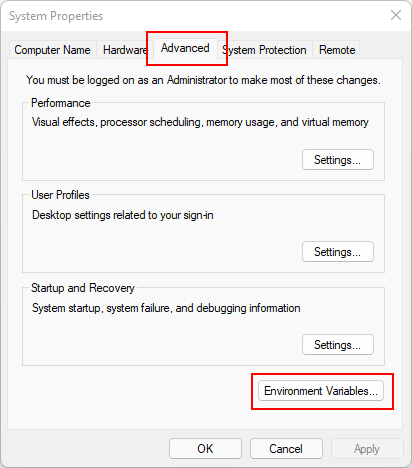
Press the Windows button and type "Edit the system environment variables" into search. Select Edit the system environment variables.

-
The System Properties window opens up to the Advanced Tab. Select Environment Variables.
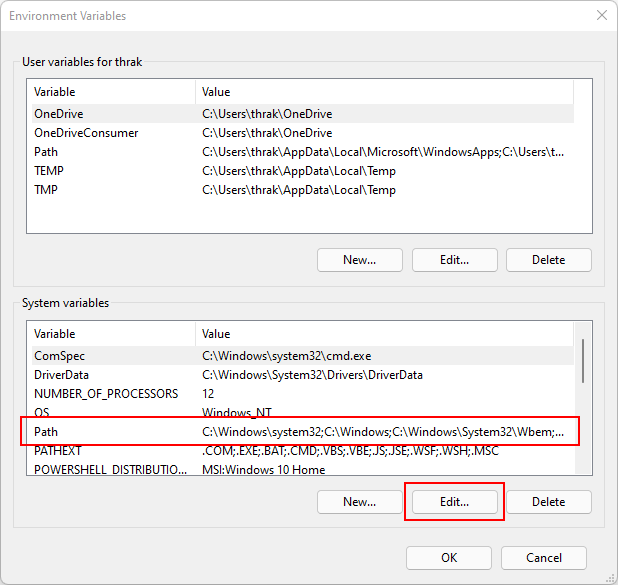
-
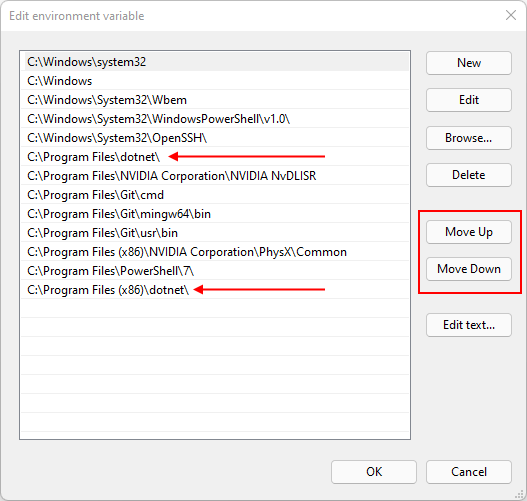
On the Environment Variables window, under the System variables group, select the Path* row and then select the Edit button.
-
Use the Move Up and Move Down buttons to move the C:\Program Files\dotnet\ entry above C:\Program Files (x86)\dotnet\.