一、 数据如何存储在MongoDB中
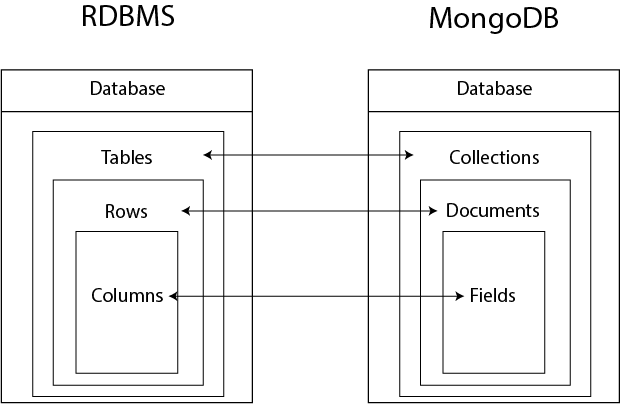
与传统的RDBMS关系型数据库不同,MongoDB并没有表Table,行row和列column的概念。它将数据存储在集合collections,文档documents和字段fields中。下图说明了与RDBMS类比的结构之间的关系:
二、操作
1、连接
创建一个全局的 mongocxx::instance 对象。然后使用 mongocxx::uri 创建一个 mongocxx::client 对象,这个对象代表一个 MongoDB 连接
    mongocxx::instance inst{};
    mongocxx::client conn{mongocxx::uri{"mongodb://localhost/27017"}};
    if (!conn.operator bool()) {
        printf("连接失败!");
    }
    printf("连接成功!");
2、断开连接时自动重新连接
使用了 mongocxx::options::client 对象 opts 来设置一些连接选项。通过设置 max_pool_size 为 1,将连接池的大小限制为 1,这样可以确保当连接断开时,马上进行重连。heartbeat_freq 指定了心跳间隔,以便在连接断开后能够及时检测并重连。
值得注意的是,尽管设置了自动重连,在对数据库进行操作时还是需要处理可能的连接错误。对于读操作,需要在错误发生时重新执行操作,而对于写操作,可能需要确保操作等,以防止数据重复插入。
mongocxx::instance inst{};
mongocxx::options::client opts;
opts.max_pool_size(1);
opts.heartbeat_freq(std::chrono::seconds(10));
mongocxx::client conn{mongocxx::uri{}, opts};
3、访问数据库
有了一个连接到 MongoDB 服务的 mongocxx::client实例。就可以使用 database() 方法或者 [] 操作获得一个 mongocxx::database 实例。
如果访问的数据库不存在,MongoDB 会在第一次存储数据时创建这个数据库。
mongocxx::database db = client["mydb"];
4、访问集合
有了一个 mongocxx::database 实例,你就可以使用 collection() 方法或者 [] 操作获得一个 mongocxx::collection 实例。
如果访问的集合不存在,MongoDB 会在第一次存储数据时创建这个集合。
mongocxx::collection coll = db["test"];
5、创建一个文档
两个可用的生成器接口(builder interfaces)中选择一个使用:
流生成器(Stream builder):bsoncxx::builder::stream 一个使用流操作的文档生成器,在构建文字文档时表现较好。
基本生成器(Basic builder):bsoncxx::builder::basic 生成器实例中更加方便的文档生成器,包含了一些调用方法。
使用 bsoncxx::builder::stream::finalize 获得一个 bsoncxx::document::value 的实例。
bsoncxx::document::value 类型是一个拥有独立存储的只读对象。为了使用它,必须使用其 view() 方法获得一个 bsoncxx::document::view 对象:
使用
[]操作 访问文档中的字段,这将会返回一个 bsoncxx::document::element 实例。name 中的值不是字符串且你没有在上面代码中包含类型检查,这个代码将会抛出 bsoncxx::exception 实例/*
{
"name" : "MongoDB",
"type" : "database",
"count" : 1,
"versions": [ "v3.2", "v3.0", "v2.6" ],
"info" : {
"x" : 203,
"y" : 102
}
}
*/
#include <cstdint>
#include <iostream>
#include <vector>
#include <bsoncxx/json.hpp>
#include <mongocxx/client.hpp>
#include <mongocxx/stdx.hpp>
#include <mongocxx/uri.hpp>
// 官方文档中缺少以下语句
#include <bsoncxx\builder\stream\document.hpp>
#include <mongocxx\instance.hpp>
using bsoncxx::builder::stream::close_array;
using bsoncxx::builder::stream::close_document;
using bsoncxx::builder::stream::document;
using bsoncxx::builder::stream::finalize;
using bsoncxx::builder::stream::open_array;
using bsoncxx::builder::stream::open_document;
int main(int,char**)
{
mongocxx::instance instance{}; // This should be done only once.
mongocxx::uri uri("mongodb://localhost:27017");
mongocxx::client client(uri);
mongocxx::database db = client["mydb"]; // 访问数据库
mongocxx::collection coll = db["test"]; // 访问集合
// 构造 JSON 文档
auto builder = bsoncxx::builder::stream::document{};
bsoncxx::document::value doc_value = builder
<< "name" << "MongoDB"
<< "type" << "database"
<< "count" << 1
<< "versions" << bsoncxx::builder::stream::open_array
<< "v3.2" << "v3.0" << "v2.6"
<< close_array
<< "info" << bsoncxx::builder::stream::open_document
<< "x" << 203
<< "y" << 102
<< bsoncxx::builder::stream::close_document
<< bsoncxx::builder::stream::finalize;
// 访问 JSON 文档 string 字段
bsoncxx::document::view view = doc_value.view();
bsoncxx::document::element element = view["name"];
if (element.type() != bsoncxx::type::k_utf8)
{
std::cout << "name type error." << std::endl;
}
std::string name = element.get_utf8().value.to_string();
std::cout << "name:" << std::endl;
std::cout << name << std::endl;
// 访问 JSON 文档 array 字段
element = view["versions"];
if (element.type() != bsoncxx::type::k_array)
{
std::cout << "versions type error." << std::endl;
}
bsoncxx::array::view version = element.get_array().value; // 获取到的元素为 array view
std::cout << "version:" << std::endl;
for each (bsoncxx::array::element var in version)
{
std::string value = var.get_utf8().value.to_string(); // 此处不再进行类型检查,检查是否为 string 的方法和上面相同
std::cout << value<<" ";
}
std::cout << std::endl;
// 访问 JSON 文档 document 字段
element = view["info"];
if (element.type() != bsoncxx::type::k_document)
{
std::cout << "info type error." << std::endl;
}
bsoncxx::document::view info = element.get_document().value; // 获取到的元素依然为 document view
std::cout << "info:" << std::endl;
bsoncxx::document::element ele1 = info["x"];
if (ele1.type() != bsoncxx::type::k_int32)
std::cout << "ele1 type error" << std::endl;
int x = ele1.get_int32().value;
std::cout << "x: " << x << std::endl;
int y = info["y"].get_int32().value; // 如果不做参数类型检查,可以使用这种简单的方式
std::cout << "y: " << y << std::endl;
system("pause");
return 0;
}
6、插入
创建或插入操作将新文档添加到集合。如果集合当前不存在,则插入操作将创建集合。
在MongoDB中,插入操作以单个集合为目标。MongoDB中的所有写操作都是单个文档级别的原子操作。
直接插入json字符
mongoInit();
auto client = mongoClient();
auto places = (*client)["places"]["places"];
    std::string doc = "{"
        "\"col_protocol_type\": \"PM3\","
        "\"channel\" : \"1\","
        "\"time\" : \"2023-08-11 15:39:57.271\","
        "\"name\" : \"回路1温度\","
        "\"unit\" : \"℃\","
        "\"max\" : ["
        "38.0,"
        "100"
        "] ,"
        "\"min\" : ["
        "28.0,"
        "8"
        "] }";

bsoncxx::document::value josn = bsoncxx::from_json(string_To_UTF8(doc));
places.insert_one(josn.view());
mongoQuit();
三、插入中文方法:
1、需要转换utf8字符串
#include <Windows.h>
using namespace std;

std::string string_To_UTF8(const std::string& str)
{
    int nwLen = ::MultiByteToWideChar(CP_ACP, 0, str.c_str(), -1, NULL, 0);

    wchar_t* pwBuf = new wchar_t[nwLen + 1];//一定要加1,不然会出现尾巴
    ZeroMemory(pwBuf, nwLen * 2 + 2);

    ::MultiByteToWideChar(CP_ACP, 0, str.c_str(), str.length(), pwBuf, nwLen);

    int nLen = ::WideCharToMultiByte(CP_UTF8, 0, pwBuf, -1, NULL, NULL, NULL, NULL);

    char* pBuf = new char[nLen + 1];
    ZeroMemory(pBuf, nLen + 1);

    ::WideCharToMultiByte(CP_UTF8, 0, pwBuf, nwLen, pBuf, nLen, NULL, NULL);

    std::string retStr(pBuf);

    delete[]pwBuf;
    delete[]pBuf;

    pwBuf = NULL;
    pBuf = NULL;

    return retStr;
}
2、添加数据库配置文件mongod.cfg
engine: wiredTiger
  wiredTiger:
    engineConfig:
      directoryForIndexes: true
      collectionConfig:
        blockCompressor: none
      indexConfig:
        prefixCompression: true
  mmapv1:
    smallFiles: true
  replication:
    replSetName: "rs0"
参考文献:
1、https://blog.csdn.net/weixin_44834554/article/details/127057842
2、https://www.python100.com/html/71390.html
3、https://codeleading.com/article/29143068957/
4、https://www.jianshu.com/p/0959d2221f43