numpy 库常见函数的介绍
<1>. numpy创建数组
1. 从已有数据中创建数组
a. 将列表转换成 ndarray:
import numpy as np
ls1 = [10, 42, 0, -17, 30]
nd1 =np.array(ls1)
print(nd1)
print(type(nd1))
运行结果:
[ 10  42   0 -17  30]
<class 'numpy.ndarray'>
b.嵌套列表可以转换成多维 ndarray:
import numpy as np
ls2 = [[8, -2, 0, 34, 7], [6, 7, 8, 9, 10]]
nd2 =np.array(ls2)
print(nd2)
print(type(nd2))
运行结果:
[[ 8 -2  0 34  7]
[ 6  7  8  9 10]]
<class 'numpy.ndarray'>
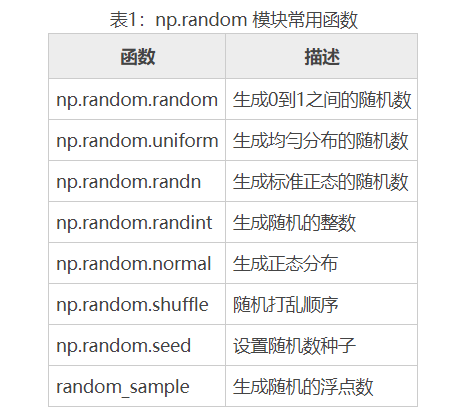
2. 利用 random 模块生成数组
几种 np.random 模块中常用的方法,如下表所示。
下面来看一些使用:
import numpy as np
import random
nd3 =np.random.random([4, 3])  #生成4行3列的数组
print(nd3)
print("nd3的形状为:",nd3.shape)
执行结果:
[[0.59115057 0.52022516 0.05992361]
 [0.5077815  0.81313999 0.70061259]
 [0.24654561 0.11705634 0.71399966]
 [0.73964407 0.57138345 0.89284498]]
nd3的形状为: (4, 3)
为了每次生成同一份数据,可以指定一个随机种子,使用 shuffle() 函数打乱生成的随机数。

import numpy as np
np.random.seed(123)
nd4 = np.random.randn(4, 3)
print(nd4)
np.random.shuffle(nd4)
print("随机打乱后数据:")
print(nd4)
print(type(nd4))
执行结果:
[[-1.0856306   0.99734545  0.2829785 ]
 [-1.50629471 -0.57860025  1.65143654]
 [-2.42667924 -0.42891263  1.26593626]
 [-0.8667404  -0.67888615 -0.09470897]]
随机打乱后数据:
[[-1.50629471 -0.57860025  1.65143654]
 [-2.42667924 -0.42891263  1.26593626]
 [-0.8667404  -0.67888615 -0.09470897]
 [-1.0856306   0.99734545  0.2829785 ]]
<class 'numpy.ndarray'>
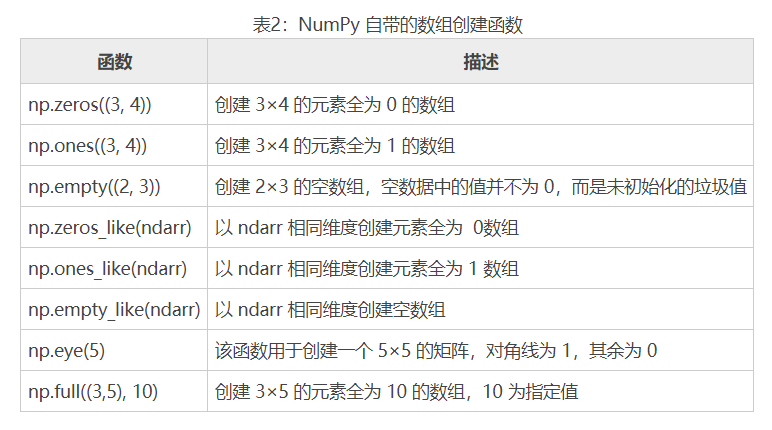
3. 创建特定形状的多维数组
参数初始化时,有时需要生成一些特殊矩阵,如全是 0 或 1 的数组或矩阵,这时我们可以利用 np.zeros、np.ones、np.diag 来实现,如下表所示。
下面通过几个示例说明:
import numpy as np
# 生成全是 0 的 3x3 矩阵
nd5 =np.zeros([3, 3])
# 生成全是 1 的 3x3 矩阵
nd6 = np.ones([3, 3])
# 生成 4 阶的单位矩阵
nd7 = np.eye(4)
# 生成 4 阶对角矩阵
nd8 = np.diag([1, 8, 3, 10])
print("nd5 =\n", nd5)
print("nd6 =\n", nd6)
print("nd7 =\n", nd7)
print("nd8 =\n", nd8)
运行结果:
nd5 =
[[0. 0. 0.]
[0. 0. 0.]
[0. 0. 0.]]
nd6 =
[[1. 1. 1.]
[1. 1. 1.]
[1. 1. 1.]]
nd7 =
[[1. 0. 0. 0.]
[0. 1. 0. 0.]
[0. 0. 1. 0.]
[0. 0. 0. 1.]]
nd8 =
[[ 1  0  0  0]
[ 0  8  0  0]
[ 0  0  3  0]
[ 0  0  0 10]]
有时还可能需要把生成的数据暂时保存到文件中,以备后续使用。
import numpy as np
nd9 =np.random.random([3, 5])
np.savetxt(X=nd9, fname='./data.txt')
nd10 = np.loadtxt('./data.txt')
print(nd10)
运行结果:
[[0.1744383  0.15515217 0.74885812 0.57633094 0.06300636]
[0.24340527 0.65213913 0.07284238 0.52232677 0.58538849]
[0.83611286 0.76508018 0.26018483 0.20485587 0.95476232]]
打开当前目录下的 data.txt 也可以看到格式化的数据。
#图像的手绘效果实现(具体问题+图像处理)
#图像的手绘效果
from PIL import Image
import numpy as np
vec_el = np.pi/2.2
vec_az = np.pi/4.
depth = 10. # (0-100)
im = Image.open('gpnu.jpg').convert('L')
a = np.asarray(im).astype('float')
grad = np.gradient(a)
grad_x, grad_y = grad
grad_x = grad_x*depth/100.
grad_y = grad_y*depth/100.
dx = np.cos(vec_el)*np.cos(vec_az)
dy = np.cos(vec_el)*np.sin(vec_az)
dz = np.sin(vec_el)
A = np.sqrt(grad_x**2 + grad_y**2 + 1.)
uni_x = grad_x/A
uni_y = grad_y/A
uni_z = 1./A
a2 = 255*(dx*uni_x + dy*uni_y + dz*uni_z)
a2 = a2.clip(0,255)
im2 = Image.fromarray(a2.astype('uint8'))

im2.save('gpnuHandDraw.jpg')


