一.前端实现代码
在实现这个功能的时候,我们第一步需要去构建一个前端项目,为了方便简洁,我们可以直接创建一个较为简单的项目,例如“Hello Client!!!”
代码如下展示出来:
如下:
<!DOCTYPE html>
<html lang="en">
<head>
    <meta charset="UTF-8">
    <title>Java课程设计作业展示</title>
</head>
<body>
Hello Client!!!
</body>
</html>
绝对路径记录C:\Users\HP\Desktop\com.itczhAndghrAndxlc\src\HTMLTest
或者也可以使用一个较大的项目,这个是由本人自行编写的一个系统的首页界面的项目(技术栈 :JavaWeb,前端,HTML,CSS,JavaScript , Tomcat , Vue , Servlet , JSON , MySQL , JDBC...):

成品:
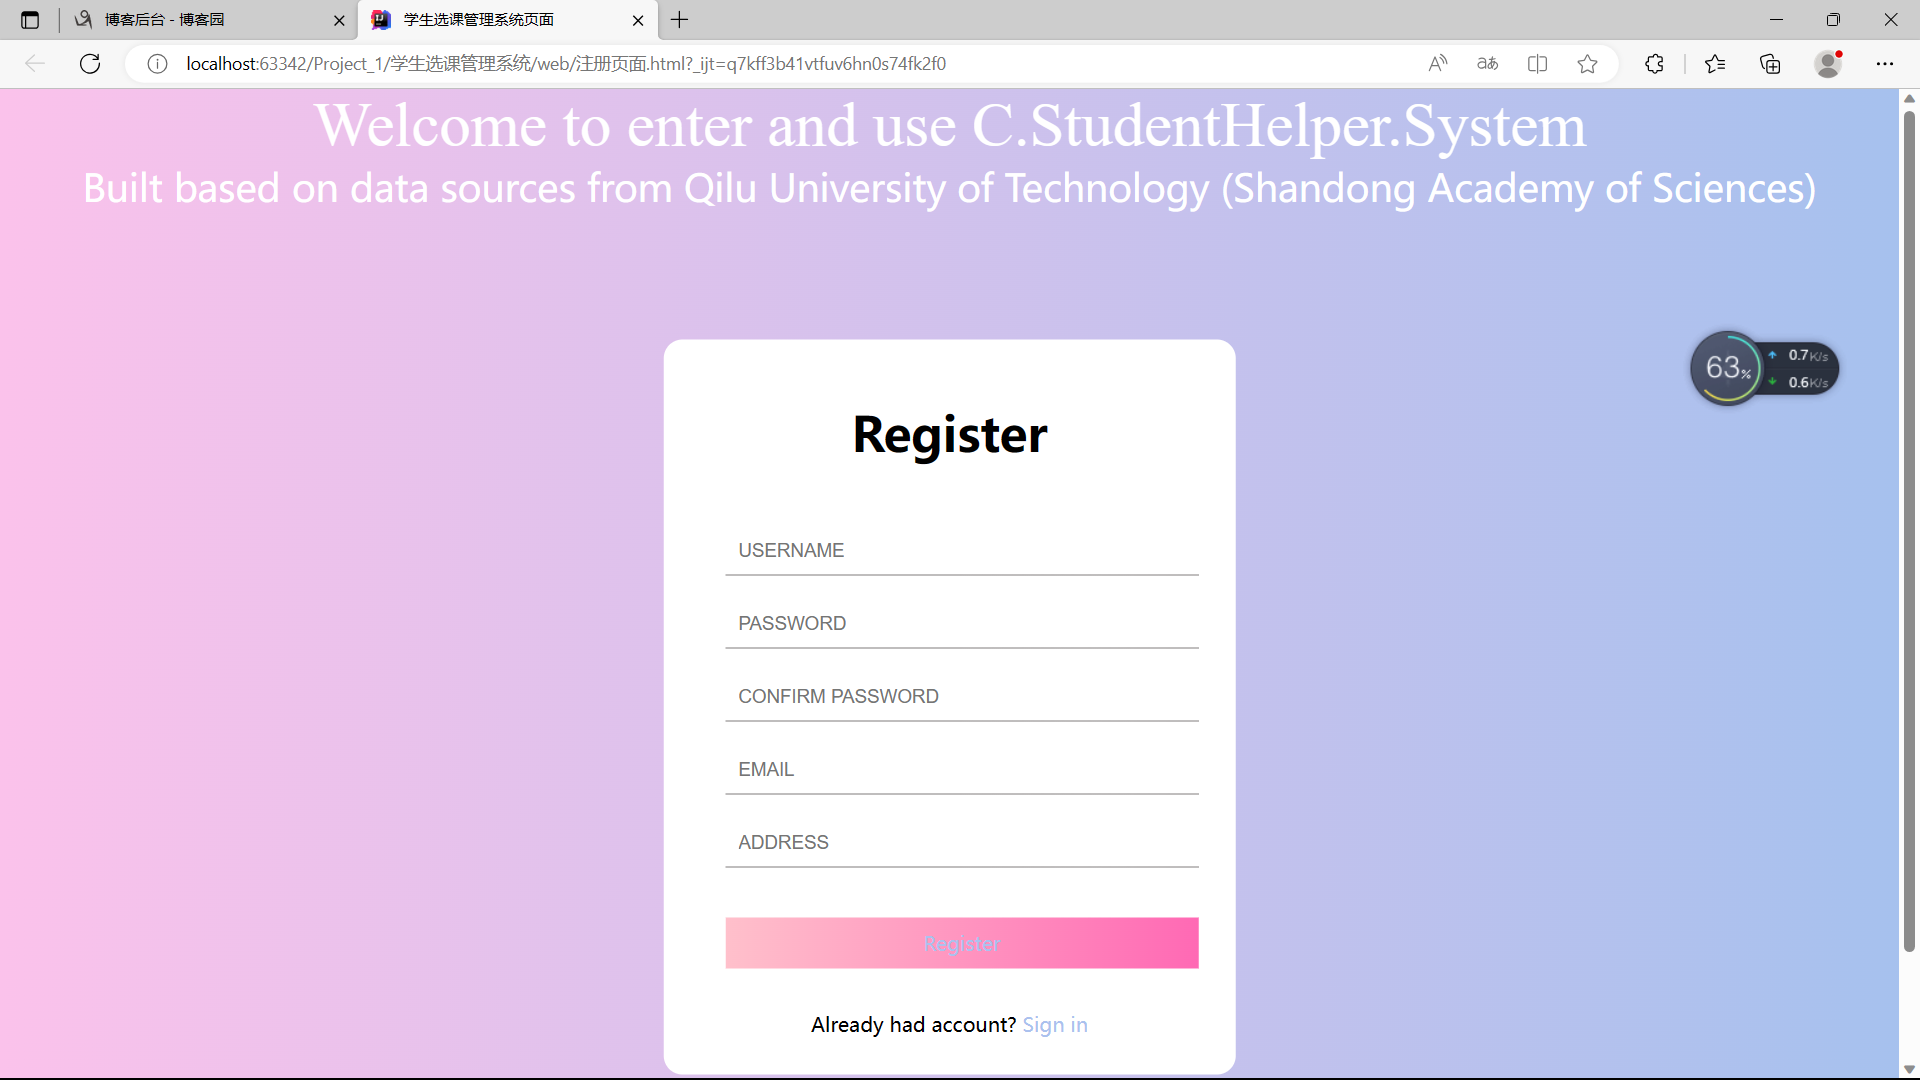
<!DOCTYPE html>
<html lang="en">
<head>
    <meta charset="UTF-8">
    <meta name="viewport" content="width=device-width, initial-scale=1.0">
    <title>学生选课管理系统页面</title>
    <style>
        * {
            margin: 0;
            padding: 0;
        }
        html {
            height: 100%;
        }
        body {
            height: 100%;
        }
        .container {
            height: 100%;
            background-image: linear-gradient(to right, #fbc2eb, #a6c1ee);
        }
        .login-wrapper {
            background-color: #fff;
            width: 358px;
            height: 588px;
            border-radius: 15px;
            padding: 0 50px;
            position: relative;
            left: 50%;
            top: 50%;
            transform: translate(-50%, -50%);
        }
        .header {
            font-size: 38px;
            font-weight: bold;
            text-align: center;
            line-height: 150px;
        }
        .input-item {
            display: block;
            width: 100%;
            margin-bottom: 20px;
            border: 0;
            padding: 10px;
            border-bottom: 1px solid rgb(128, 125, 125);
            font-size: 15px;
            outline: none;
        }
        .input-item::placeholder {
            text-transform: uppercase;
        }
        .btn {
            text-align: center;
            padding: 10px;
            width: 100%;
            margin-top: 40px;
            background-image: linear-gradient(to right, #a6c1ee, #fbc2eb);
            color: #fff;
        }
        .msg {
            text-align: center;
            line-height: 88px;
        }
        a {
            text-decoration-line: none;
            color: #abc1ee;
        }
        .header1{
            text-align: -webkit-center;
            font-family: "Times New Roman";
            font-size: 50px;
        }
        .btn1 {
            text-align: center;
            width: 100%;
            background-image: linear-gradient(to left, #a6c1ee, #fbc2eb);
            color: #fff;
        }
        .header2{
            text-align: -webkit-center;
            font-size: 30px;
        }
        .btn2 {
            text-align: center;
            padding: 10px;
            width: 100%;
            margin-top: 40px;
            background-image: linear-gradient(to right, pink, hotpink);
            color: #fff;
        }
    </style>
</head>
<body>
<div class="btn1">
    <div class="header1">Welcome to enter and use C.StudentHelper.System<br></div>
    <div class="header2">Built based on data sources from Qilu University of Technology (Shandong Academy of Sciences)</div>
</div>

<div class="container">
    <div class="login-wrapper">
        <div class="header">Register<br></div>
        <div class="form-wrapper">
            <input type="text" name="username" placeholder="username" class="input-item">
            <input type="password" name="password" placeholder="password" class="input-item">
            <input type="password" name="confirm password" placeholder="confirm password" class="input-item">
            <input type="text" name="email" placeholder="email" class="input-item">
            <input type="text" name="adddress" placeholder="address" class="input-item">
            <div class="btn2"><a href="登入界面.html">Register</a></div>
<!--            <input type="submit" value="Register" name="Register">-->
        </div>
        <div class="msg">
            Already had account?
            <a href="登入界面.html">Sign in</a>
        </div>
    </div>
</div>
</body>
</html>

具体文件已经上传至百度网盘了
二.Java项目当中Main
我们主要的操作就是Main,在这个文件里面我们可以去开启这个应用,我们监听本地的localhost地址为80,我们就会返回
HTTP Server is listening on port 80
然后停止运行这个文件,这样就可以开始进行我们最重要的一步,开始启动服务器代理模式,我们一定要复制
D:\jdk-11.0.2\bin\java.exe "-javaagent:D:\IntelliJ IDEA 2020.2.3\lib\idea_rt.jar=60747:D:\IntelliJ IDEA 2020.2.3\bin" -Dfile.encoding=UTF-8 -classpath C:\Users\HP\Downloads\com.itczhAndghrAndxlc\out\production\SimpleHttpServer Main
Main.java:
import info.zpss.SimpleHttpServer.Arguable;
import info.zpss.SimpleHttpServer.SimpleHttpServer;

public class Main implements Arguable {
    public static final String VERSION = "1.0.0";
    public static void main(String[] args) {
        new Main().init(args);
        new Thread(() -> {
            SimpleHttpServer httpServer = SimpleHttpServer.getInstance();
            httpServer.init(args);
            httpServer.start();
        }).start();
    }

    @Override
    public void init(String[] args) {
        if (Arguable.paramInArgs(args, "-h", "--help")) {
            System.out.println("Usage: java -jar SimpleHttpServer.jar [options]");
            System.out.println("Options:");
            System.out.println("  -h, --help\t\t\tShow this help message and exit");
            System.out.println("  -v, --version\t\t\tShow version info and exit");
            System.out.println("  -H, --host <host>\t\tSpecify the server host like \"http://example.com\"");
            System.out.println("  -P, --port <port>\t\tSpecify the port to listen on");
            System.out.println("  -d, --dir <dir>\t\tSpecify the root directory");
            System.out.println("  -a, --absolute-dir <dir>\tSpecify the absolute root directory");
            System.exit(0);
        }
        if (Arguable.paramInArgs(args, "-v", "--version")) {
            System.out.printf("SimpleHttpServer v%s%n", VERSION);
            System.exit(0);
        }
        String dir = Arguable.stringInArgs(args, "-d", "--dir");
        if (dir != null) {
            System.out.println("Root directory: " + dir);
            SimpleHttpServer.getInstance().setRootDir(dir);
        }
        String absDir = Arguable.stringInArgs(args, "-a", "--absolute-dir");
        if (absDir != null) {
            System.out.println("Absolute root directory: " + absDir);
            SimpleHttpServer.getInstance().setAbsoluteRootDir(absDir);
        }
    }
}
由于在使用-d 这个名称的时候使用的是相对路径,所以可能会存在代码安全性不高,我们直接使用绝对路径-a 名称,复制一下上面前端代码就可以

运行结果为:

这个时候我们就可以开始访问了,我们的localhost就已经可以开始使用了
一些注意事项:我们如果使用了localhost(80默认值)这个以后如果不让这个端口号(地址)结束(Ctrl + C),那么就会报错因为我们这个Address已经使用过,不能重复去使用它,如果我们没有把它结束我们就可以使用-P 名称去改变端口号,很重要
-h 名称:(" -h, --help\t\t\tShow this help message and exit"的语句,其中"\t"表示插入一个Tab键,达到对齐的效果。通常这段代码会被用在命令行工具的帮助信息中,用于显示帮助参数的说明。具体的表现效果会根据输出端(如终端、IDE等)而有所差异。)
-v 名称:(" -v, --version\t\t\tShow version info and exit"的语句,其中 “\t” 表示插入一个Tab键,达到对齐的效果。通常这段代码会被用在命令行工具的帮助信息中,用于显示版本信息的说明。具体的表现效果会根据输出端(如终端、IDE等)而有所差异。)
-H 名称:(" -H, --host <host>\t\tSpecify the server host like “http://example.com”“的语句,其中 “\t” 表示插入一个Tab键,达到对齐的效果,”<host>"表示该参数需要用户在命令行中指定的内容是一个主机名或者是主机地址(host name or address),而"http://example.com"则是一个示例,用于提示用户正确参数的格式。通常这段代码会被用在命令行工具的帮助信息中,用于说明指定参数的格式和用途。具体的表现效果会根据输出端(如终端、IDE等)而有所差异。)
-P, -d, -a,在上面已经解释了,这里不予解释!
三.具体实现与效果
在上述操作以后我们可以打开浏览器,不论是QQ浏览器或者是,Edge,还是谷歌都可以进行操作,我们就是用Edge进行演示:
Step1:

Step2:

Step3: Enter

这样我们的整个项目就弄好了!!!