为什么选用websocket?
聊天软件如QQ、微信等之所以选择WebSocket作为底层通信协议,主要基于以下几个优点:

实时性: WebSocket 是一种全双工通信协议,允许服务器和客户端之间进行双向实时通信,而不需要手动刷新页面或轮询服务器。

低延迟:WebSocket 建立在单一的TCP连接之上,与传统的HTTP请求/响应模型相比,减少了连接建立和断开的开销。这降低了通信的延迟,
使得消息能够更快速地到达接收方。

减少网络流量: WebSocket 使用的是长连接,而不是每次
请求都建立一个新的连接,这减少了网络流量和服务器资源的消耗,
尤其对于频繁通信的应用程序来说,这是一种有效的优化。
跨平台支持: WebSocket 是一种标准化的协议,几乎所有现代浏览器都支持它。因此,无论用户使用哪种设备或操作系统,
他们都可以方便地使用WebSocket来进行聊天。

跨平台支持: WebSocket 是一种标准化的协议,几乎所有现代浏览器都支持它。因此,无论用户使用哪种设备或操作系统,
他们都可以方便地使用WebSocket来进行聊天。
软件雏形:
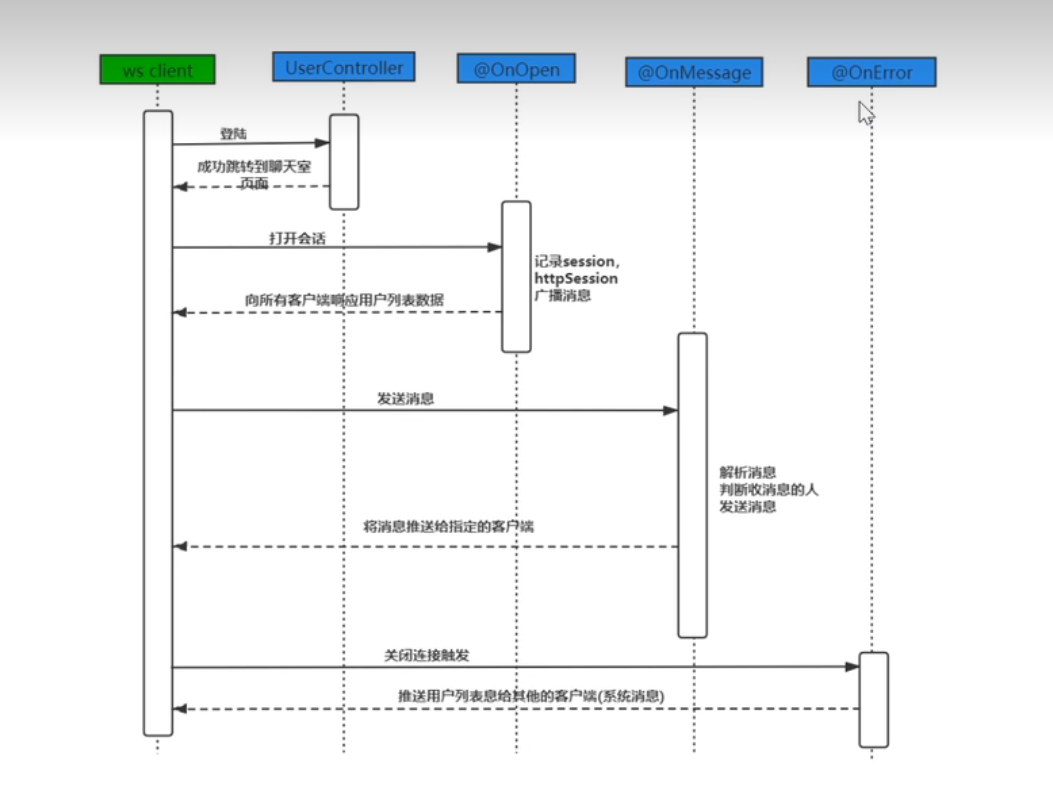
用户登陆后,需保存登录信息,并把当前用户名发送给所有已经登录的用户;
a向B发送消息,b可以收到
b下线后,在线用户可以看到下线信息,在线好友列表将少去a的名字
步骤:
1导入依赖
<dependency>
            <groupId>org.springframework.boot</groupId>
            <artifactId>spring-boot-starter-web</artifactId>
        </dependency>
        <dependency>
            <groupId>org.springframework.boot</groupId>
            <artifactId>spring-boot-starter-web</artifactId>
        </dependency>
2所需要的pojo类
a.客户端发往服务端的接受类
b.服务端返回系统消息
c.result


3所需要的pojo类(配置后,将自动注册使用了@ServerEndpoint的类)
//配置类
@Configuration
public class WebSocketConfig {
    @Bean
    //注入ServerEndpointExporter bean对象,自动注册使用注解@ServerEndpoint的bean
    public ServerEndpointExporter serverEndpointExporter(){
        return new ServerEndpointExporter();
    }
}

4.需要的工具类,用于转化信息格式(转换返回的信息)
public class MessageUtils {
public static String getMessage(boolean isSystemMessage,String fromName,Object message){
try {
ResultMessage result = new ResultMessage();
result.setSystem(isSystemMessage);
result.setMessage(message);
if (fromName!=null){
result.setFromName(fromName);
}
//把字符串转成json格式的字符串
ObjectMapper mapper = new ObjectMapper();
return mapper.writeValueAsString(result);
}catch (JsonProcessingException e){
e.printStackTrace();
}
return null;
}
}
5.登录的验证以及获取用户名的controller
@RestController
public class LoginController {
@RequestMapping("/toLogin")
public Result tologin(@RequestParam("user") String user,@RequestParam("pwd") String pwd, HttpSession session){
Result result = new Result();
if (user.equals("张三")&&pwd.equals("123")){
result.setFlag(true);
session.setAttribute("user",user);
}else if (user.equals("李四")&&pwd.equals("123")){
result.setFlag(true);
session.setAttribute("user",user);
}else if (user.equals("123")&&pwd.equals("123")){
result.setFlag(true);
session.setAttribute("user",user);
}
else if (user.equals("王五")&&pwd.equals("123")){
result.setFlag(true);
session.setAttribute("user",user);
}else {
result.setFlag(false);
result.setMessage("登录失败");
}
return result;
}
@RequestMapping("/getUsername")
public String getUsername(HttpSession session){
String username = (String) session.getAttribute("user");
return username;
}
}
6.获取HttpSession对象的类
为什么写这个类?因为在最后的通信类中的onopen中,我们需要使用config获取httpsession对像,而他没有,所有在其他地方存储进去
public class GetHttpSessionConfigurator extends ServerEndpointConfig.Configurator {
@Override
public void modifyHandshake(ServerEndpointConfig sec, HandshakeRequest request, HandshakeResponse response) {
//获取HttpSession对象
HttpSession httpSession = (HttpSession) request.getHttpSession();
sec.getUserProperties().put(HttpSession.class.getName(),httpSession);
}
}
9.最后的通信类
@ServerEndpoint(value = "/chat",configurator = GetHttpSessionConfigurator.class)
@Component
public class ChatEndpoint {
//用来存储每个用户客户端对象的ChatEndpoint对象
private static Map<String,ChatEndpoint> onlineUsers = new ConcurrentHashMap<>();
//声明session对象,通过对象可以发送消息给指定的用户
private Session session;
//声明HttpSession对象,我们之前在HttpSession对象中存储了用户名
private HttpSession httpSession;
//连接建立
@OnOpen
public void onOpen(Session session, EndpointConfig config){
this.session = session;
HttpSession httpSession = (HttpSession) config.getUserProperties().get(HttpSession.class.getName());
this.httpSession = httpSession;
//存储登陆的对象
String username = (String)httpSession.getAttribute("user");
onlineUsers.put(username,this);
//将当前在线用户的用户名推送给所有的客户端
//1 获取消息
String message = MessageUtils.getMessage(true, null, getNames());
//2 调用方法进行系统消息的推送
broadcastAllUsers(message);
}
private void broadcastAllUsers(String message){
try {
//将消息推送给所有的客户端
Set<String> names = onlineUsers.keySet();
for (String name : names) {
ChatEndpoint chatEndpoint = onlineUsers.get(name);
chatEndpoint.session.getBasicRemote().sendText(message);
}
}catch (Exception e){
e.printStackTrace();
}
}
//返回在线用户名
private Set<String> getNames(){
return onlineUsers.keySet();
}
//收到消息
@OnMessage
public void onMessage(String message,Session session){
//将数据转换成对象
try {
ObjectMapper mapper =new ObjectMapper();
Message mess = mapper.readValue(message, Message.class);
String toName = mess.getToName();
String data = mess.getMessage();
String username = (String) httpSession.getAttribute("user");
String resultMessage = MessageUtils.getMessage(false, username, data);
//发送数据
onlineUsers.get(toName).session.getBasicRemote().sendText(resultMessage);
} catch (Exception e) {
e.printStackTrace();
}
}
//关闭
@OnClose
public void onClose(Session session) {
String username = (String) httpSession.getAttribute("user");
//从容器中删除指定的用户
onlineUsers.remove(username);
MessageUtils.getMessage(true,null,getNames());
}}
注意点:
前端文件是放在resources下的templates包中,所以需要配置
spring:
  profiles:
    active: prop
  thymeleaf:
    prefix: classpath:/templates/
    suffix: .html

pom最好加入
        <dependency>
            <groupId>org.springframework.boot</groupId>
            <artifactId>spring-boot-starter-thymeleaf</artifactId>
        </dependency>

首先用户请求login路径,所以需在controller配置路径,并返回前端试图
@Controller
public class PageController2 {

    @RequestMapping("/login")
    public String login(){
        return "login";
    }

    @RequestMapping("/main")
    public String main(){
        return "main";
    }
    @RequestMapping("/loginerror")
    public String longinError(){
        return "loginerror";
    }
}