调用摄像头使我们经常会用到的一个功能,可以根据摄像头捕捉到的图像进行分析处理来做很多的东西,比如电子档案、图像识别、AI分析等等。
本示例中主要介绍Nuget最常用的两个调用摄像头的轮子 WPFMediaKit、AForge
环境: VS2019, .NetFramework472 WPF (.net core 8.0 也支持)
WPFMediaKit
新建项目,添加Nuget,安装WPFMediaKit

前台代码
<Window x:Class="摄像头测试.MainWindow"
        xmlns="http://schemas.microsoft.com/winfx/2006/xaml/presentation"
        xmlns:x="http://schemas.microsoft.com/winfx/2006/xaml"
        xmlns:d="http://schemas.microsoft.com/expression/blend/2008"
        xmlns:mc="http://schemas.openxmlformats.org/markup-compatibility/2006"
       xmlns:wpfmedia="clr-namespace:WPFMediaKit.DirectShow.Controls;assembly=WPFMediaKit"
        xmlns:local="clr-namespace:摄像头测试"
        mc:Ignorable="d"
        Title="MainWindow" Height="450" Width="800" Loaded="Window_Loaded">
    <Grid>
        <DockPanel>
            <DockPanel DockPanel.Dock="Top">
                <ComboBox Name="cb" DockPanel.Dock="Top" SelectionChanged="cb_SelectionChanged"></ComboBox>
                <Button Click="Button_Click" DockPanel.Dock="top" Height="45" Content="拍照" Margin="160,0,92,0"/>
            </DockPanel>
            <wpfmedia:VideoCaptureElement x:Name="vce" ></wpfmedia:VideoCaptureElement>
        </DockPanel>
    </Grid>
</Window>
后台代码
        private void Window_Loaded(object sender, RoutedEventArgs e)
        {
            //现在电脑上装的所有摄像头中,选择一个摄像头。
            cb.ItemsSource = MultimediaUtil.VideoInputNames;
            //设置第0个摄像头为默认摄像头。
            if (MultimediaUtil.VideoInputNames.Length > 0)
            {
                cb.SelectedIndex = 0;
            }
            else
            {
                MessageBox.Show("电脑没有安装任何摄像头");
            }
        }

        private void cb_SelectionChanged(object sender, SelectionChangedEventArgs e)
        {
            vce.VideoCaptureSource = (string)cb.SelectedItem;
        }

        private void Button_Click(object sender, RoutedEventArgs e)
        {
            //抓取控件做成图片
            RenderTargetBitmap bmp = new RenderTargetBitmap(
            (int)vce.ActualWidth, (int)vce.ActualHeight,
            96, 96, PixelFormats.Default);
            bmp.Render(vce);
            BitmapEncoder encoder = new JpegBitmapEncoder();
            encoder.Frames.Add(BitmapFrame.Create(bmp));
            using (MemoryStream ms = new MemoryStream())
            {
                encoder.Save(ms);
                byte[] captureData = ms.ToArray();
                //保存图片
                File.WriteAllBytes("E:/1.jpg", captureData);
            }
            vce.Pause();
        }
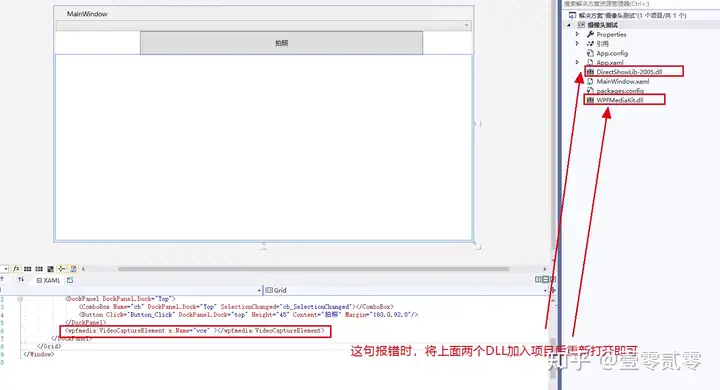
接入代码编译后,VS设计器中如报错没有找到文件的解决方案:
AForge
http://AForge.NET 是用C#写的一个关于计算机视觉和人工智能领域的框架,它包括图像处理、神经网络、遗传算法和机器学习等。
新建项目,添加Nuget,安装下列AForge包

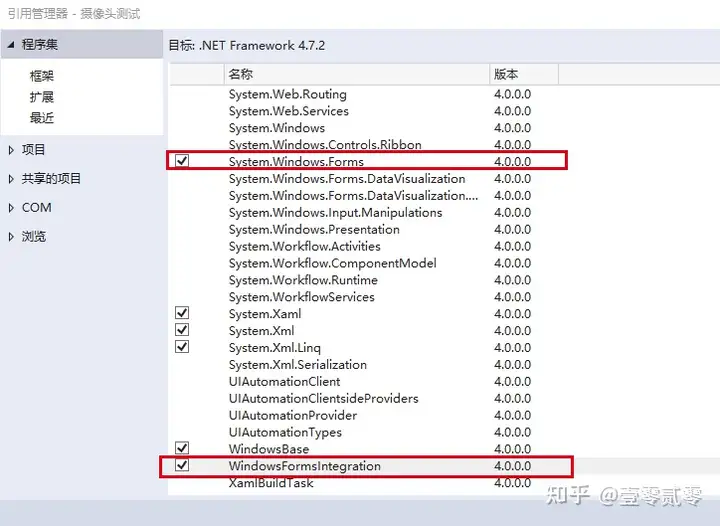
由于在WPF当中使用AForge,需要通过WindowsFormsHost嵌入在WPF当中使用, 所以需要给项目添加相关引用:
前台代码
<Window x:Class="摄像头测试.MainWindow"
        xmlns="http://schemas.microsoft.com/winfx/2006/xaml/presentation"
        xmlns:x="http://schemas.microsoft.com/winfx/2006/xaml"
        xmlns:d="http://schemas.microsoft.com/expression/blend/2008"
        xmlns:mc="http://schemas.openxmlformats.org/markup-compatibility/2006"
        xmlns:wfi ="clr-namespace:System.Windows.Forms.Integration;assembly=WindowsFormsIntegration"
        xmlns:aforge="clr-namespace:AForge.Controls;assembly=AForge.Controls"
        xmlns:local="clr-namespace:摄像头测试"
        mc:Ignorable="d"
        Title="MainWindow" Height="450" Width="800" Loaded="Window_Loaded">
    <Grid>
        <wfi:WindowsFormsHost Margin="0,30,0,0">
            <aforge:VideoSourcePlayer x:Name="player" Dock="Fill" />
        </wfi:WindowsFormsHost>
        <Image Margin="0,30,0,0" HorizontalAlignment="Stretch" Name="frameHolder"  VerticalAlignment="Stretch"  Stretch="Fill"/>
        <StackPanel Height="30" Orientation="Horizontal" VerticalAlignment="Top" HorizontalAlignment="Center">
            <Button Content="连接" Margin="20,0,0,0" Height="30" Width="100" x:Name="btnConn" Click="btnConn_Click" />
            <Button Content="拍照" Margin="20,0,0,0" Height="30" Width="100" x:Name="btnCap" Click="btnCap_Click" />
            <Button Content="断开" Margin="20,0,0,0" Height="30" Width="100" x:Name="btnClose" Click="btnClose_Click" />
        </StackPanel>
        <Image x:Name="img"/>
    </Grid>
</Window>
后台代码
        private FilterInfoCollection videoDevices;
        VideoCaptureDevice videoSource;

        private void Window_Loaded(object sender, RoutedEventArgs e)
        {
            videoDevices = new FilterInfoCollection(FilterCategory.VideoInputDevice);
        }

        private void btnConn_Click(object sender, RoutedEventArgs e)
        {
            if (videoDevices.Count <= 0)
            {
                MessageBox.Show("请插入视频设备");
                return;
            }

            videoSource = new VideoCaptureDevice(videoDevices[0].MonikerString);//连接到第一个设备,可灵活改动
            //videoSource.DesiredFrameSize = new System.Drawing.Size(240, 320);
            //videoSource.DesiredFrameRate = 1;

            player.VideoSource = videoSource;

            videoSource.Start();
            player.Start();
        }

        private void btnCap_Click(object sender, RoutedEventArgs e)
        {
            if (player.VideoSource == null)
            {
                return;
            }
            //判断是否有这个目录,如果没有则新创建这个目录
            /*if (!Directory.Exists(filePath))
            {
                Directory.CreateDirectory(filePath);
            }*/
            try
            {
                System.Drawing.Bitmap bitmap = player.GetCurrentVideoFrame();
                /*if (fileName == null)
                {
                    fileName = DateTime.Now.ToString("yyyy-MM-dd-HH-mm-ss");
                }*/
                //string str = @"" + fileName + ".jpg";
                string str = "asd.jpg";//使用InitImage可以重复读写一张图,不用的话,就只能一直保存新的图片了
                bitmap.Save(str, ImageFormat.Jpeg); //想看预览就用,不想看就不需要了

                bitmap.Dispose();

                img.Source = InitImage(str);

            }
            catch (Exception ex)
            {
                Console.WriteLine(ex.Message.ToString());
            }
        }

        //解决不同进程读取同一张图片的问题,使用流来读图片
        public BitmapImage InitImage(string filePath)
        {
            BitmapImage bitmapImage;
            using (BinaryReader reader = new BinaryReader(File.Open(filePath, FileMode.Open)))
            {
                FileInfo fi = new FileInfo(filePath);
                byte[] bytes = reader.ReadBytes((int)fi.Length);
                reader.Close();

                //image = new Image();