@
基于官网搭建
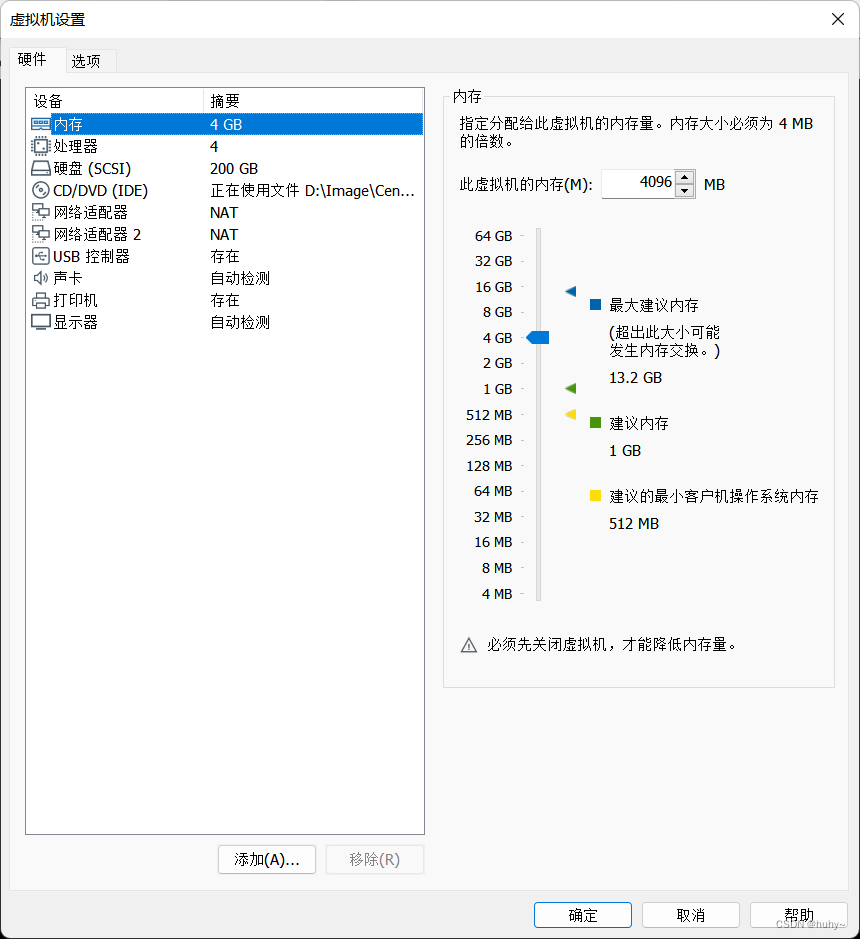
使用VMware创建两台centos7.9搭建
配置如下
| 节点 | ip |
|---|---|
| controller | 192.168.200.10 |
| compute | 192.168.200.20 |
注;在此实验中所有密码的默认设置为000000,有需要可自己更改,自己把它记住,错了可别怪我没提醒~
初始化环境
基础配置
1,修改主机名
2,配置第一张网卡,且能联网
[root@controller ~]# ping www.baidu.com
PING www.a.shifen.com (183.232.231.172) 56(84) bytes of data.
64 bytes from 183.232.231.172 (183.232.231.172): icmp_seq=1 ttl=128 time=34.1 ms
64 bytes from 183.232.231.172 (183.232.231.172): icmp_seq=2 ttl=128 time=37.6 ms
64 bytes from 183.232.231.172 (183.232.231.172): icmp_seq=3 ttl=128 time=34.1 ms
64 bytes from 183.232.231.172 (183.232.231.172): icmp_seq=4 ttl=128 time=34.4 ms
64 bytes from 183.232.231.172 (183.232.231.172): icmp_seq=5 ttl=128 time=33.9 ms
64 bytes from 183.232.231.172 (183.232.231.172): icmp_seq=6 ttl=128 time=33.9 ms
[root@compute ~]# ping www.baidu.com
PING www.a.shifen.com (183.232.231.172) 56(84) bytes of data.
64 bytes from 183.232.231.172 (183.232.231.172): icmp_seq=1 ttl=128 time=33.4 ms
64 bytes from 183.232.231.172 (183.232.231.172): icmp_seq=2 ttl=128 time=33.5 ms
64 bytes from 183.232.231.172 (183.232.231.172): icmp_seq=3 ttl=128 time=33.7 ms
64 bytes from 183.232.231.172 (183.232.231.172): icmp_seq=4 ttl=128 time=34.5 ms
3,配置主机映射(双节点执行)
[root@controller ~]# cat /etc/hosts
127.0.0.1   localhost localhost.localdomain localhost4 localhost4.localdomain4
::1         localhost localhost.localdomain localhost6 localhost6.localdomain6
192.168.200.10 controller
192.168.200.20 compute
[root@controller ~]#
[root@compute ~]# cat /etc/hosts
127.0.0.1   localhost localhost.localdomain localhost4 localhost4.localdomain4
::1         localhost localhost.localdomain localhost6 localhost6.localdomain6
192.168.200.10 controller
192.168.200.20 compute
[root@compute ~]#
4,关闭防火墙(双节点执行)
systemctl stop firewalld;systemctl disable firewalld
[root@controller ~]# systemctl stop firewalld;systemctl disable firewalld
Removed symlink /etc/systemd/system/multi-user.target.wants/firewalld.service.
Removed symlink /etc/systemd/system/dbus-org.fedoraproject.FirewallD1.service.
[root@controller ~]#
[root@compute ~]# systemctl stop firewalld;systemctl disable firewalld
Removed symlink /etc/systemd/system/multi-user.target.wants/firewalld.service.
Removed symlink /etc/systemd/system/dbus-org.fedoraproject.FirewallD1.service.
[root@compute ~]#
5,关闭selinux,配置文件必须要重启后才生效,所以还要加上临时生效(双节点执行)
setenforce 0
[root@controller ~]# setenforce 0
[root@controller ~]# getenforce
Permissive
[root@controller ~]#
[root@compute ~]# setenforce 0
[root@compute ~]# getenforce
Permissive
[root@compute ~]#
配置免密(双节点)
[root@controller ~]# ssh-keygen
Generating public/private rsa key pair.
Enter file in which to save the key (/root/.ssh/id_rsa):
Created directory '/root/.ssh'.
Enter passphrase (empty for no passphrase):
Enter same passphrase again:
Your identification has been saved in /root/.ssh/id_rsa.
Your public key has been saved in /root/.ssh/id_rsa.pub.
The key fingerprint is:
SHA256:/t1WgsVNgbAwEkOAEYPhy9izaj/INmB/2KIB5sIrC94 root@controller
The key's randomart image is:
+---[RSA 2048]----+
| .o++.o=.o .. ...|
|.. ..   o o ..  .|
| .         . . o |
|o..           o .|
|o+o     S    o   |
|*. o   .    . . .|
|*++ o   .      o |
|=B+= o   . . ..  |
|*=+E+     . ...  |
+----[SHA256]-----+
[root@controller ~]# ssh-copy-id -i /root/.ssh/id_rsa.pub root@controller
/usr/bin/ssh-copy-id: INFO: Source of key(s) to be installed: "/root/.ssh/id_rsa.pub"
The authenticity of host 'controller (192.168.200.10)' can't be established.
ECDSA key fingerprint is SHA256:KK7vhlWbiV8zPUrk3BLjpykfABgj4hAHMpbG6A+TzBc.
ECDSA key fingerprint is MD5:51:bf:e1:8f:12:7b:d1:4a:6f:33:83:44:0d:3d:91:c6.
Are you sure you want to continue connecting (yes/no)? yes
/usr/bin/ssh-copy-id: INFO: attempting to log in with the new key(s), to filter out any that are already installed
/usr/bin/ssh-copy-id: INFO: 1 key(s) remain to be installed -- if you are prompted now it is to install the new keys
root@controller's password:

Number of key(s) added: 1

Now try logging into the machine, with:   "ssh 'root@controller'"
and check to make sure that only the key(s) you wanted were added.

[root@controller ~]# ssh-copy-id -i /root/.ssh/id_rsa.pub root@compute
/usr/bin/ssh-copy-id: INFO: Source of key(s) to be installed: "/root/.ssh/id_rsa.pub"
The authenticity of host 'compute (192.168.200.20)' can't be established.
ECDSA key fingerprint is SHA256:KK7vhlWbiV8zPUrk3BLjpykfABgj4hAHMpbG6A+TzBc.
ECDSA key fingerprint is MD5:51:bf:e1:8f:12:7b:d1:4a:6f:33:83:44:0d:3d:91:c6.
Are you sure you want to continue connecting (yes/no)? yes
/usr/bin/ssh-copy-id: INFO: attempting to log in with the new key(s), to filter out any that are already installed
/usr/bin/ssh-copy-id: INFO: 1 key(s) remain to be installed -- if you are prompted now it is to install the new keys
root@compute's password:

Number of key(s) added: 1

Now try logging into the machine, with:   "ssh 'root@compute'"
and check to make sure that only the key(s) you wanted were added.

[root@controller ~]#

#######验证#########

[root@controller ~]# ssh compute
Last login: Sat Oct 15 09:38:32 2022 from 192.168.200.1
[root@compute ~]# exit
logout
Connection to compute closed.
[root@controller ~]# ssh controller
Last login: Sat Oct 15 09:38:24 2022 from 192.168.200.1
[root@controller ~]# exit
logout
Connection to controller closed.
[root@controller ~]#
[root@compute ~]# ssh-keygen
Generating public/private rsa key pair.
Enter file in which to save the key (/root/.ssh/id_rsa):
Enter passphrase (empty for no passphrase):
Enter same passphrase again:
Your identification has been saved in /root/.ssh/id_rsa.
Your public key has been saved in /root/.ssh/id_rsa.pub.
The key fingerprint is:
SHA256:b3sMwNrSmCk2DA3EgYdUGm0lJkLLomHdhOGmTe1Yikc root@compute
The key's randomart image is:
+---[RSA 2048]----+
|+X=*+o           |
|= %+=            |
|o*.E + .         |
|+.O *   o        |
|.o B . BS.       |
|  . = * o..      |
|   . o .  oo     |
|         . .o    |
|          ..     |
+----[SHA256]-----+
[root@compute ~]# ssh-copy-id -i /root/.ssh/id_rsa.pub root@controller
/usr/bin/ssh-copy-id: INFO: Source of key(s) to be installed: "/root/.ssh/id_rsa.pub"
The authenticity of host 'controller (192.168.200.10)' can't be established.
ECDSA key fingerprint is SHA256:KK7vhlWbiV8zPUrk3BLjpykfABgj4hAHMpbG6A+TzBc.
ECDSA key fingerprint is MD5:51:bf:e1:8f:12:7b:d1:4a:6f:33:83:44:0d:3d:91:c6.
Are you sure you want to continue connecting (yes/no)? yes
/usr/bin/ssh-copy-id: INFO: attempting to log in with the new key(s), to filter out any that are already installed
/usr/bin/ssh-copy-id: INFO: 1 key(s) remain to be installed -- if you are prompted now it is to install the new keys
root@controller's password:

Number of key(s) added: 1

Now try logging into the machine, with:   "ssh 'root@controller'"
and check to make sure that only the key(s) you wanted were added.

[root@compute ~]# ssh-copy-id -i /root/.ssh/id_rsa.pub root@compute
/usr/bin/ssh-copy-id: INFO: Source of key(s) to be installed: "/root/.ssh/id_rsa.pub"
The authenticity of host 'compute (192.168.200.20)' can't be established.
ECDSA key fingerprint is SHA256:KK7vhlWbiV8zPUrk3BLjpykfABgj4hAHMpbG6A+TzBc.
ECDSA key fingerprint is MD5:51:bf:e1:8f:12:7b:d1:4a:6f:33:83:44:0d:3d:91:c6.
Are you sure you want to continue connecting (yes/no)? yes
/usr/bin/ssh-copy-id: INFO: attempting to log in with the new key(s), to filter out any that are already installed
/usr/bin/ssh-copy-id: INFO: 1 key(s) remain to be installed -- if you are prompted now it is to install the new keys
root@compute's password:

Number of key(s) added: 1

Now try logging into the machine, with:   "ssh 'root@compute'"
and check to make sure that only the key(s) you wanted were added.

[root@compute ~]#

########验证###############

```powershell
[root@compute ~]# ssh controller
Last login: Sat Oct 15 09:57:06 2022 from compute
[root@controller ~]# exit
logout
Connection to controller closed.
[root@compute ~]# ssh compute
Last login: Sat Oct 15 09:57:08 2022 from controller
[root@compute ~]# exit
logout
Connection to compute closed.
[root@compute ~]#
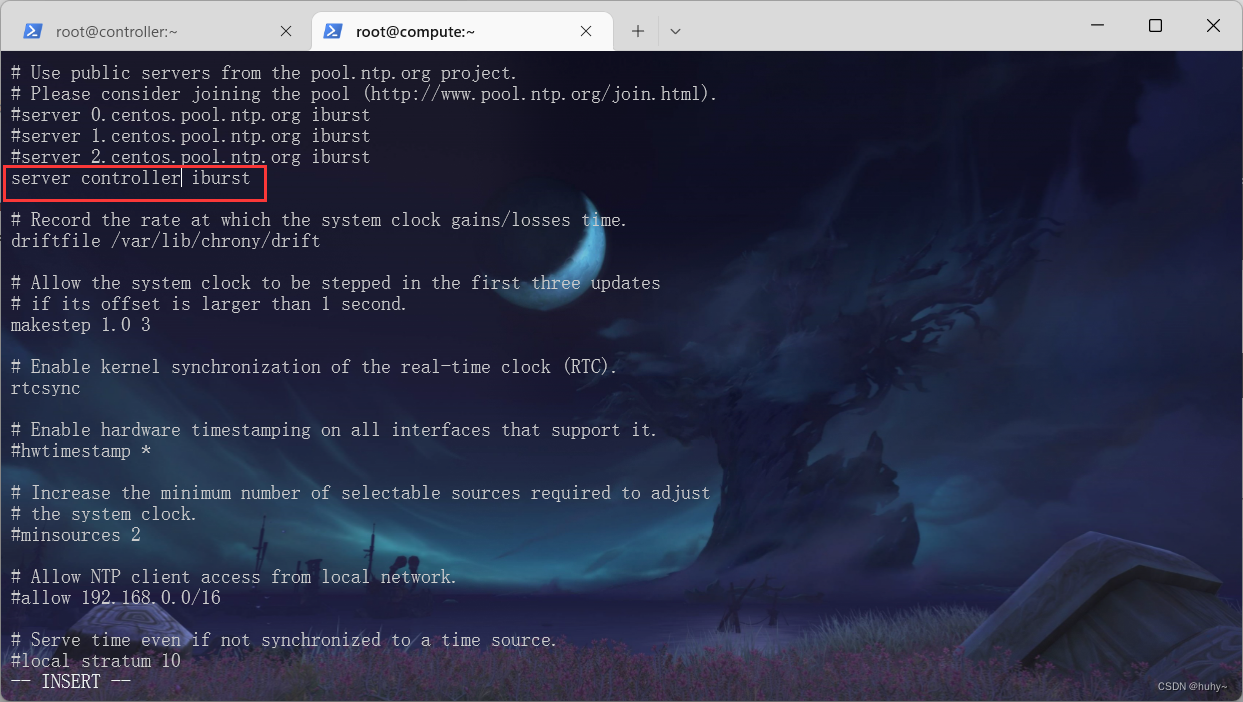
时间同步(双节点)
centos7.9镜像自带时间同步服务,下载命令为
yum install chrony -y
[root@controller ~]# yum install chrony -y
Loaded plugins: fastestmirror
Loading mirror speeds from cached hostfile
 * base: mirrors.ustc.edu.cn
 * extras: mirrors.ustc.edu.cn
 * updates: mirrors.ustc.edu.cn
Package chrony-3.4-1.el7.x86_64 already installed and latest version
Nothing to do
[root@controller ~]#
[root@controller ~]# vi /etc/chrony.conf
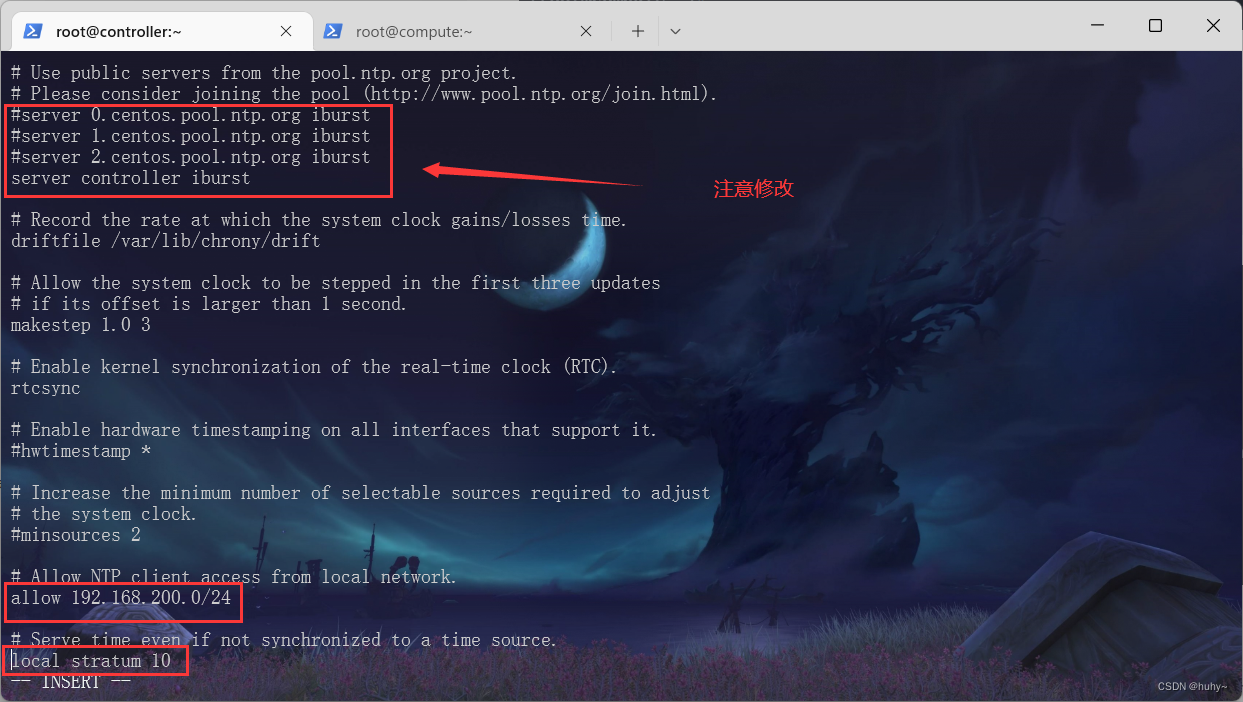
控制节点的配置文件基于上述修改后
[root@controller ~]# systemctl enable chronyd.service;systemctl restart chronyd.service
[root@controller ~]# chronyc sources
210 Number of sources = 1
MS Name/IP address         Stratum Poll Reach LastRx Last sample
===============================================================================
^* controller                   10   6   377    81     +2ns[-3079ns] +/- 5951ns
[root@controller ~]#
计算节点如下
[root@compute ~]# vi /etc/chrony.con
[root@compute ~]# systemctl restart chronyd.service;systemctl enable chronyd.service
[root@compute ~]# chronyc sources
210 Number of sources = 1
MS Name/IP address         Stratum Poll Reach LastRx Last sample
===============================================================================
^* controller                   11   6    17     3  +8036ns[ +155us] +/-  763us
[root@compute ~]#
安装yum源包
1,安装T版open stack的yuan源包,如果搭建其他版本则安装其他包(双节点执行)
yum install centos-release-openstack-train -y
2,安装T版open stack的selinux和客户端client(控制节点执行即可,计算节点用不到)
yum install python-openstackclient openstack-selinux -y
可在yum源仓库中查看
[root@controller ~]# ll /etc/yum.repos.d/
total 60
-rw-r--r--. 1 root root 1664 Oct 23  2020 CentOS-Base.repo
-rw-r--r--. 1 root root  956 Jun 19  2019 CentOS-Ceph-Nautilus.repo
-rw-r--r--. 1 root root 1309 Oct 23  2020 CentOS-CR.repo
-rw-r--r--. 1 root root  649 Oct 23  2020 CentOS-Debuginfo.repo
-rw-r--r--. 1 root root  314 Oct 23  2020 CentOS-fasttrack.repo
-rw-r--r--. 1 root root  630 Oct 23  2020 CentOS-Media.repo
-rw-r--r--. 1 root root  717 Mar 23  2020 CentOS-NFS-Ganesha-28.repo
-rw-r--r--. 1 root root 1290 Oct 22  2019 CentOS-OpenStack-train.repo
-rw-r--r--. 1 root root  612 Feb  1  2019 CentOS-QEMU-EV.repo
-rw-r--r--. 1 root root 1331 Oct 23  2020 CentOS-Sources.repo
-rw-r--r--. 1 root root  353 Jul 31  2018 CentOS-Storage-common.repo
-rw-r--r--. 1 root root 8515 Oct 23  2020 CentOS-Vault.repo
-rw-r--r--. 1 root root  616 Oct 23  2020 CentOS-x86_64-kernel.repo
[root@controller ~]#
安装数据库(控制节点执行)
安装软件包
yum install mariadb mariadb-server python2-PyMySQL -y
修改conf文件/etc/my.cnf.d/openstack.cnf
vi /etc/my.cnf.d/openstack.cnf
开机并自启mariadb
systemctl start mariadb.service;systemctl enable mariadb.service
设置数据库密码
mysql_secure_installation
演示如下
[root@controller ~]# vi /etc/my.cnf.d/openstack.cnf

[mysqld]
bind-address = 192.168.200.10
default-storage-engine = innodb
innodb_file_per_table = on
max_connections = 4096
collation-server = utf8_general_ci
character-set-server = utf8

[root@controller ~]# systemctl start mariadb.service;systemctl enable mariadb.service
Created symlink from /etc/systemd/system/mysql.service to /usr/lib/systemd/system/mariadb.service.
Created symlink from /etc/systemd/system/mysqld.service to /usr/lib/systemd/system/mariadb.service.
Created symlink from /etc/systemd/system/multi-user.target.wants/mariadb.service to /usr/lib/systemd/system/mariadb.service.

#回车后y输入密码,ynyy
[root@controller ~]# mysql_secure_installation

NOTE: RUNNING ALL PARTS OF THIS SCRIPT IS RECOMMENDED FOR ALL MariaDB
      SERVERS IN PRODUCTION USE!  PLEASE READ EACH STEP CAREFULLY!

In order to log into MariaDB to secure it, we'll need the current
password for the root user.  If you've just installed MariaDB, and
you haven't set the root password yet, the password will be blank,
so you should just press enter here.

Enter current password for root (enter for none):
OK, successfully used password, moving on...

Setting the root password ensures that nobody can log into the MariaDB
root user without the proper authorisation.

Set root password? [Y/n] y
New password:
Re-enter new password:
Password updated successfully!
Reloading privilege tables..
 ... Success!


By default, a MariaDB installation has an anonymous user, allowing anyone
to log into MariaDB without having to have a user account created for
them.  This is intended only for testing, and to make the installation
go a bit smoother.  You should remove them before moving into a
production environment.

Remove anonymous users? [Y/n] y
 ... Success!

Normally, root should only be allowed to connect from 'localhost'.  This
ensures that someone cannot guess at the root password from the network.

Disallow root login remotely? [Y/n] n
 ... skipping.

By default, MariaDB comes with a database named 'test' that anyone can
access.  This is also intended only for testing, and should be removed
before moving into a production environment.

Remove test database and access to it? [Y/n] y
 - Dropping test database...
 ... Success!
 - Removing privileges on test database...
 ... Success!

Reloading the privilege tables will ensure that all changes made so far
will take effect immediately.

Reload privilege tables now? [Y/n] y
 ... Success!

Cleaning up...

All done!  If you've completed all of the above steps, your MariaDB
installation should now be secure.

Thanks for using MariaDB!
搭建消息队列服务(控制节点执行)
安装软件包
yum install rabbitmq-server -y
启动并开机自启
systemctl enable rabbitmq-server.service;systemctl start rabbitmq-server.service
添加openstack用户并设置读写权限
rabbitmqctl add_user openstack 000000
rabbitmqctl set_permissions openstack ".*" ".*" ".*"
[root@controller ~]# systemctl enable rabbitmq-server.service;systemctl start rabbitmq-server.service
[root@controller ~]# rabbitmqctl add_user openstack 000000
Creating user "openstack"
[root@controller ~]# rabbitmqctl set_permissions openstack ".*" ".*" ".*"
Setting permissions for user "openstack" in vhost "/"
[root@controller ~]#
缓存服务安装(控制节点执行)
安装缓存软件包
yum install memcached python-memcached -y
vi /etc/sysconfig/memcached
[root@controller ~]# cat /etc/sysconfig/memcached
PORT="11211"
USER="memcached"
MAXCONN="1024"
CACHESIZE="64"
OPTIONS="-l 127.0.0.1,::1,controller"
[root@controller ~]#
启动并开机自启服务
systemctl enable memcached.service;systemctl start memcached.service
etcd可不用配置,暂时用不到
!!!记住rabbitmq设置的openstack用户密码000000,后续都会用到
身份服务(控制节点执行)
配置数据库创建keystone用户并授权
mysql -u root -p000000
创建keystone数据库
CREATE DATABASE keystone;
授权远程权限,密码后续会用来做连接
GRANT ALL PRIVILEGES ON keystone.* TO 'keystone'@'localhost' IDENTIFIED BY '000000';
GRANT ALL PRIVILEGES ON keystone.* TO 'keystone'@'%' IDENTIFIED BY '000000';
操作如下
MariaDB [(none)]> CREATE DATABASE keystone;
Query OK, 1 row affected (0.001 sec)

MariaDB [(none)]> GRANT ALL PRIVILEGES ON keystone.* TO 'keystone'@'localhost' IDENTIFIED BY '000000';
Query OK, 0 rows affected (0.000 sec)

MariaDB [(none)]> GRANT ALL PRIVILEGES ON keystone.* TO 'keystone'@'%' IDENTIFIED BY '000000';
Query OK, 0 rows affected (0.000 sec)

MariaDB [(none)]>
MariaDB [(none)]> exit
Bye
安装keystone包
yum install openstack-keystone httpd mod_wsgi -y
配置 /etc/keystone/keystone.conf文件,注意keystone数据库密码
vi /etc/keystone/keystone.conf
[database]
connection = mysql+pymysql://keystone:000000@controller/keystone

[token]
provider = fernet
使用keystone用户执行keystone-manage db_sync命令
su -s /bin/sh -c "keystone-manage db_sync" keystone
The --keystone-user and --keystone-group flags are used to specify the operating system’s user/group that will be used to run keystone. These are provided to allow running keystone under another operating system user/group. In the example below, we call the user & group keystone.
keystone-manage fernet_setup --keystone-user keystone --keystone-group keystone
keystone-manage credential_setup --keystone-user keystone --keystone-group keystone
Before the Queens release, keystone needed to be run on two separate ports to accommodate the Identity v2 API which ran a separate admin-only service commonly on port 35357. With the removal of the v2 API, keystone can be run on the same port for all interface,注意设置admin-pass密码
keystone-manage bootstrap --bootstrap-password 000000 \
  --bootstrap-admin-url http://controller:5000/v3/ \
  --bootstrap-internal-url http://controller:5000/v3/ \
  --bootstrap-public-url http://controller:5000/v3/ \
  --bootstrap-region-id RegionOne
配置httpd的/etc/httpd/conf/httpd.conf文件
vi /etc/httpd/conf/httpd.conf

ServerName controller
演示如下

Create a link to the /usr/share/keystone/wsgi-keystone.conf file:
ln -s /usr/share/keystone/wsgi-keystone.conf /etc/httpd/conf.d/
重启并开机自启
systemctl enable httpd.service;systemctl start httpd.service
注;如果报错没有权限,查看selinux是否关闭
和官网不同,这里直接设置管理员用户的变量,不设置临时变量。另外一个myuser用户脚本变量后续也用不到就不创建了
#!/bin/bash
#admin用户
export OS_PROJECT_DOMAIN_NAME=Default
export OS_USER_DOMAIN_NAME=Default
export OS_PROJECT_NAME=admin
export OS_USERNAME=admin
export OS_PASSWORD=000000
export OS_AUTH_URL=http://controller:5000/v3
export OS_IDENTITY_API_VERSION=3
export OS_IMAGE_API_VERSION=2
操作如下
[root@controller ~]# cat admin_openrch.sh
#!/bin/bash
#admin用户
export OS_PROJECT_DOMAIN_NAME=Default
export OS_USER_DOMAIN_NAME=Default
export OS_PROJECT_NAME=admin
export OS_USERNAME=admin
export OS_PASSWORD=000000
export OS_AUTH_URL=http://controller:5000/v3
export OS_IDENTITY_API_VERSION=3
export OS_IMAGE_API_VERSION=2
创建域、项目、用户、角色
创建一个example域
openstack domain create --description "An Example Domain" example
演示如下
[root@controller ~]# openstack domain create --description "An Example Domain" example
+-------------+----------------------------------+
| Field       | Value                            |
+-------------+----------------------------------+
| description | An Example Domain                |
| enabled     | True                             |
| id          | b3ff127640534e8b8c45db4ef9d19002 |
| name        | example                          |
| options     | {}                               |
| tags        | []                               |
+-------------+----------------------------------+
[root@controller ~]#
在default域下创建一个service项目或者叫租户
openstack project create --domain default --description "Service Project" service
演示如下
[root@controller ~]# openstack project create --domain default --description "Service Project" service
+-------------+----------------------------------+
| Field       | Value                            |
+-------------+----------------------------------+
| description | Service Project                  |
| domain_id   | default                          |
| enabled     | True                             |
| id          | 50c7836760a948a69d1eda0098f5fe00 |
| is_domain   | False                            |
| name        | service                          |
| options     | {}                               |
| parent_id   | default                          |
| tags        | []                               |
+-------------+----------------------------------+
[root@controller ~]#
在default域下创建一个myproject项目
openstack project create --domain default --description "Demo Project" myproject
演示如下
[root@controller ~]# openstack project create --domain default --description "Demo Project" myproject
+-------------+----------------------------------+
| Field       | Value                            |
+-------------+----------------------------------+
| description | Demo Project                     |
| domain_id   | default                          |
| enabled     | True                             |
| id          | d589e61aee8b49438c5573e3653ee2a0 |
| is_domain   | False                            |
| name        | myproject                        |
| options     | {}                               |
| parent_id   | default                          |
| tags        | []                               |
+-------------+----------------------------------+
[root@controller ~]#
在default域下创建一个用户myuser,官网的password-prompt需要手动输入两次,我直接写在命令中
openstack user create --domain default --password 000000 myuser
演示如下
[root@controller ~]# openstack user create --domain default --password 000000 myuser
+---------------------+----------------------------------+
| Field               | Value                            |
+---------------------+----------------------------------+
| domain_id           | default                          |
| enabled             | True                             |
| id                  | 5040799850164c45906203f41c1881f1 |
| name                | myuser                           |
| options             | {}                               |
| password_expires_at | None                             |
+---------------------+----------------------------------+
[root@controller ~]#
在default域下创建角色myrole
openstack role create myrole
演示如下
[root@controller ~]# openstack role create myrole
+-------------+----------------------------------+
| Field       | Value                            |
+-------------+----------------------------------+
| description | None                             |
| domain_id   | None                             |
| id          | dfad9917360a49e1997d6652cd7df674 |
| name        | myrole                           |
| options     | {}                               |
+-------------+----------------------------------+
[root@controller ~]#
把项目和角色授权给用户
openstack role add --project myproject --user myuser myrole
验证,查看不同用户的身份令牌
查看管理员用户的身份令牌
 openstack --os-auth-url http://controller:5000/v3 \
  --os-project-domain-name Default --os-user-domain-name Default \
  --os-project-name admin --os-username admin token issue
演示如下
[root@controller ~]#  openstack --os-auth-url http://controller:5000/v3 \
>   --os-project-domain-name Default --os-user-domain-name Default \
>   --os-project-name admin --os-username admin token issue
+------------+-----------------------------------------------------------------------------------------------------------------------------------------------------------------------------------------+
| Field      | Value
                                                                               |
+------------+-----------------------------------------------------------------------------------------------------------------------------------------------------------------------------------------+
| expires    | 2022-10-16T06:15:21+0000
                                                                               |
| id         | gAAAAABjS5NppEbUgugWE0LvOJbIw28OBNJrBTHs17Gde_2TUkg0f9FTWraXHs6StKZPdXxLdmKfOaCdZ9EyA1HcLEqmRKzu0wer0HPDXAK7wZ0ZBpXePNG1UDNsY-q3S52cTx0AU3azx1yAa0Fj8cFYHIxh1a0zmRS_aI1-GmBJhAhsr44wPSk |
| project_id | 917361e8ae54408693a5b94353c70b6d
                                                                               |
| user_id    | 1227799559cd4232acb596078850907c
                                                                               |
+------------+-----------------------------------------------------------------------------------------------------------------------------------------------------------------------------------------+
[root@controller ~]#
查看创建的普通用户令牌
openstack --os-auth-url http://controller:5000/v3 \
  --os-project-domain-name Default --os-user-domain-name Default \
  --os-project-name myproject --os-username myuser token issue
至此keystone服务简单搭建完成
镜像服务 (控制节点执行)
创建glance数据库并授权
进入msql
mysql -u root -p000000
创建数据库
CREATE DATABASE glance;
授权,记住密码!!!
GRANT ALL PRIVILEGES ON glance.* TO 'glance'@'localhost' IDENTIFIED BY '000000';
GRANT ALL PRIVILEGES ON glance.* TO 'glance'@'%' IDENTIFIED BY '000000';
演示如下
MariaDB [(none)]> CREATE DATABASE glance;
Query OK, 1 row affected (0.000 sec)

MariaDB [(none)]> GRANT ALL PRIVILEGES ON glance.* TO 'glance'@'localhost' IDENTIFIED BY '000000';
Query OK, 0 rows affected (0.001 sec)

MariaDB [(none)]> GRANT ALL PRIVILEGES ON glance.* TO 'glance'@'%' IDENTIFIED BY '000000';
Query OK, 0 rows affected (0.000 sec)

MariaDB [(none)]>
MariaDB [(none)]> exit
Bye
[root@controller ~]#
创建glance用户、用户授权
创建用户,密码000000
openstack user create --domain default --password 000000 glance
给用户授权service项目和admin角色
openstack role add --project service --user glance admin
创建一个image项目
openstack service create --name glance --description "OpenStack Image" image
演示如下
[root@controller ~]# source admin_openrch.sh
[root@controller ~]# openstack user create --domain default --password 000000 glance
+---------------------+----------------------------------+
| Field               | Value                            |
+---------------------+----------------------------------+
| domain_id           | default                          |
| enabled             | True                             |
| id                  | f24fcab7cbfa496a99c54b1764ab842c |
| name                | glance                           |
| options             | {}                               |
| password_expires_at | None                             |
+---------------------+----------------------------------+
[root@controller ~]# openstack role add --project service --user glance admin
[root@controller ~]# openstack service create --name glance --description "OpenStack Image" image
+-------------+----------------------------------+
| Field       | Value                            |
+-------------+----------------------------------+
| description | OpenStack Image                  |
| enabled     | True                             |
| id          | f43ae524ebec4c50a1ebfe000d97061a |
| name        | glance                           |
| type        | image                            |
+-------------+----------------------------------+
[root@controller ~]#
给image项目创建api端点
openstack endpoint create --region RegionOne image public http://controller:9292
openstack endpoint create --region RegionOne image internal http://controller:9292
openstack endpoint create --region RegionOne image admin http://controller:9292
演示如下
[root@controller ~]# openstack endpoint create --region RegionOne image public http://controller:9292
+--------------+----------------------------------+
| Field        | Value                            |
+--------------+----------------------------------+
| enabled      | True                             |
| id           | 04c58173f257443da04ab95d6e7be78b |
| interface    | public                           |
| region       | RegionOne                        |
| region_id    | RegionOne                        |
| service_id   | f43ae524ebec4c50a1ebfe000d97061a |
| service_name | glance                           |
| service_type | image                            |
| url          | http://controller:9292           |
+--------------+----------------------------------+
[root@controller ~]# openstack endpoint create --region RegionOne image internal http://controller:9292
+--------------+----------------------------------+
| Field        | Value                            |
+--------------+----------------------------------+
| enabled      | True                             |
| id           | ed4049a6621a4f38bc649a69eaf11bc0 |
| interface    | internal                         |
| region       | RegionOne                        |
| region_id    | RegionOne                        |
| service_id   | f43ae524ebec4c50a1ebfe000d97061a |
| service_name | glance                           |
| service_type | image                            |
| url          | http://controller:9292           |
+--------------+----------------------------------+
[root@controller ~]# openstack endpoint create --region RegionOne image admin http://controller:9292
+--------------+----------------------------------+
| Field        | Value                            |
+--------------+----------------------------------+
| enabled      | True                             |
| id           | f60e5b190aaf4c68ba3c14178fc48aeb |
| interface    | admin                            |
| region       | RegionOne                        |
| region_id    | RegionOne                        |
| service_id   | f43ae524ebec4c50a1ebfe000d97061a |
| service_name | glance                           |
| service_type | image                            |
| url          | http://controller:9292           |
+--------------+----------------------------------+
[root@controller ~]#
安装glance软件包
yum install openstack-glance -y
配置glance的/etc/glance/glance-api.conf
vi /etc/glance/glance-api.conf
[database]
#用于配置数据库连接,注意密码配置自己的000000
connection = mysql+pymysql://glance:GLANCE_DBPASS@controller/glance

[keystone_authtoken]
www_authenticate_uri  = http://controller:5000
auth_url = http://controller:5000
memcached_servers = controller:11211
auth_type = password
project_domain_name = Default
user_domain_name = Default
project_name = service
username = glance
#注意配置成自己设置的glance用户密码
password = GLANCE_PASS

[paste_deploy]
flavor = keystone

[glance_store]
stores = file,http
default_store = file
filesystem_store_datadir = /var/lib/glance/images/
#本地镜像存储位置
具体配置如下,在文件中进行修改
[database]
connection = mysql+pymysql://glance:000000@controller/glance

[keystone_authtoken]
www_authenticate_uri  = http://controller:5000
auth_url = http://controller:5000
memcached_servers = controller:11211
auth_type = password
project_domain_name = Default
user_domain_name = Default
project_name = service
username = glance
password = 000000

[paste_deploy]
flavor = keystone

[glance_store]
stores = file,http
default_store = file
filesystem_store_datadir = /var/lib/glance/images/
使用glance用户执行命令glance-manage db_sync
su -s /bin/sh -c "glance-manage db_sync" glance
演示如下
[root@controller ~]# su -s /bin/sh -c "glance-manage db_sync" glance
INFO  [alembic.runtime.migration] Context impl MySQLImpl.
INFO  [alembic.runtime.migration] Will assume non-transactional DDL.
/usr/lib/python2.7/site-packages/pymysql/cursors.py:170: Warning: (1280, u"Name 'alembic_version_pkc' ignored for PRIMARY key.")
  result = self._query(query)
INFO  [alembic.runtime.migration] Running upgrade  -> liberty, liberty initial
INFO  [alembic.runtime.migration] Running upgrade liberty -> mitaka01, add index on created_at and updated_at columns of 'images' table
INFO  [alembic.runtime.migration] Running upgrade mitaka01 -> mitaka02, update metadef os_nova_server
INFO  [alembic.runtime.migration] Running upgrade mitaka02 -> ocata_expand01, add visibility to images
INFO  [alembic.runtime.migration] Running upgrade ocata_expand01 -> pike_expand01, empty expand for symmetry with pike_contract01
INFO  [alembic.runtime.migration] Running upgrade pike_expand01 -> queens_expand01
INFO  [alembic.runtime.migration] Running upgrade queens_expand01 -> rocky_expand01, add os_hidden column to images table
INFO  [alembic.runtime.migration] Running upgrade rocky_expand01 -> rocky_expand02, add os_hash_algo and os_hash_value columns to images table
INFO  [alembic.runtime.migration] Running upgrade rocky_expand02 -> train_expand01, empty expand for symmetry with train_contract01
INFO  [alembic.runtime.migration] Context impl MySQLImpl.
INFO  [alembic.runtime.migration] Will assume non-transactional DDL.
Upgraded database to: train_expand01, current revision(s): train_expand01
INFO  [alembic.runtime.migration] Context impl MySQLImpl.
INFO  [alembic.runtime.migration] Will assume non-transactional DDL.
INFO  [alembic.runtime.migration] Context impl MySQLImpl.
INFO  [alembic.runtime.migration] Will assume non-transactional DDL.
Database migration is up to date. No migration needed.
INFO  [alembic.runtime.migration] Context impl MySQLImpl.
INFO  [alembic.runtime.migration] Will assume non-transactional DDL.
INFO  [alembic.runtime.migration] Context impl MySQLImpl.
INFO  [alembic.runtime.migration] Will assume non-transactional DDL.
INFO  [alembic.runtime.migration] Running upgrade mitaka02 -> ocata_contract01, remove is_public from images
INFO  [alembic.runtime.migration] Running upgrade ocata_contract01 -> pike_contract01, drop glare artifacts tables
INFO  [alembic.runtime.migration] Running upgrade pike_contract01 -> queens_contract01
INFO  [alembic.runtime.migration] Running upgrade queens_contract01 -> rocky_contract01
INFO  [alembic.runtime.migration] Running upgrade rocky_contract01 -> rocky_contract02
INFO  [alembic.runtime.migration] Running upgrade rocky_contract02 -> train_contract01
INFO  [alembic.runtime.migration] Context impl MySQLImpl.
INFO  [alembic.runtime.migration] Will assume non-transactional DDL.
Upgraded database to: train_contract01, current revision(s): train_contract01
INFO  [alembic.runtime.migration] Context impl MySQLImpl.
INFO  [alembic.runtime.migration] Will assume non-transactional DDL.
Database is synced successfully.
[root@controller ~]#
启动所有镜像服务并开机自启
systemctl enable openstack-glance-api.service;systemctl start openstack-glance-api.service
验证镜像服务是否成功
上传一个cirros镜像
openstack image create --disk-format qcow2 --container-format bare --file cirros-0.3.4-x86_64-disk.img glance-cirros
[root@controller ~]# openstack image create --disk-format qcow2 --container-format bare --file cirros-0.3.4-x86_64-disk.img glance-cirros
+------------------+--------------------------------------------------------------------------------------------------------------------------------------------------------------------------------------------+
| Field            | Value                                                                                                                                                                                      |
+------------------+--------------------------------------------------------------------------------------------------------------------------------------------------------------------------------------------+
| checksum         | ee1eca47dc88f4879d8a229cc70a07c6                                                                                                                                                           |
| container_format | bare                                                                                                                                                                                       |
| created_at       | 2022-10-16T06:15:10Z                                                                                                                                                                       |
| disk_format      | qcow2                                                                                                                                                                                      |
| file             | /v2/images/2d41d713-9892-47d5-9206-a8ef6b037dfb/file                                                                                                                                       |
| id               | 2d41d713-9892-47d5-9206-a8ef6b037dfb                                                                                                                                                       |
| min_disk         | 0                                                                                                                                                                                          |
| min_ram          | 0                                                                                                                                                                                          |
| name             | glance-cirros                                                                                                                                                                              |
| owner            | 917361e8ae54408693a5b94353c70b6d                                                                                                                                                           |
| properties       | os_hash_algo='sha512', os_hash_value='1b03ca1bc3fafe448b90583c12f367949f8b0e665685979d95b004e48574b953316799e23240f4f739d1b5eb4c4ca24d38fdc6f4f9d8247a2bc64db25d6bbdb2', os_hidden='False' |
| protected        | False
                                                                                        |
| schema           | /v2/schemas/image
                                                                                        |
| size             | 13287936
                                                                                        |
| status           | active
                                                                                        |
| tags             |
                                                                                        |
| updated_at       | 2022-10-16T06:15:10Z
                                                                                        |
| virtual_size     | None
                                                                                        |
| visibility       | shared
                                                                                        |
+------------------+--------------------------------------------------------------------------------------------------------------------------------------------------------------------------------------------+
[root@controller ~]#
部署服务(控制节点执行)
创建数据库placement并授权
mysql -u root -p000000
创建数据库
CREATE DATABASE placement;
授权
GRANT ALL PRIVILEGES ON placement.* TO 'placement'@'localhost' IDENTIFIED BY '000000';
GRANT ALL PRIVILEGES ON placement.* TO 'placement'@'%' IDENTIFIED BY '000000';
演示如下
MariaDB [(none)]> CREATE DATABASE placement;
Query OK, 1 row affected (0.000 sec)

MariaDB [(none)]> GRANT ALL PRIVILEGES ON placement.* TO 'placement'@'localhost' IDENTIFIED BY '000000';
Query OK, 0 rows affected (0.000 sec)

MariaDB [(none)]> GRANT ALL PRIVILEGES ON placement.* TO 'placement'@'%' IDENTIFIED BY '000000';
Query OK, 0 rows affected (0.000 sec)

MariaDB [(none)]> exit
Bye
[root@controller ~]#
创建placement用户、角色授权
创建placement用户
openstack user create --domain default --password 000000 placement
角色授权admin
openstack role add --project service --user placement admin
创建placement项目
openstack service create --name placement --description "Placement API" placement
演示如下
[root@controller ~]# openstack user create --domain default --password 000000 placement
+---------------------+----------------------------------+
| Field               | Value                            |
+---------------------+----------------------------------+
| domain_id           | default                          |
| enabled             | True                             |
| id                  | b2db8aeeea7b402da797795c4d2a5aed |
| name                | placement                        |
| options             | {}                               |
| password_expires_at | None                             |
+---------------------+----------------------------------+
[root@controller ~]# openstack role add --project service --user placement admin
[root@controller ~]# openstack service create --name placement --description "Placement API" placement
+-------------+----------------------------------+
| Field       | Value                            |
+-------------+----------------------------------+
| description | Placement API                    |
| enabled     | True                             |
| id          | 53a23dbd6345414191226d1abd2d9116 |
| name        | placement                        |
| type        | placement                        |
+-------------+----------------------------------+
[root@controller ~]#
给placement项目创建api端点
openstack endpoint create --region RegionOne placement public http://controller:8778
openstack endpoint create --region RegionOne placement internal http://controller:8778
openstack endpoint create --region RegionOne placement admin http://controller:8778
演示如下
[root@controller ~]# openstack endpoint create --region RegionOne placement public http://controller:8778
+--------------+----------------------------------+
| Field        | Value                            |
+--------------+----------------------------------+
| enabled      | True                             |
| id           | 8b730721b5194937894190c0def259f4 |
| interface    | public                           |
| region       | RegionOne                        |
| region_id    | RegionOne                        |
| service_id   | 53a23dbd6345414191226d1abd2d9116 |
| service_name | placement                        |
| service_type | placement                        |
| url          | http://controller:8778           |
+--------------+----------------------------------+
[root@controller ~]# openstack endpoint create --region RegionOne placement internal http://controller:8778
+--------------+----------------------------------+
| Field        | Value                            |
+--------------+----------------------------------+
| enabled      | True                             |
| id           | acd24e404e6d46859225ae06b2e0979f |
| interface    | internal                         |
| region       | RegionOne                        |
| region_id    | RegionOne                        |
| service_id   | 53a23dbd6345414191226d1abd2d9116 |
| service_name | placement                        |
| service_type | placement                        |
| url          | http://controller:8778           |
+--------------+----------------------------------+
[root@controller ~]# openstack endpoint create --region RegionOne placement admin http://controller:8778
+--------------+----------------------------------+
| Field        | Value                            |
+--------------+----------------------------------+
| enabled      | True                             |
| id           | 529e0bb7ad6d46da89359cd8f4516d77 |
| interface    | admin                            |
| region       | RegionOne                        |
| region_id    | RegionOne                        |
| service_id   | 53a23dbd6345414191226d1abd2d9116 |
| service_name | placement                        |
| service_type | placement                        |
| url          | http://controller:8778           |
+--------------+----------------------------------+
[root@controller ~]#
下载placement软件包
yum install openstack-placement-api -y
配置placement的 /etc/placement/placement.conf文件
vi /etc/placement/placement.conf
[placement_database]
connection = mysql+pymysql://placement:PLACEMENT_DBPASS@controller/placement
#注意密码的修改

[api]
auth_strategy = keystone

[keystone_authtoken]
auth_url = http://controller:5000/v3
memcached_servers = controller:11211
auth_type = password
project_domain_name = Default
user_domain_name = Default
project_name = service
username = placement
password = PLACEMENT_PASS
#替换成自己创建用户的密码
具体配置如下
[placement_database]
connection = mysql+pymysql://placement:000000@controller/placement

[api]
auth_strategy = keystone

[keystone_authtoken]
auth_url = http://controller:5000/v3
memcached_servers = controller:11211
auth_type = password
project_domain_name = Default
user_domain_name = Default
project_name = service
username = placement
password = 000000
使用placement用户执行命令placement-manage db sync
su -s /bin/sh -c "placement-manage db sync" placement
演示如下
[root@controller ~]# su -s /bin/sh -c "placement-manage db sync" placement
/usr/lib/python2.7/site-packages/pymysql/cursors.py:170: Warning: (1280, u"Name 'alembic_version_pkc' ignored for PRIMARY key.")
  result = self._query(query)
[root@controller ~]#
配置/etc/httpd/conf.d/00-placement-api.conf文件
解决http版本过高不放行问题(官方bug)
以下追加到文件末尾
vi /etc/httpd/conf.d/00-placement-api.conf
<Directory /usr/bin>
   <IfVersion >= 2.4>
      Require all granted
   </IfVersion>
   <IfVersion < 2.4>
      Order allow,deny
      Allow from all
   </IfVersion>
</Directory>
重启httpd
systemctl restart httpd
验证服务
placement-status upgrade check
演示如下
[root@controller ~]# placement-status upgrade check
+----------------------------------+
| Upgrade Check Results            |
+----------------------------------+
| Check: Missing Root Provider IDs |
| Result: Success                  |
| Details: None                    |
+----------------------------------+
| Check: Incomplete Consumers      |
| Result: Success                  |
| Details: None                    |
+----------------------------------+
[root@controller ~]#
计算服务
控制节点
创建nova、nova_api、nova_cell0数据库并授权
mysql -u root -p000000
创建数据库
CREATE DATABASE nova_api;
CREATE DATABASE nova;
CREATE DATABASE nova_cell0;
nova api数据库授权
GRANT ALL PRIVILEGES ON nova_api.* TO 'nova'@'localhost' IDENTIFIED BY '000000';
GRANT ALL PRIVILEGES ON nova_api.* TO 'nova'@'%' IDENTIFIED BY '000000';
nova数据库授权
GRANT ALL PRIVILEGES ON nova.* TO 'nova'@'localhost' IDENTIFIED BY '000000';
GRANT ALL PRIVILEGES ON nova.* TO 'nova'@'%' IDENTIFIED BY '000000';
nova cell0数据库授权
GRANT ALL PRIVILEGES ON nova_cell0.* TO 'nova'@'localhost' IDENTIFIED BY '000000';
GRANT ALL PRIVILEGES ON nova_cell0.* TO 'nova'@'%' IDENTIFIED BY '000000';
演示如下
MariaDB [(none)]> CREATE DATABASE nova_api;
Query OK, 1 row affected (0.001 sec)

MariaDB [(none)]> CREATE DATABASE nova;
Query OK, 1 row affected (0.000 sec)

MariaDB [(none)]> CREATE DATABASE nova_cell0;
Query OK, 1 row affected (0.000 sec)

MariaDB [(none)]> GRANT ALL PRIVILEGES ON nova_api.* TO 'nova'@'localhost' IDENTIFIED BY '000000';
Query OK, 0 rows affected (0.001 sec)

MariaDB [(none)]> GRANT ALL PRIVILEGES ON nova_api.* TO 'nova'@'%' IDENTIFIED BY '000000';
Query OK, 0 rows affected (0.000 sec)

MariaDB [(none)]> GRANT ALL PRIVILEGES ON nova.* TO 'nova'@'localhost' IDENTIFIED BY '000000';
Query OK, 0 rows affected (0.000 sec)

MariaDB [(none)]> GRANT ALL PRIVILEGES ON nova.* TO 'nova'@'%' IDENTIFIED BY '000000';
Query OK, 0 rows affected (0.000 sec)

MariaDB [(none)]> GRANT ALL PRIVILEGES ON nova_cell0.* TO 'nova'@'localhost' IDENTIFIED BY '000000';
Query OK, 0 rows affected (0.000 sec)

MariaDB [(none)]> GRANT ALL PRIVILEGES ON nova_cell0.* TO 'nova'@'%' IDENTIFIED BY '000000';
Query OK, 0 rows affected (0.000 sec)

MariaDB [(none)]> exit
Bye
[root@controller ~]#
创建nova用户、授权admin角色
openstack user create --domain default --password 000000 nova
用户授权
openstack role add --project service --user nova admin
创建nova计算服务
openstack service create --name nova --description "OpenStack Compute" compute
演示如下
[root@controller ~]# openstack user create --domain default --password 000000 nova
+---------------------+----------------------------------+
| Field               | Value                            |
+---------------------+----------------------------------+
| domain_id           | default                          |
| enabled             | True                             |
| id                  | 69a915f3740f48efbf4676418973ccd1 |
| name                | nova                             |
| options             | {}                               |
| password_expires_at | None                             |
+---------------------+----------------------------------+
[root@controller ~]# openstack role add --project service --user nova admin
[root@controller ~]# openstack service create --name nova --description "OpenStack Compute" compute
+-------------+----------------------------------+
| Field       | Value                            |
+-------------+----------------------------------+
| description | OpenStack Compute                |
| enabled     | True                             |
| id          | e700dd5420dd459ebfb16675b6781679 |
| name        | nova                             |
| type        | compute                          |
+-------------+----------------------------------+
[root@controller ~]#
创建compute的服务api端点
openstack endpoint create --region RegionOne compute public http://controller:8774/v2.1
openstack endpoint create --region RegionOne compute internal http://controller:8774/v2.1
openstack endpoint create --region RegionOne compute admin http://controller:8774/v2.1
演示如下
[root@controller ~]# openstack endpoint create --region RegionOne compute public http://controller:8774/v2.1
+--------------+----------------------------------+
| Field        | Value                            |
+--------------+----------------------------------+
| enabled      | True                             |
| id           | da462f8cad0c42e6b2b5d9ede01875e0 |
| interface    | public                           |
| region       | RegionOne                        |
| region_id    | RegionOne                        |
| service_id   | e700dd5420dd459ebfb16675b6781679 |
| service_name | nova                             |
| service_type | compute                          |
| url          | http://controller:8774/v2.1      |
+--------------+----------------------------------+
[root@controller ~]# openstack endpoint create --region RegionOne compute internal http://controller:8774/v2.1
+--------------+----------------------------------+
| Field        | Value                            |
+--------------+----------------------------------+
| enabled      | True                             |
| id           | 82189935e36547b79d606cb6ee1619e2 |
| interface    | internal                         |
| region       | RegionOne                        |
| region_id    | RegionOne                        |
| service_id   | e700dd5420dd459ebfb16675b6781679 |
| service_name | nova                             |
| service_type | compute                          |
| url          | http://controller:8774/v2.1      |
+--------------+----------------------------------+
[root@controller ~]# openstack endpoint create --region RegionOne compute admin http://controller:8774/v2.1
+--------------+----------------------------------+
| Field        | Value                            |
+--------------+----------------------------------+
| enabled      | True                             |
| id           | a24918423a76400fbe2cc9018fa4fba0 |
| interface    | admin                            |
| region       | RegionOne                        |
| region_id    | RegionOne                        |
| service_id   | e700dd5420dd459ebfb16675b6781679 |
| service_name | nova                             |
| service_type | compute                          |
| url          | http://controller:8774/v2.1      |
+--------------+----------------------------------+
[root@controller ~]#
安装nova软件包
yum install openstack-nova-api openstack-nova-conductor openstack-nova-novncproxy openstack-nova-scheduler -y
配置nova的 /etc/nova/nova.conf文件
vi /etc/nova/nova.conf
[DEFAULT]
enabled_apis = osapi_compute,metadata
my_ip = 10.0.0.11
#控制节点的IP
use_neutron = true
firewall_driver = nova.virt.firewall.NoopFirewallDriver
transport_url = rabbit://openstack:RABBIT_PASS@controller:5672/
#更换rabbitmq的密码

[api_database]
connection = mysql+pymysql://nova:NOVA_DBPASS@controller/nova_api
#nova_api的数据库远程访问密码记得替换

[database]
connection = mysql+pymysql://nova:NOVA_DBPASS@controller/nova
#nova数据库远程访问密码记得替换

[api]
auth_strategy = keystone

[keystone_authtoken]
www_authenticate_uri = http://controller:5000/
auth_url = http://controller:5000/
memcached_servers = controller:11211
auth_type = password
project_domain_name = Default
user_domain_name = Default
project_name = service
username = nova
password = NOVA_PASS
#替换nova用户的密码

[vnc]
enabled = true
server_listen = $my_ip
server_proxyclient_address = $my_ip

[glance]
api_servers = http://controller:9292

[oslo_concurrency]
lock_path = /var/lib/nova/tmp

[placement]
region_name = RegionOne
project_domain_name = Default
project_name = service
auth_type = password
user_domain_name = Default
auth_url = http://controller:5000/v3
username = placement
password = PLACEMENT_PASS
#提供placement用户的密码
具体配置如下
[DEFAULT]
enabled_apis = osapi_compute,metadata
my_ip = 192.168.200.10
use_neutron = true
firewall_driver = nova.virt.firewall.NoopFirewallDriver
transport_url = rabbit://openstack:000000@controller:5672/

[api_database]
connection = mysql+pymysql://nova:000000@controller/nova_api

[database]
connection = mysql+pymysql://nova:000000@controller/nova

[api]
auth_strategy = keystone

[keystone_authtoken]
www_authenticate_uri = http://controller:5000/
auth_url = http://controller:5000/
memcached_servers = controller:11211
auth_type = password
project_domain_name = Default
user_domain_name = Default
project_name = service
username = nova
password = 000000

[vnc]
enabled = true
server_listen = $my_ip
server_proxyclient_address = $my_ip

[glance]
api_servers = http://controller:9292

[oslo_concurrency]
lock_path = /var/lib/nova/tmp

[placement]
region_name = RegionOne
project_domain_name = Default
project_name = service
auth_type = password
user_domain_name = Default
auth_url = http://controller:5000/v3
username = placement
password = 000000
使用nova用户执行命令nova-manage api_db sync
su -s /bin/sh -c "nova-manage api_db sync" nova
使用nova用户执行命令nova-manage cell_v2 map_cell0
su -s /bin/sh -c "nova-manage cell_v2 map_cell0" nova
使用nova用户执行命令nova-manage cell_v2 create_cell --name=cell1 --verbose
su -s /bin/sh -c "nova-manage cell_v2 create_cell --name=cell1 --verbose" nova
使用nova用户执行命令nova-manage db sync
su -s /bin/sh -c "nova-manage db sync" nova
使用nova用户执行nova-manage cell_v2 list_cells
su -s /bin/sh -c "nova-manage cell_v2 list_cells" nova
演示如下
[root@controller ~]# su -s /bin/sh -c "nova-manage api_db sync" nova
[root@controller ~]# su -s /bin/sh -c "nova-manage cell_v2 map_cell0" nova
[root@controller ~]# su -s /bin/sh -c "nova-manage cell_v2 create_cell --name=cell1 --verbose" nova
a7973c29-4110-484d-96d9-7fcc84615a67
[root@controller ~]# su -s /bin/sh -c "nova-manage db sync" nova
/usr/lib/python2.7/site-packages/pymysql/cursors.py:170: Warning: (1831, u'Duplicate index `block_device_mapping_instance_uuid_virtual_name_device_name_idx`. This is deprecated and will be disallowed in a future release')
  result = self._query(query)
/usr/lib/python2.7/site-packages/pymysql/cursors.py:170: Warning: (1831, u'Duplicate index `uniq_instances0uuid`. This is deprecated and will be disallowed in a future release')
  result = self._query(query)
[root@controller ~]# su -s /bin/sh -c "nova-manage cell_v2 list_cells" nova
+-------+--------------------------------------+------------------------------------------+-------------------------------------------------+----------+
|  Name |                 UUID                 |              Transport URL               |               Database Connection               | Disabled |
+-------+--------------------------------------+------------------------------------------+-------------------------------------------------+----------+
| cell0 | 00000000-0000-0000-0000-000000000000 |                  none:/                  | mysql+pymysql://nova:****@controller/nova_cell0 |  False   |
| cell1 | a7973c29-4110-484d-96d9-7fcc84615a67 | rabbit://openstack:****@controller:5672/ |    mysql+pymysql://nova:****@controller/nova    |  False   |
+-------+--------------------------------------+------------------------------------------+-------------------------------------------------+----------+
[root@controller ~]#
启动并开机自启nova服务
systemctl enable \
    openstack-nova-api.service \
    openstack-nova-scheduler.service \
    openstack-nova-conductor.service \
    openstack-nova-novncproxy.service
systemctl start \
    openstack-nova-api.service \
    openstack-nova-scheduler.service \
    openstack-nova-conductor.service \
    openstack-nova-novncproxy.service
验证服务
openstack compute service list
演示如下
[root@controller ~]# openstack compute service list
+----+----------------+------------+----------+---------+-------+----------------------------+
| ID | Binary         | Host       | Zone     | Status  | State | Updated At                 |
+----+----------------+------------+----------+---------+-------+----------------------------+
|  1 | nova-conductor | controller | internal | enabled | up    | 2022-10-16T07:47:57.000000 |
|  2 | nova-scheduler | controller | internal | enabled | up    | 2022-10-16T07:47:58.000000 |
+----+----------------+------------+----------+---------+-------+----------------------------+
[root@controller ~]#
计算节点
安装nova-compute需要的软件包(注意nova是基于nova-节点安装了T版软件源的)
yum install openstack-nova-compute -y
配置nova的/etc/nova/nova.conf配置文件
vi /etc/nova/nova.conf
[DEFAULT]
enabled_apis = osapi_compute,metadata
transport_url = rabbit://openstack:RABBIT_PASS@controller
#注意替换rabbitmq中openstack用户密码
my_ip = MANAGEMENT_INTERFACE_IP_ADDRESS
#计算节点IP
use_neutron = true
firewall_driver = nova.virt.firewall.NoopFirewallDriver

[api]
auth_strategy = keystone

[keystone_authtoken]
www_authenticate_uri = http://controller:5000/
auth_url = http://controller:5000/
memcached_servers = controller:11211
auth_type = password
project_domain_name = Default
user_domain_name = Default
project_name = service
username = nova
password = NOVA_PASS
#注意替换控制节点nova用户密码

[vnc]
enabled = true
server_listen = 0.0.0.0
server_proxyclient_address = $my_ip
novncproxy_base_url = http://controller:6080/vnc_auto.html
#把controller改成ip,不然浏览器访问不了云主机vnc界面

[glance]
api_servers = http://controller:9292

[oslo_concurrency]
lock_path = /var/lib/nova/tmp

[placement]
region_name = RegionOne
project_domain_name = Default
project_name = service
auth_type = password
user_domain_name = Default
auth_url = http://controller:5000/v3
username = placement
password = PLACEMENT_PASS
#注意替换novaplacement用户密码
[DEFAULT]
enabled_apis = osapi_compute,metadata
transport_url = rabbit://openstack:000000@controller
my_ip = 192.168.200.20
use_neutron = true
firewall_driver = nova.virt.firewall.NoopFirewallDriver

[api]
auth_strategy = keystone

[keystone_authtoken]
www_authenticate_uri = http://controller:5000/
auth_url = http://controller:5000/
memcached_servers = controller:11211
auth_type = password
project_domain_name = Default
user_domain_name = Default
project_name = service
username = nova
password = 000000

[vnc]
enabled = true
server_listen = 0.0.0.0
server_proxyclient_address = $my_ip
novncproxy_base_url = http://192.168.200.10:6080/vnc_auto.html

[glance]
api_servers = http://controller:9292

[oslo_concurrency]
lock_path = /var/lib/nova/tmp

[placement]
region_name = RegionOne
project_domain_name = Default
project_name = service
auth_type = password
user_domain_name = Default
auth_url = http://controller:5000/v3
username = placement
password = 000000
确定计算节点是否支持虚拟机的硬件加速:如果此命令返回一个或更大的值,则计算节点支持硬件加速,而硬件加速通常不需要额外的配置。如果此命令返回的值为零,则计算节点不支持硬件加速,并且必须配置/etc/nova/nova.conf下的libvirt以使用QEMU而不是KVM。
egrep -c '(vmx|svm)' /proc/cpuinfo
[libvirt]
virt_type = qemu
演示如下
[root@compute ~]# egrep -c '(vmx|svm)' /proc/cpuinfo
4
[root@compute ~]#
#支持则不用配置
启动并自启nova-compute服务
systemctl enable libvirtd.service openstack-nova-compute.service;systemctl start libvirtd.service openstack-nova-compute.service
在控制节点执行如下命令进行查看验证
查找管理员凭据以启用仅限管理员的CLI命令,然后确认数据库中存在计算主机
openstack compute service list --service nova-compute
发现计算主机
su -s /bin/sh -c "nova-manage cell_v2 discover_hosts --verbose" nova
演示如下
[root@controller ~]# openstack compute service list --service nova-compute
+----+--------------+---------+------+---------+-------+----------------------------+
| ID | Binary       | Host    | Zone | Status  | State | Updated At                 |
+----+--------------+---------+------+---------+-------+----------------------------+
|  5 | nova-compute | compute | nova | enabled | up    | 2022-10-16T08:09:29.000000 |
+----+--------------+---------+------+---------+-------+----------------------------+
[root@controller ~]# su -s /bin/sh -c "nova-manage cell_v2 discover_hosts --verbose" nova
Found 2 cell mappings.
Skipping cell0 since it does not contain hosts.
Getting computes from cell 'cell1': a7973c29-4110-484d-96d9-7fcc84615a67
Checking host mapping for compute host 'compute': 75d40f3c-7c7c-4f79-95d6-ae8a24f2869f
Creating host mapping for compute host 'compute': 75d40f3c-7c7c-4f79-95d6-ae8a24f2869f
Found 1 unmapped computes in cell: a7973c29-4110-484d-96d9-7fcc84615a67
[root@controller ~]#
添加新计算节点时,必须在控制器节点上运行nova manage cell_v2 discover_hosts以注册这些新计算节点
[scheduler]
discover_hosts_in_cells_interval = 300
如果查看日志发现找不到主机的报错
2022-10-22 02:46:52.084 9077 INFO nova.scheduler.host_manager [req-9bd8f58e-6113-407f-835f-cb77584809a4 - - - - -] Received a sync request from an unknown host 'compute'. Re-created its InstanceList
1,两个节点检查selinux,和防火墙是否关闭
2,重启控制节点nova服务,再重启计算节点nova服务
网络服务
控制节点
创建neutron数据库并授权
进入数据库
mysql -u root -p000000
创建neutron数据库
CREATE DATABASE neutron;
授权
GRANT ALL PRIVILEGES ON neutron.* TO 'neutron'@'localhost' IDENTIFIED BY '000000';
GRANT ALL PRIVILEGES ON neutron.* TO 'neutron'@'%' IDENTIFIED BY '000000';
演示如下
MariaDB [(none)]> CREATE DATABASE neutron;
Query OK, 1 row affected (0.001 sec)

MariaDB [(none)]> GRANT ALL PRIVILEGES ON neutron.* TO 'neutron'@'localhost' IDENTIFIED BY '000000';
Query OK, 0 rows affected (0.001 sec)

MariaDB [(none)]> GRANT ALL PRIVILEGES ON neutron.* TO 'neutron'@'%' IDENTIFIED BY '000000';
Query OK, 0 rows affected (0.000 sec)

MariaDB [(none)]> exit
Bye
[root@controller ~]#
创建neutron用户、角色授权、网络服务
openstack user create --domain default --password 000000 neutron
neutron授权admin角色
openstack role add --project service --user neutron admin
创建neutron网络服务
openstack service create --name neutron --description "OpenStack Networking" network
演示如下
[root@controller ~]# openstack user create --domain default --password 000000 neutron
+---------------------+----------------------------------+
| Field               | Value                            |
+---------------------+----------------------------------+
| domain_id           | default                          |
| enabled             | True                             |
| id                  | 48a4ad7e44834b09a16f3d6e7368e490 |
| name                | neutron                          |
| options             | {}                               |
| password_expires_at | None                             |
+---------------------+----------------------------------+
[root@controller ~]# openstack role add --project service --user neutron admin
[root@controller ~]# openstack service create --name neutron --description "OpenStack Networking" network
+-------------+----------------------------------+
| Field       | Value                            |
+-------------+----------------------------------+
| description | OpenStack Networking             |
| enabled     | True                             |
| id          | 529f1e8e89cb45feae2b9255e9480f75 |
| name        | neutron                          |
| type        | network                          |
+-------------+----------------------------------+
[root@controller ~]#
创建网络服务的api端点
openstack endpoint create --region RegionOne network public http://controller:9696
openstack endpoint create --region RegionOne network internal http://controller:9696
openstack endpoint create --region RegionOne network admin http://controller:9696
演示如下
[root@controller ~]# openstack endpoint create --region RegionOne network public http://controller:9696
+--------------+----------------------------------+
| Field        | Value                            |
+--------------+----------------------------------+
| enabled      | True                             |
| id           | c3708a63ff0a4321b0470a6ea5439081 |
| interface    | public                           |
| region       | RegionOne                        |
| region_id    | RegionOne                        |
| service_id   | 529f1e8e89cb45feae2b9255e9480f75 |
| service_name | neutron                          |
| service_type | network                          |
| url          | http://controller:9696           |
+--------------+----------------------------------+
[root@controller ~]# openstack endpoint create --region RegionOne network internal http://controller:9696
+--------------+----------------------------------+
| Field        | Value                            |
+--------------+----------------------------------+
| enabled      | True                             |
| id           | 2d05cac65bcd47a2b2d430cd3ae0a6dc |
| interface    | internal                         |
| region       | RegionOne                        |
| region_id    | RegionOne                        |
| service_id   | 529f1e8e89cb45feae2b9255e9480f75 |
| service_name | neutron                          |
| service_type | network                          |
| url          | http://controller:9696           |
+--------------+----------------------------------+
[root@controller ~]# openstack endpoint create --region RegionOne network admin http://controller:9696
+--------------+----------------------------------+
| Field        | Value                            |
+--------------+----------------------------------+
| enabled      | True                             |
| id           | 0aef6a92185f4ea2bd6f4b400653abe4 |
| interface    | admin                            |
| region       | RegionOne                        |
| region_id    | RegionOne                        |
| service_id   | 529f1e8e89cb45feae2b9255e9480f75 |
| service_name | neutron                          |
| service_type | network                          |
| url          | http://controller:9696           |
+--------------+----------------------------------+
[root@controller ~]#
官网提供的网络选择Provider networks网络
安装软件包
yum install openstack-neutron openstack-neutron-ml2 \
  openstack-neutron-linuxbridge ebtables -y
配置 /etc/neutron/neutron.conf 文件
vi /etc/neutron/neutron.conf
[database]
connection = mysql+pymysql://neutron:NEUTRON_DBPASS@controller/neutron
#注意配置密码

[DEFAULT]
core_plugin = ml2
service_plugins =
transport_url = rabbit://openstack:RABBIT_PASS@controller
#注意配置密码
auth_strategy = keystone
notify_nova_on_port_status_changes = true
notify_nova_on_port_data_changes = true

[keystone_authtoken]
www_authenticate_uri = http://controller:5000
auth_url = http://controller:5000
memcached_servers = controller:11211
auth_type = password
project_domain_name = default
user_domain_name = default
project_name = service
username = neutron
password = NEUTRON_PASS
#注意配置密码

[nova]
#注意在配置nova的时候会发现文件中没有[nova],没有的话就自己手动添加文件末尾即可
auth_url = http://controller:5000
auth_type = password
project_domain_name = default
user_domain_name = default
region_name = RegionOne
project_name = service
username = nova
password = NOVA_PASS
#注意配置密码

[oslo_concurrency]
lock_path = /var/lib/neutron/tmp
具体配置如下
[database]
connection = mysql+pymysql://neutron:000000@controller/neutron

[DEFAULT]
core_plugin = ml2
service_plugins =
transport_url = rabbit://openstack:000000@controller
auth_strategy = keystone
notify_nova_on_port_status_changes = true
notify_nova_on_port_data_changes = true

[keystone_authtoken]
www_authenticate_uri = http://controller:5000
auth_url = http://controller:5000
memcached_servers = controller:11211
auth_type = password
project_domain_name = default
user_domain_name = default
project_name = service
username = neutron
password = 000000

[nova]
auth_url = http://controller:5000
auth_type = password
project_domain_name = default
user_domain_name = default
region_name = RegionOne
project_name = service
username = nova
password = 000000

[oslo_concurrency]
lock_path = /var/lib/neutron/tmp
配置 /etc/neutron/plugins/ml2/ml2_conf.ini文件
以下的配置参数文件中都没有,可直接手动追加都文件末尾
[ml2]
type_drivers = flat,vlan
tenant_network_types =
mechanism_drivers = linuxbridge
extension_drivers = port_security

[ml2_type_flat]
flat_networks = provider

[securitygroup]
enable_ipset = true
配置/etc/neutron/plugins/ml2/linuxbridge_agent.ini文件
vi /etc/neutron/plugins/ml2/linuxbridge_agent.ini
以下配置文件均需要手动追加到文件末尾
[linux_bridge]
physical_interface_mappings = provider:PROVIDER_INTERFACE_NAME
#此处配置物理的网络接口,注意修改为实际的物理网卡名,provider对应上面flat_networks = provider

[vxlan]
enable_vxlan = false
#关闭vxlan模式

[securitygroup]
enable_security_group = true
firewall_driver = neutron.agent.linux.iptables_firewall.IptablesFirewallDriver
具体配置如下
[linux_bridge]
physical_interface_mappings = provider:ens34

[vxlan]
enable_vxlan = false

[securitygroup]
enable_security_group = true
firewall_driver = neutron.agent.linux.iptables_firewall.IptablesFirewallDriver
开启Linux操作系统内核支持网桥筛选器
加载br_netfilter内核模块
modprobe br_netfilter
配置/etc/sysctl.conf追加
net.bridge.bridge-nf-call-iptables = 1
net.bridge.bridge-nf-call-ip6tables = 1
启动生效配置
sysctl -p
演示如下
[root@controller ~]# modprobe  br_netfilter
[root@controller ~]# vi /etc/sysctl.conf
[root@controller ~]# sysctl -p
net.bridge.bridge-nf-call-iptables = 1
net.bridge.bridge-nf-call-ip6tables = 1
[root@controller ~]#
配置/etc/neutron/dhcp_agent.ini文件
配置Linux网桥接口驱动程序Dnsmasq DHCP驱动程序,并启用独立元数据,以便提供商网络上的实例可以通过网络访问元数据
vi /etc/neutron/dhcp_agent.ini
[DEFAULT]
interface_driver = linuxbridge
dhcp_driver = neutron.agent.linux.dhcp.Dnsmasq
enable_isolated_metadata = true
配置/etc/neutron/metadata_agent.ini文件
vi /etc/neutron/metadata_agent.ini
配置访问参数,启用元数据代理,并配置机密,METADATA_SECRET是可变的,这里就设置成000000,它对应下面配置nova.conf文件,保持一致就行
[DEFAULT]
nova_metadata_host = controller
metadata_proxy_shared_secret = 000000
配置/etc/nova/nova.conf文件
[neutron]
auth_url = http://controller:5000
auth_type = password
project_domain_name = default
user_domain_name = default
region_name = RegionOne
project_name = service
username = neutron
password = NEUTRON_PASS
#注意修改密码
service_metadata_proxy = true
metadata_proxy_shared_secret = METADATA_SECRET
#注意指定元数据密码为000000,注意修改
如下所示
[neutron]
auth_url = http://controller:5000
auth_type = password
project_domain_name = default
user_domain_name = default
region_name = RegionOne
project_name = service
username = neutron
password = 000000
service_metadata_proxy = true
metadata_proxy_shared_secret = 000000
软连接
ln -s /etc/neutron/plugins/ml2/ml2_conf.ini /etc/neutron/plugin.ini
填充数据库
su -s /bin/sh -c "neutron-db-manage --config-file /etc/neutron/neutron.conf \
  --config-file /etc/neutron/plugins/ml2/ml2_conf.ini upgrade head" neutron
演示如下
[root@controller ~]# ln -s /etc/neutron/plugins/ml2/ml2_conf.ini /etc/neutron/plugin.ini
[root@controller ~]# su -s /bin/sh -c "neutron-db-manage --config-file /etc/neutron/neutron.conf \
>   --config-file /etc/neutron/plugins/ml2/ml2_conf.ini upgrade head" neutron
INFO  [alembic.runtime.migration] Context impl MySQLImpl.
INFO  [alembic.runtime.migration] Will assume non-transactional DDL.
/usr/lib/python2.7/site-packages/pymysql/cursors.py:170: Warning: (1280, u"Name 'alembic_version_pkc' ignored for PRIMARY key.")
  result = self._query(query)
  Running upgrade for neutron ...
INFO  [alembic.runtime.migration] Context impl MySQLImpl.
INFO  [alembic.runtime.migration] Will assume non-transactional DDL.
INFO  [alembic.runtime.migration] Running upgrade  -> kilo
INFO  [alembic.runtime.migration] Running upgrade kilo -> 354db87e3225
INFO  [alembic.runtime.migration] Running upgrade 354db87e3225 -> 599c6a226151
..........
INFO  [alembic.runtime.migration] Running upgrade 97c25b0d2353 -> 2e0d7a8a1586
INFO  [alembic.runtime.migration] Running upgrade 2e0d7a8a1586 -> 5c85685d616d
  OK
[root@controller ~]#
修改/etc/nova/nova.conf,解决t MessagingTimeout: Timed out
vi /etc/nova/nova.conf

rpc_response_timeout=300
重新启动计算API服务
systemctl restart openstack-nova-api.service
启动并开机自启相关网络服务
systemctl enable neutron-server.service \
  neutron-linuxbridge-agent.service neutron-dhcp-agent.service \
  neutron-metadata-agent.service
systemctl start neutron-server.service \
  neutron-linuxbridge-agent.service neutron-dhcp-agent.service \
  neutron-metadata-agent.service
验证测试
openstack network agent list
演示如下
[root@controller ~]#  openstack network agent list
+--------------------------------------+--------------------+------------+-------------------+-------+-------+---------------------------+
| ID                                   | Agent Type         | Host       | Availability Zone | Alive | State | Binary                    |
+--------------------------------------+--------------------+------------+-------------------+-------+-------+---------------------------+
| 644370fc-acd9-4dc5-984c-60b5296792ce | Linux bridge agent | controller | None              | :-)   | UP    | neutron-linuxbridge-agent |
| 9f95d84c-3ee5-4c52-8a23-a53386d75f3c | Metadata agent     | controller | None              | :-)   | UP    | neutron-metadata-agent    |
| fa15a4de-7c82-4980-aa12-a7291a4911d0 | DHCP agent         | controller | nova              | :-)   | UP    | neutron-dhcp-agent        |
+--------------------------------------+--------------------+------------+-------------------+-------+-------+---------------------------+
[root@controller ~]#
查看三个网络组件的日志
tail -f /var/log/neutron/linuxbridge-agent.log
查看组件的日志信息
[root@controller ~]# tail -f /var/log/neutron/linuxbridge-agent.log
2022-10-16 07:34:10.623 35556 INFO oslo.privsep.daemon [-] privsep process running with capabilities (eff/prm/inh): CAP_DAC_OVERRIDE|CAP_DAC_READ_SEARCH|CAP_NET_ADMIN|CAP_SYS_ADMIN|CAP_SYS_PTRACE/CAP_DAC_OVERRIDE|CAP_DAC_READ_SEARCH|CAP_NET_ADMIN|CAP_SYS_ADMIN|CAP_SYS_PTRACE/none
2022-10-16 07:34:10.623 35556 INFO oslo.privsep.daemon [-] privsep daemon running as pid 35556
2022-10-16 07:34:10.985 35509 INFO neutron.plugins.ml2.drivers.linuxbridge.agent.linuxbridge_neutron_agent [-] Agent initialized successfully, now running...
2022-10-16 07:34:11.187 35509 INFO oslo_rootwrap.client [req-6a2b1f3f-de1d-47a8-ab68-4da41cd693e6 - - - - -] Spawned new rootwrap daemon process with pid=35563
2022-10-16 07:34:11.214 35509 INFO neutron.plugins.ml2.drivers.agent._common_agent [req-6a2b1f3f-de1d-47a8-ab68-4da41cd693e6 - - - - -] RPC agent_id: lb000c2905c5d0
2022-10-16 07:34:11.220 35509 INFO neutron.agent.agent_extensions_manager [req-6a2b1f3f-de1d-47a8-ab68-4da41cd693e6 - - - - -] Loaded agent extensions: []
2022-10-16 07:34:11.386 35509 INFO neutron.plugins.ml2.drivers.agent._common_agent [req-6a2b1f3f-de1d-47a8-ab68-4da41cd693e6 - - - - -] Linux bridge agent Agent RPC Daemon Started!
2022-10-16 07:34:11.386 35509 INFO neutron.plugins.ml2.drivers.agent._common_agent [req-6a2b1f3f-de1d-47a8-ab68-4da41cd693e6 - - - - -] Linux bridge agent Agent out of sync with plugin!
2022-10-16 07:34:11.393 35509 INFO neutron.plugins.ml2.drivers.linuxbridge.agent.arp_protect [req-6a2b1f3f-de1d-47a8-ab68-4da41cd693e6 - - - - -] Clearing orphaned ARP spoofing entries for devices []
2022-10-16 07:34:11.397 35509 INFO neutron.plugins.ml2.drivers.linuxbridge.agent.arp_protect [req-6a2b1f3f-de1d-47a8-ab68-4da41cd693e6 - - - - -] Clearing orphaned ARP spoofing entries for devices []
查看Metadata agent组件的日志信息
[root@controller ~]# tail -f /var/log/neutron/metadata-agent.log
2022-10-16 07:34:08.480 34917 INFO oslo_service.service [req-4634f191-132d-4d47-ae92-199a2daf4a36 - - - - -] Waiting on 2 children to exit
2022-10-16 07:34:08.484 34946 INFO eventlet.wsgi.server [-] (34946) wsgi exited, is_accepting=True
2022-10-16 07:34:08.487 34917 INFO oslo_service.service [req-4634f191-132d-4d47-ae92-199a2daf4a36 - - - - -] Child 34946 exited with status 0
2022-10-16 07:34:08.488 34945 INFO eventlet.wsgi.server [-] (34945) wsgi exited, is_accepting=True
2022-10-16 07:34:08.491 34917 INFO oslo_service.service [req-4634f191-132d-4d47-ae92-199a2daf4a36 - - - - -] Child 34945 exited with status 0
2022-10-16 07:34:10.180 35513 INFO neutron.common.config [-] Logging enabled!
2022-10-16 07:34:10.181 35513 INFO neutron.common.config [-] /usr/bin/neutron-metadata-agent version 15.3.4
2022-10-16 07:34:10.191 35513 INFO oslo_service.service [req-89f88064-e087-4641-a3c7-7e99f735d265 - - - - -] Starting 2 workers
2022-10-16 07:34:10.197 35546 INFO eventlet.wsgi.server [-] (35546) wsgi starting up on http:/var/lib/neutron/metadata_proxy
2022-10-16 07:34:10.203 35547 INFO eventlet.wsgi.server [-] (35547) wsgi starting up on http:/var/lib/neutron/metadata_proxy
查看DHCP agent组件的日志信息
[root@controller ~]# tail -f /var/log/neutron/dhcp-agent.log
2022-10-16 07:35:59.507 35610 INFO neutron.agent.dhcp.agent [-] Synchronizing state
2022-10-16 07:35:59.512 35610 INFO neutron.agent.dhcp.agent [req-6db7a7ab-574a-47d2-a590-d9615d0e601e - - - - -] DHCP agent started
2022-10-16 07:35:59.603 35610 INFO neutron.agent.dhcp.agent [req-cc987f67-d23a-416a-888f-c621de7590df - - - - -] All active networks have been fetched through RPC.
2022-10-16 07:35:59.603 35610 INFO neutron.agent.dhcp.agent [req-cc987f67-d23a-416a-888f-c621de7590df - - - - -] Synchronizing state complete
2022-10-16 07:41:43.367 35944 INFO neutron.common.config [-] Logging enabled!
2022-10-16 07:41:43.368 35944 INFO neutron.common.config [-] /usr/bin/neutron-dhcp-agent version 15.3.4
2022-10-16 07:41:43.749 35944 INFO neutron.agent.dhcp.agent [-] Synchronizing state
2022-10-16 07:41:43.842 35944 INFO neutron.agent.dhcp.agent [req-54116955-5ce6-407b-b121-9874b907e495 - - - - -] All active networks have been fetched through RPC.
2022-10-16 07:41:43.843 35944 INFO neutron.agent.dhcp.agent [req-54116955-5ce6-407b-b121-9874b907e495 - - - - -] Synchronizing state complete
2022-10-16 07:41:43.863 35944 INFO neutron.agent.dhcp.agent [req-54116955-5ce6-407b-b121-9874b907e495 - - - - -] DHCP agent started
常见问题
本实验使用的是二层网络所以不要启动官网使用的neutron-l3-agent.service服务,这是三层网络,如果开启此服务,则需要配置驱动接口,不然会报错
2022-10-16 07:27:06.819 35159 INFO neutron.common.config [-] /usr/bin/neutron-l3-agent version 15.3.4
2022-10-16 07:27:07.126 35159 ERROR neutron.agent.l3.agent [-] An interface driver must be specified
需要配置接口驱动程序才能使用
vi /etc/neutron/l3_agent.ini

[DEFAULT]
interface_driver = linuxbridge

systemctl enable neutron-l3-agent.service
systemctl start neutron-l3-agent.service
然后再开启相应的vxlan等网络模式,就能使用了
计算节点
安装软件包
yum install openstack-neutron-linuxbridge ebtables ipset -y
配置/etc/neutron/neutron.conf 文件
vi /etc/neutron/neutron.conf
[DEFAULT]
transport_url = rabbit://openstack:RABBIT_PASS@controller
#修改成自己设置的密码
auth_strategy = keystone

[keystone_authtoken]
www_authenticate_uri = http://controller:5000
auth_url = http://controller:5000
memcached_servers = controller:11211
auth_type = password
project_domain_name = default
user_domain_name = default
project_name = service
username = neutron
password = NEUTRON_PASS
#修改成自己设置的密码

[oslo_concurrency]
lock_path = /var/lib/neutron/tmp
具体配置如下
[DEFAULT]
transport_url = rabbit://openstack:000000@controller
auth_strategy = keystone

[keystone_authtoken]
www_authenticate_uri = http://controller:5000
auth_url = http://controller:5000
memcached_servers = controller:11211
auth_type = password
project_domain_name = default
user_domain_name = default
project_name = service
username = neutron
password = 000000

[oslo_concurrency]
lock_path = /var/lib/neutron/tmp
官网上这里是选择Provider networks模式
配置/etc/neutron/plugins/ml2/linuxbridge_agent.ini文件
vi /etc/neutron/plugins/ml2/linuxbridge_agent.ini
[linux_bridge]
physical_interface_mappings = provider:PROVIDER_INTERFACE_NAME
#注意配置为自己的网卡名

[vxlan]
enable_vxlan = false

[securitygroup]
enable_security_group = true
firewall_driver = neutron.agent.linux.iptables_firewall.IptablesFirewallDriver
以下具体配置直接追加到文件末尾
[linux_bridge]
physical_interface_mappings = provider:ens34

[vxlan]
enable_vxlan = false

[securitygroup]
enable_security_group = true
firewall_driver = neutron.agent.linux.iptables_firewall.IptablesFirewallDriver
开启Linux操作系统内核支持网桥筛选器
加载br_netfilter内核模块
modprobe br_netfilter
配置/etc/sysctl.conf追加
net.bridge.bridge-nf-call-iptables = 1
net.bridge.bridge-nf-call-ip6tables = 1
启动生效配置
sysctl -p
演示如下
[root@compute ~]# modprobe  br_netfilter
[root@compute ~]# vi + /etc/sysctl.conf
[root@compute ~]# sysctl -p
net.bridge.bridge-nf-call-iptables = 1
net.bridge.bridge-nf-call-ip6tables = 1
[root@compute ~]#
配置/etc/nova/nova.conf文件
vi /etc/nova/nova.conf
[neutron]
auth_url = http://controller:5000
auth_type = password
project_domain_name = default
user_domain_name = default
region_name = RegionOne
project_name = service
username = neutron
password = 000000
重启计算服务
systemctl restart openstack-nova-compute.service
启动并开机启动Linux网桥代理服务
systemctl enable neutron-linuxbridge-agent.service;systemctl start neutron-linuxbridge-agent.service
控制节点验证测试
openstack network agent list
演示如下
[root@controller ~]# openstack network agent list
+--------------------------------------+--------------------+------------+-------------------+-------+-------+---------------------------+
| ID                                   | Agent Type         | Host       | Availability Zone | Alive | State | Binary                    |
+--------------------------------------+--------------------+------------+-------------------+-------+-------+---------------------------+
| 20612053-849f-41b0-8878-7432b472cd15 | Linux bridge agent | compute    | None              | :-)   | UP    | neutron-linuxbridge-agent |
| 644370fc-acd9-4dc5-984c-60b5296792ce | Linux bridge agent | controller | None              | :-)   | UP    | neutron-linuxbridge-agent |
| 9f95d84c-3ee5-4c52-8a23-a53386d75f3c | Metadata agent     | controller | None              | :-)   | UP    | neutron-metadata-agent    |
| fa15a4de-7c82-4980-aa12-a7291a4911d0 | DHCP agent         | controller | nova              | :-)   | UP    | neutron-dhcp-agent        |
+--------------------------------------+--------------------+------------+-------------------+-------+-------+---------------------------+
[root@controller ~]#
注;2层网络不需要配置第二张网卡内容为空
避坑
compute节点下
virsh capabilities
vi /etc/nova/nova.conf

[libvirt]
hw_machine_type = x86_64=pc-i440fx-rhel7.2.0
cpu_mode = host-passthrough
云主机测试
创建实例类型
openstack flavor create --id 0 --vcpus 1 --ram 1024 --disk 10 huhy
[root@controller ~]# openstack flavor create --id 0 --vcpus 1 --ram 1024 --disk 10 huhy
+----------------------------+-------+
| Field                      | Value |
+----------------------------+-------+
| OS-FLV-DISABLED:disabled   | False |
| OS-FLV-EXT-DATA:ephemeral  | 0     |
| disk                       | 10    |
| id                         | 0     |
| name                       | huhy  |
| os-flavor-access:is_public | True  |
| properties                 |       |
| ram                        | 1024  |
| rxtx_factor                | 1.0   |
| swap                       |       |
| vcpus                      | 1     |
+----------------------------+-------+
[root@controller ~]#
生成密钥对并添加公钥
openstack keypair create --public-key ~/.ssh/id_rsa.pub mykey
[root@controller ~]#  openstack keypair create --public-key ~/.ssh/id_rsa.pub mykey
+-------------+-------------------------------------------------+
| Field       | Value                                           |
+-------------+-------------------------------------------------+
| fingerprint | 9e:95:3b:b4:c2:b2:06:b0:6a:f7:dd:03:84:9a:f1:6f |
| name        | mykey                                           |
| user_id     | 1227799559cd4232acb596078850907c                |
+-------------+-------------------------------------------------+
[root@controller ~]#
创建安全组并开放ssh端口
openstack security group rule create --proto icmp default
openstack security group rule create --proto tcp --dst-port 22 default
[root@controller ~]# openstack security group rule create --proto icmp default
+-------------------+---------------------------------------------------------------------------------------------------------------------------------------------------------+
| Field             | Value
                                                                 |
+-------------------+---------------------------------------------------------------------------------------------------------------------------------------------------------+
| created_at        | 2022-10-16T13:11:59Z
                                                                 |
| description       |
                                                                 |
| direction         | ingress
                                                                 |
| ether_type        | IPv4
                                                                 |
| id                | b85200ad-6311-4daf-84f7-12fca9d1fff1
                                                                 |
| location          | cloud='', project.domain_id=, project.domain_name='Default', project.id='917361e8ae54408693a5b94353c70b6d', project.name='admin', region_name='', zone= |
| name              | None
                                                                 |
| port_range_max    | None
                                                                 |
| port_range_min    | None
                                                                 |
| project_id        | 917361e8ae54408693a5b94353c70b6d
                                                                 |
| protocol          | icmp
                                                                 |
| remote_group_id   | None
                                                                 |
| remote_ip_prefix  | 0.0.0.0/0
                                                                 |
| revision_number   | 0
                                                                 |
| security_group_id | 54a07688-8612-457f-8fd5-40c9c1da2bdd
                                                                 |
| tags              | []
                                                                 |
| updated_at        | 2022-10-16T13:11:59Z
                                                                 |
+-------------------+---------------------------------------------------------------------------------------------------------------------------------------------------------+
[root@controller ~]# openstack security group rule create --proto tcp --dst-port 22 default
+-------------------+---------------------------------------------------------------------------------------------------------------------------------------------------------+
| Field             | Value
                                                                 |
+-------------------+---------------------------------------------------------------------------------------------------------------------------------------------------------+
| created_at        | 2022-10-16T13:12:04Z
                                                                 |
| description       |
                                                                 |
| direction         | ingress
                                                                 |
| ether_type        | IPv4
                                                                 |
| id                | ca1b9ce4-1881-49ed-a115-8addf3ce3480
                                                                 |
| location          | cloud='', project.domain_id=, project.domain_name='Default', project.id='917361e8ae54408693a5b94353c70b6d', project.name='admin', region_name='', zone= |
| name              | None
                                                                 |
| port_range_max    | 22
                                                                 |
| port_range_min    | 22
                                                                 |
| project_id        | 917361e8ae54408693a5b94353c70b6d
                                                                 |
| protocol          | tcp
                                                                 |
| remote_group_id   | None
                                                                 |
| remote_ip_prefix  | 0.0.0.0/0
                                                                 |
| revision_number   | 0
                                                                 |
| security_group_id | 54a07688-8612-457f-8fd5-40c9c1da2bdd
                                                                 |
| tags              | []
                                                                 |
| updated_at        | 2022-10-16T13:12:04Z
                                                                 |
+-------------------+---------------------------------------------------------------------------------------------------------------------------------------------------------+
[root@controller ~]#
创建网络
网络名称huhy,网络类型为flat,物理网络名称也是配置文件里面的写入的
openstack network create  --share --external \
  --provider-physical-network provider \
  --provider-network-type flat huhy
[root@controller ~]# openstack network create  --share --external \
>   --provider-physical-network provider \
>   --provider-network-type flat huhy
+---------------------------+---------------------------------------------------------------------------------------------------------------------------------------------------------+
| Field                     | Value
                                                                         |
+---------------------------+---------------------------------------------------------------------------------------------------------------------------------------------------------+
| admin_state_up            | UP
                                                                         |
| availability_zone_hints   |
                                                                         |
| availability_zones        |
                                                                         |
| created_at                | 2022-10-16T13:18:14Z
                                                                         |
| description               |
                                                                         |
| dns_domain                | None
                                                                         |
| id                        | 51c54e7c-9f4e-401a-8c4a-6bbd22b6c543
                                                                         |
| ipv4_address_scope        | None
                                                                         |
| ipv6_address_scope        | None
                                                                         |
| is_default                | None
                                                                         |
| is_vlan_transparent       | None
                                                                         |
| location                  | cloud='', project.domain_id=, project.domain_name='Default', project.id='917361e8ae54408693a5b94353c70b6d', project.name='admin', region_name='', zone= |
| mtu                       | 1500
                                                                         |
| name                      | huhy
                                                                         |
| port_security_enabled     | True
                                                                         |
| project_id                | 917361e8ae54408693a5b94353c70b6d
                                                                         |
| provider:network_type     | flat
                                                                         |
| provider:physical_network | provider
                                                                         |
| provider:segmentation_id  | None
                                                                         |
| qos_policy_id             | None
                                                                         |
| revision_number           | 1
                                                                         |
| router:external           | External
                                                                         |
| segments                  | None
                                                                         |
| shared                    | True
                                                                         |
| status                    | ACTIVE
                                                                         |
| subnets                   |
                                                                         |
| tags                      |
                                                                         |
| updated_at                | 2022-10-16T13:18:14Z
                                                                         |
+---------------------------+---------------------------------------------------------------------------------------------------------------------------------------------------------+
[root@controller ~]#
配置子网
openstack subnet create --network huhy \
  --allocation-pool start=192.168.200.101,end=192.168.200.200 \
  --dns-nameserver 8.8.8.8 --gateway 192.168.200.2 \
  --subnet-range 192.168.200.0/24 huhy-subnet
[root@controller ~]# openstack subnet create --network huhy   --allocation-pool start=192.168.200.101,end=192.168.200.200   --dns-nameserver 8.8.8.8 --gateway 192.168.200.2   --subnet-range 192.168.200.0/24 huhy-subnet
+-------------------+---------------------------------------------------------------------------------------------------------------------------------------------------------+
| Field             | Value
                                                                 |
+-------------------+---------------------------------------------------------------------------------------------------------------------------------------------------------+
| allocation_pools  | 192.168.200.101-192.168.200.200
                                                                 |
| cidr              | 192.168.200.0/24
                                                                 |
| created_at        | 2022-10-16T13:21:56Z
                                                                 |
| description       |
                                                                 |
| dns_nameservers   | 8.8.8.8
                                                                 |
| enable_dhcp       | True
                                                                 |
| gateway_ip        | 192.168.200.2
                                                                 |
| host_routes       |
                                                                 |
| id                | 879c44ab-84e8-4abb-a9a7-79b2eff43e32
                                                                 |
| ip_version        | 4
                                                                 |
| ipv6_address_mode | None
                                                                 |
| ipv6_ra_mode      | None
                                                                 |
| location          | cloud='', project.domain_id=, project.domain_name='Default', project.id='917361e8ae54408693a5b94353c70b6d', project.name='admin', region_name='', zone= |
| name              | huhy-subnet
                                                                 |
| network_id        | 51c54e7c-9f4e-401a-8c4a-6bbd22b6c543
                                                                 |
| prefix_length     | None
                                                                 |
| project_id        | 917361e8ae54408693a5b94353c70b6d
                                                                 |
| revision_number   | 0
                                                                 |
| segment_id        | None
                                                                 |
| service_types     |
                                                                 |
| subnetpool_id     | None
                                                                 |
| tags              |
                                                                 |
| updated_at        | 2022-10-16T13:21:56Z
                                                                 |
+-------------------+---------------------------------------------------------------------------------------------------------------------------------------------------------+
[root@controller ~]#
启动实例
镜像指定名称,网络指定id,安全组指定名称,实例指定名称
openstack server create --flavor huhy --image  glance-cirros \
  --nic net-id=51c54e7c-9f4e-401a-8c4a-6bbd22b6c543 --security-group default \
  --key-name mykey huhy-vm
[root@controller ~]# openstack server create --flavor huhy --image  glance-cirros \
>   --nic net-id=51c54e7c-9f4e-401a-8c4a-6bbd22b6c543 --security-group default \
>   --key-name mykey huhy-vm
+-------------------------------------+------------------------------------------------------+
| Field                               | Value                                                |
+-------------------------------------+------------------------------------------------------+
| OS-DCF:diskConfig                   | MANUAL                                               |
| OS-EXT-AZ:availability_zone         |                                                      |
| OS-EXT-SRV-ATTR:host                | None                                                 |
| OS-EXT-SRV-ATTR:hypervisor_hostname | None                                                 |
| OS-EXT-SRV-ATTR:instance_name       |                                                      |
| OS-EXT-STS:power_state              | NOSTATE                                              |
| OS-EXT-STS:task_state               | scheduling                                           |
| OS-EXT-STS:vm_state                 | building                                             |
| OS-SRV-USG:launched_at              | None                                                 |
| OS-SRV-USG:terminated_at            | None                                                 |
| accessIPv4                          |                                                      |
| accessIPv6                          |                                                      |
| addresses                           |                                                      |
| adminPass                           | meiY5RCt3nbz                                         |
| config_drive                        |                                                      |
| created                             | 2022-10-16T13:28:09Z                                 |
| flavor                              | huhy (0)                                             |
| hostId                              |                                                      |
| id                                  | 130be352-1df4-42ed-8511-a5e0b0a15e68                 |
| image                               | glance-cirros (2d41d713-9892-47d5-9206-a8ef6b037dfb) |
| key_name                            | mykey                                                |
| name                                | huhy-vm                                              |
| progress                            | 0                                                    |
| project_id                          | 917361e8ae54408693a5b94353c70b6d                     |
| properties                          |                                                      |
| security_groups                     | name='54a07688-8612-457f-8fd5-40c9c1da2bdd'          |
| status                              | BUILD                                                |
| updated                             | 2022-10-16T13:28:09Z                                 |
| user_id                             | 1227799559cd4232acb596078850907c                     |
| volumes_attached                    |                                                      |
+-------------------------------------+------------------------------------------------------+
[root@controller ~]#
界面服务
yum install openstack-dashboard -y
配置/etc/openstack-dashboard/local_settings
OPENSTACK_HOST = "controller"
#配置dashboard可以在控制节点使用openstack服务

ALLOWED_HOSTS = ['one.example.com', 'two.example.com']
#这里接受设置所有主机可以访问

SESSION_ENGINE = 'django.contrib.sessions.backends.cache'

CACHES = {
    'default': {
         'BACKEND': 'django.core.cache.backends.memcached.MemcachedCache',
         'LOCATION': 'controller:11211',
    }
}
#配置缓存服务

OPENSTACK_KEYSTONE_URL = "http://%s:5000/v3" % OPENSTACK_HOST
#配置keystone网址

OPENSTACK_KEYSTONE_MULTIDOMAIN_SUPPORT = True
#启用对域的支持

OPENSTACK_API_VERSIONS = {
    "identity": 3,
    "image": 2,
    "volume": 3,
}
#配置api版本

OPENSTACK_KEYSTONE_DEFAULT_DOMAIN = "Default"
#设置默认的域,我们设置的是Default

OPENSTACK_KEYSTONE_DEFAULT_ROLE = "user"
#将user配置为通过仪表板创建的用户的默认角色

OPENSTACK_NEUTRON_NETWORK = {
    ...
    'enable_router': False,
    'enable_quotas': False,
    'enable_distributed_router': False,
    'enable_ha_router': False,
    'enable_lb': False,
    'enable_firewall': False,
    'enable_vpn': False,
    'enable_fip_topology_check': False,
}
#如果设置了网络二层服务,就要禁用掉这些三层网络的服务支持,这里我们是二层

TIME_ZONE = "TIME_ZONE"
#时区配置,可做可不做
OPENSTACK_HOST = "controller"

ALLOWED_HOSTS = ['*']

SESSION_ENGINE = 'django.contrib.sessions.backends.cache'

CACHES = {
    'default': {
         'BACKEND': 'django.core.cache.backends.memcached.MemcachedCache',
         'LOCATION': 'controller:11211',
    }
}

OPENSTACK_KEYSTONE_URL = "http://%s:5000/v3" % OPENSTACK_HOST
#配置keystone网址,这里不需要修改

OPENSTACK_KEYSTONE_MULTIDOMAIN_SUPPORT = True
#需要手动写在文件中,写在import os下面

OPENSTACK_API_VERSIONS = {
    "identity": 3,
    "image": 2,
    "volume": 3,
}
#手动输入

OPENSTACK_KEYSTONE_DEFAULT_DOMAIN = "Default"
#手动输入

OPENSTACK_KEYSTONE_DEFAULT_ROLE = "user"
#手动

OPENSTACK_NEUTRON_NETWORK = {
    ...
    'enable_router': False,
    'enable_quotas': False,
    'enable_distributed_router': False,
    'enable_ha_router': False,
    'enable_lb': False,
    'enable_firewall': False,
    'enable_vpn': False,
    'enable_fip_topology_check': False,
}
#如果设置了网络二层服务,就要禁用掉这些三层网络的服务支持,这里我们是二层

TIME_ZONE = "Asia/Shanghai"
#时区配置,可做可不做


WEBROOT = "/dashboard"
#tianken
配置/etc/httpd/conf.d/openstack-dashboard.conf
WSGIApplicationGroup %{GLOBAL}
重启http和缓存服务
systemctl restart httpd.service memcached.service