什么是 OpenIddict?
OpenIddict 是 OpenID Connect 服务器中间件的 .NET Core 实现,允许您在任何 .NET Core / .NET 5 应用程序中轻松设置 OpenID Connect 服务器。
为什么要使用 OpenID Connect 服务器?
将 OpenID Connect 服务器添加到您的应用程序允许您支持令牌身份验证。它还允许您使用本地密码或外部身份提供商(例如 Facebook 或 Google)在一个中央位置管理所有应用程序的所有用户,并有权控制谁可以访问您的 API 以及向每个用户公开的信息客户。
来源:https://documentation.openiddict.com/guide/index.html
在 .NET 5 中设置 OpenIddict
出于演示目的,我使用 Visual Studio 创建了一个新的 .NET 5 API 项目。可以在此处找到源代码: https: //github.com/Ngineer101/openid-connect-dotnet-5。
步骤1
安装所需的 NuGet 包:
-
设置 Entity Framework Core
-
设置 OpenIddict
第2步
ADbContext是将 OpenIddict 与 Entity Framework 一起使用所必需的。创建一个DefaultDbContext.cs类。
public class DefaultDbContext : DbContext
{
    // entity sets here...

    public DefaultDbContext(DbContextOptions<DefaultDbContext> options) : base(options) { }

    // ...
}
然后,通过在类的方法DbContext中添加以下代码,将 OpenIddict 实体集添加到您的。这将确保在您创建和应用初始数据库迁移时创建 OpenIddict 表。ConfigureServicesStartup.cs
// Register your DbContext
services.AddDbContext<DefaultDbContext>(options =>
{
    options.UseSqlite(Configuration.GetConnectionString("DefaultConnectionString"));
    options.UseOpenIddict(); // Add the OpenIddict entity sets
});
步骤 3
ConfigureServices通过在类的方法中添加以下代码,将身份系统配置为使用 OpenIddict 声明类型Startup.cs。
services.Configure<IdentityOptions>(options =>
{
    options.ClaimsIdentity.UserNameClaimType = OpenIddictConstants.Claims.Name;
    options.ClaimsIdentity.UserIdClaimType = OpenIddictConstants.Claims.Subject;
    options.ClaimsIdentity.RoleClaimType = OpenIddictConstants.Claims.Role;
    // configure more options if necessary...
});
步骤4
现在,是时候配置 OpenID Connect 服务器了。ConfigureServices在类中的方法中添加如下代码Startup.cs(解释见注释):
// OpenID Connect server configuration
services.AddOpenIddict()
    .AddCore(options => options.UseEntityFrameworkCore().UseDbContext<DefaultDbContext>())
    .AddServer(options =>
    {
        // Enable the required endpoints
        options.SetTokenEndpointUris("/connect/token");
        options.SetUserinfoEndpointUris("/connect/userinfo");

        options.AllowPasswordFlow();
        options.AllowRefreshTokenFlow();
        // Add all auth flows you want to support
        // Supported flows are:
        //      - Authorization code flow
        //      - Client credentials flow
        //      - Device code flow
        //      - Implicit flow
        //      - Password flow
        //      - Refresh token flow

        // Custom auth flows are also supported
        options.AllowCustomFlow("custom_flow_name");

        // Using reference tokens means the actual access and refresh tokens
        // are stored in the database and different tokens, referencing the actual
        // tokens (in the db), are used in request headers. The actual tokens are not
        // made public.
        options.UseReferenceAccessTokens();
        options.UseReferenceRefreshTokens();

        // Register your scopes - Scopes are a list of identifiers used to specify
        // what access privileges are requested.
        options.RegisterScopes(OpenIddictConstants.Permissions.Scopes.Email,
                        OpenIddictConstants.Permissions.Scopes.Profile,
                        OpenIddictConstants.Permissions.Scopes.Roles);

        // Set the lifetime of your tokens
        options.SetAccessTokenLifetime(TimeSpan.FromMinutes(30));
        options.SetRefreshTokenLifetime(TimeSpan.FromDays(7));

        // Register signing and encryption details
        options.AddDevelopmentEncryptionCertificate()
            .AddDevelopmentSigningCertificate();

        // Register ASP.NET Core host and configuration options
        options.UseAspNetCore().EnableTokenEndpointPassthrough();
    })
    .AddValidation(options =>
    {
        options.UseLocalServer();
        options.UseAspNetCore();
    });

services.AddAuthentication(options =>
{
    options.DefaultScheme = OpenIddictConstants.Schemes.Bearer;
    options.DefaultChallengeScheme = OpenIddictConstants.Schemes.Bearer;
});
步骤 5
为您的应用程序配置默认身份系统。指定默认User和Role实体并添加一个UserStore.cs和RoleStore.cs类。然后,将以下代码添加到类ConfigureServices中的方法中Startup.cs。
services.AddIdentity<User, Role>()
    .AddSignInManager()
    .AddUserStore<UserStore>()
    .AddRoleStore<RoleStore>()
    .AddUserManager<UserManager<User>>();
User在此处查看、Role、UserStore和类的示例RoleStore: https://github.com/Ngineer101/openid-connect-dotnet-5/tree/master/NWBlog.OpenIdConnect.Demo/Identity。
步骤 6
通过在类中添加方法app.UseAuthentication(),将身份验证中间件添加到您的应用程序中。ConfigureStartup.cs
app.UseRouting();

app.UseAuthentication(); // add this line
app.UseAuthorization();
步骤 7
在 Visual Studio 包管理器控制台中运行以下命令来创建和应用第一个数据库迁移:
Add-Migration InitialCreateUpdate-Database
如果您使用 DotNet CLI 创建和应用迁移,请运行以下命令:
dotnet ef migrations add InitialCreatedotnet ef database update
注意:不要忘记将数据库连接字符串添加到appsettings.json配置文件中。
步骤 8
需要有效的 OpenID Connect 客户端应用程序才能调用令牌端点。Configure通过在类的方法中添加以下代码,在启动时创建一个 OpenID 客户端应用程序Startup.cs。
// Create OpenID Connect client application
using var scope = app.ApplicationServices.GetRequiredService<IServiceScopeFactory>().CreateScope();
var context = scope.ServiceProvider.GetRequiredService<DefaultDbContext>();
context.Database.EnsureCreated();

var manager = scope.ServiceProvider.GetRequiredService<IOpenIddictApplicationManager>();
var existingClientApp = manager.FindByClientIdAsync("default-client").GetAwaiter().GetResult();
if (existingClientApp == null)
{
    manager.CreateAsync(new OpenIddictApplicationDescriptor
    {
        ClientId = "default-client",
        ClientSecret = "499D56FA-B47B-5199-BA61-B298D431C318",
        DisplayName = "Default client application",
        Permissions =
        {
            OpenIddictConstants.Permissions.Endpoints.Token,
            OpenIddictConstants.Permissions.GrantTypes.Password
        }
    }).GetAwaiter().GetResult();
}
步骤 9
添加AuthenticationController一个Exchange端点来处理在您的 OpenID Connect 服务器中配置的不同身份验证流程。
[HttpPost("~/connect/token")]
[Consumes("application/x-www-form-urlencoded")]
[Produces("application/json")]
public async Task<IActionResult> Exchange()
{
    var oidcRequest = HttpContext.GetOpenIddictServerRequest();
    if (oidcRequest.IsPasswordGrantType())
        return await TokensForPasswordGrantType(oidcRequest);

    if (oidcRequest.IsRefreshTokenGrantType())
    {
        // return tokens for refresh token flow
    }

    if (oidcRequest.GrantType == "custom_flow_name")
    {
        // return tokens for custom flow
    }

    return BadRequest(new OpenIddictResponse
    {
        Error = OpenIddictConstants.Errors.UnsupportedGrantType
    });
}
~/connect/token当您使用username、password、向端点发出请求时client_id,client_secret您将收到相应的登录响应。请参阅屏幕截图中的示例请求和响应。

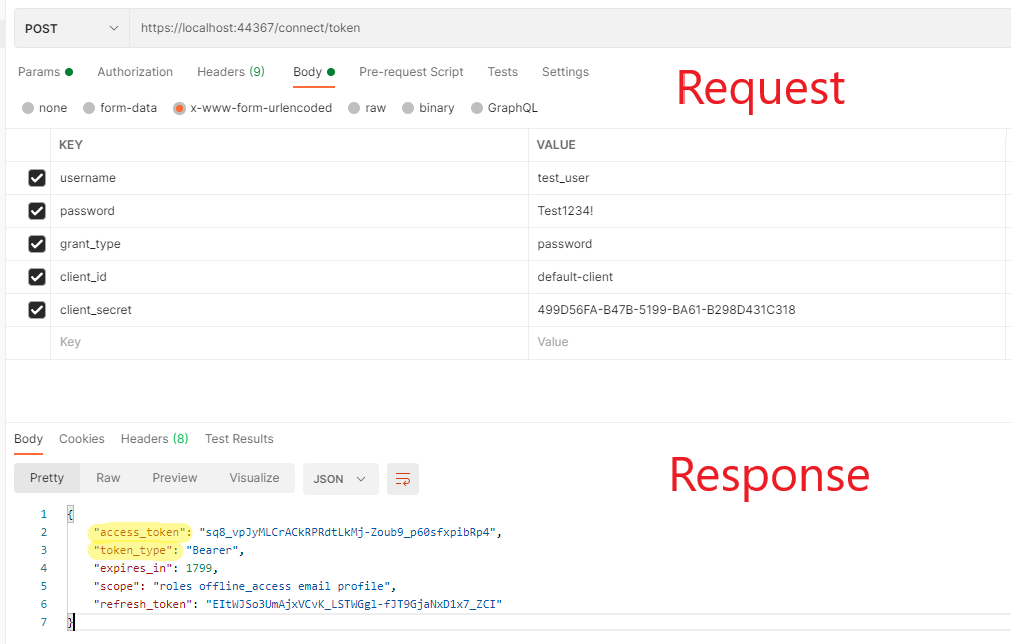
响应中的access_token可以用在Authorization对 API 的后续请求的标头中。
注意: 和不应在您的前端进行硬编码client_id。client_secret一种可能的解决方案是下载client_id并client_secret在应用程序加载时(在浏览器中)并具有严格的 CORS 配置以仅允许与某些来源共享资源。然后,还可以定期更改客户端 ID 和客户端密码值以防止误用(超出本文的范围)。
可以根据您的要求以多种方式配置 OpenID Connect 服务器。本博文并未涵盖所有可能的配置。查看 官方文档以获取更多信息和示例。
要查看完整的工作演示,请查看此存储库:https ://github.com/Ngineer101/openid-connect-dotnet-5 。