前言
初学,虽然不常用了,但对于理解MVC很有帮助,顺带学一下把。
1. 简介
核心技术是Swing Awt(Awt是Swing前身)
需要学:
窗口,弹窗,面板,文本框,列表框,按钮,图片,监听事件,鼠标,键盘。
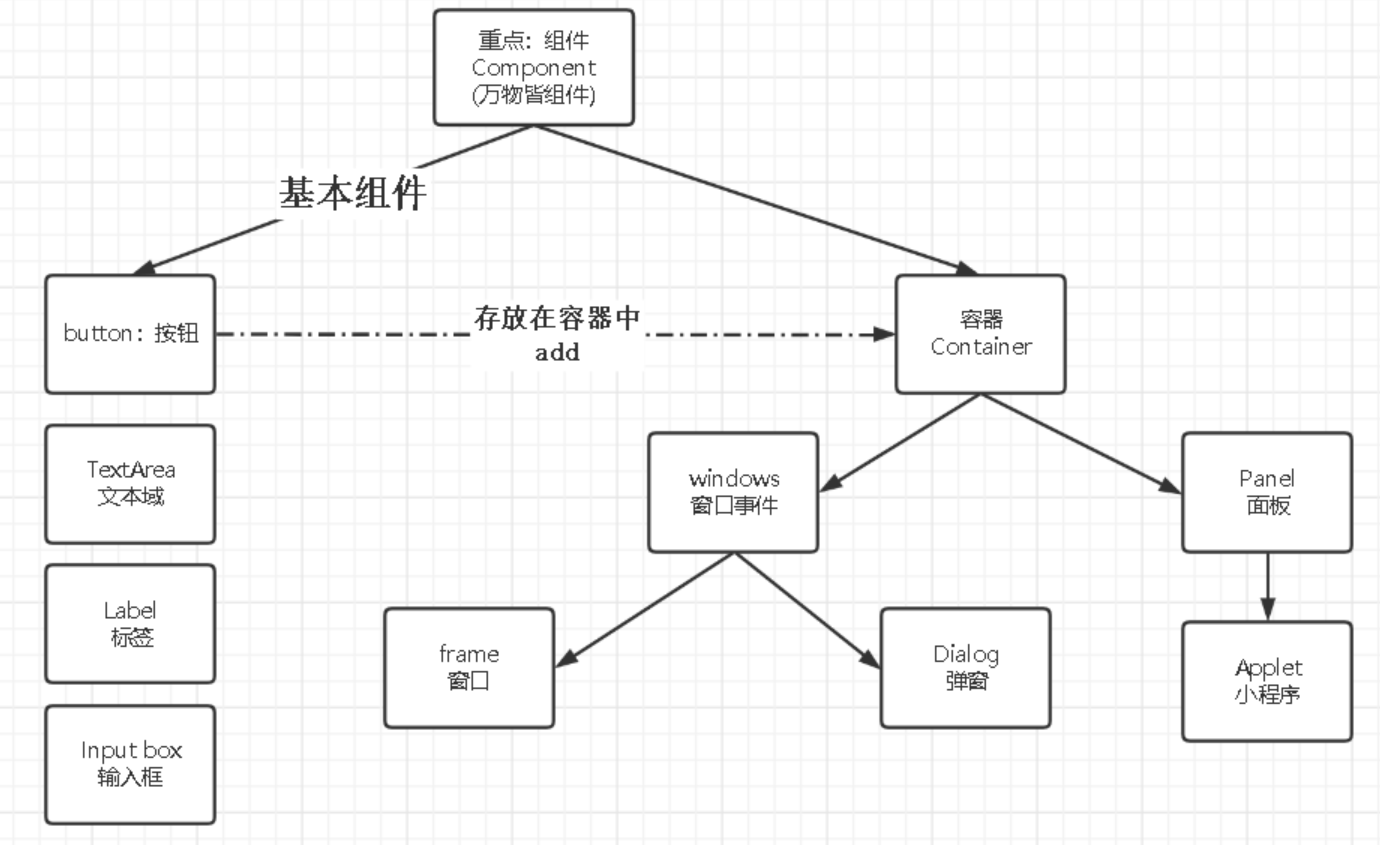
2.AWT
2.1 窗口 Frame
new一个Frame可以实现,也可以通过继承封装。
public class MyFrame extends Frame {
    public static int count;
    public Frame frame;
    public MyFrame(int x,int y,int w,int h,Color clor) throws HeadlessException {
        count++;
        frame = new Frame();
        frame.setLocation(x,y);    //设置位置
        frame.setBackground(clor);  //设置背景色
        frame.setSize(w,h);   //设置长宽
        frame.setVisible(true);  //设置可见
        frame.setTitle(count+"个窗口");
    }
}
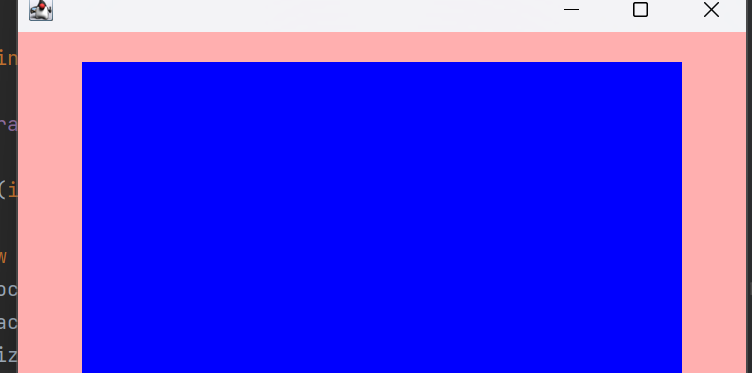
2.2 Panel面板
 public static void main(String[] args) {
        Frame myFrame1=new Frame();
        myFrame1.setLayout(null);  //设置布局
        myFrame1.setBounds(300,300,500,500);
        myFrame1.setBackground(Color.PINK);

        Panel panel = new Panel();
        panel.setBackground(Color.BLUE);
        panel.setBounds(50,50,400,400);


        myFrame1.add(panel);   //添加面板
        myFrame1.setVisible(true);
        myFrame1.addWindowListener(new WindowAdapter() {   //设置关闭监听事件
            @Override
            public void windowClosing(WindowEvent e) {
                System.exit(0);
            }
        });

    }
2.3 布局LayOut
-
流式布局FlowLayout。
frame.setLayout(new FlowLayout(FlowLayout.RIGHT)); -
东西南北中BorderLayout。
Button east = new Button("East");
frame.add(east,BorderLayout.EAST); -
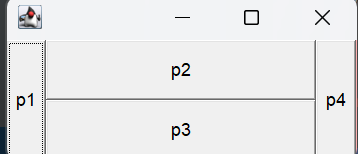
网格GridLayout。
frame.setBackground(new GridLayout(3, 2));//几行几列 fram.pack()自动布局
public void test(){
        Frame frame = new Frame();
        frame.setVisible(true);
        frame.setBackground(Color.PINK);
        frame.setBounds(50,50,400,400);

        Panel p1 = new Panel(new BorderLayout());
        Panel p2 = new Panel(new GridLayout(2,1));

        p2.add(new Button("p2"));
        p2.add(new Button("p3"));
        p1.add(new Button("p1"),BorderLayout.WEST);
        p1.add(new Button("p4"),BorderLayout.EAST);
        p1.add(p2,BorderLayout.CENTER);
        frame.add(p1);
        frame.pack();

    }
2.4 事件监听
- 组件添加监听事件,传入一个实现了接口的类。
- 多个组件公用一个事件。 抽出来接口实现类。
- 接口方法传入参数ActionEvent e,e.getActionCommaand()可以得到动作命令的信息。这个信息可以通过组件.setActionCommand("信息")
public void test() {
        Frame frame = new Frame();
        frame.setVisible(true);
        frame.setSize(400,400);
        Button button1 = new Button("开始");
        Button button2 = new Button("结束");
        button1.setActionCommand("start");
        button2.setActionCommand("end");
        frame.add(button1,BorderLayout.WEST);
        frame.add(button2,BorderLayout.EAST);
        Myaction myaction = new Myaction();
        button1.addActionListener(myaction);
        button2.addActionListener(myaction);
        frame.pack();
        frame.addWindowListener(new WindowAdapter() {
            @Override
            public void windowClosing(WindowEvent e) {
                System.exit(0);
            }
        });
    }


class Myaction implements ActionListener{

    @Override
    public void actionPerformed(ActionEvent e) {
        System.out.println("aaa"+e.getActionCommand());
    }
}
2.5 输入框TextField
- 通过new TextField并add到frame中。输入框添加监听事件
- textField.setEchoChar('*'); 可以实现替换编码
- 监听事件ActionEvent e,通过e.getSource()可以得到Object对象,强转为TextField,通过field.getText()得到String文本。
- field.setText()可以设置文本。
{
    public void test() {
        Frame frame = new Frame();
        frame.setVisible(true);
        frame.setBackground(Color.PINK);
        frame.setBounds(50,50,400,400);

        TextField textField = new TextField();
        MyAction2 myAction = new MyAction2();
        textField.addActionListener(myAction);
        textField.setEchoChar('*');
        frame.add(textField);
        frame.pack();
    }
}
class MyAction2 implements ActionListener{
    @Override
    public void actionPerformed(ActionEvent e) {
        Object source = e.getSource();
        TextField tx=(TextField) source;
        System.out.println(tx.getText());
        tx.setText(""); //清空输入框
        System.out.println(tx.getText());
    }
}
2.6 画笔
重写Frame的paint方法即可
public class PaintTest extends Frame {
    public void test(){  //调用这个方法即可
        setBounds(0,0,400,400);
        setVisible(true);

    }

    @Override
    public void paint(Graphics g) {
        g.setColor(Color.BLUE);
        g.drawRect(10,10,200,200);
        g.fillOval(200,200,200,200);
    }
}
2.7 鼠标监听器 MouseAdapter
public class PointpaintTest {
    public static void main(String[] args) {
        new Myframe2("画板");
    }
}

class Myframe2 extends Frame{
    ArrayList points;   //存储集合
    public Myframe2(String title) throws HeadlessException {
        super(title);
        setVisible(true);
        setBounds(200,200,400,400);
        points=new ArrayList<>();
        addMouseListener(new MyMouseAdapter());   //添加监听器
    }

    @Override
    public void paint(Graphics g) { //重写paint画图
        Iterator iterator = points.iterator();
        while (iterator.hasNext()) {
            Point next = (Point) iterator.next();
            g.setColor(Color.pink);
            g.fillOval(next.x,next.y,10,10);
        }
    }
    private class MyMouseAdapter extends MouseAdapter{  //继承适配器,选择性实现方法
        @Override
        public void mousePressed(MouseEvent e) {
            Myframe2 frame = (Myframe2) e.getSource();    //getSource得到鼠标事件窗口
            points.add(new Point(e.getX(),e.getY())); //getXY得到鼠标事件坐标
            frame.repaint();  //窗口刷新
        }
    }
}
2.8 窗口监听器 WindowAdapter
public class TestWindow {
    public static void main(String[] args) {
        new WindowFrame();
    }
}
class WindowFrame extends Frame {
    public WindowFrame() {
        setBackground(Color.BLUE);
        setBounds(100, 100, 200, 200);
        setVisible(true);

        //优化:匿名内部类
        this.addWindowListener (
            new WindowAdapter() {
                //关闭窗口
                @Override
                public void windowClosing(WindowEvent e) {
                    System.out.println("windowClosing");
                    System.exit(0);
                }

                //激活窗口
                @Override
                public void windowActivated(WindowEvent e) {
                    WindowFrame source = (WindowFrame) e.getSource();//获取什么数据呢?WindowFrame
                    source.setTitle("被激活了");
                    System.out.println("windowActivated");//窗口激活
                }
            }
        );
    }
}
2.9 键盘监听
//键盘监听
public class TestKeyListener {
    public static void main(String[] args) {
        new KeyFrame();
    }
}

class KeyFrame extends Frame {
    //给无参构造器
    public KeyFrame() {
        setBounds(1, 2, 300, 400);
        setVisible(true);

        this.addKeyListener(new KeyAdapter() {
            //键盘按下的时候出现的事情
            @Override
            public void keyPressed(KeyEvent e) {
                //获得键盘按下的键是那个键,当前的码
                int keyCode = e.getKeyCode();//不需要记这个值,直接使用静态属性 VK_XXX
                System.out.println(keyCode);
                if(keyCode == KeyEvent.VK_UP) {
                    System.out.println("你按下了上键");
                }
            }
        });
    }
}
3. Swing
Swing是AWT的子类。
3.1 窗口 Jframe
- 没有区别。
- 增加了一个获得容器的方法,
Container container = this.getContentPane()可以对这个容器进行赋颜色的功能。 - 窗口关闭事件可以不用写监听事件了,直接写方法。
jFrame.setDefaultCloseOperation(WindowContains.EXIT_ON_CLOSE)
3.2 弹窗 JDialog
 public MyJDialog(MyFrame frame) {
        //实例化一个JDialog类对象,指定对话框的父窗体、窗体标题和类型
        super(frame, "JDialog窗体", true);

        Container container = getContentPane();                    //创建一个容器
        container.add(new JLabel("这是一个对话框"));           //在容器中添加标签
        setBounds(120, 120, 150, 100);          //设置对话框窗体大小
    }
3.3 图标Icon
图标 实现Icon接口
- 实现icon接口,要实现三个方法(画什么,多大)。
- Icon放到label或button中,再将label或button加入到获取的容器中。
//图标,需要实现类,继承JFrame,使用弹窗implements
public class IconDemo extends JFrame implements Icon {
    private int width;
    private int height;
    //无参构造器
    public IconDemo() {

    }
    //构造器
    public IconDemo(int width, int height) {
        this.width = width;
        this.height = height;
    }

    public void init() {
        IconDemo iconDemo = new IconDemo(15, 15);
        //图标放在标签,也可以放在按钮上!
        JLabel label = new JLabel("icontest", iconDemo, SwingConstants.CENTER);

        Container container = getContentPane();
        container.add(label);//生成label对象才能放进去

        this.setVisible(true);
        this.setDefaultCloseOperation(WindowConstants.EXIT_ON_CLOSE);
    }

    public static void main(String[] args) {
        new IconDemo().init();
    }

    @Override
    public void paintIcon(Component c, Graphics g, int x, int y) {
        g.fillOval(x, y, width, height);
    }

    @Override
    public int getIconWidth() {
        return this.width;
    }

    @Override
    public int getIconHeight() {
        return this.height;
    }
}
图片 new ImageIcon类
- 通过
类名.class.getResource("文件名")获取同类文件下的图片资源,得到Url - new ImageIcon类传入image
- label.set方法传入imageIcon
public class ImageIconDemo extends JFrame {
    public ImageIconDemo() {
        //获取图片的地址,一般要写入到标签
        JLabel label = new JLabel("ImageIcon");
        URL ur1 = ImageIconDemo.class.getResource("zzz.jpg");//获取菜单栏中的文件

        ImageIcon imageIcon = new ImageIcon(ur1);
        label.setIcon(imageIcon);
        label.setHorizontalAlignment(SwingConstants.CENTER);//居中

        Container container = getContentPane();
        container.add(label);

        setVisible(true);
        setDefaultCloseOperation(WindowConstants.EXIT_ON_CLOSE);
        setBounds(100, 100, 200, 200);
    }

    public static void main(String[] args) {
        new ImageIconDemo();
    }
}
3.4 面板 JPanel,JScrollPanel
- 网格布局增加了边距?may
- 滚动条面板
public class JScrollDemo extends JFrame {

    public JScrollDemo() {
        Container container = this.getContentPane();

        //文本域
        JTextArea textArea = new JTextArea(20, 50);
        textArea.setText("欢迎学习狂神说java");

        //Scroll面板
        JScrollPane scrollPane = new JScrollPane(textArea);
        container.add(scrollPane); //把面板丢到容器里

        this.setVisible(true);
        this.setBounds(100, 100, 300, 350);
        this.setDefaultCloseOperation(WindowConstants.EXIT_ON_CLOSE);
    }

    public static void main(String[] args) {
        new JScrollDemo();
    }
}
3.5 按钮
图片按钮
- 获取图片传入ImageIcon变图标
- button.setIcon传入图标。
public class JButtonDemo01 extends JFrame {

    //初始化:构造/初始化方法都可以实现
    public JButtonDemo01() {
        Container container = this.getContentPane();
        //图片变为图标
        URL url = JButtonDemo01.class.getResource("ppkq.png");
        Icon icon = new ImageIcon(url);//需要手动编程Icon

        //图标放在按钮上
        JButton button = new JButton();
        button.setIcon(icon);
        button.setToolTipText("图片按钮");

        //按钮加到容器上
        container.add(button);

        this.setVisible(true);
        this.setSize(500, 300);
        this.setDefaultCloseOperation(WindowConstants.EXIT_ON_CLOSE);

    }

    public static void main(String[] args) {
        new JButtonDemo01();
    }
}
单选按钮 JRadioButton
- new 出几个单选按钮
- 都添加到同一个组中
//单选框
        JRadioButton jRadioButton01 = new JRadioButton("JRadioButton01");
        JRadioButton jRadioButton02 = new JRadioButton("JRadioButton02");
        JRadioButton jRadioButton03 = new JRadioButton("JRadioButton03");

        //由于单选框只能选择一个,分组,一个组中只能选一个
        ButtonGroup group = new ButtonGroup();
        group.add(jRadioButton01);
        group.add(jRadioButton02);
        group.add(jRadioButton03);

        container.add(jRadioButton01, BorderLayout.CENTER);
        container.add(jRadioButton02, BorderLayout.NORTH);
        container.add(jRadioButton03, BorderLayout.SOUTH);

        this.setVisible(true);
        this.setSize(500, 300);
        this.setDefaultCloseOperation(WindowConstants.EXIT_ON_CLOSE);
多选按钮 JCheckBox
//多选框
        JCheckBox CheckBox01 = new JCheckBox("CheckBox01");
        JCheckBox CheckBox02 = new JCheckBox("CheckBox02");

        //放到容器里
        container.add(CheckBox01, BorderLayout.NORTH);
        container.add(CheckBox02, BorderLayout.SOUTH);

        this.setVisible(true);
        this.setSize(500, 300);
        this.setDefaultCloseOperation(WindowConstants.EXIT_ON_CLOSE);
3.6 列表
下拉框 JComboBox
Container container = this.getContentPane();

        JComboBox status = new JComboBox ();
        status.addItem(null);
        status.addItem("正在热映");
        status.addItem("已下架");
        status.addItem("即将上映");

        container.add(status);

        this.setVisible(true);
列表框
用于展示信息,一般时动态扩容。
public class TestComboboxDemo02 extends JFrame{
    public TestComboboxDemo02() {
        Container container = this.getContentPane();

        //生成列表的内容
        //String[] content  = {"1", "2", "3"}; //静态变量
        Vector content = new Vector(); //动态变量

        //列表中需要放内容
        JList jList = new JList(content);

        content.add("zhangsan");
        content.add("lisi");
        content.add("wangwu");

        container.add(jList);

        this.setVisible(true);
        this.setSize(500, 350);
        this.setDefaultCloseOperation(WindowConstants.EXIT_ON_CLOSE);
    }

    public static void main(String[] args) {
        new TestComboboxDemo02();
    }
}
3.7 文本框 JTextField
public class TestTextDemo01 extends JFrame {
    public TestTextDemo01() {
        Container container = this.getContentPane();

        JTextField textField = new JTextField("hello");
        JTextField textField2 = new JTextField("world");

        container.add(textField, BorderLayout.NORTH);
        container.add(textField2, BorderLayout.SOUTH);

        this.setVisible(true);
        this.setSize(500, 350);
        this.setDefaultCloseOperation(WindowConstants.EXIT_ON_CLOSE);
    }

    public static void main(String[] args) {
        new TestTextDemo01();
    }

}