网卡命名规则
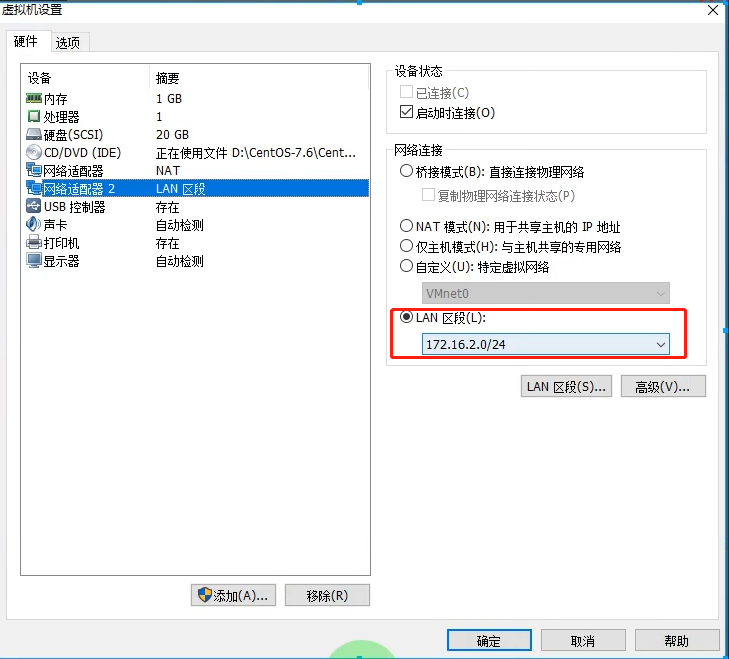
添加网卡,添加lan区段,保证在同一网段下

进去安装界面 在安装选项上,按下tab,然后在quiet后输入空格, biosdevname=0 net.ifnames=0

输入完直接回车
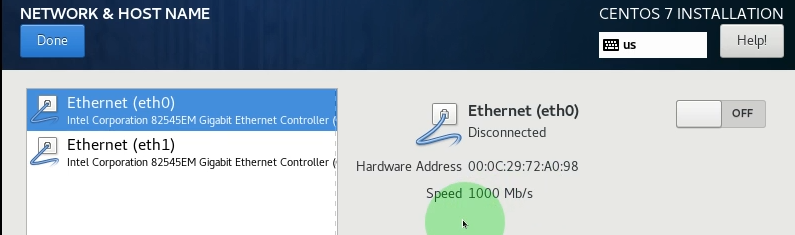
在配置网络界面,出现2块网卡 eth0和eth1, 名字已修改完成
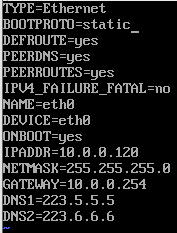
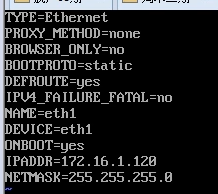
网卡配置文件
安装完系统,配置网卡1
vi /etc/sysconfig/network-scripts/ifcfg-eth0
BOOTPROTO    dhcp改成none或者static
IPV6相关配置可以删掉
后期克隆虚拟机,UUID如果一样,网卡会冲突,直接删掉
ONBOOT  开机自动启动,改成yes
设置ip地址 IPADDR
配置掩码 NETMASK
配置网关 GATEWAY
设置首选备用DNS(尽量使用阿里云的)
DNS1=223.5.5.5
DNS2=223.6.6.6
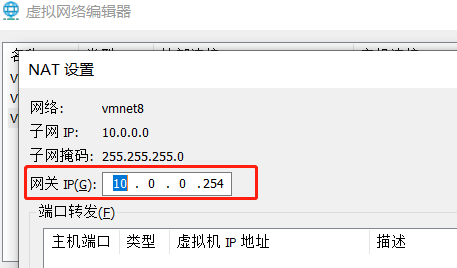 网关地址
网关地址
配置网卡2
IPADDR设置为和lan区段相同,最后一位推荐和网卡一最后一位一致
内网网卡不需要网关
systemctl restart network    # 因为本身就启动着的,这里要重启
ip a     # 查看ip是否出现
cat /etc/resolv.conf    # 重启完这个命令能看到2个说明dns配置ok了,加载出来了
模板镜像优化
阿里换源
curl -o /etc/yum.repos.d/CentOS-Base.repo https://mirrors.aliyun.com/repo/Centos-7.repo
yum install -y wget tree gcc gcc-c++ glibc vim net-tools telnet

把 /etc/yum.repos.d下除CentOS-Base.repo镜像外都删了,没什么用, 浪费加载时间
find /etc/yum.repos.d/ -type f ! -name 'CentOS-Base.repo'|xargs rm -f

wget -O /etc/yum.repos.d/epel.repo https://mirrors.aliyun.com/repo/epel-7.repo
# 修改主机名命令
hostnamectl set-hostname 主机名
# 查看,或者直接输入hostname查看
cat /etc/hostname
写个脚本,修改主机命和ip
vim host_ip.sh#!/bin/bash

. /etc/init.d/functions

read -p '请输入要修改的IP主机位: ' IP
read -p '请输入要修改的主机名: ' H

sed -i "s#120#$IP#g" /etc/sysconfig/network-scripts/ifcfg-eth{0,1}

systemctl restart network
if [ $? -eq 0 ]; then
        action "network" /bin/true
else
        action "network" /bin/false
fi

hostnamectl set-hostname $H

new_name=`cat /etc/hostname`

if [ $new_name -eq $H ];then
        action "hostname" /bin/true
else
        action "hostname" /bin/false
fi
修改selinux
vim /etc/sysconfig/selinux
改为 SELINUX=disabled
关闭防火墙
systemctl stop firewalld
以后模板机不要启动了,直接管理克隆,选快照,创建连接克隆
启动新镜像
sh host_ip.sh
系统systemd进程管理
什么是systemd
systemd即为system daemon守护进程,systemd主要解决上文的问题而诞生,
systemd的目标是,为系统的启动和管理提供一套完整的解决方案。
systemd优势
1.最新系统都采用systemd管理(RedHat7,CentOS7,Ubuntu15...)
2.CentOS7 支持开机并行启动服务,显著提高开机启动效率
3.CentOS7关机只关闭正在运行的服务,而CentOS6,全部都关闭一次。
4.CentOS7服务的启动与停止不在使用脚本进行管理,也就是/etc/init.d下不在有脚本。
5.CentOS7使用systemd解决原有模式缺陷,比如原有service不会关闭程序产生的子进程。
systemd相关的配置文件
/usr/lib/systemd/system #类似C6系统的启动脚本目录/etc/init.d/
/etc/systemd/system/ #类似C6系统的/etc/rc.d/rcN.d/    # 默认运行级别,可以通过软链接修改,
# 也可通过systemctl get-default获取,systemctl set-default+级别   进行修改
/etc/systemd/system/multi-user.target.wants/    # 开机自启,可以通过这里加软链接也可以通过命令修改
# systemctl enable sshd增加sshd自启动,systemctl disable sshd停止sshd自启动
systemd相关的命令:
Centos6:
启动服务:
/etc/init.d/服务名 start
service 服务名 start

关闭服务:
/etc/init.d/服务名 stop
service 服务名 stop

[root@oldboyedu ~]# chkconfig --list

设置开机自启动:
[root@oldboyedu ~]# chkconfig 服务名 on
取消开机自启动:
[root@oldboyedu ~]# chkconfig 服务名 off

查看服务的启动状态:
[root@oldboyedu ~]# /etc/init.d/sshd status
Centos7:
启动服务:
systemctl start 服务名


停止服务:
systemctl stop 服务名

设置开机自启动:
[root@oldboyedu ~]# systemctl enable 服务名
Created symlink from /etc/systemd/system/multi-user.target.wants/vsftpd.service to /usr/lib/systemd/system/vsftpd.service.

取消开机自启动:
[root@oldboyedu ~]# systemctl disable 服务名
Removed symlink /etc/systemd/system/multi-user.target.wants/vsftpd.service.


查看服务的启动状态:
[root@oldboyedu ~]# systemctl status vsftpd