1、configure源码
configure由Shel1脚本编写,执行过程中间会调用
<nginx-source>/auto/目录下的脚本。
#!/bin/sh

# Copyright (C) Igor Sysoev
# Copyright (C) Nginx, Inc.

# auto/options 脚本处理 configure 命今的参数,定义后续工作将要用到的变量,然后根据本次参数以及默认值设置这些变量式。
. auto/options

# auto/init 脚本初始化后续将产生的文件路径。例如,Makefile、ngx_modules.c 等文件默认情况下将会在<nginx-source>/objs/路径下
. auto/init

# auto/sources 脚本将分析 Nginx 的源码结构,这样才能构造后续的 Makefile 文件
. auto/sources

# 编译过程中所有目标文件生成的路径由 --builddir=DIR 参数指定,默认情况下为 <nginx-source>/objs, 不存在就创建这个目录
test -d $NGX_OBJS || mkdir $NGX_OBJS

# 开始准备建立ngx_auto_headers.h、autoconf.err 等必要的编译文件
echo > $NGX_AUTO_HEADERS_H
echo > $NGX_AUTOCONF_ERR

# 向objs/ngx_auto_config.h 写入命令行带的参数
echo "#define NGX_CONFIGURE \"$NGX_CONFIGURE\"" > $NGX_AUTO_CONFIG_H

# 判断DEBUG标志,如果有,那么在objs/ngx_auto_config.h文件中写入 DEBUG 宏
if [ $NGX_DEBUG = YES ]; then
    have=NGX_DEBUG . auto/have
fi

# 检查操作系统参数是否支持后续编译
if test -z "$NGX_PLATFORM"; then
    echo "checking for OS"

    NGX_SYSTEM=`uname -s 2>/dev/null`
    NGX_RELEASE=`uname -r 2>/dev/null`
    NGX_MACHINE=`uname -m 2>/dev/null`

    # 屏幕上输出OS名称、内核版本、32位/64 位内核
    echo " + $NGX_SYSTEM $NGX_RELEASE $NGX_MACHINE"

    NGX_PLATFORM="$NGX_SYSTEM:$NGX_RELEASE:$NGX_MACHINE";

    # windows操作系统,mingw版本号(MINGW64_NT-10.0-19044)0
    case "$NGX_SYSTEM" in
        MINGW32_*)
            NGX_PLATFORM=win32
        ;;
    esac

else
    echo "building for $NGX_PLATFORM"
    NGX_SYSTEM=$NGX_PLATFORM
fi

# 检查并设置编译器,如 GCC 是否安装、GCC 版本是否支持后续编译nginx
. auto/cc/conf

# 对非 Windows 操作系统定义一些必要的头文件,并检查其是否存在,以此决定 configure 后续步骤是否可以成功
if [ "$NGX_PLATFORM" != win32 ]; then
    . auto/headers
fi

# 对于当前操作系统,定义一些特定的操作系统相关的方法并检查当前环境是否支持。例如,对于 Linux,在这里使用 sched_setaffinity 设置进程优先级,使用 Linux 特有的 sendfile 系统调用来加速向网络中发送文件块
. auto/os/conf

# 定义类 UNIX 操作系统中通用的头文件和系统调用等,并检查当前环境是否支持
if [ "$NGX_PLATFORM" != win32 ]; then
    . auto/unix
fi


# 最核心的构造运行期 modules 的脚本。它将会生成ngx_modules.c文件,这个文件会被编译进Nginx中,其中它所做的唯一的事情就是定义了ngx_modules 数组。ngx_modules 指明 Nginx 运行期间有哪些模块会参与到请求的处理中,包括 HTTP 请求可能会使用哪些模块处理,因此,它对数组元素的顺序非常敏感,也就是说,绝大部分模块在ngx_modules 数组中的顺序其实是固定的。例如,一个请求必须先执行 ngx_http_gzip_filter_module 模块重新修改 HTTP 响应中的头部后,才能使用ngx_http_header_filter 模块按照 headers_in 结构体里的成员构造出以 TCP 流形式发送给客户端的 HTTP 响应头部。注意,我们在 --add-module= 参数里加入的第三方模块也在此步骤写入到 ngx_modules.c 文件中了
. auto/modules

# conf 脚本用来检查 Nginx 在链接期间需要链接的第三方静态库、动态库或者目标文件是否存在
. auto/lib/conf

# 处理 Nginx 安装后的路径
case ".$NGX_PREFIX" in
    .)
        NGX_PREFIX=${NGX_PREFIX:-/usr/local/nginx}
        have=NGX_PREFIX value="\"$NGX_PREFIX/\"" . auto/define
    ;;

    .!)
# 在 configure 脚本里检查某个特性是否存在时,会生成一个最简单的只包含 main 函数的C程序,该序会包含相应的头文件。然后,通过检查是否可以编译通过来确认特性是否支持,并将结果记录在 objsautoconf.err 文件中。后续检查头文件、检查特性的脚本都用了类似的方法
        NGX_PREFIX=
    ;;

    *)
        have=NGX_PREFIX value="\"$NGX_PREFIX/\"" . auto/define
    ;;
esac

# 处理 Nginx 安装后 conf 文件的路径
if [ ".$NGX_CONF_PREFIX" != "." ]; then
    have=NGX_CONF_PREFIX value="\"$NGX_CONF_PREFIX/\"" . auto/define
fi

# 处理 Nqinx安装后,二进制文件、pid、lock 等其他文件的路径可参见 confiqure 参数中路径类选项的说明
have=NGX_SBIN_PATH value="\"$NGX_SBIN_PATH\"" . auto/define
have=NGX_CONF_PATH value="\"$NGX_CONF_PATH\"" . auto/define
have=NGX_PID_PATH value="\"$NGX_PID_PATH\"" . auto/define
have=NGX_LOCK_PATH value="\"$NGX_LOCK_PATH\"" . auto/define
have=NGX_ERROR_LOG_PATH value="\"$NGX_ERROR_LOG_PATH\"" . auto/define

have=NGX_HTTP_LOG_PATH value="\"$NGX_HTTP_LOG_PATH\"" . auto/define
have=NGX_HTTP_CLIENT_TEMP_PATH value="\"$NGX_HTTP_CLIENT_TEMP_PATH\""
. auto/define
have=NGX_HTTP_PROXY_TEMP_PATH value="\"$NGX_HTTP_PROXY_TEMP_PATH\""
. auto/define
have=NGX_HTTP_FASTCGI_TEMP_PATH value="\"$NGX_HTTP_FASTCGI_TEMP_PATH\""
. auto/define
have=NGX_HTTP_UWSGI_TEMP_PATH value="\"$NGX_HTTP_UWSGI_TEMP_PATH\""
. auto/define
have=NGX_HTTP_SCGI_TEMP_PATH value="\"$NGX_HTTP_SCGI_TEMP_PATH\""
. auto/define

# 创建编译时使用的objs/Makefile 文件
. auto/make

# 为objs/Makefile 加入需要连接的第三方静态库、动态库或者目标文件
. auto/lib/make

# 为objs/Makefile加入install功能,当执行make install时将编译生成的必要文件复制到安装路径,建立必要的目录
. auto/install

#在ngx_auto_config.h 文件中加入 NGX_SUPPRESS_WARN宏、NGX_SMP宏
. auto/stubs

# 在ngx_auto_config.h文件中指定 NGX_USER 和 NGX_GROUP 宏,如果执行 configure 时没有参数指定,默认两者皆为 nobody (也就是默认以 nobody 用户运行进程)
have=NGX_USER value="\"$NGX_USER\"" . auto/define
have=NGX_GROUP value="\"$NGX_GROUP\"" . auto/define

# 显示 configure 执行的结果,如果失败,则给出原因
. auto/summary
2、configure生成的文件
当 configure 执行成功时会生成 objs 目录,并在该目录下产生以下目录和文件

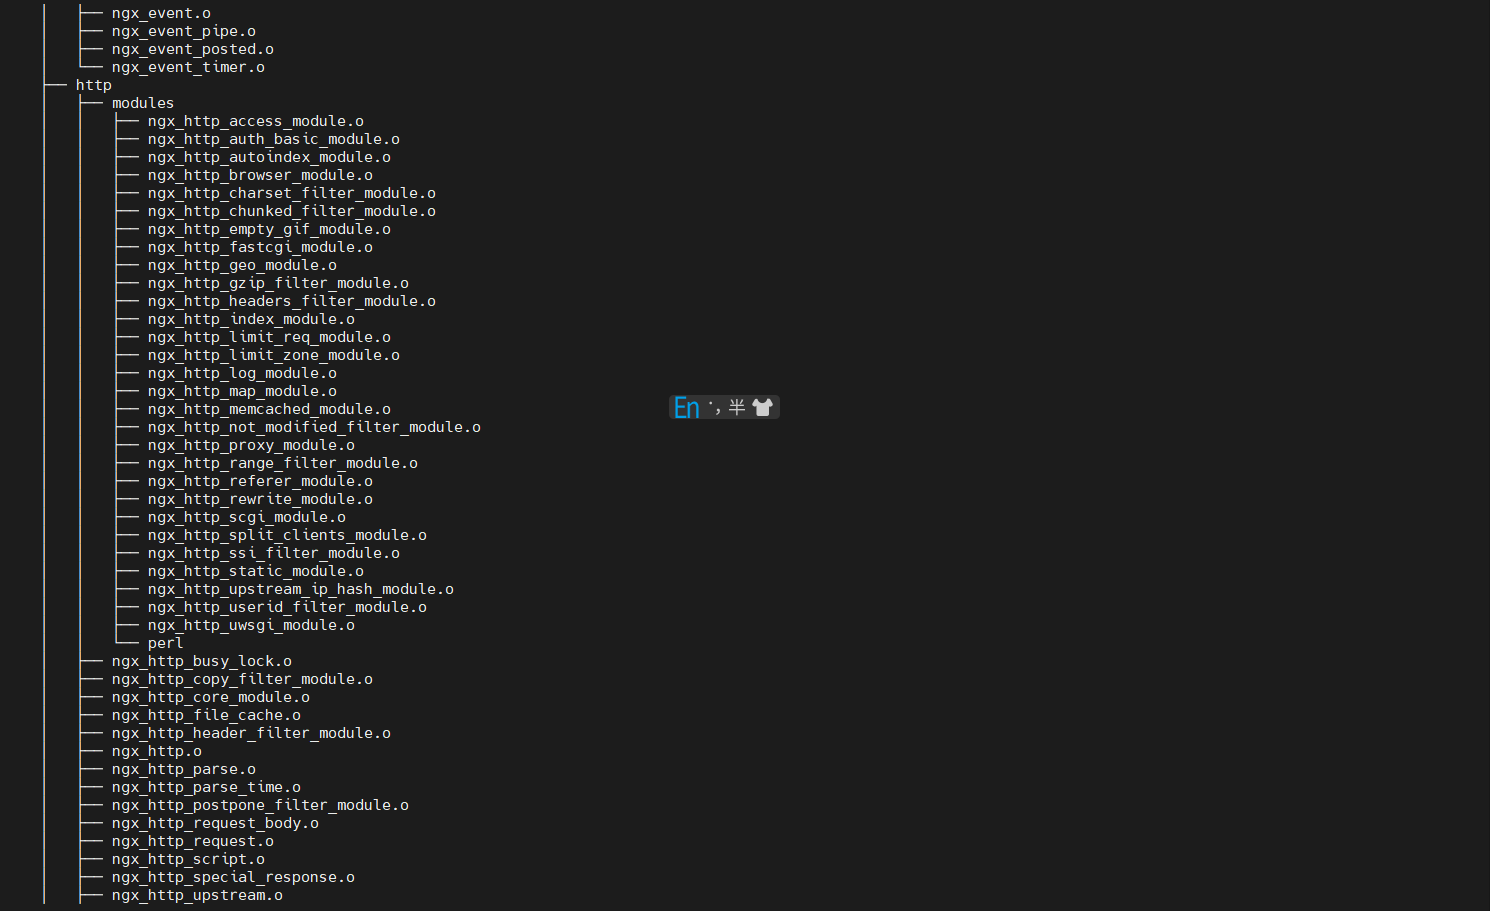
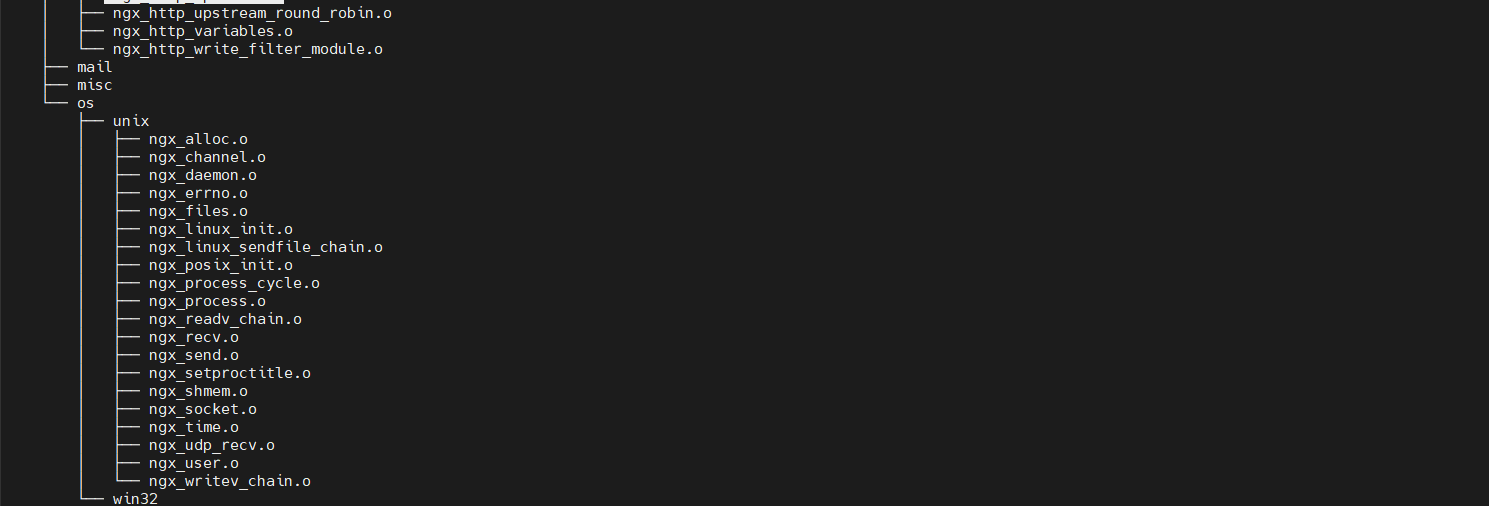
上述目录和文件介绍如下
- src 目录用于存放编译时产生的目标文件
- Makefile文件用于编译Nginx 工程以及在加instal1参数后安装Nginx。
- autoconf.err 保存 configure 执行过程中产生的结果。
- ngx_aut_ headers.h和ngx_auto_config.h保存了一些宏,这两个头文会被 src/corelngx_config.h及src/os/unix/ngx linux_configh.h文件引用。
- ngx_modules.c是一个关键文件,我们需要看看它的内部结构。一个默认配置下生成的ngx_modules.c文件内容如下:
#include <ngx_config.h>
#include <ngx_core.h>


extern ngx_module_t  ngx_core_module;
extern ngx_module_t  ngx_errlog_module;
extern ngx_module_t  ngx_conf_module;
extern ngx_module_t  ngx_events_module;
extern ngx_module_t  ngx_event_core_module;
extern ngx_module_t  ngx_epoll_module;
extern ngx_module_t  ngx_http_module;
extern ngx_module_t  ngx_http_core_module;
extern ngx_module_t  ngx_http_log_module;
extern ngx_module_t  ngx_http_upstream_module;
extern ngx_module_t  ngx_http_static_module;
extern ngx_module_t  ngx_http_autoindex_module;
extern ngx_module_t  ngx_http_index_module;
extern ngx_module_t  ngx_http_auth_basic_module;
extern ngx_module_t  ngx_http_access_module;
extern ngx_module_t  ngx_http_limit_zone_module;
extern ngx_module_t  ngx_http_limit_req_module;
extern ngx_module_t  ngx_http_geo_module;
extern ngx_module_t  ngx_http_map_module;
extern ngx_module_t  ngx_http_split_clients_module;
extern ngx_module_t  ngx_http_referer_module;
extern ngx_module_t  ngx_http_rewrite_module;
extern ngx_module_t  ngx_http_proxy_module;
extern ngx_module_t  ngx_http_fastcgi_module;
extern ngx_module_t  ngx_http_uwsgi_module;
extern ngx_module_t  ngx_http_scgi_module;
extern ngx_module_t  ngx_http_memcached_module;
extern ngx_module_t  ngx_http_empty_gif_module;
extern ngx_module_t  ngx_http_browser_module;
extern ngx_module_t  ngx_http_upstream_ip_hash_module;
extern ngx_module_t  ngx_http_write_filter_module;
extern ngx_module_t  ngx_http_header_filter_module;
extern ngx_module_t  ngx_http_chunked_filter_module;
extern ngx_module_t  ngx_http_range_header_filter_module;
extern ngx_module_t  ngx_http_gzip_filter_module;
extern ngx_module_t  ngx_http_postpone_filter_module;
extern ngx_module_t  ngx_http_ssi_filter_module;
extern ngx_module_t  ngx_http_charset_filter_module;
extern ngx_module_t  ngx_http_userid_filter_module;
extern ngx_module_t  ngx_http_headers_filter_module;
extern ngx_module_t  ngx_http_copy_filter_module;
extern ngx_module_t  ngx_http_range_body_filter_module;
extern ngx_module_t  ngx_http_not_modified_filter_module;

ngx_module_t *ngx_modules[] = {
    &ngx_core_module,
    &ngx_errlog_module,
    &ngx_conf_module,
    &ngx_events_module,
    &ngx_event_core_module,
    &ngx_epoll_module,
    &ngx_http_module,
    &ngx_http_core_module,
    &ngx_http_log_module,
    &ngx_http_upstream_module,
    &ngx_http_static_module,
    &ngx_http_autoindex_module,
    &ngx_http_index_module,
    &ngx_http_auth_basic_module,
    &ngx_http_access_module,
    &ngx_http_limit_zone_module,
    &ngx_http_limit_req_module,
    &ngx_http_geo_module,
    &ngx_http_map_module,
    &ngx_http_split_clients_module,
    &ngx_http_referer_module,
    &ngx_http_rewrite_module,
    &ngx_http_proxy_module,
    &ngx_http_fastcgi_module,
    &ngx_http_uwsgi_module,
    &ngx_http_scgi_module,
    &ngx_http_memcached_module,
    &ngx_http_empty_gif_module,
    &ngx_http_browser_module,
    &ngx_http_upstream_ip_hash_module,
    &ngx_http_write_filter_module,
    &ngx_http_header_filter_module,
    &ngx_http_chunked_filter_module,
    &ngx_http_range_header_filter_module,
    &ngx_http_gzip_filter_module,
    &ngx_http_postpone_filter_module,
    &ngx_http_ssi_filter_module,
    &ngx_http_charset_filter_module,
    &ngx_http_userid_filter_module,
    &ngx_http_headers_filter_module,
    &ngx_http_copy_filter_module,
    &ngx_http_range_body_filter_module,
    &ngx_http_not_modified_filter_module,
    NULL
};
ngx_modules.c文件就是用来定义ngx_modules 数组的。它指明了每个模块在Nginx中的优先级,当一个请求同时符合多个模块的处理规则时,将按照它们在 ngx_modules 数组中的顺序选择最靠前的模块优先处理。对于 HTTP 过滤模块而言则是相反的,因为 HTTP 框架在初始化时,会在ngx_modules数组中将过滤模块按先后顺序向过滤链表中添加,但每次都是添加到链表的表头,因此,对HTTP过滤模块而言,在ngx_modules 数组中越是靠后的模块反而会首先处理HTTP响应。