1.什么是SonarQube
既然是学习devops 运维流水线构建
开发
↓
测试
↓
运维


华为devops软件开发流水线文档
https://support.huaweicloud.com/reference-devcloud/devcloud_reference_040404.html
前面我们已经基本实现了,基于git+gitlab+jenkins实现了
代码推送到远程仓库
自动触发jenkins构建任务,结合shell脚本实现服务器配置更新

为了精益求精,再学下企业里进行自动化代码质量扫描的软件,SonarQube
https://zh.wikipedia.org/zh-cn/SonarQube
在公司的软件开发项目周期里,研发老大会关注代码的质量,确保尽可能少的bug后再上线;
但如果以人工检查如代码质量,框架漏洞,或者代码的算法,写法太垃圾。。
这是一个大工程,如果能借助一些自动化工具去扫描代码,就可以极大的减少code review(代码审查)的时间
因此SonarQube它来了。
2.SonarQube部署
2.1 mysql安装
https://downloads.mysql.com/archives/community/
https://downloads.mysql.com/archives/get/p/23/file/mysql-5.7.28-linux-glibc2.12-x86_64.tar.gz

1.创建目录且下载,解压缩

mkdir -p /www.yuchaoit.cn/soft

# 将mysql5.7的目录放置在/opt下
cd /www.yuchaoit.cn/soft/ && wget https://downloads.mysql.com/archives/get/p/23/file/mysql-5.7.28-linux-glibc2.12-x86_64.tar.gz && tar zxf mysql-5.7.28-linux-glibc2.12-x86_64.tar.gz -C /opt/

# 设置软连接
mv /opt/mysql-5.7.28-linux-glibc2.12-x86_64 /opt/mysql-5.7.28
ln -s /opt/mysql-5.7.28 /opt/mysql

# 检查
[root@jenkins-100 /opt]#ll
total 242268
-rw-r--r-- 1 root root 170023183 Jul 10 19:15 jdk-8u181-linux-x64.rpm
-rw-r--r-- 1 root root  78055160 Jul 10 19:15 jenkins-2.190.1-1.1.noarch.rpm
lrwxrwxrwx 1 root root        17 Jul 13 11:36 mysql -> /opt/mysql-5.7.28
drwxr-xr-x 9 root root       129 Jul 13 11:35 mysql-5.7.28
drwxr-xr-x 2 root root         6 Jul 11 06:23 plugins


# 创建数据库目录,待会使用
mkdir -p /www.yuchaoit.cn/mysql_3306/


2.设置环境变量
[root@jenkins-100 /opt]#echo 'export PATH=$PATH:/opt/mysql/bin' >>/etc/profile
[root@jenkins-100 /opt]#source /etc/profile
[root@jenkins-100 /opt]#mysql -V
mysql  Ver 14.14 Distrib 5.7.28, for linux-glibc2.12 (x86_64) using  EditLine wrapper


# 清除mariadb的依赖
rpm -qa|grep mariadb
yum remove mariadb-libs -y
rm -rf /etc/my.cnf

3.安装mysql5.7的依赖
yum install -y libaio-devel

4.创建mysql用户,授权数据目录
useradd -s /sbin/nologin -M mysql
chown -R mysql.mysql /www.yuchaoit.cn/
chown -R mysql.mysql /opt/mysql*

5.初始化数据库
[root@jenkins-100 /opt]#mysqld --initialize-insecure --user=mysql --basedir=/opt/mysql --datadir=/www.yuchaoit.cn/mysql_3306/
2022-07-13T04:03:35.115013Z 0 [Warning] TIMESTAMP with implicit DEFAULT value is deprecated. Please use --explicit_defaults_for_timestamp server option (see documentation for more details).
2022-07-13T04:03:35.290090Z 0 [Warning] InnoDB: New log files created, LSN=45790
2022-07-13T04:03:35.324794Z 0 [Warning] InnoDB: Creating foreign key constraint system tables.
2022-07-13T04:03:35.380019Z 0 [Warning] No existing UUID has been found, so we assume that this is the first time that this server has been started. Generating a new UUID: c46ac1d3-0260-11ed-9ad5-000c294710ac.
2022-07-13T04:03:35.380520Z 0 [Warning] Gtid table is not ready to be used. Table 'mysql.gtid_executed' cannot be opened.
2022-07-13T04:03:35.749798Z 0 [Warning] CA certificate ca.pem is self signed.
2022-07-13T04:03:35.857768Z 1 [Warning] root@localhost is created with an empty password ! Please consider switching off the --initialize-insecure option.


看到结尾的提示,默认mysql密码是空

6.创建自定义的mysql配置文件
cat> /etc/my.cnf <<'EOF'
[mysqld]
user=mysql
basedir=/opt/mysql
datadir=/www.yuchaoit.cn/mysql_3306
socket=/tmp/mysql.sock

[mysql]
socket=/tmp/mysql.sock
EOF

7.设置启动mysql的脚本
[root@jenkins-100 /opt]#
[root@jenkins-100 /opt]#cp /opt/mysql/support-files/mysql.server  /etc/init.d/mysqld
[root@jenkins-100 /opt]#chkconfig --add mysqld
[root@jenkins-100 /opt]#systemctl start mysqld

[root@jenkins-100 /opt]#netstat -lntup|grep 3306
tcp6       0      0 :::3306                 :::*                    LISTEN      102661/mysqld


8.如果要是前台启动mysql,可以用如下的完整命令(通过ps命令可见)
[root@jenkins-100 /opt]#/opt/mysql/bin/mysqld --basedir=/opt/mysql --datadir=/www.yuchaoit.cn/mysql_3306 --plugin-dir=/opt/mysql/lib/plugin --user=mysql --log-error=/www.yuchaoit.cn/mysql_3306/log/mysql.log --pid-file=/www.yuchaoit.cn/mysql_3306/db01.pid --socket=/tmp/mysql.sock

9.修改mysql密码
mysqladmin password www.yuchaoit.cn


10.测试登录
[root@jenkins-100 /opt]#mysql -uroot -p'www.yuchaoit.cn' -e 'select version();'
mysql: [Warning] Using a password on the command line interface can be insecure.
+-----------+
| version() |
+-----------+
| 5.7.28    |
+-----------+
3.安装SonarQube
1.下载软件包,没有从超哥要
[root@jenkins-100 /opt]#ls so*
sonar_plugins.tar.gz  sonarqube-7.0.zip  sonar-scanner-cli-4.0.0.1744-linux.zip

2.安装java环境,因为sonarqube是java开发的
yum install java -y

3.解压缩SonarQube主程序
[root@jenkins-100 /opt]#unzip sonarqube-7.0.zip -d /opt/
[root@jenkins-100 /opt]#ln -s /opt/sonarqube-7.0/ /opt/sonarqube

4.创建普通用户,授权
[root@jenkins-100 /opt]#useradd sonar -M -s /sbin/nologin
[root@jenkins-100 /opt]#chown -R sonar.sonar /opt/sonarqube*

5.配置sonnaqube连接mysql参数
cp /opt/sonarqube/conf/sonar.properties{,.bak}

cat > /opt/sonarqube/conf/sonar.properties << 'EOF'
sonar.jdbc.username=root
sonar.jdbc.password=www.yuchaoit.cn
sonar.jdbc.url=jdbc:mysql://localhost:3306/sonar?useUnicode=true&characterEncoding=utf8&rewriteBatchedStatements=true&useConfigs=maxPerformance&useSSL=false
EOF

6.修改sonarqube启动脚本,指定运行用户
[root@jenkins-100 /opt]#grep '^RUN_AS' /opt/sonarqube/bin/linux-x86-64/sonar.sh
RUN_AS_USER=sonar

7.创建sonarqube数据库
[root@jenkins-100 /opt]#mysql -uroot -pwww.yuchaoit.cn -e 'create database sonar default character set utf8;'
mysql: [Warning] Using a password on the command line interface can be insecure.
[root@jenkins-100 /opt]#mysql -uroot -pwww.yuchaoit.cn -e 'show databases;'
mysql: [Warning] Using a password on the command line interface can be insecure.
+--------------------+
| Database           |
+--------------------+
| information_schema |
| log                |
| mysql              |
| performance_schema |
| sonar              |
| sys                |
+--------------------+


8.创建sonarqube服务管理脚本,用systemctl去管理
cat >/usr/lib/systemd/system/sonar.service<<'EOF'
[Unit]
Description=sonar

[Service]
ExecStart=/opt/sonarqube/bin/linux-x86-64/sonar.sh start
ExecStop=/opt/sonarqube/bin/linux-x86-64/sonar.sh stop
Type=forking
User=sonar
Group=sonar

[Install]
WantedBy=multi-user.target
EOF

systemctl daemon-reload
systemctl start sonar
systemctl status sonar
[root@jenkins-100 ~]#systemctl enable  sonar
Created symlink from /etc/systemd/system/multi-user.target.wants/sonar.service to /usr/lib/systemd/system/sonar.service.


9.检查服务
[root@jenkins-100 /opt]#netstat -tunlp|grep java
tcp        0      0 127.0.0.1:32000         0.0.0.0:*               LISTEN      104899/java
tcp6       0      0 127.0.0.1:38439         :::*                    LISTEN      105219/java
tcp6       0      0 :::9000                 :::*                    LISTEN      105022/java
tcp6       0      0 127.0.0.1:9001          :::*                    LISTEN      104924/java
tcp6       0      0 :::8080                 :::*                    LISTEN      17763/java
tcp6       0      0 :::45781                :::*                    LISTEN      17763/java
udp6       0      0 :::33848                :::*                                17763/java
udp6       0      0 :::5353                 :::*                                17763/java


10.如果报错,可以去查看sonar的日志
[root@jenkins-100 /opt]#ls /opt/sonarqube/logs/
access.log  ce.log  es.log  sonar.log  web.log

=================================================================

如下操作和部署无关,java程序运行需要较多内核资源,可能要进行调整

查看内核参数
[root@jenkins-100 /opt]#sysctl -a |grep max_map
sysctl: reading key "net.ipv6.conf.all.stable_secret"
sysctl: reading key "net.ipv6.conf.default.stable_secret"
sysctl: reading key "net.ipv6.conf.ens33.stable_secret"
sysctl: reading key "net.ipv6.conf.ens37.stable_secret"
sysctl: reading key "net.ipv6.conf.lo.stable_secret"
vm.max_map_count = 65530


修改内核参数
echo "vm.max_map_count=262144" >> /etc/sysctl.conf
echo "root             -       nofile          65536"  >> /etc/security/limits.conf
echo "sonar            -       nofile          65536"  >> /etc/security/limits.conf
sysctl -p
4.初始化SonarQube
4.1 登录
http://10.0.0.100:9000/
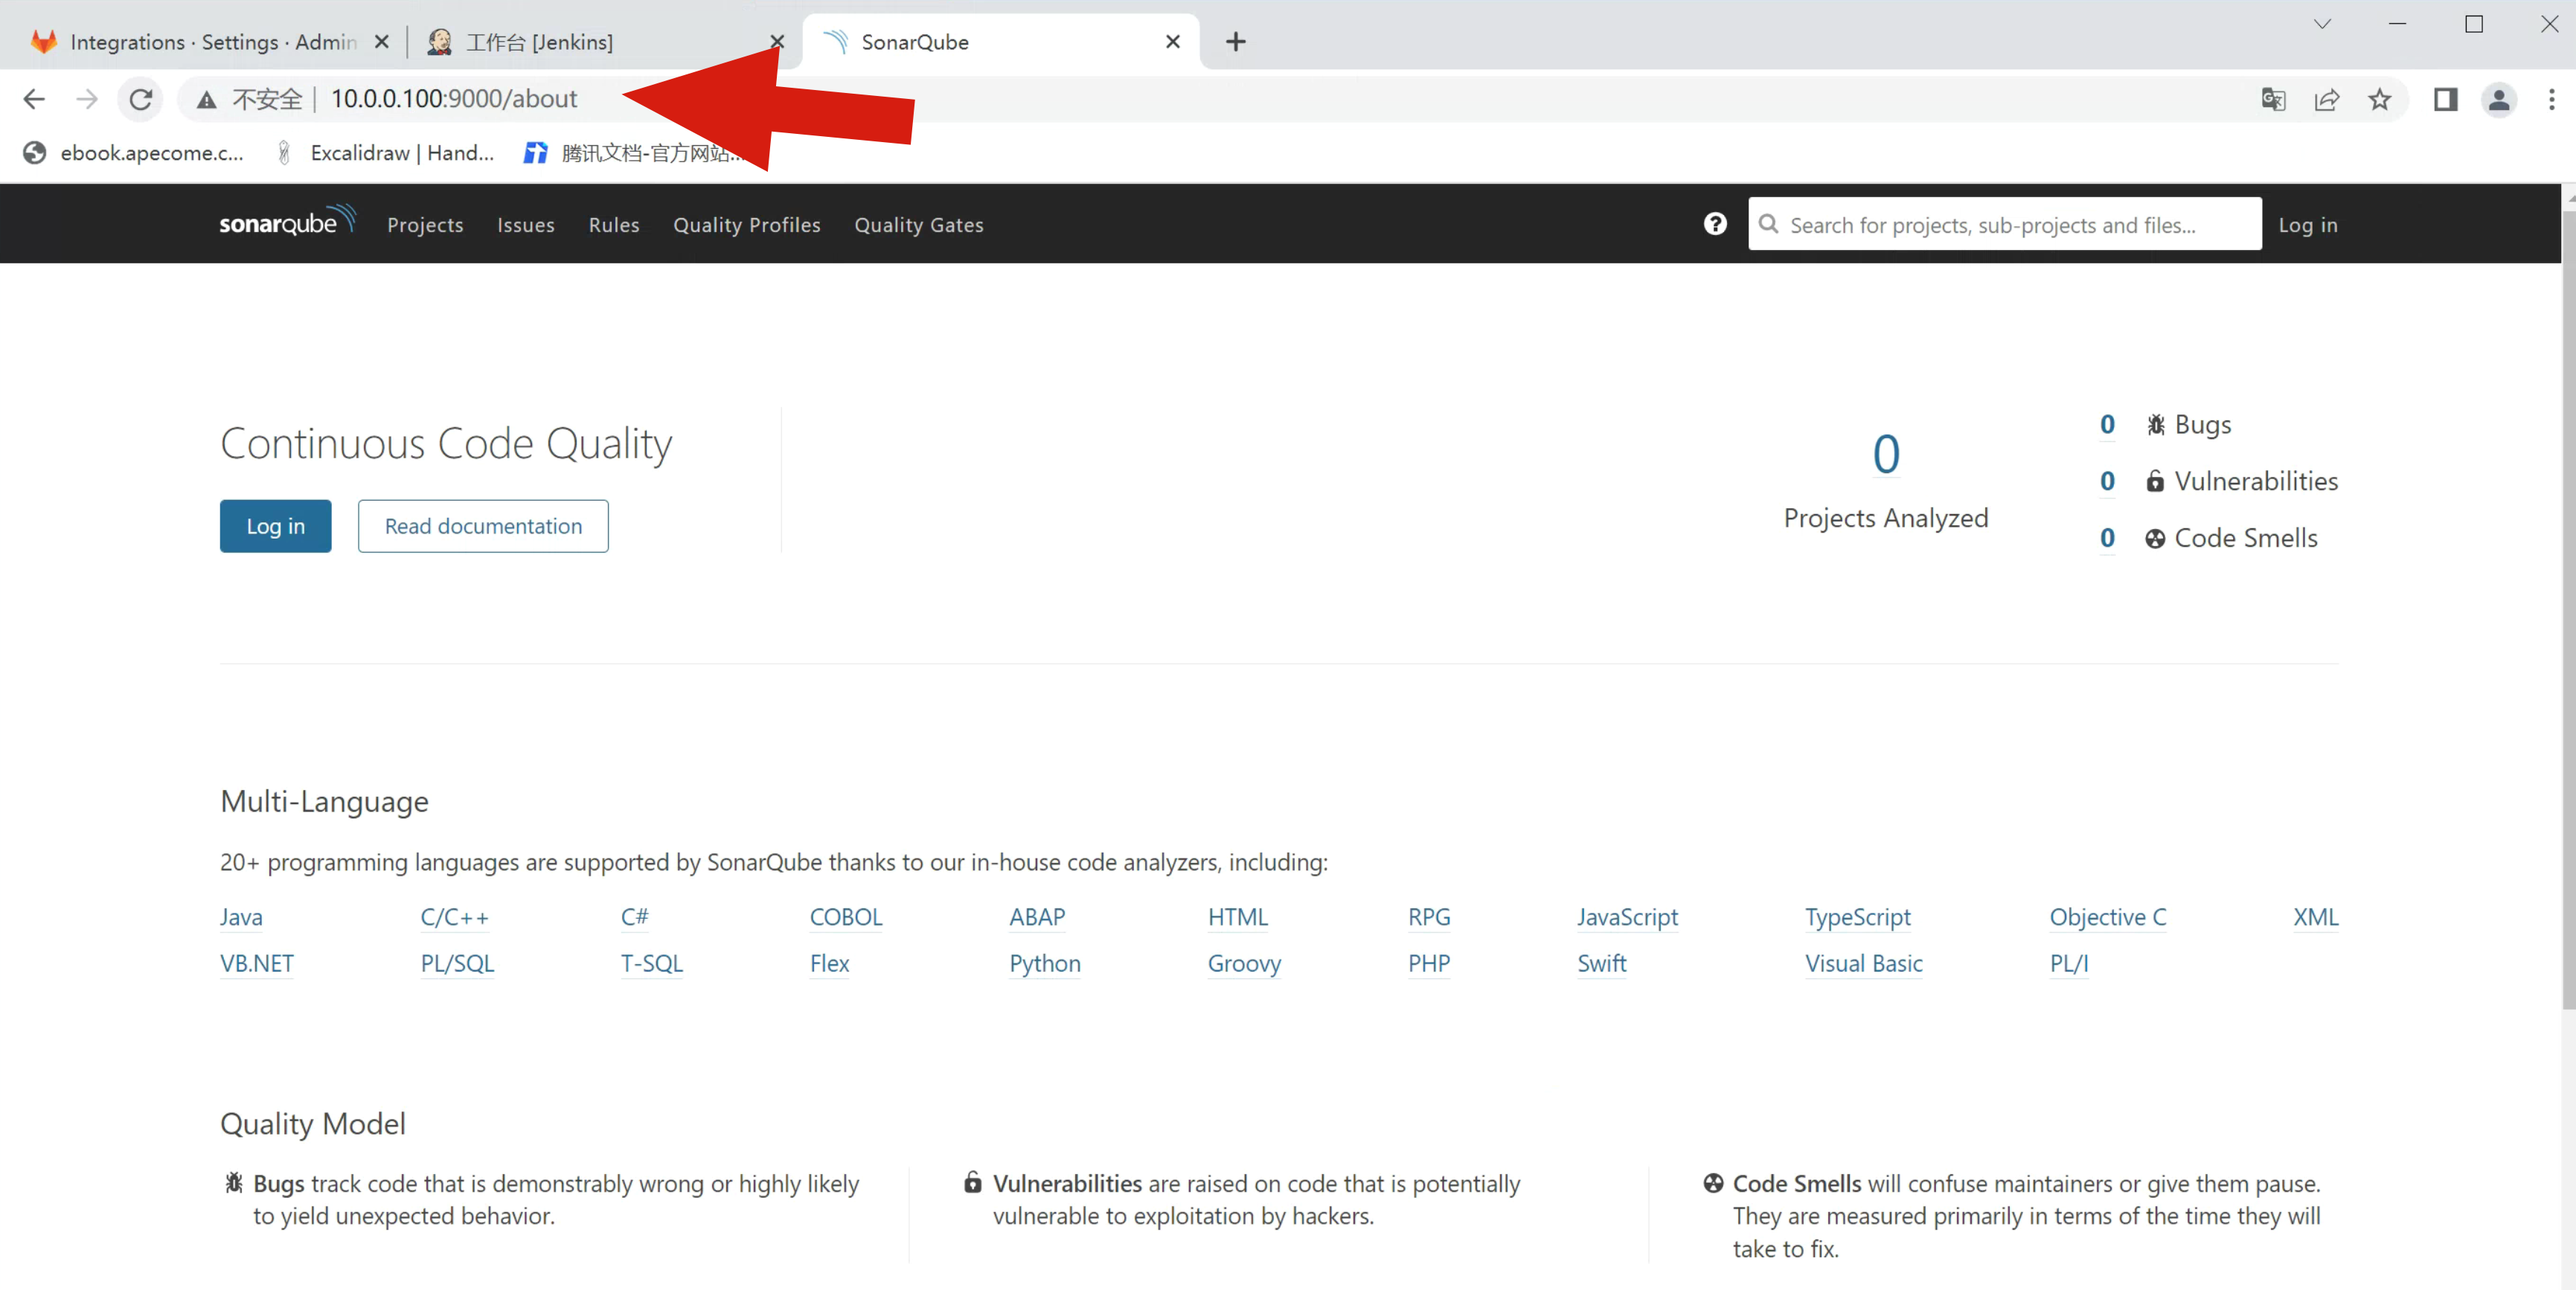
默认账密
admin
admin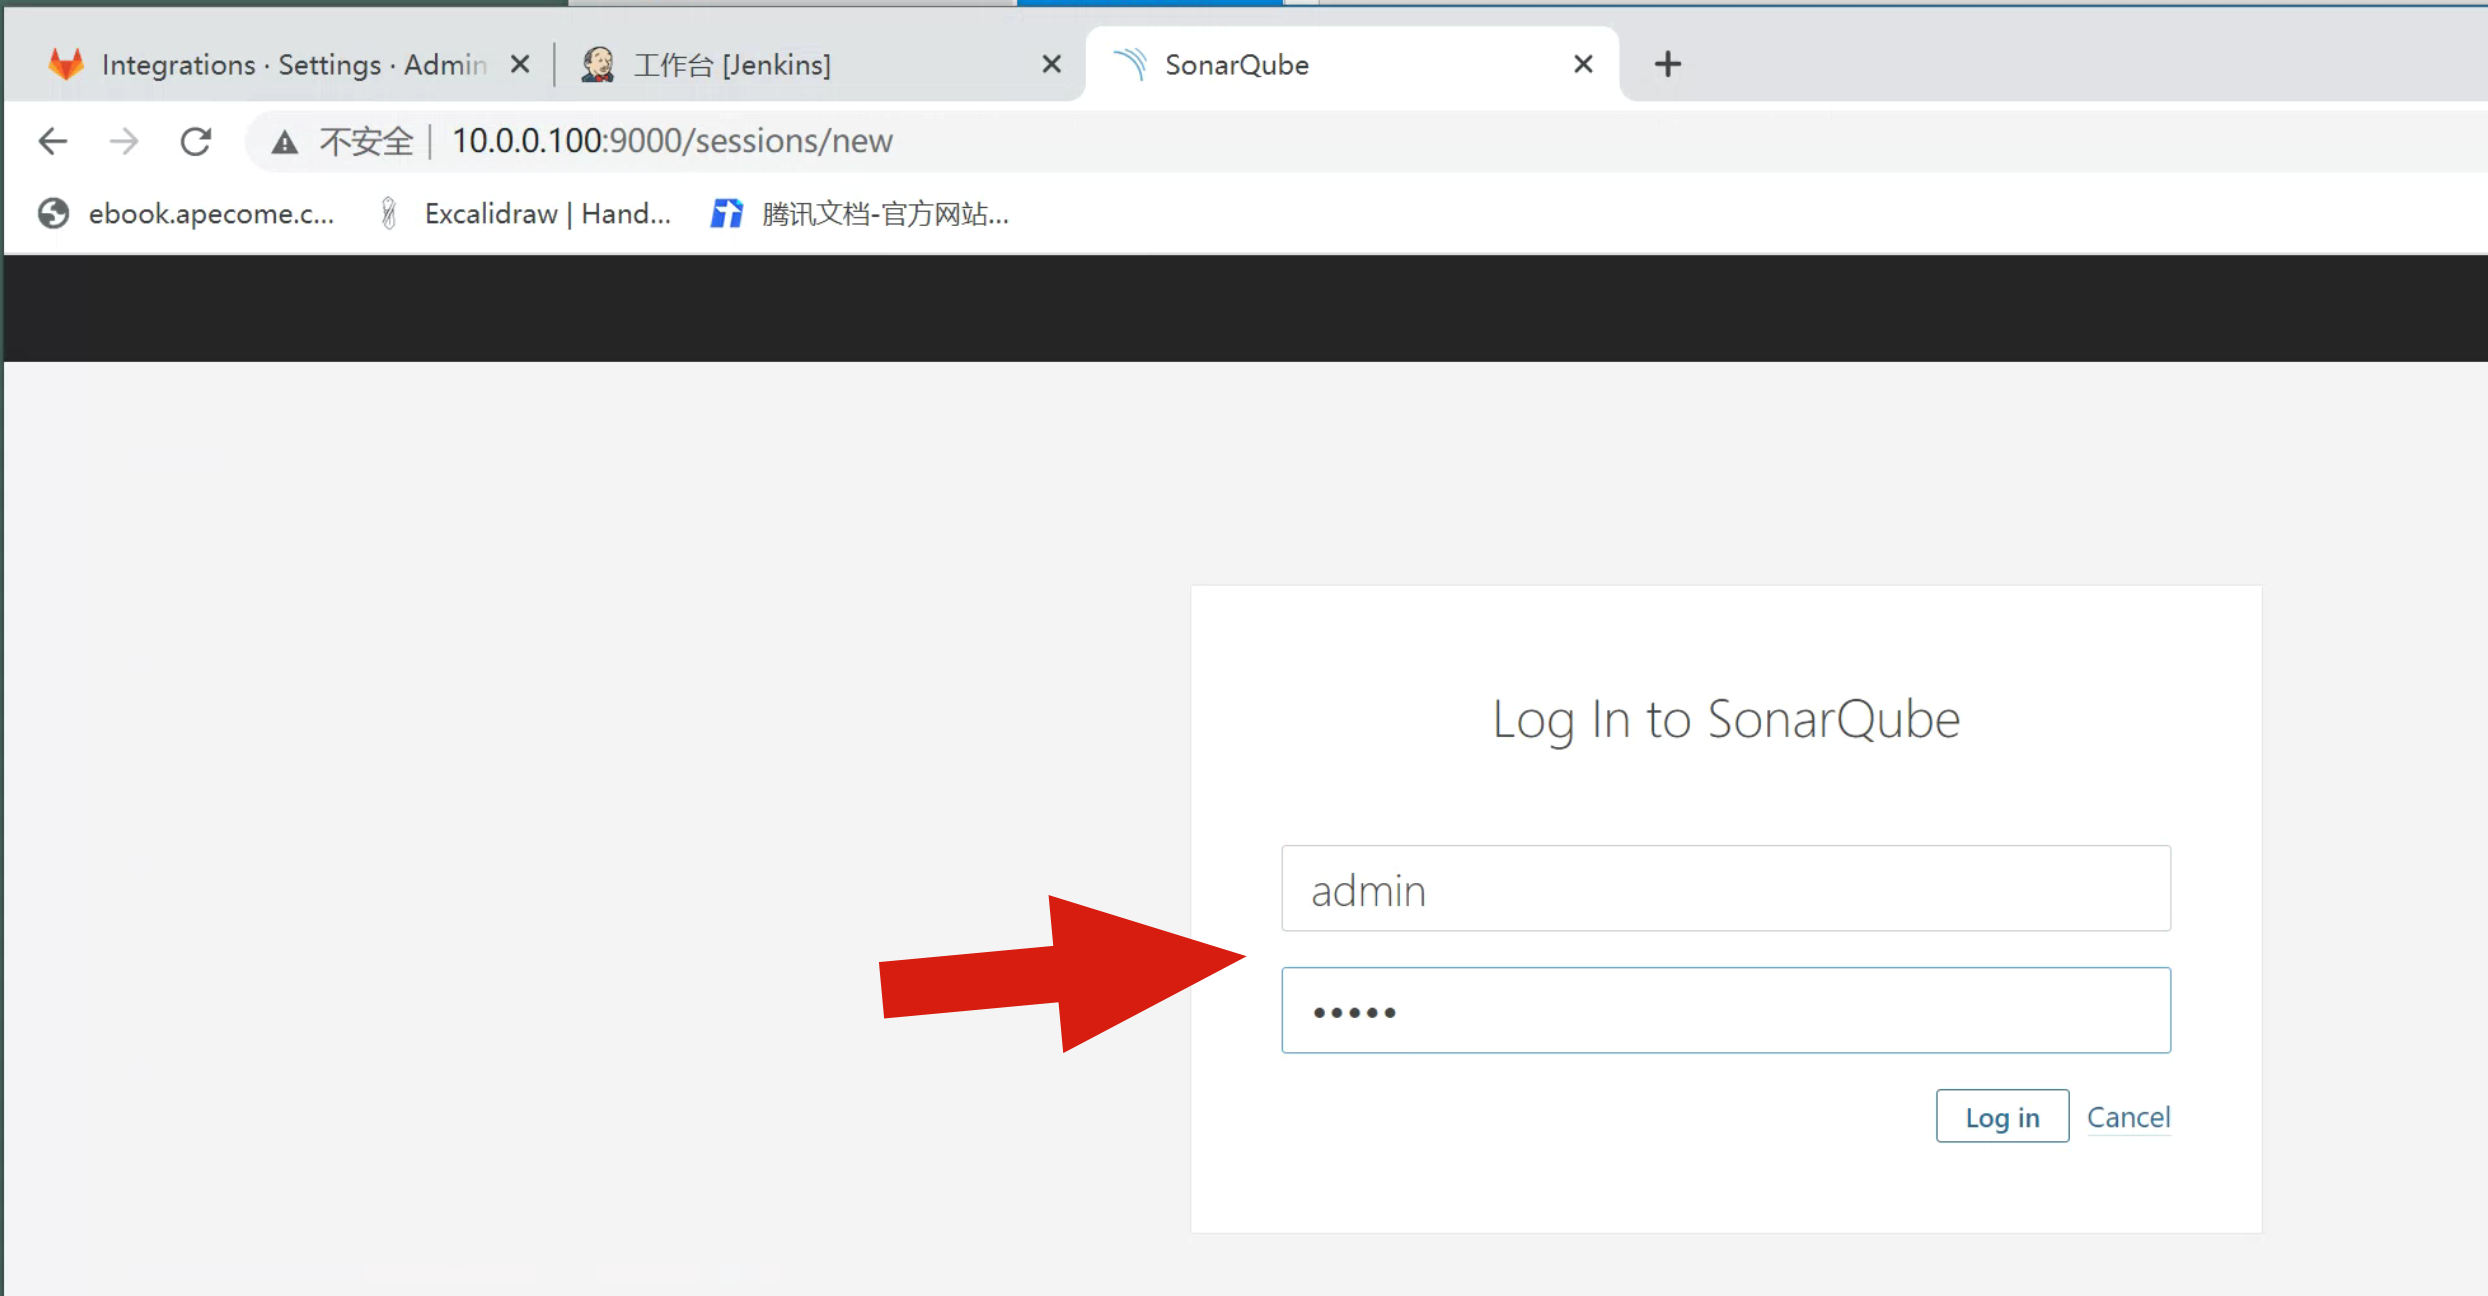
4.2 生成token
在输入框内输入jenkins,然后点击Generate生成token,需要保存好这个tocken,后面会用到
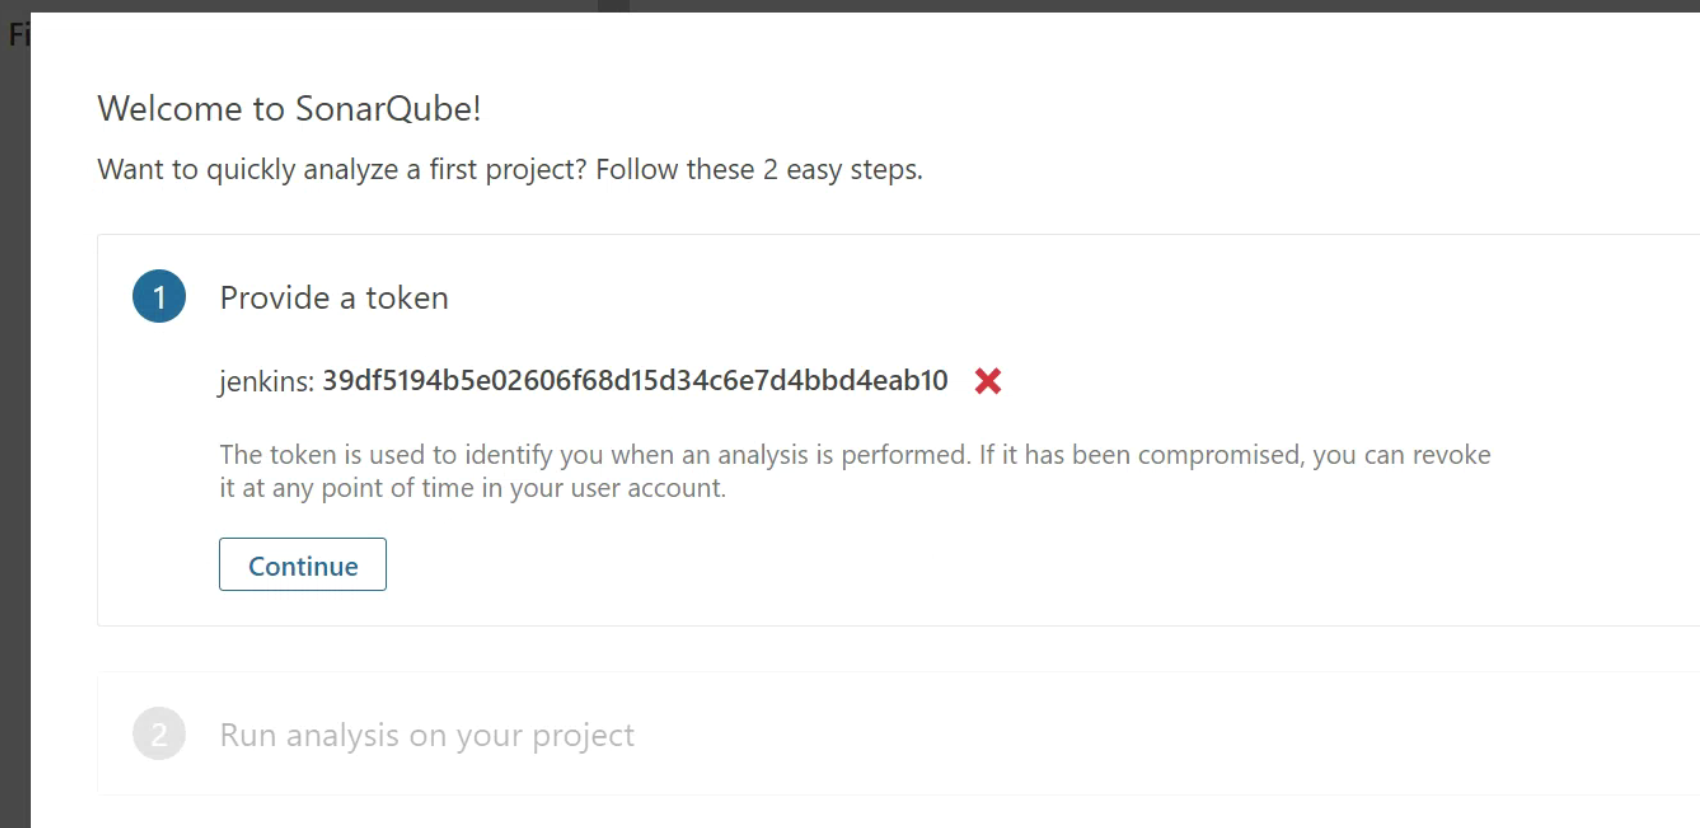
token就是一串字符串数据,用于身份校验

输入jenkins,点击生成token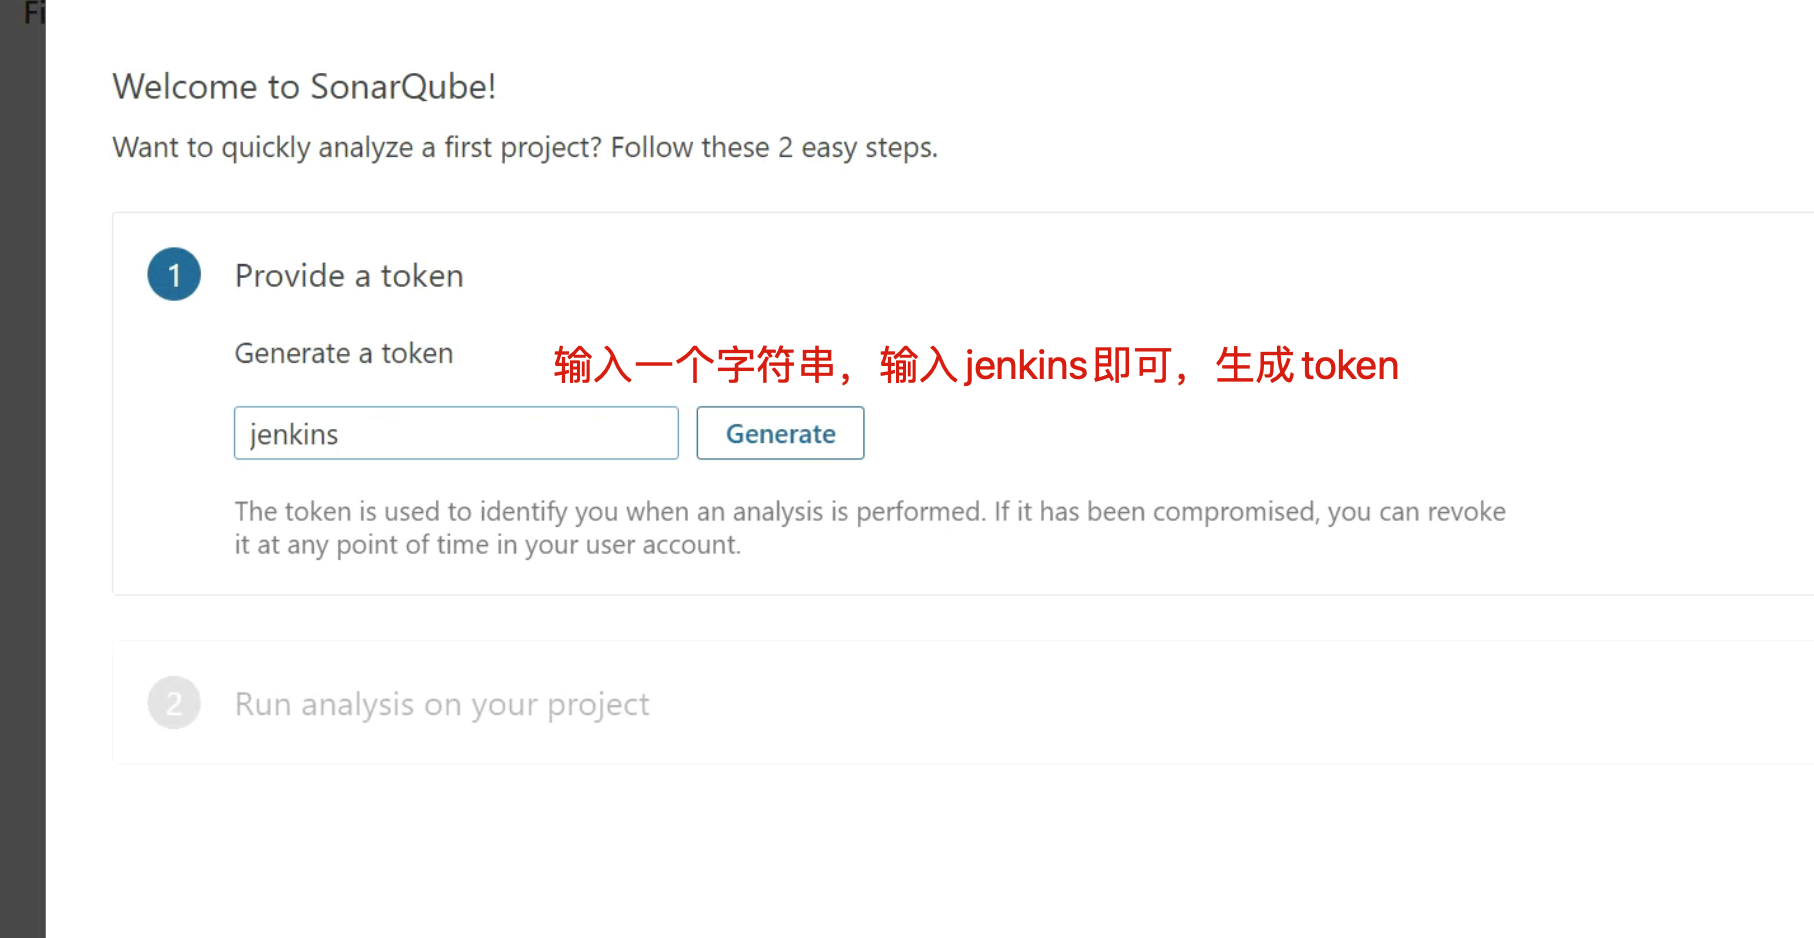
jenkins: 39df5194b5e02606f68d15d34c6e7d4bbd4eab10
4.3 选择项目类型(开发语言)
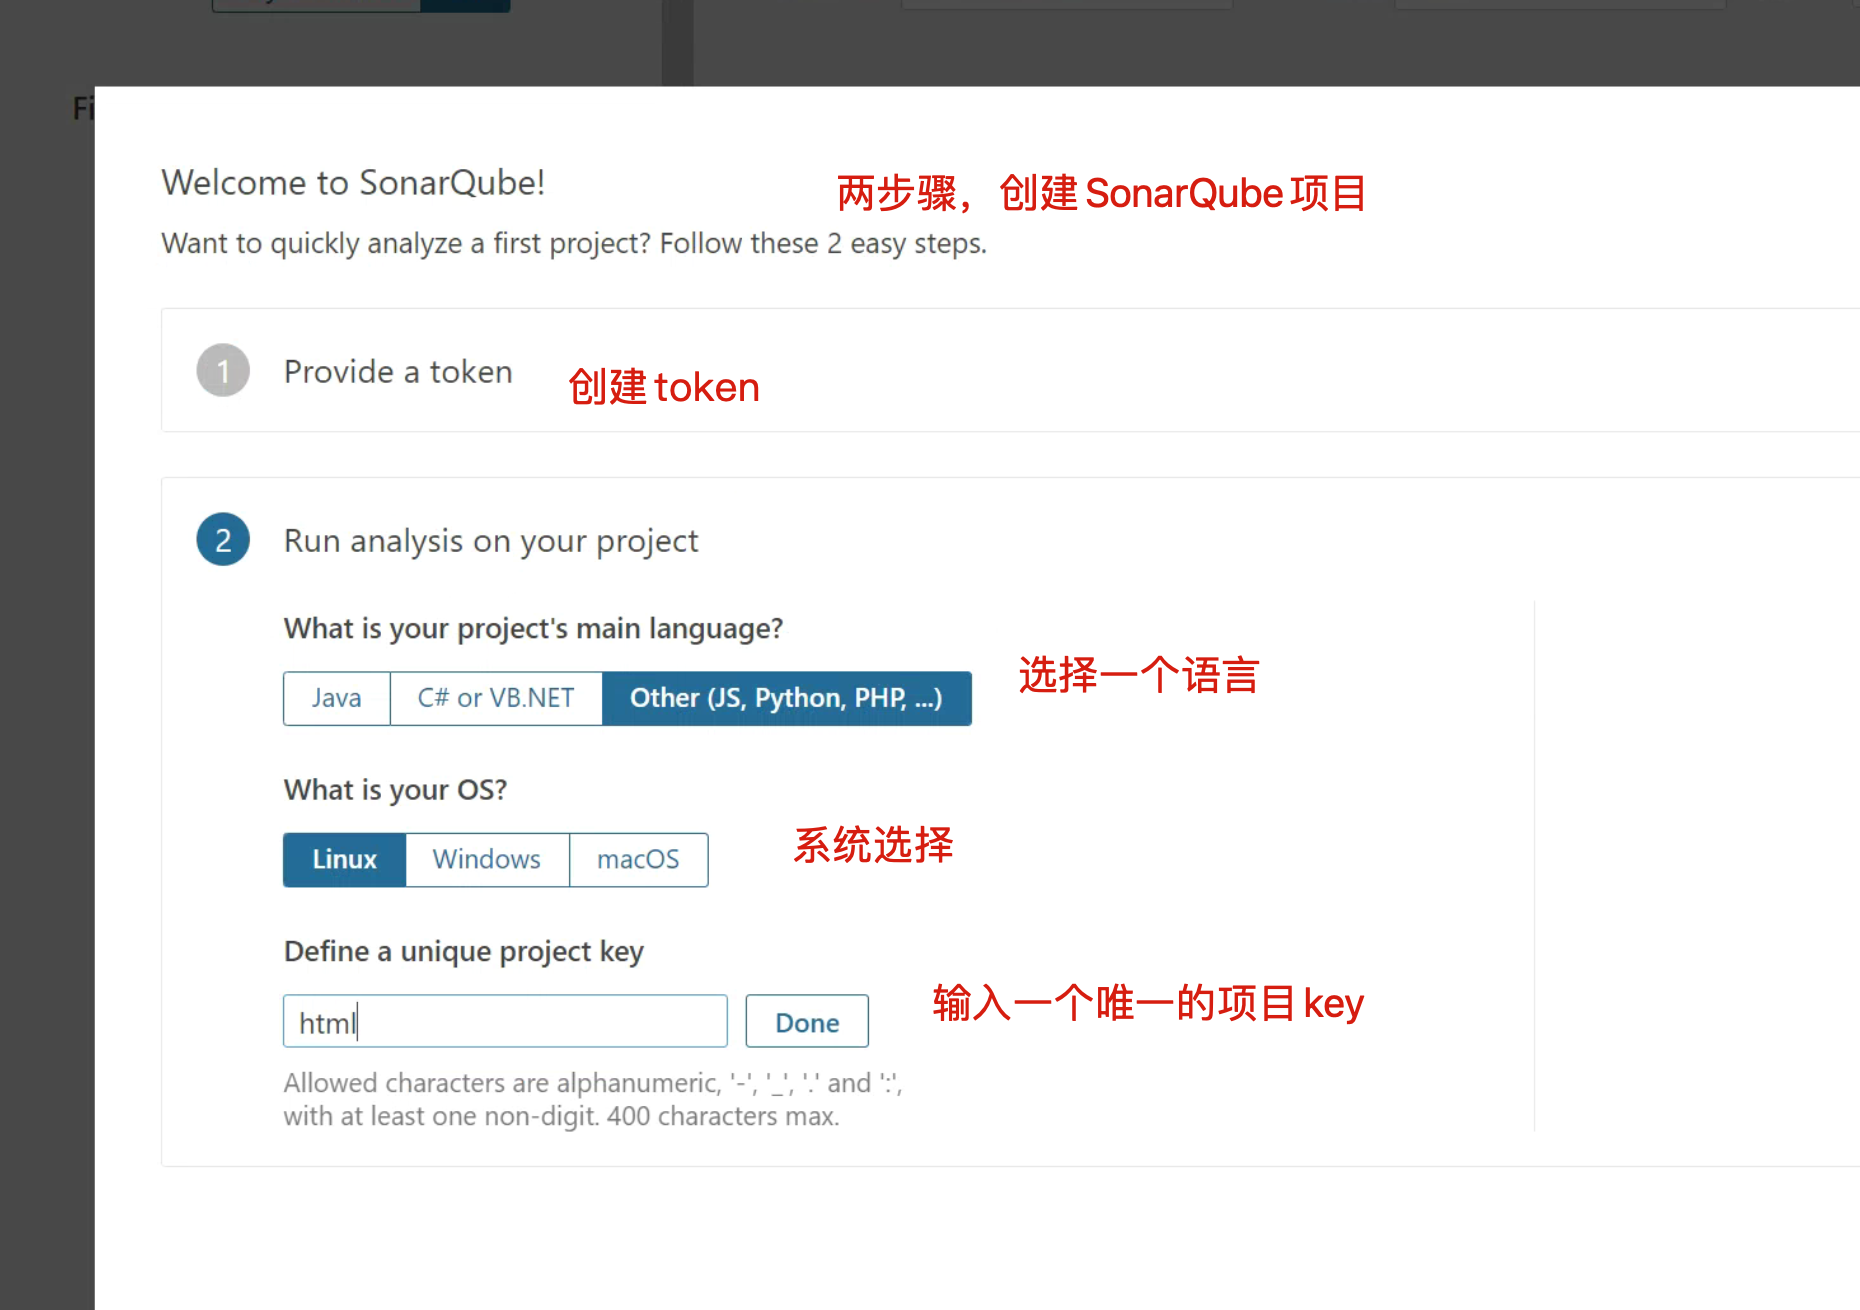
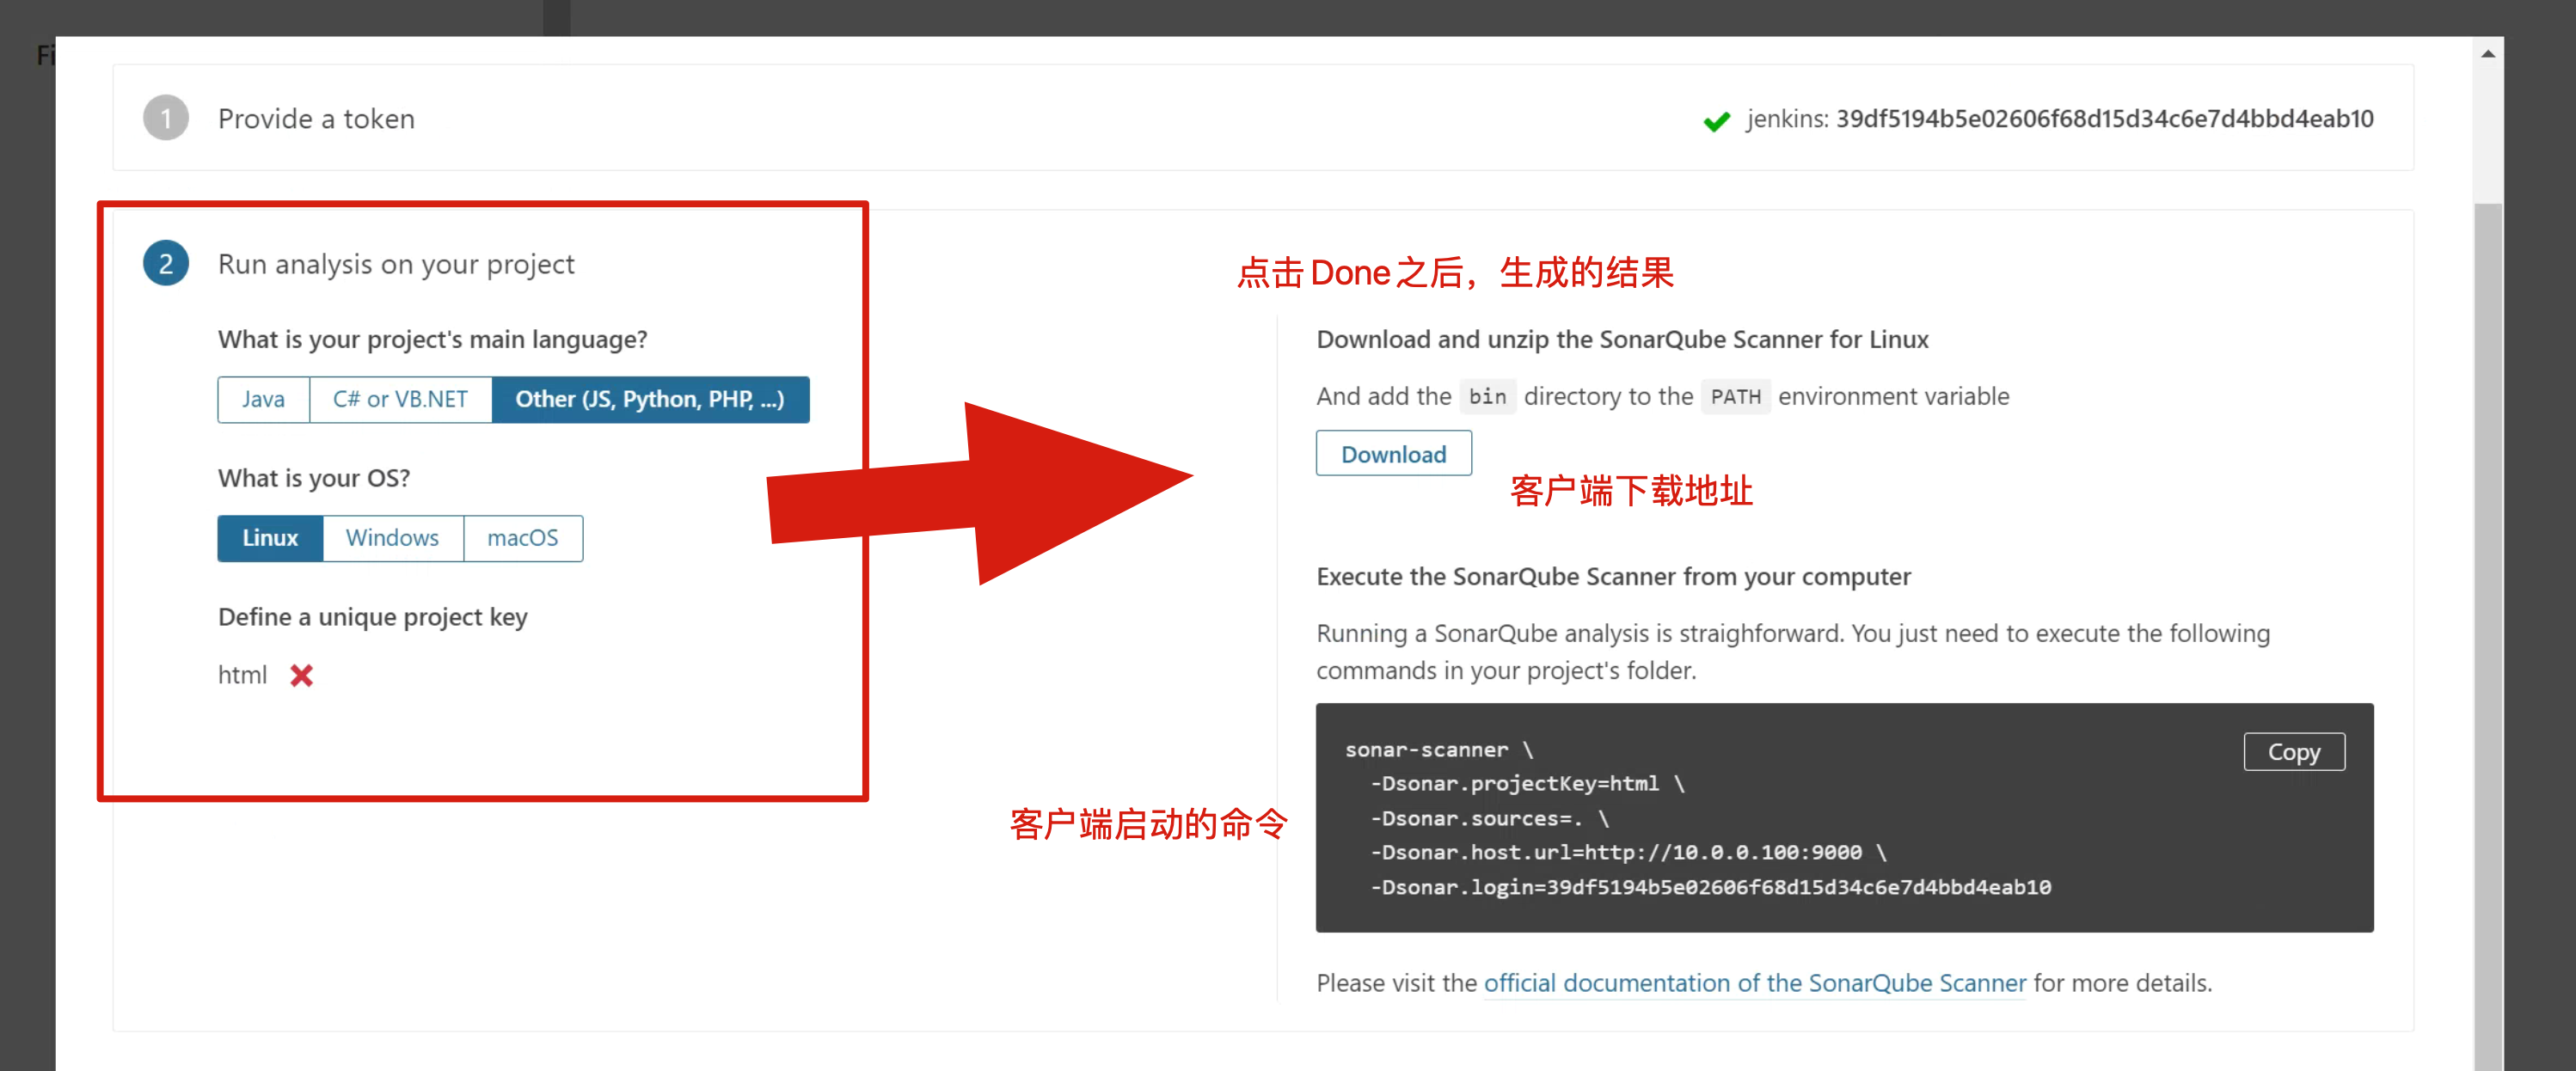
保存客户端启动命令

sonar-scanner \
  -Dsonar.projectKey=html \
  -Dsonar.sources=. \
  -Dsonar.host.url=http://10.0.0.100:9000 \
  -Dsonar.login=39df5194b5e02606f68d15d34c6e7d4bbd4eab10
5.安装SonarQube中文插件
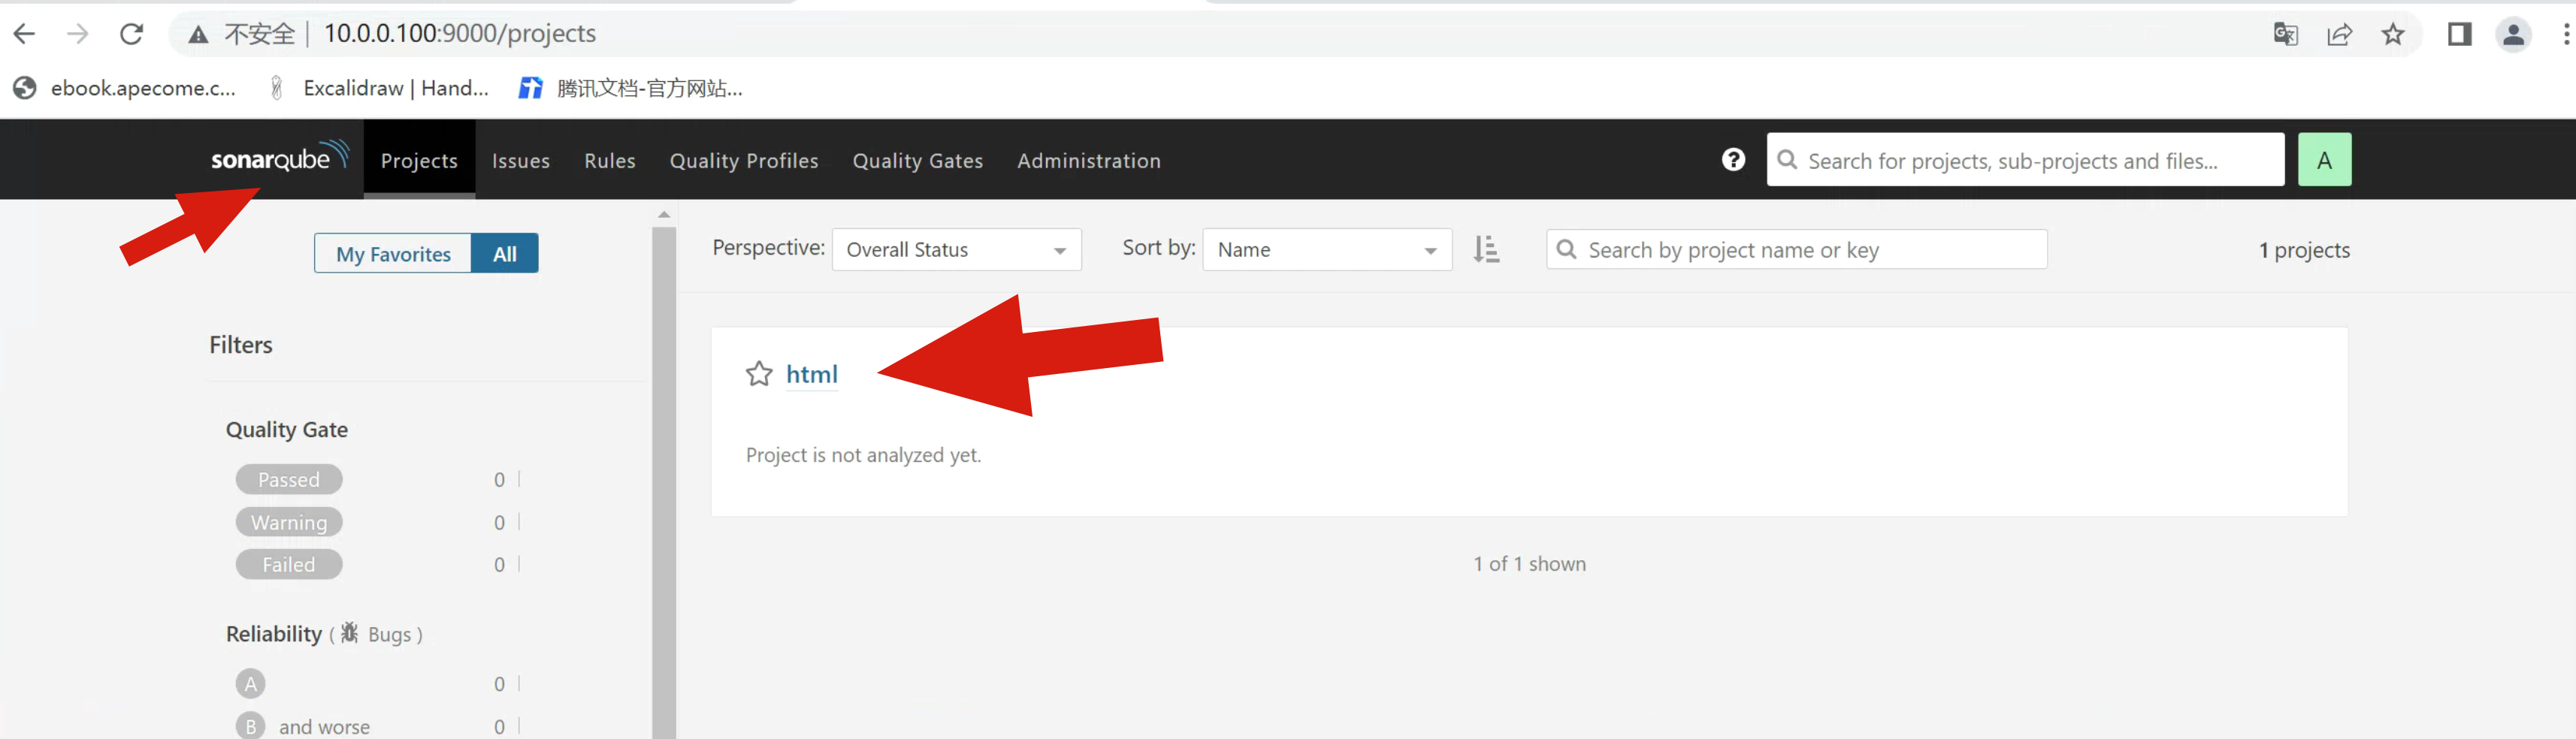
目前已有的一个检测项目(名字是 html)
安装中文插件
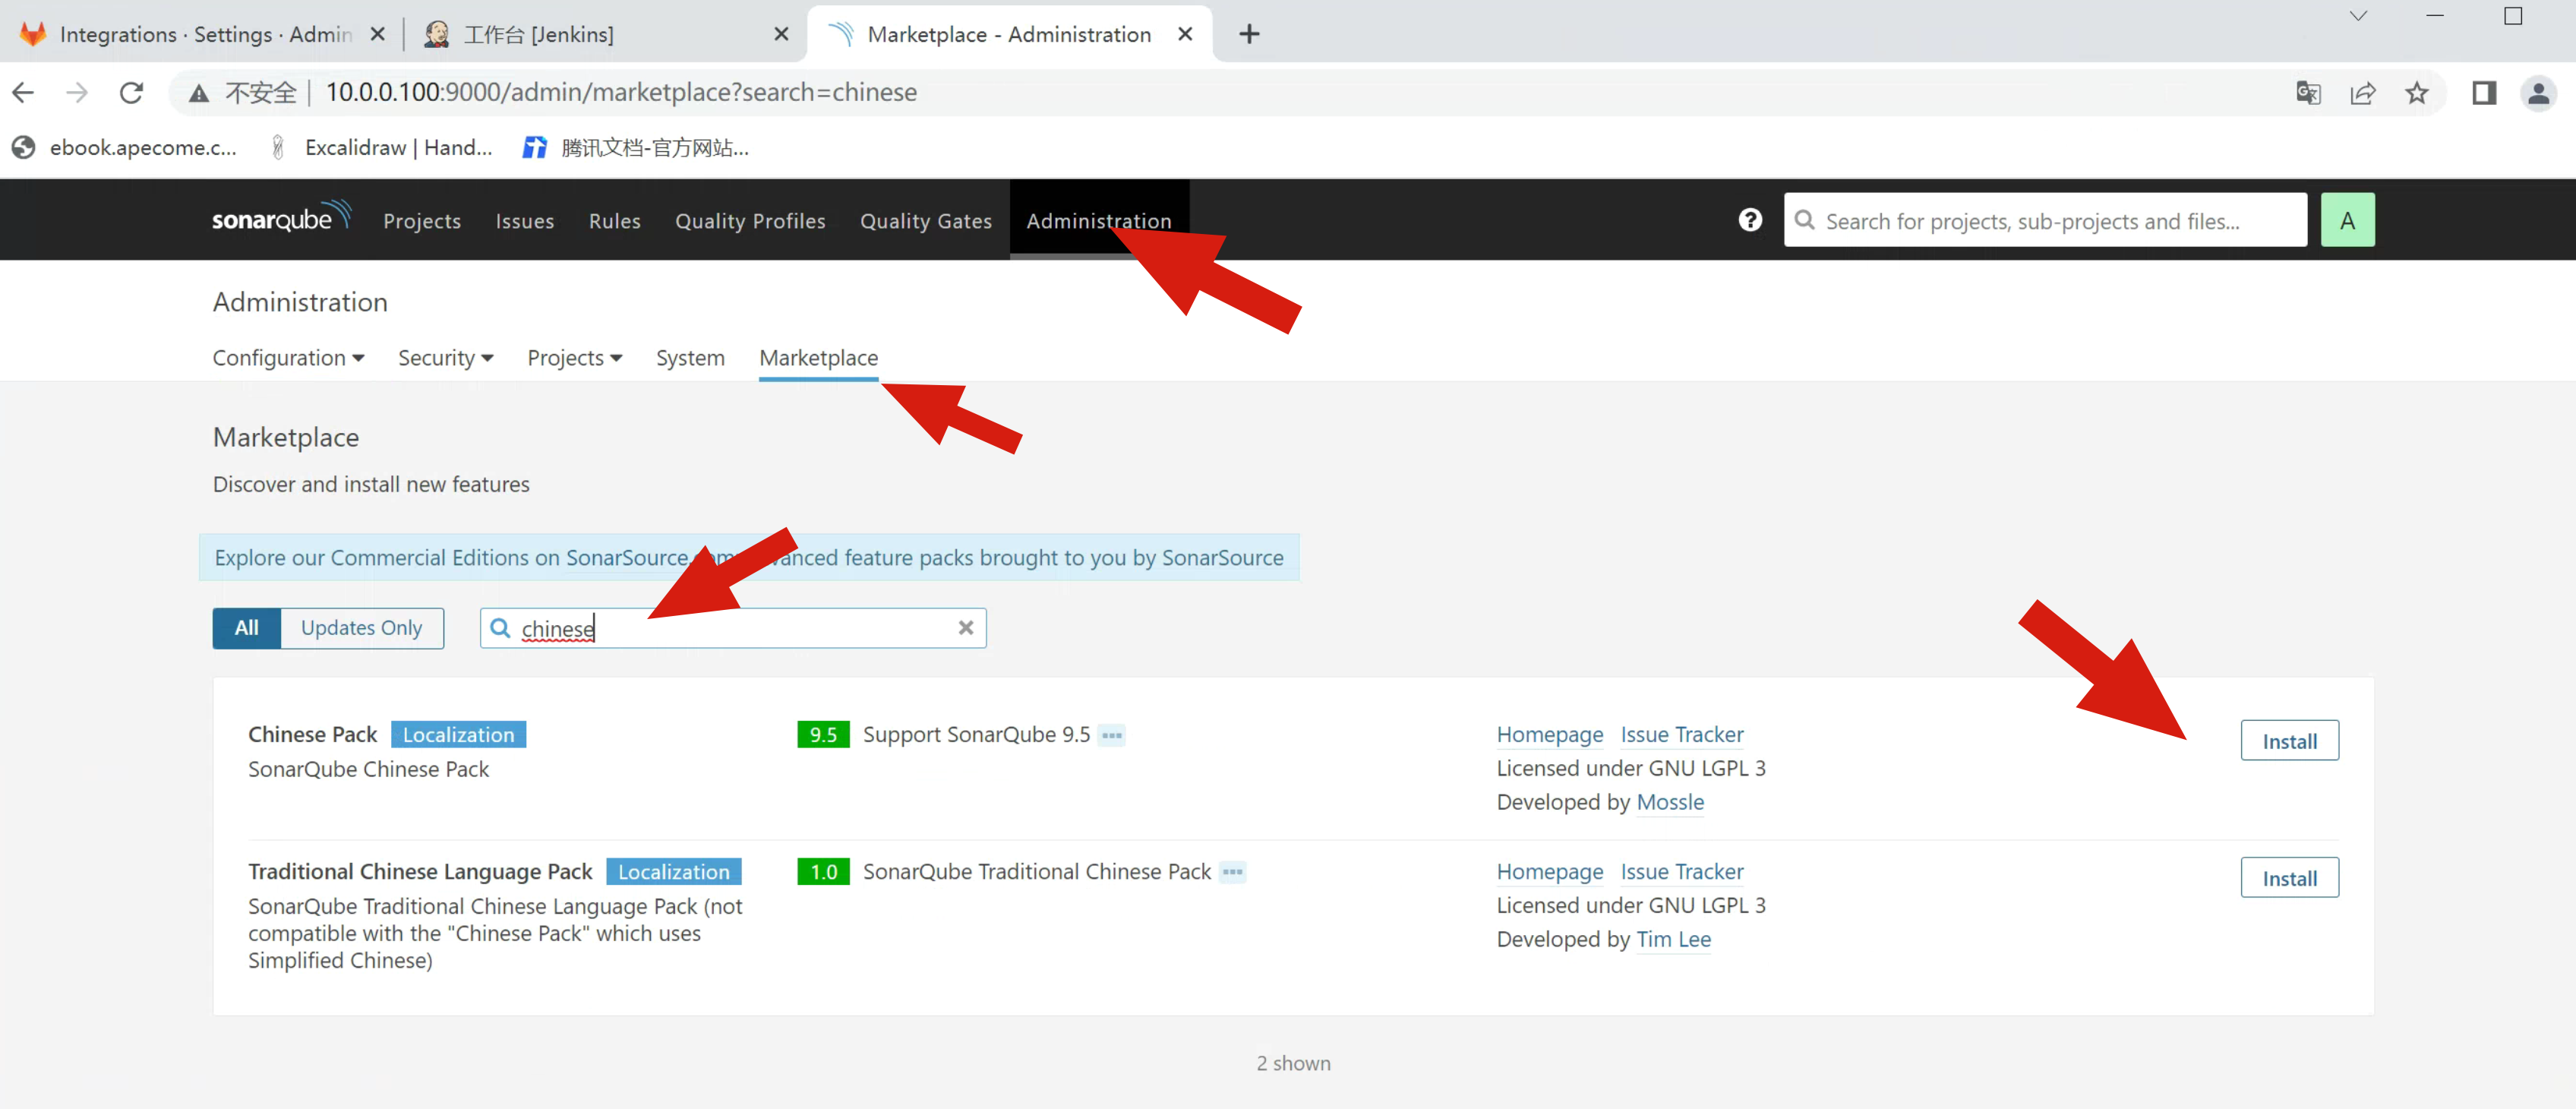
遗憾貌似装不了,采用离线安装吧
https://docs.sonarqube.org/latest/analysis/languages/
5.1 导入于超老师准备的插件
解压缩插件
备份原有插件目录
[root@jenkins-100 /opt]#mv /opt/sonarqube/extensions/plugins/ /opt/sonarqube/extensions/plugins_bak
[root@jenkins-100 /opt]#tar xf sonar_plugins.tar.gz -C /opt/sonarqube/extensions/
[root@jenkins-100 /opt]#ls /opt/sonarqube/extensions/
downloads jdbc-driver plugins plugins_bak
[root@jenkins-100 /opt]#ls /opt/sonarqube/extensions/plugins
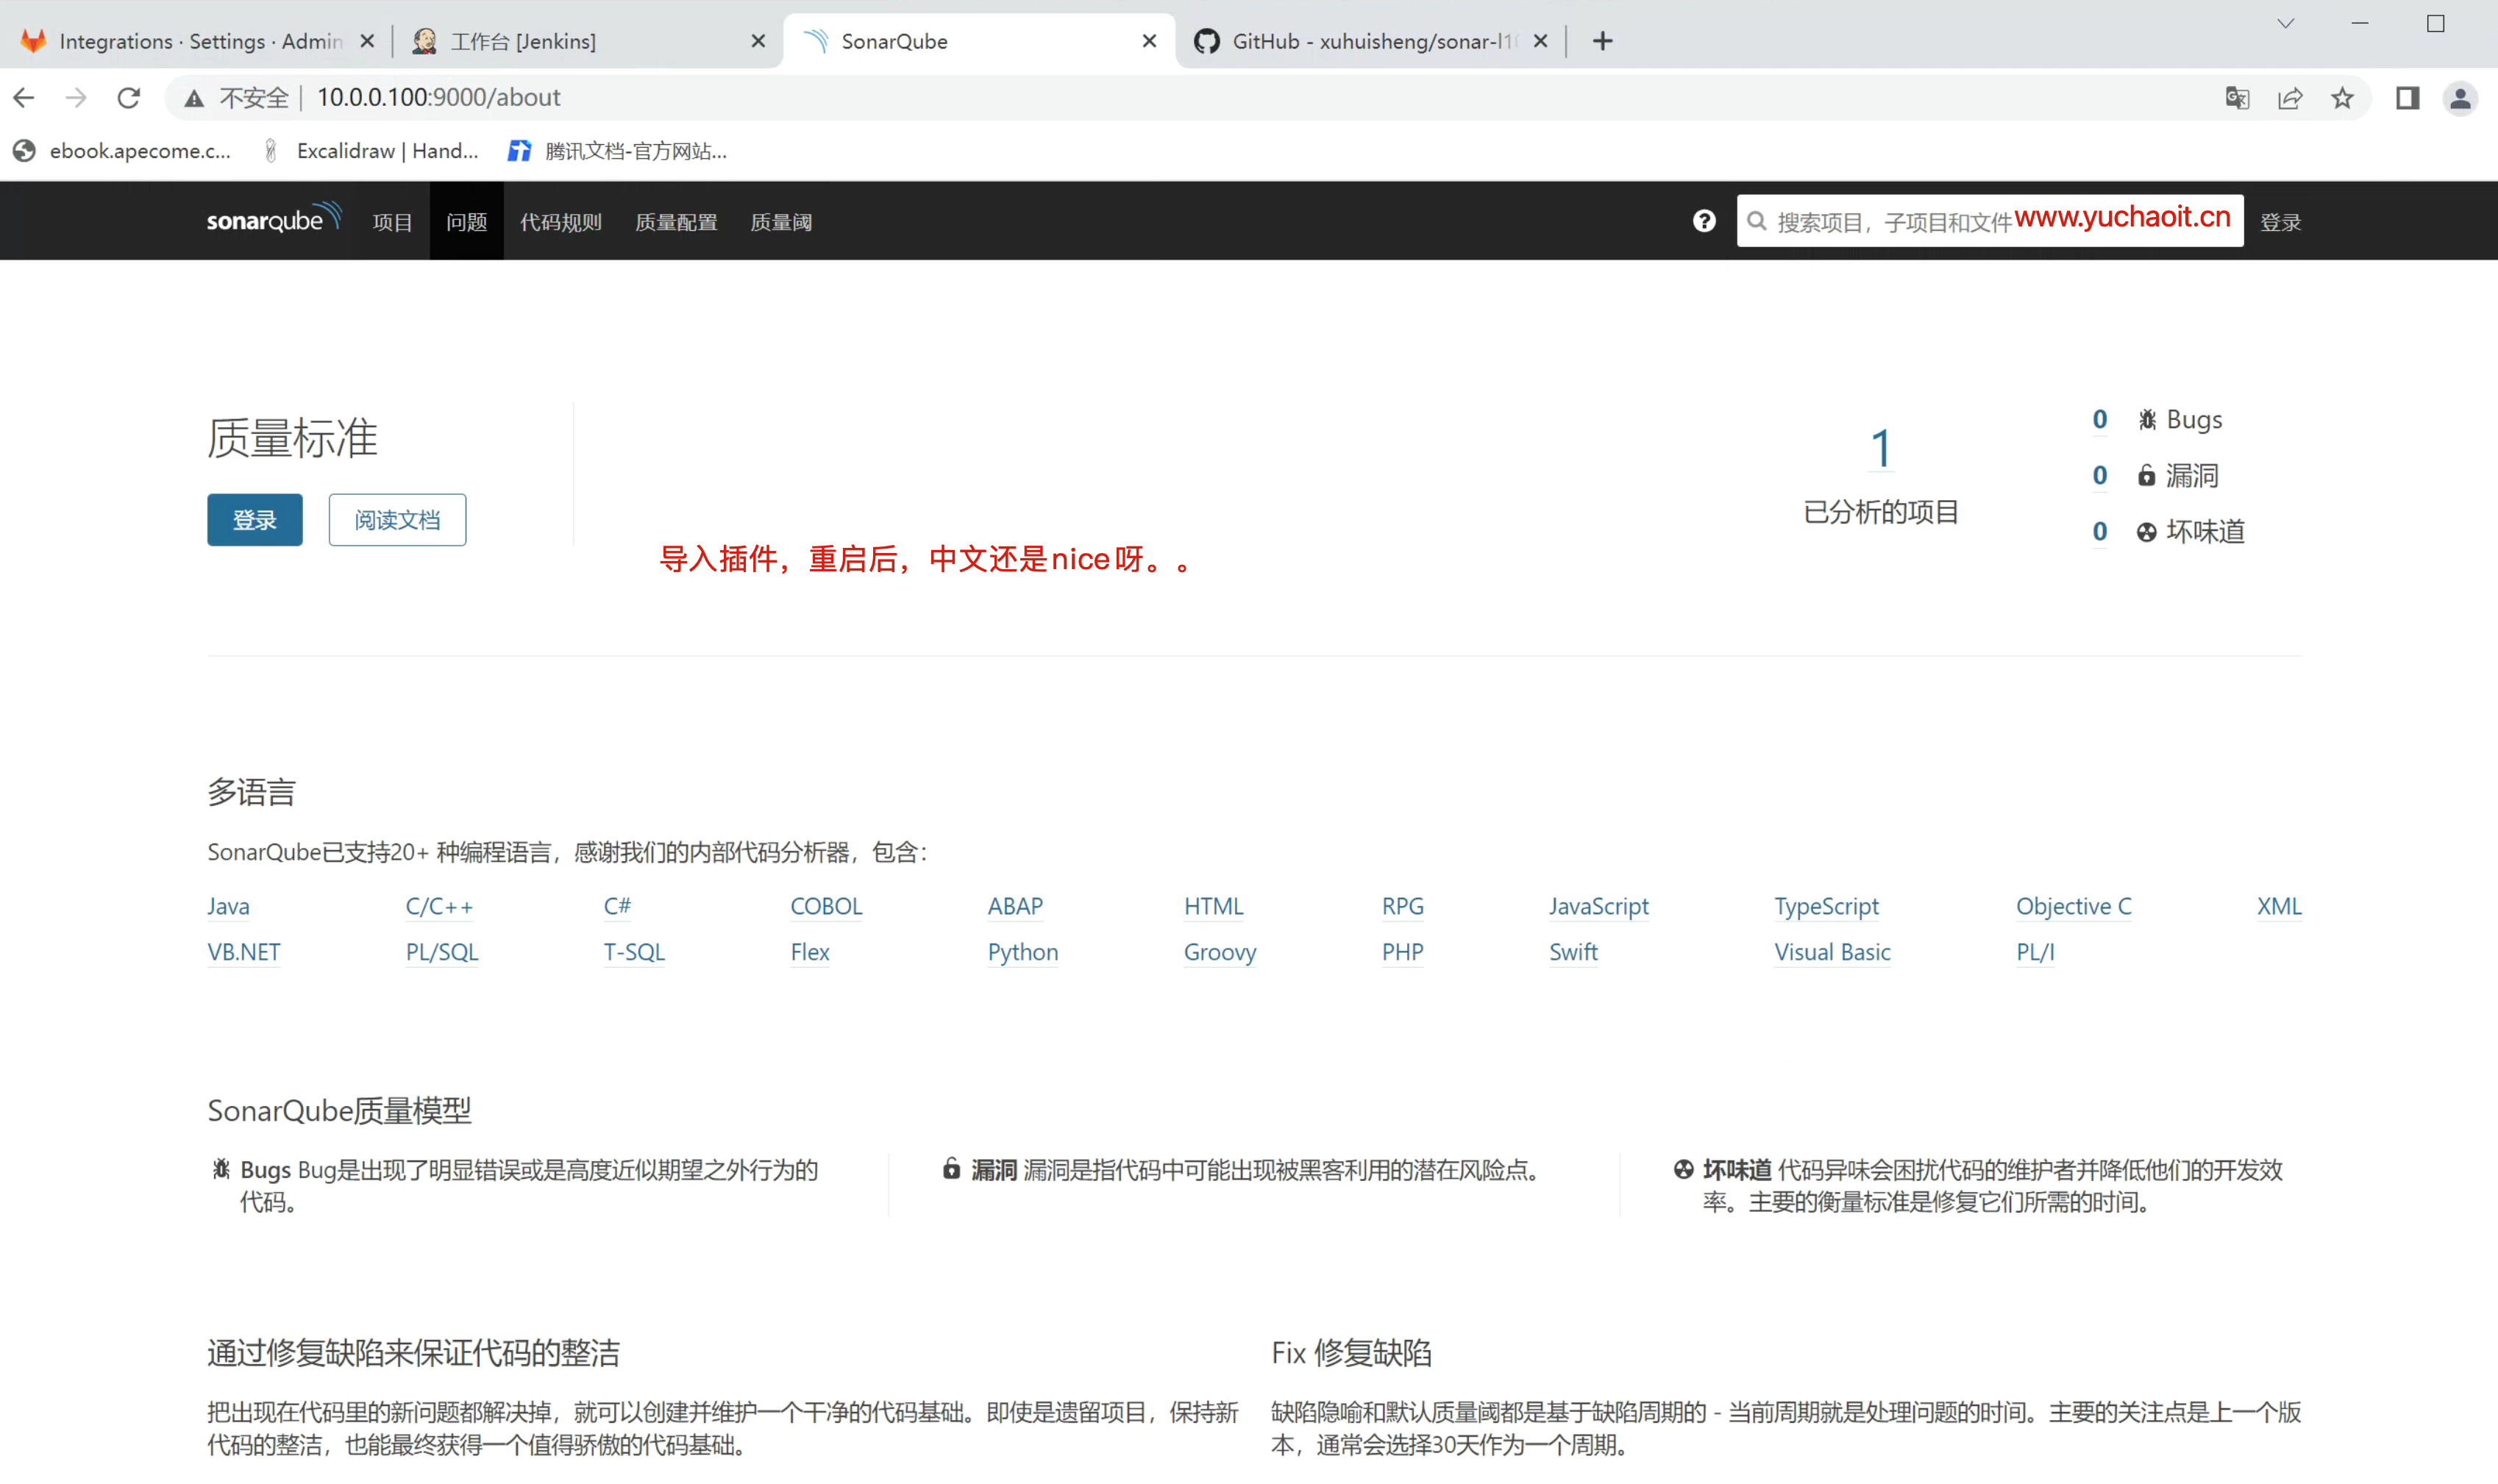
重启服务
[root@jenkins-100 /opt]#systemctl restart sonar.service再次访问
6.安装客户端
架构图
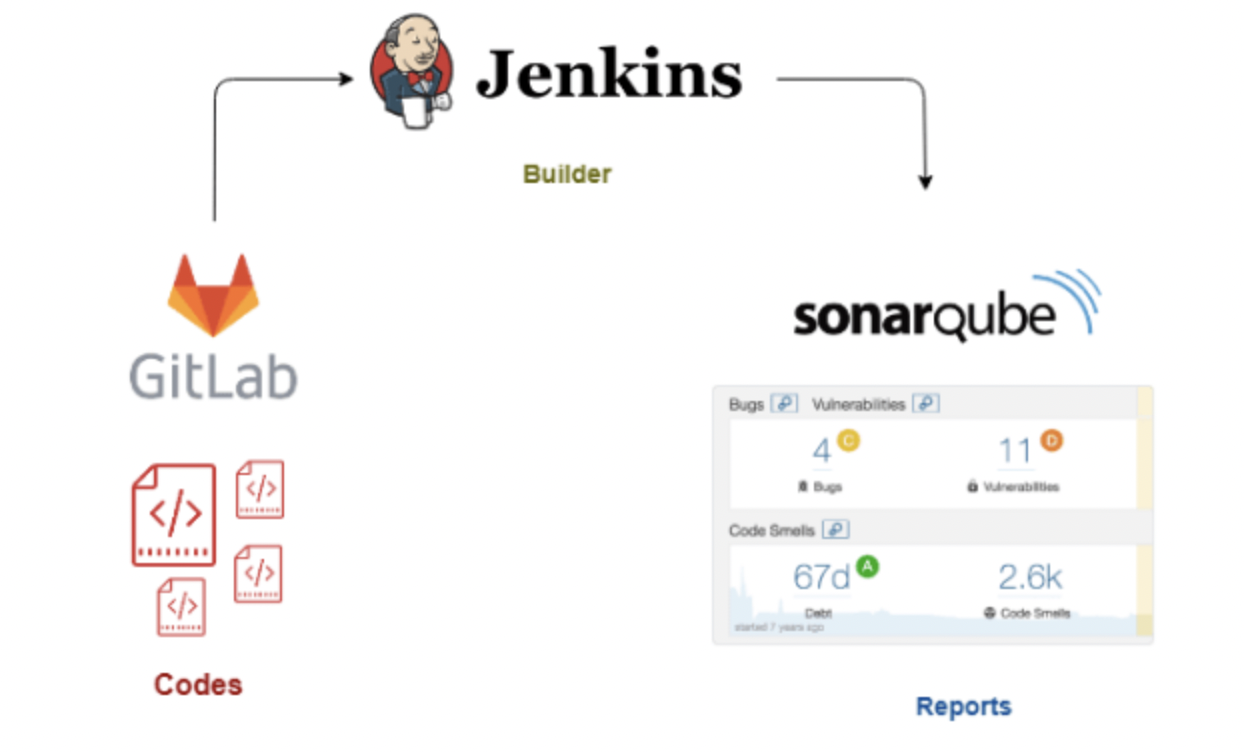
sonar-scanner 是专门用于代码检测的命令工具
1.jenkins机器,安装sonarqube客户端

我们需要将拉取的gitlab代码交给sonarqube,因此jenkins作为一个客户端,推送数据


[root@jenkins-100 /opt]#unzip sonar-scanner-cli-4.0.0.1744-linux.zip -d /opt

[root@jenkins-100 /opt]#ln -s /opt/sonar-scanner-4.0.0.1744-linux/ sonar-scanner

2. 加入环境变量
echo 'export PATH=$PATH:/opt/sonar-scanner/bin' >> /etc/profile
source /etc/profile


3.推送代码到SonarQube,注意是于超老师在创建Sonarqube项目html时,生成的token,换成你自己的就好

# 参数解释
项目名 html
代码目录 .
sonar地址
token值


# 具体命令
sonar-scanner \
  -Dsonar.projectKey=html \
  -Dsonar.sources=. \
  -Dsonar.host.url=http://10.0.0.100:9000 \
  -Dsonar.login=39df5194b5e02606f68d15d34c6e7d4bbd4eab10

4.进入到于超老师讲解的jenkins章节,工作区目录,里面有用于测试的html代码
[root@jenkins-100 /opt]#cd /var/lib/jenkins/workspace/yuchao_monitor
[root@jenkins-100 /var/lib/jenkins/workspace/yuchao_monitor]#
# 执行即可
sonar-scanner \
  -Dsonar.projectKey=html \
  -Dsonar.sources=. \
  -Dsonar.host.url=http://10.0.0.100:9000 \
  -Dsonar.login=39df5194b5e02606f68d15d34c6e7d4bbd4eab10
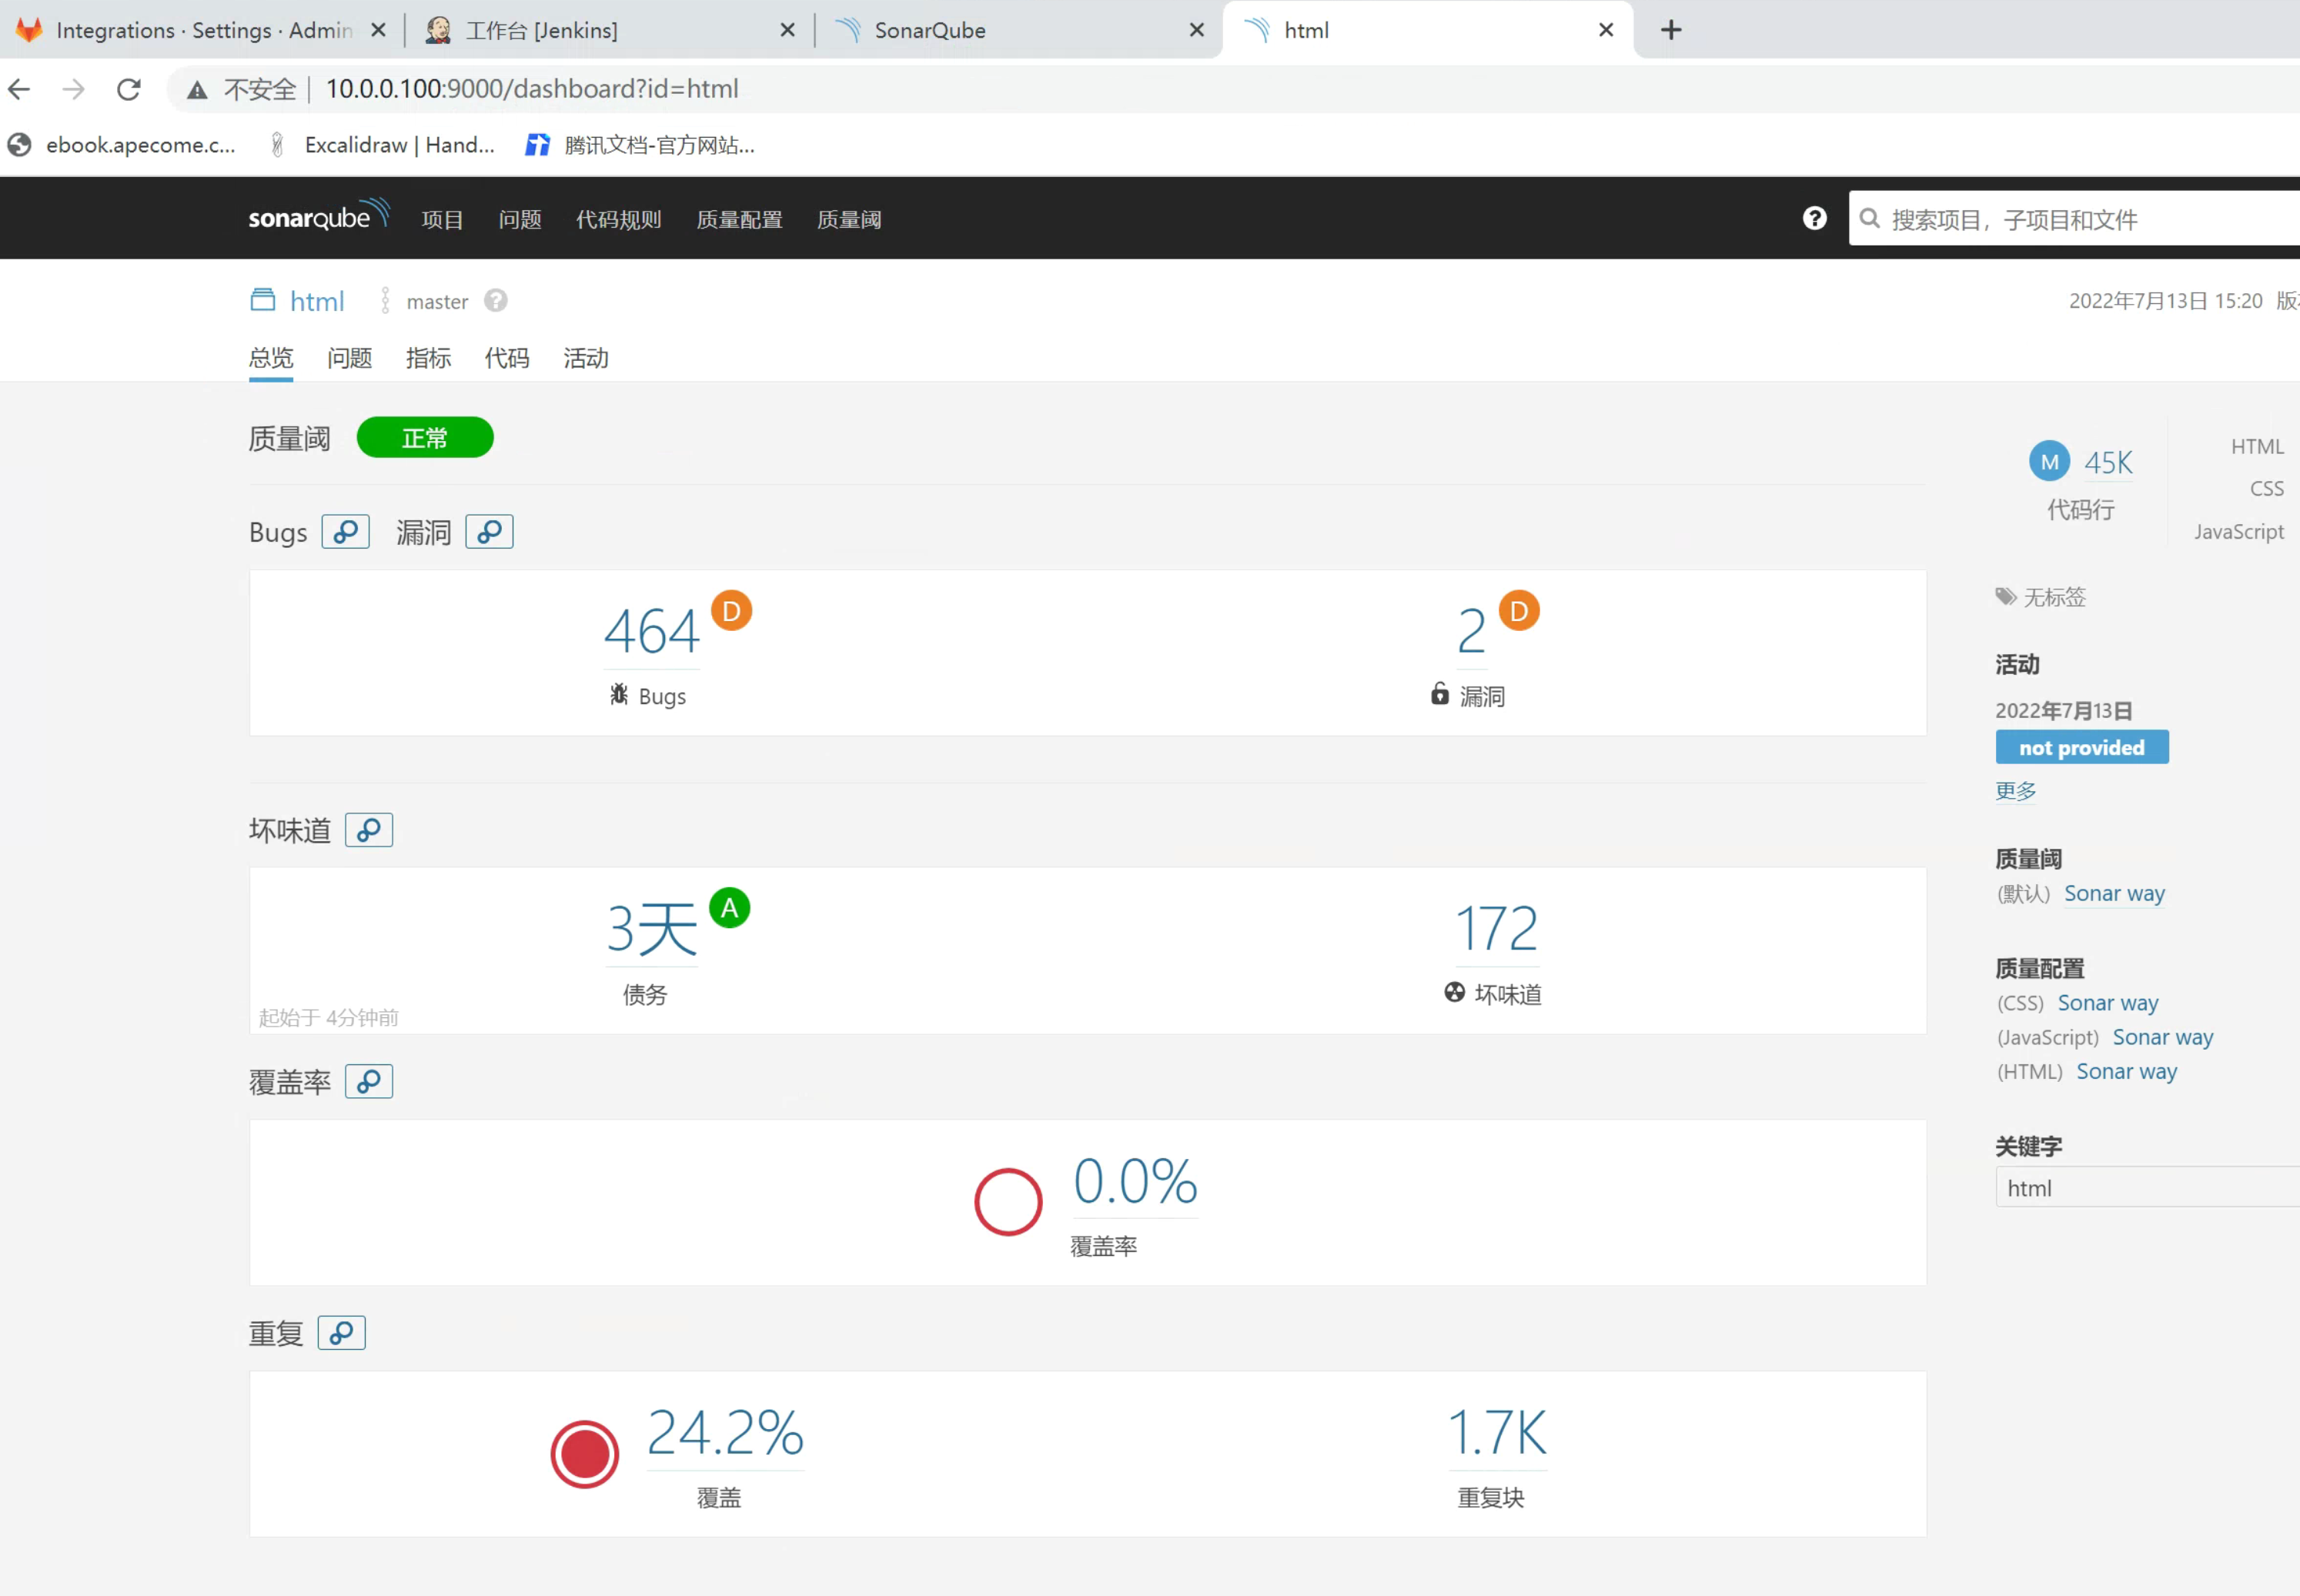
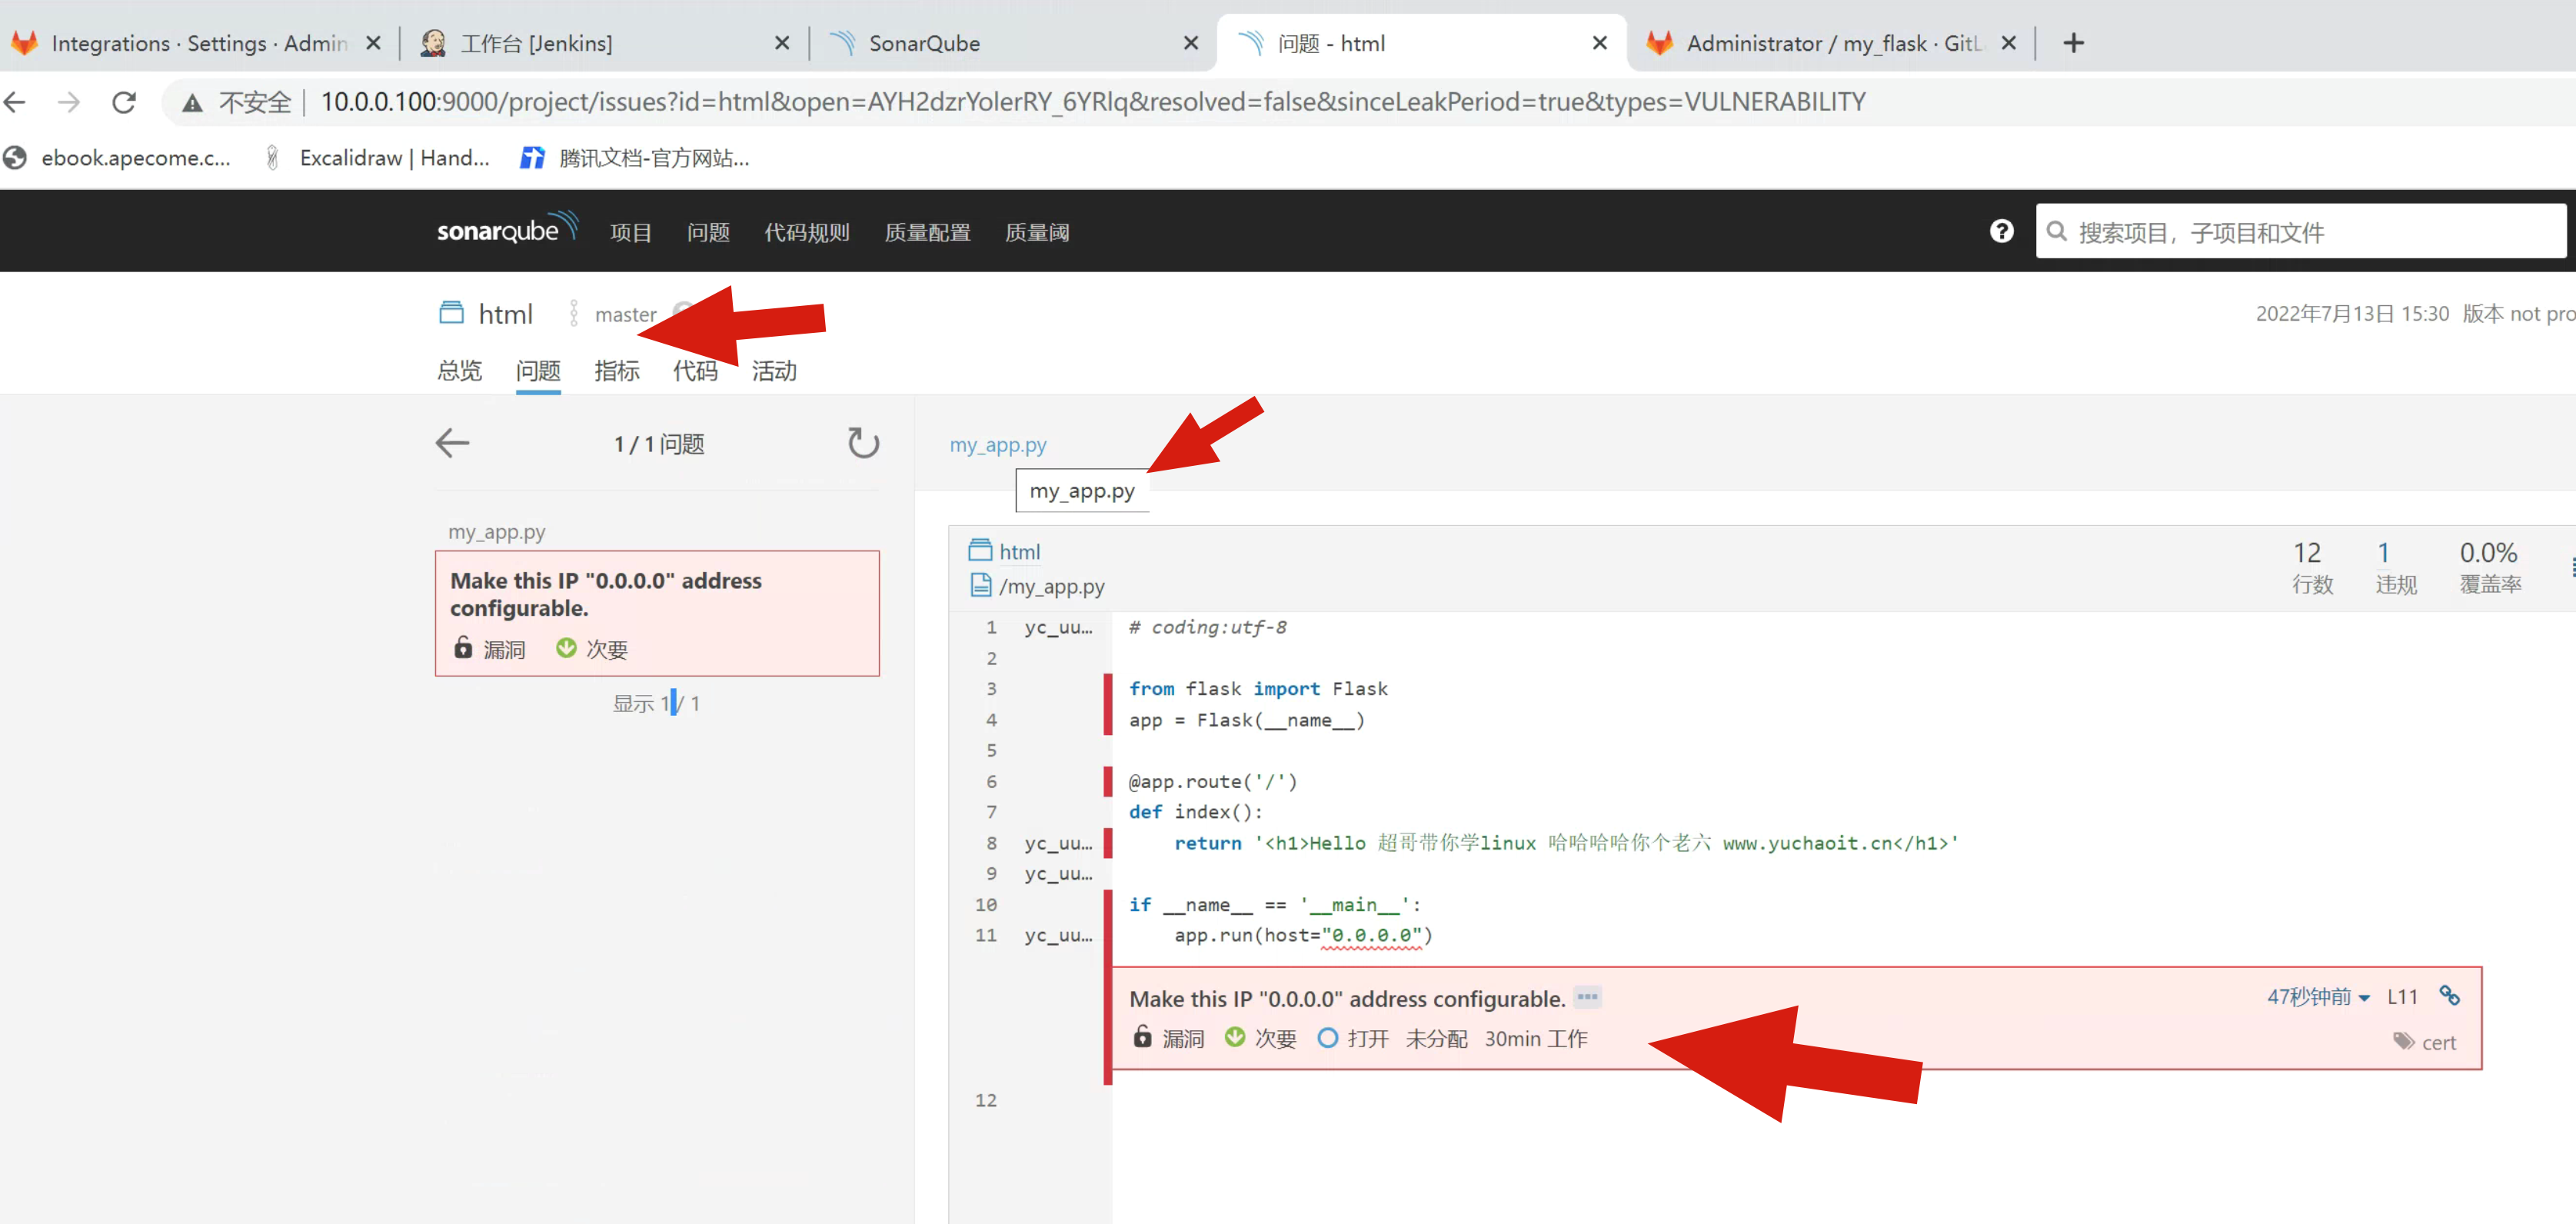
6.1 代码扫描结果
6.2 解决报错
ERROR: Error when running: 'node -v'. Is Node.js available during analysis? No CSS files will be analyzed.
org.sonarsource.nodejs.NodeCommandException: Error when running: 'node -v'. Is Node.js available during analysis?
    at org.sonarsource.nodejs.NodeCommand.start(NodeCommand.java:77)
解决
解决方法:在jenkins服务器上安装nodejs环境,然后重新推送就不会再报错了:

cat > install_node12-13.sh <<'EOF'
cd /opt/
wget https://nodejs.org/dist/v12.13.0/node-v12.13.0-linux-x64.tar.xz
tar xf node-v12.13.0-linux-x64.tar.xz
mv node-v12.13.0-linux-x64 node
echo 'export PATH=$PATH:/opt/node/bin' >> /etc/profile
source /etc/profile
npm -v
node -v
EOF

结果

6.12.0
v12.13.0
6.3 测测其他代码试试
简单玩下试试就行,要检测更多其他复杂源码,需要安装插件,做更多学习。
7.SonarQube集成jenkins
7.1 jenkins里添加SonarQube的凭证
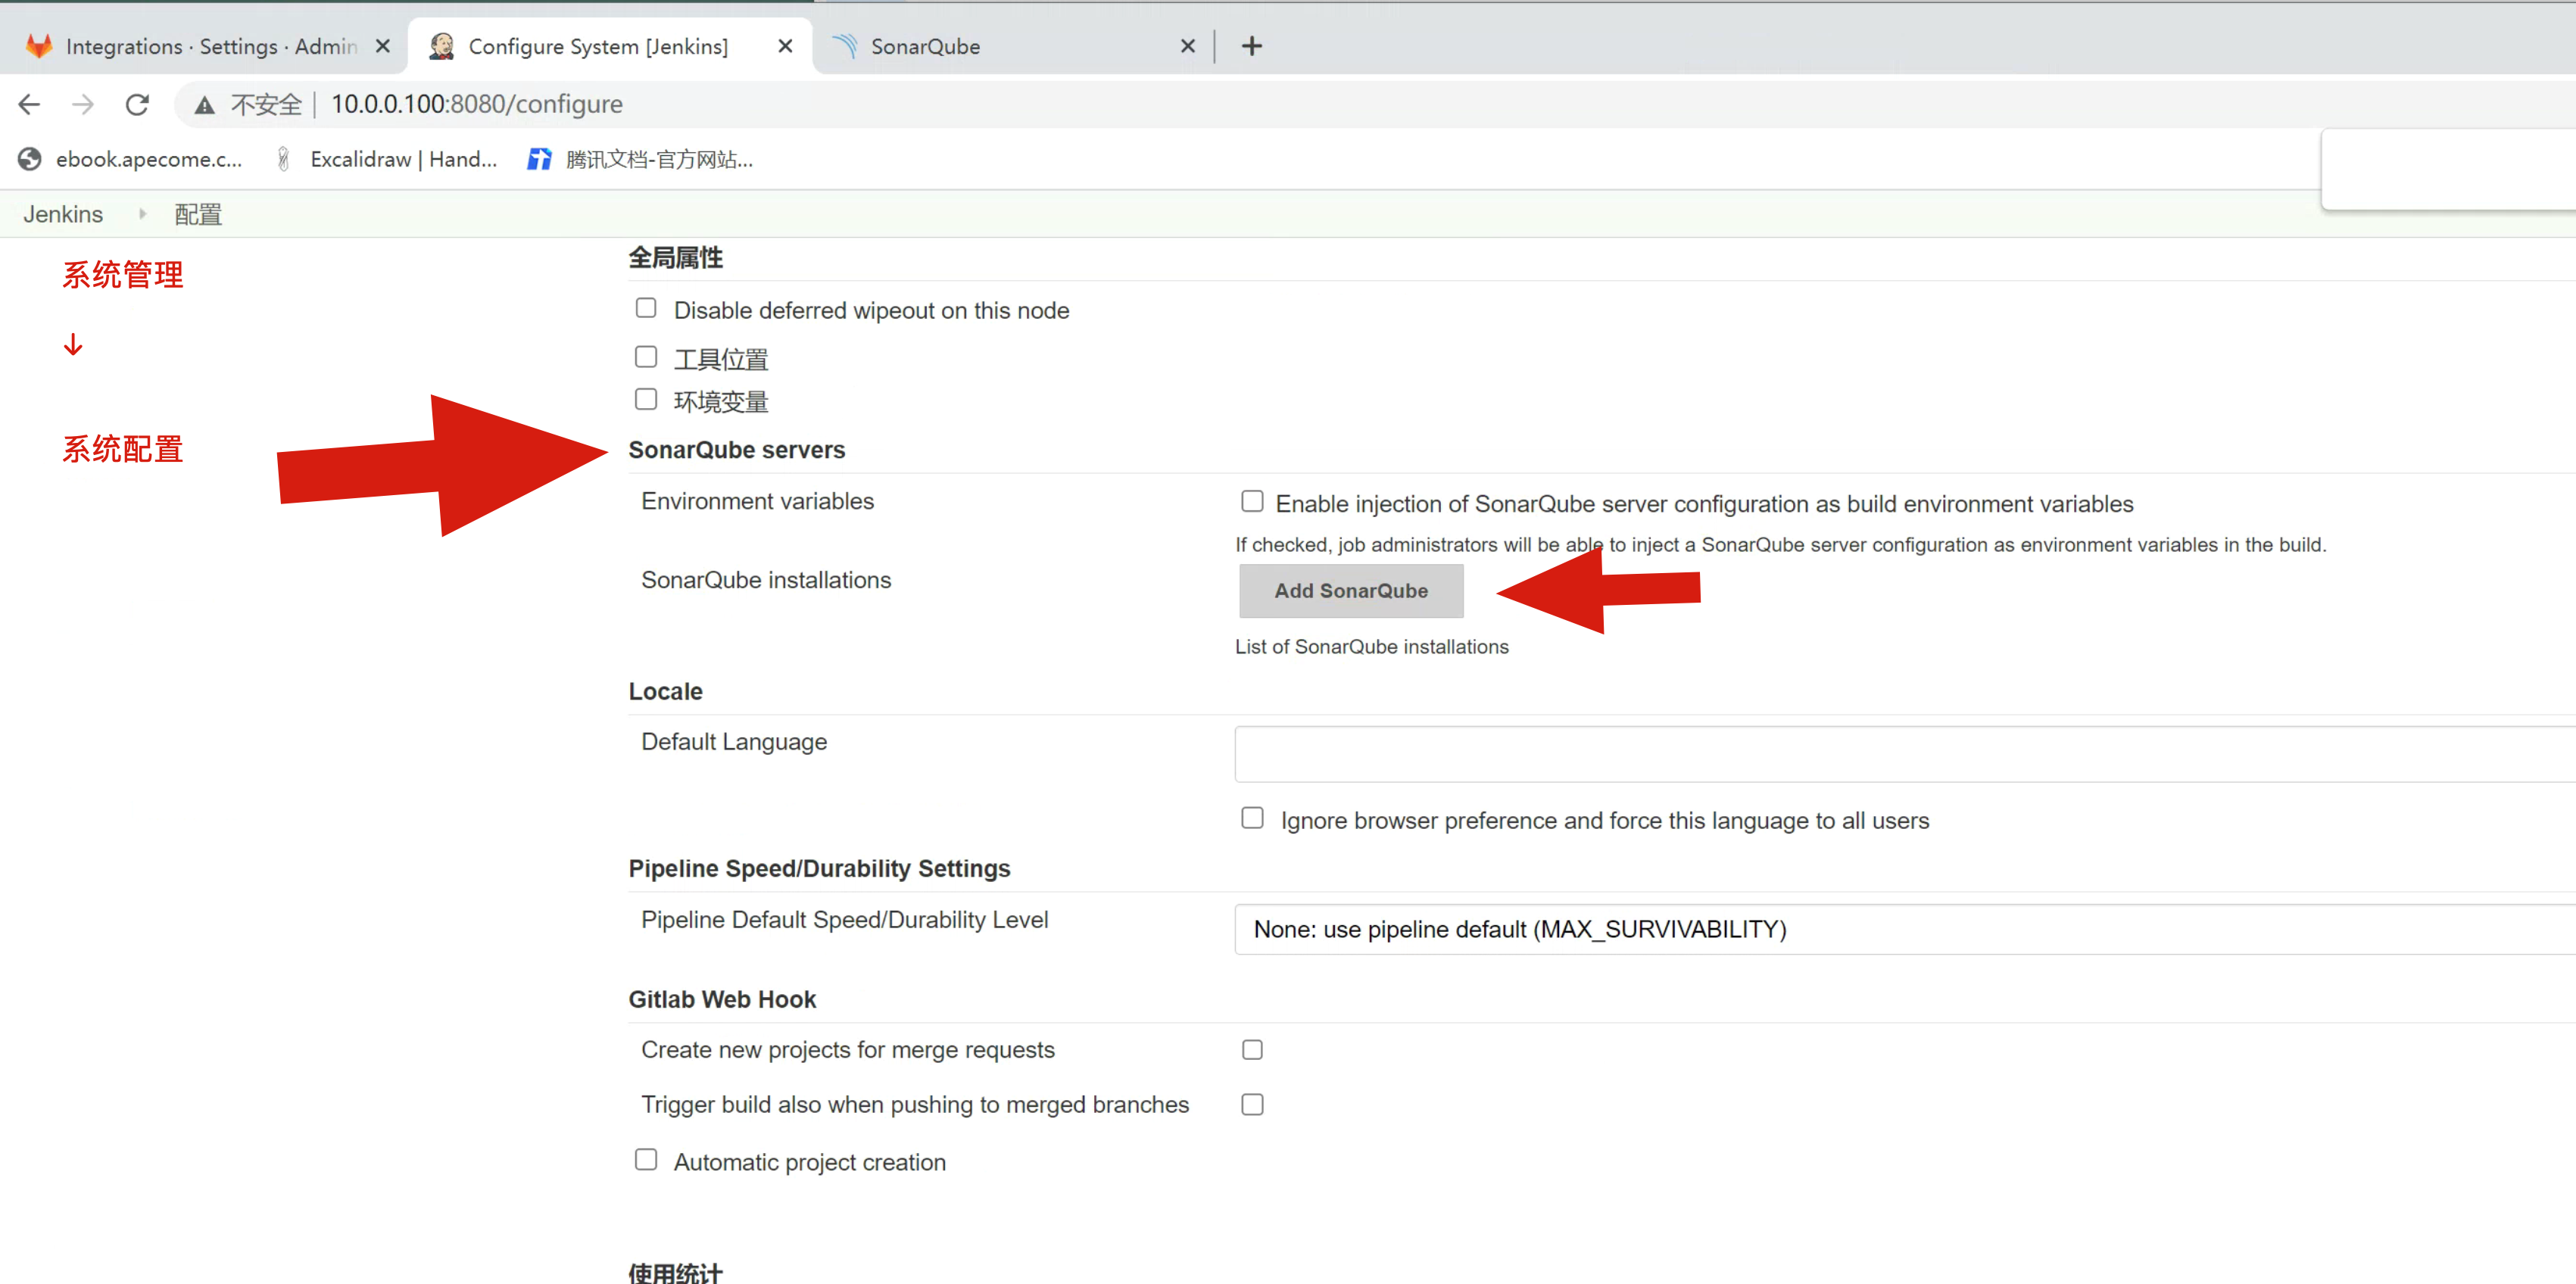
先保存sonar设置,然后再添加sonar凭证


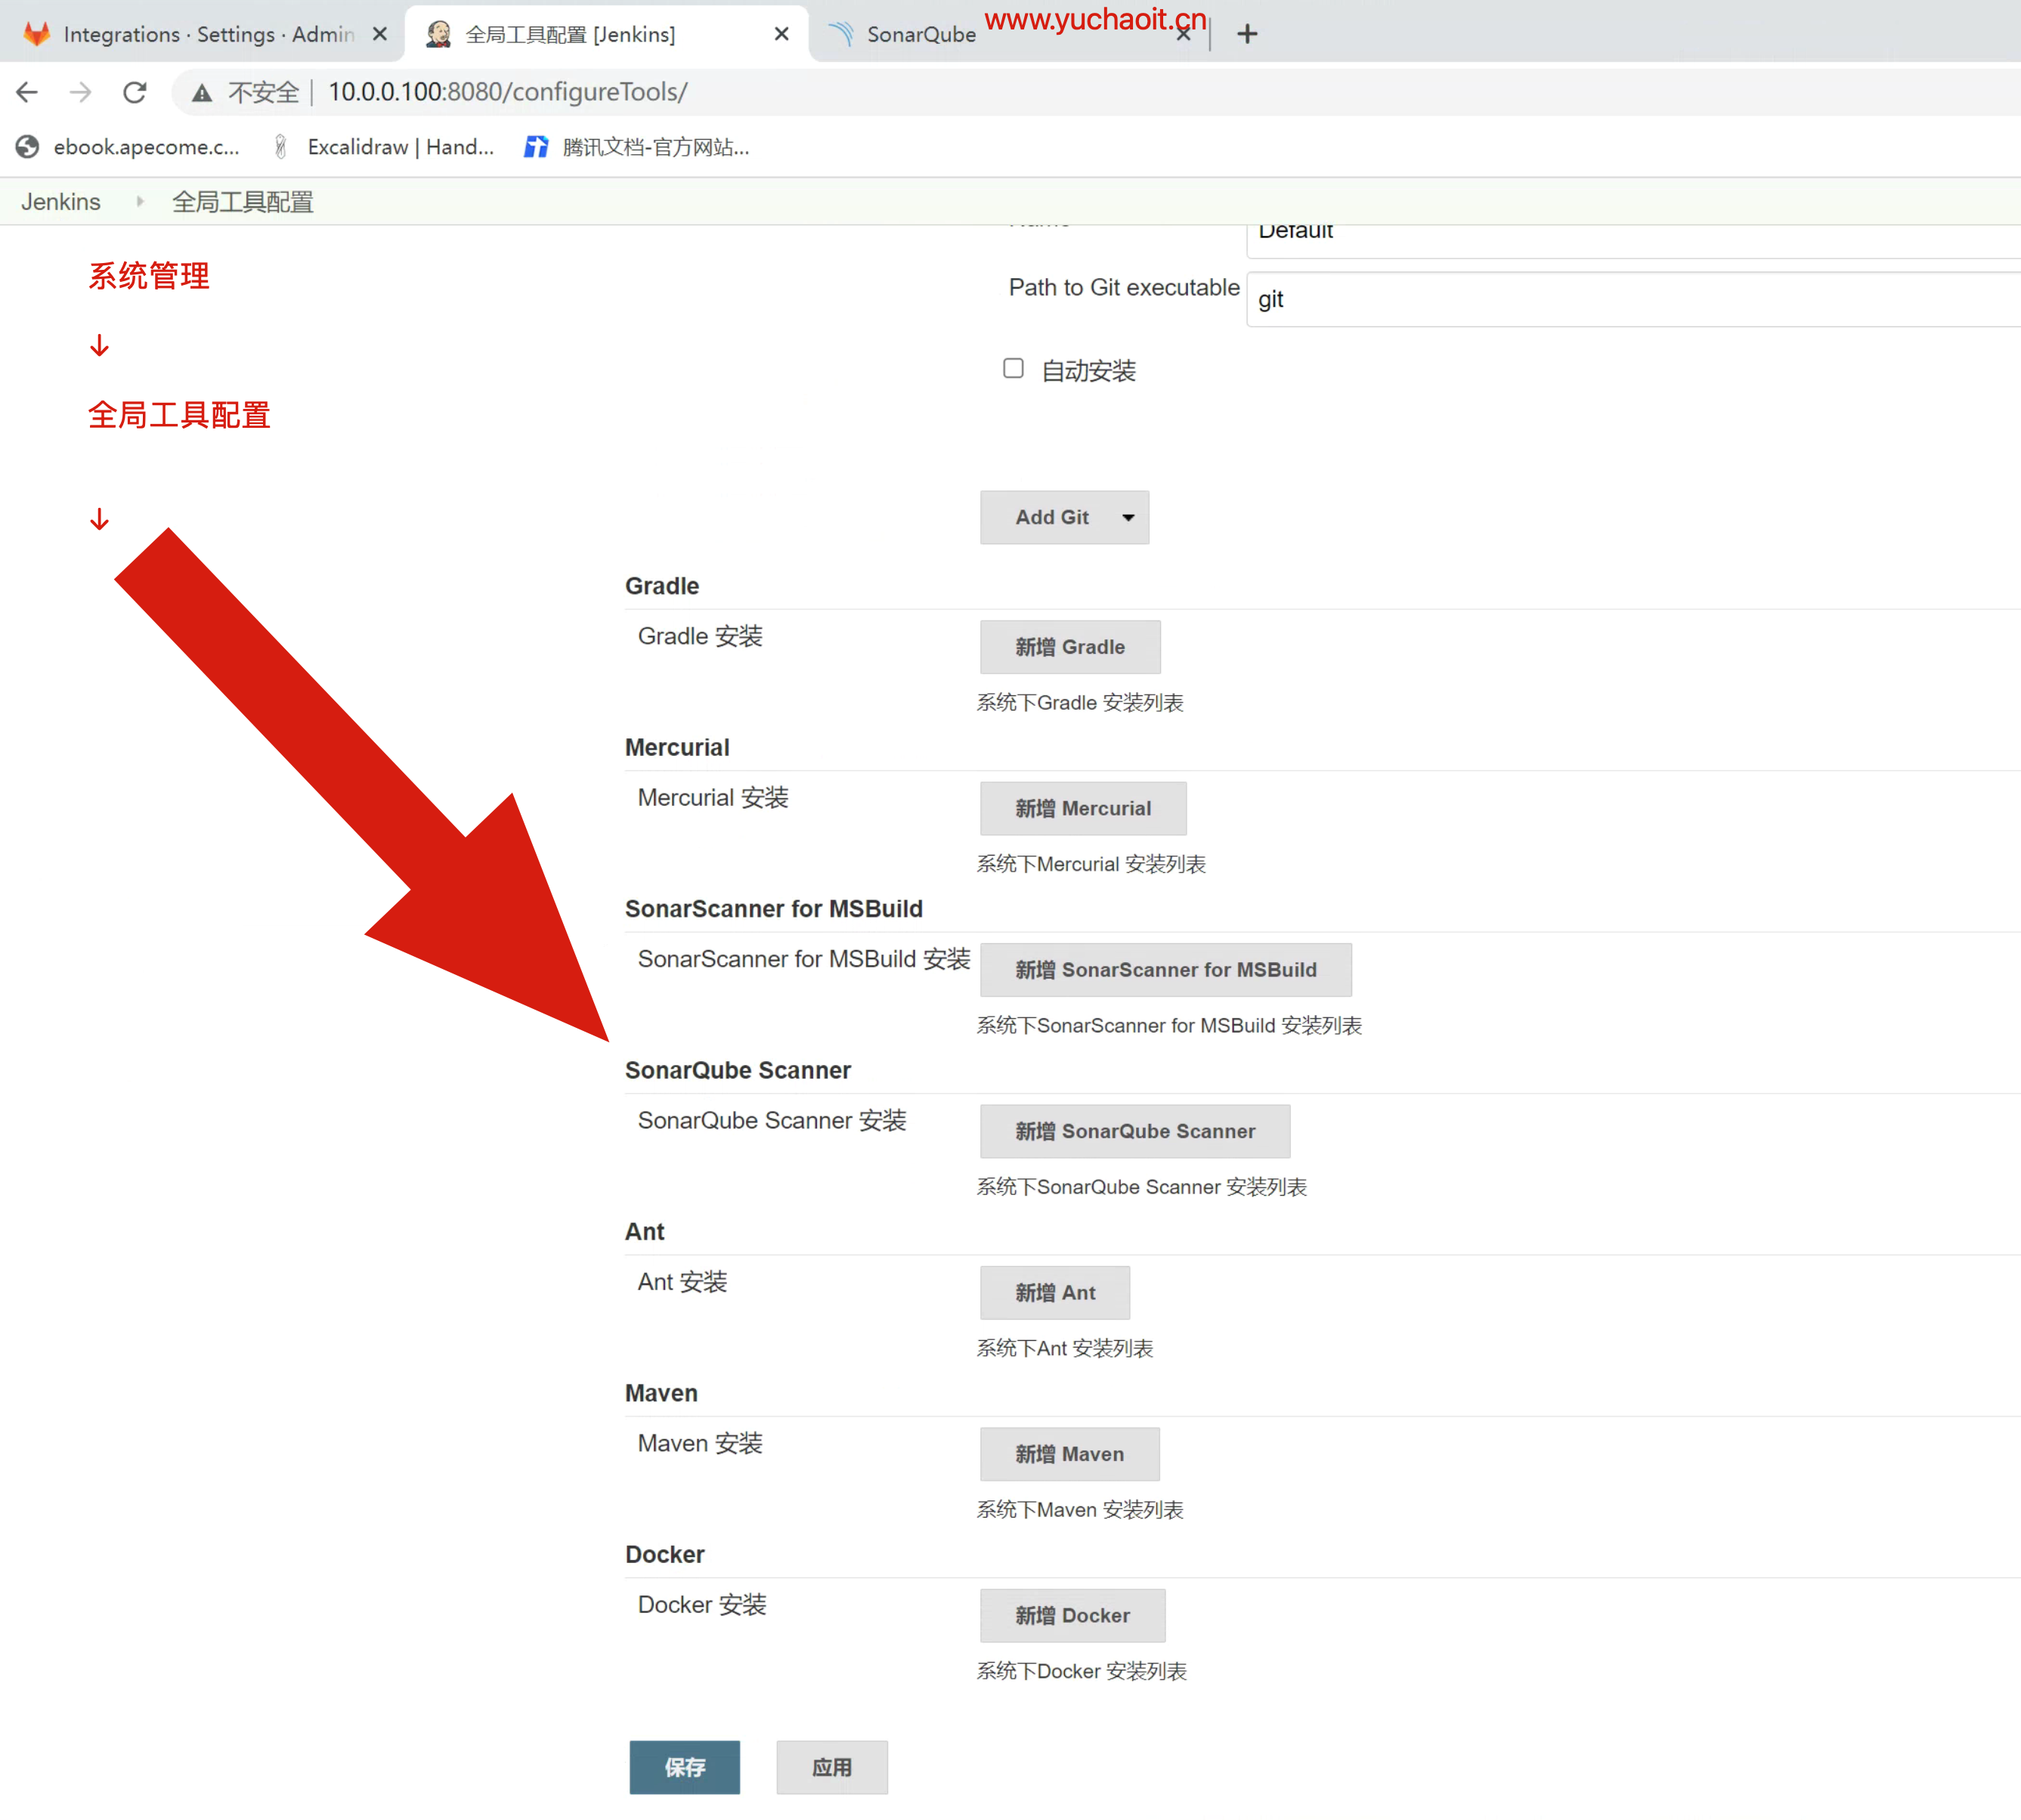
7.2 添加Sonar客户端的家目录
也就是代码检测的目录,待会要和jenkins的工作区对应上。

7.3 给job添加sonar构建动作
构建的同时进行代码扫描
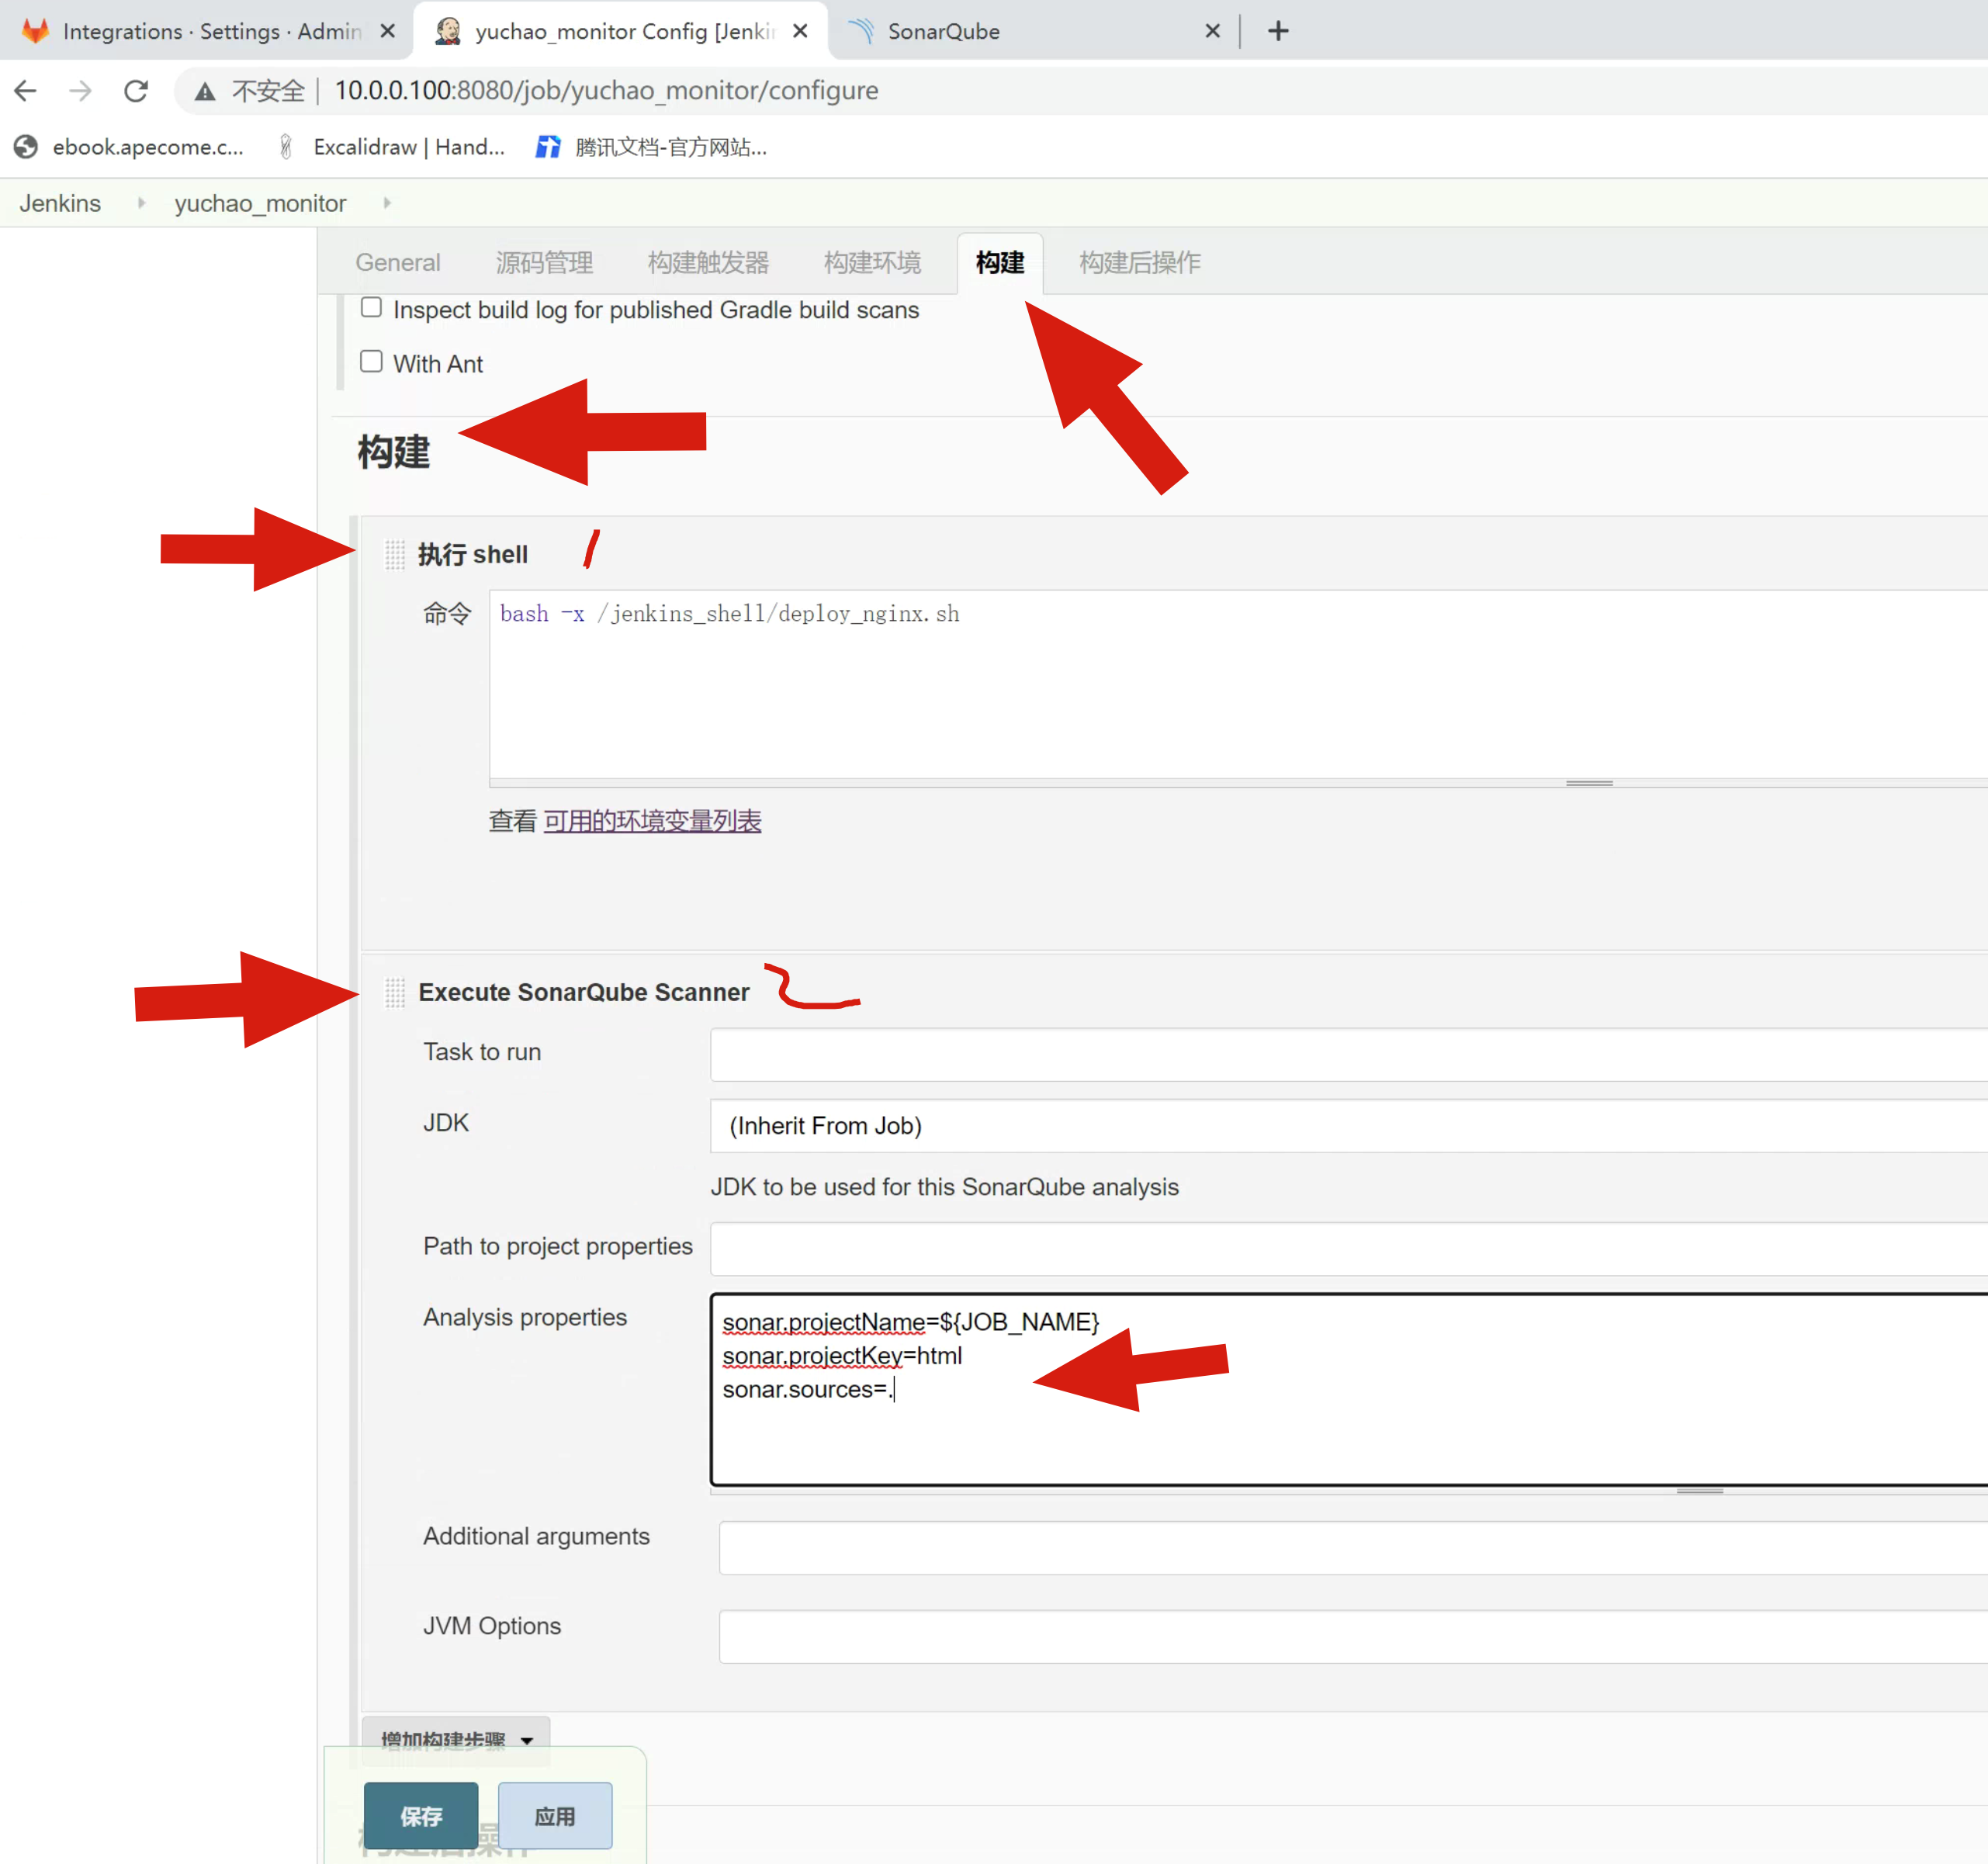
也就是添加三个sonar执行的参数,确保sonnar的命令是在代码目录下执行
sonar.projectName=${JOB_NAME}
sonar.projectKey=html
sonar.sources=.
7.4 最后注意细节
软件开发流程是
开发、测试、运维上线。
调整jenkins的devops流程构建步骤。
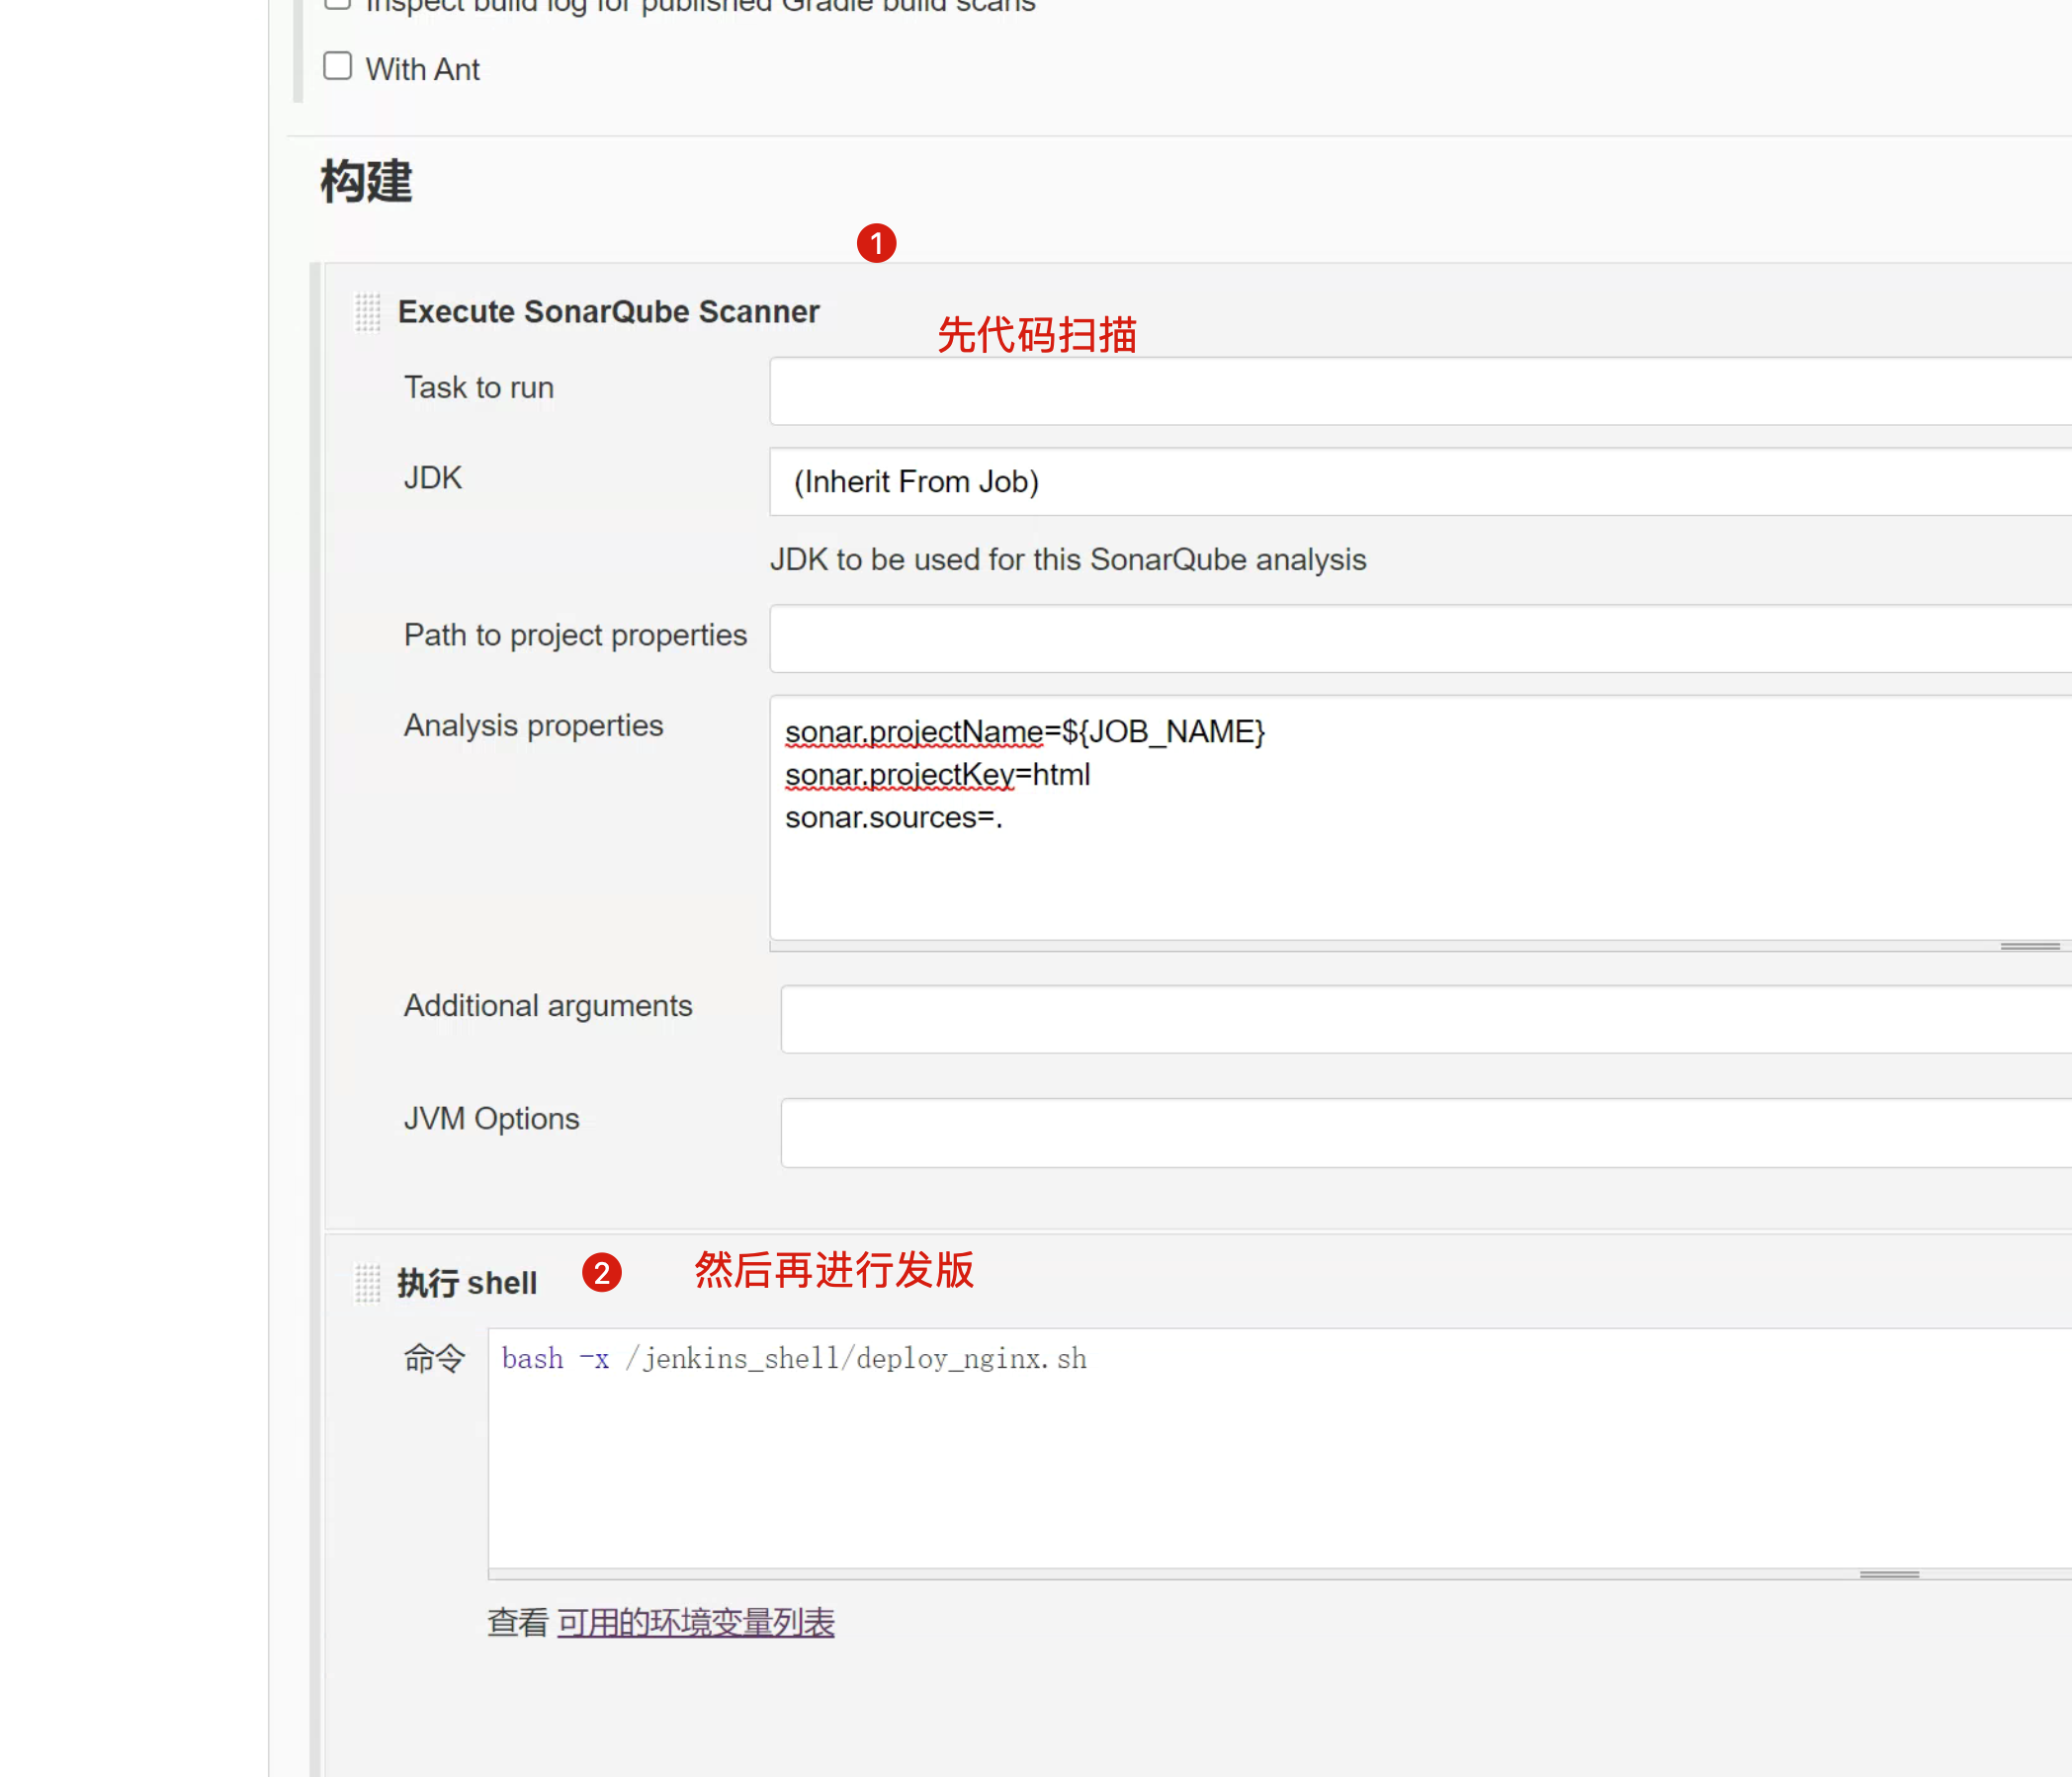
8.最终测试
1. 开发推送代码,触发gitlab的webhook,执行jenkins任务
2. 构建动作里,先sonnar代码扫描,然后进行脚本发布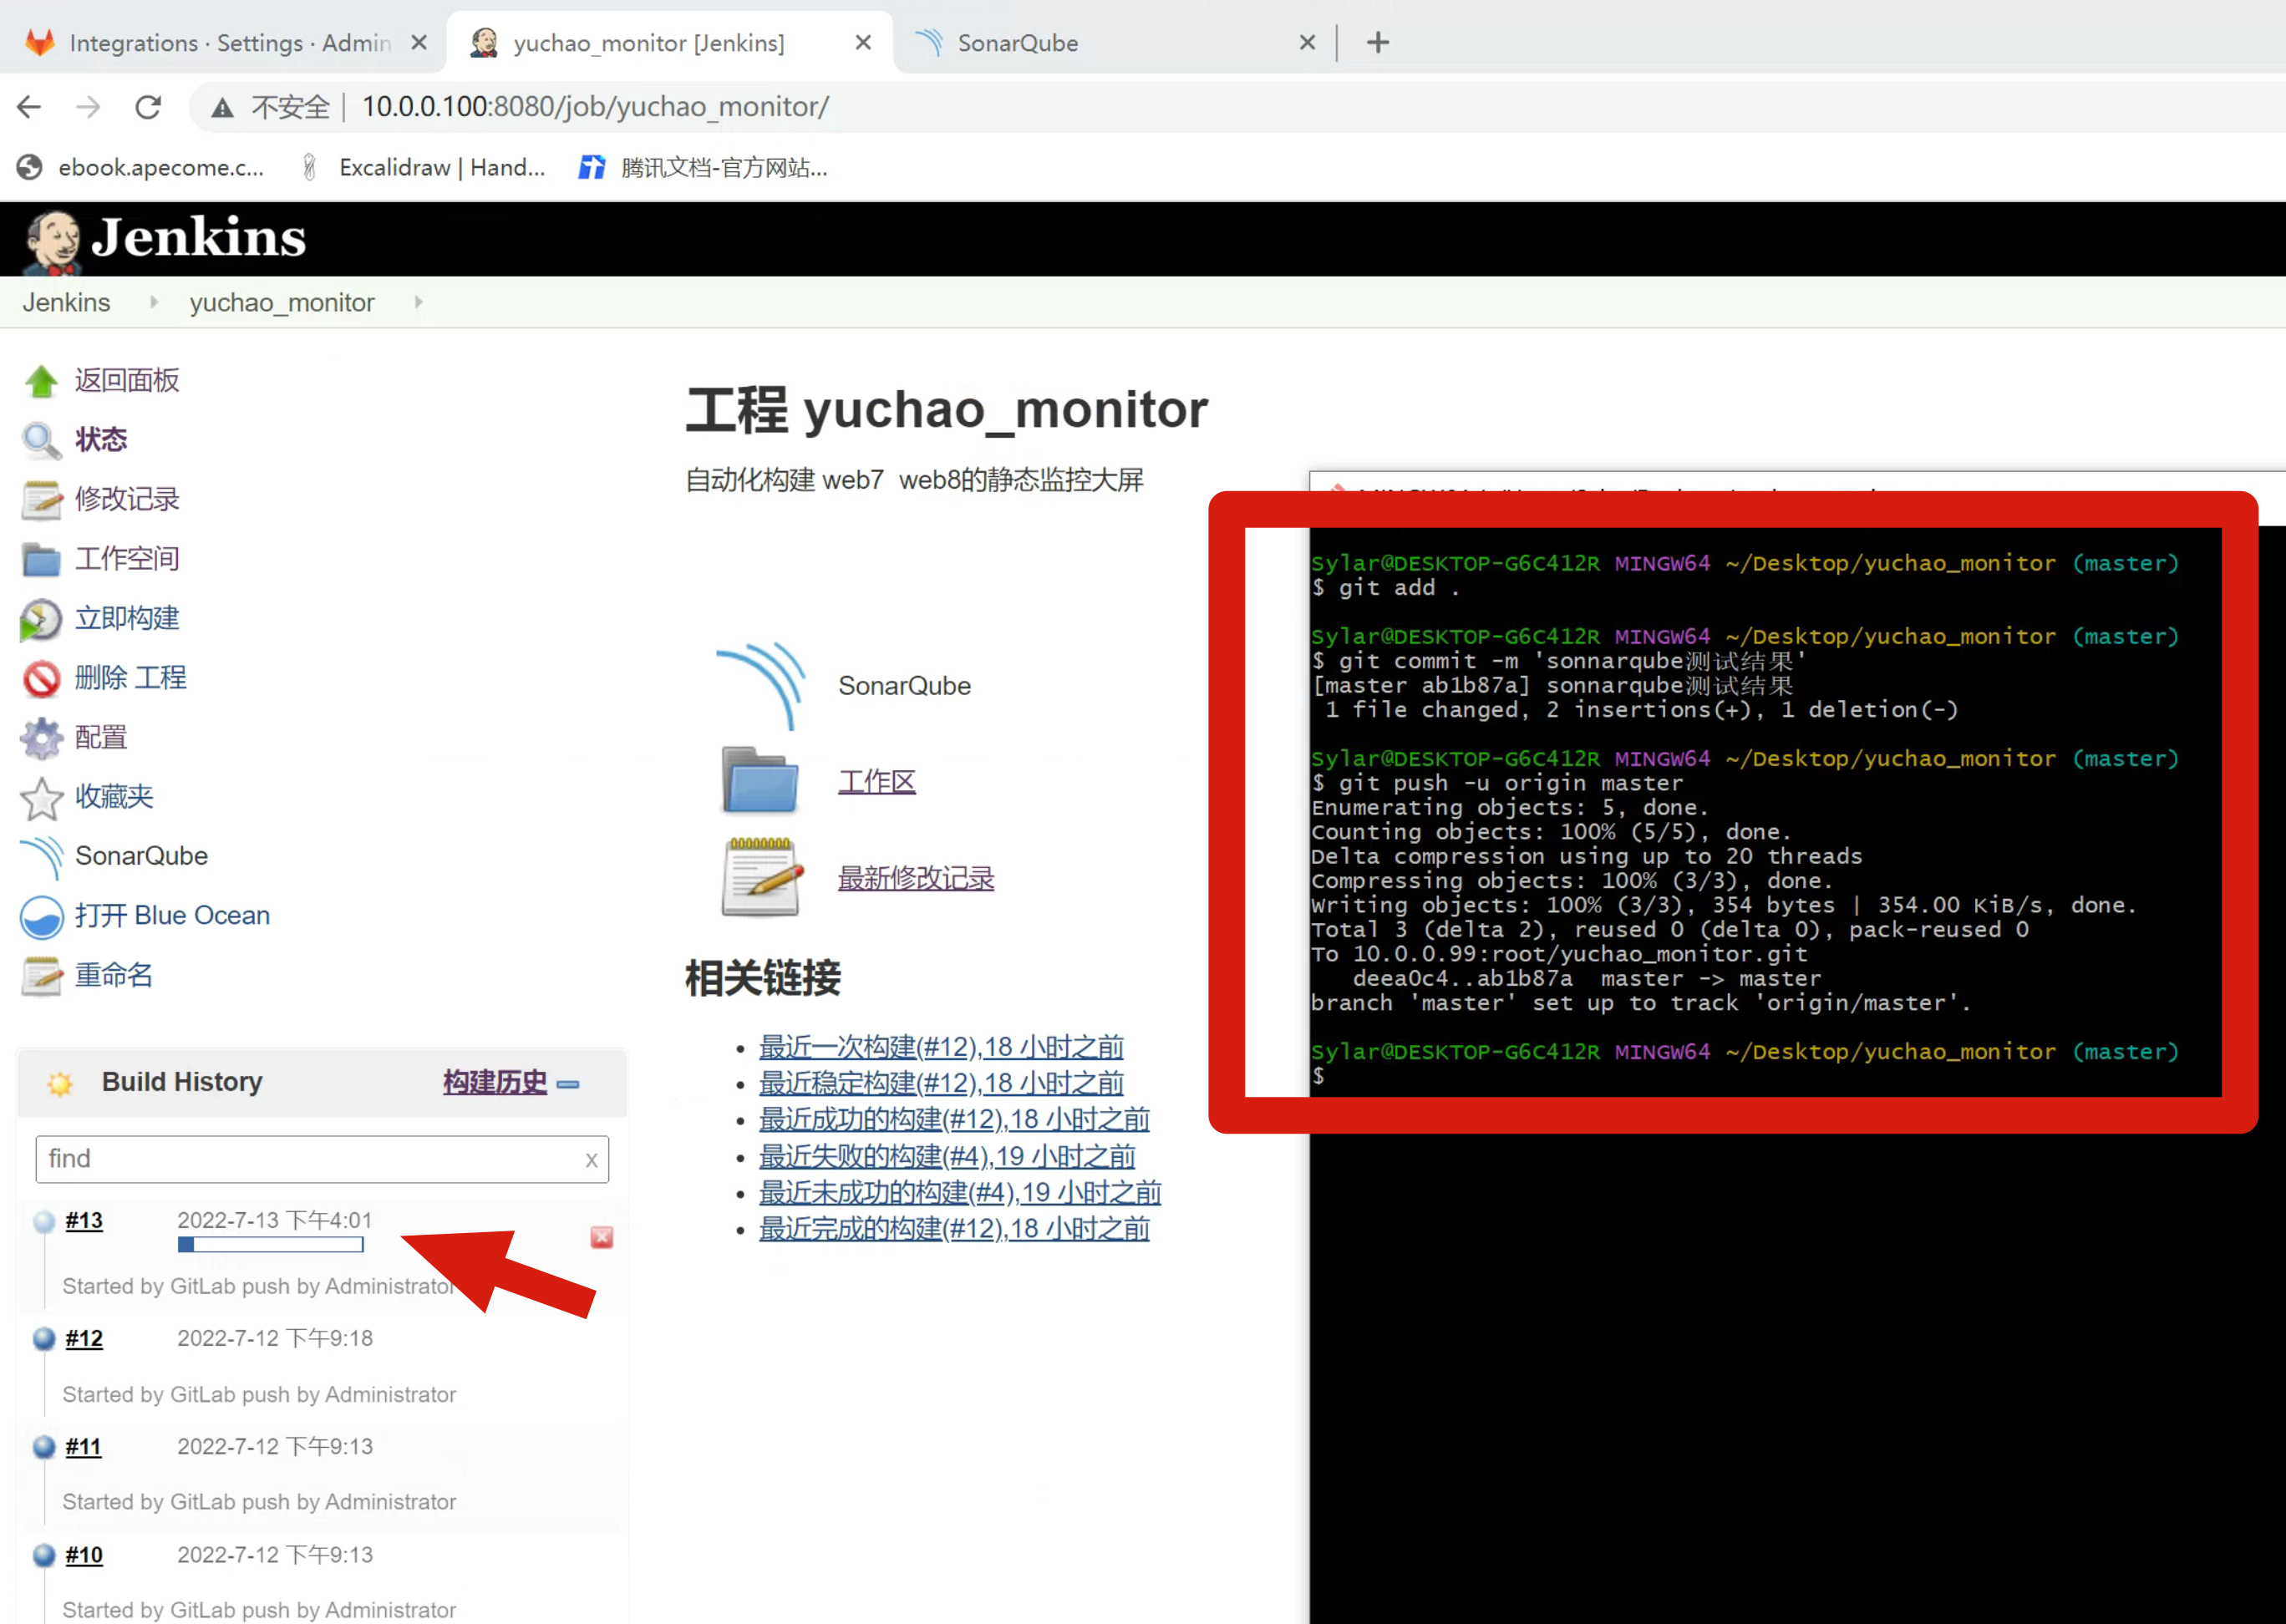
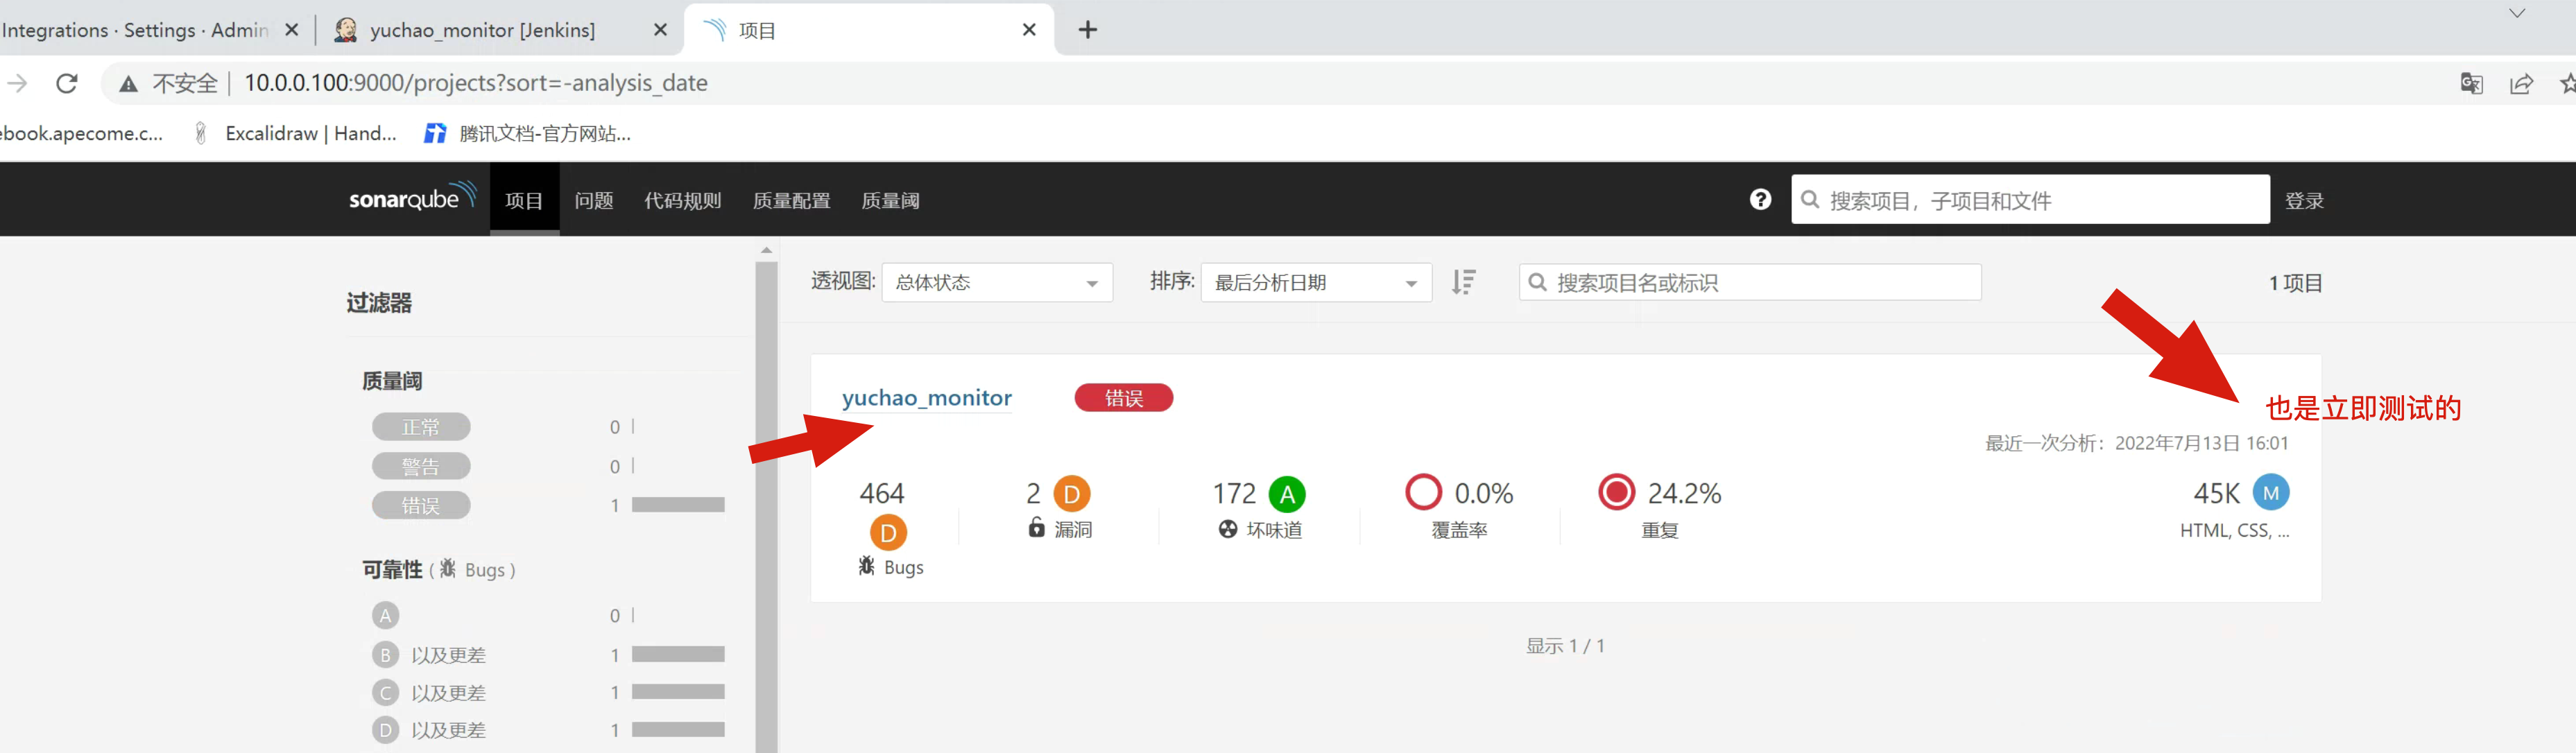
检查sonarqube
检查部署结果
