一、背景介绍
在开发过程中,经常使用到画笔Bursh。在WPF中,画笔可用于描述按钮的背景、文本的前景和形状填充等。 下面将整理一下各种画笔的作用与使用方法。
二、画笔Brush介绍
大多数视觉对象都允许你指定如何绘制它们。 下表列出了可以使用 Brush 的一些常见对象和属性:
| 类 | 画笔属性 |
|---|---|
| Border | BorderBrush, Background |
| Control | Background, Foreground |
| Panel | Background |
| Pen | Brush |
| Shape | Fill, Stroke |
| TextBlock | Background |
不同的画笔具有不同的输出类型。 某些画笔使用纯色绘制区域,其他画笔使用渐变、图案、图像或绘图。 下图展示了每种不同 Brush 类型的示例。
1、纯色绘制-SolidColorBrush
SolidColorBrush 使用纯色绘制区域。以下示例使用 SolidColorBrush 来绘制 Rectangle 的 Fill:
Rectangle exampleRectangle = new Rectangle();
exampleRectangle.Width = 75;
exampleRectangle.Height = 75;

// Create a SolidColorBrush and use it to
// paint the rectangle.
SolidColorBrush myBrush = new SolidColorBrush(Colors.Red);
exampleRectangle.Fill = myBrush;
<Rectangle Width="75" Height="75">
  <Rectangle.Fill>
    <SolidColorBrush Color="Red" />
  </Rectangle.Fill>
</Rectangle>
2、线性渐变绘制-LinearGradientBrush
LinearGradientBrush 使用线性渐变绘制区域。 线性渐变在线条(渐变轴)中混合了两种或多种颜色。 可以使用 GradientStop 对象指定渐变的颜色及其位置。以下示例使用 LinearGradientBrush 来绘制 Rectangle 的 Fill:
Rectangle exampleRectangle = new Rectangle();
exampleRectangle.Width = 75;
exampleRectangle.Height = 75;

// Create a LinearGradientBrush and use it to
// paint the rectangle.
LinearGradientBrush myBrush = new LinearGradientBrush();
myBrush.GradientStops.Add(new GradientStop(Colors.Yellow, 0.0));
myBrush.GradientStops.Add(new GradientStop(Colors.Orange, 0.5));
myBrush.GradientStops.Add(new GradientStop(Colors.Red, 1.0));

exampleRectangle.Fill = myBrush;
<Rectangle Width="75" Height="75">
  <Rectangle.Fill>
    <LinearGradientBrush>
      <GradientStop Color="Yellow" Offset="0.0" />
      <GradientStop Color="Orange" Offset="0.5" />
      <GradientStop Color="Red" Offset="1.0" />
    </LinearGradientBrush>
  </Rectangle.Fill>
</Rectangle>
下面的插图显示了对角方向的渐变。图中添加了一条线,用于突出显示渐变从起点到终点的插值路径(附测试代码):
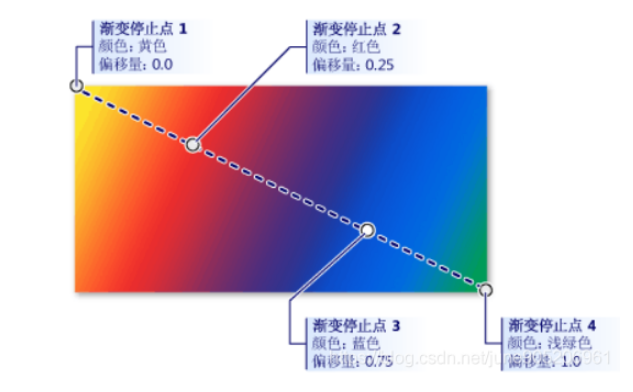
<Rectangle Width="200" Height="100">
            <Rectangle.Fill>
                <LinearGradientBrush StartPoint="0,0" EndPoint="1,1" Opacity="0.8">
                    <GradientStop Offset="0.0" Color="Yellow"/>
                    <GradientStop Offset="0.25" Color="Red"/>
                    <GradientStop Offset="0.75" Color="Blue"/>
                    <GradientStop Offset="1.0" Color="LimeGreen"/>
                </LinearGradientBrush>
            </Rectangle.Fill>
</Rectangle>
3、径向渐变绘制-RadialGradientBrush
RadialGradientBrush 使用径向渐变绘制区域。 径向渐变将两种或多种颜色混合在一个圆圈中。 与 LinearGradientBrush 类一样,可以使用 GradientStop 对象指定渐变的颜色及其位置。以下示例使用 RadialGradientBrush 来绘制 Rectangle 的 Fill:
Rectangle exampleRectangle = new Rectangle();
exampleRectangle.Width = 75;
exampleRectangle.Height = 75;

// Create a RadialGradientBrush and use it to
// paint the rectangle.
RadialGradientBrush myBrush = new RadialGradientBrush();
myBrush.GradientOrigin = new Point(0.75, 0.25);
myBrush.GradientStops.Add(new GradientStop(Colors.Yellow, 0.0));
myBrush.GradientStops.Add(new GradientStop(Colors.Orange, 0.5));
myBrush.GradientStops.Add(new GradientStop(Colors.Red, 1.0));

exampleRectangle.Fill = myBrush;
<Rectangle Width="75" Height="75">
  <Rectangle.Fill>
    <RadialGradientBrush GradientOrigin="0.75,0.25">
      <GradientStop Color="Yellow" Offset="0.0" />
      <GradientStop Color="Orange" Offset="0.5" />
      <GradientStop Color="Red" Offset="1.0" />
    </RadialGradientBrush>
  </Rectangle.Fill>
</Rectangle>
4、图像绘制-ImageBrush
ImageBrush使用 ImageSource 绘制区域。 ImageBrush能够实现对图像的拉伸、对齐和平铺,而且能够防止失真。
Rectangle exampleRectangle = new Rectangle();
exampleRectangle.Width = 75;
exampleRectangle.Height = 75;

// Create an ImageBrush and use it to
// paint the rectangle.
ImageBrush myBrush = new ImageBrush();
myBrush.ImageSource =
    new BitmapImage(new Uri(@"sampleImages\pinkcherries.jpg", UriKind.Relative));

exampleRectangle.Fill = myBrush;
<!--图片平铺效果-->
<!-- Sets the button's Background property with an ImageBrush. The resulting
ton has an image as its background. -->
<Button Grid.Row="3" Grid.Column="2"
        Height="75" Width="100" Foreground="White" FontWeight="Bold"
        HorizontalAlignment="Left">
        A Button
    <Button.Background>
        <ImageBrush ImageSource="Resources/1.jpg"
                Stretch="None"
                TileMode="Tile"
                ViewportUnits="Absolute">
            <ImageBrush.Viewport>
                <Rect X="0" Y="0" Width="20" Height="20"/>
            </ImageBrush.Viewport>
        </ImageBrush>
    </Button.Background>
</Button>
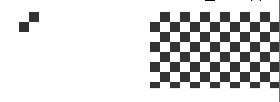
实现效果如下图所示:
5、绘图绘制-DrawingBrush
DrawingBrush 使用 Drawing 绘制区域。 Drawing 可以包含形状、图像、文本和媒体。
Rectangle exampleRectangle = new Rectangle();
exampleRectangle.Width = 75;
exampleRectangle.Height = 75;

// Create a DrawingBrush and use it to
// paint the rectangle.
DrawingBrush myBrush = new DrawingBrush();

GeometryDrawing backgroundSquare =
    new GeometryDrawing(
        Brushes.White,
        null,
        new RectangleGeometry(new Rect(0, 0, 100, 100)));

GeometryGroup aGeometryGroup = new GeometryGroup();
aGeometryGroup.Children.Add(new RectangleGeometry(new Rect(0, 0, 50, 50)));
aGeometryGroup.Children.Add(new RectangleGeometry(new Rect(50, 50, 50, 50)));

LinearGradientBrush checkerBrush = new LinearGradientBrush();
checkerBrush.GradientStops.Add(new GradientStop(Colors.Black, 0.0));
checkerBrush.GradientStops.Add(new GradientStop(Colors.Gray, 1.0));

GeometryDrawing checkers = new GeometryDrawing(checkerBrush, null, aGeometryGroup);

DrawingGroup checkersDrawingGroup = new DrawingGroup();
checkersDrawingGroup.Children.Add(backgroundSquare);
checkersDrawingGroup.Children.Add(checkers);

myBrush.Drawing = checkersDrawingGroup;
myBrush.Viewport = new Rect(0, 0, 0.25, 0.25);
myBrush.TileMode = TileMode.Tile;

exampleRectangle.Fill = myBrush;
<Grid>
    <Grid.Background>
        <DrawingBrush Stretch="Fill" TileMode="None"
                  Viewport="0,0,20,20" ViewportUnits="Absolute" >
            <DrawingBrush.Drawing>
                <GeometryDrawing Brush="#333333" Geometry="M0,2 L1,2 1,3 0,3 Z M1,1 L2,1 2,2 1,2 z"/>
            </DrawingBrush.Drawing>
        </DrawingBrush>
    </Grid.Background>
</Grid>
<Grid>
    <Grid.Background>
        <DrawingBrush Stretch="Fill" TileMode="Tile"
                  Viewport="0,0,20,20" ViewportUnits="Absolute" >
            <DrawingBrush.Drawing>
                <GeometryDrawing Brush="#333333" Geometry="M0,2 L1,2 1,3 0,3 Z M1,1 L2,1 2,2 1,2 z"/>
            </DrawingBrush.Drawing>
        </DrawingBrush>
    </Grid.Background>
</Grid>
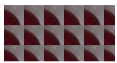
实现效果如下图所示:
6、视觉对象绘制-VisualBrush
VisualBrush 使用 Visual 对象绘制区域。 视觉对象的示例包括 Button、Page 和 MediaElement。 VisualBrush 可以将应用程序的一部分内容投影到另一个区域,创建反射效果和放大屏幕部分非常有用:
Rectangle exampleRectangle = new Rectangle();
exampleRectangle.Width = 75;
exampleRectangle.Height = 75;

// Create a VisualBrush and use it
// to paint the rectangle.
VisualBrush myBrush = new VisualBrush();

//
// Create the brush's contents.
//
StackPanel aPanel = new StackPanel();

// Create a DrawingBrush and use it to
// paint the panel.
DrawingBrush myDrawingBrushBrush = new DrawingBrush();
GeometryGroup aGeometryGroup = new GeometryGroup();
aGeometryGroup.Children.Add(new RectangleGeometry(new Rect(0, 0, 50, 50)));
aGeometryGroup.Children.Add(new RectangleGeometry(new Rect(50, 50, 50, 50)));
RadialGradientBrush checkerBrush = new RadialGradientBrush();
checkerBrush.GradientStops.Add(new GradientStop(Colors.MediumBlue, 0.0));
checkerBrush.GradientStops.Add(new GradientStop(Colors.White, 1.0));
GeometryDrawing checkers = new GeometryDrawing(checkerBrush, null, aGeometryGroup);
myDrawingBrushBrush.Drawing = checkers;
aPanel.Background = myDrawingBrushBrush;

// Create some text.
TextBlock someText = new TextBlock();
someText.Text = "Hello, World";
FontSizeConverter fSizeConverter = new FontSizeConverter();
someText.FontSize = (double)fSizeConverter.ConvertFromString("10pt");
someText.Margin = new Thickness(10);

aPanel.Children.Add(someText);

myBrush.Visual = aPanel;
exampleRectangle.Fill = myBrush;
<Rectangle Width="75" Height="75">
  <Rectangle.Fill>
    <VisualBrush TileMode="Tile">
      <VisualBrush.Visual>
        <StackPanel>
          <StackPanel.Background>
            <DrawingBrush>
              <DrawingBrush.Drawing>
                <GeometryDrawing>
                  <GeometryDrawing.Brush>
                    <RadialGradientBrush>
                      <GradientStop Color="MediumBlue" Offset="0.0" />
                      <GradientStop Color="White" Offset="1.0" />
                    </RadialGradientBrush>
                  </GeometryDrawing.Brush>
                  <GeometryDrawing.Geometry>
                    <GeometryGroup>
                      <RectangleGeometry Rect="0,0,50,50" />
                      <RectangleGeometry Rect="50,50,50,50" />
                    </GeometryGroup>
                  </GeometryDrawing.Geometry>
                </GeometryDrawing>
              </DrawingBrush.Drawing>
            </DrawingBrush>
          </StackPanel.Background>
          <TextBlock FontSize="10pt" Margin="10">Hello, World!</TextBlock>
        </StackPanel>
      </VisualBrush.Visual>
    </VisualBrush>
  </Rectangle.Fill>
</Rectangle>
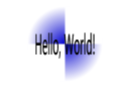
实现效果如下图所示:
7、使用系统画笔绘制区域
SystemColors 类可访问系统画笔和颜色,例如 ControlBrush、ControlBrushKey 和 DesktopBrush。 系统画笔是使用指定系统颜色绘制区域的 SolidColorBrush 对象。 系统画笔总是生成纯色填充,它不能用于创建渐变。
以下示例使用动态系统画笔引用来设置按钮的背景:
<Page xmlns="http://schemas.microsoft.com/winfx/2006/xaml/presentation"
  xmlns:x="http://schemas.microsoft.com/winfx/2006/xaml"
  WindowTitle="SystemColors Example" Background="White">
  <StackPanel Margin="20">

    <!-- Uses a dynamic resource to set the
         background of a button.
         If the desktop brush changes while this application
         is running, this button will be updated. -->
    <Button
      Background="{DynamicResource {x:Static SystemColors.DesktopBrushKey}}"
      Content="Hello, World!" />

  </StackPanel>
</Page>
下一个示例使用静态系统画笔引用来设置按钮的背景:
<Page xmlns="http://schemas.microsoft.com/winfx/2006/xaml/presentation"
  xmlns:x="http://schemas.microsoft.com/winfx/2006/xaml"
  WindowTitle="SystemColors Example" Background="White">
  <StackPanel Margin="20">

    <!-- Uses a static brush to set the
         background of a button.
         If the desktop brush changes while this application
         is running, this button will not be updated until
         the page is loaded again. -->
    <Button
      Background="{x:Static SystemColors.DesktopBrush}"
      Content="Hello, World!"  />

  </StackPanel>
</Page>