SpringBootWeb案例
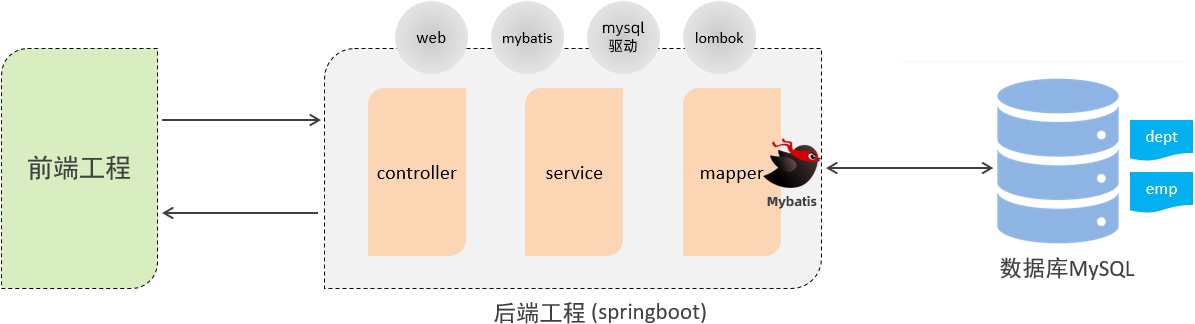
前面我们已经讲解了Web前端开发的基础知识,也讲解了Web后端开发的基础(HTTP协议、请求响应),并且也讲解了数据库MySQL,以及通过Mybatis框架如何来完成数据库的基本操作。 那接下来,我们就通过一个案例,来将前端开发、后端开发、数据库整合起来。 而这个案例呢,就是我们前面提到的Tlias智能学习辅助系统。
在这个案例中,前端开发人员已经将前端工程开发完毕了。 我们需要做的,就是参考接口文档完成后端功能的开发,然后结合前端工程进行联调测试即可。
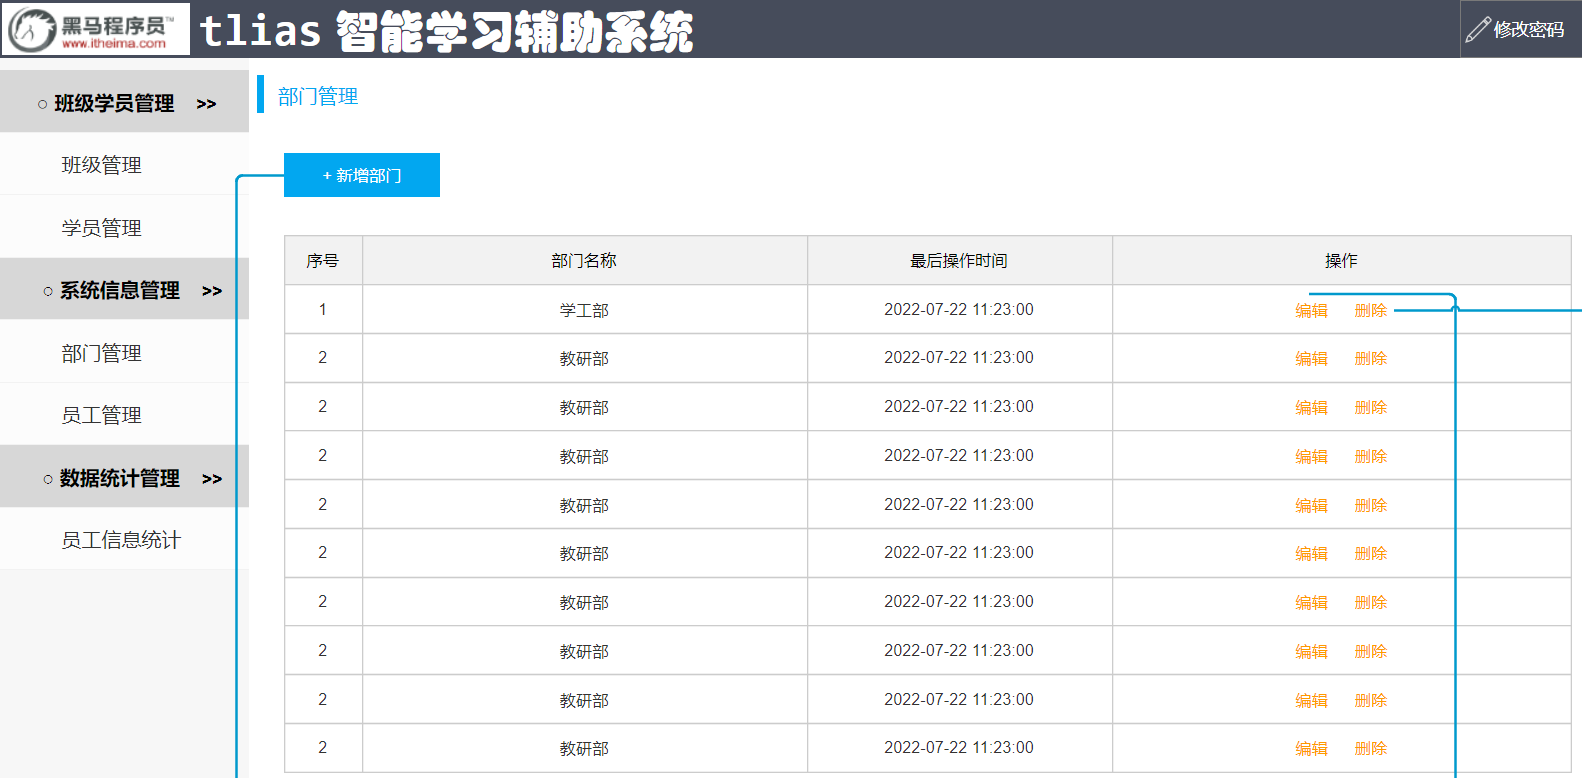
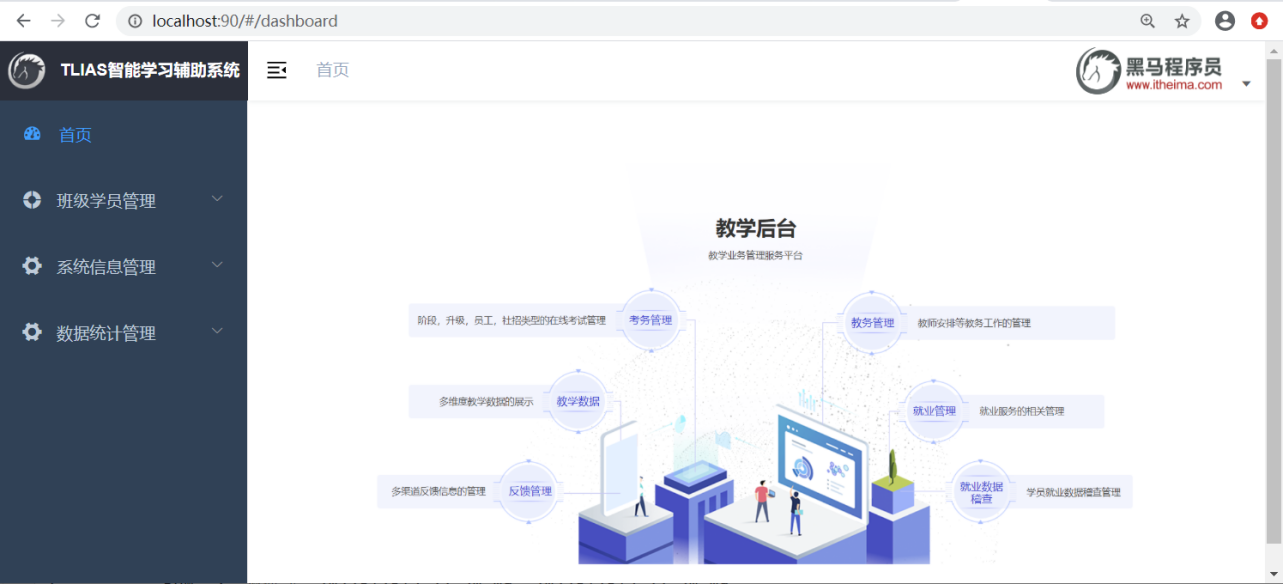
完成后的成品效果展示:
今天的主要内容如下:
- 准备工作
- 部门管理
- 员工管理
下面我们就进入到今天的第1个内容准备工作的学习。
1. 准备工作
准备工作的学习,我们先从"需求"和"环境搭建"开始入手。
1.1 需求&环境搭建
1.1.1 需求说明
1、部门管理

部门管理功能开发包括:
- 查询部门列表
- 删除部门
- 新增部门
- 修改部门
2、员工管理
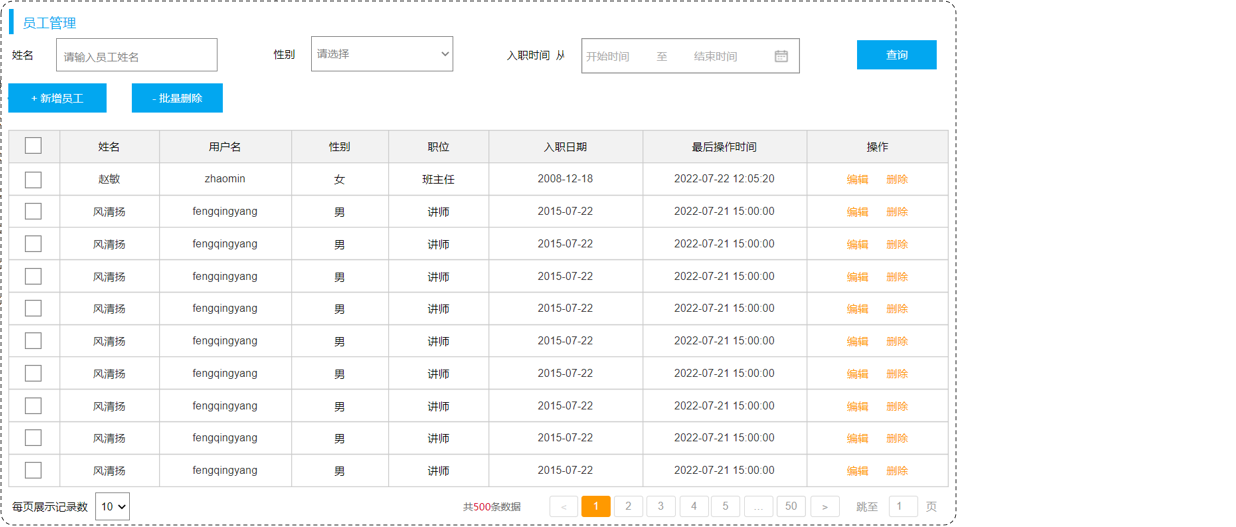
员工管理功能开发包括:
- 查询员工列表(分页、条件)
- 删除员工
- 新增员工
- 修改员工
1.1.2 环境搭建
步骤:
- 准备数据库表(dept、emp)
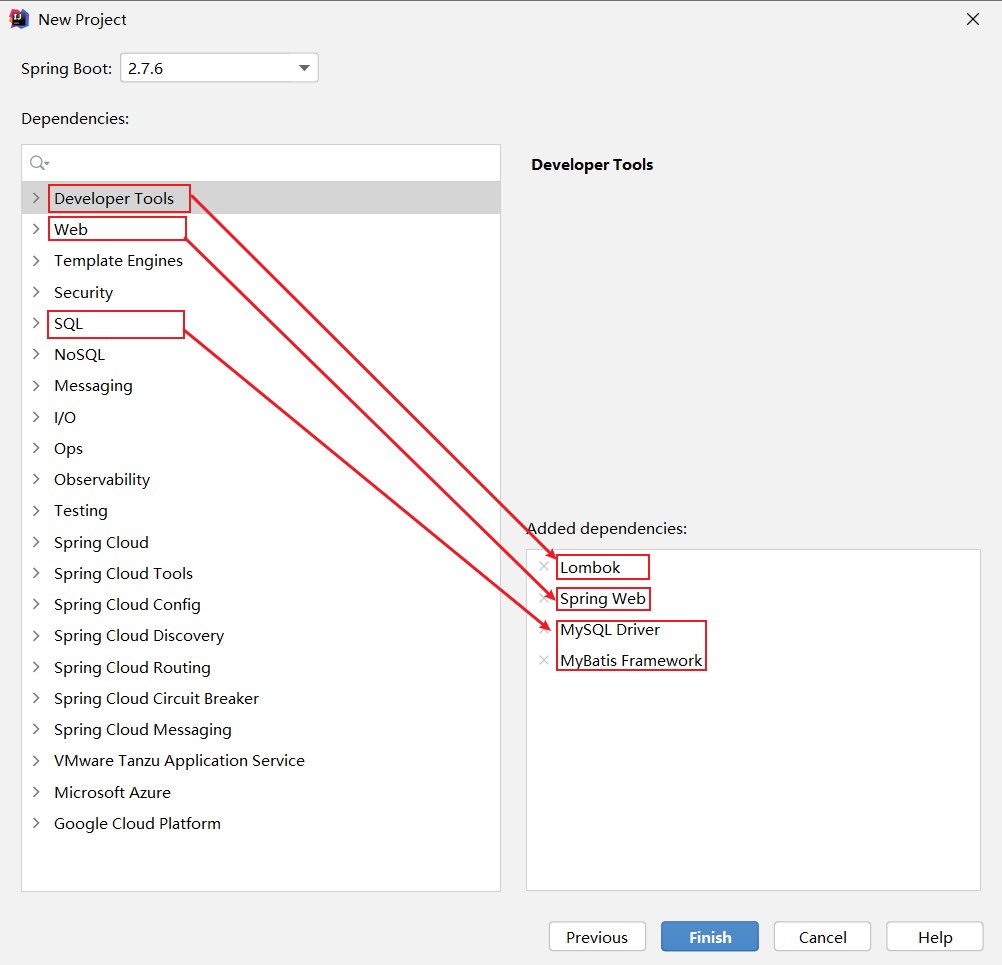
- 创建springboot工程,引入对应的起步依赖(web、mybatis、mysql驱动、lombok)
- 配置文件application.properties中引入mybatis的配置信息,准备对应的实体类
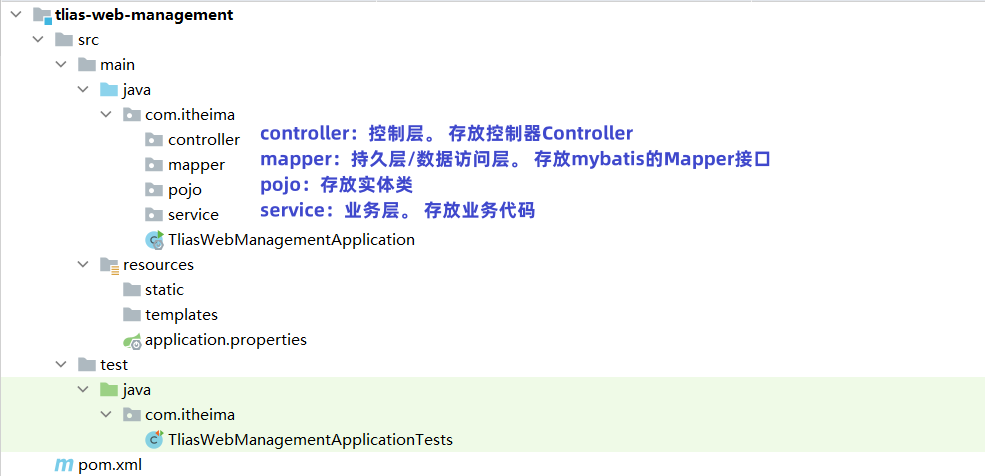
- 准备对应的Mapper、Service(接口、实现类)、Controller基础结构
第1步:准备数据库表
-- 部门管理
create table dept(
id int unsigned primary key auto_increment comment '主键ID',
name varchar(10) not null unique comment '部门名称',
create_time datetime not null comment '创建时间',
update_time datetime not null comment '修改时间'
) comment '部门表';
-- 部门表测试数据
insert into dept (id, name, create_time, update_time) values(1,'学工部',now(),now()),(2,'教研部',now(),now()),(3,'咨询部',now(),now()), (4,'就业部',now(),now()),(5,'人事部',now(),now());
-- 员工管理(带约束)
create table emp (
id int unsigned primary key auto_increment comment 'ID',
username varchar(20) not null unique comment '用户名',
password varchar(32) default '123456' comment '密码',
name varchar(10) not null comment '姓名',
gender tinyint unsigned not null comment '性别, 说明: 1 男, 2 女',
image varchar(300) comment '图像',
job tinyint unsigned comment '职位, 说明: 1 班主任,2 讲师, 3 学工主管, 4 教研主管, 5 咨询师',
entrydate date comment '入职时间',
dept_id int unsigned comment '部门ID',
create_time datetime not null comment '创建时间',
update_time datetime not null comment '修改时间'
) comment '员工表';
-- 员工表测试数据
INSERT INTO emp
(id, username, password, name, gender, image, job, entrydate,dept_id, create_time, update_time) VALUES
(1,'jinyong','123456','金庸',1,'1.jpg',4,'2000-01-01',2,now(),now()),
(2,'zhangwuji','123456','张无忌',1,'2.jpg',2,'2015-01-01',2,now(),now()),
(3,'yangxiao','123456','杨逍',1,'3.jpg',2,'2008-05-01',2,now(),now()),
(4,'weiyixiao','123456','韦一笑',1,'4.jpg',2,'2007-01-01',2,now(),now()),
(5,'changyuchun','123456','常遇春',1,'5.jpg',2,'2012-12-05',2,now(),now()),
(6,'xiaozhao','123456','小昭',2,'6.jpg',3,'2013-09-05',1,now(),now()),
(7,'jixiaofu','123456','纪晓芙',2,'7.jpg',1,'2005-08-01',1,now(),now()),
(8,'zhouzhiruo','123456','周芷若',2,'8.jpg',1,'2014-11-09',1,now(),now()),
(9,'dingminjun','123456','丁敏君',2,'9.jpg',1,'2011-03-11',1,now(),now()),
(10,'zhaomin','123456','赵敏',2,'10.jpg',1,'2013-09-05',1,now(),now()),
(11,'luzhangke','123456','鹿杖客',1,'11.jpg',5,'2007-02-01',3,now(),now()),
(12,'hebiweng','123456','鹤笔翁',1,'12.jpg',5,'2008-08-18',3,now(),now()),
(13,'fangdongbai','123456','方东白',1,'13.jpg',5,'2012-11-01',3,now(),now()),
(14,'zhangsanfeng','123456','张三丰',1,'14.jpg',2,'2002-08-01',2,now(),now()),
(15,'yulianzhou','123456','俞莲舟',1,'15.jpg',2,'2011-05-01',2,now(),now()),
(16,'songyuanqiao','123456','宋远桥',1,'16.jpg',2,'2007-01-01',2,now(),now()),
(17,'chenyouliang','123456','陈友谅',1,'17.jpg',NULL,'2015-03-21',NULL,now(),now());
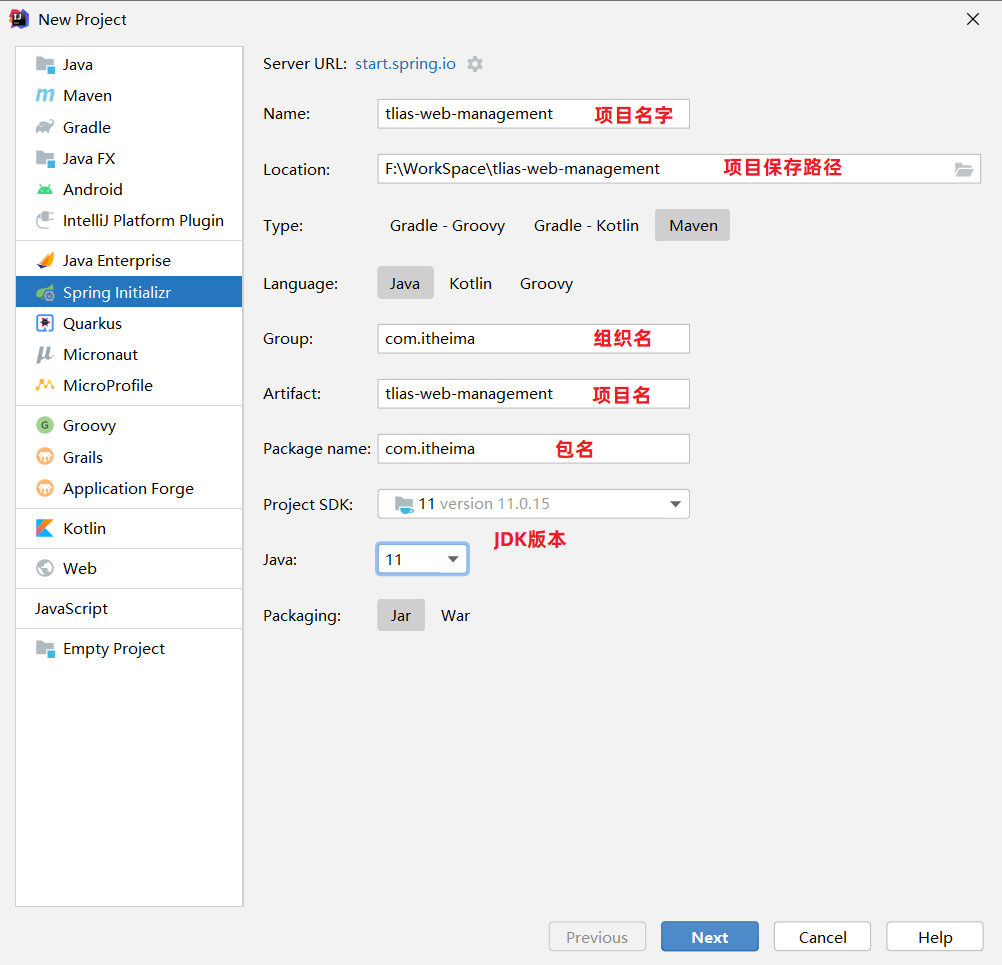
第2步:创建一个SpringBoot工程,选择引入对应的起步依赖(web、mybatis、mysql驱动、lombok) (版本选择2.7.5版本,可以创建完毕之后,在pom.xml文件中更改版本号)
生成的pom.xml文件:
<?xml version="1.0" encoding="UTF-8"?>
<project xmlns="http://maven.apache.org/POM/4.0.0" xmlns:xsi="http://www.w3.org/2001/XMLSchema-instance"
xsi:schemaLocation="http://maven.apache.org/POM/4.0.0 https://maven.apache.org/xsd/maven-4.0.0.xsd">
<modelVersion>4.0.0</modelVersion>
<parent>
<groupId>org.springframework.boot</groupId>
<artifactId>spring-boot-starter-parent</artifactId>
<version>2.7.5</version>
<relativePath/>
</parent>
<groupId>com.itheima</groupId>
<artifactId>tlias-web-management</artifactId>
<version>0.0.1-SNAPSHOT</version>
<name>tlias-web-management</name>
<description>Demo project for Spring Boot</description>
<properties>
<java.version>11</java.version>
</properties>
<dependencies>
<dependency>
<groupId>org.springframework.boot</groupId>
<artifactId>spring-boot-starter-web</artifactId>
</dependency>
<dependency>
<groupId>org.mybatis.spring.boot</groupId>
<artifactId>mybatis-spring-boot-starter</artifactId>
<version>2.3.0</version>
</dependency>
<dependency>
<groupId>com.mysql</groupId>
<artifactId>mysql-connector-j</artifactId>
<scope>runtime</scope>
</dependency>
<dependency>
<groupId>org.projectlombok</groupId>
<artifactId>lombok</artifactId>
<optional>true</optional>
</dependency>
<dependency>
<groupId>org.springframework.boot</groupId>
<artifactId>spring-boot-starter-test</artifactId>
<scope>test</scope>
</dependency>
</dependencies>
<build>
<plugins>
<plugin>
<groupId>org.springframework.boot</groupId>
<artifactId>spring-boot-maven-plugin</artifactId>
<configuration>
<excludes>
<exclude>
<groupId>org.projectlombok</groupId>
<artifactId>lombok</artifactId>
</exclude>
</excludes>
</configuration>
</plugin>
</plugins>
</build>
</project>
创建项目工程目录结构:
第3步:配置文件application.properties中引入mybatis的配置信息,准备对应的实体类
- application.properties (直接把之前项目中的复制过来)
#数据库连接
spring.datasource.driver-class-name=com.mysql.cj.jdbc.Driver
spring.datasource.url=jdbc:mysql://localhost:3306/tlias
spring.datasource.username=root
spring.datasource.password=1234
#开启mybatis的日志输出
mybatis.configuration.log-impl=org.apache.ibatis.logging.stdout.StdOutImpl
#开启数据库表字段 到 实体类属性的驼峰映射
mybatis.configuration.map-underscore-to-camel-case=true
- 实体类
/*部门类*/
@Data
@NoArgsConstructor
@AllArgsConstructor
public class Dept {
private Integer id;
private String name;
private LocalDateTime createTime;
private LocalDateTime updateTime;
}
/*员工类*/
@Data
@NoArgsConstructor
@AllArgsConstructor
public class Emp {
private Integer id;
private String username;
private String password;
private String name;
private Short gender;
private String image;
private Short job;
private LocalDate entrydate;
private Integer deptId;
private LocalDateTime createTime;
private LocalDateTime updateTime;
}
第4步:准备对应的Mapper、Service(接口、实现类)、Controller基础结构
数据访问层:
- DeptMapper
package com.itheima.mapper;
import org.apache.ibatis.annotations.Mapper;
@Mapper
public interface DeptMapper {
}
- EmpMapper
package com.itheima.mapper;
import org.apache.ibatis.annotations.Mapper;
@Mapper
public interface EmpMapper {
}
业务层:
- DeptService
package com.itheima.service;
//部门业务规则
public interface DeptService {
}
- DeptServiceImpl
package com.itheima.service.impl;
import lombok.extern.slf4j.Slf4j;
import org.springframework.stereotype.Service;
//部门业务实现类
@Slf4j
@Service
public class DeptServiceImpl implements DeptService {
}
- EmpService
package com.itheima.service;
//员工业务规则
public interface EmpService {
}
- EmpServiceImpl
package com.itheima.service.impl;
import com.itheima.service.EmpService;
import lombok.extern.slf4j.Slf4j;
import org.springframework.stereotype.Service;
//员工业务实现类
@Slf4j
@Service
public class EmpServiceImpl implements EmpService {
}
控制层:
- DeptController
package com.itheima.controller;
import org.springframework.web.bind.annotation.RestController;
//部门管理控制器
@RestController
public class DeptController {
}
- EmpController
package com.itheima.controller;
import org.springframework.web.bind.annotation.RestController;
//员工管理控制器
@RestController
public class EmpController {
}
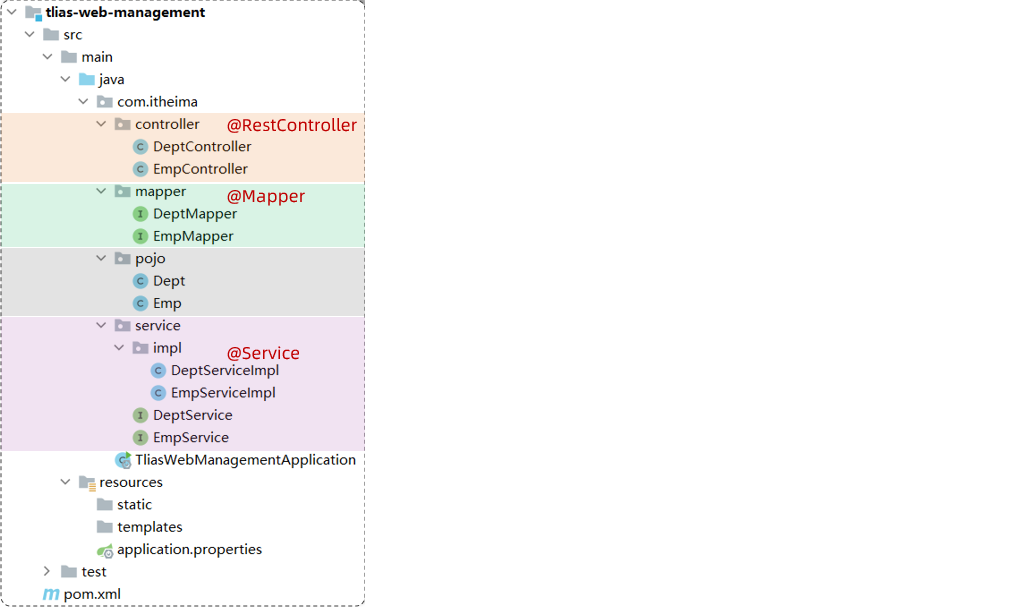
项目工程结构:
1.2 开发规范
了解完需求也完成了环境搭建了,我们下面开始学习开发的一些规范。
开发规范我们主要从以下几方面介绍:
1、开发规范-REST
我们的案例是基于当前最为主流的前后端分离模式进行开发。
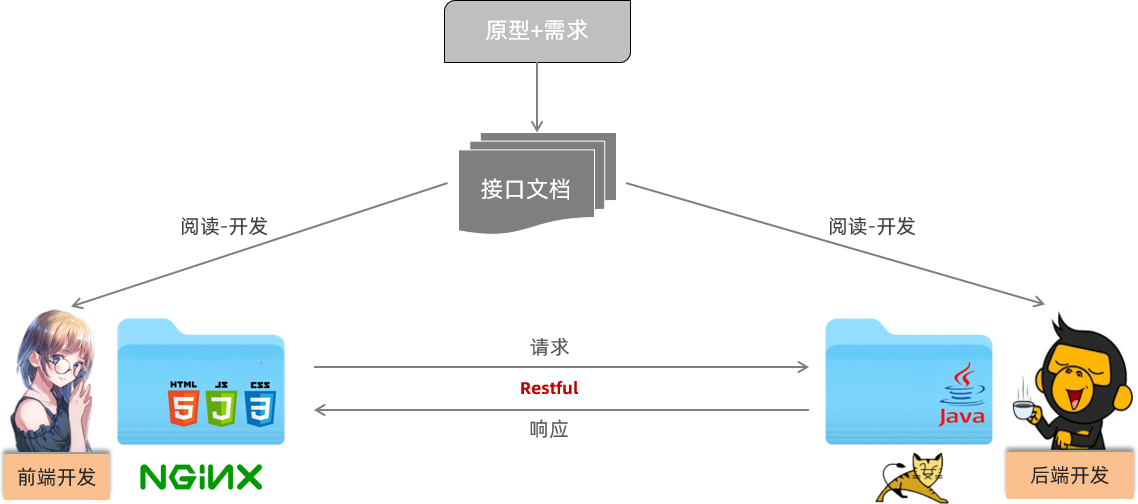
在前后端分离的开发模式中,前后端开发人员都需要根据提前定义好的接口文档,来进行前后端功能的开发。
后端开发人员:必须严格遵守提供的接口文档进行后端功能开发(保障开发的功能可以和前端对接)

而在前后端进行交互的时候,我们需要基于当前主流的REST风格的API接口进行交互。
什么是REST风格呢?
- REST(Representational State Transfer),表述性状态转换,它是一种软件架构风格。
传统URL风格如下:
http://localhost:8080/user/getById?id=1 GET:查询id为1的用户
http://localhost:8080/user/saveUser POST:新增用户
http://localhost:8080/user/updateUser POST:修改用户
http://localhost:8080/user/deleteUser?id=1 GET:删除id为1的用户
我们看到,原始的传统URL呢,定义比较复杂,而且将资源的访问行为对外暴露出来了。
基于REST风格URL如下:
http://localhost:8080/users/1 GET:查询id为1的用户
http://localhost:8080/users POST:新增用户
http://localhost:8080/users PUT:修改用户
http://localhost:8080/users/1 DELETE:删除id为1的用户
其中总结起来,就一句话:通过URL定位要操作的资源,通过HTTP动词(请求方式)来描述具体的操作。
在REST风格的URL中,通过四种请求方式,来操作数据的增删改查。
- GET : 查询
- POST :新增
- PUT :修改
- DELETE :删除
我们看到如果是基于REST风格,定义URL,URL将会更加简洁、更加规范、更加优雅。
注意事项:
- REST是风格,是约定方式,约定不是规定,可以打破
- 描述模块的功能通常使用复数,也就是加s的格式来描述,表示此类资源,而非单个资源。如:users、emps、books…
2、开发规范-统一响应结果
前后端工程在进行交互时,使用统一响应结果 Result。
package com.itheima.pojo;
import lombok.AllArgsConstructor;
import lombok.Data;
import lombok.NoArgsConstructor;
@Data
@NoArgsConstructor
@AllArgsConstructor
public class Result {
private Integer code;//响应码,1 代表成功; 0 代表失败
private String msg; //响应信息 描述字符串
private Object data; //返回的数据
//增删改 成功响应
public static Result success(){
return new Result(1,"success",null);
}
//查询 成功响应
public static Result success(Object data){
return new Result(1,"success",data);
}
//失败响应
public static Result error(String msg){
return new Result(0,msg,null);
}
}
3、开发流程
我们在进行功能开发时,都是根据如下流程进行:

- 查看页面原型明确需求
- 根据页面原型和需求,进行表结构设计、编写接口文档(已提供)
- 阅读接口文档
- 思路分析
- 功能接口开发
- 就是开发后台的业务功能,一个业务功能,我们称为一个接口
- 功能接口测试
- 功能开发完毕后,先通过Postman进行功能接口测试,测试通过后,再和前端进行联调测试
- 前后端联调测试
- 和前端开发人员开发好的前端工程一起测试
2. 部门管理
我们按照前面学习的开发流程,开始完成功能开发。首先按照之前分析的需求,完成部门管理的功能开发。
开发的部门管理功能包含:
- 查询部门
- 删除部门
- 新增部门
- 更新部门(不讲解,自己独立完成)
2.1 查询部门
2.1.1 原型和需求
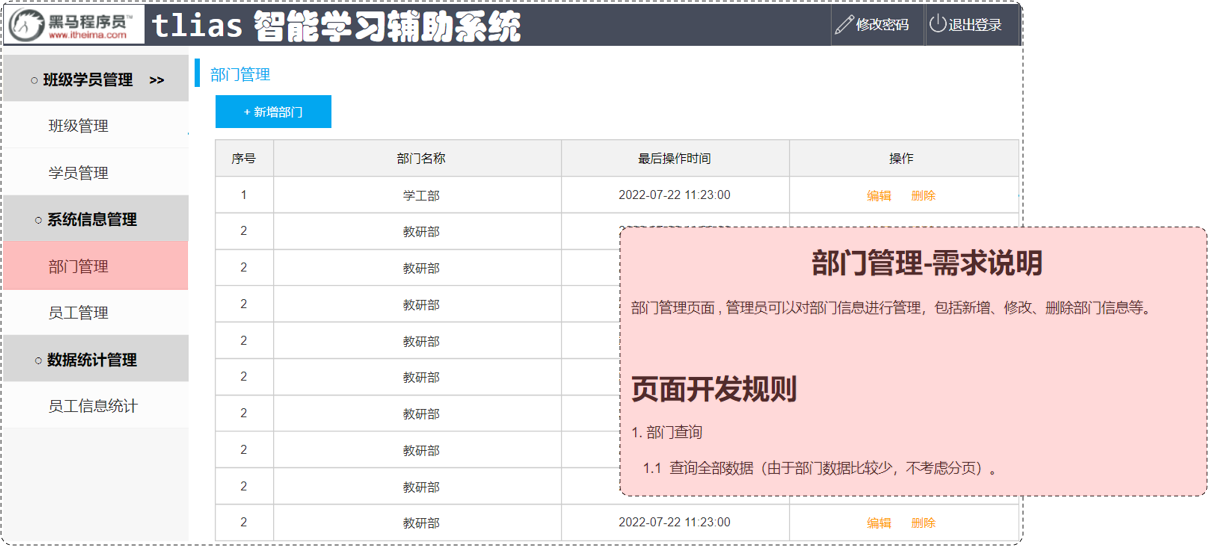
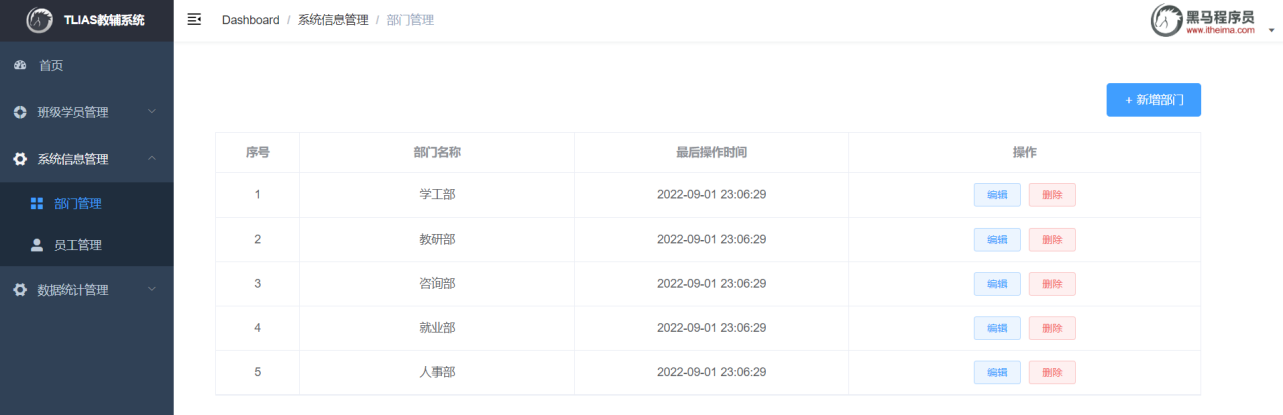
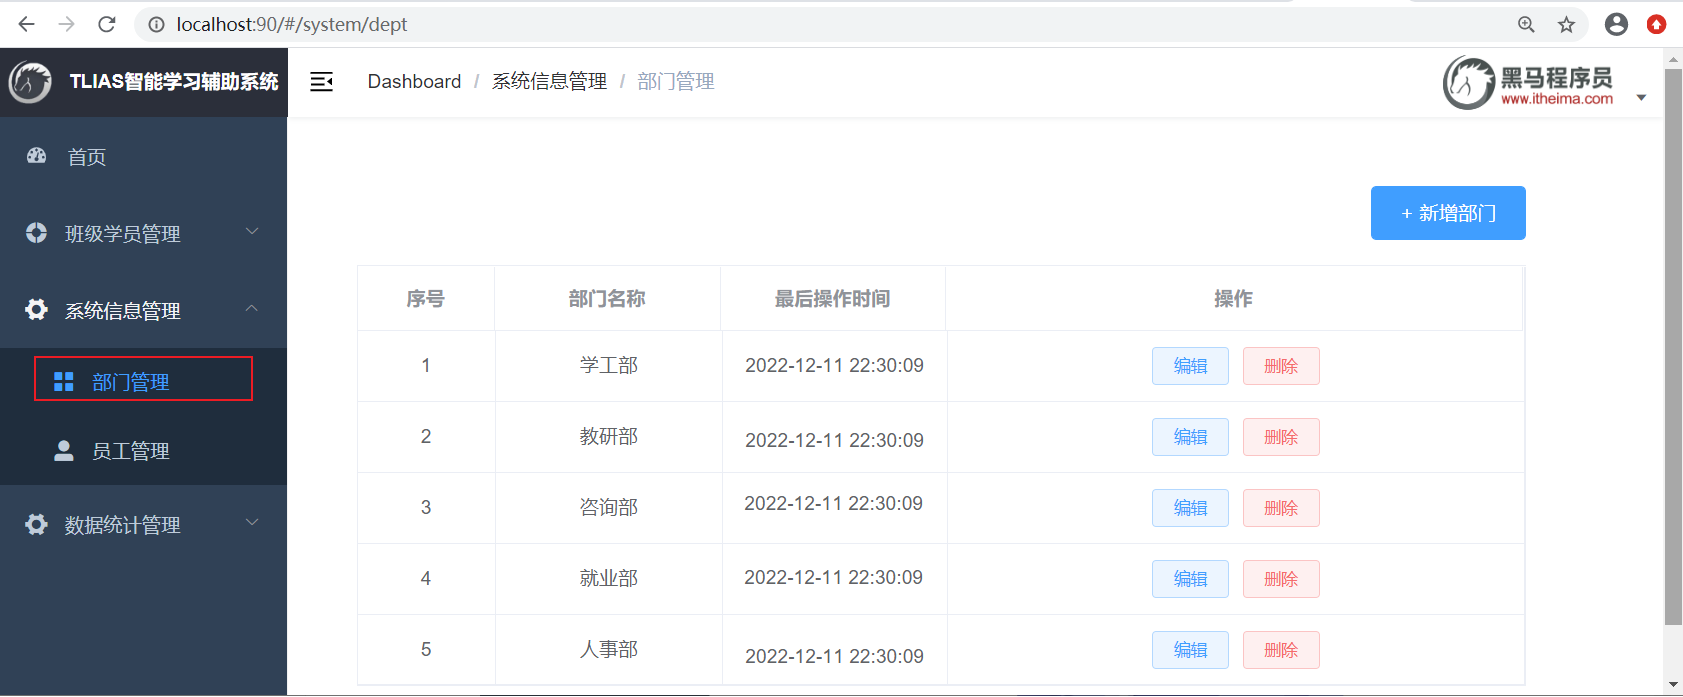
查询的部门的信息:部门ID、部门名称、修改时间
通过页面原型以及需求描述,我们可以看到,部门查询,是不需要考虑分页操作的。
2.1.2 接口文档
部门列表查询
- 基本信息
- 请求路径:/depts
请求方式:GET
接口描述:该接口用于部门列表数据查询 - 请求参数
- 无
- 响应数据
- 参数格式:application/json
- 参数说明:
参数名 | 类型 | 是否必须 | 备注 |
|---|---|---|---|
code | number | 必须 | 响应码,1 代表成功,0 代表失败 |
msg | string | 非必须 | 提示信息 |
data | object[ ] | 非必须 | 返回的数据 |
|- id | number | 非必须 | id |
|- name | string | 非必须 | 部门名称 |
|- createTime | string | 非必须 | 创建时间 |
|- updateTime | string | 非必须 | 修改时间 |
- 响应数据样例:
- {
"code": 1,
"msg": "success",
"data": [
{
"id": 1,
"name": "学工部",
"createTime": "2022-09-01T23:06:29",
"updateTime": "2022-09-01T23:06:29"
},
{
"id": 2,
"name": "教研部",
"createTime": "2022-09-01T23:06:29",
"updateTime": "2022-09-01T23:06:29"
}
]
}
2.1.3 思路分析
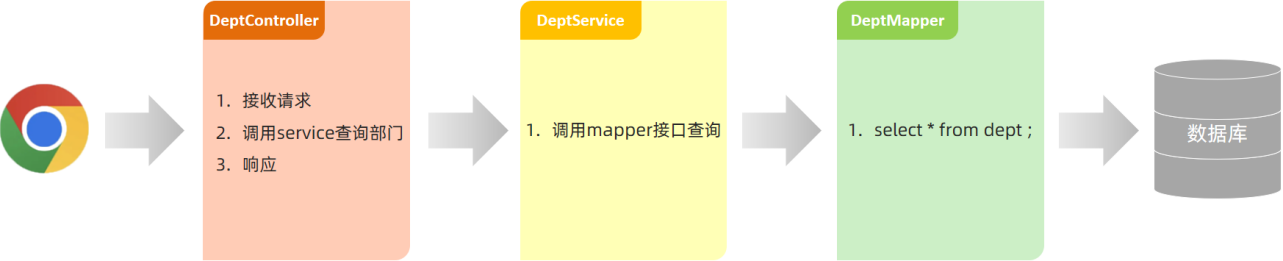
2.1.4 功能开发
通过查看接口文档:部门列表查询
请求路径:/depts
请求方式:GET
请求参数:无
响应数据:json格式
DeptController
@Slf4j
@RestController
public class DeptController {
@Autowired
private DeptService deptService;
//@RequestMapping(value = "/depts" , method = RequestMethod.GET)
@GetMapping("/depts")
public Result list(){
log.info("查询所有部门数据");
List<Dept> deptList = deptService.list();
return Result.success(deptList);
}
}
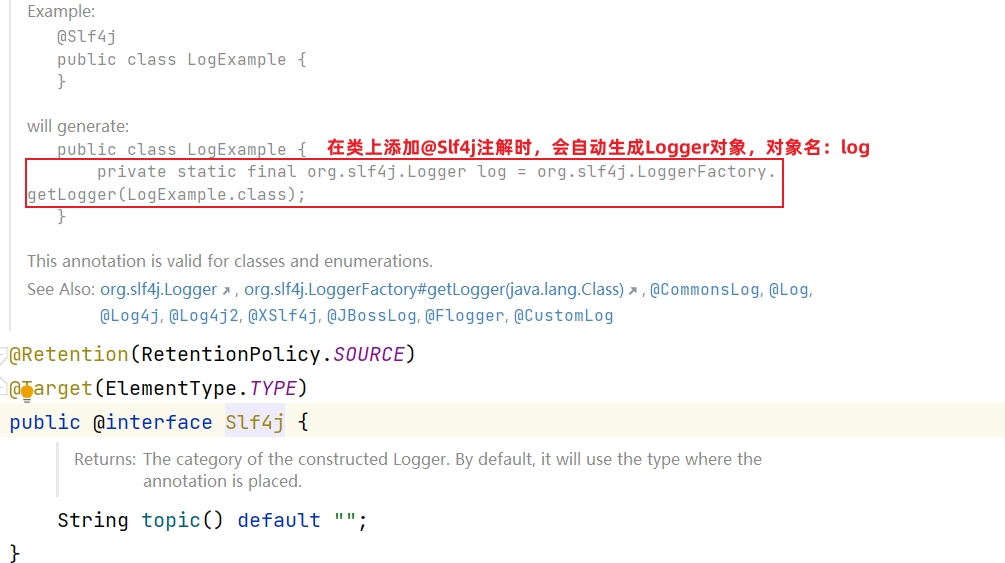
@Slf4j注解源码:
DeptService(业务接口)
public interface DeptService {
/**
* 查询所有的部门数据
* @return 存储Dept对象的集合
*/
List<Dept> list();
}
DeptServiceImpl(业务实现类)
@Slf4j
@Service
public class DeptServiceImpl implements DeptService {
@Autowired
private DeptMapper deptMapper;
@Override
public List<Dept> list() {
List<Dept> deptList = deptMapper.list();
return deptList;
}
}
DeptMapper
@Mapper
public interface DeptMapper {
//查询所有部门数据
@Select("select id, name, create_time, update_time from dept")
List<Dept> list();
}
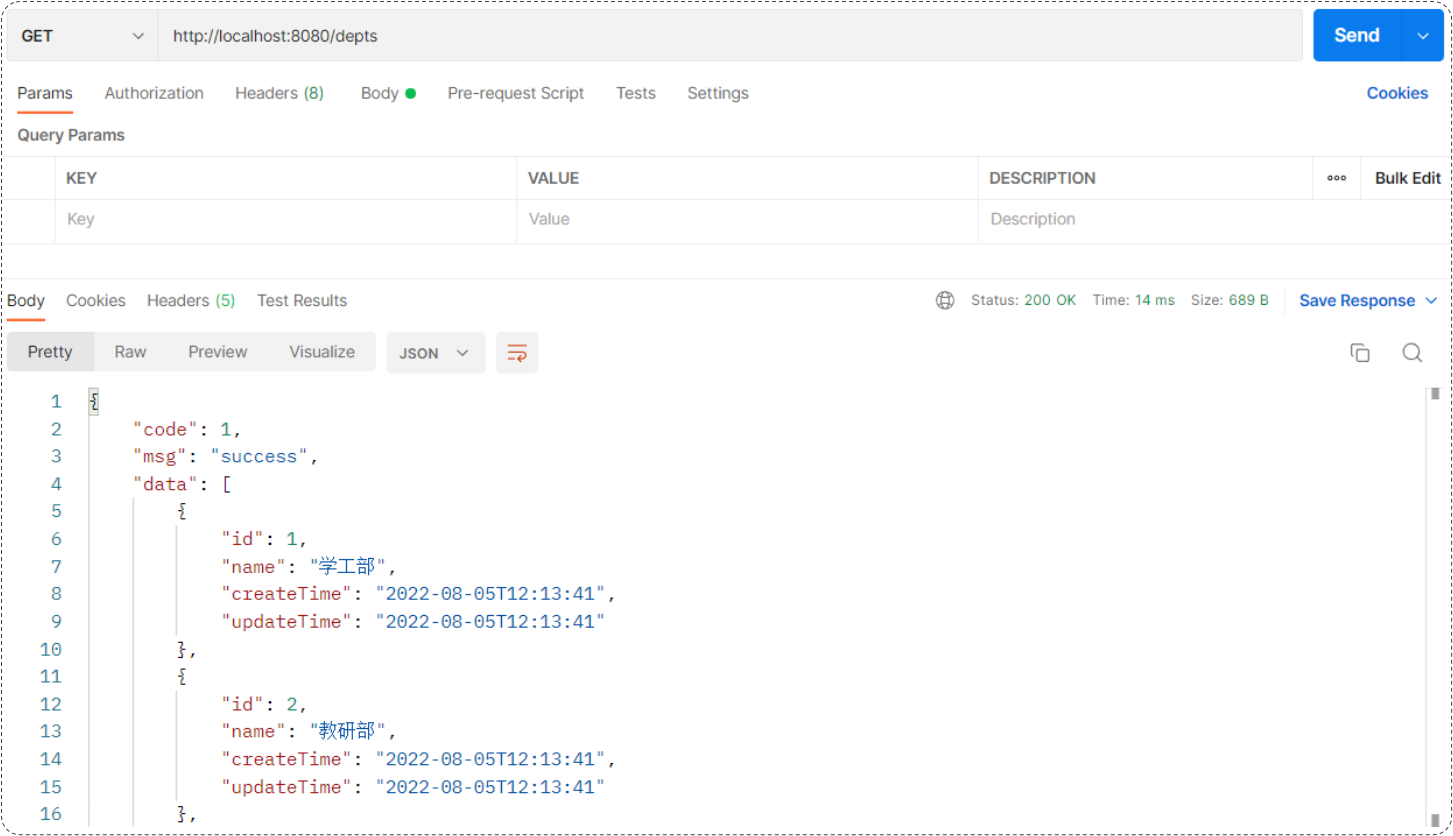
2.1.5 功能测试
功能开发完成后,我们就可以启动项目,然后打开postman,发起GET请求,访问 :http://localhost:8080/depts
2.2 前后端联调
完成了查询部门的功能,我们也通过postman工具测试通过了,下面我们再基于前后端分离的方式进行接口联调。具体操作如下:
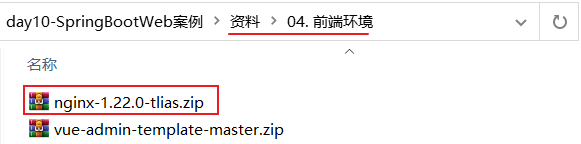
1、将资料中提供的"前端环境"文件夹中的压缩包,拷贝到一个没有中文不带空格的目录下
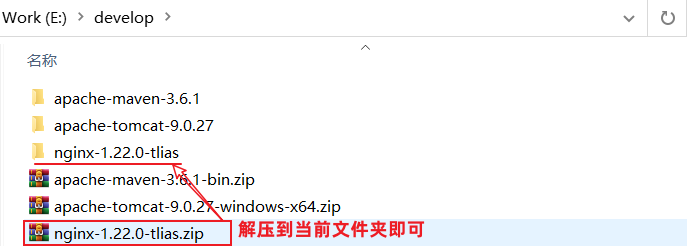
2、拷贝到一个没有中文不带空格的目录后,进行解压(解压到当前目录)
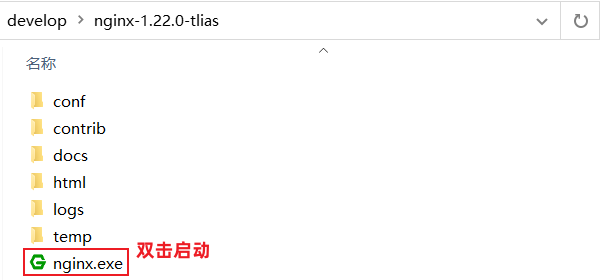
3、启动nginx

4、打开浏览器,访问:http://localhost:90
5、测试:部门管理 - 查询部门列表
说明:只要按照接口文档开发功能接口,就能保证前后端程序交互
- 后端:严格遵守接口文档进行功能接口开发
- 前端:严格遵守接口文档访问功能接口
2.3 删除部门
查询部门的功能我们搞定了,下面我们开始完成删除部门的功能开发。
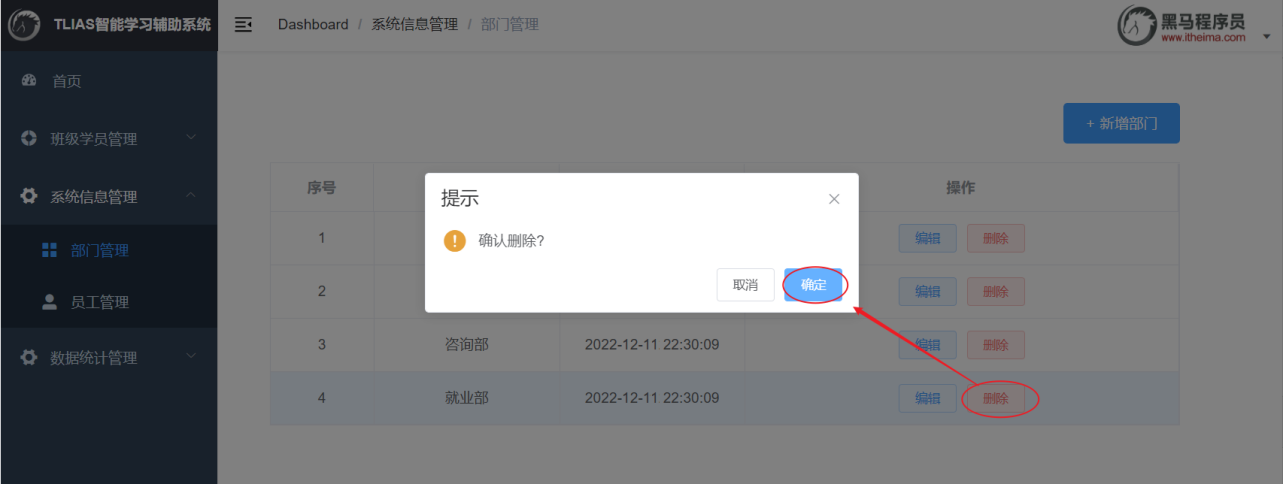
2.3.1 需求

点击部门列表后面操作栏的 "删除" 按钮,就可以删除该部门信息。 此时,前端只需要给服务端传递一个ID参数就可以了。 我们从接口文档中也可以看得出来。
2.3.2 接口文档
删除部门
- 基本信息
- 请求路径:/depts/{id}
请求方式:DELETE
接口描述:该接口用于根据ID删除部门数据 - 请求参数
参数格式:路径参数 - 参数说明:
参数名 | 类型 | 是否必须 | 备注 |
|---|---|---|---|
id | number | 必须 | 部门ID |
- 请求参数样例:
- /depts/1
- 响应数据
参数格式:application/json - 参数说明:
参数名 | 类型 | 是否必须 | 备注 |
|---|---|---|---|
code | number | 必须 | 响应码,1 代表成功,0 代表失败 |
msg | string | 非必须 | 提示信息 |
data | object | 非必须 | 返回的数据 |
- 响应数据样例:
- {
"code":1,
"msg":"success",
"data":null
}
2.3.3 思路分析
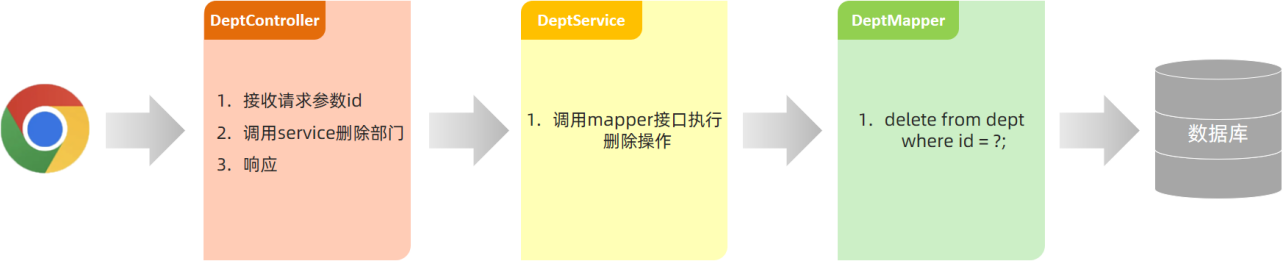
接口文档规定:
- 前端请求路径:/depts/{id}
- 前端请求方式:DELETE
问题1:怎么在controller中接收请求路径中的路径参数?
@PathVariable
问题2:如何限定请求方式是delete?
@DeleteMapping
2.3.4 功能开发
通过查看接口文档:删除部门
请求路径:/depts/{id}
请求方式:DELETE
请求参数:路径参数 {id}
响应数据:json格式
DeptController
@Slf4j
@RestController
public class DeptController {
@Autowired
private DeptService deptService;
@DeleteMapping("/depts/{id}")
public Result delete(@PathVariable Integer id) {
//日志记录
log.info("根据id删除部门");
//调用service层功能
deptService.delete(id);
//响应
return Result.success();
}
//省略...
}
DeptService
public interface DeptService {
/**
* 根据id删除部门
* @param id 部门id
*/
void delete(Integer id);
//省略...
}
DeptServiceImpl
@Slf4j
@Service
public class DeptServiceImpl implements DeptService {
@Autowired
private DeptMapper deptMapper;
@Override
public void delete(Integer id) {
//调用持久层删除功能
deptMapper.deleteById(id);
}
//省略...
}
DeptMapper
@Mapper
public interface DeptMapper {
/**
* 根据id删除部门信息
* @param id 部门id
*/
@Delete("delete from dept where id = #{id}")
void deleteById(Integer id);
//省略...
}
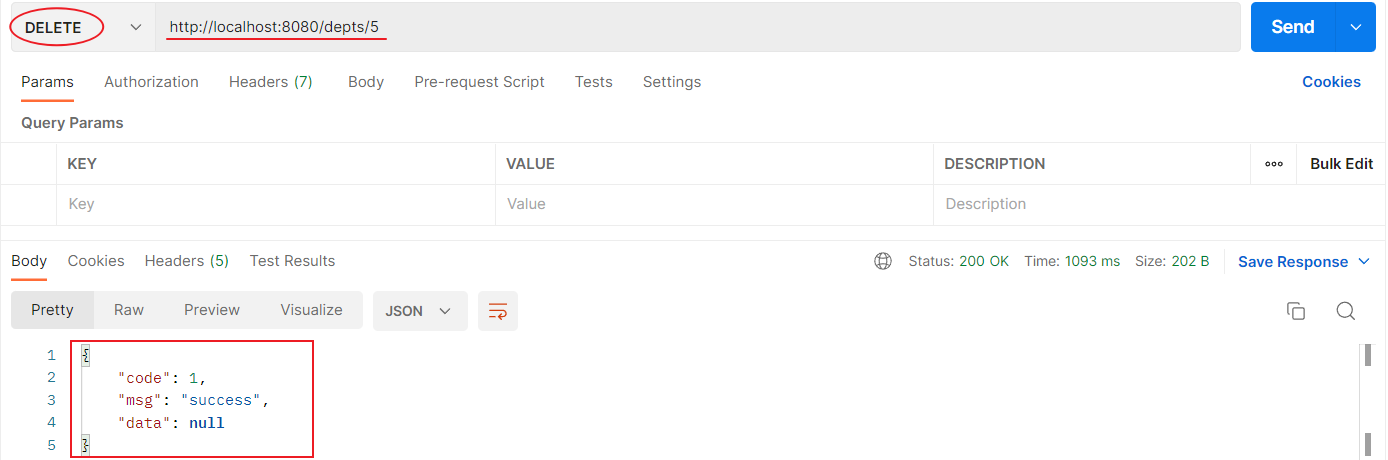
2.3.5 功能测试
删除功能开发完成后,重新启动项目,使用postman,发起DELETE请求:
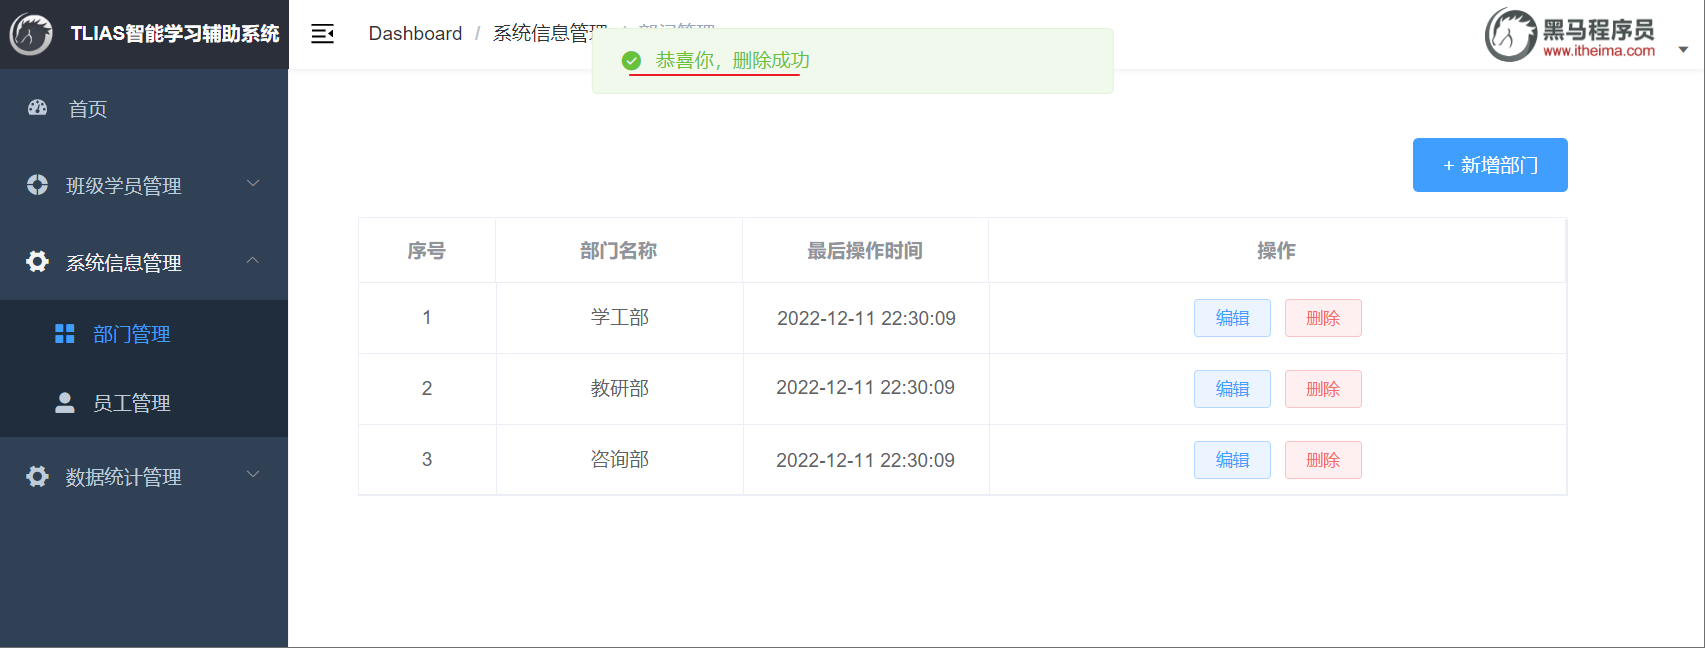
2.3.6 前后端联调
打开浏览器,测试后端功能接口:
2.4 新增部门
我们前面已完成了查询部门、删除部门两个功能,也熟悉了开发的流程。下面我们继续完成新增部门功能。
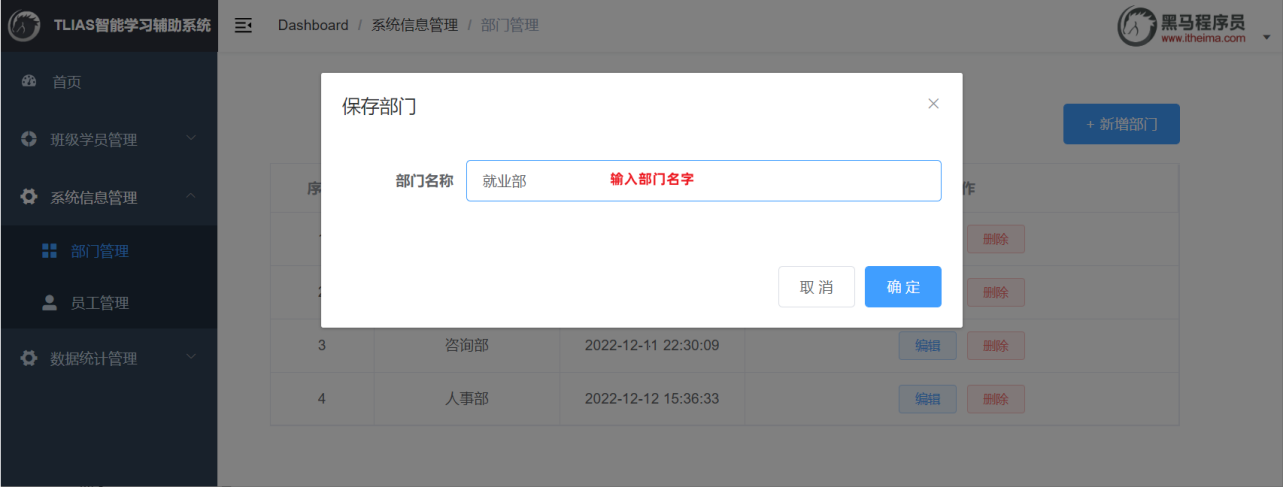
2.4.1 需求
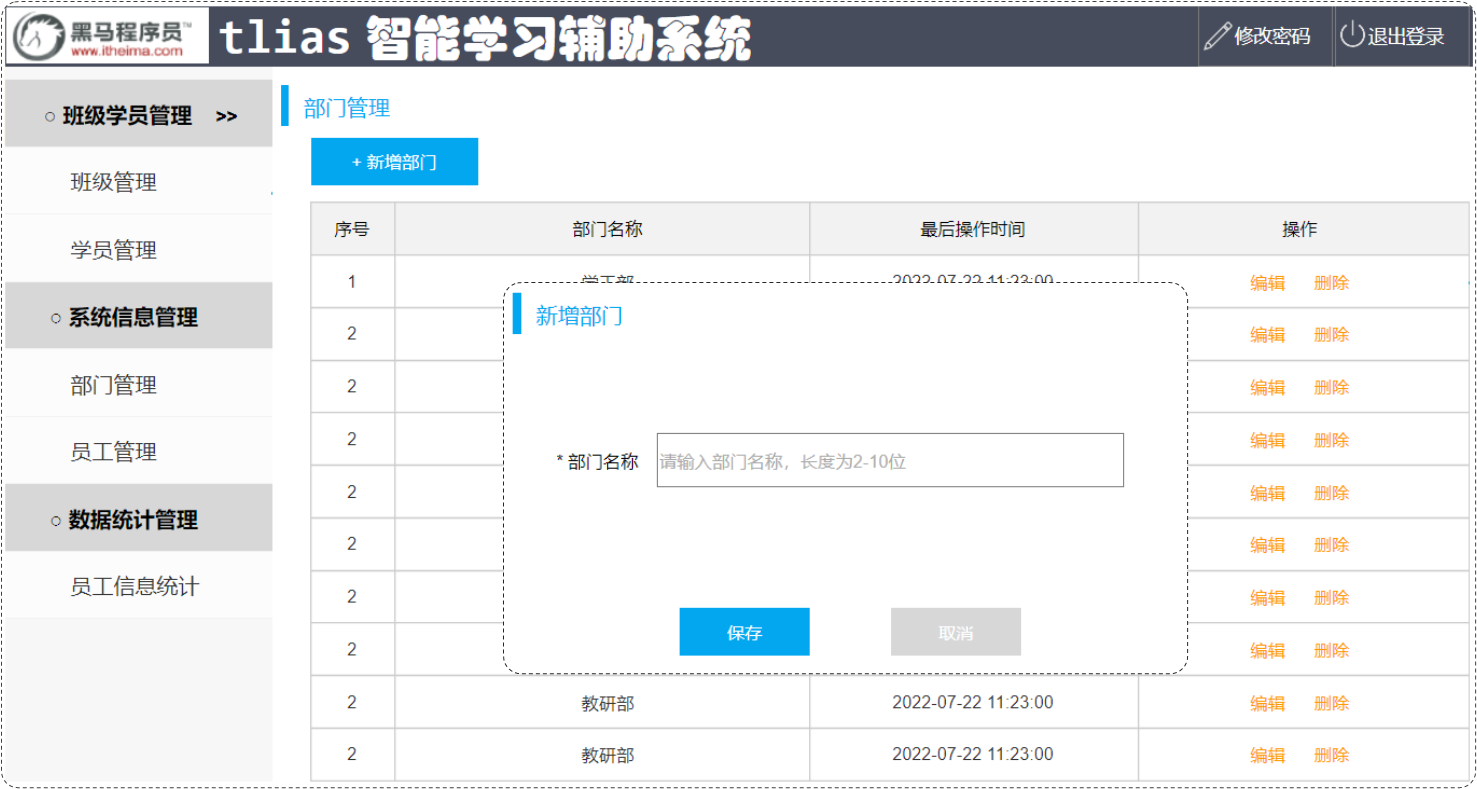
点击 "新增部门" 按钮,弹出新增部门对话框,输入部门名称,点击 "保存" ,将部门信息保存到数据库。
2.4.2 接口文档
添加部门
- 基本信息
- 请求路径:/depts
请求方式:POST
接口描述:该接口用于添加部门数据 - 请求参数
- 格式:application/json
- 参数说明:
参数名 | 类型 | 是否必须 | 备注 |
|---|---|---|---|
name | string | 必须 | 部门名称 |
- 请求参数样例:
- {
"name": "教研部"
} - 响应数据
- 参数格式:application/json
- 参数说明:
参数名 | 类型 | 是否必须 | 备注 |
|---|---|---|---|
code | number | 必须 | 响应码,1 代表成功,0 代表失败 |
msg | string | 非必须 | 提示信息 |
data | object | 非必须 | 返回的数据 |
- 响应数据样例:
- {
"code":1,
"msg":"success",
"data":null
}
2.4.3 思路分析
接口文档规定:
- 前端请求路径:/depts
- 前端请求方式:POST
- 前端请求参数 (Json格式):{ "name": "教研部" }
问题1:如何限定请求方式是POST?
@PostMapping
问题2:怎么在controller中接收json格式的请求参数?
@RequestBody //把前端传递的json数据填充到实体类中
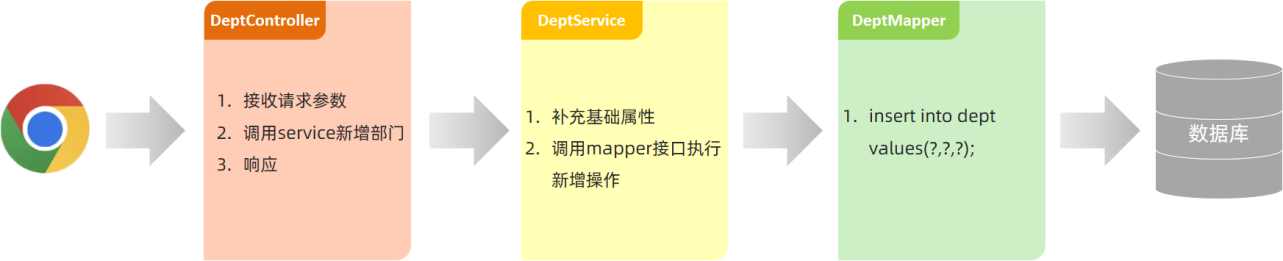
2.4.4 功能开发
通过查看接口文档:新增部门
请求路径:/depts
请求方式:POST
请求参数:json格式
响应数据:json格式
DeptController
@Slf4j
@RestController
public class DeptController {
@Autowired
private DeptService deptService;
@PostMapping("/depts")
public Result add(@RequestBody Dept dept){
//记录日志
log.info("新增部门:{}",dept);
//调用service层添加功能
deptService.add(dept);
//响应
return Result.success();
}
//省略...
}
DeptService
public interface DeptService {
/**
* 新增部门
* @param dept 部门对象
*/
void add(Dept dept);
//省略...
}
DeptServiceImpl
@Slf4j
@Service
public class DeptServiceImpl implements DeptService {
@Autowired
private DeptMapper deptMapper;
@Override
public void add(Dept dept) {
//补全部门数据
dept.setCreateTime(LocalDateTime.now());
dept.setUpdateTime(LocalDateTime.now());
//调用持久层增加功能
deptMapper.inser(dept);
}
//省略...
}
DeptMapper
@Mapper
public interface DeptMapper {
@Insert("insert into dept (name, create_time, update_time) values (#{name},#{createTime},#{updateTime})")
void inser(Dept dept);
//省略...
}
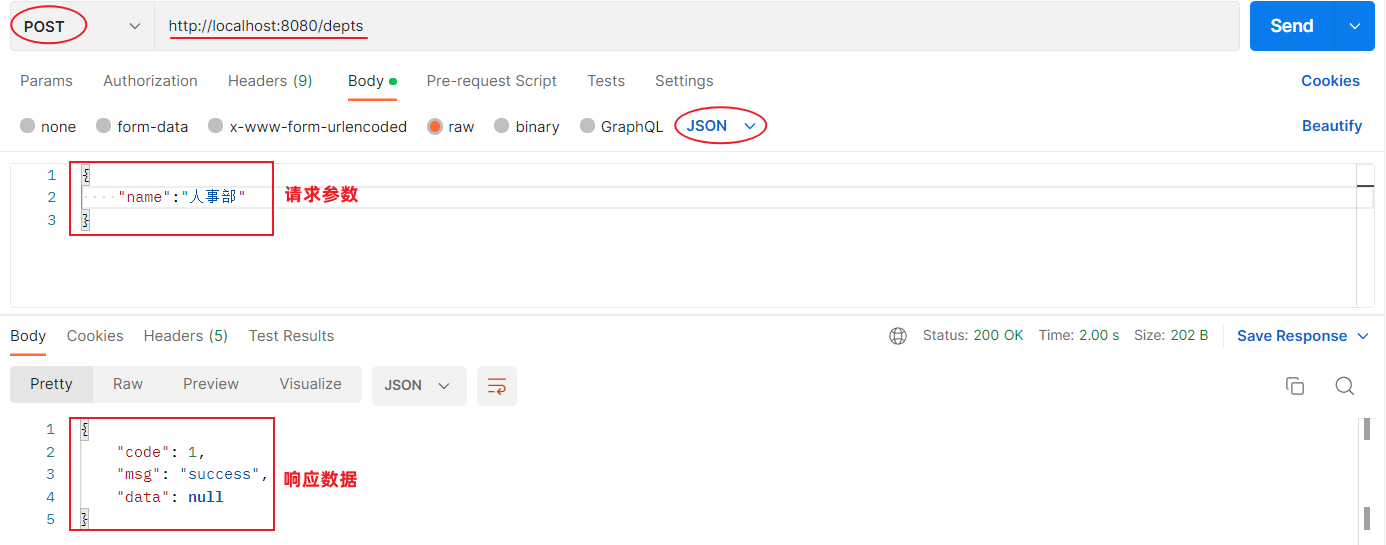
2.4.5 功能测试
新增功能开发完成后,重新启动项目,使用postman,发起POST请求:
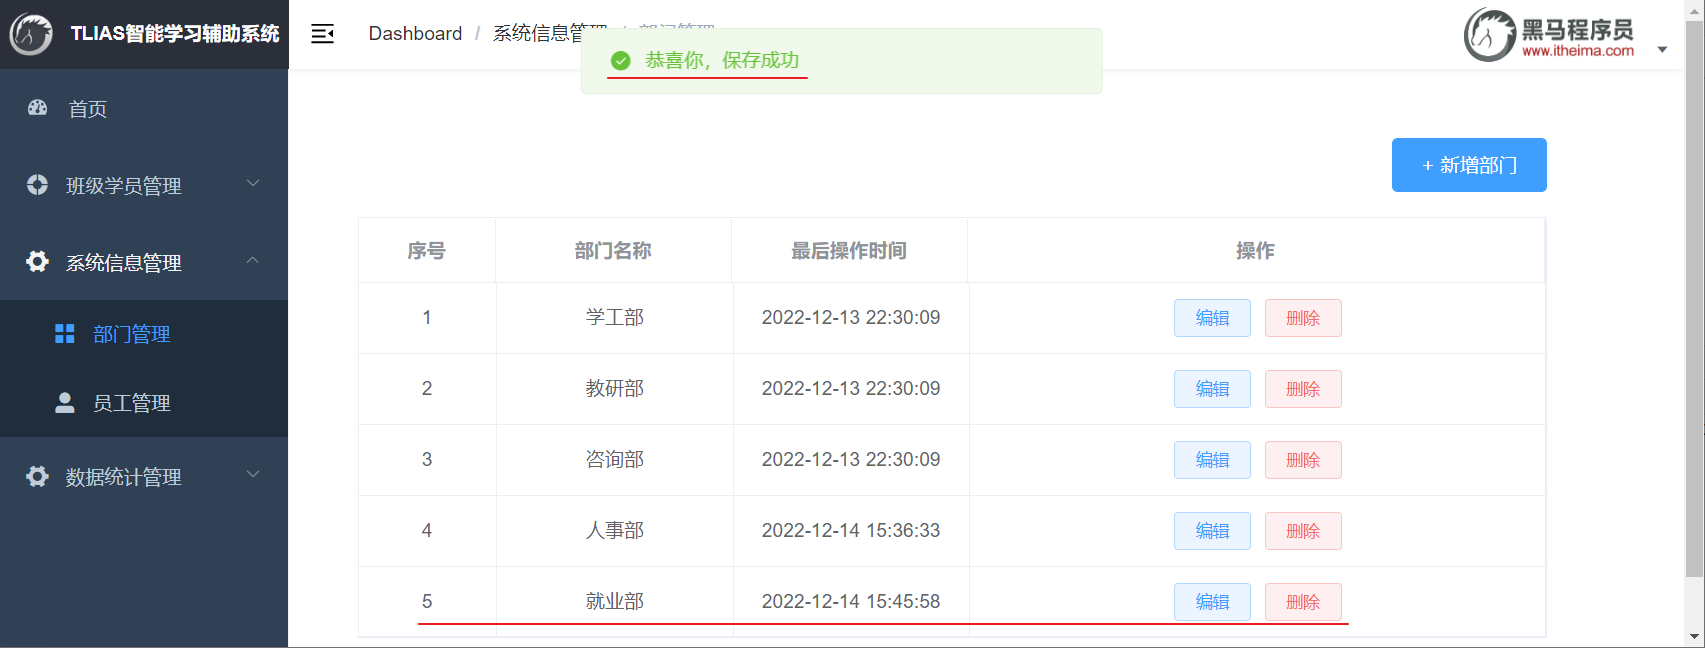
2.4.6 前后端联调
打开浏览器,测试后端功能接口:
2.4.7 请求路径
我们部门管理的查询、删除、新增功能全部完成了,接下来我们要对controller层的代码进行优化。
首先我们先来看下目前controller层代码:
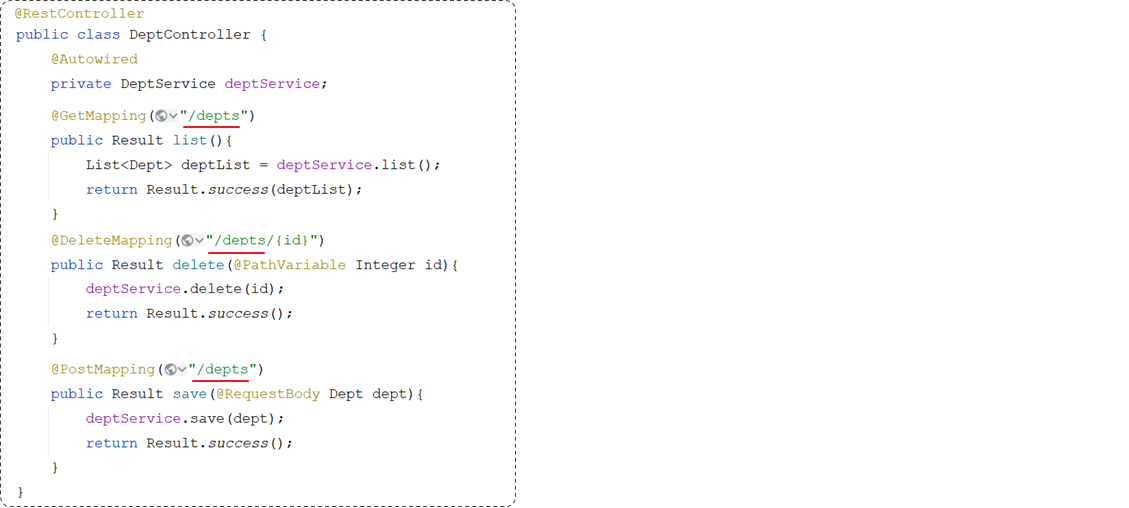
以上三个方法上的请求路径,存在一个共同点:都是以/depts作为开头。(重复了)
在Spring当中为了简化请求路径的定义,可以把公共的请求路径,直接抽取到类上,在类上加一个注解@RequestMapping,并指定请求路径"/depts"。代码参照如下:
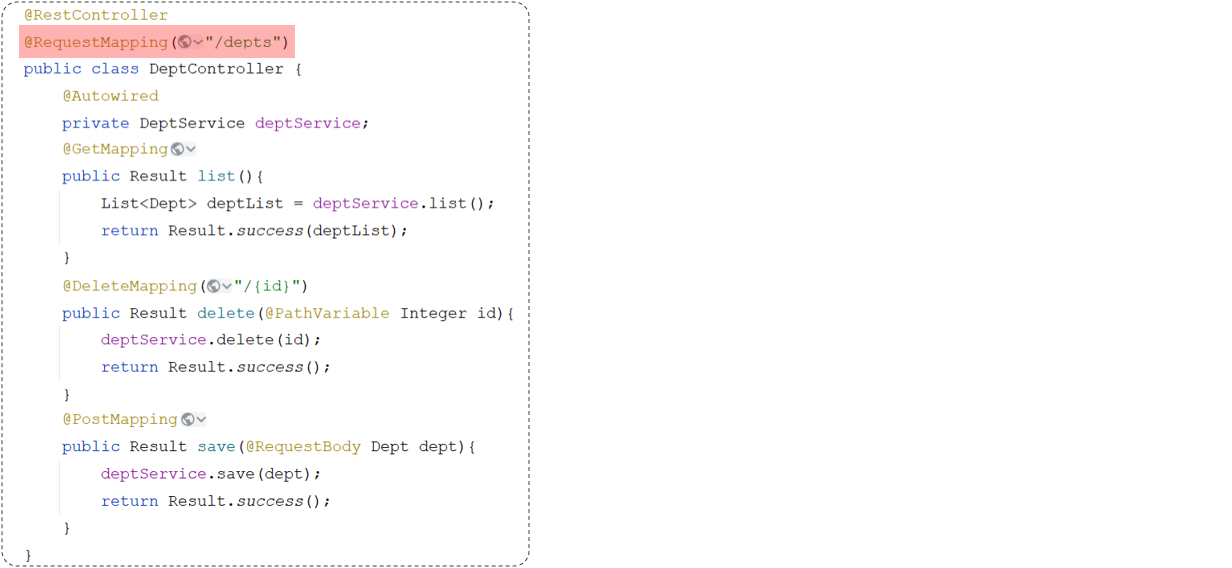
优化前后的对比:
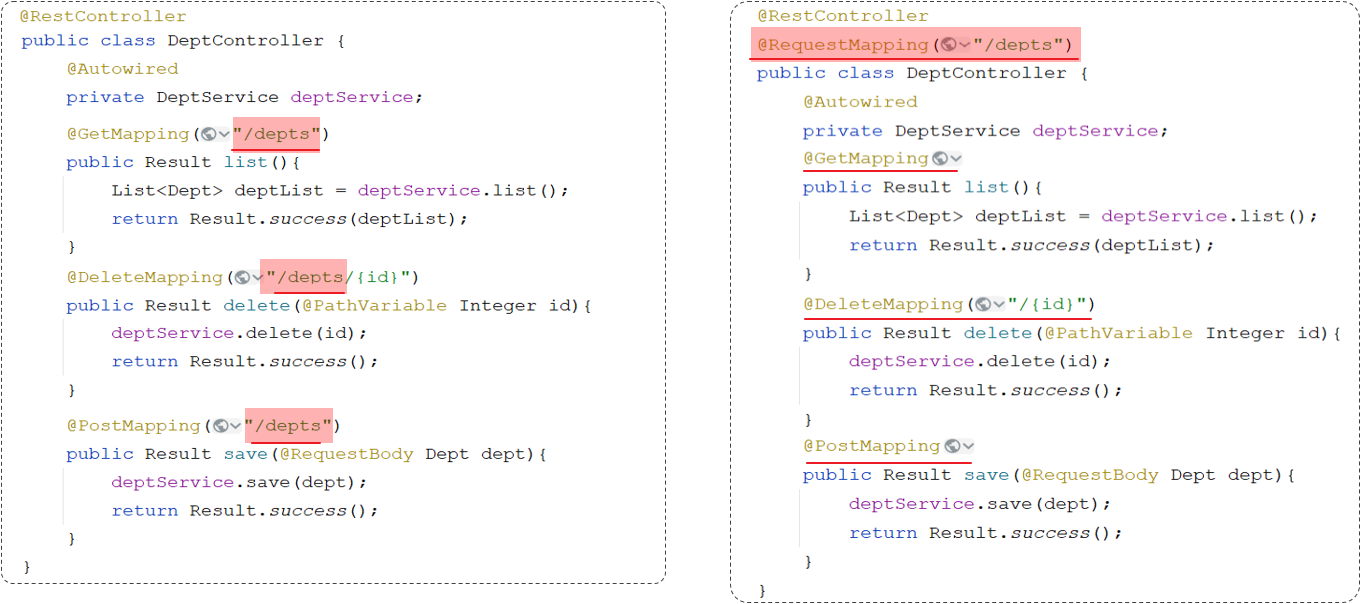
注意事项:一个完整的请求路径,应该是类上@RequestMapping的value属性 + 方法上的 @RequestMapping的value属性