1、硬件对比
屏幕尺寸: 800*480
颜色格式: RGB565
一帧数据: 800*480*2 = 768000 = 750k
LCD 频率 : 32MHz/768000 = 41 HZ
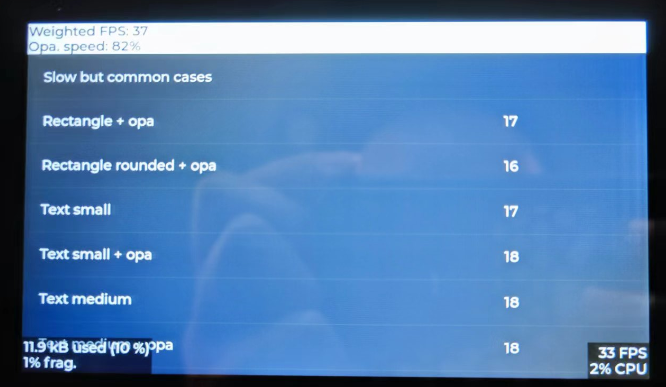
lvgl fps : 33
优化等级: AC5-O3
新硬件:GD32F470II
SDRAM : 32bit带宽 ,120MHz
MCU: 240MHz, 768K RAM, 2M Flash
lv_demo_benchmark()的结果如下:
老硬件:GD32F450zg
SDRAM : 16bit带宽 ,100MHz
MCU: 200MHz, 256K RAM, 1M Flash
lv_demo_benchmark()的结果如下:

而跑我自己的开机动画则是如下情况:

可以看到新版硬件比老版本速度提升了3倍,显然MCU那40MHz并不是主力,大部分是32Bit SDRAM起到的功劳。
这里的结论就是,800*480 的屏至少32Bit SDRAM起步,否则就只能播放下PPT。
驱动方面对帧率的影响也非常大,下面把几个主流的驱动方式贴出来做对比。
2、驱动对比
1、GD32官方驱动
核心就两个函数
 1 void lv_port_disp_init(void)
 2 {
 3     /*-------------------------
 4      * Initialize your display
 5      * -----------------------*/
 6     disp_init();
 7
 8     /*-----------------------------
 9      * Create a buffer for drawing
10      *----------------------------*/
11
12     static lv_disp_buf_t draw_buf_dsc_2;
13     static lv_color_t draw_buf_2_1[COLOR_BUF_SIZE] __attribute__((at(0xC0080000)));
14     static lv_color_t draw_buf_2_2[COLOR_BUF_SIZE] __attribute__((at(0xC0100000)));
15     lv_disp_buf_init(&draw_buf_dsc_2, draw_buf_2_1, draw_buf_2_2, COLOR_BUF_SIZE);   /*Initialize the display buffer*/
16
17     /*-----------------------------------
18      * Register the display in LVGL
19      *----------------------------------*/
20
21     lv_disp_drv_t disp_drv;                         /*Descriptor of a display driver*/
22     lv_disp_drv_init(&disp_drv);                    /*Basic initialization*/
23
24     /*Set up the functions to access to your display*/
25
26     /*Set the resolution of the display*/
27     disp_drv.hor_res = LV_HOR_RES_MAX;
28     disp_drv.ver_res = LV_VER_RES_MAX;
29
30     /*Used to copy the buffer's content to the display*/
31     disp_drv.flush_cb = disp_flush;
32
33     /*Set a display buffer*/
34     disp_drv.buffer = &draw_buf_dsc_2;
35
36     rcu_periph_clock_enable(RCU_IPA);
37
38 #if LV_USE_GPU
39     /*Optionally add functions to access the GPU. (Only in buffered mode, LV_VDB_SIZE != 0)*/
40
41     /*Blend two color array using opacity*/
42     disp_drv.gpu_blend_cb = gpu_blend;
43
44     /*Fill a memory array with a color*/
45     disp_drv.gpu_fill_cb = gpu_fill;
46 #endif
47
48     /*Finally register the driver*/
49     lv_disp_drv_register(&disp_drv);
50
51 #ifdef USE_IPA_INT
52     nvic_irq_enable(IPA_IRQn, 0, 1);
53 #endif
54 }
 1 static void disp_flush(lv_disp_drv_t * disp_drv, const lv_area_t * area, lv_color_t * color_p)
 2 {
 3     /*The most simple case (but also the slowest) to put all pixels to the screen one-by-one*/
 4 #ifndef USE_IPA_INT
 5     uint32_t time_out;
 6 #endif
 7     uint16_t offline;
 8     offline = LV_HOR_RES_MAX - (area->x2 - area->x1 + 1);
 9
10     IPA_CTL = 0x0;
11     IPA_FMADDR = (uint32_t)color_p;
12     IPA_DMADDR = (uint32_t)(uint32_t)LCD_FRAME_BUFFER + 2*(LV_HOR_RES_MAX*area->y1+area->x1);
13     IPA_FLOFF = 0;
14     IPA_DLOFF = offline;
15     IPA_FPCTL = FOREGROUND_PPF_RGB565;
16     IPA_IMS = (uint32_t)((area->x2 - area->x1 + 1) << 16) | (uint16_t)(area->y2 - area->y1 + 1);
17
18 #ifdef USE_IPA_INT
19     g_disp_drv = disp_drv;
20     /* enable IPA interrupt */
21     IPA_CTL |= IPA_CTL_FTFIE | IPA_CTL_TAEIE | IPA_CTL_WCFIE;
22     IPA_CTL |= IPA_CTL_TEN;
23     g_ipa_flag = 1;
24 #else
25     IPA_CTL |= IPA_CTL_TEN;
26     /* Wait until transfer is done */
27     while (IPA_CTL & IPA_CTL_TEN)
28     {
29         if(time_out++ >= 0XFFFFFFFF) break;
30     }
31
32     /* IMPORTANT!!!
33      * Inform the graphics library that you are ready with the flushing*/
34     lv_disp_flush_ready(disp_drv);
35 #endif
36 }
我使用的就是这个代码,达到的效果就是上面看到的
2、2个图层互切
 1 static void DEMO_FlushDisplay(lv_disp_drv_t * disp_drv, const lv_area_t * area, lv_color_t * color_p)
 2 {
 3     if (color_p == buf2_1)
 4     {
 5         tli_layer_disable(LAYER0);
 6         tli_layer_enable(LAYER1);
 7         tli_reload_config(TLI_REQUEST_RELOAD_EN);
 8     }
 9     else if (color_p == buf2_2)
10     {
11         tli_layer_disable(LAYER1);
12         tli_layer_enable(LAYER0);
13         tli_reload_config(TLI_REQUEST_RELOAD_EN);
14     }
15
16     /* IMPORTANT!!!
17      * Inform the graphics library that you are ready with the flushing*/
18     lv_disp_flush_ready(disp_drv);
19 }
这种方式我没有成功,因为设置两个图层后,我的layer1不显示,只有layer0显示,也不知道为什么。而且其速度应该跟3相似,所以也没有特别考究。
3、LCD和LVGL公用双buf
 1 void lv_port_disp_init(void)
 2 {
 3     /*-------------------------
 4      * Initialize your display
 5      * -----------------------*/
 6     disp_init();
 7
 8     /*-----------------------------
 9      * Create a buffer for drawing
10      *----------------------------*/
11     /* Example for 3) also set disp_drv.full_refresh = 1 below*/
12     static lv_disp_draw_buf_t draw_buf_dsc_3;
13     static lv_color_t *buf_3_1 = (lv_color_t * )(LVGL_MemoryAdd);             /*A screen sized buffer*/
14     static lv_color_t *buf_3_2 = (lv_color_t * )(LVGL_MemoryAdd + LCD_Width*LCD_Height*sizeof(lv_color_t));           /*Another screen sized buffer*/
15     lv_disp_draw_buf_init(&draw_buf_dsc_3, buf_3_1, buf_3_2, LCD_Width * LCD_Height);   /*Initialize the display buffer*/
16
17     /*-----------------------------------
18      * Register the display in LVGL
19      *----------------------------------*/
20
21     static lv_disp_drv_t disp_drv;                  /*Descriptor of a display driver*/
22     lv_disp_drv_init(&disp_drv);                    /*Basic initialization*/
23
24     /*Set up the functions to access to your display*/
25
26     /*Set the resolution of the display*/
27     disp_drv.hor_res = LCD_Width;
28     disp_drv.ver_res = LCD_Height;
29
30     /*Used to copy the buffer's content to the display*/
31     disp_drv.flush_cb = disp_flush;
32
33     /*Set a display buffer*/
34     disp_drv.draw_buf = &draw_buf_dsc_3;
35
36     /*Required for Example 3)*/
37     disp_drv.full_refresh = 1; //双缓冲需要打开此设置
38
39
40     /*Finally register the driver*/
41     lv_disp_drv_register(&disp_drv);
42 }
 1 static void disp_flush(lv_disp_drv_t * disp_drv, const lv_area_t * area, lv_color_t * color_p)
 2 {
 3     /*The most simple case (but also the slowest) to put all pixels to the screen one-by-one*/
 4
 5     LTDC_Layer1->CFBAR = (uint32_t)color_p;
 6
 7     /*IMPORTANT!!!
 8     *Inform the graphics library that you are ready with the flushing*/
 9     lv_disp_flush_ready(disp_drv);
10 }
这个方案的重点有两个:
1、LCD使用的显存地址就是LVGL的帧地址,LVGL把乒乓buf中的一个填写好后直接把这个地址交给LCD驱动去往屏幕上刷,少了帧缓冲到显存之间的搬运
2、disp_drv.full_refresh = 1; //双缓冲需要打开此设置,也就是这种刷新方式是全屏刷新,没有局部刷新了。相当于局部虽然刷新一个点,但是disp_flush传进来的也是整帧的地址。(不知道整帧内容是不是也是需要整帧生成)
网友使用的就是这种方式,开启GPU后STM32F429能跑到45FPS
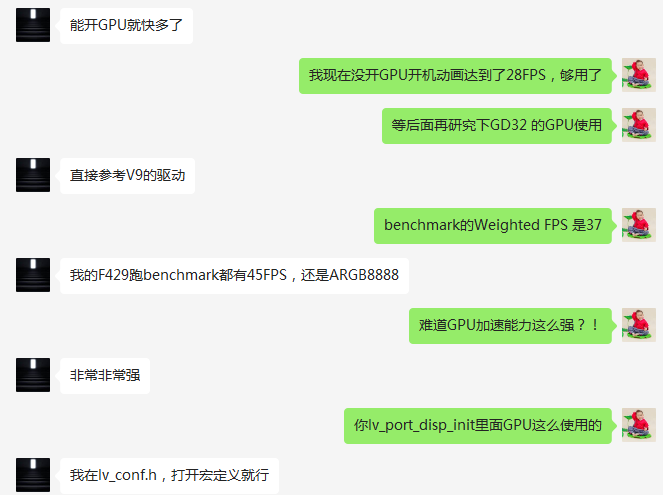
下一步就是研究GD32的GPU使用方法