zynq7010, 基于linux 验证 USB-wifi 功能
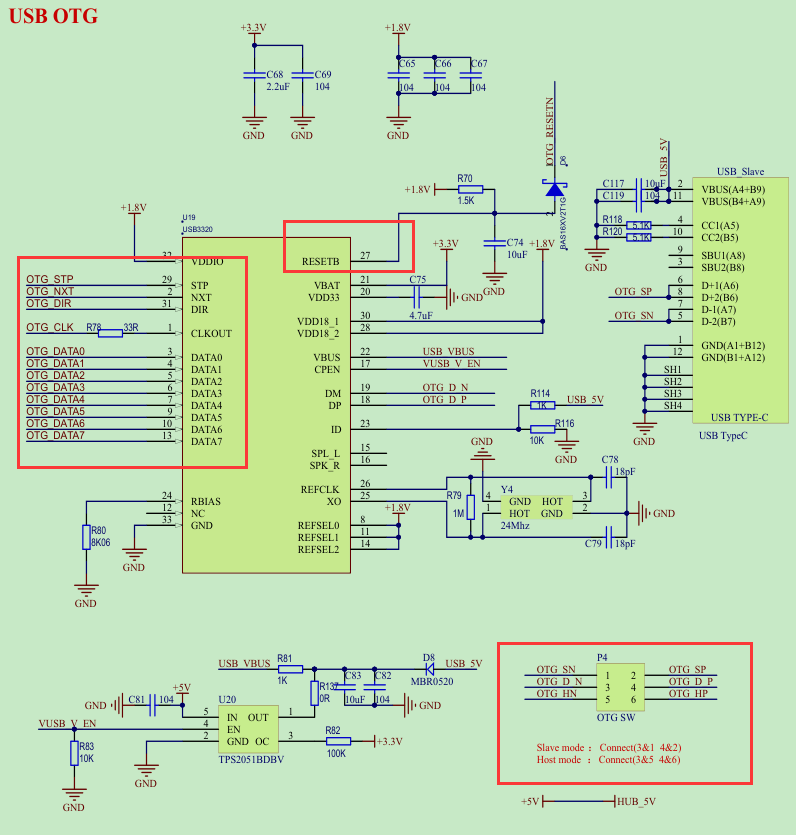
1. 相关电路图, 这里貌似复位键默认上电开启的, 引脚并没有印出来
需要注意的地方
- 注意芯片型号 "USB3320", 这个在linux内核中如果USB配置正确的话是会被打印出来的
usbcore: registered new interface driver usb-storage
chipidea-usb2 e0002000.usb: e0002000.usb supply vbus not found, using dummy regulator
ULPI transceiver vendor/product ID 0x0424/0x0007
Found SMSC USB3320 ULPI transceiver.
ULPI integrity check: passed.
ci_hdrc ci_hdrc.0: doesn't support gadget
ci_hdrc ci_hdrc.0: EHCI Host Controller
ci_hdrc ci_hdrc.0: new USB bus registered, assigned bus number 1
ci_hdrc ci_hdrc.0: USB 2.0 started, EHCI 1.00
hub 1-0:1.0: USB hub found
hub 1-0:1.0: 1 port detected
- 内核日志中凡是关于
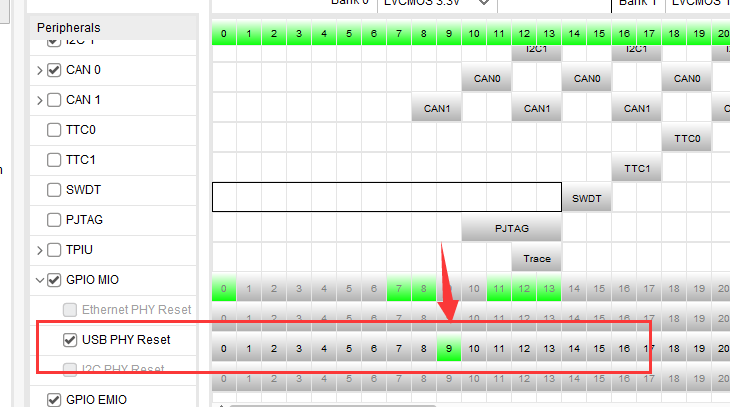
usbcore: registered xxx的都是开始注册了一个相关USB的驱动程序 - 注意芯片复位引脚接法 "OTG_RESETN", 当前是接在 "PSMIO9" 的, 如果芯片没有复位
- 需要注意 "host", "otg", "peripheral"(从设备), 设备树需要设置
dr_mode对应参数,当前使用 "otg", 即可主又可从


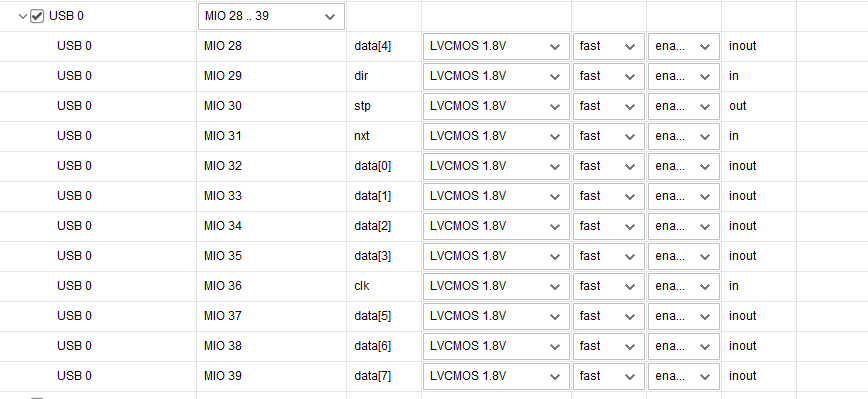
2. 引脚约束了寄存器配置
- 其它引脚约束
- 复位引脚
3. 设备树
	usb_phy0: phy0@e0002000 {
		compatible = "ulpi-phy";
		#phy-cells = <0>;
		reg = <0xe0002000 0x1000>;
		view-port = <0x0170>;
		drv-vbus;
	};
&usb0 {
	status = "okay";
	dr_mode = "otg";
	usb-phy = <&usb_phy0>;
};
完整的设备树
点击查看代码
/*
 * CAUTION: This file is automatically generated by Xilinx.
 * Version: HSI
 * Today is: Thu Dec 15 17:28:45 2022
 */
#define GPIO_ACTIVE_HIGH 0
#define GPIO_ACTIVE_LOW 1

/dts-v1/;
#include "zynq-7000.dtsi"
#include "pl.dtsi"
#include "pcw.dtsi"
#include <dt-bindings/gpio/gpio.h>
#include <dt-bindings/interrupt-controller/irq.h>
#include <dt-bindings/input/input.h>
/ {
	model = "Alientek ZYNQ Development Board";
	chosen {
		bootargs = "console=ttyPS0,115200 earlyprintk root=/dev/mmcblk0p2 rw rootwait";
		stdout-path = "serial0:115200n8";
	};

	aliases {
		ethernet0 = &gem0;
		i2c0 = &i2c0;
		i2c1 = &i2c1;
		i2c2 = &i2c2;
		serial0 = &uart0;
		serial1 = &uart1;
		spi0 = &qspi;
	};
	memory {
		device_type = "memory";
		reg = <0x0 0x20000000>;
	};
    // led {
    //     compatible = "alientek,led";
    //     status = "okay";
    //     default-state = "on";
    //     reg = < 0xE000A040 0x4
    //             0xE000A204 0x4
    //             0xE000A208 0x4
    //             0xE000A214 0x4
    //             0xF800012C 0x4
    //         >;
    // };
	led1 {
		compatible = "test_gpio_led";
		state = "okay";
		label = "ps_led0";
		default-state = "on";
		led-gpio = <&gpio0 7 GPIO_ACTIVE_HIGH>;
	};

	key1 {
		compatible = "test_ps_key1";
		state = "okay";
		lable = "ps_key1";
		key-gpio = <&gpio0 12 GPIO_ACTIVE_LOW>;
		interrupt-parent = <&gpio0>;
		interrupts = <12 IRQ_TYPE_EDGE_BOTH>;  //上升沿和下降沿都有效
	};
	key {
		compatible = "gpio-keys";
		autorepeat; //按键支持连续按

		key@0 {
			label = "GPIO Key DOWN";
			linux,code = <KEY_ENTER>;
			gpios = <&gpio0 11 GPIO_ACTIVE_LOW>;
			debounce-interval = <15>;
		};
	};
	usb_phy0: phy0@e0002000 {
		compatible = "ulpi-phy";
		#phy-cells = <0>;
		reg = <0xe0002000 0x1000>;
		view-port = <0x0170>;
		drv-vbus;
	};
};
// USB HOST 接口工作
// 需要通过两个跳线帽将 P4 端子的 DN 与 HN 相连、DP 与 HP 相连(如图 55.2.1),注意先
// 连接 DN 与 HN。
// USB OTG 接口工作
// 需要通过两个跳线帽将 P4 端子的 DN 与 SN 相连、DP 与 SP 相连,注意先连接 DN 与 SN。
// 我们依次来看一下这两部分的硬件原理图。
// Documentation/devicetree/bindings/usb/generic.txt
// Documentation/devicetree/bindings/usb/ci-hdrc-usb2.txt
&usb0 {
	status = "okay";
	dr_mode = "otg";
	usb-phy = <&usb_phy0>;
};

&i2c0 {								//这里引用了 i2c0 的地址 0xe0004000
	clock-frequency = <100000>; 	//i2c 通信速率 100KHz

	rtc@51 {
		compatible = "zynq-pcf8563";
		reg = <0x51>;
	};
};

&gem0 {
	local-mac-address = [00 0a 35 00 1e 53];
};

&qspi {
	#address-cells = <1>;
	#size-cells = <0>;
	flash0: flash@0 {
		compatible = "n25q512a","micron,m25p80";
		reg = <0x0>;
		#address-cells = <1>;
		#size-cells = <1>;
		spi-max-frequency = <50000000>;
		partition@0x00000000 {
			label = "boot";
			reg = <0x00000000 0x00500000>;
		};
		partition@0x00500000 {
			label = "bootenv";
			reg = <0x00500000 0x00020000>;
		};
		partition@0x00520000 {
			label = "kernel";
			reg = <0x00520000 0x00a80000>;
		};
		partition@0x00fa0000 {
			label = "spare";
			reg = <0x00fa0000 0x00000000>;
		};
	};
};
4. 内核驱动配置
官方文档 https://xilinx-wiki.atlassian.net/wiki/spaces/A/pages/18842272/Zynq+Linux+USB+Device+Driver
Device Drivers
USB support
    <*> ChipIdea Highspeed Dual Role Controller
    <*> ChipIdea device controller
    <*> USB Gadget Support
          <M> USB Gadget Drivers
          <M> USB functions configurable through configfs
          [*] Mass storage
- 需要注意的点, 在选择
USB Gadget Support, 如果选择 M, 则ChipIdea Highspeed Dual Role Controller也会编程 M, 然后 M 是编译不到内核镜像 zImage 中的. 所以开机之后, 会发现 lsusb 检测不到设备 - 如何查看设备树是否配置正确, 在系统启动之后
- 查看
/sys/bus/platform/devices目录中是否存在e0002000.phy0 - 查看
/sys/bus/platform/drivers目录中 是否有ulpi-phy, 且ulpi-phy目录中是否存在对应的驱动e0002000.phy0
- 查看
root@ALIENTEK-ZYNQ:/sys/bus/platform/drivers# ls
Xilinx Watchdog      imx_usb              snd-soc-dummy        xilinx-cresample     xilinx_axienet
alarmtimer           leds-gpio            soc-audio            xilinx-drm           xilinx_can
armv7-pmu            macb                 sram                 xilinx-drm-dp        xilinx_emaclite
axi-i2s              msm_hsusb            synopsys-edac        xilinx-drm-dp-sub    xilinx_spi
axi-spdif            of-flash             syscon               xilinx-frmbuf        xlnx_pr_decoupler
basic-mmio-gpio      of_fixed_clk         tegra-udc            xilinx-gpio          xuartps
cdns-i2c             of_fixed_factor_clk  uio_pdrv_genirq      xilinx-pcie          zevio_usb
cdns-spi             physmap-flash        ulpi-phy             xilinx-remapper      zynq-gpio
cdns-wdt             pl35x-nand           usbmisc_imx          xilinx-rgb2yuv       zynq-ocm
chipidea-usb2        pl35x-smc            vexpress-osc         xilinx-scaler        zynq-pinctrl
ci_hdrc              pwrseq_emmc          vexpress-reset       xilinx-switch        zynq-qspi
cpuidle-zynq         pwrseq_simple        vexpress-syscfg      xilinx-tpg           zynq_fpga_manager
fpga-region          reg-dummy            vexpress-sysreg      xilinx-trafgen
gpio-clk             reg-fixed-voltage    xadc                 xilinx-vdma
gpio-keys            reset_zynq           xilinx-axipmon       xilinx-video
gpio-keys-polled     sdhci-arasan         xilinx-cfa           xilinx-vtc
root@ALIENTEK-ZYNQ:/sys/bus/platform/drivers# ls ulpi-phy/
bind           e0002000.phy0  uevent         unbind
5. 验证 USB 接口
- 内核日志有打印
usbcore: registered new interface driver usb-storage
chipidea-usb2 e0002000.usb: e0002000.usb supply vbus not found, using dummy regulator
ULPI transceiver vendor/product ID 0x0424/0x0007
Found SMSC USB3320 ULPI transceiver.
ULPI integrity check: passed.
ci_hdrc ci_hdrc.0: doesn't support gadget
ci_hdrc ci_hdrc.0: EHCI Host Controller
ci_hdrc ci_hdrc.0: new USB bus registered, assigned bus number 1
ci_hdrc ci_hdrc.0: USB 2.0 started, EHCI 1.00
hub 1-0:1.0: USB hub found
hub 1-0:1.0: 1 port detected
- lsusb能检测到设备
root@ALIENTEK-ZYNQ:/sys/bus/platform/devices# lsusb
Bus 001 Device 001: ID 1d6b:0002
Bus 001 Device 002: ID 05e3:0608
- 插上键盘, USB等设备有检测的打印信息
usb 1-1.4: new low-speed USB device number 3 using ci_hdrc
input: Logitech USB Optical Mouse as /devices/soc0/amba/e0002000.usb/ci_hdrc.0/usb1/1-1/1-1.4/1-1.4:1.0/0003:046D:C077.0001/input/input1
hid-generic 0003:046D:C077.0001: input: USB HID v1.11 Mouse [Logitech USB Optical Mouse] on usb-ci_hdrc.0-1.4/input0
- 插上鼠标键盘, 在输入监听设备当中会多出
/dev/input/event*, 然后使用hexdump /dev/input/event*, 这个时候移动鼠标和键盘会有对应的打印信息
这里需要配置USB鼠标键盘驱动:
Device Drivers --->
   HID support  --->
      USB HID support --->
	     <*> USB HID transport layer
- 如果是其他的驱动,, 比如wifi, 就得自行加载对应的驱动才是
6. USB-wifi 驱动, wifi芯片 RTL8188EU
6.1 镜像驱动配置
[*] Networking support --->
  -*- Wireless --->
    <*> cfg80211 - wireless configuration API
    [*] cfg80211 wireless extensions compatibility
    <*> Generic IEEE 802.11 Networking Stack (mac80211)

Device Drivers --->
  [*] Staging drivers --->  //选中
     <M> Realtek RTL8188EU Wireless LAN NIC driver  //将 RTL8188EU 驱动编译为模块
     [*] Realtek RTL8188EU AP mode   //自动选中
- 使用 make zImage 制作镜像
- 使用 make modules 生成驱动文件
r8188eu.ko - 以下是 .config USB相关所有的配置
CONFIG_USB_NET_DRIVERS=y
CONFIG_SND_USB=y
CONFIG_USB_HID=y
CONFIG_USB_OHCI_LITTLE_ENDIAN=y
CONFIG_USB_SUPPORT=y
CONFIG_USB_COMMON=y
CONFIG_USB_ARCH_HAS_HCD=y
CONFIG_USB=y
CONFIG_USB_PCI=y
CONFIG_USB_DEFAULT_PERSIST=y
CONFIG_USB_EHCI_HCD=y
CONFIG_USB_EHCI_ROOT_HUB_TT=y
CONFIG_USB_EHCI_PCI=y
CONFIG_USB_STORAGE=y
CONFIG_USB_CHIPIDEA=y
CONFIG_USB_CHIPIDEA_OF=y
CONFIG_USB_CHIPIDEA_PCI=y
CONFIG_USB_CHIPIDEA_UDC=y
CONFIG_USB_CHIPIDEA_HOST=y
CONFIG_USB_PHY=y
CONFIG_NOP_USB_XCEIV=y
CONFIG_USB_ULPI=y
CONFIG_USB_ULPI_VIEWPORT=y
CONFIG_USB_GADGET=y
CONFIG_USB_GADGET_VBUS_DRAW=2
CONFIG_USB_GADGET_STORAGE_NUM_BUFFERS=2
CONFIG_USB_GADGET_XILINX=y
CONFIG_USB_LIBCOMPOSITE=m
CONFIG_USB_F_SS_LB=m
CONFIG_USB_F_MASS_STORAGE=m
CONFIG_USB_CONFIGFS=m
CONFIG_USB_CONFIGFS_MASS_STORAGE=y
CONFIG_USB_ZERO=m
CONFIG_USB_ULPI_BUS=y
- 系统启动之后, 加载驱动文件, 然后插上 usb-wifi 模块打印信息
root@ALIENTEK-ZYNQ:~# insmod r8188eu.ko
r8188eu: module is from the staging directory, the quality is unknown, you have been warned.
usbcore: registered new interface driver r8188eu
root@ALIENTEK-ZYNQ:~# usb 1-1.4: new high-speed USB device number 3 using ci_hdrc
Chip Version Info: CHIP_8188E_Normal_Chip_TSMC_UNKNOWN_CUT(10)_1T1R_RomVer(0)
- 然后使用
ifconfig -a, 能查看到多了个wlan0网络
6.2 wpa_supplicant 配置
- petalinux-config -c rootfs
Filesystem Packages --->
  network --->
    wpa-supplicant --->
      [*] wpa-supplicant	//选中
- petalinux-build -c rootfs 编译
- sudo tar -xvf images/linux/rootfs.tar.gz -C $
6.1 RTL8188EU 固件
- 下载: https://git.kernel.org/pub/scm/linux/kernel/git/firmware/linux-firmware.git/
- 然后解压, 将文件
linux-firmware- 20200721\rtlwifi\rtl8188eufw.bin拷贝到目录/lib/firmware/rtlwifi, 目录不存在可以手动创建
6.3 wireless tools 工具移植
wireless tools 工具包含:
- iwconfig: 设置无线网络相关参数
- iwlist: 扫描, 列出频率, 比特率, 密钥等, 获取 wifi热点
- iwspy: 获取每个节点链接的质量
- iwpriv: 操作 WirelessExtensions 特定驱动
- ifrename: 基于各种静态标准命名接口
工具移植
-
工具下载: https://hewlettpackard.github.io/wireless-tools/wireless_tools.29.tar.gz
-
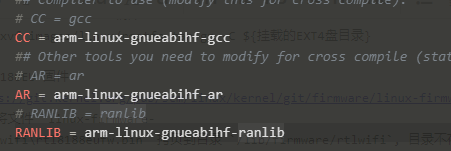
关于 gcc, ar, 以及 ranlib 工具都属于GUN编译的工具, 其中ar和 ranlib属于静态编译的工具
-
解压后进入目录, 并修改 Makefile, 修改其中编译工具, 并使用 make 编译
-
将文件 iwlist, iwconfig, iwspy, iwpriv, ifrename 拷贝到开发板中
/usr/bin, 将 libiw.so.29 拷贝到开发板/usr/lib

-
然后输入
iwlist查看工具是否移植成功
root@ALIENTEK-ZYNQ:/usr/lib# iwlist
Usage: iwlist [interface] scanning [essid NNN] [last]
              [interface] frequency
              [interface] channel
              [interface] bitrate
              [interface] rate
              [interface] encryption
              [interface] keys
              [interface] power
              [interface] txpower
              [interface] retry
              [interface] ap
              [interface] accesspoints
              [interface] peers
              [interface] event
              [interface] auth
              [interface] wpakeys
              [interface] genie
              [interface] modulation
6.4 wifi 联网测试
ifconfig -a查看是否有wlan0ifconfig wlan0 up打开设备iwlist wlan0 scan扫描 wifi, 包含wifi的MAC,ESSID(wifi名称),频率, 速率, 信号质量等- 修改文件
/etc/wpa_supplicant.conf, 将需要连接的wifi名称和密码写进入, 这里对格式要求比较严格,缩进用空格,等号两边没有空格
ctrl_interface=/var/run/wpa_supplicant
ap_scan=1
network={
        ssid="icpc203"
        psk="shenhuashi0401"
}
wpa_supplicant -D wext -c /etc/wpa_supplicant.conf -i wlan0 &连接iwconfig wlan0查看无线连接状态ifconifg wlan0 192.168.1.100, 设置网络, 并ping下其它的ip 查看网络的连通性
root@ALIENTEK-ZYNQ:~# iwconfig wlan0
wlan0     IEEE 802.11bgn  ESSID:"icpc203"  Nickname:"<WIFI@REALTEK>"
          Mode:Managed  Frequency:2.412 GHz  Access Point: A4:1A:3A:64:50:6B
          Bit Rate:150 Mb/s   Sensitivity:0/0
          Retry:off   RTS thr:off   Fragment thr:off
          Encryption key:****-****-****-****-****-****-****-****   Security mode:open
          Power Management:off
          Link Quality=100/100  Signal level=100/100  Noise level=0/100
          Rx invalid nwid:0  Rx invalid crypt:0  Rx invalid frag:0
          Tx excessive retries:0  Invalid misc:0   Missed beacon:0
udhcpc -i wlan0自动获取IP地址, 并 "ping www.baidu.com" 查看网络的连通性
root@ALIENTEK-ZYNQ:~# udhcpc -i wlan0
udhcpc (v1.24.1) started
Sending discover...
Sending select for 192.168.1.18...
Sending select for 192.168.1.18...
Lease of 192.168.1.18 obtained, lease time 172800
/etc/udhcpc.d/50default: Adding DNS 192.168.1.1
6.5 汇总, 可以编写脚本自启动
insmod r8188eu.ko
ifconfig wlan0 up
wpa_supplicant -D wext -c /etc/wpa_supplicant.conf -i wlan0 &
udhcpc -i wlan0
ping www.baidu.com