1. libcamera and libcamera-apps工具简介
- I. libcamera 是一款用来支持用户基于Linux 操作系统控制复杂相机的应用程序,用户可以通过libcamera直接操作树莓派芯片集成的GPU模块。
- II. libcamera 开放了基于C++语言的应用程序接口用于配置相机并从相机获取图像的功能API,同时libcamera管理的图像缓冲buffer能够直接输入到图像编码器或者直接输出到显示模块中。
- III. libcamera-app 是基于libcamera完成的相机控制例程,其代码设计主要是模拟基于博通专有GPU代码的传统堆栈的功能,具体提供的功能如下:
- libcamera-hello: 输出从相机中获取的预览图像功能
- libcamera-jpeg: 通过相机获取高分辨率的JPEG图像
- libcamera-still: 一个功能类似于raspistill的相机视频获取程序
- libcamera-vid: 视频捕获程序
- libcamera-raw: 直接从相机中获取未压缩的原始RAW图像程序
- libcamera-detect: 这个程序默认是不编译的,如果用户在树莓派上安装了TensorFlow Lite软件则可以使用此程序进行目标检测图像捕获。
- IV. libcamera工具基于树莓派提供的图像pipeline处理流程,能够完成ISP图像预处理功能,所有的功能均在树莓派的ARM核心下完成,包括的功能如下:
- AEC/AGC (Auto Exposure/Gain Control)
- AWB (Auto White Balance)
- ALSC (Auto Lens Shading Correction)
- V. libcamera能够支持的相机:OV5647 ,IMX219 ,IMX477 ,IMX708 ,IMX290, IMX327, OV9281, IMX378
- VI. Raspberry支持了用户可编辑的 IQ Tunning File,从而能够让用户进行图像预处理ISP功能的调试优化,具体参考 官方 Tuning Guide for the Raspberry Pi cameras and libcamera,树莓派相机Tuning实战。
2. libcamera 使用测试
I. libcamera-hello 一般功能测试
libcamera-hello # 获取相机设备并展示5s的实时视频
libcamera-hello -t 0 # 一直获取相机设备并展示,永不停止(使用Ctrl+C终止)
libcamera-hello --tuning-file /usr/share/libcamera/ipa/raspberrypi/imx219_noir.json -t 0 # 使用imx219无红外滤波片模组的tuning文件进行ISP预处理
libcamera-hello --info-text "red gain %rg, blue gain %bg, Lens Focus %focus" # 直接获取Camera当前红色通道以及蓝色通道的增益信息,相机镜头焦距(仅支持HQ Camera)
libcamera-hello --roi 0.25,0.25,0.5,0.5 # --roi Select a crop (region of interest) from the camera <x,y,w,h> 设置ROI起点和宽度&高度
libcamera-still --hdr -o hdr.jpg # 开启相机的HDR模式
- 相机信息的查看 Tips:
--info-textDirective Substitution %frame The sequence number of the frame %fps The instantaneous frame rate %exp The shutter speed used to capture the image, in microseconds %ag The analogue gain applied to the image in the sensor %dg The digital gain applied to the image by the ISP %rg The gain applied to the red component of each pixel %bg The gain applied to the blue component of each pixel %focus The focus metric for the image, where a larger value implies a sharper image %lp The current lens position in dioptres (1 / distance in metres). %afstate The autofocus algorithm state (one of idle, scanning, focused or failed).
II. libcamera-jpeg 图像采集测试
libcamera-jpeg -o test.jpg # 获取一张全分辨率的JPG图片
libcamera-jpeg -o test.jpg -t 2000 --width 640 --height 480 # 预览2000ms后在拍照,拍摄VGA照片分辨率为 640*480
libcamera-jpeg -o test.jpg -t 2000 --shutter 20000 --gain 1.5 # 预览2000ms后在拍照,拍摄曝光快门参数为 20ms,增益为1.5x(需要注意的是,当增益在CMOS模拟增益范围内时,该参数控制的是模拟增益,当增益超出模拟增益最大值时,启用数字增益)
libcamera-jpeg --ev -0.5 -o darker.jpg # 配置AEC/AGC 算法参数控制曝光补偿,能够通过设置该参数使得图片明暗变化
libcamera-jpeg --ev 0 -o normal.jpg
libcamera-jpeg --ev 0.5 -o brighter.jpg
- 关于数字增益Tips:
- 数字增益实际上是ISP(image Signal Processor)的功能,而不是Sensor本身的功能,数字增益一般都为1除非以下特殊情况
- 使用
--gain参数项配置的增益值超出了Sensor自身能够提供的模拟增益最大值的情况,数字增益ISP提供超出部分的增益功能 - 色彩增益也是数字增益的功能之一,对除了绿色通道以外的其他两个通道 RB 通道进行 \(1 / min(red_{gain}, blue_{gain})\) 增益,从而归一化色彩信息
- 当 AEC/AGC 参数发生变化时,数字增益将会发生变化以保证波动的平滑
III. libcamera-still 图像获取测试
libcamera-still -o test.jpg # 获取一张全分辨率jpg图像
libcamera-still -e png -o test.png # 编码功能:输出PNG格式图片 -e ~ --encoding,如果未设定图片输出格式,将按照文件名称自动确认
libcamera-still -e bmp -o test.bmp # 编码功能:输出bmp格式图片
libcamera-still -e rgb -o test.data # 二进制数据直接输出功能:输出rgb RAW图
libcamera-still -e yuv420 -o test.data # 二进制数据直接输出功能:输出 yuv420 RAW图
# RAW图可以被保存为jpg,dng格式,而其存储格式为 DNG(Adobe Digital Negative) 格式,能够兼容多种软件: dcraw or RawTherapee
libcamera-still -r -o test.jpg # Raw Image Capture 相机原始RAW图像捕获输出 libcamera-still --raw -o test.jpg
libcamera-still -o long_exposure.jpg --shutter 100000000 --gain 1 --awbgains 1,1 --immediate # 100s超长时间曝光,在使用超长时曝光功能之前,需要停止使能 AEC/AGC 和 AWB 的功能,这是由于这两个功能将会强制等待若干帧图像数据
- DNG file Tips:
- DNG文件信息中包括了图像捕获过程中的原始信息,包括了黑点平数据,白平衡信息,CCM颜色矫正矩阵信息等ISP需要使用的参数,这样将大大方便后期人员手动进行RAW图处理流程的实施
- 使用
exiftool工具读取 DNG 文件中的原始数据信息如下:
File Name                       : test.dng
Directory                       : .
File Size                       : 24 MB
File Modification Date/Time     : 2021:08:17 16:36:18+01:00
File Access Date/Time           : 2021:08:17 16:36:18+01:00
File Inode Change Date/Time     : 2021:08:17 16:36:18+01:00
File Permissions                : rw-r--r--
File Type                       : DNG
File Type Extension             : dng
MIME Type                       : image/x-adobe-dng
Exif Byte Order                 : Little-endian (Intel, II)
Make                            : Raspberry Pi
Camera Model Name               : /base/soc/i2c0mux/i2c@1/imx477@1a
Orientation                     : Horizontal (normal)
Software                        : libcamera-still
Subfile Type                    : Full-resolution Image
Image Width                     : 4056
Image Height                    : 3040
Bits Per Sample                 : 16
Compression                     : Uncompressed
Photometric Interpretation      : Color Filter Array
Samples Per Pixel               : 1
Planar Configuration            : Chunky
CFA Repeat Pattern Dim          : 2 2
CFA Pattern 2                   : 2 1 1 0
Black Level Repeat Dim          : 2 2
Black Level                     : 256 256 256 256
White Level                     : 4095
DNG Version                     : 1.1.0.0
DNG Backward Version            : 1.0.0.0
Unique Camera Model             : /base/soc/i2c0mux/i2c@1/imx477@1a
Color Matrix 1                  : 0.8545269369 -0.2382823821 -0.09044229197 -0.1890484985 1.063961506 0.1062747385 -0.01334283455 0.1440163847 0.2593136724
As Shot Neutral                 : 0.4754476844 1 0.413686484
Calibration Illuminant 1        : D65
Strip Offsets                   : 0
Strip Byte Counts               : 0
Exposure Time                   : 1/20
ISO                             : 400
CFA Pattern                     : [Blue,Green][Green,Red]
Image Size                      : 4056x3040
Megapixels                      : 12.3
Shutter Speed                   : 1/20
IV. libcamera-vid 视频功能测试
- 基本功能测试
libcamera-vid -t 10000 -o test.h264 # 保存10s的h264格式视频,在不指定格式的情况下,vid默认保存格式也为 h264,该保存的视频可以使用 vlc来播放 vlc test.h264 # 播放视频 libcamera-vid -o test.h264 --save-pts timestamps.txt # 输出当前视频对应的 timestamps 时间间隔文件 mkvmerge -o test.mkv --timecodes 0:timestamps.txt test.h264 # 使用 mkvmerge 工具,通过 timestamps 文件和原始视频转码为其他格式视频数据 libcamera-vid -t 10000 --codec mjpeg -o test.mjpeg # 视频录制的保存格式设置功能 mjpeg 格式 libcamera-vid -t 10000 --codec yuv420 -o test.data # 视频录制的保存格式设置功能 yuv420 格式 libcamera-vid -t 10000 --codec mjpeg --segment 1 -o test%05d.jpeg # 录制 mjpeg 格式的视频,并将该视频按照 1ms 的格式分割为图片保存 - 网络流功能测试
# UDP 方式 libcamera-vid -t 0 --inline -o udp://<ip-addr>:<port> # Server视频流服务端,ip-addr:port 为客户端IP地址:端口号 vlc udp://@:<port> :demux=h264 # 客户端获取Server端视频流数据 # TCP 方式,30FPS条件下延时较低,树莓派将等待客户端的链接,然后才启动视频流服务 libcamera-vid -t 0 --inline --listen -o tcp://0.0.0.0:<port> # Server视频流服务端,ip-addr:port 为客户端IP地址:端口号 vlc tcp/h264://<ip-addr-of-server>:<port> # 客户端获取Server端视频流数据 # RTSP 网络广播视频流方式 libcamera-vid -t 0 --inline -o - | cvlc stream:///dev/stdin --sout '#rtp{sdp=rtsp://:8554/stream1}' :demux=h264 # Server视频流服务端 vlc rtsp://<ip-addr-of-server>:8554/stream1 # 客户端获取Server端视频流数据 - 高帧率获取图像
- 需要配置 H.264 的功能版本为
--level 4.2 - ISP软件色彩去噪功能需要关闭,提高CPU能力
--denoise cdn_off - 对于超出100FPS的应用需求,需要
-n选项关闭CPU一些辅助的不必要的资源消耗,从而减少丢帧的情况 - 需要在
/boot/config.txt文件中设置force_turbo=1功能,保证CPU主频不被限制 - 配置ISP处理的图像像素尺寸小于等于
--width 1280 --height 720 - 通过
/boot/config.txt文件中配置GPU超频功能gpu_freq=550 - 1280x720 120fps 视频编码命令样例:
libcamera-vid --level 4.2 --framerate 120 --width 1280 --height 720 --save-pts timestamp.pts -o video.264 -t 10000 --denoise cdn_off -n
- 需要配置 H.264 的功能版本为
V. libcamera-raw RAW图功能测试
libcamera-raw -t 2000 -o test.raw # 保存原始的RAW图像到当前目录下,保存过程中不会展示预览视频窗口,运行指令打印了当前保存RAW图像的像素尺寸和Bayer的格式,从而方便用户解析RAW数据
libcamera-raw -t 2000 --segment 1 -o test%05d.raw # 2s时间的图像切片1ms保存一张,在存储条件好的条件下, 例如SSD存储器时,能够在12MP的高清图像以10FPS保存下来
libcamera-raw -t 5000 --width 4056 --height 3040 -o test.raw --framerate 8 # 配置图像保存时间,图像像素宽度&高度,保存的帧率
3. Post-Processing 图像数据流处理
post-processing 作为一种后处理框架,能够有效地从Camera中获取的数据输送到用户定制化的 图像处理/神经网络 算法流程当中,而具体完成算法的流程及算法当中涉及到的参数都通过 JSON 文件进行了传递,用户可以脱离图像处理算法本身,从而更为便捷地完成图像处理的功能。
a) 将图像进行色彩亮度翻转功能
libcamera-hello --post-process-file /path/to/negate.json # 其中negate.json为图像色彩翻转算法的JSON文件
使用的 JSON 文件内容,由于色彩翻转算法不需要任何的处理参数,所以仅仅需要 negate 即可。
{
    "negate":
    {
    }
}
b)HDR 高动态功能
HDR算法中包括了HDR (high dynamic range) imaging 和 DRC (dynamic range compression)两种算法,HDR 法实际上是基于多帧图像的 DRC 算法。
算法的基本流程如下:
- 通过边缘保持的平滑滤波器(edge-preserving smoothing filter)获得一个低通图像(LP).
- 将原始图像与低通图像进行差值获得高通图像(HP).
- 使用全局色调图除了低通图像数据 LP,并将处理后的结果加在HP数据上,从而保证最终的图像保留了显著的特征
HDR模块控制的参数如下表所示:
使用命令
libcamera-still -o test.jpg --post-process-file drc.json
上述处理流程在树莓派4上运行的时间大约为4s@12MP,
{
    "hdr" :
    {
	"num_frames" : 1,
	"lp_filter_strength" : 0.2,
	"lp_filter_threshold" : [ 0, 10.0 , 2048, 205.0, 4095, 205.0 ],
	"global_tonemap_points" :
	[
	    { "q": 0.1, "width": 0.05, "target": 0.15, "max_up": 1.5, "max_down": 0.7 },
	    { "q": 0.5, "width": 0.05, "target": 0.5, "max_up": 1.5, "max_down": 0.7 },
	    { "q": 0.8, "width": 0.05, "target": 0.8, "max_up": 1.5, "max_down": 0.7 }
	],
	"global_tonemap_strength" : 1.0,
	"local_pos_strength" : [ 0, 6.0, 1024, 2.0, 4095, 2.0 ],
	"local_neg_strength" : [ 0, 4.0, 1024, 1.5, 4095, 1.5 ],
	"local_tonemap_strength" : 1.0,
	"local_colour_scale" : 0.9
    }
}
c) 复合的多流程 post-processing 功能
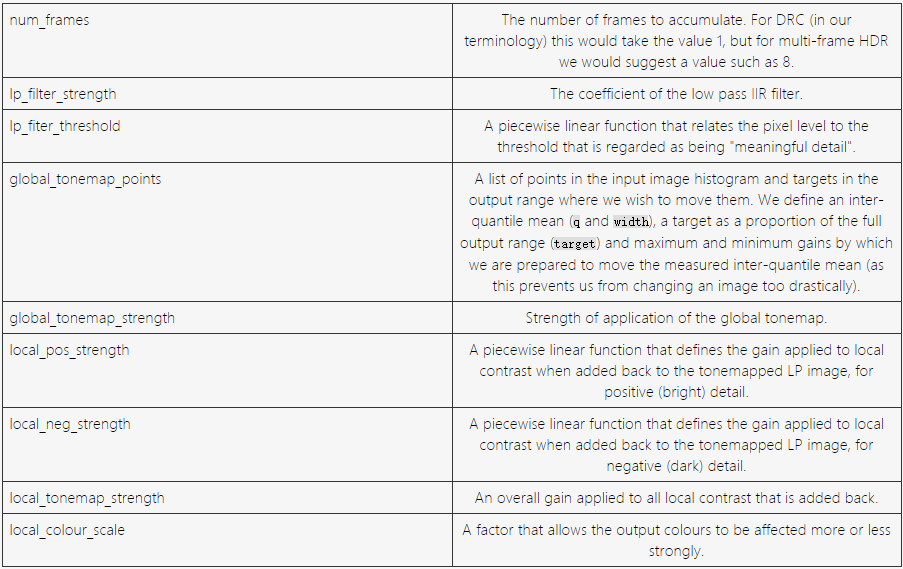
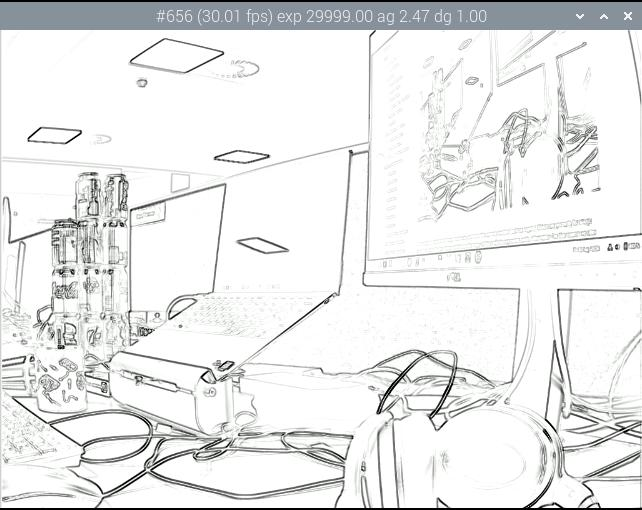
libcamera-hello --post-process-file /path/to/multiple.json # 其中multiple.json为图像Sobel边缘提取 + 色彩翻转算法的JSON文件
multiple.json文件中包括了第一位置的 Sobel 边缘检测算子,其算子的核矩阵大小为 5x5,然后第二步进行了 图像色彩翻转功能
{
    "sobel_cv":
    {
        "ksize": 5
    },
    "negate":
    {
    }
}
d) Opencv Post-Processing
-
sobel_cv
{
	"sobel_cv":
	{
		"ksize": 5
	}
}
-
face_detect_cv
{
	"face_detect_cv":
	{
		"cascade_name" : "/usr/local/share/OpenCV/haarcascades/haarcascade_frontalface_alt.xml",
		"scaling_factor" : 1.1,
		"min_neighbors" : 2,
		"min_size" : 32,
		"max_size" : 256,
		"refresh_rate" : 1,
		"draw_features" : 1
	}
}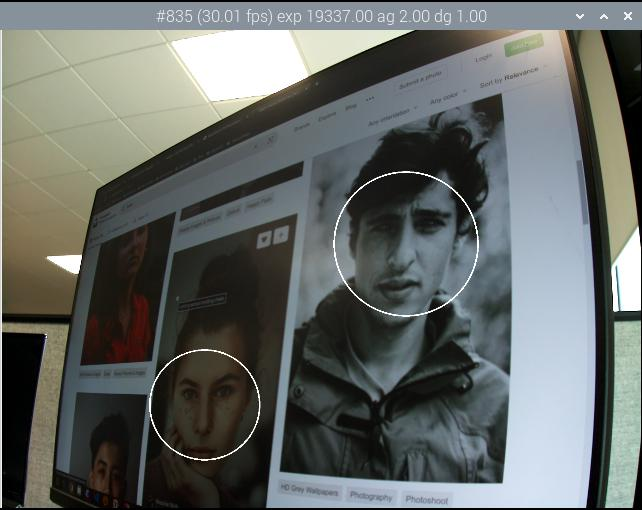
-
annotate_cv
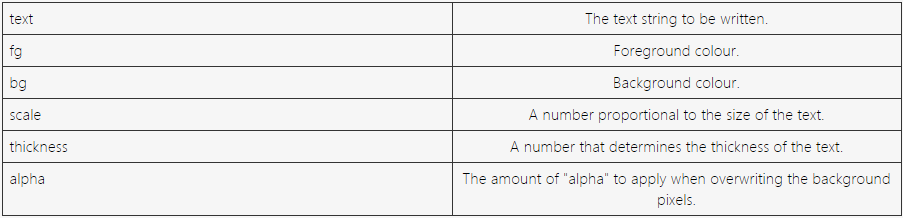
{
	"annotate_cv" :
	{
	"text" : "Frame %frame exp %exp ag %ag dg %dg",
	"fg" : 255,
	"bg" : 0,
	"scale" : 1.0,
	"thickness" : 2,
	"alpha" : 0.3
	}
}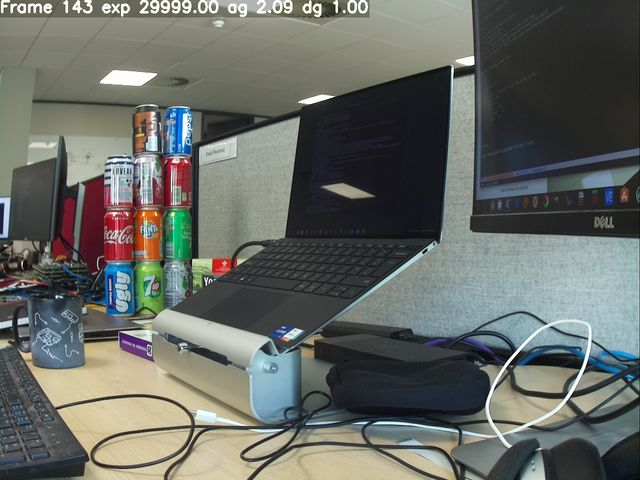
e) Tensorflow Lite Post-Processing
在使用树莓派平台的TensorFlow Lite功能之前,需要对libcamera进行重新编译以使能该功能,下面距离介绍基于TenlsorFlow的中间神经网络处理流程。
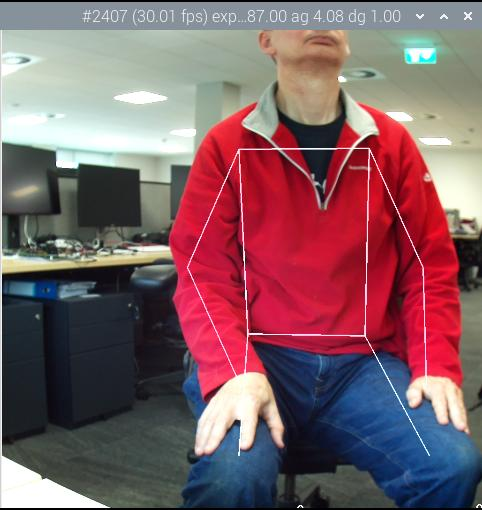
- pose_estimation_tf
姿态估计识别框架,使用了 Google MobileNet v1 modelposenet_mobilenet_v1_100_257x257_multi_kpt_stripped.tflite下载
基本命令:{ "pose_estimation_tf": { "refresh_rate" : 5, "model_file" : "posenet_mobilenet_v1_100_257x257_multi_kpt_stripped.tflite" }, "plot_pose_cv" : { "confidence_threshold" : -0.5 } }libcamera-hello --post-process-file pose_estimation_tf.json --lores-width 258 --lores-height 258
运行结果:
其他图像中间处理算法 JSON 参考: CVAlgJSONExample.json