一、 基本概念
1.1 Django说明
-
Django发布于2005年, 网络框架, 用Python编写的开源的Web应用框架。
-
采用了MVC框架模式,也称为MTV模式。
-
官网: https://www.djangoproject.com
1.2 MVC框架
- Model: 封装和数据库相关的业务逻辑
- View: 视图, 用来呈现数据
- Controller: 控制器,接收用户输入,调用View的输出,协调流程的运转
- 特点: 解耦, 降低模块之间的耦合性, 方便变更, 容易重构。
1.3 MTV框架
- Model: 模型,封装 数据库相关的业务逻辑
- Template: 模板, html, 相当于 MVC中View的职责
- Views: 视图函数, 相当于MVC中的Controller, 用来协调
- urls: Django中的分发器, 一般称为url路由; 将一个URL页面的请求分发给不同的View进行处理,View再调用相应的Model和Template

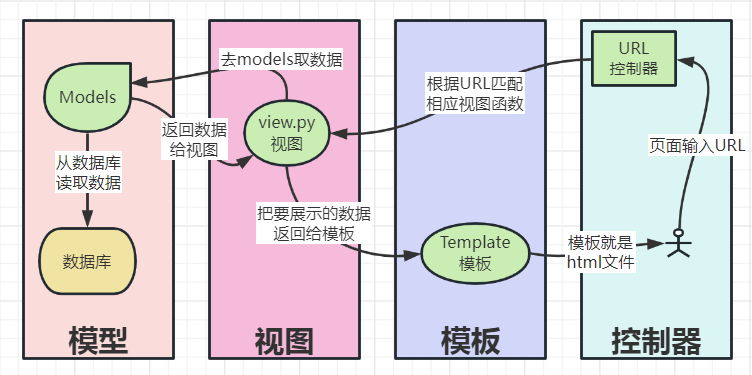
1.4 请求流程
- 请求到urls分发器
- urls分发器 根据路由规则(正则)分发到views
- views 调用Model, 交互数据
- views 将数据渲染到 模板中
- 模板呈现给用户
二、 Django 项目初始化
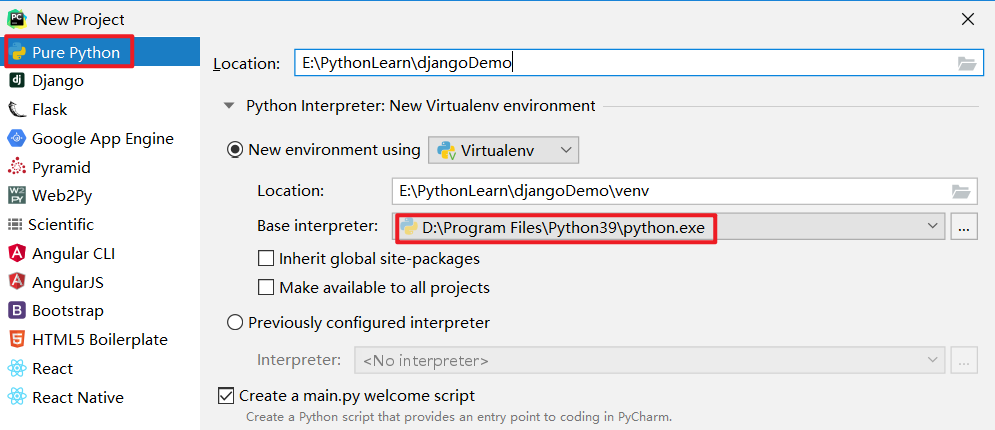
2.1 创建工程: 纯Python工程(Pure Python)
2.2 安装Django=2.1.5
(venv) E:\PythonLearn\djangoDemo>pip install django==2.0.1
Looking in indexes: https://pypi.doubanio.com/simple
2.3 创建Django 项目
# django-admin 必须在安装了Django的环境中使用
(venv) E:\PythonLearn\djangoDemo>django-admin --help
Type 'django-admin help <subcommand>' for help on a specific subcommand.

# django-admin 命令 创建Django项目
(venv) E:\PythonLearn\djangoDemo>django-admin startproject helloDjango
修改 Django项目 目录为源码目录

2.4 创建Django项目的 应用APP
在一个Django项目中,可以有很多的app应用(模块), 创建好的app 需要手动注册到主工程中(settings.py)
# 进入到工程目录下创建应用,不然应用目录在命令执行的路径下
(venv) E:\PythonLearn\djangoDemo>cd helloDjango

# 通过django-admin 创建app应用
(venv) E:\PythonLearn\djangoDemo\helloDjango>django-admin startapp mainapp
(venv) E:\PythonLearn\djangoDemo\helloDjango>django-admin startapp orderapp
Django项目的目录结构

三、实现应用
3.1 第一个应用页面
3.1.1 配置 helloDjango/helloDjango/settings.py
# 当前 WEB 服务绑定的IP,*代表任意IP
ALLOWED_HOSTS = ['*']

INSTALLED_APPS = [
    'django.contrib.admin',
    'django.contrib.auth',
    'django.contrib.contenttypes',
    'django.contrib.sessions',
    'django.contrib.messages',
    'django.contrib.staticfiles',
    'mainapp',    # 注册app
    'orderapp'    # 注册app
]
3.1.2 编写 helloDjango/helloDjango/urls.py
from django.urls import path
from django.http import HttpRequest, HttpResponse

# 视图函数
def index(request: HttpRequest):
    return HttpResponse('<h1 style="color:green;">Hi Django!</h1>'.encode('utf-8'))

urlpatterns = [
    path('admin/', admin.site.urls),
    path('index/', index)              # 新增路由
]
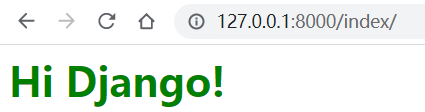
3.1.3 启动应用
(venv) E:\PythonLearn\djangoDemo\helloDjango>python manage.py runserver
Performing system checks...

System check identified no issues (0 silenced).

You have 14 unapplied migration(s). Your project may not work properly until you apply the migrations for app
(s): admin, auth, contenttypes, sessions.
Run 'python manage.py migrate' to apply them.
April 01, 2023 - 18:34:46
Django version 2.0.1, using settings 'helloDjango.settings'
Starting development server at http://127.0.0.1:8000/
Quit the server with CTRL-BREAK.

[01/Apr/2023 18:39:19] "GET /index HTTP/1.1" 301 0
[01/Apr/2023 18:39:19] "GET /index/ HTTP/1.1" 200 40
3.2 Client与Server交互
- 请求与响应: request请求对象、response响应对象
- urls分发: 方式一: urlpatterns 添加路由子项; 方式二:在模块的urls.py中添加路由
- views视图函数: def index(request): 必须包含一个request请求参数; 必须要有一个response对象
3.3 Django请求参数request
3.3.1 请求参数 request 包含的信息
- 请求头headers(method, path, path_info,get_full_path() )
- request.get_full_path()
- request.path()
- request.method()
3.3.2 字典结构请求信息
- request.COOKIES: Cookies信息
- request.GET: 查询参数
- request.POST: 表单参数
3.3.3 请求体body(字节类型)
    print("Request_getFullPath: ", request.get_full_path())
    print("Request_Path: ", request.path)
    print("Request_Method: ", request.method)
    print("Request_Cookies: ", request.COOKIES)
    print("Request_GET: ", request.GET)
    print("Request_POST: ", request.POST)
    print("Request_Body: ", request.body)

# 请求 /index/ 结果:
Request_getFullPath:  /index/
Request_Path:  /index/
Request_Method:  GET
Request_Cookies:  {'csrftoken': 'g6nM2bj7OlaZgNHxzZk2f5G9uDwvr4WMpZg7cdpgIOl4sDEebJ2sHe2uHC4oAWOJ'}
Request_GET:  <QueryDict: {}>
Request_POST:  <QueryDict: {}>
Request_Body:  b''
3.4 基于模板实现应用
3.4.1 创建视图函数index
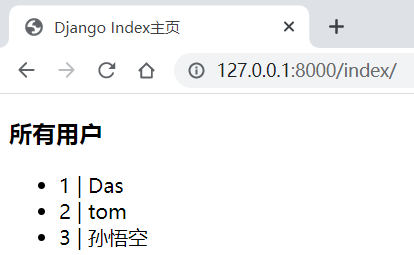
users = [
    {'id': 1, 'name': 'Das'}, {'id': 2, 'name': 'tom'}, {'id': 3, 'name': '孙悟空'}
]

def index(request: HttpRequest):
    # 将数据渲染到模板中,并将渲染之后的html 返回给客户端
    return render(request=request, template_name='index.html', context={'users': users, 'msg': '所有用户'})
3.4.2 创建模板目录和文件: djangoDemo/templates 和 djangoDemo/templates/index.html
模板文件index.html:
<!DOCTYPE html>
<html lang="en">
<head>
    <meta charset="UTF-8">
    <title>Django Index主页</title>
</head>
<body>
    <h3>{{ msg }}</h3>
    <ul>
        {% for user in users %}
            <li>{{ user.id }} | {{ user.name }}</li>
        {% endfor %}
    </ul>
</body>
</html>
3.4.3 修改配置文件settings.py, 添加templates目录
TEMPLATES = [
    {
        'BACKEND': 'django.template.backends.django.DjangoTemplates',
        'DIRS': [
            os.path.join(BASE_DIR, 'templates')  # 设置template文件的目录
        ],
        'APP_DIRS': True,
        ......
]
3.4.4 访问结果
3.5 基于应用模块(mainapp)
3.5.1 编写 djangoDemo/helloDjango/mainapp/urls.py
from django.urls import path
from mainapp.views import user_list, user_list2

urlpatterns = [
    path('user', user_list),
    path('user2', user_list2)
]
3.5.2 创建模板文件 djangoDemo/helloDjango/templates/user/list.html; 文件内容参考index.html
3.5.3 编写 djangoDemo/helloDjango/mainapp/views.py
from django.shortcuts import render
from django.http import HttpRequest
# Create your views here.
def user_list(request: HttpRequest):
data = [
{'id': 101, 'name': '宋江', 'age': 47}, {'id': 102, 'name': '晁盖', 'age': 43}, {'id': 103, 'name': '武松', 'age': 39}
]
return render(request, 'user/list.html', {'users': data, 'msg': '水浒人物'})
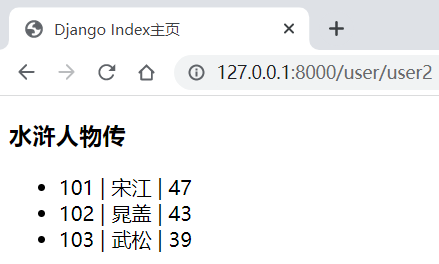
def user_list2(request: HttpRequest):
users = [
{'id': 101, 'name': '宋江', 'age': 47}, {'id': 102, 'name': '晁盖', 'age': 43}, {'id': 103, 'name': '武松', 'age': 39}
]
msg = '水浒人物传'
return render(request, 'user/list.html', locals())
3.5.4 编写 djangoDemo/helloDjango/urls.py
from django.urls import path, include

urlpatterns = [
    path('admin/', admin.site.urls),
    path('index/', index),
    # 配置子路由;  include() 导入mainapp模块下urls.py中声明的所有子路由
    path('user/', include('mainapp.urls'))
]

四、 Django默认数据库:SQLite3
4.1 默认数据库配置
DATABASES = {
    'default': {
        'ENGINE': 'django.db.backends.sqlite3',
        'NAME': os.path.join(BASE_DIR, 'db.sqlite3'),
    }
}
4.2 测试SQLite3
# coding: utf-8
import sqlite3

# sqlite3是一个微型数据库,主要用于浏览器、手机、平板、智能设备的应用
# 支持标准的sql语句,没有特定的数据类型;可以根据开发语法的特性或逻辑来限制字段类型
# 自动创建文件 demo.sqlite3
conn = sqlite3.connect('demo.sqlite3')

cursor = conn.cursor()
cursor.execute('''CREATE TABLE user(id Integer PRIMARY KEY, name, age, phone)''')
cursor.execute('''INSERT INTO user(name, age, phone) values('Tom', 20, '19280809897')''')
cursor.execute('''INSERT INTO user(name, age, phone) values('Jack', 18, '19200009897')''')

cursor.execute('SELECT * FROM user')
for row in cursor.fetchall():
    print(row)

conn.commit()
输出结果:
(1, 'Tom', 20, '19280809897')
(2, 'Jack', 18, '19200009897')