Sentinel 是阿里的一款微服务请求监控组件,能够通过配置实现流量控制,降级熔断,热点参数限流,授权规则限流,使用非常方便。官方默认只提供了流量控制配置规则持久化代码实现,这也是我们最常用的,上篇博客已经实现并进行了部署。
本篇博客基于上篇博客搭建好的 Sentinel 和 Nacos 环境,介绍 Spring Cloud 如何集成和使用 Sentinel 监控微服务的 http 请求资源和 Feign 请求资源。对于 Sentinel 的监控界面配置非常简单,这里不详细介绍,只介绍总结个别容易出错的细节。
Sentinel 官网地址:https://sentinelguard.io/zh-cn/index.html
一、集成 Sentinel
首先我们先列出父工程的 pom 文件详情,主要是引入 Spring Cloud 依赖和各微服务公共使用的依赖:
<?xml version="1.0" encoding="UTF-8"?>
<project xmlns="http://maven.apache.org/POM/4.0.0"
         xmlns:xsi="http://www.w3.org/2001/XMLSchema-instance"
         xsi:schemaLocation="http://maven.apache.org/POM/4.0.0
         http://maven.apache.org/xsd/maven-4.0.0.xsd">
    <modelVersion>4.0.0</modelVersion>

    <groupId>com.jobs</groupId>
    <artifactId>springcloud_sentinel</artifactId>
    <packaging>pom</packaging>
    <version>1.0</version>
    <modules>
        <module>feign_client</module>
        <module>provider_app</module>
        <module>consumer_app</module>
    </modules>

    <properties>
        <maven.compiler.source>8</maven.compiler.source>
        <maven.compiler.target>8</maven.compiler.target>
    </properties>

    <parent>
        <groupId>org.springframework.boot</groupId>
        <artifactId>spring-boot-starter-parent</artifactId>
        <version>2.3.12.RELEASE</version>
    </parent>

    <dependencyManagement>
        <dependencies>
            <!-- 引入 springCloud 依赖-->
            <dependency>
                <groupId>org.springframework.cloud</groupId>
                <artifactId>spring-cloud-dependencies</artifactId>
                <version>Hoxton.SR10</version>
                <type>pom</type>
                <scope>import</scope>
            </dependency>
            <!--引入 springCloud alibaba 依赖-->
            <dependency>
                <groupId>com.alibaba.cloud</groupId>
                <artifactId>spring-cloud-alibaba-dependencies</artifactId>
                <version>2.2.9.RELEASE</version>
                <type>pom</type>
                <scope>import</scope>
            </dependency>
        </dependencies>
    </dependencyManagement>
    <dependencies>
        <dependency>
            <groupId>org.projectlombok</groupId>
            <artifactId>lombok</artifactId>
        </dependency>
    </dependencies>
</project>
对于各个微服务,我们需要引入 spring-cloud-starter-alibaba-sentinel 依赖:
<!--引入 nacos 依赖-->
<dependency>
    <groupId>com.alibaba.cloud</groupId>
    <artifactId>spring-cloud-starter-alibaba-nacos-discovery</artifactId>
</dependency>
<!--引入 sentinel 依赖包-->
<dependency>
    <groupId>com.alibaba.cloud</groupId>
    <artifactId>spring-cloud-starter-alibaba-sentinel</artifactId>
</dependency>
微服务的 application.yml 中需要配置 Sentinel Dashboard 的连接信息:
spring:
  cloud:
    sentinel:
      transport:
        dashboard: 192.168.136.128:8080
默认情况下,Sentinel 只监控 http 接口,也就是 Controller 提供的接口,因此访问任意接口后,就可以在 Sentinel Dashboard 界面中看到请求的资源路径,然后就可以通过其右侧的按钮,添加流控、熔断、热点、授权等限流规则,但是这些规则设置好后,都是存储在相应微服务的内存中的,微服务如果重启,所设置的规则就会丢失。
如果想要对非 Controller 接口进行监控和限流的话,比如 Service 类中的方法,则需要使用 @SentinelResource 注解,比如在 consumer-app 中对 CostService 中的 getSingleCost 方法使用 Sentinel 进行监控并可以设置限流规则,代码如下:
package com.jobs.service;

import com.alibaba.csp.sentinel.annotation.SentinelResource;
import com.jobs.client.EmployeeClient;
import com.jobs.pojo.Cost;
import com.jobs.pojo.Employee;
import lombok.extern.slf4j.Slf4j;
import org.springframework.beans.factory.annotation.Autowired;
import org.springframework.stereotype.Service;

import java.util.Random;

@Slf4j
@Service
public class CostService {

    //注入 feign 接口
    @Autowired
    private EmployeeClient employeeClient;

    //Sentinel 默认只监控 Controller 对外提供的 http 接口
    //如果想要监控类方法,需要使用 @SentinelResource 注解
    @SentinelResource("SingleCost")
    public Cost getSingleCost(Integer id) {
        Cost cost = new Cost();
        cost.setId(id);

        String[] arr = {"打车费", "团建费", "交通费", "招待费", "电话费", "住宿费"};
        Random rd = new Random();
        int index = rd.nextInt(6);
        cost.setCategory(arr[index]);
        cost.setMoney(rd.nextInt(500));

        Employee emp = employeeClient.getEmployeeById(id);
        cost.setEmployee(emp);

        log.info("返回的报销费用信息:" + cost);
        return cost;
    }
}
二、将流控规则持久化到 Nacos
上篇博客已经通过修改官方提供的源代码,使 Sentinel 具备了将流控规则持久化到 Nacos 的条件,这样所设置的流控规则就不会随着微服务和 Nacos 的重启而丢失。要想实现这种效果,微服务的 application.yml 中还需要配置流控规则的 Nacos 连接信息:
spring:
  cloud:
    sentinel:
      datasource:
        flow:
          nacos:
            server-addr: 192.168.136.128:8848
            dataId: consumer-app-flow-rules
            groupId: sentinel-group
            rule-type: flow
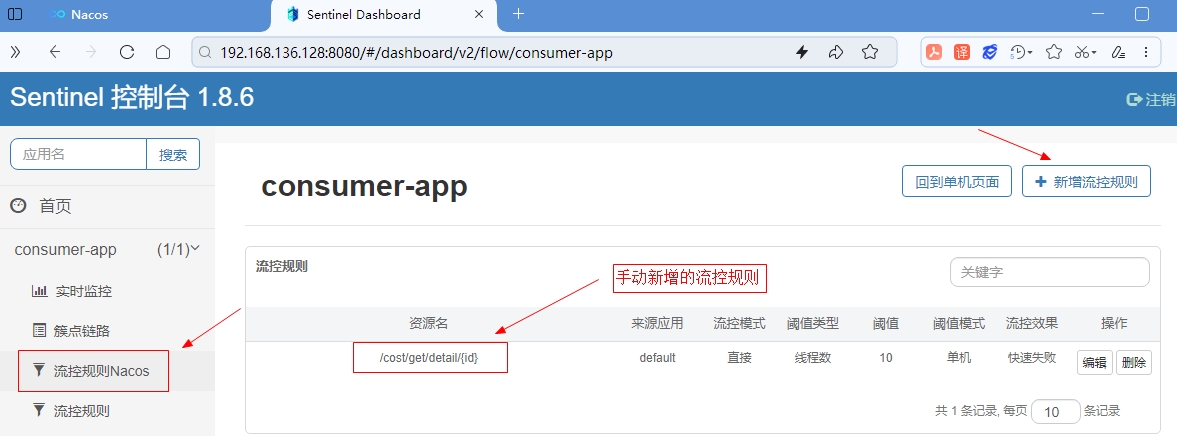
然后我们在【流控规则Nacos】菜单上进行配置流控规则,才能持久化到 Nacos 中。该菜单有一个缺点:那就是不能自动展示出用户请求的资源,我们只能从【簇点链路】中找到我们需要限制的请求资源路径,复制一下添加到【流控规则Nacos】中。
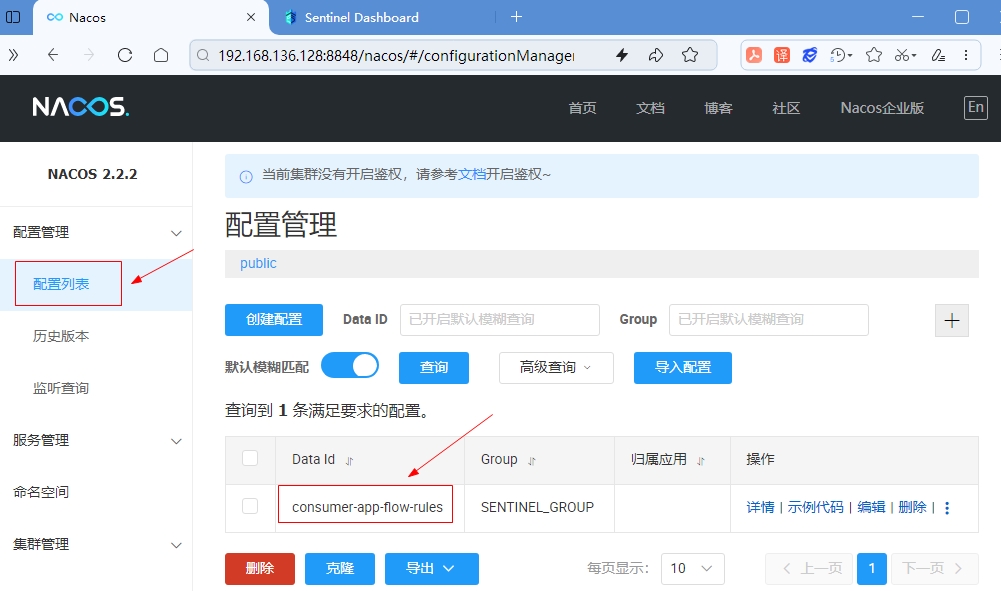
此时在 Nacos 的配置列表中,就能够找到我们配置的流控规则,如下图所示,其内容是 Json 数据
三、链路模式支持
配置流控规则时,流控模式设置中,有一种模式是链路模式,其实现效果就是只针对从指定链路访问到具体某种资源的请求做统计,判断是否超过阈值,如果超过阈值,就阻止请求访问。对于 Sentinel 来说默认会给进入微服务的所有请求设置同一个 root 资源,会导致链路模式失效,因此必须在微服务中通过配置关闭对请求资源路径的整合才行,在 application.yml 中进行如下配置即可
spring:
  cloud:
    sentinel:
      # Sentinel 默认会对资源请求链路进行整合,这样会导致流控模式中的链路模式无法使用
      # 因此需要关闭 context 整合,这样 sentinel 监控界面会单独展示出每种链路请求路径
      web-context-unify: false
四、开启 Feign 对 Sentinel 的支持
对于 SpringCloud 来说,绝大部分情况下微服务之间的调用是通过 Feign 进行的,Sentinel 默认情况下不会监控 Feign 的调用请求,要想启动则必须在微服务的 application.yml 中进行如下配置:
feign:
  sentinel:
    enabled: true
微服务之间的调用,难免会因为各种原因导致调用失败,使用 Feign 的好处在于可以为 Feign 的每个调用接口设置失败处理方法,也就是服务降级处理方案,一般采用实现 FallbackFactory 接口的实现方案,因为该方案能够对远程调用的异常做处理。
以 consumer-app 为例,其需要通过 feign 调用 provider-app 的接口,为 feign 接口提供降级方法的具体步骤为:
首先编写一个实现 FallbackFactory 的自定义类,代码如下:
package com.jobs.client.fallback;

import com.jobs.client.EmployeeClient;
import com.jobs.pojo.Employee;
import feign.hystrix.FallbackFactory;
import lombok.extern.slf4j.Slf4j;

@Slf4j
public class EmployeeClientFallback implements FallbackFactory<EmployeeClient> {

    @Override
    public EmployeeClient create(Throwable cause) {
        //由于 feign 都是调用远程接口的,很有可能会因为某种原因调用失败。
        //这里实现 EmployeeClient 中的每个方法,调用远程接口失败时的默认返回结果
        return new EmployeeClient() {
            @Override
            public Employee getEmployeeById(Integer id) {
                log.error("远程接口调用失败:根据 id 获取员工信息");
                //这里实例化一个默认的员工实例并返回
                Employee employee =
                        new Employee().setId(0).setName("未知员工").setDepart("未知部门");
                return employee;
            }
        };
    }
}
然后将该类的实例注册为 Bean
package com.jobs.client.config;

import com.jobs.client.fallback.EmployeeClientFallback;
import feign.RequestInterceptor;
import org.springframework.context.annotation.Bean;
import org.springframework.context.annotation.Configuration;

@Configuration
public class FeignConfig {

    //将 feign 接口的 FallbackFactory 实例注册到 Spring 容器
    @Bean
    public EmployeeClientFallback getEmployeeClientFallback() {
        return new EmployeeClientFallback();
    }
}
最后在 Feign 接口上面的 @FeignClient 注解中,设置 fallbackFactory 属性即可
package com.jobs.client;

import com.jobs.client.config.FeignConfig;
import com.jobs.client.fallback.EmployeeClientFallback;
import com.jobs.pojo.Employee;
import org.springframework.cloud.openfeign.FeignClient;
import org.springframework.web.bind.annotation.GetMapping;
import org.springframework.web.bind.annotation.PathVariable;

//指定【服务提供者】的【服务名称】
@FeignClient(value = "provider-app", fallbackFactory = EmployeeClientFallback.class)
public interface EmployeeClient {

    @GetMapping("/emp/get/data/{id}")
    Employee getEmployeeById(@PathVariable("id") Integer id);
}
五、授权规则的使用
授权规则可以对调用方的来源做控制,有白名单和黑名单两种方式。
-
白名单:来源(origin)在白名单内的调用者允许访问
-
黑名单:来源(origin)在黑名单内的调用者不允许访问

这里重点要说的是【流控应用】如何进行设置,比如设置白名单,只允许 Feign 调用接口,不需要浏览器调用接口,这里的流控应用该如何填写呢?其实填写的并不是应用的名称,而是我们自定义的值。比如我们在 Feign 请求时,让其携带一个 Header,Header 的名称是 ReqSource,值是 feignRequest,这里的 feignRequest 就是我们自定义的值,具体实现如下:
首先我们在自定义的 FeignConfig 类中,拦截 Feign 的所有请求,为其增加 Header
package com.jobs.client.config;

import com.jobs.client.fallback.EmployeeClientFallback;
import feign.RequestInterceptor;
import org.springframework.context.annotation.Bean;
import org.springframework.context.annotation.Configuration;

@Configuration
public class FeignConfig {

    //拦截 feign 的请求,为其增加一个 header
    @Bean
    public RequestInterceptor getRequestInterceptor() {
        return requestTemplate -> {
            requestTemplate.header("ReqSource", "feignRequest");
        };
    }
}
然后在 Feign 接口上的 @FeignClient 注解上,配置 configuration 属性即可
//指定【服务提供者】的【服务名称】
@FeignClient(value = "provider-app", configuration = FeignConfig.class)
public interface EmployeeClient {

    @GetMapping("/emp/get/data/{id}")
    Employee getEmployeeById(@PathVariable("id") Integer id);
}
最后在 provider-app 中编写一个自定义类,实现 RequestOriginParser 接口:
package com.jobs.config;

import com.alibaba.cloud.commons.lang.StringUtils;
import com.alibaba.csp.sentinel.adapter.spring.webmvc.callback.RequestOriginParser;
import org.springframework.stereotype.Component;

import javax.servlet.http.HttpServletRequest;

//用于 sentinel 监控获取自定义的 header ,从而判断请求来源。
//这样就可以在授权规则中,通过请求来源进行限制
@Component
public class HeadSourceParse implements RequestOriginParser {

    @Override
    public String parseOrigin(HttpServletRequest httpServletRequest) {

        //我们在 FeignConfig 中配置 feign 客户都调用接口时会携带 ReqSource 头
        //因此 feign 请求 provider-app 的接口时,会携带 ReqSource 头,且值为 feignRequest
        //如果是浏览器请求 provider-app 的接口时,则不会携带 ReqSource 头,我们这里设置其值为 null
        //此时可以通过 sentinel 设置授权规则,比如设置来源应用为 feignRequest
        //此时只允许 feign 调用 provider-app 的接口,浏览器则无法访问。
        String source = httpServletRequest.getHeader("ReqSource");
        if (StringUtils.isEmpty(source)) {
            source = "null";
        }
        return source;
    }
}
在 parseOrigin 方法中,获取请求的 Header 中是否存在 ReqSource 的 Header,Sentinel 会从该方法中获取【流控应用】的值,因此将流控应用配置为 feignRequest,并设置为白名单,便实现了只允许 feign 接口访问所配置的资源,因为浏览器访问所配置的资源时,该方法由于无法获取到 ReqSource 这个 Header 的值,返回的流控应用名称为 null。当然这里设置的是获取 Header 的值,你也可以通过 Cookie 或者 Session 等其它方式进行控制,绝大多数情况下都是采用 Header 的控制方式。
以上就是 Sentinel 比较常用但容易出错的问题小结,这里再把源代码发出来,可以下载后运行验证效果。
本篇博客的源代码下载地址为:https://files.cnblogs.com/files/blogs/699532/springcloud_sentinel.zip