Jetson Xavier NX 试玩 (三)
玩一下 ZED MINI
0 前言
ZED Mini是一款优秀的双目摄像头,功能丰富。
除了深度视觉功能,它还内置了加速度计、陀螺仪、磁力计、气压计等传感器。
众所周知,双目摄像头可应用于空间定位,且精度很高,做过是室内定位应用的同学可能或多或少玩过英特尔家的T265双目摄像头,它内置 VPU ,可以自己运行 slam 算法,对于主机的硬件要求不高。但是,官方在2022年就停止了这个项目,
https://discuss.ardupilot.org/t/intel-stop-production-of-t265-feb-2022/77311 。
也就是说,T265尚存的一些bug官方不会修复了(maybe),该项目的一些衍生应用都会受到一定的影响。
ZED Mini作为一款双目相机,定位功能肯定是有的,那么效果如何呢?
正巧,我手里有一款 ZED Mini,那就来玩一玩吧。
1 查看GPU
ZED Mini 的使用需要一定的GPU算力支持
那么我们的Jetson Xavier NX支不支持呢,本着严谨的态度,我们查看一下。
官方提供了查看方法,https://forums.developer.nvidia.com/t/what-compute-capability-of-jetson-xavier-nx-gpu-is/146241
做一下,如下
jetson@ubuntu:/usr/local/cuda-10.2/samples/1_Utilities/deviceQuery$ ls
deviceQuery.cpp  Makefile  NsightEclipse.xml  readme.txt
jetson@ubuntu:/usr/local/cuda-10.2/samples/1_Utilities/deviceQuery$ make
/usr/local/cuda-10.2/bin/nvcc -ccbin g++ -I../../common/inc  -m64    -gencode arch=compute_30,code=sm_30 -gencode arch=compute_32,code=sm_32 -gencode arch=compute_53,code=sm_53 -gencode arch=compute_61,code=sm_61 -gencode arch=compute_62,code=sm_62 -gencode arch=compute_70,code=sm_70 -gencode arch=compute_72,code=sm_72 -gencode arch=compute_75,code=sm_75 -gencode arch=compute_75,code=compute_75 -o deviceQuery.o -c deviceQuery.cpp
Assembler messages:
Fatal error: can't create deviceQuery.o: Permission denied
Makefile:310: recipe for target 'deviceQuery.o' failed
make: *** [deviceQuery.o] Error 1
jetson@ubuntu:/usr/local/cuda-10.2/samples/1_Utilities/deviceQuery$ sudo make
/usr/local/cuda-10.2/bin/nvcc -ccbin g++ -I../../common/inc  -m64    -gencode arch=compute_30,code=sm_30 -gencode arch=compute_32,code=sm_32 -gencode arch=compute_53,code=sm_53 -gencode arch=compute_61,code=sm_61 -gencode arch=compute_62,code=sm_62 -gencode arch=compute_70,code=sm_70 -gencode arch=compute_72,code=sm_72 -gencode arch=compute_75,code=sm_75 -gencode arch=compute_75,code=compute_75 -o deviceQuery.o -c deviceQuery.cpp
/usr/local/cuda-10.2/bin/nvcc -ccbin g++   -m64      -gencode arch=compute_30,code=sm_30 -gencode arch=compute_32,code=sm_32 -gencode arch=compute_53,code=sm_53 -gencode arch=compute_61,code=sm_61 -gencode arch=compute_62,code=sm_62 -gencode arch=compute_70,code=sm_70 -gencode arch=compute_72,code=sm_72 -gencode arch=compute_75,code=sm_75 -gencode arch=compute_75,code=compute_75 -o deviceQuery deviceQuery.o
mkdir -p ../../bin/aarch64/linux/release
cp deviceQuery ../../bin/aarch64/linux/release
jetson@ubuntu:/usr/local/cuda-10.2/samples/1_Utilities/deviceQuery$ ls
deviceQuery      deviceQuery.o  NsightEclipse.xml
deviceQuery.cpp  Makefile       readme.txt
jetson@ubuntu:/usr/local/cuda-10.2/samples/1_Utilities/deviceQuery$ ./deviceQuery
./deviceQuery Starting...

 CUDA Device Query (Runtime API) version (CUDART static linking)

Detected 1 CUDA Capable device(s)

Device 0: "Xavier"
  CUDA Driver Version / Runtime Version          10.2 / 10.2
  CUDA Capability Major/Minor version number:    7.2
  Total amount of global memory:                 7765 MBytes (8142626816 bytes)
  ( 6) Multiprocessors, ( 64) CUDA Cores/MP:     384 CUDA Cores
  GPU Max Clock rate:                            1109 MHz (1.11 GHz)
  Memory Clock rate:                             1109 Mhz
  Memory Bus Width:                              256-bit
  L2 Cache Size:                                 524288 bytes
  Maximum Texture Dimension Size (x,y,z)         1D=(131072), 2D=(131072, 65536), 3D=(16384, 16384, 16384)
  Maximum Layered 1D Texture Size, (num) layers  1D=(32768), 2048 layers
  Maximum Layered 2D Texture Size, (num) layers  2D=(32768, 32768), 2048 layers
  Total amount of constant memory:               65536 bytes
  Total amount of shared memory per block:       49152 bytes
  Total number of registers available per block: 65536
  Warp size:                                     32
  Maximum number of threads per multiprocessor:  2048
  Maximum number of threads per block:           1024
  Max dimension size of a thread block (x,y,z): (1024, 1024, 64)
  Max dimension size of a grid size    (x,y,z): (2147483647, 65535, 65535)
  Maximum memory pitch:                          2147483647 bytes
  Texture alignment:                             512 bytes
  Concurrent copy and kernel execution:          Yes with 1 copy engine(s)
  Run time limit on kernels:                     No
  Integrated GPU sharing Host Memory:            Yes
  Support host page-locked memory mapping:       Yes
  Alignment requirement for Surfaces:            Yes
  Device has ECC support:                        Disabled
  Device supports Unified Addressing (UVA):      Yes
  Device supports Compute Preemption:            Yes
  Supports Cooperative Kernel Launch:            Yes
  Supports MultiDevice Co-op Kernel Launch:      Yes
  Device PCI Domain ID / Bus ID / location ID:   0 / 0 / 0
  Compute Mode:
     < Default (multiple host threads can use ::cudaSetDevice() with device simultaneously) >

deviceQuery, CUDA Driver = CUDART, CUDA Driver Version = 10.2, CUDA Runtime Version = 10.2, NumDevs = 1
Result = PASS
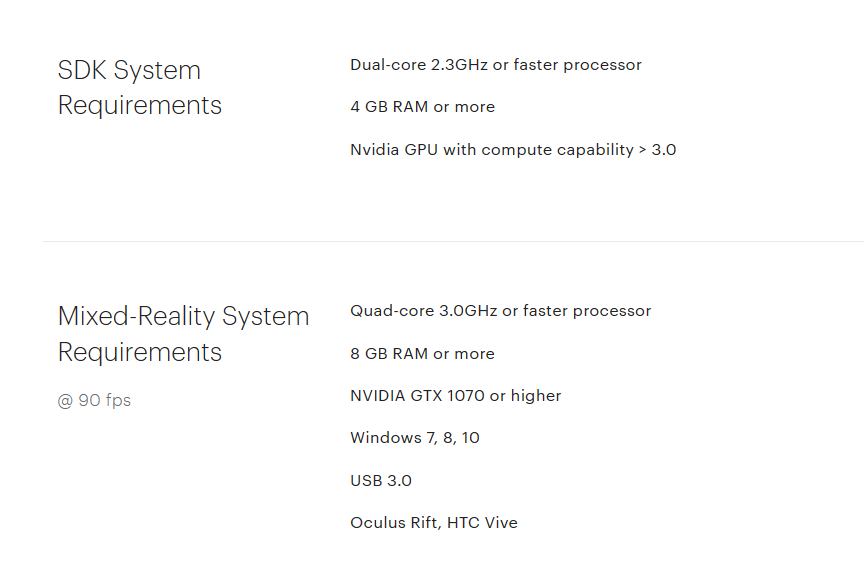
看到我们的 CUDA Capability Major/Minor version number 是7.2,应该是能够驾驭ZED Mini的SDK,不过它的虚拟现实功能必须在Windows系统上,并且对显卡有了更高的要求,在jetson上就无能为力了。
2 安装SDK
https://www.stereolabs.com/docs/installation/jetson/
官网找到对应LT4版本的ZED SDK ,是一个xxx.run文件,然后给权限,执行,就可以下载相关SDK了。
我在下载过程中遇到一些网络问题,下载过程非常的慢,甚至有时某些模块下载失败,明明是开了代理的。
同时我发现,并不是每一条网络请求都走proxy,这让我感到不解,只能暂时作罢。
也有可能是我的局域网环境有些差的缘故,没啥方法,只能多试几次。
突然发现我对于代理的理解还不够,只是设置系统代理应该是不够的,某些软件访问网址是不走系统代理的。
找到了个不错的设置代理的脚本
该脚本设置了 apt 、env 、bashrc
(设置完后,下载这个SDK的速度就快多了)
3 运行第一个程序
就以C++为例
https://www.stereolabs.com/docs/app-development/cpp/linux/
cd /home/jetson/baiyug_ws/ZED_Mini/zed-examples/tutorials/tutorial 1 - hello ZED/cpp
mkdir build && cd build
cmake ..
make
./ZED_Tutorial_1

还有很多例程,不一一演示了。
4 ZED ROS wrapper
官方也提供了关于ros的使用程序
https://www.stereolabs.com/docs/ros/
4.1 ros install
http://wiki.ros.org/melodic/Installation/Ubuntu
这一步没什么难的,唯一需要解决的应该外网访问问题。
4.2 克隆zed-ros-wrapper
选个文件夹作为zed-ros的工作目录,然后clone就行
mkdir -p zedros_ws/src
cd zedros_ws/src
git clone https://github.com/stereolabs/zed-ros-wrapper.git
然后就是catkin_make
留意一下,截至20230425,zed-ros-wrapper这个工程只支持ZED SDK 4版本,更早的版本编译时会报错。
(可惜官方并没有说清楚,害得我重装了一遍SDK?)
然后就编译ros工作空间即可
catkin_make
然后就是要添加一下环境变量
source ~/baiyug_ws/zedros_ws/devel/setup.bash
如果不想每开一次终端就source一遍,就把这个命令添加到~/.bashrc里,可以直接复制黏贴到该文件,也可以直接用以下命令
echo "source ~/baiyug_ws/zedros_ws/devel/setup.bash" >> ~/.bashrc
然后运行一下
source ~/.bashrc
使用以下命令查看环境变量是否添加成功
echo $ROS_PACKAGE_PATH
要启动zed-ros-wrapper的各个节点可以使用launch文件,zed mini用这个
roslaunch zed_wrapper zedm.launch

这样可能不太直观,可以用rviz看一下
4.3 Displaying ZED data
cd ~/zedros_ws/src
git clone https://github.com/stereolabs/zed-ros-examples.git

cd ..
catkin_make
roslaunch zed_display_rviz display_zedm.launch
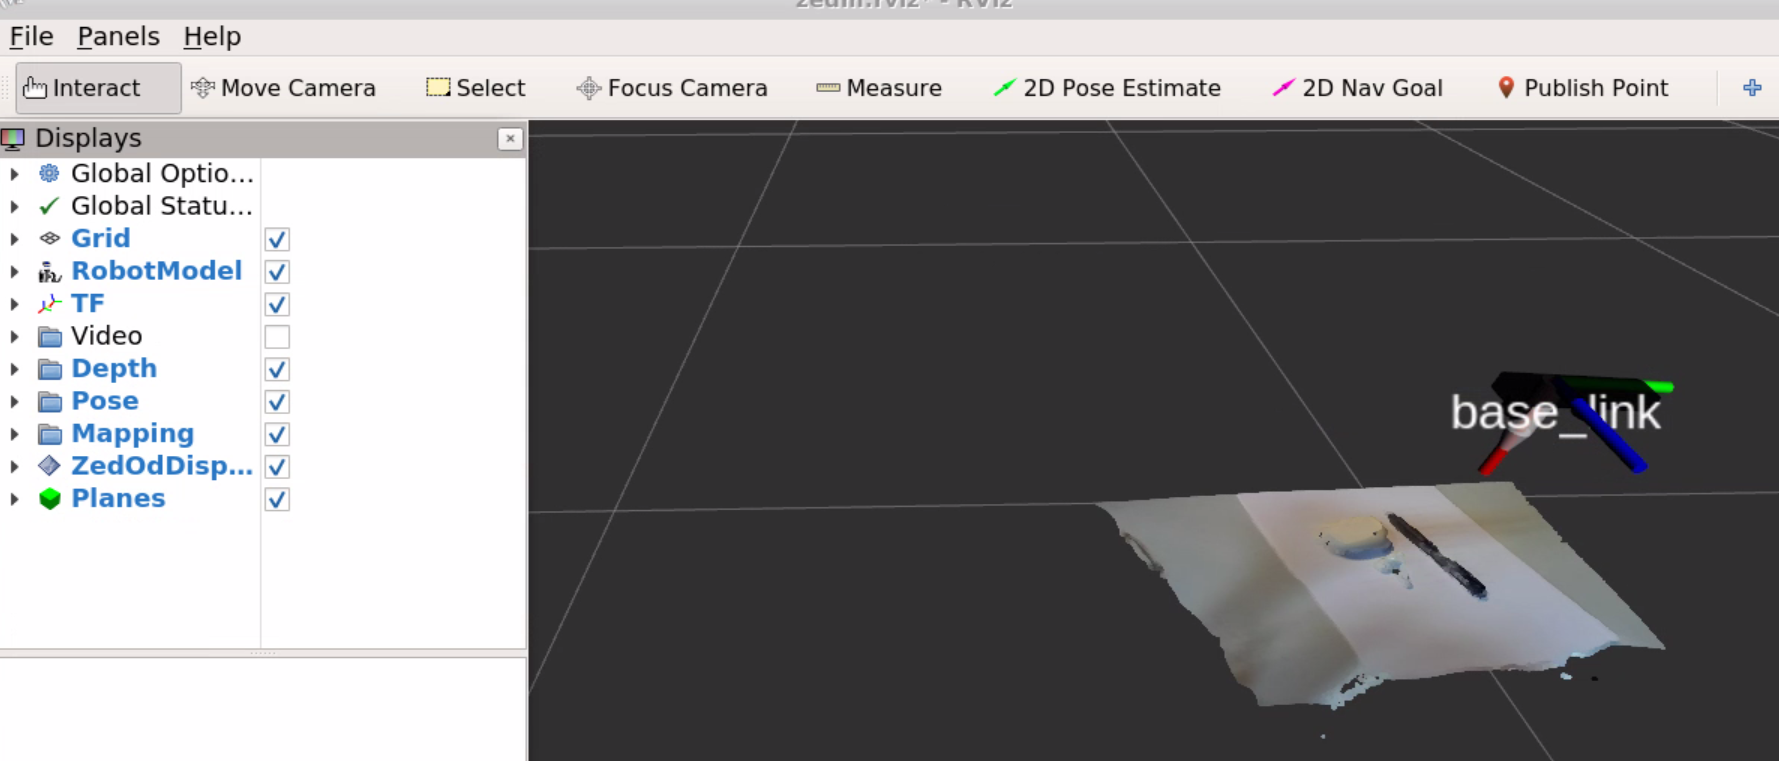
综上,我们现在可以得到ZED mini提供的空间位置信息,深度视觉信息等等。这些信息在机器人导航中有着重要的应用。以无人机为例,这些信息能够使得室内无人机的控制精度达到厘米级。(当然,这是商用级产品的效果)
5 我必须立刻控制位置!
利用ros,我们可以轻易地获得zed提供的位置信息,然后再加上一些控制算法就可以实现机器人的精密运动啦
官方还贴心地给了例程 https://github.com/stereolabs/zed-ros-examples/tree/master/tutorials , 注释好像还不少,爱了爱了?
小提示:要想正确运行例程,别忘了将它添加到ros工作空间中并且编译通过哦,当然如果你成功运行了roslaunch zed_display_rviz display_zedm.launch,那么说明你已经正确编译了,哈哈
ps:博主是个ros初学者,工程经验有限,有说的不对的地方还望海涵?
5.1 zed_tracking_sub_tutorial
这个文件的例程就是告诉我们如何获得位置信息
查看zed_tracking_sub_tutorial.cpp,原本例程里是订阅的话题是"/zed/zed_node/...",现在我用的是zed mini,因此要做个改动,即zed改成zedm,这是zed-ros-wrapper里关于zed mini定义的话题名字,具体改动如下:
  /**
   * The subscribe() call is how you tell ROS that you want to receive messages
   * on a given topic.  This invokes a call to the ROS
   * master node, which keeps a registry of who is publishing and who
   * is subscribing.  Messages are passed to a callback function, here
   * called imageCallback.  subscribe() returns a Subscriber object that you
   * must hold on to until you want to unsubscribe.  When all copies of the Subscriber
   * object go out of scope, this callback will automatically be unsubscribed from
   * this topic.
   *
   * The second parameter to the subscribe() function is the size of the message
   * queue.  If messages are arriving faster than they are being processed, this
   * is the number of messages that will be buffered up before beginning to throw
   * away the oldest ones.
   */
  ros::Subscriber subOdom = n.subscribe("/zedm/zed_node/odom", 10, odomCallback);
  ros::Subscriber subPose = n.subscribe("/zedm/zed_node/pose", 10, poseCallback);
然后在启动zed-ros-wrapper的各个节点后,即使用zedm.launch后,我们在启动这个例程节点
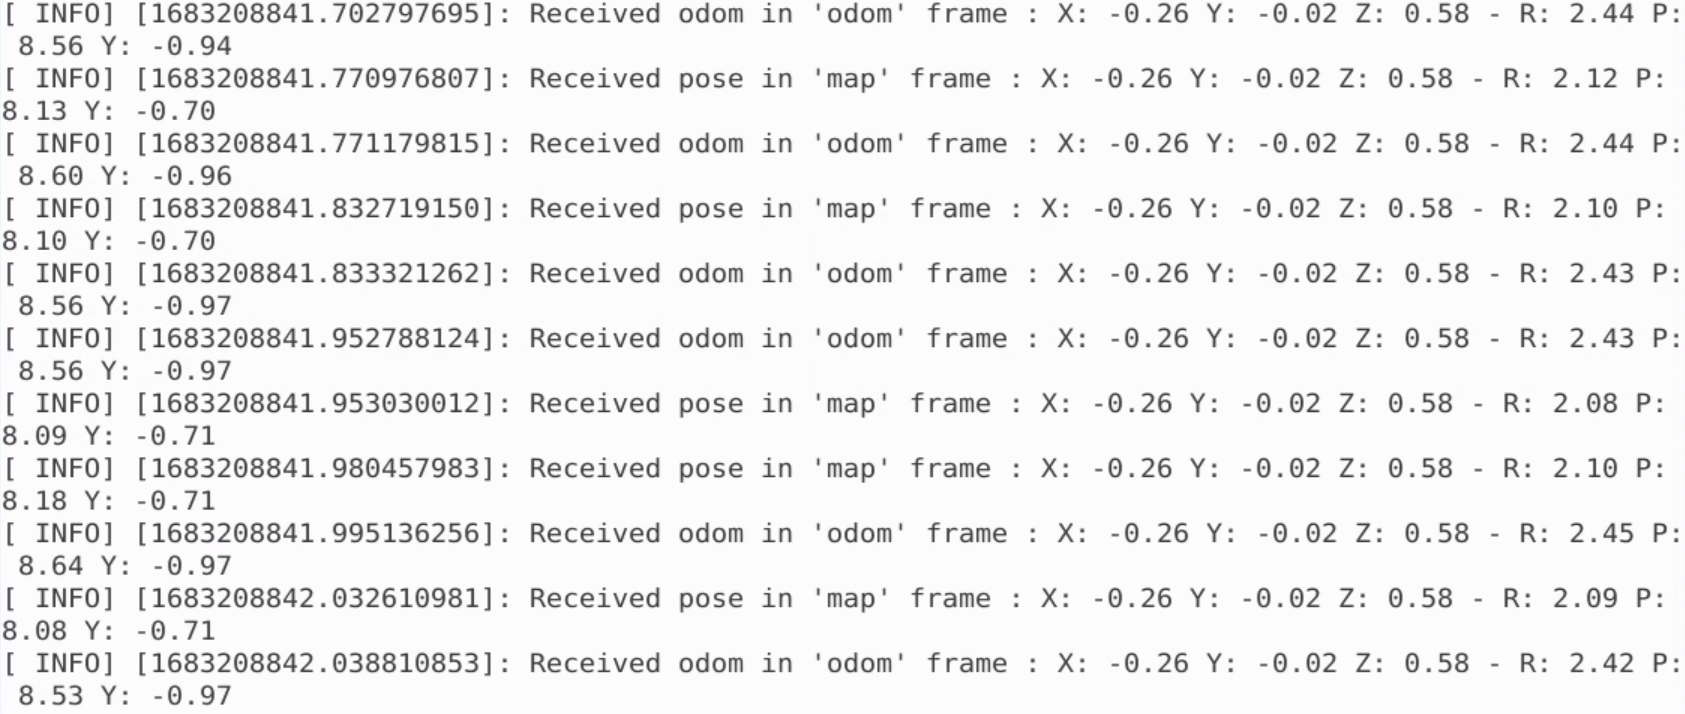
rosrun zed_tracking_sub_tutorial zed_tracking_sub
可以看到,该节点输出的一些信息
5.2 geometry_msgs/PoseStamped
geometry_msgs/PoseStamped是 ros 的一个消息类型
http://docs.ros.org/en/noetic/api/geometry_msgs/html/msg/PoseStamped.html
https://docs.ros.org/en/diamondback/api/geometry_msgs/html/msg/PoseStamped.html
zed-ros-wrapper使用了这个消息类型,来输出位置信息
默认是map-frames,即空间坐标系,也就是说,在zed开机后,SDK运行,此时zed会以当前的位置为原点,建立map坐标系并固定下来。
map坐标系符合FLU(前左上)坐标系的规则,前是指摄像头的朝向。
5.3 nav_msgs/Odometry
zed-ros-wrapper也使用了这个消息类型,来输出位置信息
http://docs.ros.org/en/noetic/api/nav_msgs/html/msg/Odometry.html
该消息理论上是里程计下计算的空间位置和速度,
默认坐标系是odometry frames,里程计坐标系,在zed的开机时,该坐标系应该和map坐标系重合,然后随着里程计误差的自我修正,该坐标系可能会发生移动。即产生误差。
该消息数据的特点是变化平缓,适合放在较为细微场景下使用,如避障等。