上文所述的装饰器仅能观察到第一层的变化,但是在实际应用开发中,应用会根据开发需要,封装自己的数据模型。对于多层嵌套的情况,比如二维数组,或者数组项class,或者class的属性是class,他们的第二层的属性变化是无法观察到的。这就引出了@Observed/@ObjectLink装饰器。
说明:
从API version 9开始,这两个装饰器支持在ArkTS卡片中使用。
概述
@ObjectLink和@Observed类装饰器用于在涉及嵌套对象或数组的场景中进行双向数据同步:
● 被@Observed装饰的类,可以被观察到属性的变化;
● 子组件中@ObjectLink装饰器装饰的状态变量用于接收@Observed装饰的类的实例,和父组件中对应的状态变量建立双向数据绑定。这个实例可以是数组中的被@Observed装饰的项,或者是class object中的属性,这个属性同样也需要被@Observed装饰。
● 单独使用@Observed是没有任何作用的,需要搭配@ObjectLink或者@Prop使用。
限制条件
使用@Observed装饰class会改变class原始的原型链,@Observed和其他类装饰器装饰同一个class可能会带来问题。
装饰器说明
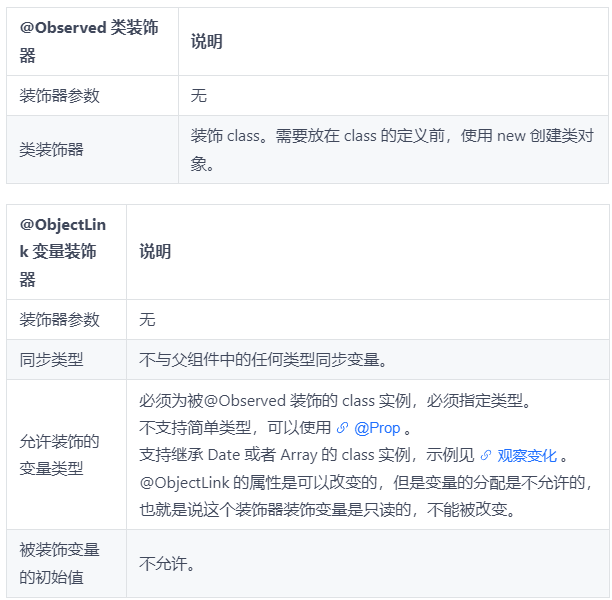
@ObjectLink装饰的数据为可读示例。
// 允许@ObjectLink装饰的数据属性赋值
this.objLink.a= ...
// 不允许@ObjectLink装饰的数据自身赋值
this.objLink= ...
说明:
@ObjectLink装饰的变量不能被赋值,如果要使用赋值操作,请使用@Prop。
● @Prop装饰的变量和数据源的关系是是单向同步,@Prop装饰的变量在本地拷贝了数据源,所以它允许本地更改,如果父组件中的数据源有更新,@Prop装饰的变量本地的修改将被覆盖;
● @ObjectLink装饰的变量和数据源的关系是双向同步,@ObjectLink装饰的变量相当于指向数据源的指针。禁止对@ObjectLink装饰的变量赋值,如果一旦发生@ObjectLink装饰的变量的赋值,则同步链将被打断。因为@ObjectLink修饰的变量通过数据源(Object)引用来初始化。对于实现双向数据同步的@ObjectLink,赋值相当于更新父组件中的数组项或者class的属性,TypeScript/JavaScript不能实现,会发生运行时报错。
变量的传递/访问规则说明
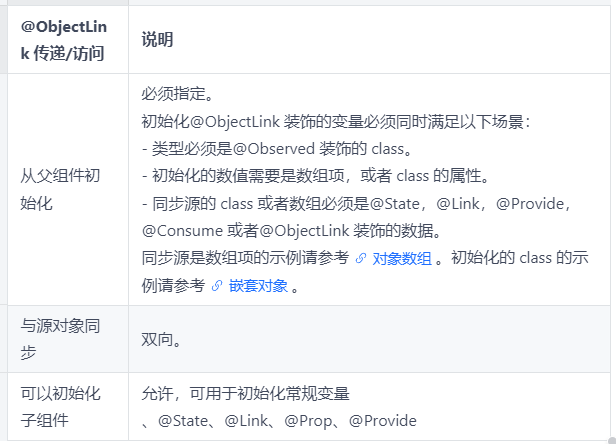
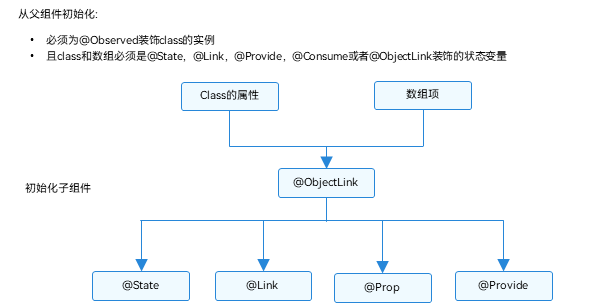
图1 初始化规则图示
观察变化和行为表现
观察变化
@Observed装饰的类,如果其属性为非简单类型,比如class、Object或者数组,也需要被@Observed装饰,否则将观察不到其属性的变化。
class ClassA {
  public c: number;

  constructor(c: number) {
    this.c = c;
  }
}

@Observed
class ClassB {
  public a: ClassA;
  public b: number;

  constructor(a: ClassA, b: number) {
    this.a = a;
    this.b = b;
  }
}
以上示例中,ClassB被@Observed装饰,其成员变量的赋值的变化是可以被观察到的,但对于ClassA,没有被@Observed装饰,其属性的修改不能被观察到。
@ObjectLink b: ClassB

// 赋值变化可以被观察到
this.b.a = new ClassA(5)
this.b.b = 5

// ClassA没有被@Observed装饰,其属性的变化观察不到
this.b.a.c = 5
@ObjectLink:@ObjectLink只能接收被@Observed装饰class的实例,可以观察到:● 其属性的数值的变化,其中属性是指Object.keys(observedObject)返回的所有属性,示例请参考嵌套对象。
● 如果数据源是数组,则可以观察到数组item的替换,如果数据源是class,可观察到class的属性的变化,示例请参考对象数组。
继承Date的class时,可以观察到Date整体的赋值,同时可通过调用Date的接口setFullYear, setMonth, setDate, setHours, setMinutes, setSeconds, setMilliseconds, setTime, setUTCFullYear, setUTCMonth, setUTCDate, setUTCHours, setUTCMinutes, setUTCSeconds, setUTCMilliseconds 更新Date的属性。
@Observed
class DateClass extends Date {
  constructor(args: number | string) {
    super(args)
  }
}

@Observed
class ClassB {
  public a: DateClass;

  constructor(a: DateClass) {
    this.a = a;
  }
}

@Component
struct ViewA {
  label: string = 'date';
  @ObjectLink a: DateClass;

  build() {
    Column() {
      Button(`child increase the day by 1`)
        .onClick(() => {
          this.a.setDate(this.a.getDate() + 1);
        })
      DatePicker({
        start: new Date('1970-1-1'),
        end: new Date('2100-1-1'),
        selected: this.a
      })
    }
  }
}

@Entry
@Component
struct ViewB {
  @State b: ClassB = new ClassB(new DateClass('2023-1-1'));

  build() {
    Column() {
      ViewA({ label: 'date', a: this.b.a })

      Button(`parent update the new date`)
        .onClick(() => {
          this.b.a = new DateClass('2023-07-07');
        })
      Button(`ViewB: this.b = new ClassB(new DateClass('2023-08-20'))`)
        .onClick(() => {
          this.b = new ClassB(new DateClass('2023-08-20'));
        })
    }
  }
}
框架行为
1. 初始渲染:
a. @Observed装饰的class的实例会被不透明的代理对象包装,代理了class上的属性的setter和getter方法
b. 子组件中@ObjectLink装饰的从父组件初始化,接收被@Observed装饰的class的实例,@ObjectLink的包装类会将自己注册给@Observed class。
2. 属性更新:当@Observed装饰的class属性改变时,会走到代理的setter和getter,然后遍历依赖它的@ObjectLink包装类,通知数据更新。
使用场景
嵌套对象
以下是嵌套类对象的数据结构。
// objectLinkNestedObjects.ets
let NextID: number = 1;

@Observed
class ClassA {
  public id: number;
  public c: number;

  constructor(c: number) {
    this.id = NextID++;
    this.c = c;
  }
}

@Observed
class ClassB {
  public a: ClassA;

  constructor(a: ClassA) {
    this.a = a;
  }
}

@Observed
class ClassD {
  public c: ClassC;

  constructor(c: ClassC) {
    this.c = c;
  }
}

@Observed
class ClassC extends ClassA {
  public k: number;

  constructor(k: number) {
    // 调用父类方法对k进行处理
    super(k);
    this.k = k;
  }
}
以下组件层次结构呈现的是嵌套类对象的数据结构。
@Component
struct ViewC {
  label: string = 'ViewC1';
  @ObjectLink c: ClassC;

  build() {
    Row() {
      Column() {
        Text(`ViewC [${this.label}] this.a.c = ${this.c.c}`)
          .fontColor('#ffffffff')
          .backgroundColor('#ff3fc4c4')
          .height(50)
          .borderRadius(25)
        Button(`ViewC: this.c.c add 1`)
          .backgroundColor('#ff7fcf58')
          .onClick(() => {
            this.c.c += 1;
            console.log('this.c.c:' + this.c.c)
          })
      }
    .width(300)
  }
}
}

@Entry
@Component
struct ViewB {
  @State b: ClassB = new ClassB(new ClassA(0));
  @State child : ClassD = new ClassD(new ClassC(0));
  build() {
    Column() {
      ViewC({ label: 'ViewC #3', c: this.child.c})
      Button(`ViewC: this.child.c.c add 10`)
        .backgroundColor('#ff7fcf58')
        .onClick(() => {
          this.child.c.c += 10
          console.log('this.child.c.c:' + this.child.c.c)
        })
    }
  }
}
被@Observed装饰的ClassC类,可以观测到继承基类的属性的变化。
ViewB中的事件句柄:
● this.child.c = new ClassA(0) 和this.b = new ClassB(new ClassA(0)): 对@State装饰的变量b和其属性的修改。
● this.child.c.c = ... :该变化属于第二层的变化,@State无法观察到第二层的变化,但是ClassA被@Observed装饰,ClassA的属性c的变化可以被@ObjectLink观察到。
ViewC中的事件句柄:
● this.c.c += 1:对@ObjectLink变量a的修改,将触发Button组件的刷新。@ObjectLink和@Prop不同,@ObjectLink不拷贝来自父组件的数据源,而是在本地构建了指向其数据源的引用。
● @ObjectLink变量是只读的,this.a = new ClassA(...)是不允许的,因为一旦赋值操作发生,指向数据源的引用将被重置,同步将被打断。
对象数组
对象数组是一种常用的数据结构。以下示例展示了数组对象的用法。
@Component
struct ViewA {
  // 子组件ViewA的@ObjectLink的类型是ClassA
  @ObjectLink a: ClassA;
  label: string = 'ViewA1';

  build() {
    Row() {
      Button(`ViewA [${this.label}] this.a.c = ${this.a.c} +1`)
        .onClick(() => {
          this.a.c += 1;
        })
    }
  }
}

@Entry
@Component
struct ViewB {
  // ViewB中有@State装饰的ClassA[]
  @State arrA: ClassA[] = [new ClassA(0), new ClassA(0)];

  build() {
    Column() {
      ForEach(this.arrA,
        (item: ClassA) => {
          ViewA({ label: `#${item.id}`, a: item })
        },
        (item: ClassA): string => item.id.toString()
      )
      // 使用@State装饰的数组的数组项初始化@ObjectLink,其中数组项是被@Observed装饰的ClassA的实例
      ViewA({ label: `ViewA this.arrA[first]`, a: this.arrA[0] })
      ViewA({ label: `ViewA this.arrA[last]`, a: this.arrA[this.arrA.length-1] })

      Button(`ViewB: reset array`)
        .onClick(() => {
          this.arrA = [new ClassA(0), new ClassA(0)];
        })
      Button(`ViewB: push`)
        .onClick(() => {
          this.arrA.push(new ClassA(0))
        })
      Button(`ViewB: shift`)
        .onClick(() => {
          this.arrA.shift()
        })
      Button(`ViewB: chg item property in middle`)
        .onClick(() => {
          this.arrA[Math.floor(this.arrA.length / 2)].c = 10;
        })
      Button(`ViewB: chg item property in middle`)
        .onClick(() => {
          this.arrA[Math.floor(this.arrA.length / 2)] = new ClassA(11);
        })
    }
  }
}
● this.arrA[Math.floor(this.arrA.length/2)] = new ClassA(..) :该状态变量的改变触发2次更新:
○ ForEach:数组项的赋值导致ForEach的itemGenerator被修改,因此数组项被识别为有更改,ForEach的item builder将执行,创建新的ViewA组件实例。
○ ViewA({ label: ViewA this.arrA[first], a: this.arrA[0] }):上述更改改变了数组中第一个元素,所以绑定this.arrA[0]的ViewA将被更新。
● this.arrA.push(new ClassA(0)) : 将触发2次不同效果的更新:
○ ForEach:新添加的ClassA对象对于ForEach是未知的itemGenerator,ForEach的item builder将执行,创建新的ViewA组件实例。
○ ViewA({ label: ViewA this.arrA[last], a: this.arrA[this.arrA.length-1] }):数组的最后一项有更改,因此引起第二个ViewA的实例的更改。对于ViewA({ label: ViewA this.arrA[first], a: this.arrA[0] }),数组的更改并没有触发一个数组项更改的改变,所以第一个ViewA不会刷新。
● this.arrA[Math.floor(this.arrA.length/2)].c:@State无法观察到第二层的变化,但是ClassA被@Observed装饰,ClassA的属性的变化将被@ObjectLink观察到。
二维数组
使用@Observed观察二维数组的变化。可以声明一个被@Observed装饰的继承Array的子类。
@Observed
class StringArray extends Array<String> {
}
使用new StringArray()来构造StringArray的实例,new运算符使得@Observed生效,@Observed观察到StringArray的属性变化。
声明一个从Array扩展的类class StringArray extends Array<String> {},并创建StringArray的实例。@Observed装饰的类需要使用new运算符来构建class实例。
@Observed
class StringArray extends Array<String> {
}

@Component
struct ItemPage {
  @ObjectLink itemArr: StringArray;

  build() {
    Row() {
      Text('ItemPage')
        .width(100).height(100)

      ForEach(this.itemArr,
        (item: string | Resource) => {
          Text(item)
            .width(100).height(100)
        },
        (item: string) => item
      )
    }
  }
}

@Entry
@Component
struct IndexPage {
  @State arr: Array<StringArray> = [new StringArray(), new StringArray(), new StringArray()];

  build() {
    Column() {
      ItemPage({ itemArr: this.arr[0] })
      ItemPage({ itemArr: this.arr[1] })
      ItemPage({ itemArr: this.arr[2] })
      Divider()


      ForEach(this.arr,
        (itemArr: StringArray) => {
          ItemPage({ itemArr: itemArr })
        },
        (itemArr: string) => itemArr[0]
      )

      Divider()

      Button('update')
        .onClick(() => {
          console.error('Update all items in arr');
          if ((this.arr[0] as Array<String>)[0] !== undefined) {
            // 正常情况下需要有一个真实的ID来与ForEach一起使用,但此处没有
            // 因此需要确保推送的字符串是唯一的。
            this.arr[0].push(`${this.arr[0].slice(-1).pop()}${this.arr[0].slice(-1).pop()}`);
            this.arr[1].push(`${this.arr[1].slice(-1).pop()}${this.arr[1].slice(-1).pop()}`);
            this.arr[2].push(`${this.arr[2].slice(-1).pop()}${this.arr[2].slice(-1).pop()}`);
          } else {
            this.arr[0].push('Hello');
            this.arr[1].push('World');
            this.arr[2].push('!');
          }
        })
    }
  }
}