伪类选择器
<style>
    a:link{
        color: blue;
        /*未访问显示连接*/
    }
    a:hover{
        color: black;
        /*鼠标移到上面显示*/
    }
    a:active{
        color: aliceblue;
         /* 左键选定的链接 */
    }
    a:visited{
        color: aqua;
        /*访问后的颜色*/
    }
    input:focus {
            outline: none;
        /*该属性移除了当元素获取焦点时默认出现的轮廓线*/
            background-color: #eee;
        该属性设置了输入框(input元素)在获取焦点时的背景颜色为浅灰色(#eee)

        /*input输入框获取焦点时样式*/
        }

</style>
伪元素选择器
<head>
    <meta charset="UTF-8">
    <title>Title</title>
</head>
<style>
    /*常用给首字母设置格式*/
   p:first-letter{
       font-size: 50px;
       color: black;
   }
    /*在每个p标签前插入数据*/
   p:before{
       content:'*';
       color: blueviolet;
   }
   /*在每个标签后面插入数据*/
   p:after{
       content: '/';
       color: crimson;
   }
</style>
<body>
<p>大鹏一日同风起,扶摇直上九万里</p>
</body>
选择器优先级
比较id、类、标签选择器的优先级
style样式、外部引入的CSS、行内式
1. 选择器相同的情况下,谁的优先级更高
选择器相同,谁离标签越近就听谁的
ps:行内式的优先级是最高的
2. 选择器不同的情况下,谁的优先级更高
行内式 > id选择器 > 类选择器 > 标签选择器
CSS相关属性
宽和高
width属性:设置宽度
height属性:设置高度
块级才能设置高度,行内标签的宽度有内容来决定
   <style>
  div{
    width: 500px;
    height: 40px;
  }
</style>
字体属性
font-family:设置字体
body {
  font-family: "Microsoft Yahei", "微软雅黑", "Arial", sans-serif
}
font-size:字体大小
p {
  font-size: 14px;
}
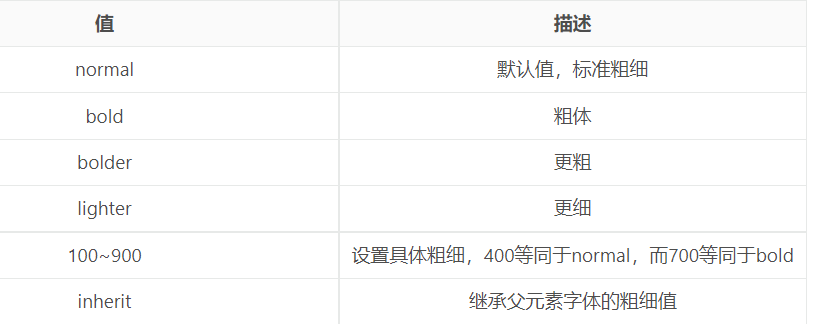
font-weigth:设置粗细
<style>
  div{
    font-weight: normal;
  }
  div{
    font-weight: bold;
  }
  div{
    font-weight: bolder;
  }
  div{
    font-weight: lighter;
  }
  div{
    font-weight: 700;
  }
  div{
    font-weight: inherit;
  }
</style>
<body>
<div>
  大鹏一日同风起,扶摇直上九万里
</div>
</body>
字体颜色
<style>
  div{
    /*color:#FF0000 ;*/
    /*color: rgb(0,0,255);*/
    color: rgba(0,0,220,0.1);
  }
</style>
<body>
<div>
  大鹏
</div>
颜色属性被用来设置文字的颜色。
颜色是通过CSS最经常的指定:
- 十六进制值 - 如: #FF0000
- 一个RGB值 - 如: RGB(255,0,0)
- 颜色的名称 - 如: red
还有rgba(255,0,0,0.3),第四个值为alpha, 指定了色彩的透明度/不透明度,它的范围为0.0到1.0之间
opacity: 0.1; 透明度
文字属性
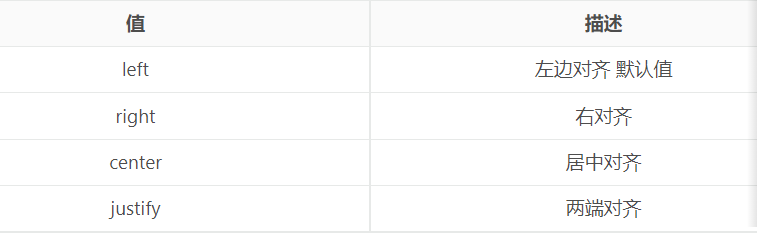
文字对齐
text-align属性:对齐方式
文字装饰
text-decoration 属性:用来给文字添加特殊效果
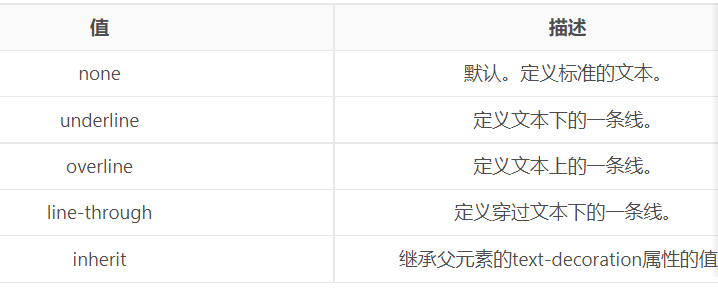
常用的为去掉a标签默认的自划线:
a {
  text-decoration: none;
}
首行缩进
text-indent属性:首行缩进
p {
  text-indent: 32px;
}
背景属性
background-repeat: 背景重复
repeat(默认):背景图片平铺排满整个网页
repeat-x:背景图片只在水平方向上平铺
repeat-y:背景图片只在垂直方向上平铺
no-repeat:背景图片不平铺
背景颜色
background-color: red;
背景图片
background-image: url('1.jpg');
背景位置
background-position: left top;
background-position: 200px 200px;
将图片固定在页面
background-attachment: fixed
<style>
    div{
        width: 200px;
        height: 200px;
        border: 1px solid red;
        /*background-color: bisque;*/
        background-image: url("images.jpg");
        /*background-repeat:repeat-x ;*/
        /*background-repeat:repeat-y ;*/
        background-position: center center;
        /*background-repeat: no-repeat*/
        /*background: repeat-x red  center center url("images.jpg")*/
    }
</style>
边框
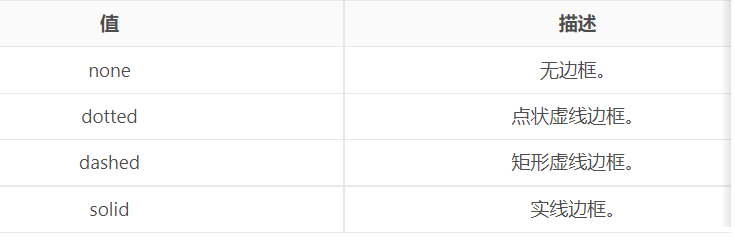
边框属性
border-width:宽度
border-style:格式
border-color:颜色
#i1 {
  border-width: 2px;
  border-style: solid;
  border-color: red;
}
边框样式
border-radius
p {
            /*border-width: 10px;*/
            /*border-style: dashed;*/
            /*border-color: green;*/
            /*border-left-width: 10px;*/
            /*border-left-style: solid;*/
            /*border-left-color: red;*/

            /*border-top-width: 5px;*/
            /*border-top-style: dashed;*/
            /*border-top-color: green;*/

            /*border-right-width: 5px;*/
            /*border-right-style: dashed;*/
            /*border-right-color: orange;*/

            /* border-bottom-width: 5px;*/
            /*border-bottom-style: dashed;*/
            /*border-bottom-color: brown;*/

            /*border: 5px solid red;*/

            width: 400px;
            height: 400px;
            border: 5px solid red;
            background: red;
            /*border-radius: 50%;*/
            border-top-left-radius: 100px;
            border-top-right-radius: 100px;
            border-bottom-left-radius: 100px;
            border-bottom-right-radius: 100px;
        }
display属性
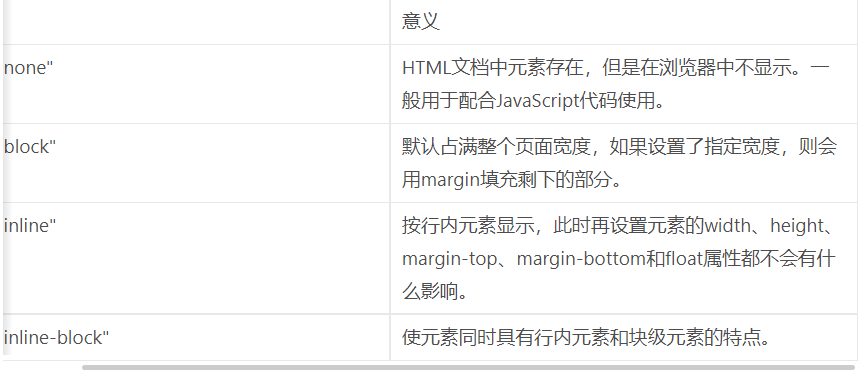
 <style>
        #d1 {
            width: 100px;
            height: 100px;
            background: red;
            /*display: none; 掌握*/
            visibility: hidden;
        }

        #d2 {
            width: 100px;
            height: 100px;
            background: green;
        }

        /*.c1 {*/
        /*    width: 100px;*/
        /*    height: 100px;*/
        /*    background: green;*/
        /*    display: inline-block;*/
        /*}*/

        /*.c2 {*/
        /*    width: 100px;*/
        /*    height: 100px;*/
        /*    background: orange;*/
        /*    display: inline-block;*/
        /*}*/
    </style>
举例:以快递盒与快递盒为例
快递盒与快递盒之间的距离称为是外边距----------->margin值
快递盒与内部的物品之间的距离称为是内边距---------->padding值
快递盒子的厚度称之为是边框--------------->border表示
物品的实际大小称之为是内容-------------->content来表示
ps:调整标签与标签之间的距离使用的是margin值
属性
margin: 用于控制元素与元素之间的距离;margin的最基本用途就是控制元素周围空间的间隔,从视觉角度上达到相互隔开的目的。
padding: 用于控制内容与边框之间的距离;
order(边框): 围绕在内边距和内容外的边框。
ontent(内容): 盒子的内容,显示文本和图像。
顺序:上右下左
补充padding的常用简写方式:
- 提供一个,用于四边;
- 提供两个,第一个用于上-下,第二个用于左-右;
- 如果提供三个,第一个用于上,第二个用于左-右,第三个用于下;
- 提供四个参数值,将按上-右-下-左的顺序作用于四边;
清除浮动
清除浮动的副作用(父标签塌陷问题)
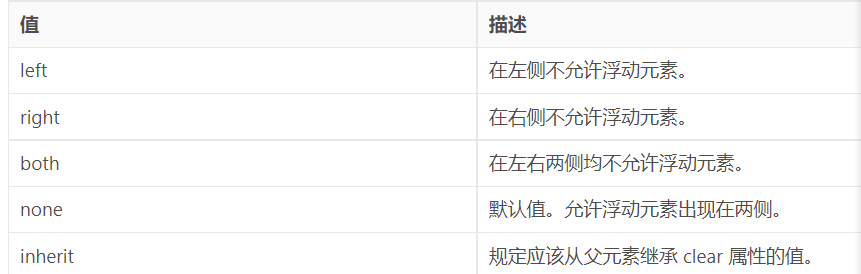
clear
clear属性规定元素的哪一侧不允许其他浮动元素。
主要有三种方式:
- 固定高度
- 伪元素清除法
- overflow:hidden
父标签塌陷问题,如何解决的
谁塌陷就给谁加一下代码
 .clearfix:after {
            content: "";
            display: block;
            clear: both;
        }