本文展示在pytorch框架下将 pth格式转为onnx格式,然后在openvino框架下部署,并进行效果展示对比。
U2-Net模型分为大小两种:
- U2NET---173.6 MB (参数量:4千万)
- U2NEP---4.7 MB (参数量:1 百万
上述两种模型结构是一样的,唯一不同的是:U2NET在编码阶段:特征图的channel维度从3->64->128->256->512,特征图W、H由320逐步降采样至10;而U2NETP在编码阶段:特征图的channel维度从3->64->64->64->64,特征图W、H由320逐步降采样至10。可以看到,channel维度不同,不论是U2NET的stage间卷积核参数不同,其中嵌套的小型U型结构中卷积核参数也不同,综上,U2NETP相对参数量少得多。
环境:win10,下面是conda包环境:
 1 # 原作者的环境是真J8扯淡!
 2 conda create -n u2net python==3.8
 3 pip install torch==1.6.0+cu101 torchvision==0.7.0+cu101 -f https://download.pytorch.org/whl/torch_stable.html
 4 numpy==1.21.4
 5 scikit-image==0.19.0
 6 pillow==8.4.0
 7 opencv-python==4.5.4.58
 8 matplotlib==3.5.0
 9 # 下面暂时不装
10 paddlepaddle
11 paddlehub
12 gradio
一、onnx模型导出
在模型导出之前,我们写一个加载原始模型文件的demo,便于后续移植到openvino中,代码u2net_demo.py:


 1 import torch
 2 import numpy as np
 3 from model import U2NET  # full size version 173.6 MB
 4 import cv2
 5 from model import U2NETP
 6
 7 # normalize the predicted SOD probability map
 8 def normPRED(d):
 9     ma = torch.max(d)
10     mi = torch.min(d)
11     dn = (d - mi) / (ma - mi)
12     return dn
13 def normPRED_ByNumPy(d):
14     ma = np.max(d)
15     mi = np.min(d)
16     dn = (d - mi) / (ma - mi)
17     return dn
18
19 if __name__ == "__main__":
20     """
21     读取数据\模型
22     """
23     image_path = "d:/Data/7.jpg"
24     use_u2net = False
25     if use_u2net:
26         model_path = "d:/CodePython/U-2-Net-master/saved_models/u2net/u2net.pth"
27         net = U2NET(3, 1)
28     else:
29         model_path = "d:/CodePython/U-2-Net-master/saved_models/u2netp/u2netp.pth"
30         net = U2NETP(3, 1)
31
32     net.load_state_dict(torch.load(model_path, map_location='cpu'))
33     net.eval()
34
35     # dataloader
36     image_src = cv2.imread(image_path, -1)  # 必须是3通道
37     assert image_src.shape[2] == 3
38     """
39     数据预处理
40     """
41     image_src_ = cv2.cvtColor(image_src, cv2.COLOR_BGR2RGB)
42     # resize
43     output_size = 320
44     # new_size = getNewSize(image_src.shape, output_size)
45     image = cv2.resize(image_src_, (output_size, output_size))
46
47
48
49     # sub the mean and var
50     tmpImg = np.zeros((image.shape[0], image.shape[1], 3))
51     image = image / np.max(image)
52     tmpImg[:, :, 0] = (image[:, :, 0] - 0.485) / 0.229
53     tmpImg[:, :, 1] = (image[:, :, 1] - 0.456) / 0.224
54     tmpImg[:, :, 2] = (image[:, :, 2] - 0.406) / 0.225
55     # change the r,g,b to b,r,g from [0,255] to [0,1]
56     tmpImg = tmpImg.transpose((2, 0, 1))
57     tmpImg = np.expand_dims(tmpImg, 0)
58     # numpy -> tensor
59     inputs_test = torch.from_numpy(tmpImg)
60     inputs_test = inputs_test.type(torch.FloatTensor)
61
62     """
63     推理
64     """
65     d1, d2, d3, d4, d5, d6, d7 = net(inputs_test)
66     """
67     解析结果
68     """
69     # normalization
70     pred = d1[0, 0, :, :]
71     predict = normPRED(pred)
72     predict_np = predict.cpu().data.numpy()
73     im = predict_np * 255
74     #im = cv2.cvtColor(im, cv2.COLOR_BGR2RGB)  # pytorch输入image是BGR,和OpenCV一致
75     imo = cv2.resize(im, (image_src.shape[1], image_src.shape[0]), cv2.INTER_LINEAR)
76     imo = np.uint8(imo)
77     # show
78     cv2.imshow("image_src", image_src)
79     cv2.imshow("ret", imo)
80     cv2.waitKey(0)
81     cv2.destroyAllWindows()
下图中,左边mask是上述代码效果图,右边是官方效果图,你可以对比细微区别。上述代码采用opencv做的图像处理,官方采用torch做的图像处理,由于时间有限,我就不再debug(从输入到输出,对比下图像RGB顺序,插值算法等等就行了)。
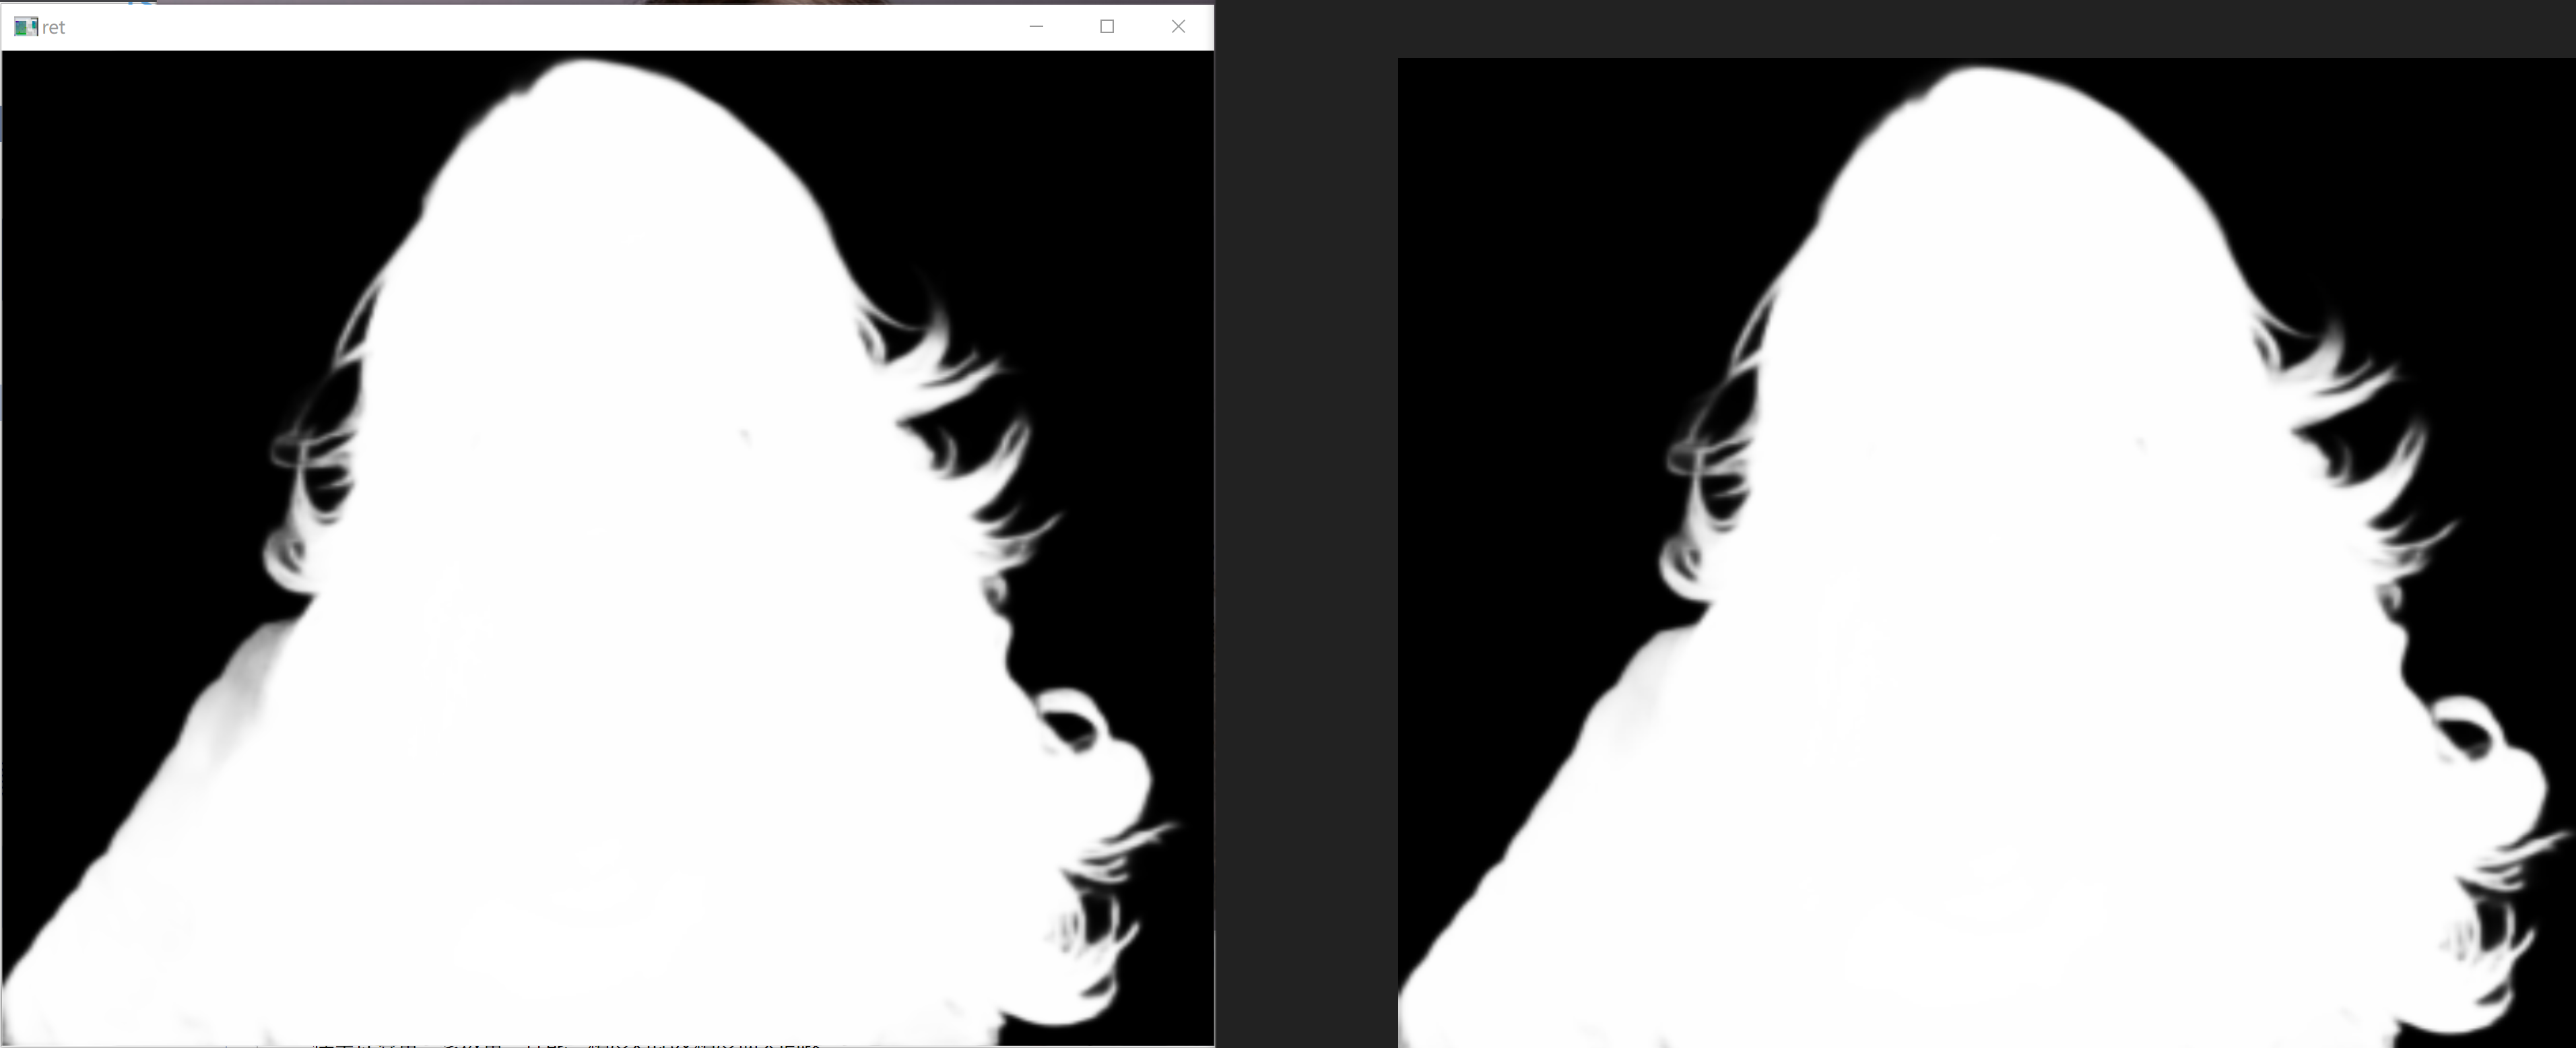
基于官方pth大模型的分割效果;opencv图像预处理(左),pytorch图像预处理(右)
下面是两种pth模型(u2net、u2netp)的onnx格式模型导出代码export_u2net.py:
 1 import  torch.nn
 2 from model import U2NET
 3 from model import U2NETP
 4
 5 use_u2net = False  # False for u2netp.pt
 6
 7 image_input = torch.autograd.Variable(torch.randn(1, 3, 320, 320))
 8 input_names = ["shiruiyu"]
 9 output_names = ["output"]
10
11 if use_u2net:  # for u2net.pt
12     model_path = "d:/CodePython/U-2-Net-master/saved_models/u2net/u2net.pth"
13     model = U2NET(3, 1)
14     model.load_state_dict(torch.load(model_path, map_location='cpu'))
15     model.eval()
16     torch.onnx.export(model, image_input, "saved_models/onnx/u2net_onnx.onnx",
17                       verbose=True,
18                       input_names=input_names,
19                       output_names=output_names,
20                       opset_version=11,
21                       training=False)
22 else:  # for u2netp.pt
23     model_path = "d:/CodePython/U-2-Net-master/saved_models/u2netp/u2netp.pth"
24     model = U2NETP(3, 1)
25     model.load_state_dict(torch.load(model_path, map_location='cpu'))
26     model.eval()
27     torch.onnx.export(model, image_input, "saved_models/onnx/u2netp_onnx.onnx",
28                       verbose=True,
29                       input_names=input_names,
30                       output_names=output_names,
31                       opset_version=11,
32                       training=False)
33
34
35 print()
二、模型计算量、参数量、性能、精度对比及精度损失问题
三、openvino代码编写
将步骤1中的onnx模型拿出来,下面是openvino代码:
my_OK_u2net.py
 1 """
 2 u2net
 3 """
 4
 5 import cv2
 6 from openvino.inference_engine import IECore
 7 from timeit import default_timer as timer
 8 import numpy as np
 9 from timeit import default_timer as timer
10
11 # normalize the predicted SOD probability map
12 def normPRED(d):
13     ma = np.max(d)
14     mi = np.min(d)
15     dn = (d - mi) / (ma - mi)
16     return dn
17 # ---------------------------Step 1. Initialize inference engine core--------------------------------------------------
18 ie = IECore()
19 device = "CPU"
20 # ---------------------------Step 2. Read a model in OpenVINO Intermediate Representation or ONNX format---------------
21 model_onnx = "data/u2net_onnx.onnx"
22 net = ie.read_network(model=model_onnx)
23 # ---------------------------Step 3. Configure input & output----------------------------------------------------------
24 input_blob = next(iter(net.input_info))
25 output_blob = list()
26 for obj in iter(net.outputs):
27     output_blob.append(obj)
28 n, c, h, w = net.inputs[input_blob].shape
29 output_blob_6 = output_blob[6]
30 print("outputs's shape = ", net.outputs[output_blob[6]].shape)
31 """
32 读取数据模型
33 """
34 image_path = "d:/Data/7.jpg"
35 # dataloader
36 image_src = cv2.imread(image_path, -1)  # 必须是3通道
37 assert image_src.shape[2] == 3
38 """
39 数据预处理
40 """
41 image_src_ = cv2.cvtColor(image_src, cv2.COLOR_BGR2RGB)
42 # resize
43 image = cv2.resize(image_src_, (320, 320))
44 # sub the mean and var
45 tmpImg = np.zeros((image.shape[0], image.shape[1], 3))
46 image = image / np.max(image)
47 tmpImg[:, :, 0] = (image[:, :, 0] - 0.485) / 0.229
48 tmpImg[:, :, 1] = (image[:, :, 1] - 0.456) / 0.224
49 tmpImg[:, :, 2] = (image[:, :, 2] - 0.406) / 0.225
50 # change the r,g,b to b,r,g from [0,255] to [0,1]
51 tmpImg = tmpImg.transpose((2, 0, 1))
52 # ---------------------------Step 4. Loading model to the device-------------------------------------------------------
53 exec_net = ie.load_network(network=net, device_name=device)
54 # ---------------------------Step 5. Create infer request--------------------------------------------------------------
55 # ---------------------------Step 6. Prepare input---------------------------------------------------------------------
56 # ---------------------------Step 7. Do inference----------------------------------------------------------------------
57 start_time = timer()
58 res = exec_net.infer(inputs={input_blob: [tmpImg]})
59 cost_time = timer() - start_time
60 print("cost_time:", cost_time)
61 res = res[output_blob_6]
62 pred = res[0, 0, :, :]
63 predict = normPRED(pred)
64 im = predict * 255
65 im = cv2.cvtColor(im, cv2.COLOR_BGR2RGB)  # pytorch输入image是BGR,和OpenCV一致
66 imo = cv2.resize(im, (image_src.shape[1], image_src.shape[0]), cv2.INTER_LINEAR)
67 imo = np.uint8(imo)
68 # show
69 cv2.imshow("image_src", image_src)
70 cv2.imshow("vino-ret", imo)
71 cv2.waitKey(0)
my_OK_u2netp.py
 1 """
 2 u2netp
 3 """
 4
 5 import cv2
 6 from openvino.inference_engine import IECore
 7 from timeit import default_timer as timer
 8 import numpy as np
 9 from timeit import default_timer as timer
10
11 # normalize the predicted SOD probability map
12 def normPRED(d):
13     ma = np.max(d)
14     mi = np.min(d)
15     dn = (d - mi) / (ma - mi)
16     return dn
17 # ---------------------------Step 1. Initialize inference engine core--------------------------------------------------
18 ie = IECore()
19 device = "CPU"
20 # ---------------------------Step 2. Read a model in OpenVINO Intermediate Representation or ONNX format---------------
21 model_onnx = "data/u2netp_onnx.onnx"
22 net = ie.read_network(model=model_onnx)
23 # ---------------------------Step 3. Configure input & output----------------------------------------------------------
24 input_blob = next(iter(net.input_info))
25 output_blob = list()
26 for obj in iter(net.outputs):
27     output_blob.append(obj)
28 n, c, h, w = net.inputs[input_blob].shape
29 output_blob_6 = output_blob[6]
30 print("outputs's shape = ", net.outputs[output_blob[6]].shape)
31 """
32 读取数据模型
33 """
34 image_path = "d:/Data/7.jpg"
35 # dataloader
36 image_src = cv2.imread(image_path, -1)  # 必须是3通道
37 assert image_src.shape[2] == 3
38 """
39 数据预处理
40 """
41 image_src_ = cv2.cvtColor(image_src, cv2.COLOR_BGR2RGB)
42 # resize
43 image = cv2.resize(image_src_, (320, 320))
44 # sub the mean and var
45 tmpImg = np.zeros((image.shape[0], image.shape[1], 3))
46 image = image / np.max(image)
47 tmpImg[:, :, 0] = (image[:, :, 0] - 0.485) / 0.229
48 tmpImg[:, :, 1] = (image[:, :, 1] - 0.456) / 0.224
49 tmpImg[:, :, 2] = (image[:, :, 2] - 0.406) / 0.225
50 # change the r,g,b to b,r,g from [0,255] to [0,1]
51 tmpImg = tmpImg.transpose((2, 0, 1))
52 # ---------------------------Step 4. Loading model to the device-------------------------------------------------------
53 exec_net = ie.load_network(network=net, device_name=device)
54 # ---------------------------Step 5. Create infer request--------------------------------------------------------------
55 # ---------------------------Step 6. Prepare input---------------------------------------------------------------------
56 # ---------------------------Step 7. Do inference----------------------------------------------------------------------
57 start_time = timer()
58 res = exec_net.infer(inputs={input_blob: [tmpImg]})
59 cost_time = timer() - start_time
60 print("cost_time:", cost_time)
61 res = res[output_blob_6]
62 pred = res[0, 0, :, :]
63 predict = normPRED(pred)
64 im = predict * 255
65 im = cv2.cvtColor(im, cv2.COLOR_BGR2RGB)  # pytorch输入image是BGR,和OpenCV一致
66 imo = cv2.resize(im, (image_src.shape[1], image_src.shape[0]), cv2.INTER_LINEAR)
67 imo = np.uint8(imo)
68 # show
69 cv2.imshow("image_src", image_src)
70 cv2.imshow("vino-ret", imo)
71 cv2.waitKey(0)
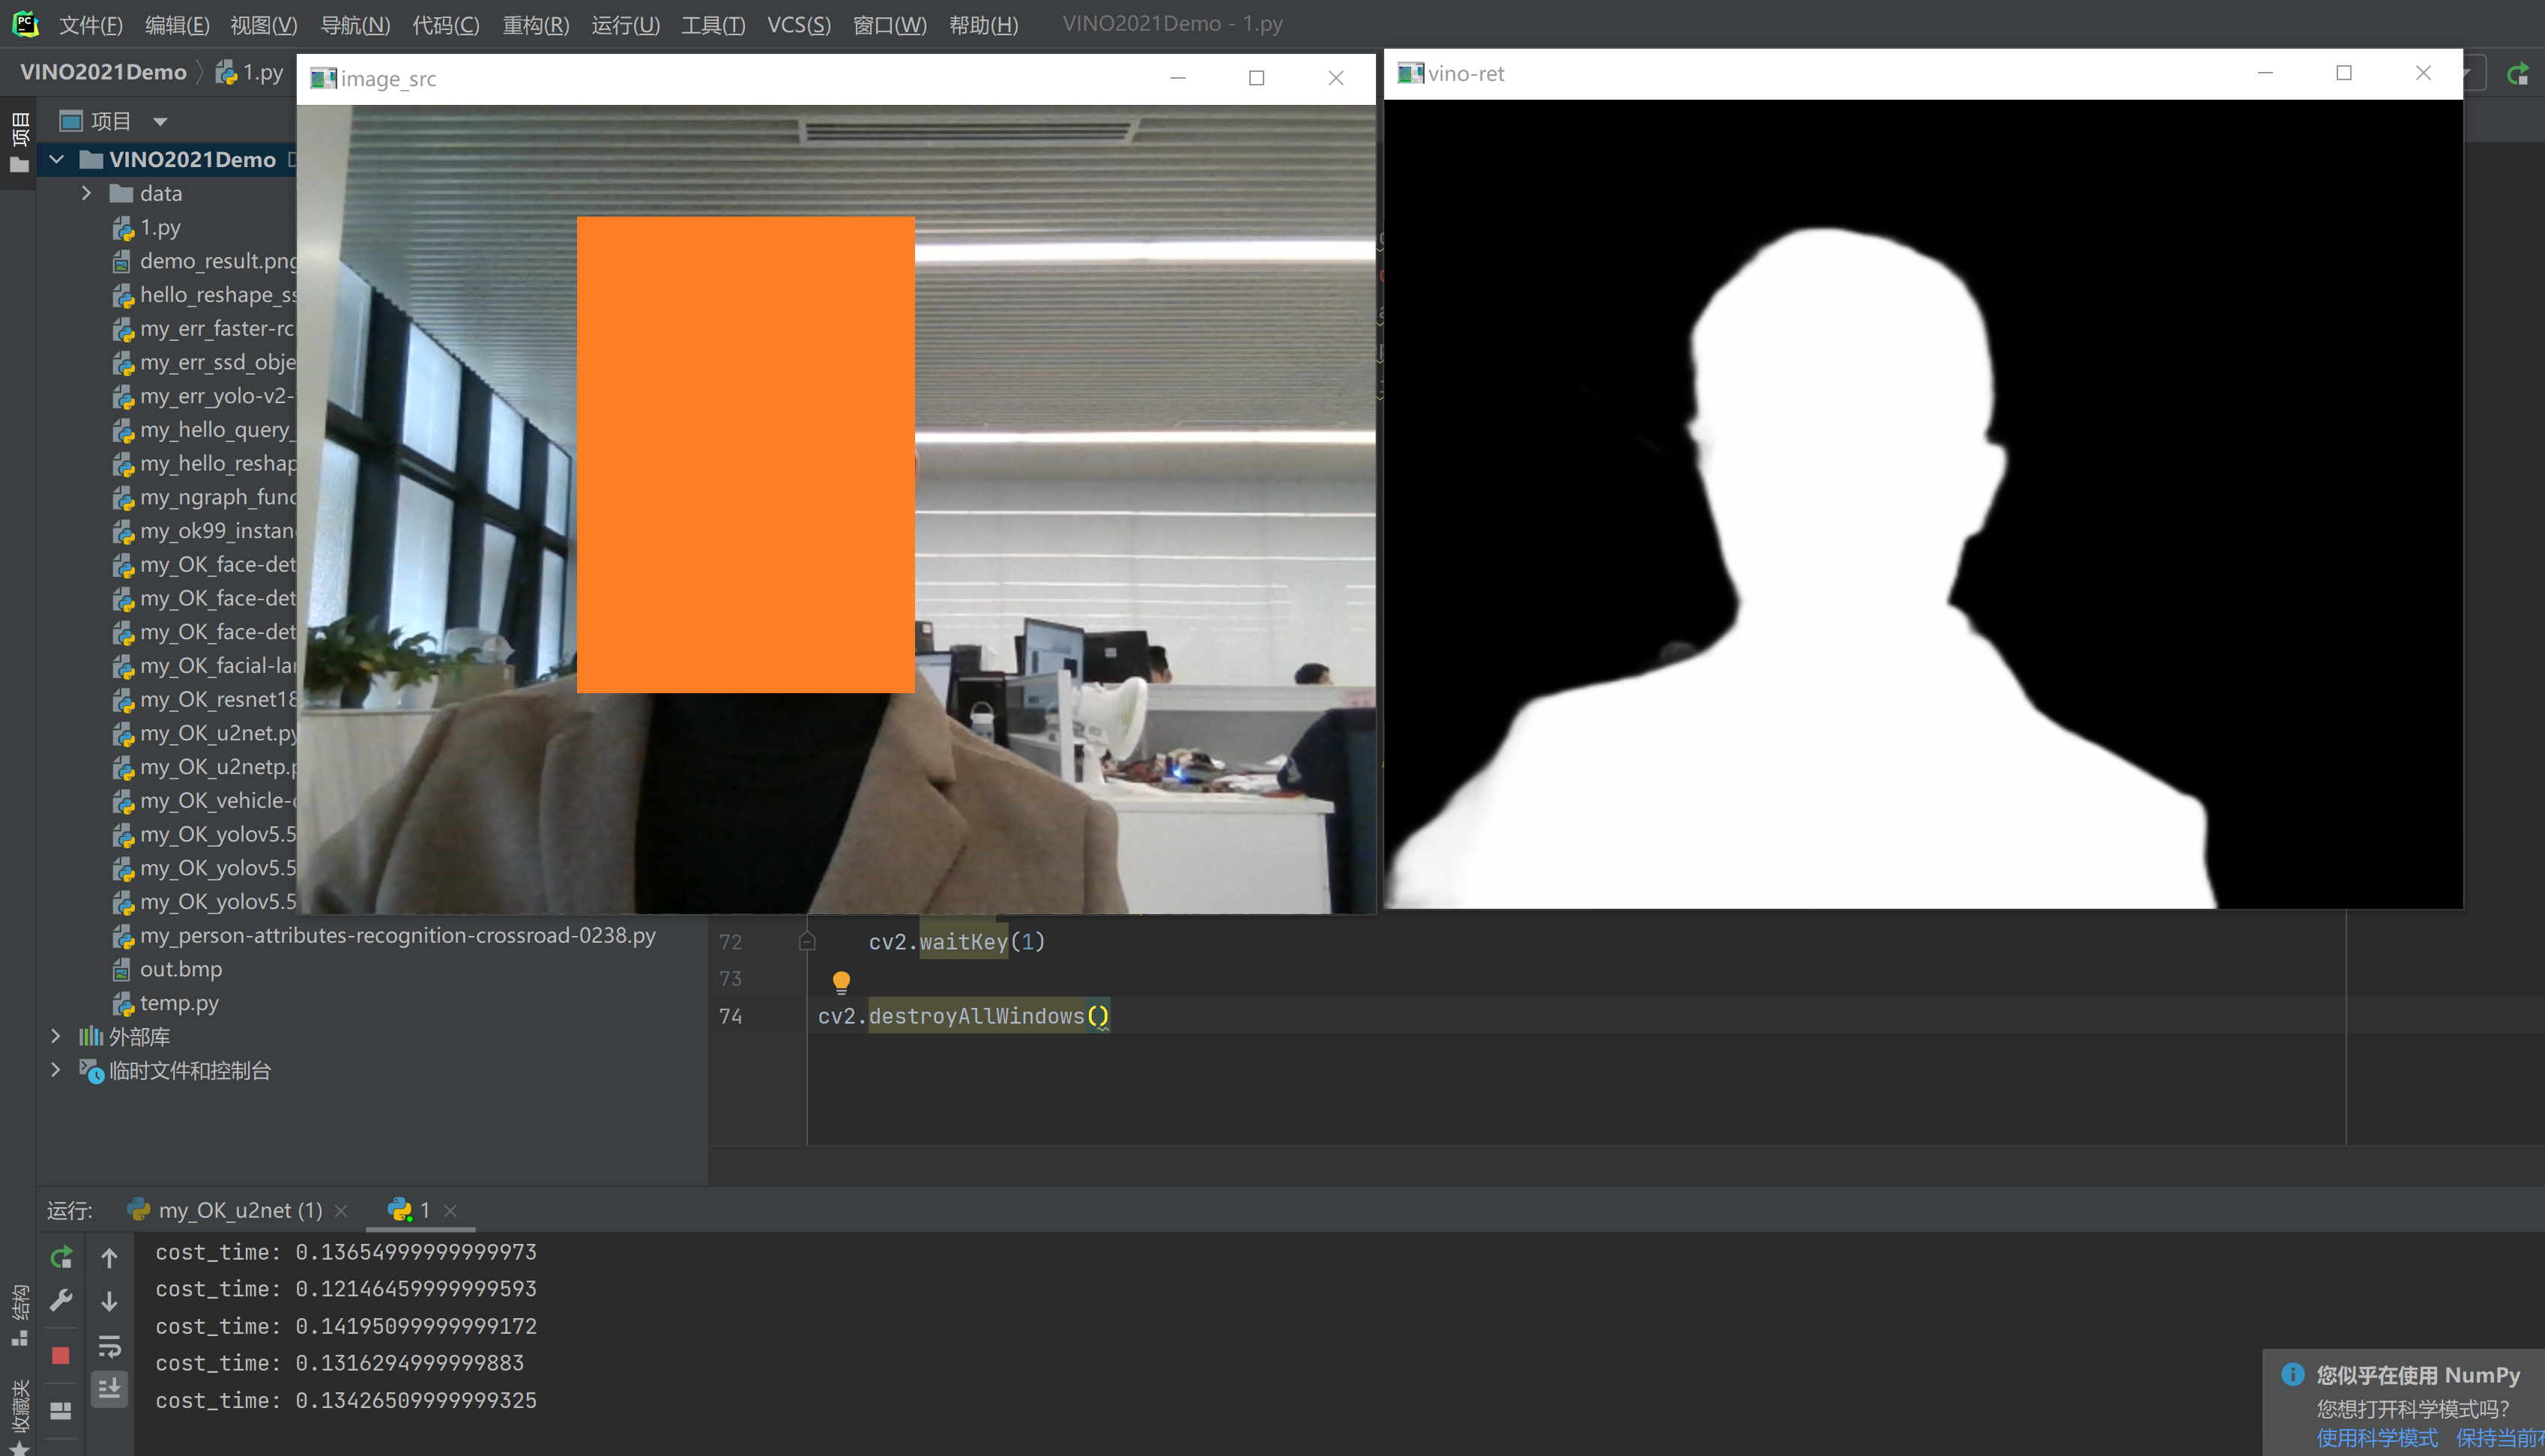
我们对比下,所有细节完全一致,咱们部署模型的效果达到了:

基于openvino+opencv的处理结果(左),基于torch+opencv的处理结果(右)
四、CPU上实时背景去除
感觉还可以啊。