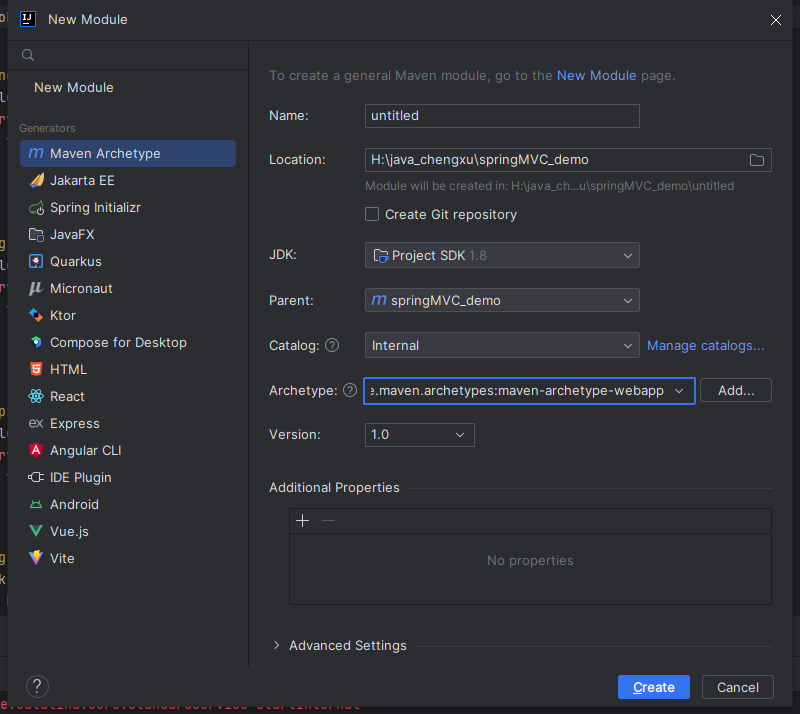
一、创建maven项目
二、导入相关坐标
在pom.xml中加入
    <dependencies>
        <dependency>
            <groupId>org.springframework</groupId>
            <artifactId>spring-webmvc</artifactId>
            <version>5.2.10.RELEASE</version>
        </dependency>

        <dependency>
            <groupId>org.springframework</groupId>
            <artifactId>spring-jdbc</artifactId>
            <version>5.2.10.RELEASE</version>
        </dependency>

        <dependency>
            <groupId>org.springframework</groupId>
            <artifactId>spring-test</artifactId>
            <version>5.2.10.RELEASE</version>
        </dependency>

        <dependency>
            <groupId>org.mybatis</groupId>
            <artifactId>mybatis</artifactId>
            <version>3.5.6</version>
        </dependency>

        <dependency>
            <groupId>org.mybatis</groupId>
            <artifactId>mybatis-spring</artifactId>
            <version>1.3.0</version>
        </dependency>

        <dependency>
            <groupId>mysql</groupId>
            <artifactId>mysql-connector-java</artifactId>
            <version>5.1.47</version>
        </dependency>

        <dependency>
            <groupId>com.alibaba</groupId>
            <artifactId>druid</artifactId>
            <version>1.1.16</version>
        </dependency>

        <dependency>
            <groupId>junit</groupId>
            <artifactId>junit</artifactId>
            <version>4.12</version>
            <scope>test</scope>
        </dependency>

        <dependency>
            <groupId>javax.servlet</groupId>
            <artifactId>javax.servlet-api</artifactId>
            <version>3.1.0</version>
            <scope>provided</scope>
        </dependency>

        <dependency>
            <groupId>com.fasterxml.jackson.core</groupId>
            <artifactId>jackson-databind</artifactId>
            <version>2.9.0</version>
        </dependency>
    </dependencies>
    <build>
        <finalName>spring_ssm_demo</finalName>
        <plugins>
            <plugin>
                <groupId>org.apache.tomcat.maven</groupId>
                <artifactId>tomcat7-maven-plugin</artifactId>
                <version>2.1</version>
                <configuration>
                    <port>8088</port>
                    <path>/</path>
                </configuration>
            </plugin>
        </plugins>
    </build>
三、创建配置类
1、创建SpringMvcConfig类配置SpringMvc
package com.itheima.config;

import org.springframework.context.annotation.ComponentScan;
import org.springframework.context.annotation.Configuration;
import org.springframework.web.servlet.config.annotation.EnableWebMvc;

@Configuration
@ComponentScan(basePackages = {"com.itheima.controller"})
@EnableWebMvc
public class SpringMvcConfig {
}
2、创建SpringConfig类
package com.itheima.config;

import org.springframework.context.annotation.ComponentScan;
import org.springframework.context.annotation.Configuration;
import org.springframework.context.annotation.Import;
import org.springframework.context.annotation.PropertySource;

@Configuration
@ComponentScan(basePackages = {"com.itheima.service", "com.itheima.dao"})
@PropertySource("classpath:jdbc.properties")
@Import({JdbcConfig.class,MyBatisConfig.class})
public class SpringConfig {
}
3、创建JdbcConfig类
package com.itheima.config;

import com.alibaba.druid.pool.DruidDataSource;
import org.springframework.beans.factory.annotation.Value;
import org.springframework.context.annotation.Bean;

import javax.sql.DataSource;

public class JdbcConfig {
    @Value("${jdbc.driver}")
    private String driver;
    @Value("${jdbc.url}")
    private String url;
    @Value("${jdbc.username}")
    private String username;
    @Value("${jdbc.password}")
    private String password;

    @Bean
    public DataSource dataSource() {
        DruidDataSource dataSource = new DruidDataSource();
        dataSource.setDriverClassName(driver);
        dataSource.setUrl(url);
        dataSource.setUsername(username);
        dataSource.setPassword(password);
        return dataSource;
    }
}
4、创建MyBatisConfig类
package com.itheima.config;

import org.mybatis.spring.SqlSessionFactoryBean;
import org.mybatis.spring.mapper.MapperScannerConfigurer;
import org.springframework.context.annotation.Bean;

import javax.sql.DataSource;


public class MyBatisConfig {
    // 配置mybatis的工厂
    @Bean
    public SqlSessionFactoryBean sqlSessionFactory(DataSource dataSource) {
        SqlSessionFactoryBean factoryBean = new SqlSessionFactoryBean();
        factoryBean.setDataSource(dataSource);
        factoryBean.setTypeAliasesPackage("com.itheima.domain");
        return factoryBean;
    }
    // 配置mybatis的扫描
    @Bean
    public MapperScannerConfigurer mapperScannerConfigurer() {
        MapperScannerConfigurer msc = new MapperScannerConfigurer();
        // 指定dao所在的包
        msc.setBasePackage("com.itheima.dao");
        return msc;
    }
}
5、创建数据源配置文件,在resources文件夹下创建,jdbc.properties文件
jdbc.driver=com.mysql.jdbc.Driver
jdbc.url=jdbc:mysql://127.0.0.1:3306/test?useSSL=false
jdbc.username=root
jdbc.password=123456
6、创建ServcletConfig类
package com.itheima.config;

import org.springframework.web.servlet.support.AbstractAnnotationConfigDispatcherServletInitializer;

public class ServletConfig extends AbstractAnnotationConfigDispatcherServletInitializer {
    // 配置Spring
    @Override
    protected Class<?>[] getRootConfigClasses() {
        return new Class[]{SpringConfig.class};
    }
    // 配置
    @Override
    protected Class<?>[] getServletConfigClasses() {
        return new Class[]{SpringMvcConfig.class};
    }
    // 映射,将所有请求映射到SpringMVC中
    @Override
    protected String[] getServletMappings() {
        return new String[]{"/"};
    }
}
四、创建数据库类
创建domain文件夹,并在下面创建Book类
package com.itheima.domain;

public class Book {
    private Integer id;
    private String type;
    private String name;
    private String description;

    @Override
    public String toString() {
        return "Book{" +
                "id=" + id +
                ", type='" + type + '\'' +
                ", name='" + name + '\'' +
                ", description='" + description + '\'' +
                '}';
    }

    public Integer getId() {
        return id;
    }

    public void setId(Integer id) {
        this.id = id;
    }

    public String getType() {
        return type;
    }

    public void setType(String type) {
        this.type = type;
    }

    public String getName() {
        return name;
    }

    public void setName(String name) {
        this.name = name;
    }

    public String getDescription() {
        return description;
    }

    public void setDescription(String description) {
        this.description = description;
    }
}
五、创建Dao层
创建Dao文件夹,并创建BookDao接口文件
package com.itheima.dao;

import com.itheima.domain.Book;
import org.apache.ibatis.annotations.Delete;
import org.apache.ibatis.annotations.Insert;
import org.apache.ibatis.annotations.Select;
import org.apache.ibatis.annotations.Update;

import java.util.List;

public interface BookDao {
    @Insert("insert into tbl_book (type,name,description) values(#{type},#{name},#{description})")
    public void save(Book book);

    @Update("update tbl_book set type = #{type}, name = #{name}, description = #{description} where id = #{id}")
    public void update(Book book);

    @Delete("delete from tbl_book where id = #{id}")
    public void delete(Integer id);

    @Select("select * from tbl_book where id = #{id}")
    public Book getById(Integer id);

    @Select("select * from tbl_book")
    public List<Book> getAll();
}
六、创建Service层
1、在service文件夹下创建BookService接口类
package com.itheima.service;

import com.itheima.domain.Book;
import org.springframework.transaction.annotation.Transactional;

import java.util.List;

@Transactional
public interface BookService {
    /**
     * 保存
     * @param book
     * @return
     */
    public boolean save(Book book);

    /**
     * 修改
     * @param book
     * @return
     */
    public boolean update(Book book);

    /**
     * 按id删除
     * @param id
     * @return
     */
    public boolean delete(Integer id);

    /**
     * 按id查询
     * @param id
     * @return
     */
    public Book getById(Integer id);

    /**
     * 查询全部
     * @return
     */
    public List<Book> getAll();
}
2、创建BookService实现类,在service文件夹下创建impl文件夹并创建BookServiceImpl类文件
package com.itheima.service.impl;

import com.itheima.dao.BookDao;
import com.itheima.domain.Book;
import com.itheima.service.BookService;
import org.springframework.beans.factory.annotation.Autowired;
import org.springframework.stereotype.Service;


import java.util.List;
@Service
public class BookServiceImpl implements BookService {
    @Autowired
    private BookDao bookDao;

    public boolean save(Book book) {
        bookDao.save(book);
        return true;
    }

    public boolean update(Book book) {
        bookDao.update(book);
        return true;
    }

    public boolean delete(Integer id) {
        bookDao.delete(id);
        return true;
    }

    public Book getById(Integer id) {
        return bookDao.getById(id);
    }

    public List<Book> getAll() {
        return bookDao.getAll();
    }

}
七、创建controller层
创建controller文件夹并创建BookController类文件
package com.itheima.controller;

import com.itheima.dao.BookDao;
import com.itheima.domain.Book;
import com.itheima.service.BookService;
import org.springframework.beans.factory.annotation.Autowired;
import org.springframework.web.bind.annotation.*;

import java.util.List;

@RestController
@RequestMapping("/books")
public class BookController {
    @Autowired
    private BookService bookService;

    @PostMapping("/save")
    public Boolean save(@RequestBody Book book) {
        bookService.save(book);
        return true;
    }


    @PutMapping("/update")
    public Boolean update(@RequestBody Book book) {
        bookService.update(book);
        return true;
    }


    @DeleteMapping("/{id}")
    public Boolean delete(@PathVariable Integer id) {
        bookService.delete(id);
        return true;
    }

    @GetMapping("/{id}")
    public Book getById(@PathVariable Integer id) {
        return bookService.getById(id);
    }

    @GetMapping
    public List<Book> getAll() {
        return bookService.getAll();
    }

}
到此,就创建完了。接下来两种方式测试下是否成功。
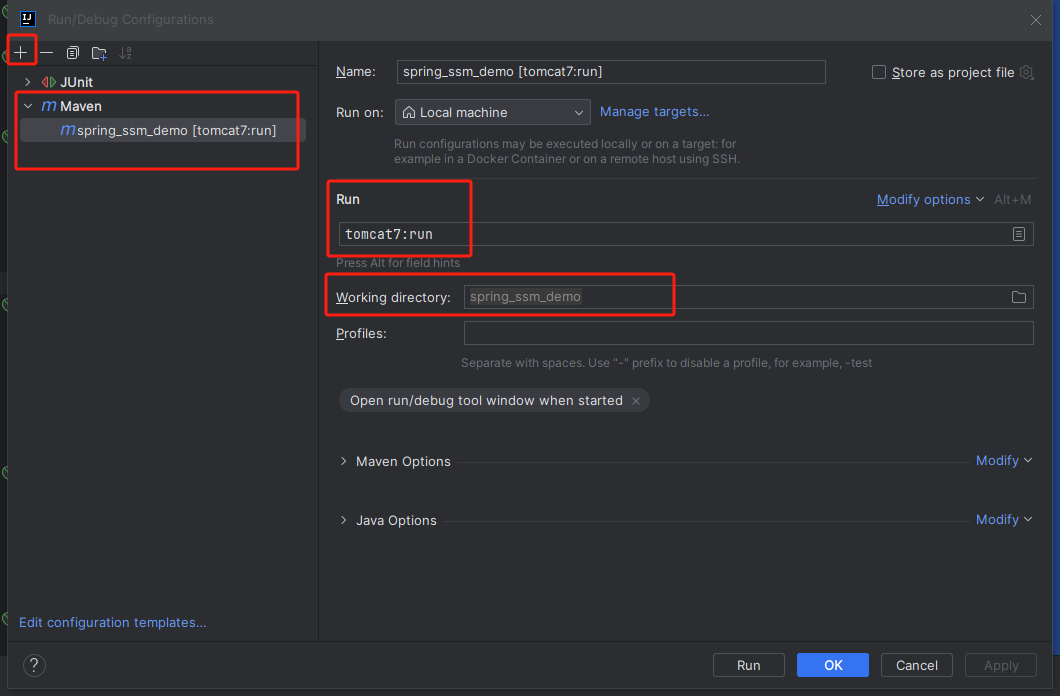
八、配置tomcat,启动项目
九、写测试类,进行测试
在test文件夹下的java文件夹下创建测试类BookServiceTest文件
import com.itheima.config.SpringConfig;
import com.itheima.domain.Book;
import com.itheima.service.BookService;
import org.junit.Test;
import org.junit.runner.RunWith;
import org.springframework.beans.factory.annotation.Autowired;
import org.springframework.test.context.ContextConfiguration;
import org.springframework.test.context.junit4.SpringJUnit4ClassRunner;

import java.util.List;

@RunWith(SpringJUnit4ClassRunner.class)
@ContextConfiguration(classes = SpringConfig.class)
public class BookServiceTest {

    @Autowired
    private BookService bookService;

    @Test
    public void testGetById(){
        Book book = bookService.getById(1);
        System.out.println(book);
    }

    @Test
    public void testGetAll(){
        List<Book> all = bookService.getAll();
        System.out.println(all);
    }

}
测试类的运行不必要进行第八步启动项目。测试类可以单独运行。