一、NFS存储
使用master-1-230 节点做NFS服务器,具体安装步骤参考:https://www.cnblogs.com/pythonlx/p/17766242.html (4.1 在master节点搭建NFS)
node节点查看NFS挂载目录
# # showmount -e 192.168.1.230
Export list for 192.168.1.230:
/data/kubernetes *
/data/nfs_test   *
/data/nfs        *
定义基于NFS的PV
vim nfs-pv.yaml
apiVersion: v1
kind: PersistentVolume
metadata:
  name: nfs-pv
spec:
  capacity:
    storage: 5Gi
  accessModes:
    - ReadWriteMany
  persistentVolumeReclaimPolicy: Retain
  storageClassName: nfs-storage
  nfs:
    path: /data/nfs_test
    server: 192.168.1.230
应用YAML
# kubectl apply  -f nfs-pv.yaml
persistentvolume/nfs-pv created
定义PVC
vim nfs-pvc.yaml
apiVersion: v1
kind: PersistentVolumeClaim
metadata:
  name: nfs-pvc
spec:
  storageClassName: nfs-storage
  accessModes:
    - ReadWriteMany
  resources:
    requests:
      storage: 5Gi
应用YAML
# kubectl  apply -f nfs-pvc.yaml
persistentvolumeclaim/nfs-pvc created
定义Pod
vim nfs-pod.yaml
apiVersion: v1
kind: Pod
metadata:
  name: nfs-pod
spec:
  containers:
  - name: nfs-container
    image: nginx:1.25.2
    volumeMounts:
    - name: nfs-storage
      mountPath: /data
  volumes:
  - name: nfs-storage
    persistentVolumeClaim:
      claimName: nfs-pvc
应用YAML
# kubectl  apply -f nfs-pod.yaml
pod/nfs-pod created
验证:
# kubectl exec -it nfs-pod -- bash
root@nfs-pod:/# echo "hello kubernetes" >/data/hello.txt
root@nfs-pod:/# exit
exit
[root@master-1-230 6.3]# cat /data/nfs_test/hello.txt
hello kubernetes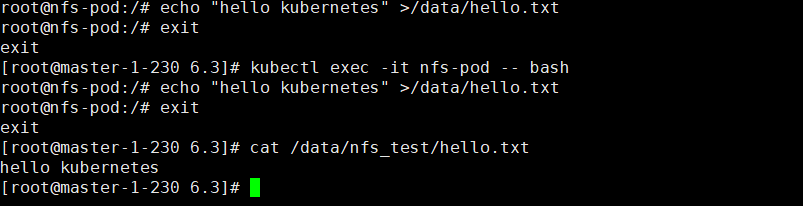
二、API资源对象StorageClass
SC 主要作用:自动创建PV,实现PVC按需自动绑定PV
使用NFS的sc需要安装NFS provisioner,可以自动创建NFS的pv。使用gitee 导入 https://github.com/kubernetes-sigs/nfs-subdir-external-provisioner
下载源代码
# git clone https://gitee.com/ikubernetesi/nfs-subdir-external-provisioner.git
正克隆到 'nfs-subdir-external-provisioner'...
remote: Enumerating objects: 7784, done.
remote: Counting objects: 100% (7784/7784), done.
remote: Compressing objects: 100% (3052/3052), done.
remote: Total 7784 (delta 4443), reused 7784 (delta 4443), pack-reused 0
接收对象中: 100% (7784/7784), 8.44 MiB | 2.08 MiB/s, done.
处理 delta 中: 100% (4443/4443), done.
# cd nfs-subdir-external-provisioner/deploy/
[root@master-1-230 deploy]# sed -i 's/namespace: default/namespace: kube-system/' rbac.yaml
[root@master-1-230 deploy]# kubectl apply -f rbac.yaml
serviceaccount/nfs-client-provisioner unchanged
clusterrole.rbac.authorization.k8s.io/nfs-client-provisioner-runner unchanged
clusterrolebinding.rbac.authorization.k8s.io/run-nfs-client-provisioner unchanged
role.rbac.authorization.k8s.io/leader-locking-nfs-client-provisioner unchanged
rolebinding.rbac.authorization.k8s.io/leader-locking-nfs-client-provisioner unchanged修改修改deployment.yaml
sed -i 's/namespace: default/namespace: kube-system/' deployment.yaml ##修改命名空间为kube-system修改nfs-subdir-external-provisioner镜像仓库和nfs地址
cat deployment.yaml
# cat deployment.yaml
apiVersion: apps/v1
kind: Deployment
metadata:
  name: nfs-client-provisioner
  labels:
    app: nfs-client-provisioner
  # replace with namespace where provisioner is deployed
  namespace: default
spec:
  replicas: 1
  strategy:
    type: Recreate
  selector:
    matchLabels:
      app: nfs-client-provisioner
  template:
    metadata:
      labels:
        app: nfs-client-provisioner
    spec:
      serviceAccountName: nfs-client-provisioner
      containers:
        - name: nfs-client-provisioner
          image: registry.cn-hangzhou.aliyuncs.com/kavin1028/nfs-subdir-external-provisioner:v4.0.2
          volumeMounts:
            - name: nfs-client-root
              mountPath: /persistentvolumes
          env:
            - name: PROVISIONER_NAME
              value: k8s-sigs.io/nfs-subdir-external-provisioner
            - name: NFS_SERVER
              value: 192.168.1.230
            - name: NFS_PATH
              value: /data/kubernetes
      volumes:
        - name: nfs-client-root
          nfs:
            server: 192.168.1.230
            path: /data/kubernetes
SC YAML示例
# cat class.yaml
apiVersion: storage.k8s.io/v1
kind: StorageClass
metadata:
  name: nfs-client
provisioner: k8s-sigs.io/nfs-subdir-external-provisioner # or choose another name, must match deployment's env PROVISIONER_NAME'
parameters:
  archiveOnDelete: "false"
应用YAML
# kubectl  apply -f deployment.yaml  -f class.yaml
deployment.apps/nfs-client-provisioner created
storageclass.storage.k8s.io/nfs-client created
创建PVC
vim nfsPvc.yaml
apiVersion: v1
kind: PersistentVolumeClaim
metadata:
  name: nfspvc

spec:
  storageClassName: nfs-client
  accessModes:
    - ReadWriteMany

  resources:
    requests:
      storage: 200Mi
创建Pod绑定PVC
vim nfsPod.yaml
apiVersion: v1
kind: Pod
metadata:
  name: nfspod
spec:
  containers:
  - name: nfspod
    image: nginx:1.25.2
    volumeMounts:
    - name: nfspv
      mountPath: "/usr/share/nginx/html"
  volumes:
  - name: nfspv
    persistentVolumeClaim:
      claimName: nfspvc
应用YAML
# kubectl  apply -f nfsPvc.yaml
persistentvolumeclaim/nfspvc created
# kubectl  apply -f nfsPod.yaml
pod/nfspod created
验证:
进入容器创建index.html 文件,写入数据后在nfs服务器查看数据
# kubectl  exec -it nfspod -- bash
root@nfspod:/# cd /usr/share/nginx/html/
root@nfspod:/usr/share/nginx/html# echo 'hello kubernetes2023' >index.html
root@nfspod:/usr/share/nginx/html# ls
index.html
root@nfspod:/usr/share/nginx/html# curl http://127.0.0.1/index.html
hello kubernetes2023
三、Ceph存储-搭建ceph集群
Kubernetes使用Ceph作为存储,有两种方式:
- 将Ceph部署在Kubernetes里,要借助一个工具rook
- 使用外部的Ceph集群。
3.1 搭建Ceph集群
3.1.1 准备工作
cat deployment.yaml
# crontab  -l
* * * * * /usr/sbin/ntpdate time1.aliyun.com| 集群变化 | 主机名 | IP |
| 1 | node-1-231 | 192.168.1.231 |
| 2 | node-1-232 | 192.168.1.232 |
| 3 | node-1-233 | 192.168.1.233 |
# crontab  -l
* * * * * /usr/sbin/ntpdate time1.aliyun.com[ceph]
name=ceph
baseurl=http://mirrors.aliyun.com/ceph/rpm-pacific/el8/x86_64/
gpgcheck=0
priority =1
[ceph-noarch]
name=cephnoarch
baseurl=http://mirrors.aliyun.com/ceph/rpm-pacific/el8/noarch/
gpgcheck=0
priority =1
[ceph-source]
name=Ceph source packages
baseurl=http://mirrors.aliyun.com/ceph/rpm-pacific/el8/SRPMS
gpgcheck=0
priority=1yum install -y yum-utils ]# yum-config-manager \
> --add-repo \
> https://download.docker.com/linux/centos/docker-ce.repo
已加载插件:fastestmirror
adding repo from: https://download.docker.com/linux/centos/docker-ce.repo
grabbing file https://download.docker.com/linux/centos/docker-ce.repo to /etc/yum.repos.d/docker-ce.repo
repo saved to /etc/yum.repos.d/docker-ce.repo安装docker-ce
yum install -y docker-ce配置镜像加速
sudo tee /etc/docker/daemon.json <<-'EOF'
{
  "registry-mirrors": ["https://1pew6xht.mirror.aliyuncs.com"],
  "exec-opts": ["native.cgroupdriver=systemd"],
  "log-driver": "json-file",
  "log-opts": {
    "max-size": "100m",
    "max-file":"1"
  },
  "storage-driver": "overlay2"
}
EOF
sudo systemctl daemon-reload
sudo systemctl restart docker
检验是否生效
docker info |grep -A 3 "Registry Mirrors"启动服务
systemctl start docker
systemctl enable docker
所有机器安装python3、lvm2(三台都做)
yum install -y python3 lvm23.1.2 安装cephadm (node-1-231)
yum install -y cephadm3.1.3 使用cephadm部署ceph(node-1-231)
# cephadm  bootstrap --mon-ip 192.168.1.231
  File "/usr/sbin/cephadm", line 84
    logger: logging.Logger = None  # type: ignore
          ^
SyntaxError: invalid syntax

注意:第一次执行报错,修改,/usr/sbin/cephadm 引用的python路径
# more /usr/sbin/cephadm
#! /usr/bin/python3
#/usr/libexec/platform-python -s
cephadm bootstrap --mon-ip 192.168.1.231
 # cephadm  bootstrap --mon-ip 192.168.1.231
Creating directory /etc/ceph for ceph.conf
Verifying podman|docker is present...
Verifying lvm2 is present...
Verifying time synchronization is in place...
Unit chronyd.service is enabled and running
Repeating the final host check...
docker (/usr/bin/docker) is present
systemctl is present
lvcreate is present
Unit chronyd.service is enabled and running
Host looks OK
Cluster fsid: ee7e33cc-7334-11ee-a911-000c29b31cf8
Verifying IP 192.168.1.231 port 3300 ...
Verifying IP 192.168.1.231 port 6789 ...
Mon IP `192.168.1.231` is in CIDR network `192.168.1.0/24`
Mon IP `192.168.1.231` is in CIDR network `192.168.1.0/24`
Internal network (--cluster-network) has not been provided, OSD replication will default to the public_network
Pulling container image quay.io/ceph/ceph:v16...

Ceph version: ceph version 16.2.14 (238ba602515df21ea7ffc75c88db29f9e5ef12c9) pacific (stable)
Extracting ceph user uid/gid from container image...
Creating initial keys...
Creating initial monmap...
Creating mon...
Waiting for mon to start...
Waiting for mon...
mon is available
Assimilating anything we can from ceph.conf...
Generating new minimal ceph.conf...
Restarting the monitor...
Setting mon public_network to 192.168.1.0/24
Wrote config to /etc/ceph/ceph.conf
Wrote keyring to /etc/ceph/ceph.client.admin.keyring
Creating mgr...
Verifying port 9283 ...
Waiting for mgr to start...
Waiting for mgr...
mgr not available, waiting (1/15)...
mgr not available, waiting (2/15)...
mgr not available, waiting (3/15)...
mgr is available
Enabling cephadm module...
Waiting for the mgr to restart...
Waiting for mgr epoch 5...
mgr epoch 5 is available
Setting orchestrator backend to cephadm...
Generating ssh key...
Wrote public SSH key to /etc/ceph/ceph.pub
Adding key to root@localhost authorized_keys...
Adding host node-1-231...
Deploying mon service with default placement...
Deploying mgr service with default placement...
Deploying crash service with default placement...
Deploying prometheus service with default placement...
Deploying grafana service with default placement...
Deploying node-exporter service with default placement...
Deploying alertmanager service with default placement...
Enabling the dashboard module...
Waiting for the mgr to restart...
Waiting for mgr epoch 9...
mgr epoch 9 is available
Generating a dashboard self-signed certificate...
Creating initial admin user...
Fetching dashboard port number...
Ceph Dashboard is now available at:

	     URL: https://node-1-231:8443/
	    User: admin
	Password: tonmrqb80x

Enabling client.admin keyring and conf on hosts with "admin" label
Enabling autotune for osd_memory_target
You can access the Ceph CLI as following in case of multi-cluster or non-default config:

	sudo /usr/sbin/cephadm shell --fsid ee7e33cc-7334-11ee-a911-000c29b31cf8 -c /etc/ceph/ceph.conf -k /etc/ceph/ceph.client.admin.keyring

Or, if you are only running a single cluster on this host:

	sudo /usr/sbin/cephadm shell

Please consider enabling telemetry to help improve Ceph:

	ceph telemetry on

For more information see:

	https://docs.ceph.com/en/pacific/mgr/telemetry/

Bootstrap complete.
[root@node-1-231 ~]#
3.1.4 访问dashboard
https://192.168.1.231:8443/
更改密码后,使用新密码登录控制台
3.1.5 增加host
首先进入ceph shell (node-1-231)
# cephadm  shell
Inferring fsid ee7e33cc-7334-11ee-a911-000c29b31cf8
Using recent ceph image quay.io/ceph/ceph@sha256:78572a6fe59578df2799d53ca121619a479252d814898c01d85c92523963f7aa
[ceph: root@node-1-231 /]#
生成密钥对
[ceph: root@node-1-231 /]# ceph cephadm get-pub-key > ~/ceph.pub配置到另外两台机器免密钥登录
# pwd
/root
[ceph: root@node-1-231 ~]# ls -l
total 4
-rw-r--r-- 1 root root 595 Oct 25 13:03 ceph.pub
[ceph: root@node-1-231 ~]# ssh-copy-id -f -i ceph.pub  root@node-1-232
/usr/bin/ssh-copy-id: INFO: Source of key(s) to be installed: "ceph.pub"
The authenticity of host 'node-1-232 (192.168.1.232)' can't be established.
ECDSA key fingerprint is SHA256:rLW2DFKnj3exSSD+kgjfNyI54YmUQ/D3uKicnTFNYSs.
Are you sure you want to continue connecting (yes/no/[fingerprint])? yes
root@node-1-232's password:

Number of key(s) added: 1

Now try logging into the machine, with:   "ssh 'root@node-1-232'"
and check to make sure that only the key(s) you wanted were added.

[ceph: root@node-1-231 ~]# ssh-copy-id -f -i ceph.pub  root@node-1-233
/usr/bin/ssh-copy-id: INFO: Source of key(s) to be installed: "ceph.pub"
The authenticity of host 'node-1-233 (192.168.1.233)' can't be established.
ECDSA key fingerprint is SHA256:AzXtP3QebO2w3tJLc0xYKep++z1OCGpYtGIHNHfqLzE.
Are you sure you want to continue connecting (yes/no/[fingerprint])? yes
root@node-1-233's password:

Number of key(s) added: 1

Now try logging into the machine, with:   "ssh 'root@node-1-233'"
and check to make sure that only the key(s) you wanted were added.
到浏览器添加主机
# ceph orch host add node-1-231
Added host 'node-1-231' with addr '192.168.1.231'
[ceph: root@node-1-231 ~]# ceph orch host add node-1-232
Added host 'node-1-232' with addr '192.168.1.232'
[ceph: root@node-1-231 ~]# ceph orch host add node-1-233
Added host 'node-1-233' with addr '192.168.1.233'
验证:
# ceph orch host ls
HOST        ADDR           LABELS  STATUS
node-1-231  192.168.1.231  _admin
node-1-232  192.168.1.232
node-1-233  192.168.1.233
3 hosts in cluster
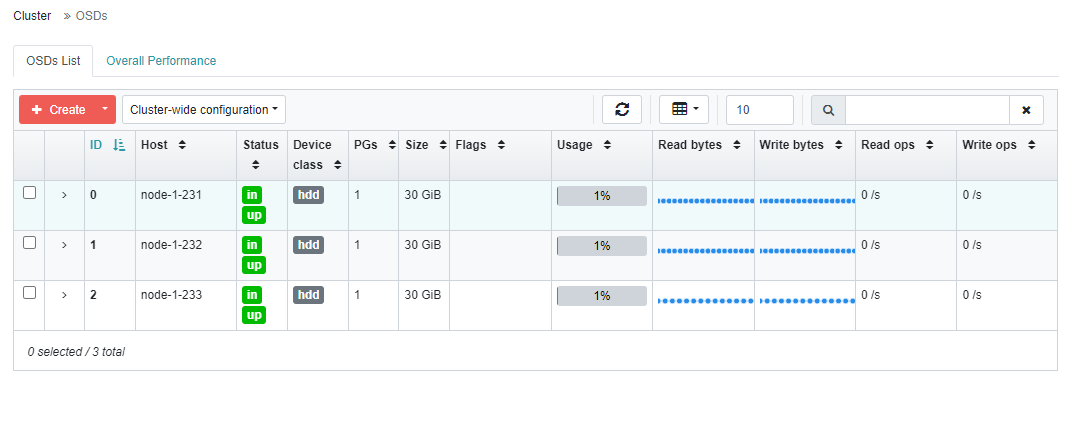
3.1.6 创建OSD (ceph shell 模式下,在ceph上操作)
使用fdisk -l 查看到,新增的磁盘为/dev/sdb
# ceph orch host ls
HOST        ADDR           LABELS  STATUS
node-1-231  192.168.1.231  _admin
node-1-232  192.168.1.232
node-1-233  192.168.1.233
3 hosts in cluster
[ceph: root@node-1-231 /]# ceph orch daemon add osd node-1-231:/dev/sdb
Created osd(s) 0 on host 'node-1-231'
[ceph: root@node-1-231 /]# ceph orch daemon add osd node-1-232:/dev/sdb
Created osd(s) 1 on host 'node-1-232'
[ceph: root@node-1-231 /]# ceph orch daemon add osd node-1-233:/dev/sdb
Created osd(s) 2 on host 'node-1-233'
查看磁盘列表
# ceph orch device ls
HOST        PATH      TYPE  DEVICE ID   SIZE  AVAILABLE  REFRESHED  REJECT REASONS
node-1-231  /dev/sdb  hdd              30.0G             60s ago    Insufficient space (<10 extents) on vgs, LVM detected, locked
node-1-232  /dev/sdb  hdd              30.0G             20s ago    Insufficient space (<10 extents) on vgs, LVM detected, locked
node-1-233  /dev/sdb  hdd              30.0G             20s ago    Insufficient space (<10 extents) on vgs, LVM detected, locked
在dashboard验证
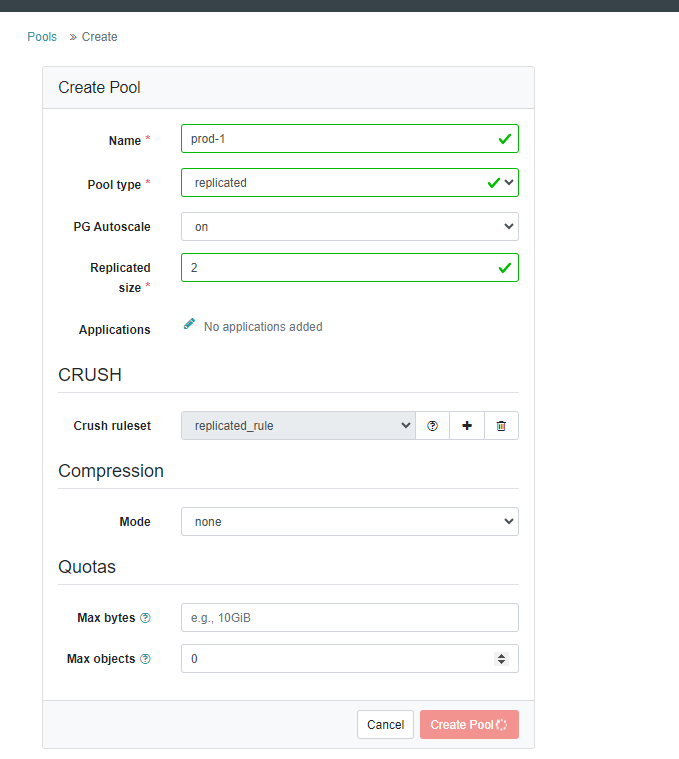
3.1.7 创建pool
3.1.8 查看集群状态
# ceph -s
  cluster:
    id:     ee7e33cc-7334-11ee-a911-000c29b31cf8
    health: HEALTH_OK

  services:
    mon: 3 daemons, quorum node-1-231,node-1-233,node-1-232 (age 9m)
    mgr: node-1-231.sxkpgc(active, since 12m), standbys: node-1-233.zqpruy
    osd: 3 osds: 3 up (since 2m), 3 in (since 2m)

  data:
    pools:   2 pools, 2 pgs
    objects: 0 objects, 0 B
    usage:   871 MiB used, 89 GiB / 90 GiB avail
    pgs:     50.000% pgs unknown
             1 active+clean
             1 unknown
3.1.9 针对prod-1 pool 启用rbd application
# ceph osd pool application enable  prod-1 rbd
enabled application 'rbd' on pool 'prod-1'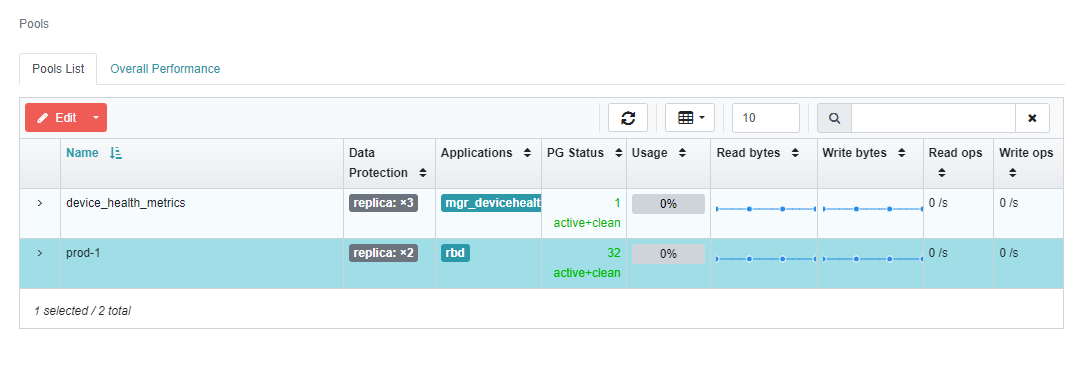
3.1.10 初始化pool
rbd pool init prod-1
四、Ceph存储-在k8s里使用ceph