Random Forest Classifier On Malware
(copyright 2020 by YI SHA, if you want to re-post this,please send me an email:shayi1983end@gmail.com)
(全英语版)处理恶意软件的随机森林分类器算法(Random Forest Classifier On Malware)Overview
随机森林分类器是最近很流行的一种识别恶意软件的机器学习算法,由 python 编程语言实现;用于杀毒软件的传统基于特征码、签名、启发式识别已经无法完全检测大量的变体,因此需要一种高效和准确的方法。很幸运的是我们有开源的 sklearn 库能够利用:
In this tutorial,I'll show you how to use random forest classifier machine learning algorithm to detect malware by Python programming language;
The traditional yet obsolete signature-based or heuristic approach used by majority anti-virus softwares are no longer suitable for detecting huge-scale malware variations emerged nowadays;for these billions of variations,we need a fast、automatically and accurately way to make judgement about an unknown software binary is malicious or benign;
The Python sklearn library provide a Random Forest Classifier Class for doing this job excellently,note the simplest way of using random forest algorithm is in a dichotomy scenario:determine or classified an unknown object into its two possible categories ;which means any task that involve dichotomy,not merely malware-benign ware identification,can take advantage of Random Forest Classifier;
So let's enter our topic,from a high-level overview perspective,I'll extract any printable string whose length large than five characters from the two training datasets:malware and benign ware,respectively;then compress these data using hashing trick to save memory usage and boosting analysis speed;then I use these data,along with a label vector,to train our random forest classifier machine learning model,make it to have a general concept about what is a malware or benign ware;finally,I pass in a sheer previously unseen Windows PE binary file to this classifier,let it make prediction,the resulting value is a probability of its maliciousness,and feed this to other components logic inside an anti-virus;
(don't worry too much about aforementioned terminologies,I will explain them as I bring you to the code line by line;)
Implementation and Execution
We import the first three prerequis Python libraries:
✔ re(regular expression);
✔ numpy;
✔ FeatureHasher Class(perform string hashing ):

The definition of function get_string_features() as shown in following figures,it take an absolute filename path as its first argument,and an instance of FeatureHasher Class as its 2nd argument;
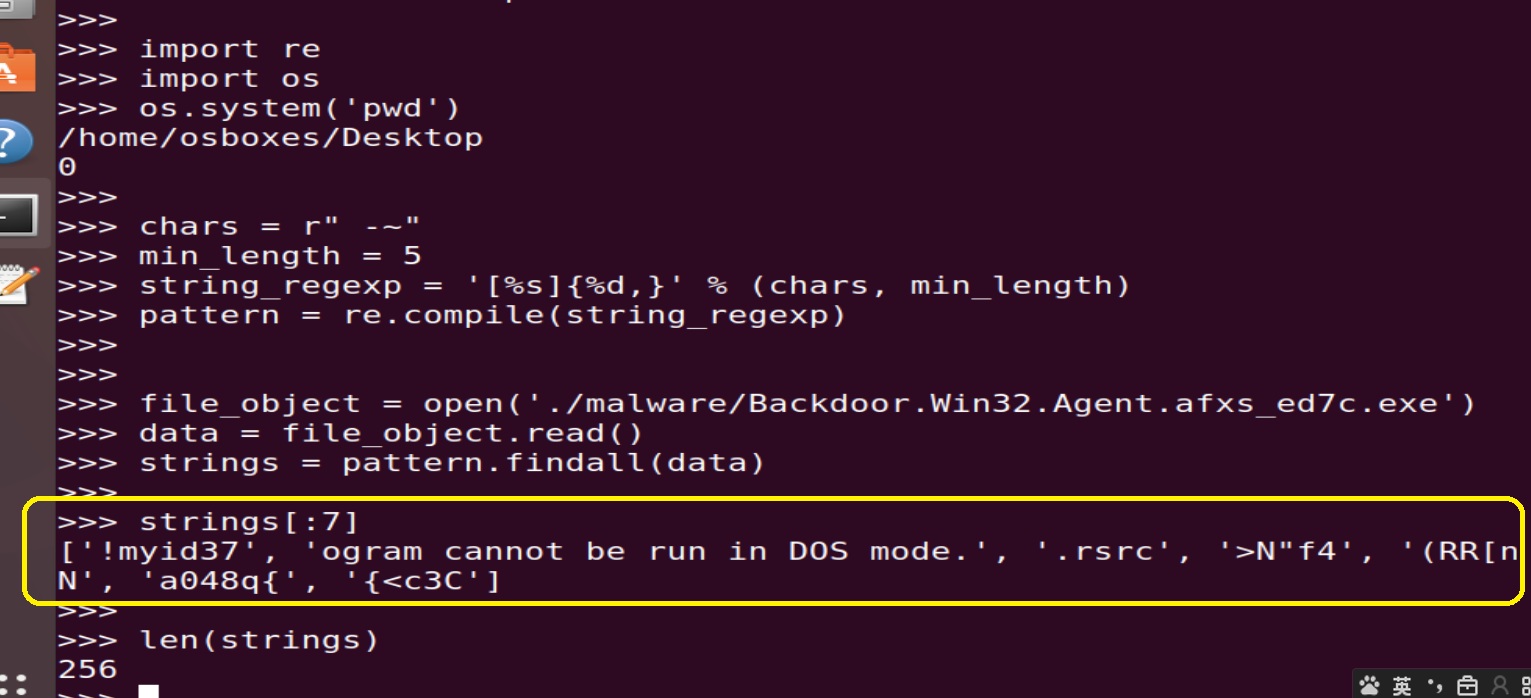
The "front-end" of this function open a PE binary file specified by caller,and use regular expression performing text match on that file,return all matched strings into a list(the variable strings);

For example,if we extract strings from a malware binary using above code snippet,findall() method will return a list containing all candidate strings:
The "back-end" of this function iterate over this strings list,using every string as a key,and 1 as its corresponding value to build a feature dictionary,indicating that string existing within this binary;then it use the transform() method coming from FeatureHasher Class, to compress this dictionary,after that,dense the resulting sparse matrix,convert it to a standard numpy array,and return the first element to the caller:

To make this point more clear,I do some experiment to show you the internal working of that code chunk:


As you can see from the above figure,compare to the original list we used for storage raw strings,this function return a very large numpy array, but most of then are zero,only 256 / 20000 = 1% are occupy by 1;
Next,I formally acquire every fully absolutely filename path from the given two training data set directory by using the following code piece:

Basically,this will construct two lists of complete filename path for malware and benign ware locate in hard disk drive,respectively,and the execution output is shown in following figure:

Now we can actually invoke get_string_features() on full_file_path_malware and full_file_path_benign lists to extract hashed string-based features for every binary;I achieve this by a compact list comprehension expression;also,we need another label vector aforementioned to tell the machine learning detector the rules of how to treat these binaries as malicious or benign:

According to machine learning community and mathematical convention , we frequently use capitalized "X" to represent a matrix and lower-case “y” to represent single vector;because get_string_features() return a list,calling it repeatedly will produce a list of lists——so "X" is a two-dimensional matrix;also,"y" has identical length with "X",and labeled 1 for all malware hashed string lists inside "X";labeled 0 for all benign ware hashed string lists inside "X":


After data preparation and pre-processing,next we use Random Forest Classifier support by sklearn library, to fit(or "train")this machine learning malware detector based on this set of training data "X" and "y":


The final step,I extracted a hashed string-based features form an unknown、real-world Windows PE binary file(which is a kind of launcher of a popular MMORPG client ^^),the use our classifier to probe it:

The predict_proba() method gives out the probability of that binary could be malicious and return it into a second element of a list,the first element is the probability of that binary could be benign,so these two member are mutual:they adds to 100%:


As you can see,sklearn library handle the most heavy lifting works including created different decision trees randomly (to allow them form a forest)、the mathematical decision processes behind each of these trees and make a majority vote to determine whether this unknown is malicious;
So make leverage of its merits to conduct artificial intelligence-related problem solving only require several lines of code;
By carefully watch the output above you may be wondering why this customized machine learning detector treat a legitimate online game client as a malware ?
There are several reasons can explain this seemingly "false positive" phenomenon,such as those strings related to anti-debugging、anti-reverse engineering techniques might appear within these launcher,which also frequently used by malware authors;but more importantly,we can change the threshold value defined in our if clause as a simple way to reduce "false positive" and increase detection accuracy;
Evaluate Performance
To evaluate the accuracy of this machine learning detector furthermore,we can setup a optional experimental procedure,called "cross validation",involves these steps:
① Randomly divide our training data into subsets——several training sets,to train the classifier;and a test set,which playing a role as previously unseen binaries set to test the classifier,
② Let it make probability prediction about the maliciousness scores;use that scores accompanying with the test label vector(which generated randomly from also dividing the original label vector into training and test set,which representing the "official" categorize standards that we know in advance),to compute the "Receiver Operating Characteristic (ROC) curve" of this detector;
The ROC curve measures the relationship and changes between a classifier's true positive rate(TPR) and false positive rate(FPR),we can use roc_curve() function of metrics module coming from sklearn library for this task;
③ Then we record the TPR and FPR value in memory by using semilogx() function of pyplot module coming from the de facto data visualization library——matplotlib——and then exchange(alternately) the roles of traning and testing subsets,repeat above process until all subsets are covered,which is why it called "cross validation";
④ Finally,we actually draw all ROC curves computed during these processes using a series of pyplot's plotting functionalities and display it;
To preventing you get confused with all these complex steps involved in a "cross validation",I show you a overall clear logic in the following figure:

Now you have the general concept of the "cross validation",let's walk through the code:

Here,I wrapped all the logic into a cv_evaluate() function that takes "X" training dataset matrix and "y" label vector as its first two arguments,and a FeatureHasher instance as its last argument;the function import three essential libraries and modules,convert "X" and "y" to numpy arrays,set and initializes a counter variable used for final chart plotting;
The KFold instance is actually an iterator that gives a different training or test example split on each iteration,here I specified the passes of iteration is two,and randomly separating training and testing sets by setting 3rd argument shuffle=True;thus at each iteration,we get different training and test sets to train and test a different random forest classifier(notice the instantiate stage was putting inside the for loop to guarantee each new classifier CANNOT see or remember the previous experiments and will get outcome independently);
The following figure demonstrate the process when I told KFold() to perform three times of "cross validation",as you can see clearly,a random forest classifier and a matplotlib line2D object was generated three times:

The final figure showing each of the three ROC curves being drawn,we can explain as this:within about a 1%(10^-2)false positive rate,we have approximately of maximum 80% average of true positive rate;and as the true positive rate of this machine learning detector approach from 80% to 100%,at the same time,its false positive rate also increases from 1% to 100% !!!

Summary
In this tutorial I showed you how to extract and prepare training and testing dataset then train and test a specific malware machine learning model,you also know how to evaluate its detection accuracy in a general trend,however,what technique this tutorial haven't told you is how to improve its accuracy and reduce its false positive rate;to achieve this goal you will need to train and test at least more than tens of thousands of samples(you can get them from virustotal.com),or you can redesign the feature extraction logic to include import address table(IAT) analysis of a PE file,or assembly instruction N-gram analysis of a PE file;alternatively,you can explore other machine learning algorithm provided by sklearn,such as logistic regression、decision tree,which I will leave you for exercises^^
Appendix A
This section will help you understand the internal behavior of the iterator that KFold() return;
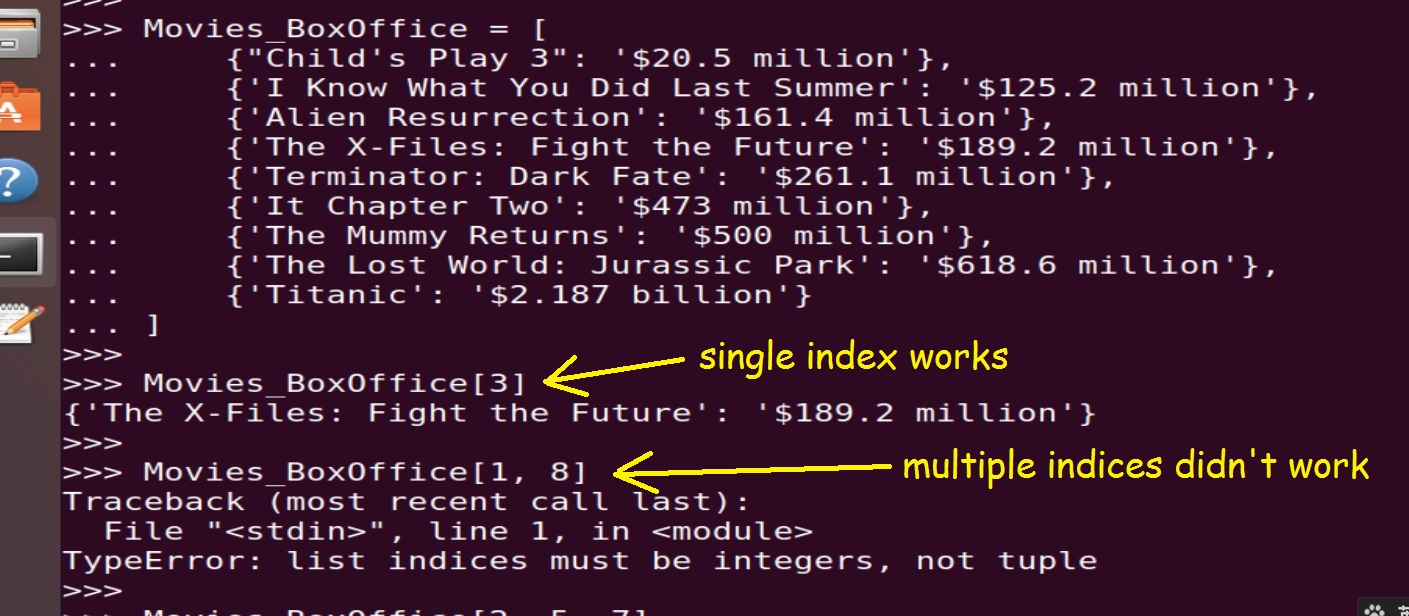
Suppose we have a list of dictionaries store
the correspondences between movie names and their box offices(measured by USD),in ascending order:

Now one of our requirements is to extract a sub collection from it with some specific film members,but using the traditional multi-indices may failed,because pure Python list doesn't support specifying multiple index simultaneously:
One workaround of this problem is to using numpy's array() function,convert our whole movies and box offices list to an array ( said,A),then also convert those indices to another array (said,B),then you can safely use B as indices into A,to retrieve several members at once:


This seems pretty cool,but what if we now have another requirement:to randomly divide this movies-box office array into two parts with different elements in them?
This is where KFold() from sklearn's cross_validation module comes into play,the following code show you how easily I accomplish this with only handful lines of code:

execution outputs:


The second argument of KFold() specify iteration passes,it must less than or equal to the number of elements in target array which we want to split on;
As you can see,within each iteration,we divide the array into two separate parts ,each part have randomly members in it;and we know that KFold() return randomly arranged indices as two sub-arrays of its parent array,in the above case,array "np_MoviesBoxOffice" has
a complete indices [0-8],indices_A and indices_B only contain partially random indices from "np_MoviesBoxOffice";this is why we can use them index into the original parent array,to split our training and testing set!!!