To download the Log Parser Studio, please see the attachment on this blog post.
Anyone who regularly uses Log Parser 2.2 knows just how useful and powerful it can be for obtaining valuable information from IIS (Internet Information Server) and other logs. In addition, adding the power of SQL allows explicit searching of gigabytes of logs returning only the data that is needed while filtering out the noise. The only thing missing is a great graphical user interface (GUI) to function as a front-end to Log Parser and a ‘Query Library’ in order to manage all those great queries and scripts that one builds up over time.
Log Parser Studio was created to fulfill this need; by allowing those who use Log Parser 2.2 (and even those who don’t due to lack of an interface) to work faster and more efficiently to get to the data they need with less “fiddling” with scripts and folders full of queries.
With Log Parser Studio (LPS for short) we can house all of our queries in a central location. We can edit and create new queries in the ‘Query Editor’ and save them for later. We can search for queries using free text search as well as export and import both libraries and queries in different formats allowing for easy collaboration as well as storing multiple types of separate libraries for different protocols.
Processing Logs for Exchange Protocols
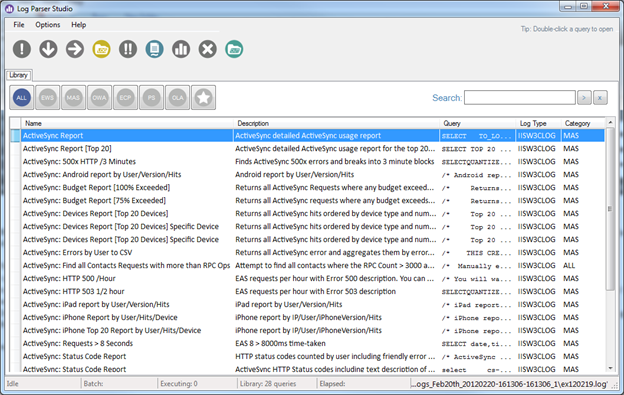
We all know this very well: processing logs for different Exchange protocols is a time consuming task. In the absence of special purpose tools, it becomes a tedious task for an Exchange Administrator to sift thru those logs and process them using Log Parser (or some other tool), if output format is important. You also need expertise in writing those SQL queries. You can also use special purpose scripts that one can find on the web and then analyze the output to make some sense of out of those lengthy logs. Log Parser Studio is mainly designed for quick and easy processing of different logs for Exchange protocols. Once you launch it, you’ll notice tabs for different Exchange protocols, i.e. Microsoft Exchange ActiveSync (MAS), Exchange Web Services (EWS), Outlook Web App (OWA/HTTP) and others. Under those tabs there are tens of SQL queries written for specific purposes (description and other particulars of a query are also available in the main UI), which can be run by just one click!
Let’s get into the specifics of some of the cool features of Log Parser Studio …
Query Library and Management
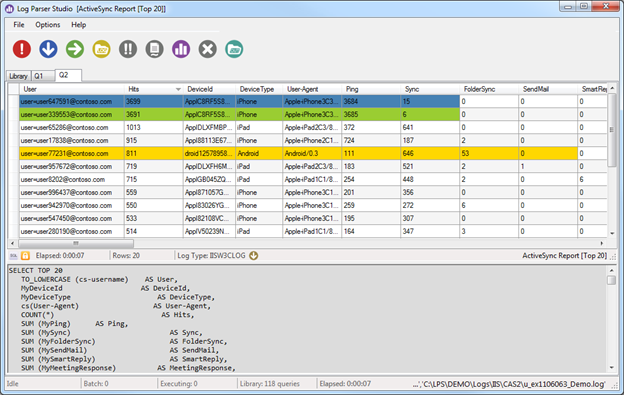
Upon launching LPS, the first thing you will see is the Query Library preloaded with queries. This is where we manage all of our queries. The library is always available by clicking on the Library tab. You can load a query for review or execution using several methods. The easiest method is to simply select the query in the list and double-click it. Upon doing so the query will auto-open in its own Query tab. The Query Library is home base for queries. All queries maintained by LPS are stored in this library. There are easy controls to quickly locate desired queries & mark them as favorites for quick access later.
Library Recovery
The initial library that ships with LPS is embedded in the application and created upon install. If you ever delete, corrupt or lose the library you can easily reset back to the original by using the recover library feature (Options | Recover Library). When recovering the library all existing queries will be deleted. If you have custom/modified queries that you do not want to lose, you should export those first, then after recovering the default set of queries, you can merge them back into LPS.
Import/Export
Depending on your need, the entire library or subsets of the library can be imported and exported either as the default LPS XML format or as SQL queries. For example, if you have a folder full of Log Parser SQL queries, you can import some or all of them into LPS’s library. Usually, the only thing you will need to do after the import is make a few adjustments. All LPS needs is the base SQL query and to swap out the filename references with ‘[LOGFILEPATH]’ and/or ‘[OUTFILEPATH]’ as discussed in detail in the PDF manual included with the tool (you can access it via LPS | Help | Documentation).
Queries
Remember that a well-written structured query makes all the difference between a successful query that returns the concise information you need vs. a subpar query which taxes your system, returns much more information than you actually need and in some cases crashes the application.
The art of creating great SQL/Log Parser queries is outside the scope of this post, however all of the queries included with LPS have been written to achieve the most concise results while returning the fewest records. Knowing what you want and how to get it with the least number of rows returned is the key!
Batch Jobs and Multithreading
You’ll find that LPS in combination with Log Parser 2.2 is a very powerful tool. However, if all you could do was run a single query at a time and wait for the results, you probably wouldn’t be making near as much progress as you could be. In lieu of this LPS contains both batch jobs and multithreaded queries.
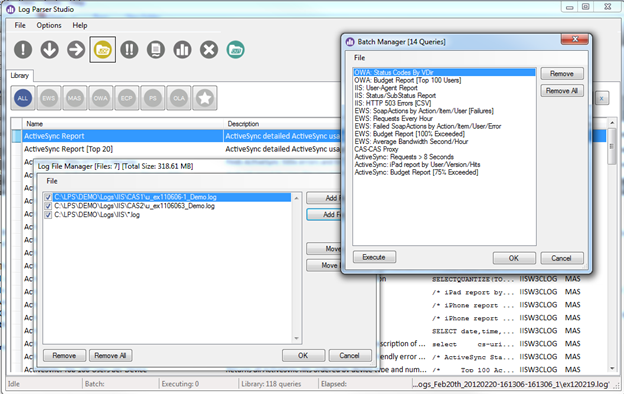
A batch job is simply a collection of predefined queries that can all be executed with the press of a single button. From within the Batch Manager you can remove any single or all queries as well as execute them. You can also execute them by clicking the Run Multiple Queries button or the Execute button in the Batch Manager. Upon execution, LPS will prepare and execute each query in the batch. By default LPS will send ALL queries to Log Parser 2.2 as soon as each is prepared. This is where multithreading works in our favor. For example, if we have 50 queries setup as a batch job and execute the job, we’ll have 50 threads in the background all working with Log Parser simultaneously leaving the user free to work with other queries. As each job finishes the results are passed back to the grid or the CSV output based on the query type. Even in this scenario you can continue to work with other queries, search, modify and execute. As each query completes its thread is retired and its resources freed. These threads are managed very efficiently in the background so there should be no issue running multiple queries at once.
Now what if we did want the queries in the batch to run concurrently for performance or other reasons? This functionality is already built-into LPS’s options. Just make the change in LPS | Options | Preferences by checking the ‘Process Batch Queries in Sequence’ checkbox. When checked, the first query in the batch is executed and the next query will not begin until the first one is complete. This process will continue until the last query in the batch has been executed.
Automation
In conjunction with batch jobs, automation allows unattended scheduled automation of batch jobs. For example we can create a scheduled task that will automatically run a chosen batch job which also operates on a separate set of custom folders. This process requires two components, a folder list file (.FLD) and a batch list file (.XML). We create these ahead of time from within LPS. For more details on how to do that, please refer to the manual.
Charts
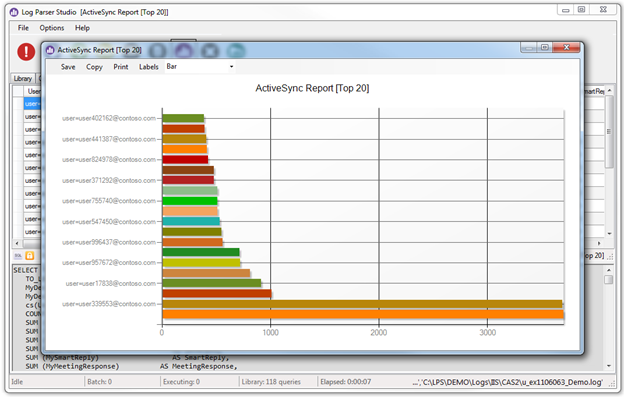
Many queries that return data to the Result Grid can be charted using the built-in charting feature. The basic requirements for charts are the same as Log Parser 2.2, i.e.
- The first column in the grid may be any data type (string, number etc.)
- The second column must be some type of number (Integer, Double, Decimal), Strings are not allowed
Keep the above requirements in mind when creating your own queries so that you will consciously write the query to include a number for column two. To generate a chart click the chart button after a query has completed. For #2 above, even if you forgot to do so, you can drag any numbered column and drop it in the second column after the fact. This way if you have multiple numbered columns, you can simply drag the one that you’re interested in, into second column and generate different charts from the same data. Again, for more details on charting feature, please refer to the manual.
Keyboard Shortcuts/Commands
There are multiple keyboard shortcuts built-in to LPS. You can view the list anytime while using LPS by clicking LPS | Help | Keyboard Shortcuts. The currently included shortcuts are as follows:
| Shortcut | What it does |
|---|---|
| CTRL+N | Start a new query. |
| CTRL+S | Save active query in library or query tab depending on which has focus. |
| CTRL+Q | Open library window. |
| CTRL+B | Add selected query in library to batch. |
| ALT+B | Open Batch Manager. |
| CTRL+B | Add the selected queries to batch. |
| CTRL+D | Duplicates the current active query to a new tab. |
| CTRL+ALT+E | Open the error log if one exists. |
| CTRL+E | Export current selected query results to CSV. |
| ALT+F | Add selected query in library to the favorites list. |
| CTRL+ALT+L | Open the raw Library in the first available text editor. |
| CTRL+F5 | Reload the Library from disk. |
| F5 | Execute active query. |
| F2 | Edit name/description of currently selected query in the Library. |
| F3 | Display the list of IIS fields. |
Supported Input and Output types
Log Parser 2.2 has the ability to query multiple types of logs. Since LPS is a work in progress, only the most used types are currently available. Additional input and output types will be added when possible in upcoming versions or updates.
Supported Input Types
Full support for W3SVC/IIS, CSV, HTTP Error and basic support for all built-in Log Parser 2.2 input formats. In addition, some custom written LPS formats such as Microsoft Exchange specific formats that are not available with the default Log Parser 2.2 install.
Supported Output Types
CSV and TXT are the currently supported output file types.
Log Parser Studio - Quick Start Guide
Want to skip all the details & just run some queries right now? Start here …
The very first thing Log Parser Studio needs to know is where the log files are, and the default location that you would like any queries that export their results as CSV files to be saved.
1. Setup your default CSV output path:
a. Go to LPS | Options | Preferences | Default Output Path.
b. Browse to and select the folder you would like to use for exported results.
c. Click Apply.
d. Any queries that export CSV files will now be saved in this folder.
NOTE: If you forget to set this path before you start the CSV files will be saved in %AppData%\Microsoft\Log Parser Studio by default but it is recommended that y ou move this to another location.
2. Tell LPS where the log files are by opening the Log File Manager. If you try to run a query before completing this step LPS will prompt and ask you to set the log path. Upon clicking OK on that prompt, you are presented with the Log File Manager. Click Add Folder to add a folder or Add File to add a single or multiple files. When adding a folder you still must select at least one file so LPS will know which type of log we are working with. When doing so, LPS will automatically turn this into a wildcard (*.xxx) Indicating that all matching logs in the folder will be searched.
You can easily tell which folder or files are currently being searched by examining the status bar at the bottom-right of Log Parser Studio. To see the full path, roll your mouse over the status bar.
NOTE: LPS and Log Parser handle multiple types of logs and objects that can be queried. It is important to remember that the type of log you are querying must match the query you are performing. In other words, when running a query that expects IIS logs, only IIS logs should be selected in the File Manager. Failure to do this (it’s easy to forget) will result errors or unexpected behavior will be returned when running the query.
3. Choose a query from the library and run it:
a. Click the Library tab if it isn’t already selected.
b. Choose a query in the list and double-click it. This will open the query in its own tab.
c. Click the Run Single Query button to execute the query
The query execution will begin in the background. Once the query has completed there are two possible outputs targets; the result grid in the top half of the query tab or a CSV file. Some queries return to the grid while other more memory intensive queries are saved to CSV.
As a general rule queries that may return very large result sets are probably best served going to a CSV file for further processing in Excel. Once you have the results there are many features for working with those results. For more details, please refer to the manual.
Have fun with Log Parser Studio! & always remember – There’s a query for that!
Kary Wall
Escalation Engineer
Microsoft Exchange Support
介绍:Log Parser Studio
- 项目
- 2012/04/24
本文内容
原文发布于 2012 年 3 月 8 日(星期四)
经常使用 Log Parser 2.2 的用户都知道,此工具功能强大而且实用,它可以从 IIS (Internet Information Server) 及其他日志中获取重要信息。另外,SQL 功能增强后允许对数 GB 大小的日志进行明确搜索,可以在筛选掉无用信息时仅返回需要的数据。其唯一缺少的是用作 Log Parser 前端的强大图形用户界面 (GUI),以及用于管理用户在一段时间内积累的所有出色查询和脚本的“查询库”。
Log Parser Studio 旨在弥补这一欠缺;借助此工具,使用 Log Parser 2.2 的用户(甚至由于缺少界面而不使用此工具的用户)可以提升工作速度和工作效率,不用太多地摆弄满是查询的脚本和文件就能获得所需的数据。
使用 Log Parser Studio(简称 LPS),我们可以将所有查询存储到一个中心位置。我们可以在“查询编辑器”中编辑并创建新查询,并可以进行保存供日后使用。我们还可以使用自定义文本搜索来搜索查询内容,并将库和查询以不同格式导出或导入,以便轻松协作或针对不同协议存储多种单独的库。
处理 Exchange 协议的日志
我们都深知一点:处理各种 Exchange 协议的日志非常耗时。在缺少专用工具,但又对输出格式要求较高时,筛选这些日志并使用 Log Parser(或其他某种工具)进行处理,对于 Exchange 管理员来说将是一项令人厌烦的任务。而且,您还需要具备编写这些 SQL 查询的专业知识。当然,您也可以使用可在 Web 上找到的特制脚本,然后对输出进行分析以尝试弄明白这些冗长的日志的输出结果。Log Parser Studio 的设计主旨是用于快速轻松地处理 Exchange 协议的各种日志。启动此工具后,您会发现针对不同的 Exchange 协议设置了不同标签,即 Microsoft Exchange ActiveSync (MAS)、Exchange Web 服务 (EWS)、Outlook Web App (OWA/HTTP) 等。在这些标签下有数十个针对特定用途编写的 SQL 查询(查询的描述及其他详情也会出现在主用户界面上),只需单击一下即可立即运行!
现在,让我们来探究一下 Log Parser Studio 的一些超酷功能的细节吧…
查询库和管理
启动 LPS 后,首先映入眼帘的是随查询预加载的查询库。这是管理我们所有查询的位置。单击“库”(Library) 标签即可使用查询库。可以使用多种方法加载查询以进行检查或执行。最简单的方法是在列表中选择该查询,然后双击它。此时,查询将在其自己的“查询”(Query) 标签中自动打开。查询库 是查询的总部。LPS 维护的所有查询都存储在此库中。您可以利用简单的控件快速定位到所需的查询,也可以将其加入收藏,以便日后快速访问。
库恢复
LPS 附带的初始库嵌入在应用程序中,在程序安装时创建。如果您删除、损坏或丢失了此库,则可以使用恢复库功能(“选项”(Options)|“恢复库”(Recover Library))轻松重置为原始库。在恢复库时,所有现有的查询都将被删除。如果您需要保留某些自定义/修改的查询,您应该先将其导出,在恢复默认查询集后,即可以将导出的查询合并回 LPS 中。
导入/导出
根据您的需要,您可以将整个库或部分库以默认的 LPS XML 格式或作为 SQL 查询导入或导出。例如,如果您有一个文件夹里存满了 Log Parser SQL 查询,您可以将部分或全部查询导入到 LPS 库中。在导入后,您通常只需要进行些许调整。LPS 只需要基本 SQL 查询,并将“[LOGFILEPATH]”和/或“[OUTFILEPATH]”替换为文件名引用,在此工具随附的 PDF 手册(可通过“LPS”|“帮助”(Help)|“文档”(Documentation) 访问该手册)中有详细介绍。
查询
请牢记,编写合理的结构化查询是决定查询成败的关键,成功的查询将返回您需要的准确信息,而失败的查询将占用您的系统,返回过多不符合要求的信息,而且有时会导致应用程序崩溃。
创建完美的 SQL/Log Parser 查询的技巧不属于本文讨论的范围,不过,LPS 附带的所有查询均能够获得最精准的结果,同时返回最少量的记录。关键在于了解您的需要以及如何通过返回最少行获得所需的数据!
批处理作业和多线程处理
您会发现,LPS 与 Log Parser 2.2 结合起来就是一款非常强大的工具。但是,如果您只能一次运行一个查询,然后就是等待结果,则很可能无法获得您本应获得的效果。为此,LPS 同时包含了批处理作业和多线程查询。
一个批处理作业其实就是预定义查询的集合,只需按下一个按钮即可执行所有查询。从“批处理管理器”(Batch Manager) 中,您可以移除任何一个或所有查询以及执行这些查询。您也可以通过单击“批处理管理器”(Batch Manager) 中的“运行多个查询”(Run Multiple Queries) 按钮或“执行”(Execute) 按钮来执行查询。在执行时,LPS 将准备和执行批次中的每个查询。默认情况下,LPS 会在准备好每个查询后立即将所有查询发送到 Log Parser 2.2。这是多线程处理的优势所在。例如,如果我们将 50 个查询设置为一个批处理作业并执行此作业,那么在后台将有 50 个线程同时使用 Log Parser,这让用户可以有空处理其他查询。各个作业结束后,结果将发送回网格或 CSV 输出,具体取决于查询类型。此时,您仍然可以继续进行其他查询、搜索、修改和执行。每个查询完成后,查询的线程将停用,查询资源将被释放。这些线程将在后台得到非常高效地管理,因此能够立即运行多个查询。
那么,如果我们出于性能或其他原因希望一个批次中的查询同时运行,该怎么办?LPS 的选项中已内置了这项功能。只需选中“依次处理批次查询”(Process Batch Queries in Sequence)复选框,更改“LPS”|“选项”(Options)|“首选项”(Preferences) 即可。选中后,系统将执行批次中的第一个查询,直到第一个查询完成后,下一个查询才开始执行。此过程将在批次中的最后一个查询执行后结束。
自动化
与批处理作业相结合,自动化功能实现了无管理按计划自动处理批处理作业。例如,我们可以创建一个将自动运行所选批处理作业的计划任务,也可以对一组单独的自定义文件夹运行此任务。此过程需要两个组件,一个是文件夹列表文件 (.FLD),另一个是批处理列表文件 (.XML)。我们需要在 LPS 内提前创建这些文件。有关如何进行此操作的更多详细信息,请参考手册。
图表
可以使用内置的图表功能对将数据返回到“结果网格”的许多查询绘制图表。也就是说,图表的基本要求与 Log Parser 2.2 相同。
- 网格的第一列可以是任何数据类型(字符串、数字等)
- 第二列则必须是某类数字(整数、双精度、小数),不允许有字符串
在创建自己的查询时请记住上述要求,以便您在编写查询时不会忘记在第二列中加入数字。若要生成图表,请在查询完成后单击图表按钮。对于上述第二点,即使您忘记按要求操作,您还可以在事后拖动任何一个包含数字的列,将其放到第二列内。这样,如果您有多个包含数字的列,只要拖动您需要的一列放到第二列内即可,此时将根据相同数据生成不同的图表。同样,有关图表功能的更多详细信息,请参考手册。
键盘快捷方式/命令
LPS 中内置了多个键盘快捷方式。在使用 LPS 时您可以随时查看快捷方式列表,方法是单击“LPS”|“帮助”(Help)|“键盘快捷方式”(Keyboard Shortcuts)。目前包含的快捷方式有:
| 快捷方式 | 作用 |
|---|---|
| CTRL+N | 开始新查询。 |
| CTRL+S | 在库或查询标签(根据焦点情况)内保存活动查询。 |
| CTRL+Q | 打开库窗口。 |
| CTRL+B | 将库中选中的查询添加到批次。 |
| ALT+B | 打开批处理管理器。 |
| CTRL+B | 将选中的查询添加到批次。 |
| CTRL+D | 将当前活动查询复制到新标签。 |
| CTRL+ALT+E | 打开错误日志(如果有)。 |
| CTRL+E | 将当前选中的查询结果导出到 CSV。 |
| ALT+F | 将库中选中的查询添加到收藏夹列表。 |
| CTRL+ALT+L | 在第一个可用的文本编辑器中打开原始库。 |
| CTRL+F5 | 从磁盘重新加载库。 |
| F5 | 执行活动查询。 |
| F2 | 编辑库中当前选中的查询的名称/描述。 |
| F3 | 显示 IIS 字段列表。 |
支持的输入和输出类型
Log Parser 2.2 能够查询多种日志。由于 LPS 仍处于开发阶段,目前仅支持最常用的类型。更多输入和输出类型将在未来推出的版本或更新中不断增加。
支持的输入类型
完全支持 W3SVC/IIS、CSV、HTTP 错误,基本支持 Log Parser 2.2 内置的所有输入格式。此外,还有一些不随默认 Log Parser 2.2 安装包含的自定义编写的 LPS 格式(如 Microsoft Exchange 特定格式)。
支持的输出类型
目前支持的输出文件类型有 CSV 和 TXT。
Log Parser Studio - 快速入门指南
希望跳过所有详细介绍,直接运行一些查询?从这里开始 …
Log Parser Studio 需要确认的第一件事是日志文件的位置,以及您希望保存将其结果导出为 CSV 文件的任何查询的默认存储位置。
1. 设置默认的 CSV 输出路径:
a. 进入“LPS”|“选项”(Options)|“首选项”(Preferences)|“默认输出路径”(Default Output Path)。
b. 浏览并选择您希望用于存储导出结果的文件夹。
c. 单击“应用”(Apply)。
d. 导出 CSV 文件的任何查询现在都将保存到此文件夹中。
注意:如果在开始前您忘记设置此路径,CSV 文件将默认保存到 %AppData%\Microsoft\Log Parser Studio,不过建议您更改此保存位置。
2. 打开“日志文件管理器”(Log File Manager),告知 LPS 日志文件的位置。如果您在完成此步骤前尝试运行查询,LPS 将发出提示,要求您设置日志路径。单击提示窗口的“确定”(OK) 后将出现“日志文件管理器”(Log File Manager)。单击“添加文件夹”(Add Folder) 以添加文件夹,或单击“添加文件”(Add File) 以添加一个或多个文件。在添加文件夹时,您仍必须至少选择一个文件,以通知 LPS 我们正在使用的日志类型。执行此操作后,LPS 会自动转变为通配符 (*.xxx),表示将搜索文件夹中所有匹配的日志。
您可以通过检查 Log Parser Studio 右下角的状态栏轻松确认当前正在搜索的文件夹或文件。若要查看完整路径,请在状态栏上滚动鼠标。
注意:LPS 和 Log Parser 可处理能够进行查询的多种日志和对象。请切记,查询的日志类型必须与所执行的查询相匹配。换言之,如果运行的查询需要 IIS 日志,则只能在文件管理器中选择 IIS 日志。否则(这一点很容易忘记),在运行查询时将返回错误或意外行为。
3. 从库中选择查询并运行它:
a. 如果未进行选择,请单击“库”(Library) 标签。
b. 从列表中选择查询并双击它。这时查询将在自己的标签中打开。
c. 单击“运行单个查询”(Run Single Query) 按钮执行此查询
查询将在后台开始执行。查询完成后,将有两种可能的输出目标;查询标签上半部分中的结果网格或 CSV 文件。一些查询将返回到网格,而其他占用较多内存的查询将保存为 CSV。
一般规则是,有可能返回超大结果集的查询也许更适合保存为 CSV 文件,以便在 Excel 中进一步进行处理。获得结果后,便可使用许多功能处理这些结果。有关更多详细信息,请参考手册。
希望 Log Parser Studio 能带给您更多便利!不要忘记 – 查询需要它!
Kary Wall
呈报工程师
Microsoft Exchange 支持
- Introducing the incident management
- 如何让Visual Studio Tools for Unity插件用于调试你自己的Mono嵌入应用程序
- deveco studio 的安装步骤。
- visual studio编译不再支持的framework环境
- chromium vlog 替换 log(info)
- Visual Studio 2022密钥
- MySQL Ignoring the redo log due to missing MLOG_CHECKPOINT between the checkpoint
- 清理linux日志/var/log/journal/
- 安装 openharmony deveco studio 4.0
- 关于 Visual studio 卸载DevExpress 控件 ,nuget 残留计算机范围内的程序源删除办法
- Introducing Parser Studio Logintroducing parser studio log 系统parser studio日志 android studio log introducing revolutionary introducing the internet convolutions transformers introducing vision ws-introducing introducing management incident the dramatically introducing effective exadata introducing generation networking wireless


