企业级项目目录
- api接口模块:发送ajax请求的接口模块
- utils工具模块:自己封装的一些工具方法模块
Vant 组件库
第三方组件库:https://vant-contrib.gitee.io/vant/v2/#/zh-CN/
引入组件
方式一. 自动按需引入组件 (推荐)
babel-plugin-import 是一款 babel 插件,它会在编译过程中将 import 的写法自动转换为按需引入的方式
# 安装插件
npm i babel-plugin-import -D
// 在.babelrc 中添加配置
// 注意:webpack 1 无需设置 libraryDirectory
{
  "plugins": [
    ["import", {
      "libraryName": "vant",
      "libraryDirectory": "es",
      "style": true
    }]
  ]
}

// 对于使用 babel7 的用户,可以在 babel.config.js 中配置
module.exports = {
  plugins: [
    ['import', {
      libraryName: 'vant',
      libraryDirectory: 'es',
      style: true
    }, 'vant']
  ]
};
方式二. 手动按需引入组件
在不使用插件的情况下,可以手动引入需要的组件。
import Button from 'vant/lib/button';
import 'vant/lib/button/style';
方式三. 导入所有组件
Vant 支持一次性导入所有组件,引入所有组件会增加代码包体积,因此不推荐这种做法。
import Vue from 'vue';
import Vant from 'vant';
import 'vant/lib/index.css';

Vue.use(Vant);
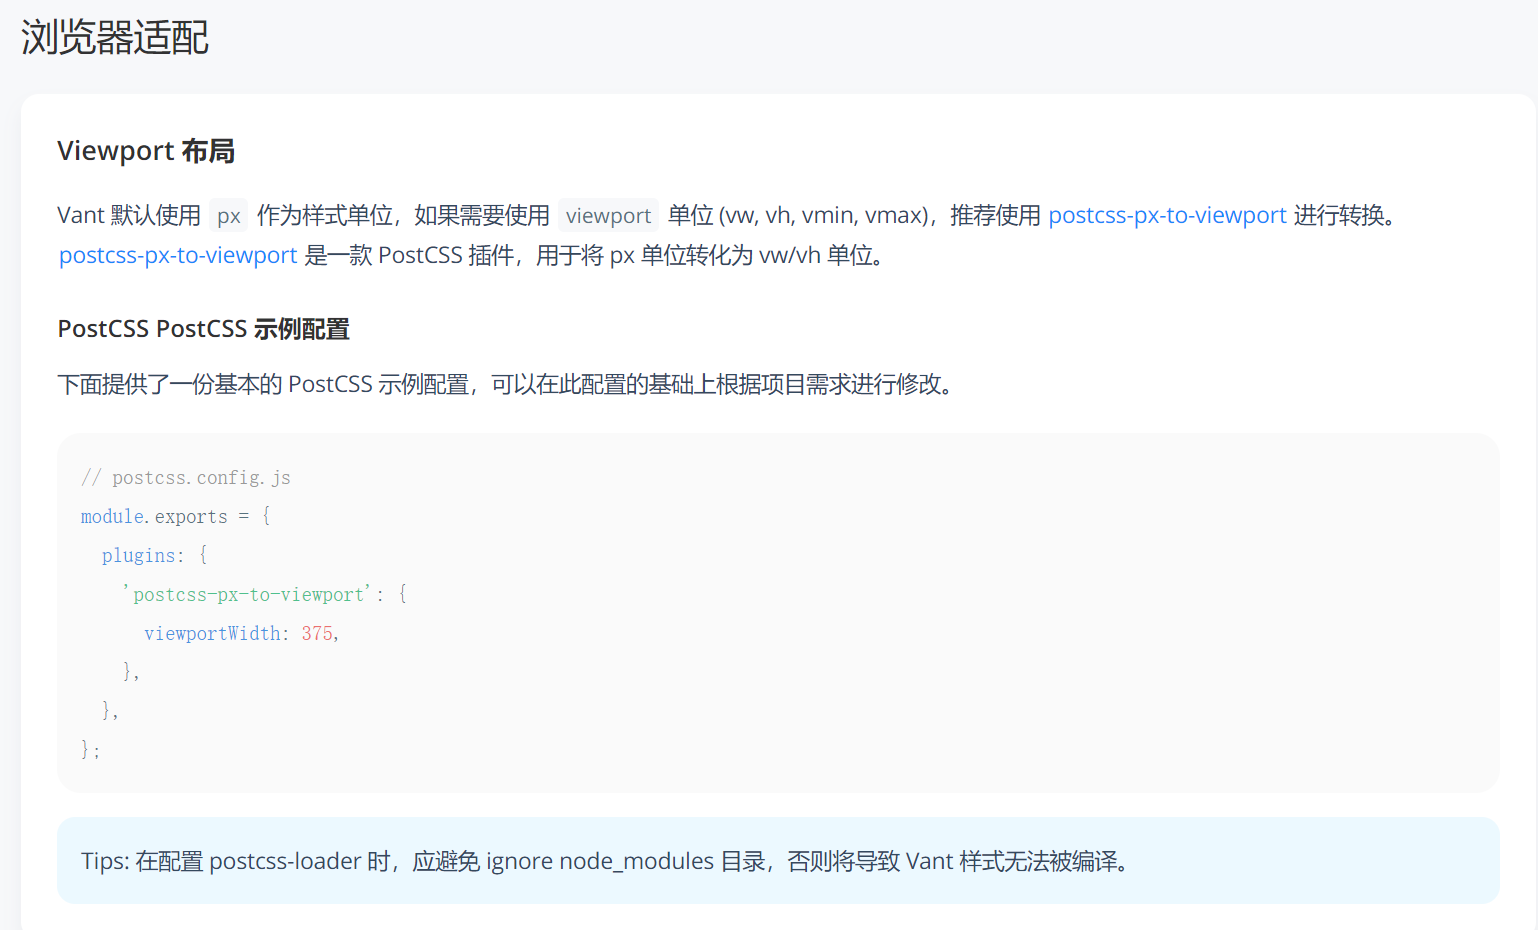
项目中的vw适配
目标:基于postcss 插件 实现项目vw适配
-
安装插件
npm i postcss-px-to-viewport@1.1.1 -D -
根目录新建 postcss.config.js 文件,填入配置
module.exports = {
  plugins: {
    'postcss-px-to-viewport': {
      // 标准屏宽度
      viewportWidth: 375
    }
  }
}
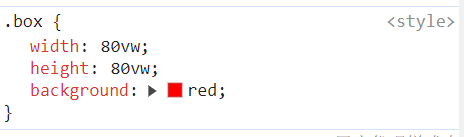
在代码成 css 样式中设置css
.box{
  width: 300px;
  height: 300px;
  background: red;
}
虽然它自动帮我们转换了
request模块-axios封装
目标:将axios请求方法,封装到request模块
官网:https://www.axios-http.cn/docs/instance
使用axios来请求后端接口,一般都会对axios进行一些配置(比如:配置基础地址,请求响应拦截器等)
所以项目开发中,都会对axios进行基本的二次封装,单独封装到一个request模块中,便于维护使用
- 安装axios
npm i axios - 新建request模块: utils/request.js
- 创建实例&配置导出实例
import axios from 'axios'
// 创建 axios 实例,将来对创建出来的实例 进行自定义配置
// 好处不会污染原始的 axios 实例
const instance = axios.create({
  baseURL: 'http://cba.itlike.com/public/index.php?s=/api/',
  timeout: 5000
})

// 自定义配置 - 请求/响应 拦截器
// 添加请求拦截器
instance.interceptors.request.use(function (config) {
  // 在发送请求之前做些什么
  return config
}, function (error) {
  // 对请求错误做些什么
  return Promise.reject(error)
})

// 添加响应拦截器
instance.interceptors.response.use(function (response) {
  // 2xx 范围内的状态码都会触发该函数。
  // 对响应数据做点什么 (默认axios 会多包装一层data,需要响应拦截器中处理一下)
  return response.data
}, function (error) {
  // 超出 2xx 范围的状态码都会触发该函数。
  // 对响应错误做点什么
  return Promise.reject(error)
})
// 导出配置好的实例
export default instance
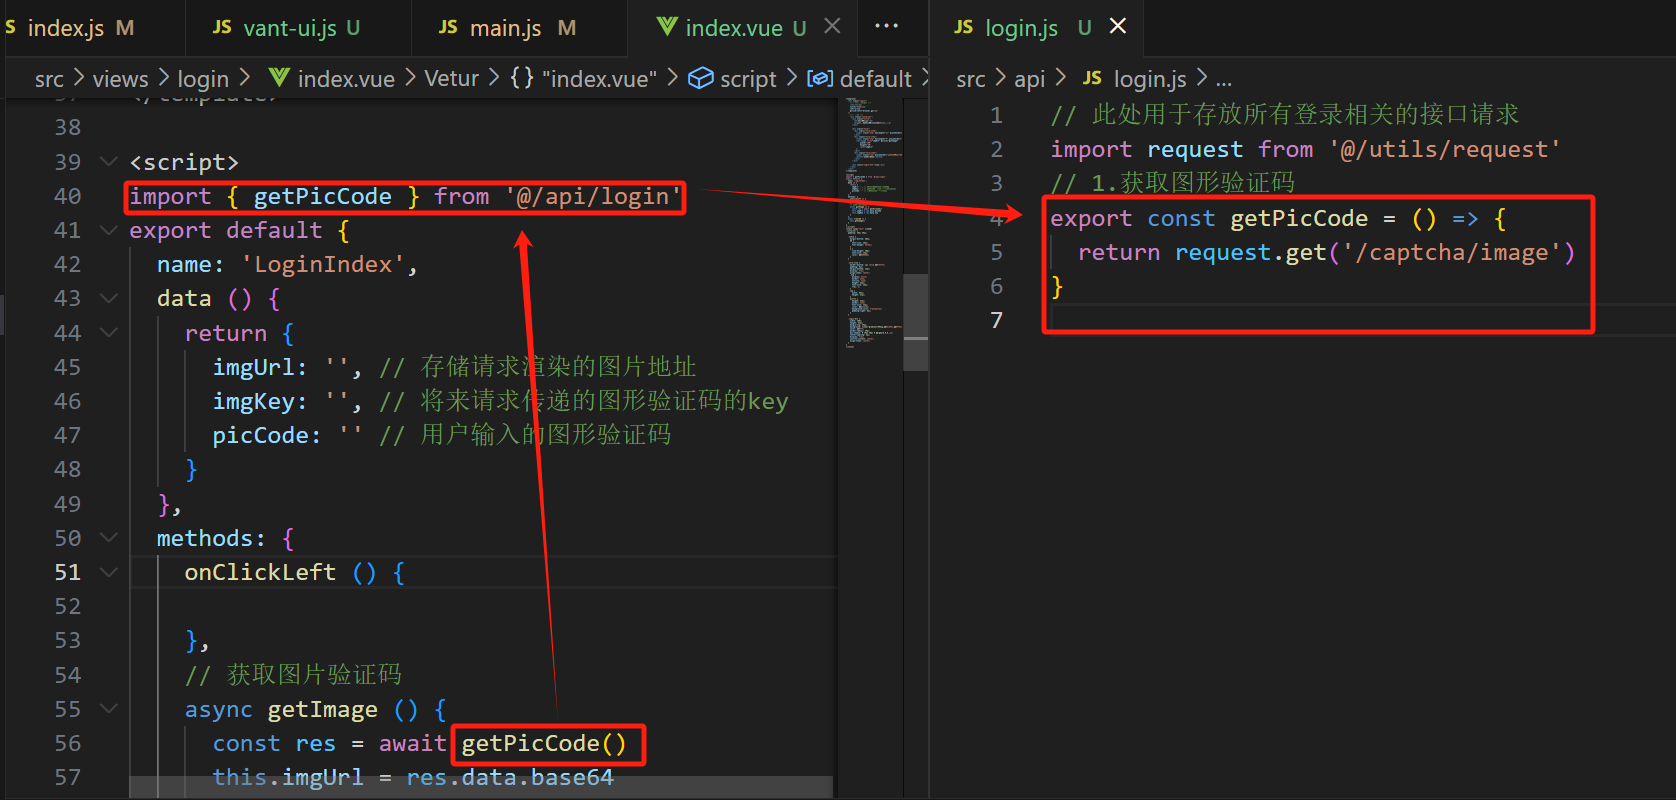
- 测试使用
import request from '@/utils/request'
 async getImage () {
      const res = await request.get('/captcha/image')
      this.imgUrl = res.data.base64
      this.imgKey = res.data.key
    }
更好的配置:
将请求封装成方法,统一存放到api模块,与页面分离
封装api模块的好处:
- 请求页面逻辑分离
- 相同的请求可以直接复用
- 请求进行了统一管理
步骤:
- 新建请求模块
- 封装请求函数
- 页面中导入调用
短信验证倒计时
步骤分析:
- 点击按钮,实现倒计时效果
- 倒计时之前的校验处理(手机号、验证码)
- 封装短信验证请求接口,发送请求添加提示
<!-- 发送短信按钮 -->
 <button @click="getCode" >{{ totalSecond===second?'获取验证码':second +'秒后重新发送'}}</button>

 data () {
    return {
      imgUrl: '', // 存储请求渲染的图片地址
      imgKey: '', // 将来请求传递的图形验证码的key
      picCode: '', // 用户输入的图形验证码
      mobile: '', // 手机号码
      totalSecond: 60, // 总秒数
      second: 60, // 当前秒数,开启定时器对 second --
      timer: null // 定时器id
    }
  },

 // 获取图片验证码
    async getImage () {
      const res = await getPicCode()
      this.imgUrl = res.data.base64
      this.imgKey = res.data.key
    },
    // 校验 手机号 和图形验证码是否合法
    validFn () {
      if (!/^1[3-9]\d{9}$/.test(this.mobile)) {
        this.$toast('手机号码格式不正确')
        return false
      }
      if (!/^\w{4}$/.test(this.picCode)) {
        this.$toast('请输入正确的图片验证码')
        return false
      }
      return true
    },

    // 获取短信验证码
    async getCode () {
      if (!this.validFn()) {
        // 如果没有通过校验,没必要往下走了
        return false
      }
      // 发送短信验证码,调用后端发起请求
      const res = await getSmsCode({
        mobile: this.mobile,
        picCode: this.picCode,
        imgKey: this.imgKey
      })
      console.log(res)
      // 当目前没有定时器开着,且 totalSecond 和 second 一致(归位)才可以倒计时
      if (!this.timer && this.totalSecond === this.second) {
        // 开启倒计时
        this.timer = setInterval(() => {
          this.second--
          if (this.second < 0) {
            clearInterval(this.timer)
            this.timer = null // 重置定时器id
            this.second = this.totalSecond // 归位
          }
        }, 1000)
      }
    }
  },
  async created () {
    this.getImage()
  },
  // 销毁定时器
  destroyed () {
    // 当离开组件后,应该清除定时器
    clearInterval(this.timer)
  }
实现效果:

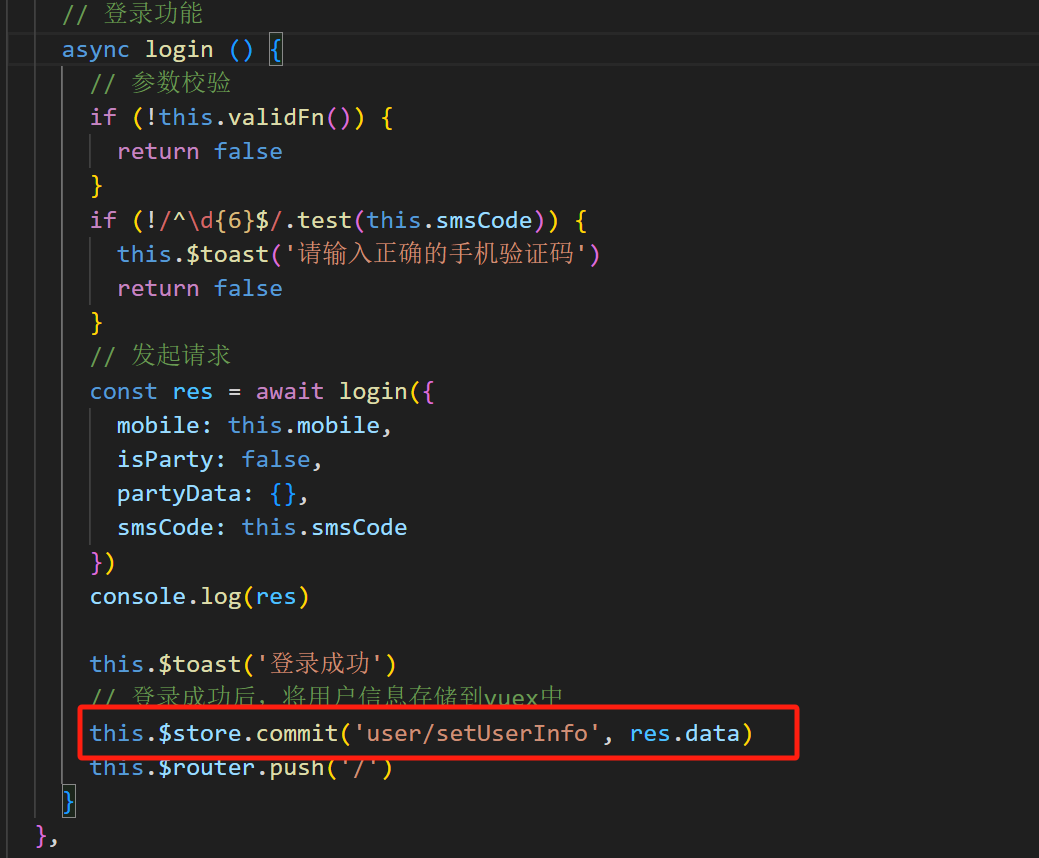
登录功能
步骤分析:
- 阅读接口文档,封装登录接口
- 登录前的校验(手机号,图形验证码,短信验证码)
- 调用方法,发送请求,成功添加提示并跳转
// 登录功能
/*
form object {4} 必需
isParty boolean 是否存在第三方用户信息 必需
mobile string 手机号 必需
partyData object {0} 三方登录信息,默认为:{} 可选
smsCode  string  短信验证码, 测试环境验证码为:246810  必需
*/
export const login = (params) => {
  return request.post('/passport/login', {
    form: {
      isParty: params.isParty,
      mobile: params.mobile,
      partyData: params.partyData,
      smsCode: params.smsCode
    }
  })
}
// 登录功能
    async login () {
      // 参数校验
      if (!this.validFn()) {
        return false
      }
      if (!/^\d{6}$/.test(this.smsCode)) {
        this.$toast('请输入正确的手机验证码')
        return false
      }
      // 发起请求
      const res = await login({
        mobile: this.mobile,
        isParty: false,
        partyData: {},
        smsCode: this.smsCode
      })
      console.log(res)

      this.$toast('登录成功')
      this.$router.push('/')
    }
  },
响应拦截器统一处理错误提示
目标:通过响应拦截器,统一处理接口的错误提示
问题:每次请求,都会有可能会错误,就都需要错误提示
说明:响应拦截器是咱们拿到数据的第一个数据流转站,可以在里面统一处理错误
// 添加响应拦截器
instance.interceptors.response.use(function (response) {
  const res = response.data
  // 对于非200的请求,我们捕获后抛出异常以及给出响应
  if (res.status !== 200) {
    // 给提示
    Toast(res.message)
    // 抛出一个错误的promise,这样就会拒绝服务,就不会接着让程序继续执行
    return Promise.reject(res.message)
  }
  return res
}, function (error) {
  // 超出 2xx 范围的状态码都会触发该函数。
  // 对响应错误做点什么
  console.log(error)
  return Promise.reject(error)
})
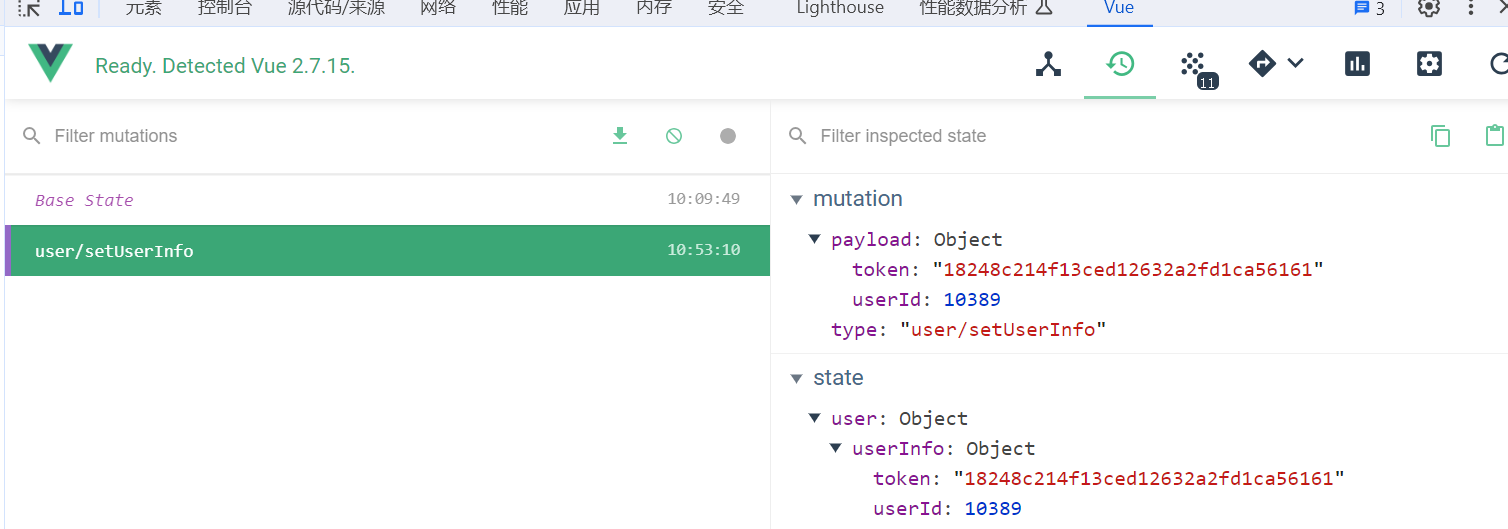
登录权证信息存储
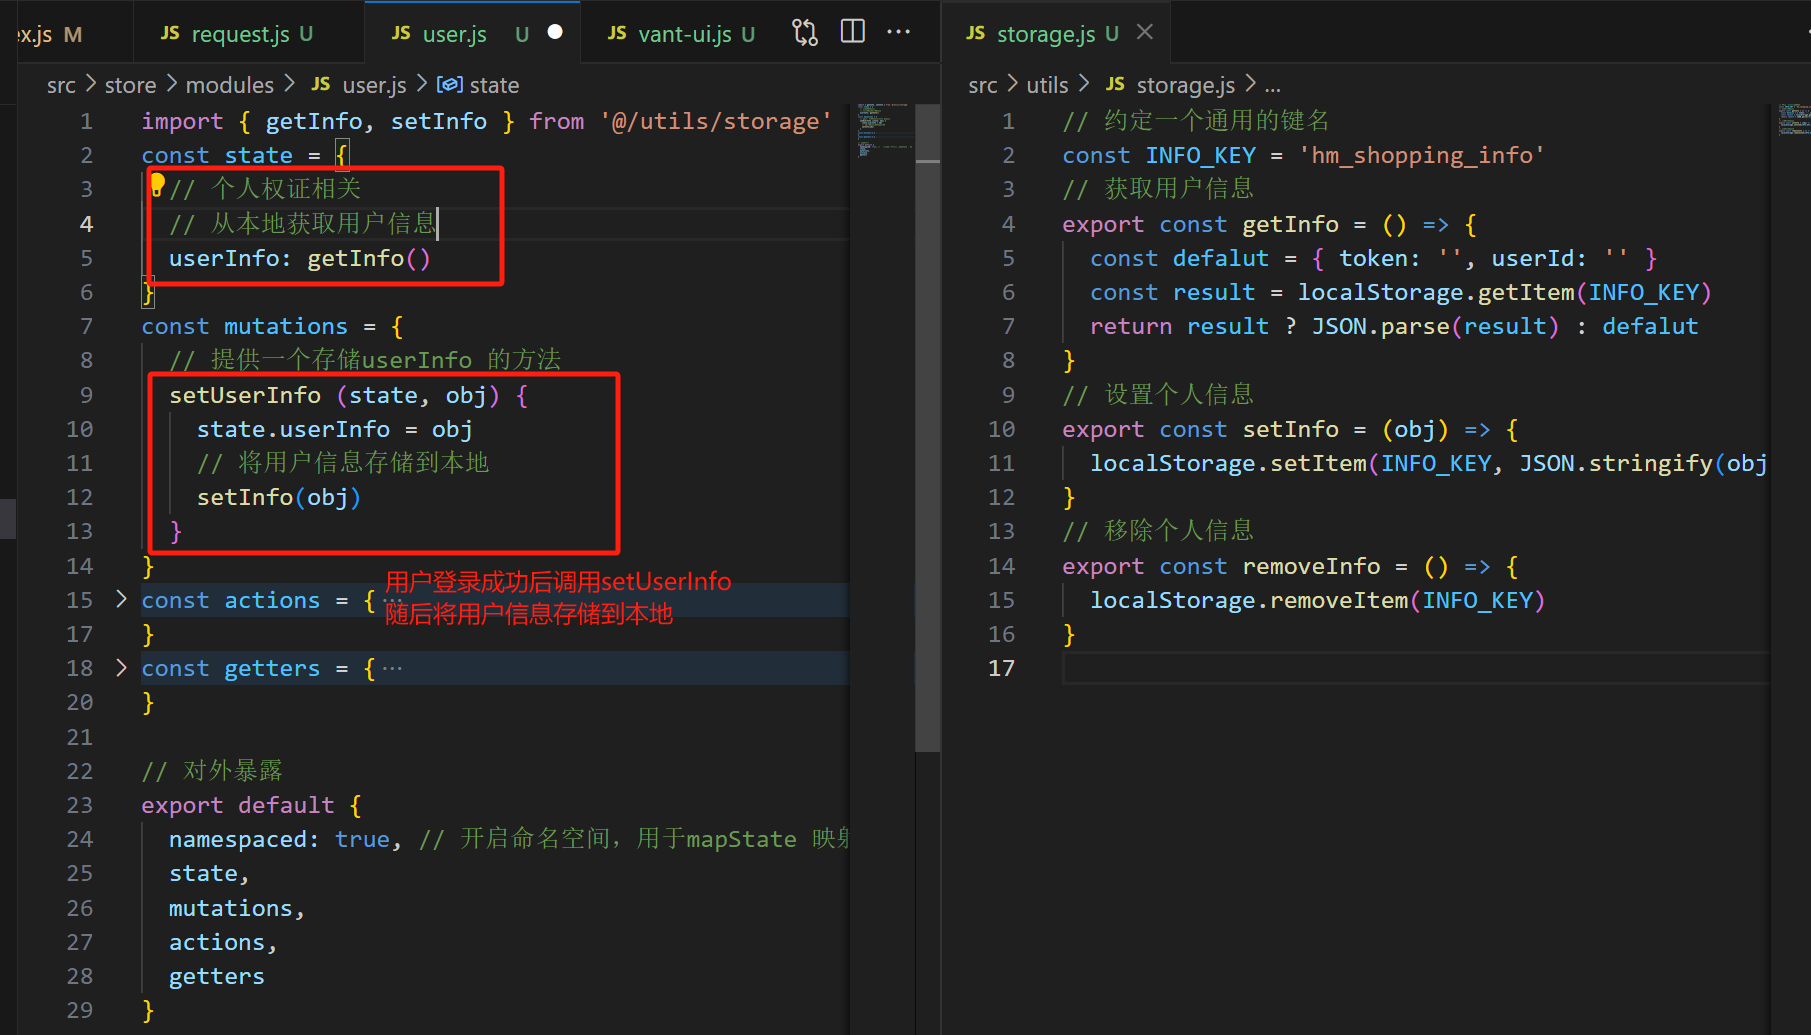
目标:vuex构建user 模块存储登录权证 (token & userId)
说明:
- token存入vuex的好处,易获取,响应式
- vuex需要分模块 =》user模块
当用户登录成功后,后端返回的数据格式如下:
{
  "status": 200,
  "message": "登录成功",
  "data": {
    "userId": 10003,
    "token": "1741f74aed758a688515f72572dc8e37"
  }
}
我们需要将这些信息存储到本地和vuex中。
步骤:
- 构建user模块
- 提供mutations
import Vue from 'vue'
import Vuex from 'vuex'
Vue.use(Vuex)
const state = {
  // 个人权证相关
  userInfo: {
    token: '',
    userId: ''
  }
}
const mutations = {
  // 提供一个存储userInfo 的方法
  setUserInfo (state, obj) {
    state.userInfo = obj
  }
}
const actions = {

}
const getters = {

}

// 对外暴露
export default {
  namespaced: true, // 开启命名空间,用于mapState 映射
  state,
  mutations,
  actions,
  getters
}
- 挂载到vuex
import Vue from 'vue'
import Vuex from 'vuex'
import user from '@/store/modules/user'

Vue.use(Vuex)

export default new Vuex.Store({
  state: {
  },
  getters: {
  },
  mutations: {
  },
  actions: {
  },
  modules: {
    user
  }
})
- 页面中commit调用 或者辅助函数
效果展示:
vuex持久化
上诉案例中,虽然将用户信息存储到了vuex中,但是当页面刷新后,vuex中的数据就清空了,在实际开发中是不允许的
目标:封装 storage存储模块,利用本地存储,进行vuex持久化处理