Spring SpringMvc Mybatis整合(SSM)
1、建立一个 maven-webapp的项目

2、在file---->project structre---->modules中找到你所建的项目,在源文件的main目录下新建java包和resources(用于存放jdbc连接语句)的文件并更改其属性

2、在resources文件夹中创建配置文件jdbc.property做数据库的连接
jdbc.driver=com.mysql.cj.jdbc.Driver
jdbc.url=jdbc:mysql://localhost:3306/mybatis?useSSL=false&allowPublicKeyRetrieval=true
jdbc.username=root
jdbc.password=547915
注意点:
1、driver为mysql的版本带有cj的是8.0版本的没有的为5.0版本
2、url为数据库的连接地址以及对应的数据库名
3、username和password是用户登录数据库时的用户名以及密码
3、创建congfig包(用于存放相关的配置类)
(1)创建JdbcConfig类
package com.mybatis.config;

import com.alibaba.druid.pool.DruidDataSource;
import org.springframework.beans.factory.annotation.Value;
import org.springframework.context.annotation.Bean;

import javax.sql.DataSource;
/**
 * @author : lihuigang
 * @description :jdbc的连接以及连接数据库的操作
 */
public class JdbcConfig {
	//@Value用于引用外部配置文件对应的jdbc.property
    @Value("${jdbc.driver}")
    private String driver;
    @Value("${jdbc.url}")
    private String url;
    @Value("${jdbc.username}")
    private String username;
    @Value("${jdbc.password}")
    private String password;
    @Bean
    //数据源的配置
    public DataSource dataSource(){
        DruidDataSource dataSource = new DruidDataSource();
        dataSource.setDriverClassName(driver);
        dataSource.setUrl(url);
        dataSource.setUsername(username);
        dataSource.setPassword(password);
        return dataSource;
    }
}
注意小点:@Value的值有两类:
① ${ property : default_value }
② #{ obj.property? :default_value }
第一个注入的是外部配置文件对应的property,第二个则是SpEL表达式对应的内容。 那个
default_value,就是前面的值为空时的默认值。注意二者的不同,#{}里面那个obj代表对象。
(2)创建SpringConfig类(容器类)
package com.mybatis.config;

import org.springframework.context.annotation.ComponentScan;
import org.springframework.context.annotation.Configuration;
import org.springframework.context.annotation.Import;
import org.springframework.context.annotation.PropertySource;
/**
 * @author : lihuigang
 * @description :spring配置类
 */
@Configuration
@ComponentScan("com.mybatis.service")
@PropertySource("classpath:jdbc.properties")
@Import({JdbcConfig.class,MybatisConfig.class})
public class SpringConfig {
}
(3)创建SpringMvcConfig类(容器类)
package com.mybatis.config;

import org.springframework.context.annotation.ComponentScan;
import org.springframework.context.annotation.Configuration;
import org.springframework.web.servlet.config.annotation.EnableWebMvc;
/**
 * @author : lihuigang
 * @description :SpringMvc配置类
 */
@Configuration
@ComponentScan({"com.mybatis.controller","com.mybatis.config"})
@EnableWebMvc
public class SpringMvcConfig {
}
(4)创建MybatisConfig类(容器类)
package com.mybatis.config;

import org.mybatis.spring.SqlSessionFactoryBean;
import org.mybatis.spring.mapper.MapperScannerConfigurer;
import org.springframework.context.annotation.Bean;

import javax.sql.DataSource;
/**
 * @author : lihuigang
 * @description :1、构建SqlsessionFactory   2、 扫描mapper路径
 */
public class MybatisConfig {

    @Bean
    public SqlSessionFactoryBean sqlSessionFactoryBean(DataSource dataSource){
        SqlSessionFactoryBean sqlSessionFactoryBean = new SqlSessionFactoryBean();
        //设置数据源
        sqlSessionFactoryBean.setDataSource(dataSource);
        return sqlSessionFactoryBean;
    }

    @Bean
    public MapperScannerConfigurer mapperScannerConfigurer(){
        MapperScannerConfigurer mapperScannerConfigurer = new MapperScannerConfigurer();
        //设置mapper扫描路径包
        mapperScannerConfigurer.setBasePackage("com.mybatis.mapper");
        return mapperScannerConfigurer;
    }
}
(4)创建ServletContainerConfig类(容器类)
package com.mybatis.config;

import org.springframework.web.context.WebApplicationContext;
import org.springframework.web.context.support.AnnotationConfigWebApplicationContext;
import org.springframework.web.servlet.support.AbstractDispatcherServletInitializer;
/**
 * @author : lihuigang
 * @description :容器初始化
 */
public class ServletContainerConfig extends AbstractDispatcherServletInitializer {
    @Override
    protected WebApplicationContext createServletApplicationContext() {
        //加载SpringMvc的配置类
        AnnotationConfigWebApplicationContext atx = new AnnotationConfigWebApplicationContext();
        atx.register(SpringMvcConfig.class);
        return atx;
    }
    @Override
    //让所有的请求都让SpringMvc来处理
    protected String[] getServletMappings() {
        return new String[]{
                "/"
        };
    }
    @Override
    //加载Spring的配置类
    protected WebApplicationContext createRootApplicationContext() {
        AnnotationConfigWebApplicationContext atx = new AnnotationConfigWebApplicationContext();
        atx.register(SpringConfig.class);
        return atx;
    }
}
(5)创建SpringmvcSupport类(容器类)
package com.mybatis.config;

import org.springframework.context.annotation.Configuration;
import org.springframework.web.servlet.config.annotation.ResourceHandlerRegistry;
import org.springframework.web.servlet.config.annotation.WebMvcConfigurationSupport;

/**
 * @author : lihuigang
 * @description :前台页面链接容器
 */
@Configuration
public class SpringmvcSupport extends WebMvcConfigurationSupport {


    @Override
    protected void addResourceHandlers(ResourceHandlerRegistry registry) {
        registry.addResourceHandler("/pages/**").addResourceLocations("/pages/");
        registry.addResourceHandler("/css/**").addResourceLocations("/css/");
        registry.addResourceHandler("/js/**").addResourceLocations("/js/");
        registry.addResourceHandler("/plugins/**").addResourceLocations("/plugins/");
    }
}
4、在pojo包(实体层用于实现对于数据的get、set、toString()方法的调用)下创建onepiece类
package com.mybatis.pojo;

import lombok.Data;

/**
 * @author : lihuigang
 * @description :实体类
 */

@Data
public class Onepiece {
    private String id;
    private String name;
    private String rewardMoney;
    private String job;
    private String dangerLevel;

}
注意点:
@Data注解是由Lombok库提供的,会生成getter、setter以及equals()、hashCode()、toString()等方法:
方法一:pom.xml中配置依赖引入—————配置依赖引入有的可能不生效
<dependency>
      <groupId>org.projectlombok</groupId>
      <artifactId>lombok</artifactId>
      <version>1.18.6</version>
      <scope>provided</scope>
</dependency>
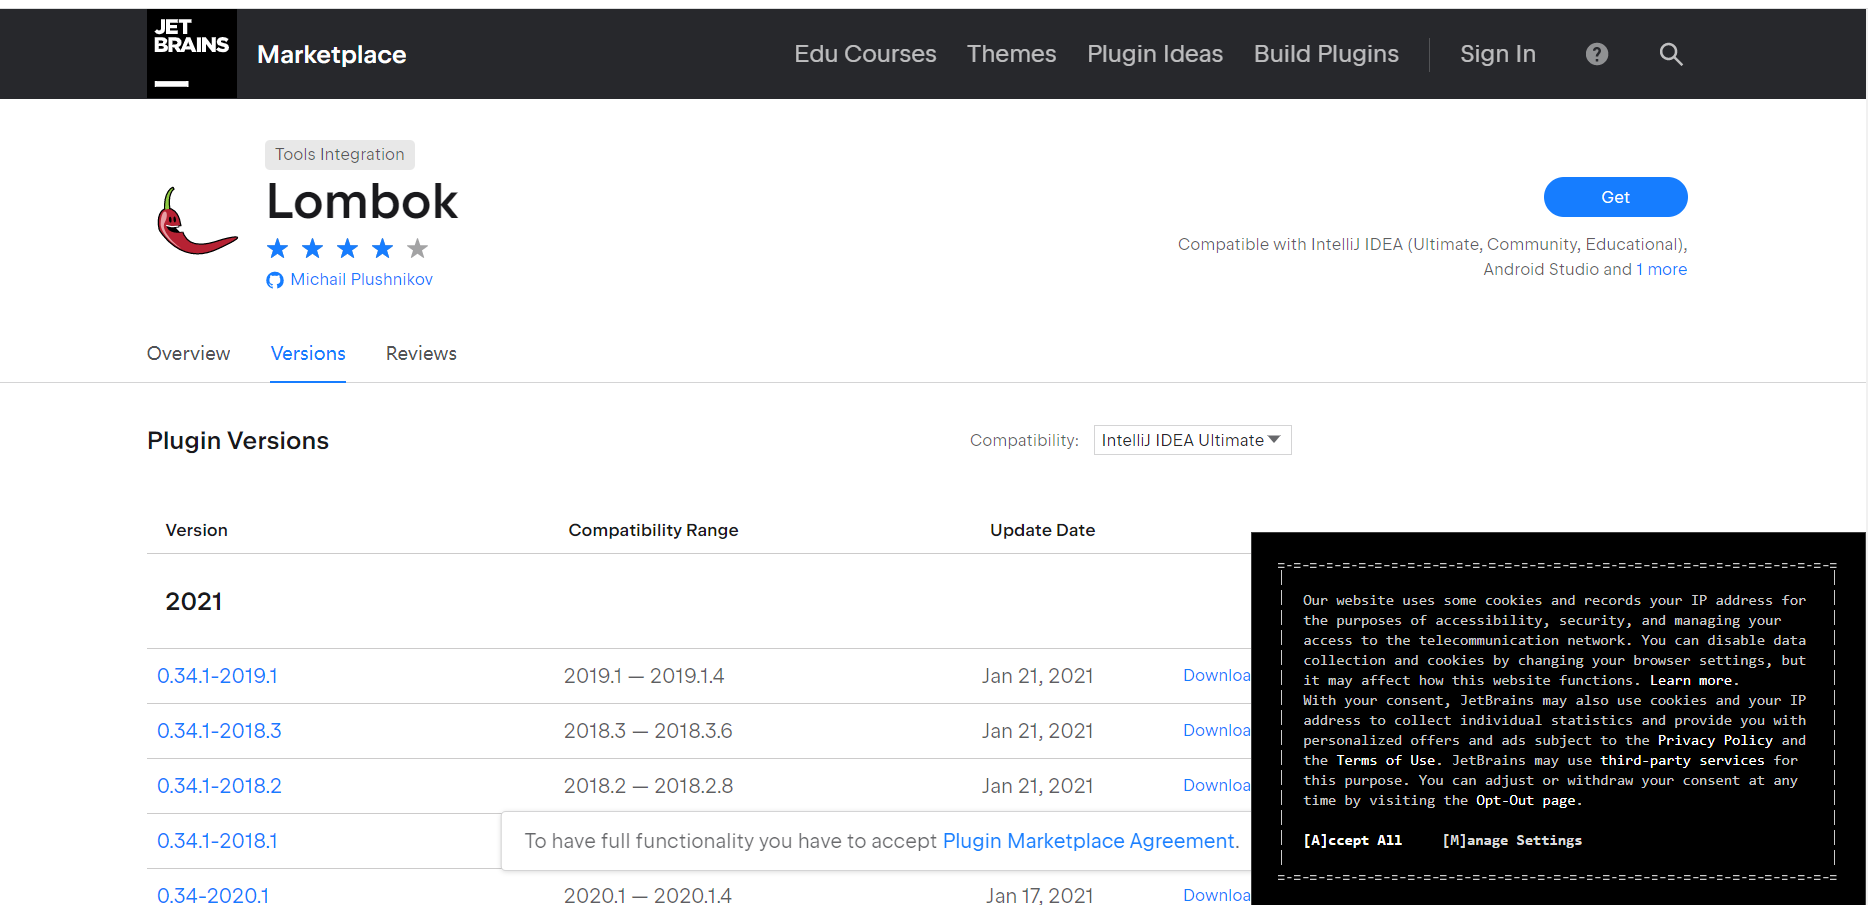
方法二:建议架包形式的导入(版本可能不一致导致引包的时候报错建议更换其他版本)
https://plugins.jetbrains.com/plugin/6317-lombok
5、在mapper包(也叫作dao层用于对数据库进行数据持久化操作,他的方法语句是直接针对数据库操作的,主要实现一些增删改查操作,在mybatis中方法主要与与xxx.xml内相互一一映射)下创建OnepieceMapper接口类
package com.mybatis.mapper;

import com.mybatis.pojo.Onepiece;
import org.apache.ibatis.annotations.Delete;
import org.apache.ibatis.annotations.Insert;
import org.apache.ibatis.annotations.Select;
import org.apache.ibatis.annotations.Update;

import java.util.List;
/**
 * @author : lihuigang
 * @description :sql语句的操作
 */

public interface OnepieceMapper {
    @Insert("INSERT INTO table_onepiece (`name`, rewardMoney, job,dangerLevel) VALUES (#{name},#{rewardMoney},#{job},#{dangerLevel})")
    void addOnepiece(Onepiece onepiece);

    @Delete("DELETE FROM table_onepiece WHERE (`id` = #{id})")
    void delOnepiece(Integer id);

    @Update("UPDATE table_onepiece SET `name` = #{name},rewardMoney = #{rewardMoney}, job = #{job},dangerLevel = #{dangerLevel} WHERE (`id` = #{id})")
    void updateOnepiece(Onepiece onepiece);


    @Select("select * from table_onepiece where id = #{id}")
    Onepiece selectOnepieceById(Integer id);

    @Select("select * from table_onepiece")
    List<Onepiece> selectAllOnepiece();

}
6、在service包下建立OnepieceService接口类
package com.mybatis.service;

import com.mybatis.pojo.Onepiece;
import org.apache.ibatis.annotations.Delete;
import org.apache.ibatis.annotations.Insert;
import org.apache.ibatis.annotations.Select;
import org.apache.ibatis.annotations.Update;

import java.util.List;

/**
 * @author : lihuigang
 * @description :业务service层,给controller层的类提供接口进行调用。一般就是自己写的方法封装起来,就是声明一下,具体实现在serviceImpl中
 */
public interface OnepieceService {

    boolean addOnepiece(Onepiece onepiece);

    boolean deleteOnepiece(Integer id);

    boolean updateOnepiece(Onepiece onepiece);

    Onepiece selectOnepieceById(Integer id);

    List<Onepiece> selectAllOnepiece();


}
6.1在OnepieceServiceImpl包下创建OnepieceServiceImpl用于实现接口类中的方法
package com.mybatis.service.impl;

import com.mybatis.mapper.OnepieceMapper;
import com.mybatis.pojo.Onepiece;
import com.mybatis.service.OnepieceService;
import org.springframework.beans.factory.annotation.Autowired;
import org.springframework.stereotype.Service;

import java.util.List;

/**
 * @author : lihuigang
 * @description :接口实现类
 */
@Service
public class OnepieceServiceImpl implements OnepieceService {

    @Autowired
    private OnepieceMapper onepieceMapper;

    @Override
    public boolean addOnepiece(Onepiece onepiece) {
        try {
            onepieceMapper.addOnepiece(onepiece);
        }catch (Exception e){
            System.out.println(e);
            return  false;
        }
        return true;
    }

    @Override
    public boolean deleteOnepiece(Integer id) {
        try {
            onepieceMapper.deleteOnepiece(id);
        }catch (Exception e){
            System.out.println(e);
            return  false;
        }
        return true;
    }

    @Override
    public boolean updateOnepiece(Onepiece onepiece) {
        try {
            onepieceMapper.updateOnepiece(onepiece);
        }catch (Exception e){
            System.out.println(e);
            return  false;
        }
        return true;
    }

    @Override
    public Onepiece selectOnepieceById(Integer id) {

        return onepieceMapper.selectOnepieceById(id);
    }

    @Override
    public List<Onepiece> selectAllOnepiece() {
        return onepieceMapper.selectAllOnepiece();
    }
}
注意点:service层需要添加@Service注解,才能被识别
7、在controller包下创建OnepieceController类
package com.mybatis.controller;

import com.mybatis.pojo.Onepiece;
import com.mybatis.service.OnepieceService;
import com.mybatis.utils.ResultUtils;
import org.springframework.beans.factory.annotation.Autowired;
import org.springframework.web.bind.annotation.*;

import java.util.List;

/**
 * @author :lihuigang
 * @description : 控制层,负责具体模块的业务流程控制,需要调用service逻辑设计层的接口来控制业务流程。因为service中的方法是我们使用到的,controller通过接收前端传过来的参数进行业务操作,再将处理结果返回到前端
 */
@RestController
@RequestMapping("/onepieces")
public class OnepieceController {

    /*
    请求进入到controller------调用service业务层的接口-------业务层跳转到service实现类-------在service实现类里面注入mapper-----调用mapper的方法去操作db
     */

    @Autowired
    private OnepieceService onepieceService;

    @PostMapping
    public ResultUtils addOnepiece(@RequestBody Onepiece onepiece) {

        if(onepiece.getName()==null){
            return ResultUtils.fail("姓名不能为空");
        }
        boolean flag = onepieceService.addOnepiece(onepiece);
        if(!flag){
            return ResultUtils.fail("新增船员失败");
        }
        return ResultUtils.success("新增船员成功");

    }

    @DeleteMapping("/{id}")
    public ResultUtils deleteOnepiece(@PathVariable Integer id) {
        boolean flag = onepieceService.deleteOnepiece(id);
        if(!flag){
            return ResultUtils.fail("删除船员信息失败");
        }
        return ResultUtils.success("删除船员信息成功");
    }

    @PutMapping
    public ResultUtils updateOnepiece(@RequestBody Onepiece onepiece) {
        boolean flag = onepieceService.updateOnepiece(onepiece);
        if(!flag){
            return ResultUtils.fail("修改船员信息失败");
        }
        return ResultUtils.success("修改船员信息成功");
    }

    @GetMapping("/{id}")
    public ResultUtils selectOnepieceById(@PathVariable Integer id) {
        Onepiece onepiece = onepieceService.selectOnepieceById(id);
        return ResultUtils.success(onepiece);
    }

    @GetMapping
    public ResultUtils selectAllOnepiece() {
        List<Onepiece> onepieceList = onepieceService.selectAllOnepiece();
        return  ResultUtils.success(onepieceList);
    }
}
注意点:
1、@RestController包含了@Controller @ResponseBody的方法
2、 @Autowired 注释,它可以对类成员变量、方法及构造函数进行标注,完成自动装配的工作。 通过 @Autowired的使用来消除 set ,get方法。
3、mapping获取到的值为json的数据格式
8、pom.xml中的依赖配置
<!--spring-web-maven依赖-->
  <dependencies>
    <dependency>
      <groupId>org.springframework</groupId>
      <artifactId>spring-webmvc</artifactId>
      <version>5.3.1</version>
    </dependency>

    <dependency>
      <groupId>javax.servlet</groupId>
      <artifactId>javax.servlet-api</artifactId>
      <version>4.0.1</version>
      <scope>provided</scope>
    </dependency>
<!--测试包的依赖-->
    <dependency>
      <groupId>junit</groupId>
      <artifactId>junit</artifactId>
      <version>4.11</version>
      <scope>test</scope>
    </dependency>

<!--    日志的注解-->
    <!-- 添加slf4j日志api -->
    <dependency>
      <groupId>org.slf4j</groupId>
      <artifactId>slf4j-api</artifactId>
      <version>1.7.20</version>
    </dependency>
    <!-- 添加logback-classic依赖 -->
    <dependency>
      <groupId>ch.qos.logback</groupId>
      <artifactId>logback-classic</artifactId>
      <version>1.2.3</version>
    </dependency>
    <!-- 添加logback-core依赖 -->
    <dependency>
      <groupId>ch.qos.logback</groupId>
      <artifactId>logback-core</artifactId>
      <version>1.2.3</version>
     </dependency>
    <!--json格式转换依赖-->
    <dependency>
      <groupId>com.fasterxml.jackson.core</groupId>
      <artifactId>jackson-databind</artifactId>
      <version>2.9.0</version>
    </dependency>
<!--   <!-- lombok依赖 -->
    <dependency>
      <groupId>org.projectlombok</groupId>
      <artifactId>lombok</artifactId>
      <version>1.18.4</version>
      <scope>compile</scope>
    </dependency>   -->

  </dependencies>
8.1 Tomcat的配置依赖(运行的时候可以使用tomcat方式运行也可以使用maven的方式运行)
<!--tomcat容器-->
  <build>
    <plugins>
      <plugin>
        <groupId>org.apache.tomcat.maven</groupId>
        <artifactId>tomcat7-maven-plugin</artifactId>
        <version>2.1</version>
        <configuration>
          <port>8080</port>
          <!--访问路径编解码字符集-->
          <uriEncoding>UTF-8</uriEncoding>
          <path>/</path>
        </configuration>
      </plugin>
    </plugins>
  </build>
配置属性:(这里是maven的配置运行方式)
9、前台页面文件包引入后放在webapp下面
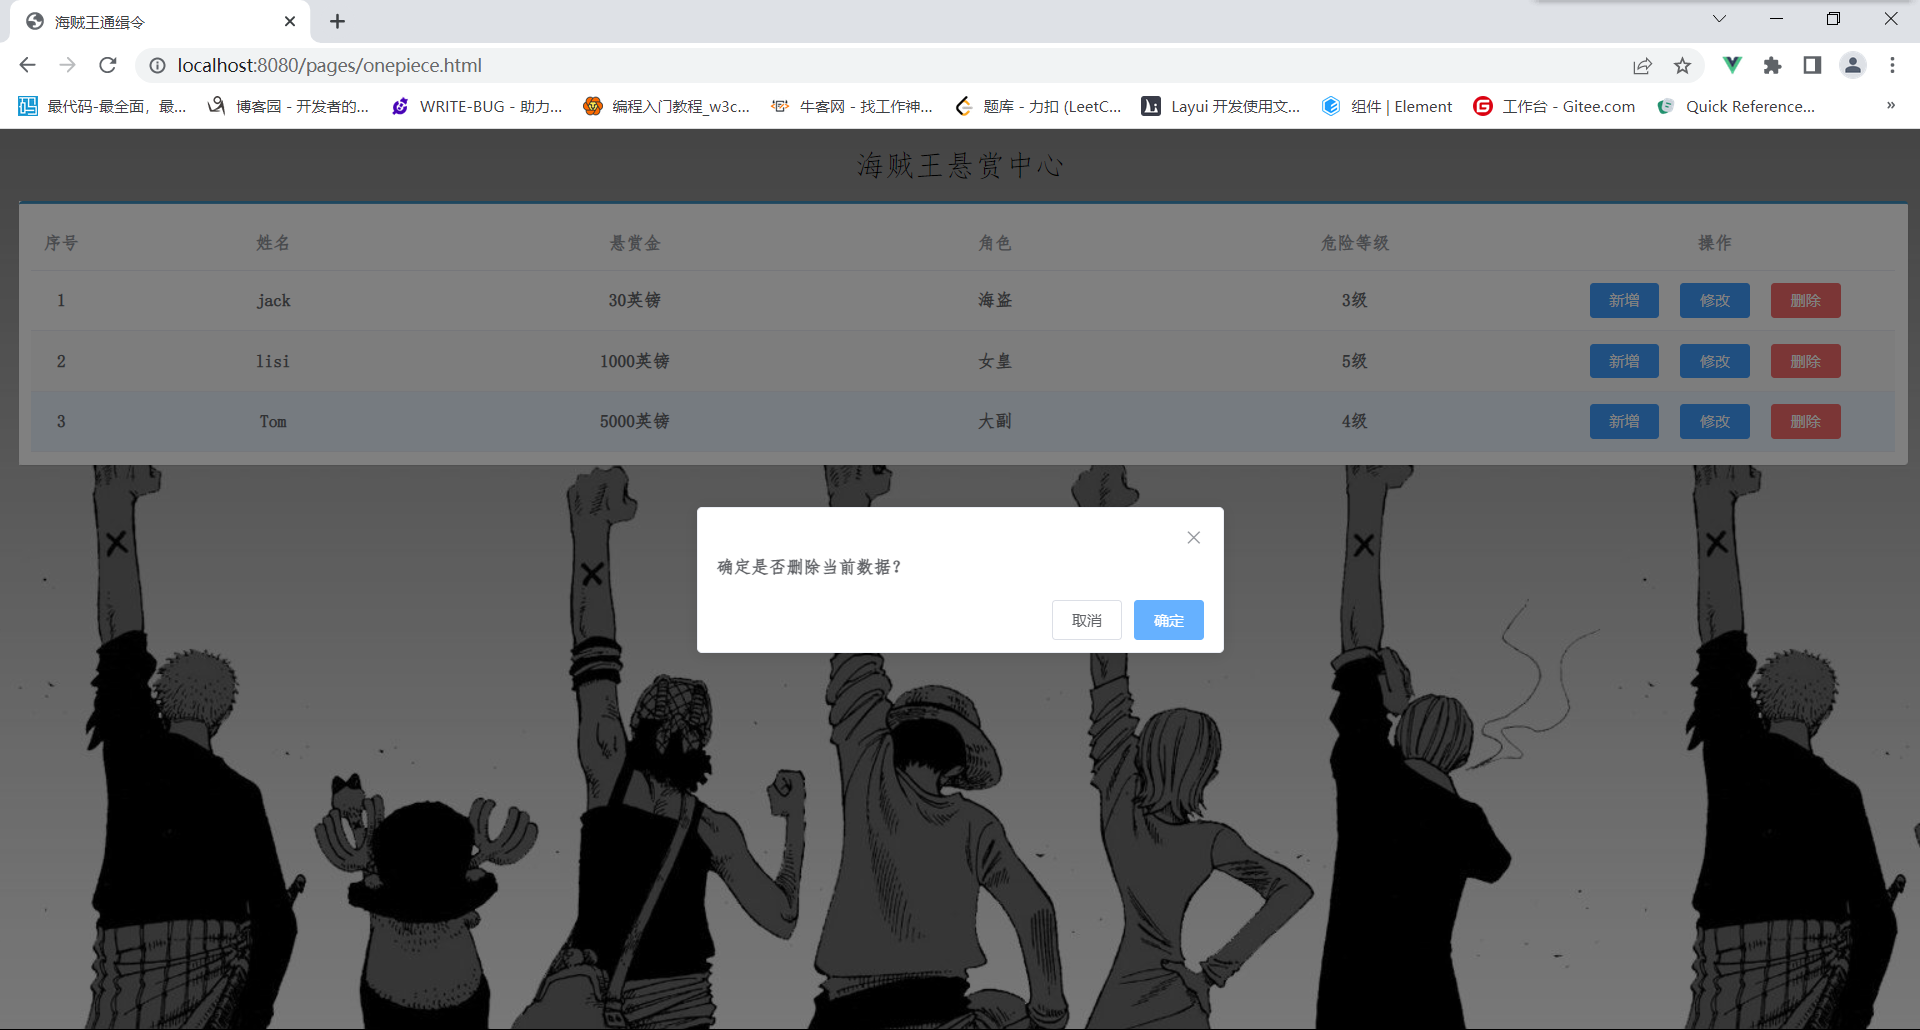
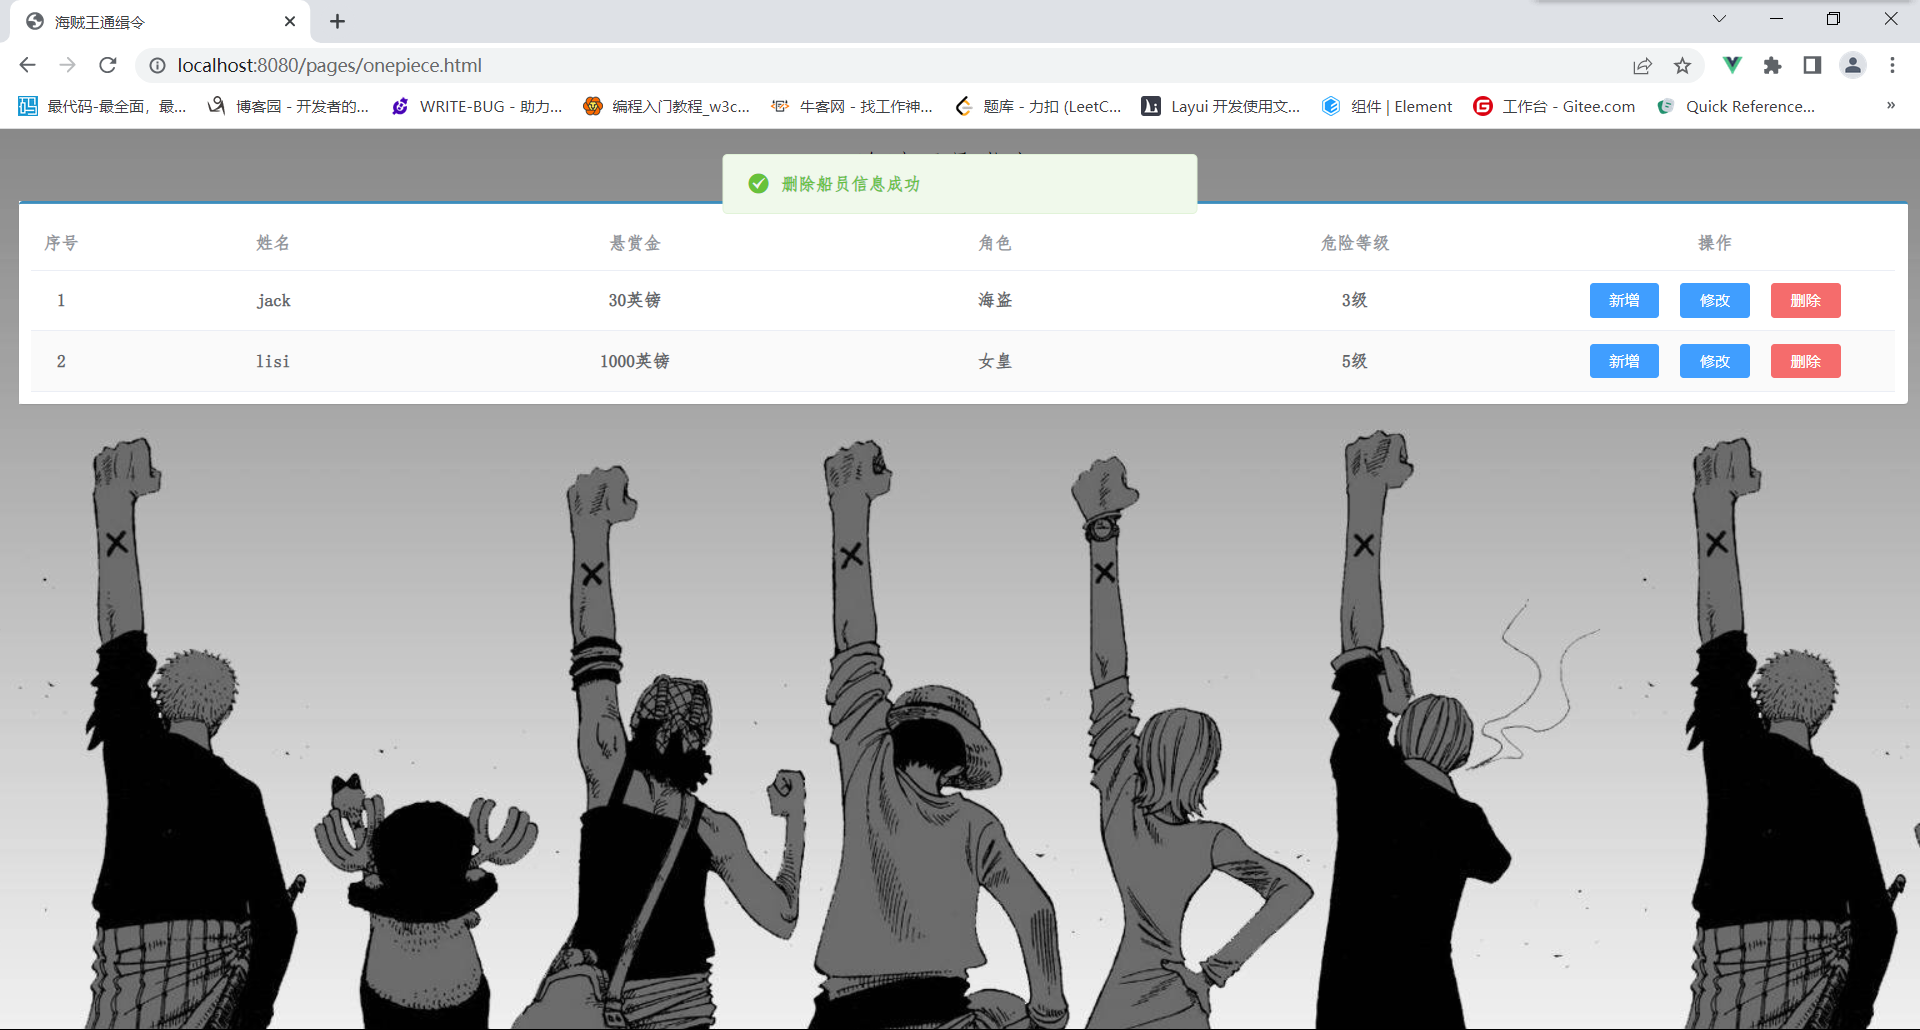
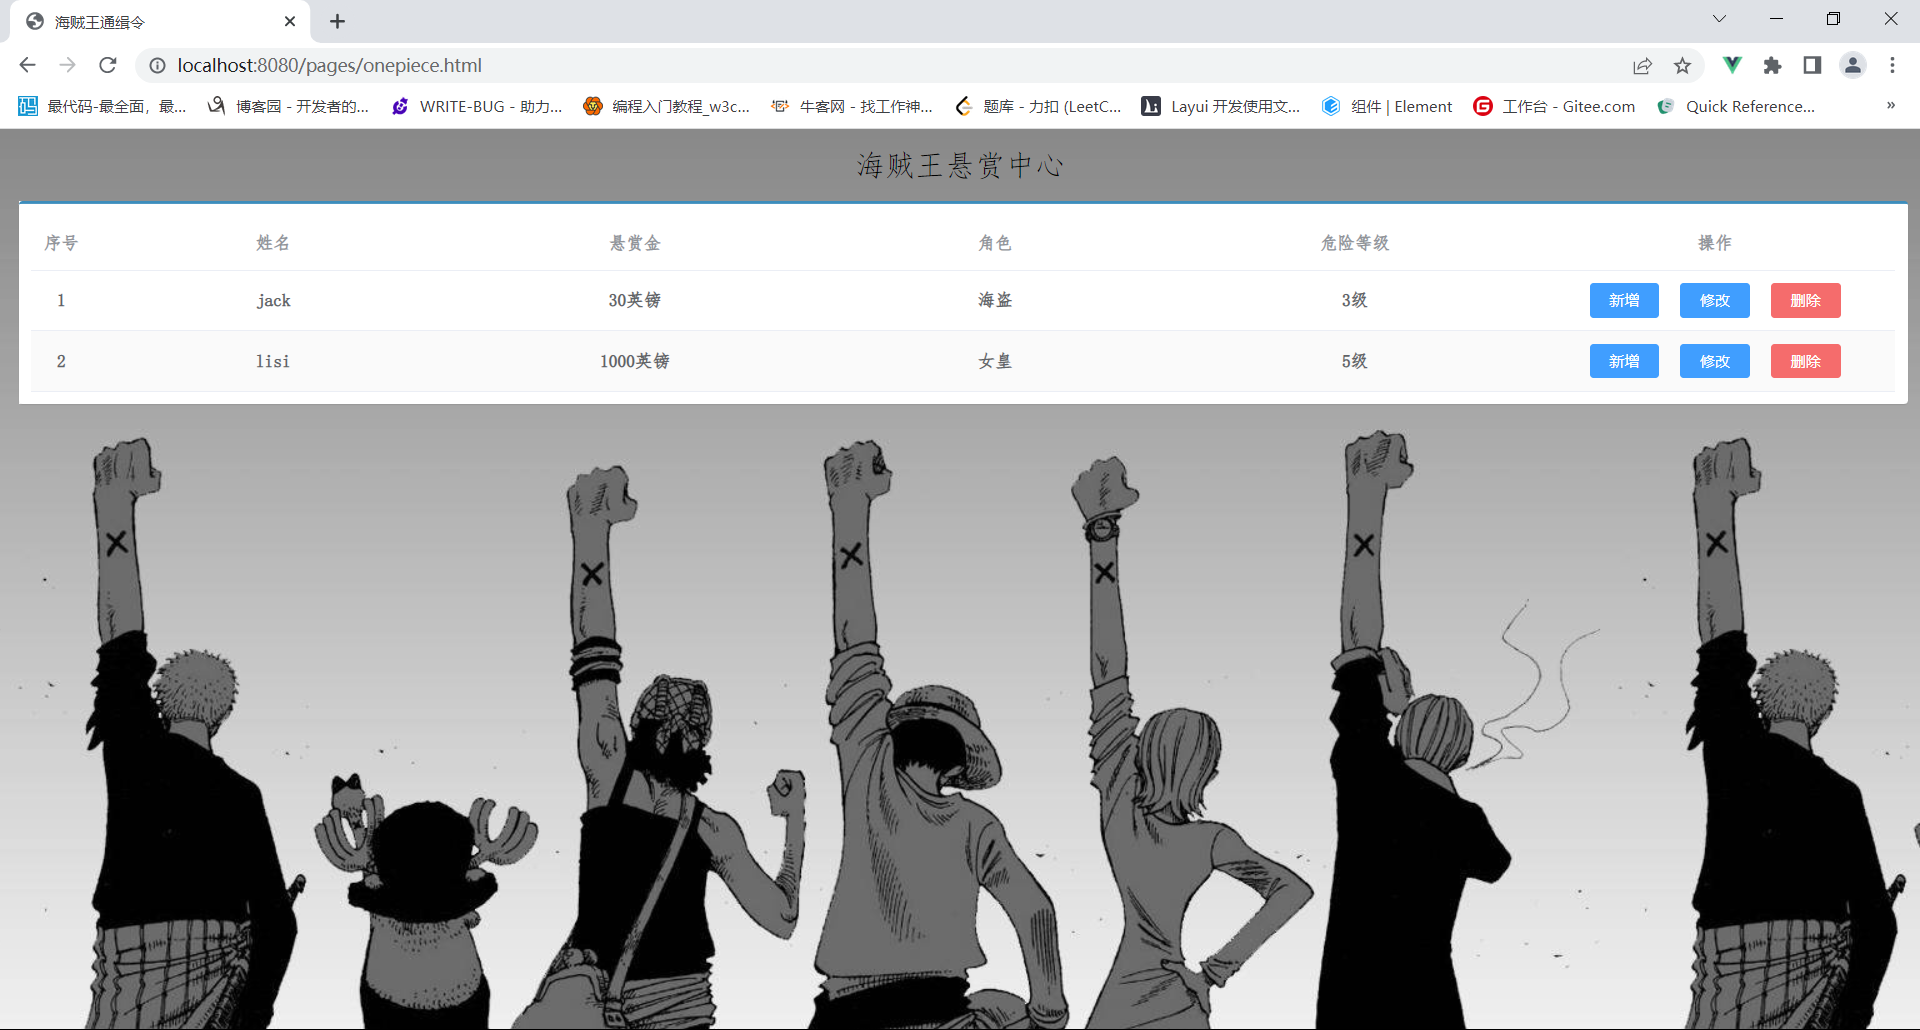
10、基本的增删改查实现效果页面截图
1.查询数据
2.新增数据


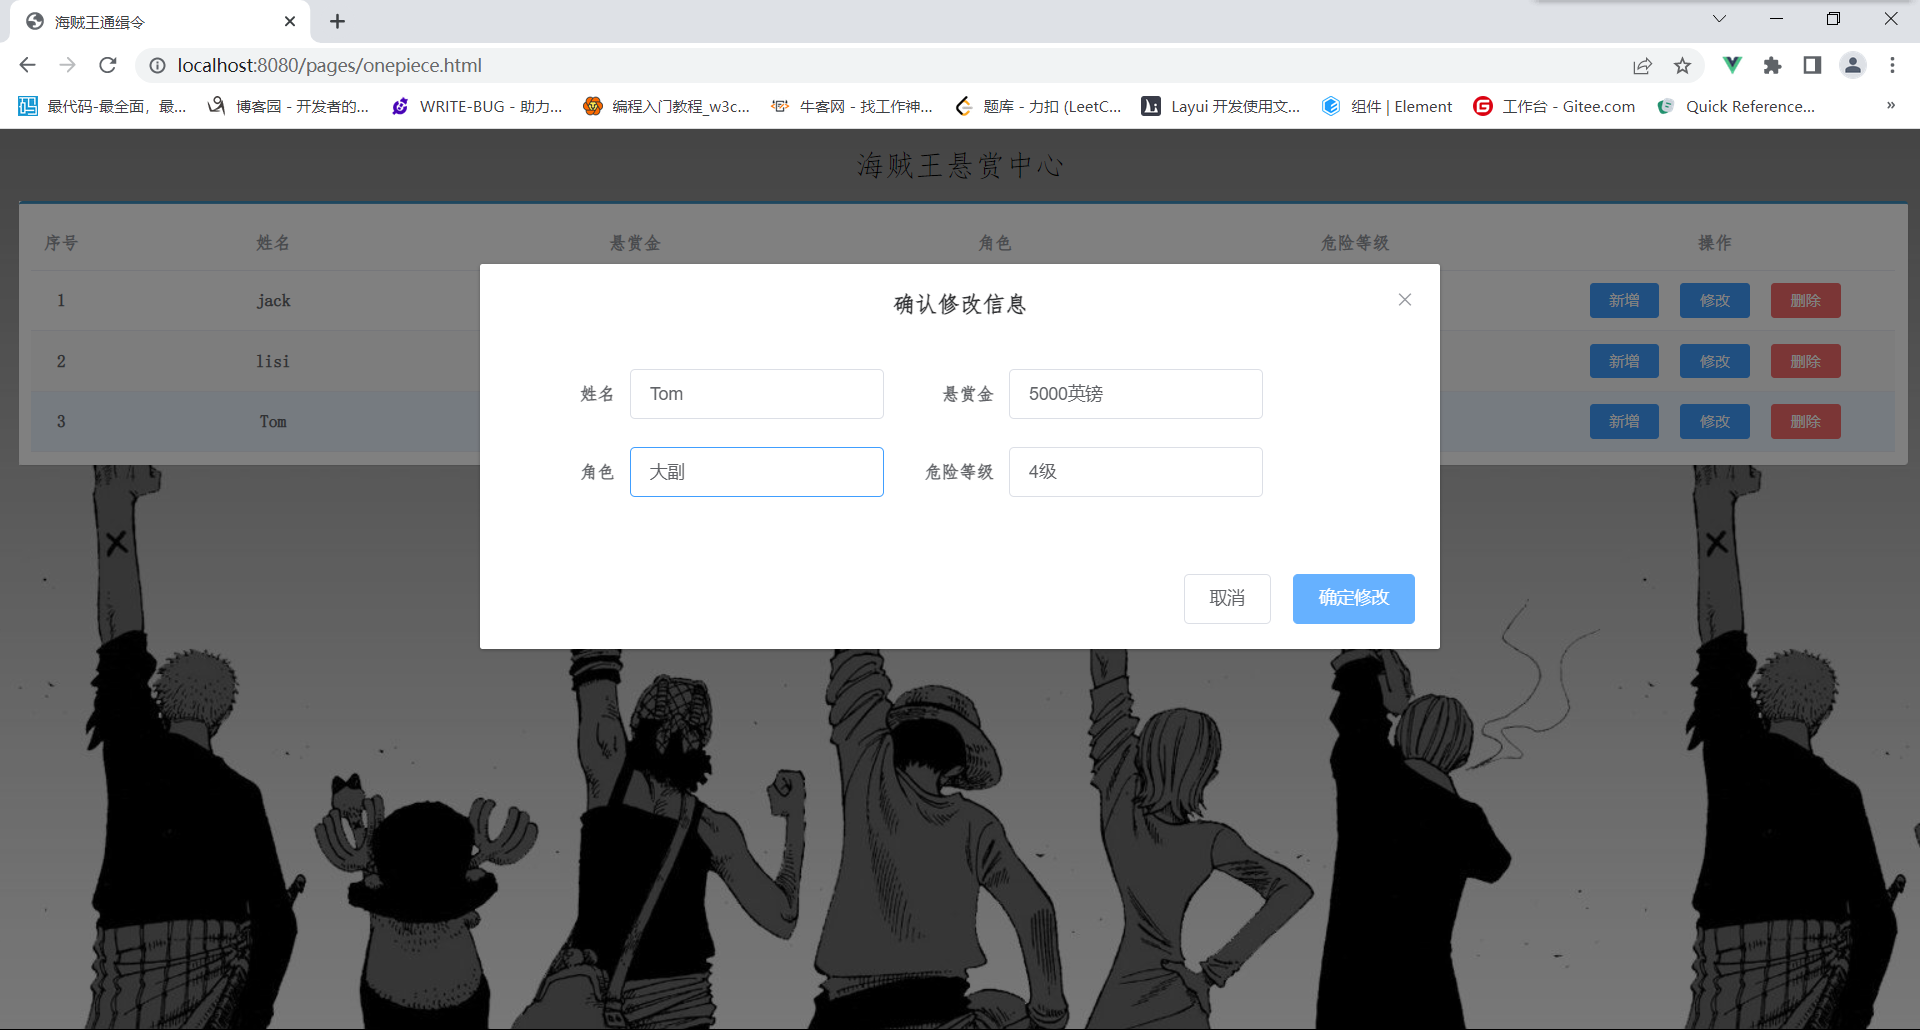
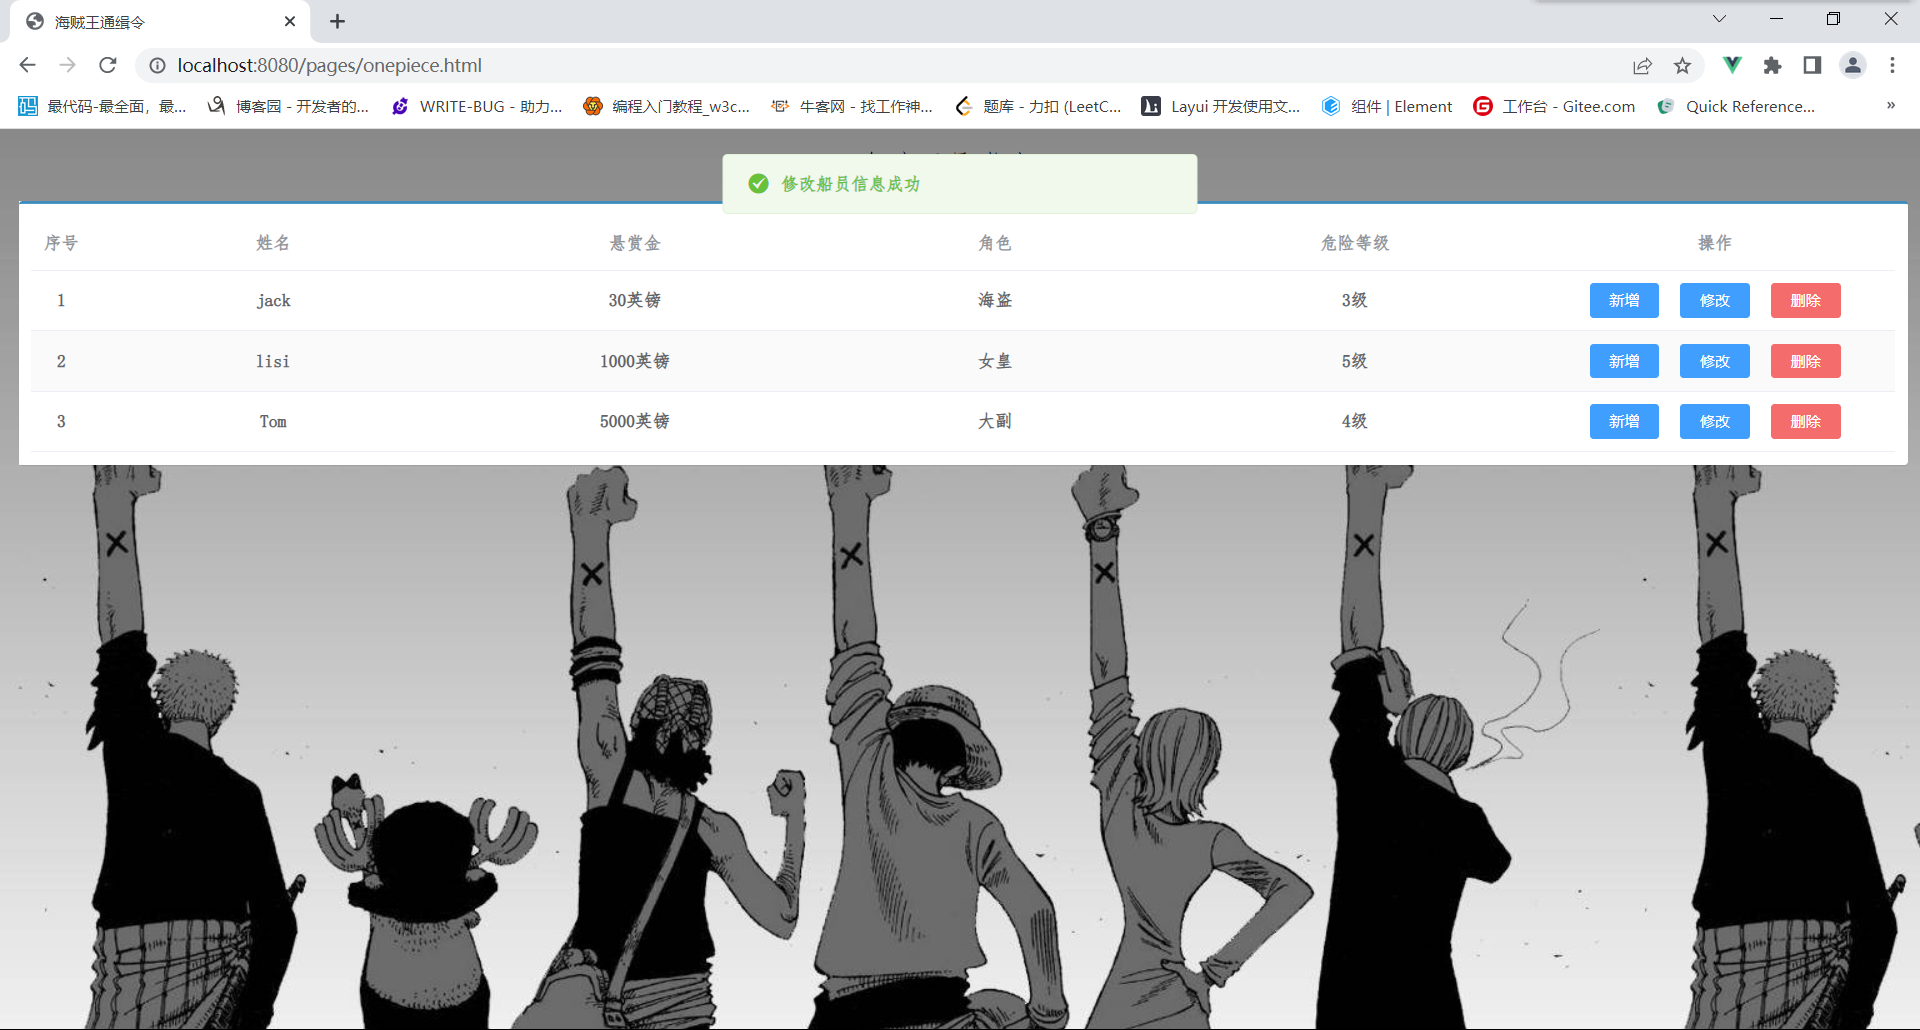
3.修改数据
4.删除数据